James Ritson
-
Posts
908 -
Joined
-
Last visited


About James Ritson

Recent Profile Visitors
23,396 profile views


-
 CRC Studio reacted to a post in a topic:
Affinity is now Free for Eligible Schools and Nonprofits
CRC Studio reacted to a post in a topic:
Affinity is now Free for Eligible Schools and Nonprofits
-
Johannes reacted to a post in a topic:
Affinity is now Free for Eligible Schools and Nonprofits
-

Develop Persona Settings
James Ritson replied to boelens218's topic in Desktop Questions (macOS and Windows)
@boelens218 take a look at the Profiles checkbox on the Basic panel when developing an image: you can change the output profile to something wider like ROMM RGB and you will see the histogram shift. Don't expect a dramatic difference in the image, but if you have colour values outside the range of sRGB (and a monitor capable of displaying them), then you will see these areas become more intense. If you always want to use a wider profile like ROMM, you can set it as the 32bit profile by default like carl123 suggested—just be aware that any 32-bit files you open (as in non-RAW) will then be converted to this profile. To clarify, Develop will convert from the camera's colour space to an unbounded space, where various operations like white balance, shadows/highlights, tonal modifications are unclamped, and any operations that cannot be performed unclamped use ROMM RGB as it's sufficiently wide. The image is then converted to whichever profile is specified in the Output Profile combo box (or if that's not specified, it will use the default profile mandated in Settings>Colour)—you'll see this final conversion for the on-screen image and histogram. -
amoraleite reacted to a post in a topic:
Affinity is now Free for Eligible Schools and Nonprofits
-
Paul in Northern Michigan reacted to a post in a topic:
Not processing astro fits files well
-
Hah, not at all! I just didn't expect the stretches to be useful for regular terrestrial photography. At some point I will go through and check them all, then update them where necessary to avoid this issue in the future. That would probably make sense, although the stretches won't work the same way. If you tone map and bound the pixel range to 0-1 you should be able to avoid most issues associated with 32-bit compositing. You can use the Tone Mapping Persona to achieve that, or I've got some macros which will do it via procedural texture (similar to tone stretching). If you develop raw files straight to 32-bit without the tone curve, they will remain unbounded—so you could always experiment with tone mapping single exposures if you wanted to try something different...
-
 Anton Marinski reacted to a post in a topic:
Black dots appearing on image after adding adjustment layer
Anton Marinski reacted to a post in a topic:
Black dots appearing on image after adding adjustment layer
-
Ldina reacted to a post in a topic:
Black dots appearing on image after adding adjustment layer
-
Komatös reacted to a post in a topic:
Black dots appearing on image after adding adjustment layer
-
Hangman reacted to a post in a topic:
Black dots appearing on image after adding adjustment layer
-
Hey @Anton Marinski, the issue is with the procedural texture equation creating NaN (not-a-number) pixels because one of your channels for some of the pixels is negative—the blue channel, it looks like. I'm not sure why you're using a stretch that looks like it was designed for astrophotography on a regular photographic image 😁 but you could adjust the equation slightly to fix this by clamping any negative values at the start: var clr=clampmin(R, 0); var factor=0.1 / ((a*3) * 2.0); pow((factor - 1.0) * clr / ((2.0 * factor - 1.0) * clr-factor), a*b) var clr=clampmin(G, 0); var factor=0.1 / ((a*3) * 2.0); pow((factor - 1.0) * clr / ((2.0 * factor - 1.0) * clr-factor), a*b) var clr=clampmin(B, 0); var factor=0.1 / ((a*3) * 2.0); pow((factor - 1.0) * clr / ((2.0 * factor - 1.0) * clr-factor), a*b) When working in 32-bit, you should be mindful that you're no longer working with a bounded pixel format, so various blending operations, adjustments and filters can potentially create either negative values (which could cause issues later in the editing process) or NaNs because of the maths involved. Unless you need to remain in 32-bit, the most sensible option is to tone map if required to get your pixels into a bounded 0-1 range, then flatten and convert to 16-bit. Hope that helps!
-
PaulEC reacted to a post in a topic:
Shift-constrain
-
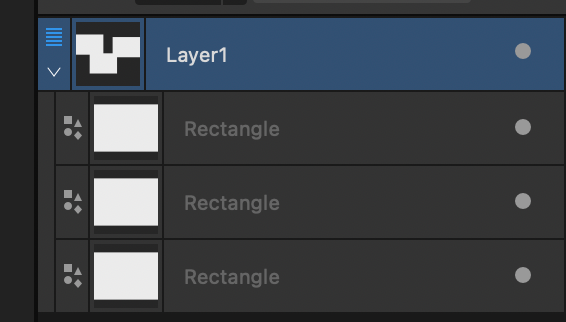
Hey @Washishu, aspect correct scaling—by default—is based on the layer type you're transforming. Raster content such as pixel layers, image layers and embedded/linked documents are constrained when dragging from one of the corner nodes (or not if dragging from the top, bottom, left or right nodes). Other content such as artistic text layers, which make sense to constrain by default, also have this behaviour. Other layer types such as vector shapes, poly curves and frame text do not constrain by default, as you're more likely to want to scale them in a non-constrained way. The randomness you mention won't be related to copy and pasting layer data, but rather the type of layer you're transforming. If you hover your cursor over the small icon to the left of the layer name, it will indicate which layer type you're working with, e.g. "Curve", "Art Text" etc. Curve layers will not constrain by default, Art Text will etc. It's worth noting that if you have grouped content, selecting and transforming the group will use constrain by default—so you could for example have a group full of Curve layers which don't constrain themselves, but the top level group (if selected) will. The same applies to container layers in Designer. These have a blue multi-line icon: In the above screenshot, transforming all the child Rectangles with the container Layer1 selected would constrain. If I were to select the Rectangle layers themselves and not Layer1, they would not constrain. If you're still not sure about the behaviour, please do post a screen grab of your layer stack if you're able to (or even a screen recording). As you've noted, you can also change the option in Settings>Tools from Automatic to always or never constrain by default regardless of layer type, leaving you free to toggle to the alternative behaviour with Shift. Hope the above is helpful!

-
Lyndhurst reacted to a post in a topic:
Official Affinity Publisher (V2) Tutorials
-
@Frozen Death Knight Prior to 2.6, non-pixel layers couldn't be used with Merge Selected if they were the bottom (source) layer—I am aware that there was a front-end issue which made users believe they could (e.g. Merge Selected would be available with a group as the source layer, but wouldn't do anything). 2.6 then allowed Image and Develop layers to be at the bottom of a Merge Down/Selected operation, but it was in 2.6.1 that the front end logic was fixed up to correctly reflect what is possible/not possible (which is why Merge Selected is now greyed out if the source layer is a group, for example). From initial testing, it seems an easy accommodation to allow other layer types to be the source for a Merge Selected operation—such as a group, text layer, vector layer etc. Can't make any promises, but we'll look into it...
-
@Frozen Death Knight I don't think this got tagged by the info bot, but in the 2.6.2 beta build (3187) this has been corrected, so you'll be able to liquify multiple Pixel and Mask layers again.
-
Hey @Ryps, I can't reproduce that here, Select Sampled Colour works as expected. Are you referring to the initial action of using Select Sampled Colour deleting the layer, or do you mean that it appears to be selecting all pixel content rather than some of it? As GarryP has said, would you be able to provide a screenshot or screen recording of what you're doing? PS with 2.6 you can now delete from Image/RAW layers with a pixel selection, no need to rasterise to a Pixel layer. It will mask by default, but if you wish to destructively remove areas you can change this in the Assistant Options (the little robot icon on the top toolbar). Look for the option "Delete selection from Image/RAW layer". Hope that helps.
-
Marquee Selection Issue
James Ritson replied to Wolf Wallis's topic in Desktop Questions (macOS and Windows)
@Wolf Wallis I've tried the following in both 2.5.7 and 2.6: Make a selection with the Rectangular Marquee Tool Use Select>Feather and a large value to give the selection box rounded edges Select Refine, either from the context toolbar or via Select>Refine Edges In both versions, the red overlay disappears, which is an issue we can look at. I'm interested in why you've needed to roll back to 2.5.7, however, if the problem remains the same. Are you certain you're not trying different selection modifications? The other commands such as Grow/Shrink, Smooth and Outline all work fine when performing selection refinement afterwards. Similarly, if you just enter refinement (without using Select>Feather first), then the feathering feature in there works OK as well. I've attached a video which demonstrates me going through the same steps in both 2.5.7 and 2.6, using the same document with the same selection. As you'll see from the video, the behaviour (including the issue with using Select>Feather then refining) is consistent. I turned off Antialias on the context toolbar for 2.6 which is now enabled by default—whilst this can influence the selection slightly, I don't believe it would cause a problem that isn't also present in 2.5.7. If you were able to detail the exact steps you're taking in 2.5.7 that don't work in 2.6, that would be really useful for us to be able to reproduce what's happening. Screen Recording 2025-02-26 at 08.26.53.mp4 -
What's wrong with 2.6.0?
James Ritson replied to Guedes's topic in Feedback for the Affinity V2 Suite of Products
This is incorrect speculation. -
Hey @nickbatz, sounds like you want Lock Children. With the Move Tool active and your "bg sky" layer selected, look on the context toolbar. On the far right you should see a checkbox called "Lock Children". This will lock the child mask layer in place whilst you transform the parent layer. Whilst transforming, you can also hold the Space bar down to invert whichever behaviour you've chosen. Here's a tutorial on the process: Hope that helps!
-
@Frozen Death Knight apologies, this was due to all the logic changing to accommodate rasterisation of Image/RAW layers when entering Liquify/Develop/Tone Mapping. This will be changed to restore the original behaviour, so you'll be able to liquify multiple Pixel and Mask layers (but Image and RAW layers will still require a single selection).
-
Hey @Mordy, Photo does actually have quite a few of those already: 2.6 will ship with machine learning functionality including the Object Selection tool and Select Subject command—whilst they don't address the three requests listed here directly, they are a step in that direction. The tools are available to try in the public beta now. Photo already has these in one form or another: placing .afphoto (or .afdesign/.afpub) files into an existing document will import them as embedded documents, which can also be linked externally if required. The contents of these documents can be edited at any time, and non-destructive filters such as a live perspective transform can be applied to manipulate them in the parent document. Filters can be applied non-destructively by taking advantage of Live Filters. These are similar to adjustment layers in that you can place them anywhere in the layer stack to control how they render, change their blending options, mask them etc. No need to merge your layer work so far into a single layer that you then apply smart filters to. As far as advanced layer modes for compositing, Photo has blend ranges which let you blend based on source layer and underlying layer tonal range. You can also modify blend gamma and control antialiasing (e.g. for text/other vector elements). File>New Batch Job lets you apply macros to multiple files at once, so you can build up some decent batch processing workflows this way, although there is room for improvement with this feature. Multi-file conversion can be achieved via Batch Job, or you can use the Export Persona to export either the whole document or specific layers to multiple formats simultaneously, including different scaling/resolution options as well. As far as workspace customisation, do you have any examples? You can save panel layouts under Window>Studio and switch between them, and you can customise your tool selection and top toolbar options. Thanks, James
-
Cmd+Return shortcut broken (regression)
James Ritson replied to MikeTO's topic in Other New Bugs and Issues in the Betas
Hi @MikeTO, thanks for the information, in the newest build (3106) I believe I've fixed it so you can now use CMD+[Additional modifier/s]+Return. If you could confirm this is working for you, I'd appreciate it! -
affinity designer How to export layered EXR?
James Ritson replied to MmmMaarten's topic in Desktop Questions (macOS and Windows)
It should be straightforward , assuming that the user has opened a multi-channel EXR. I suspect it's only because you're starting with a non-multi-channel document, so the layer naming convention needs to be adopted in this case. The documentation could probably be expanded upon which would be helpful to clarify this further, I think... -
affinity designer How to export layered EXR?
James Ritson replied to MmmMaarten's topic in Desktop Questions (macOS and Windows)
Hey @MmmMaarten, it might be worth having a look at the help topic on OpenEXR: https://affinity.help/photo2/English.lproj/pages/HDR/openexr.html Specifically this part: When you import a multi-channel EXR, the layer naming convention is all set up for you on import, e.g. you have LayerName.RGB, LayerName.A etc. If you've enabled alpha association on import, you'll typically get LayerName.RGBA. You might have other data type extensions as well, e.g. a Normal pass could import as Normal.[X][Y][Z] However, because you've imported a standard single channel EXR, the layers just come in as RGB and A (or RGBA if you've enabled alpha association). In order for the multi-channel export to work correctly, you'll have to rename your layers, e.g.: (Or use whatever layer name you like, e.g. MainLayer.RGB, MainLayer.A). Then you should find your export works correctly. Hope that helps!