Search the Community
Showing results for 'ROMM RGB'.
-

Photo V2 Newest version. Locks when choosing swatch.
Hangman replied to Sukavi's topic in V2 Bugs found on macOS
Okay, so I've now managed to replicate the issue... Initially, it seems to relate to the 'Colours' Swatches, i.e., the default 'Colours' Swatches palette in the Affinity Apps. Despite having the Colour Swatches panel set to be the default palette for RGB/8 files every time I opened your file it defaulted to a different swatches panel which appeared above it alphabetically in my swatches list. I've just deleted the other palette so the Colour Swatches palette is now the first in the list. Now when I open your file I see exactly the same issue in both Photo and Designer, an instant hang when selecting a swatch from the Colour Swatches panel. Edit: It's not the 'Colours' palette, I can now replicate this every time I open the file so something else is going on here which will require some additional testing... -
Hi @SamMN, It's difficult to comment without having seen both files in the flesh but out of interest if you create a new single-page RGB document using the same page size, dpi and image placement policy and then use Document > Add Pages from File... select your First Document and choose All Pages and Replace Page 1 to add all the pages from the First Document to a New Document then Save and export using the same Digital (High Quality) PDF Preset, is the exported PDF file still 709 MB?
-

Gradient map does not affect color
NathanC replied to Bartek's topic in Affinity on Desktop Questions (macOS and Windows)
Hi @Bartek, To me this looks like a bug, particularly as setting the left node K100 only and the other to 4C black does show a colour gradient on the gradient map dialog, and there is a somewhat similar issue logged with the CMYK sliders failing to convert to RGB correctly. I'll log this with the developers for further investigation and confirmation. -
 Hi Pyanepsion, I don't think the coloured spaces are causing the text spans at all. It is the multiple highlights on the spaces that are causing it. As I understand it SVG doesn't allow for highlighted text, so to make it work we have to draw a rectangle for every space using a highlighted colour. This is why you have that massive block of rectangles. So to ensure that wasn't causing the increased text spans I did an export with all of them set to no fill. SVG export with coloured spaces (attached Highlight Spaces.svg): <g transform="matrix(1,0,0,2.14286,0,0)"> <text x="14px" y="39.665px" style="font-family:'ArialMT', 'Arial', sans-serif;font-size:8px;fill:rgb(16,24,32);">Nullam hendrerit viverra dolor<tspan x="118.488px 120.711px 122.934px 127.828px 132.277px " y="39.665px 39.665px 39.665px 39.665px 39.665px ">. Ves</tspan>tibulum fringilla, lectus id viverra malesuada, enim</text> <g transform="matrix(8,0,0,8,201.648,50.0652)"> </g> <text x="14px" y="50.065px" style="font-family:'ArialMT', 'Arial', sans-serif;font-size:8px;fill:rgb(16,24,32);">mi adipiscing ligula, et bibendum lacus lectus id sem.</text> </g> SVG export without coloured spaces (attached Non highlight spaces.svg) <g> <text x="14px" y="39.665px" style="font-family:'ArialMT', 'Arial', sans-serif;font-size:8px;fill:rgb(16,24,32);">Nullam hendrerit viverra dolor<tspan x="118.488px 120.711px 122.934px 127.828px 132.277px " y="39.665px 39.665px 39.665px 39.665px 39.665px ">. Ves</tspan>tibulum fringilla, lectus id viverra malesuada, enim</text> <g transform="matrix(8,0,0,8,201.648,50.0652)"> </g> <text x="14px" y="50.065px" style="font-family:'ArialMT', 'Arial', sans-serif;font-size:8px;fill:rgb(16,24,32);">mi adipiscing ligula, et bibendum lacus lectus id sem.</text> </g> Notice how the spans are in exactly the same place? The spans are used to try to ensure objects are placed to match what you see in Affinity as closely as possible. Obviously this isn't always what people want, which is why we added the 'Longer Text Spans' option inside the Export Settings. This should do exactly what you want and remove those two text spans. I took the above two examples and exported them with 'Longer Text Spans' enabled and get this: SVG export with coloured spaces using longer text spans (Highlight Longer Text Spans.svg) <g transform="matrix(1,0,0,2.14286,0,0)"> <text x="14px" y="39.665px" style="font-family:'ArialMT', 'Arial', sans-serif;font-size:8px;fill:rgb(16,24,32);">Nullam hendrerit viverra <g transform="matrix(8,0,0,8,201.648,50.0652)"> </g> <text x="14px" y="50.065px" style="font-family:'ArialMT', 'Arial', sans-serif;font-size:8px;fill:rgb(16,24,32);">mi adipiscing ligula, et </g> SVG export without coloured spaces using longer text spans (Non Highlight spaces Longer Text Spans.svg) <g> <text x="14px" y="39.665px" style="font-family:'ArialMT', 'Arial', sans-serif;font-size:8px;fill:rgb(16,24,32);">Nullam hendrerit viverra <g transform="matrix(8,0,0,8,201.648,50.0652)"> </g> <text x="14px" y="50.065px" style="font-family:'ArialMT', 'Arial', sans-serif;font-size:8px;fill:rgb(16,24,32);">mi adipiscing ligula, et </g> So to summarize, I don't think there is an issue here, but it does sound like 'Longer Text Spans' will be what you need. You can also look at further minimizing the file size by using 'Use Hex Colours', 'Flatten Transforms' and also disabling 'Use Line Breaks'. Highlight Spaces.svgNon Highlight spaces Longer Text Spans.svgHighlight Longer Text Spans.svgNon highlight spaces.svg
 -
 I use to use ProPhoto RGB as my working space. Should I choose ROMM RGB now at Preferences>Colour (AFF.Photo)? Thank you.
 -

Preflight for CMYK 0,0,0,100?
thomaso replied to mykee's topic in Affinity on Desktop Questions (macOS and Windows)
In addition to @lacerto's hints: Compare the attached PDF files exported from a CMYK .afpub + a placed RGB image in 4 variations. • Both PDF are exported as PDF/X-4 but only 1 got "Convert image colour spaces" activated. The one which does not did export the RGB images as RGB and thus causes their K-only settings to result in CMY + K. • If you open the PDFs in APub the Resource Manager lists one image as Grayscale and three as colour images. The grayscale is the one with K-Only and no fill colour. k-only & colour _cmyk X-4.pdf k-only & colour _cmyk X-4 convert.pdf k only & colour.m4v
-
Unfortunately the Picker Tool can show only one colour mode, as @lacerto mentioned it is the colour space of the document. If you place a grayscale image in a CMYK document then the button "K Only" gets automatically activated which results in only K values for the Picker Tool. If you deselect 'K Only' in the Context Toolbar for this image then the Colour Picker shows the gray in 4 ink channels. – Additionally, if you have 'K Only' for a grayscale image deactivated in a CMYK document then it will be exported in 4-channel gray even if the image resource was saved with a grayscale profile. This is related to the fact that Affinity handles grayscale colours internally as RGB/HSL, even in a CMYK or grayscale document. The Colour Picker limitation to the current document colour mode also means that it shows colours of an RGB resource in a CMYK document as CMYK values. Affinity's 'K Only' workflow (or workaround) also means you can activate 'K Only' for an RGB resource to get it exported as K values only. If you apply a fill colour to an RGB image with 'K Only' activated it gets applied accordingly to its K only equivalent and thus appears monochromatic and brighter, different to the fill colour applied to an RGB resource without 'K Only' pressed.
-
 You could create a pixels selection using color or tonal ranges: https://affinity.help/photo2/en-US.lproj/index.html?page=pages/Selections/selections_range.html&title=Range pixel selections https://affinity.help/photo2/en-US.lproj/pages/Selections/selections_sampled.html Or perhaps you could use some dynamic masks? https://affinity.help/photo2/en-US.lproj/pages/LiveMasks/mask_liveBandPass.html https://affinity.help/photo2/en-US.lproj/pages/LiveMasks/mask_liveLuminosityRange.html And to see which are the RGB pixels without a CMYK equivalent, you can use the Gamut check in the Soft Proof adjustment: https://affinity.help/photo2/en-US.lproj/pages/Adjustments/adjustment_softProof.html
 -
 32-bit depth is 32 bits for the entire color information of one pixel, while RGB-32 is 32 bits for one color component, i.e. a total of 128 bits for the color of one pixel. Just curious, if you change your document to RGB-8, how big will the file be?
 -
 But that's still done with RGB-8 color format (8 bits for R, 8 for G, 8 for B, and 8 for A), not RGB-32 (32 bits for R, 32 for G, 32 for B, and 32 for A).
 -
 I don't know if this has been brought up yet, but I am working on a photo manipulation that has 6 layers, with each layer being a separate image. When I was trying to initiate the Shadows/Highlights adjustment from the Filters dropdown menu to make adjustments on one layer the program would quit and I would get the error notification to send to Apple. This has now happened 10 times, which is why I am posting it in the forum to see if this particular error has been encountered before. I am running AP2.4 on a 2021 MacBook Pro Ventura. The problem seems to be affecting only this one file because I tried the same adjustments with a Nikon D810 raw photo and had no problems. The image I am working on is 7000 pixels square, 32bit HDR in ROMM RGB color. As I mentioned, it is composed of 6 layers that have been rasterized. The file is rather large at over 700 megabytes saved as an Affinity Photo Document. I have worked on files much larger than this without a problem, so I am wondering if this has something to do with the number of active layers. The problem started when I added a 6th layer. If this is a bug that is currently being addressed please let me know so that I can await the next update.
 -
Hi @Seneca, I don't really have anything specific to say other than the team is still smashing out APIs! We've also had to go back and do some of the less interesting "that can wait" tasks, such as dealing with shut down properly e.g. you start running a script and then decide to shut down the app halfway through its execution - we need to make sure things like asynchronous ops are properly aborted / synchronous waits end gracefully. We've also been re-evaluating the high level JS layers to make sure they were intuitive and usable. We went hell for leather to get bits of the app exposed, but didn't do them in a particularly good way e.g. this kind of sucks: let clrData = new RGBA8(0, 0, 255); let clr = new Colour(clrData); and should be something much more concise like: let clr = RGB(0, 0, 255);
- 655 replies
-
- 5
-

-

-
- automation
- scripting
- (and 3 more)
-
Publisher 2.4 Bug with PDF-export text with stroke
Hangman replied to anto's topic in V2 Bugs found on Windows
Hi @Dan C, I think the issue here is actually different and not a result of the Allow Advanced Features option... If you set up a CMYK and an RGB version of the same document and test, the issue only appears to happen with the RGB version irrespective of the font or stroke alignment and irrespective of whether Allow Advanced Features is enabled or not. Sophia Sans RGB.mp4 -
I'm not seeing exactly what you showed, but I've only tried it so far on an iPad. I am suspicious about you having an RGB-32 (HDR) document that you're exporting to PNG, though. RGB-32 PNG files are rare, I think, and the support for them in the Affinity applications is very new.
-
 All the way in 2021 @yitzaklr asked for something similar as feedback to Affinity Designer 1. I just posted there not realizing it's an old thread so I'll copy that here. It depends on the Color Space model used to interpolate the gradient. Ideally we'd have an option to choose from multiple color spaces and newer Color Appearance Models (CAMs) such as OKLAB and CAM16, but even just CIELAB would be a great improvement over RGB. This should also be an option for transparency interpolation. Also Adobe has offered this functionality for a while.. The steps to compute this from an RGB base are roughly: Convert the gradient RGB colors into the new CAM space Linearly interpolate between the CAM colors to fill in the gradient Convert those new CAM colors back into RGB space Affinity already has HSL sliders so it should be easy to at least implement HSL gradient interpolation. Hope to hear back about this!
-
LAB Interpolation for Gradients
evnb replied to yitzaklr's topic in Feedback for Affinity Designer V1 on Desktop
It depends on the Color Space model used to interpolate the gradient. Ideally we'd have an option to choose from multiple color spaces and newer Color Appearance Models (CAMs) such as OKLAB and CAM16, but even just CIELAB would be a great improvement over RGB. This should also be an option for transparency interpolation. Also Adobe has offered this functionality for a while.. The steps to compute this from an RGB base are roughly: Convert the gradient RGB colors into the new CAM space Linearly interpolate between the CAM colors to fill in the gradient Convert those new CAM colors back into RGB space Affinity already has HSL sliders so it should be easy to at least implement HSL gradient interpolation. -
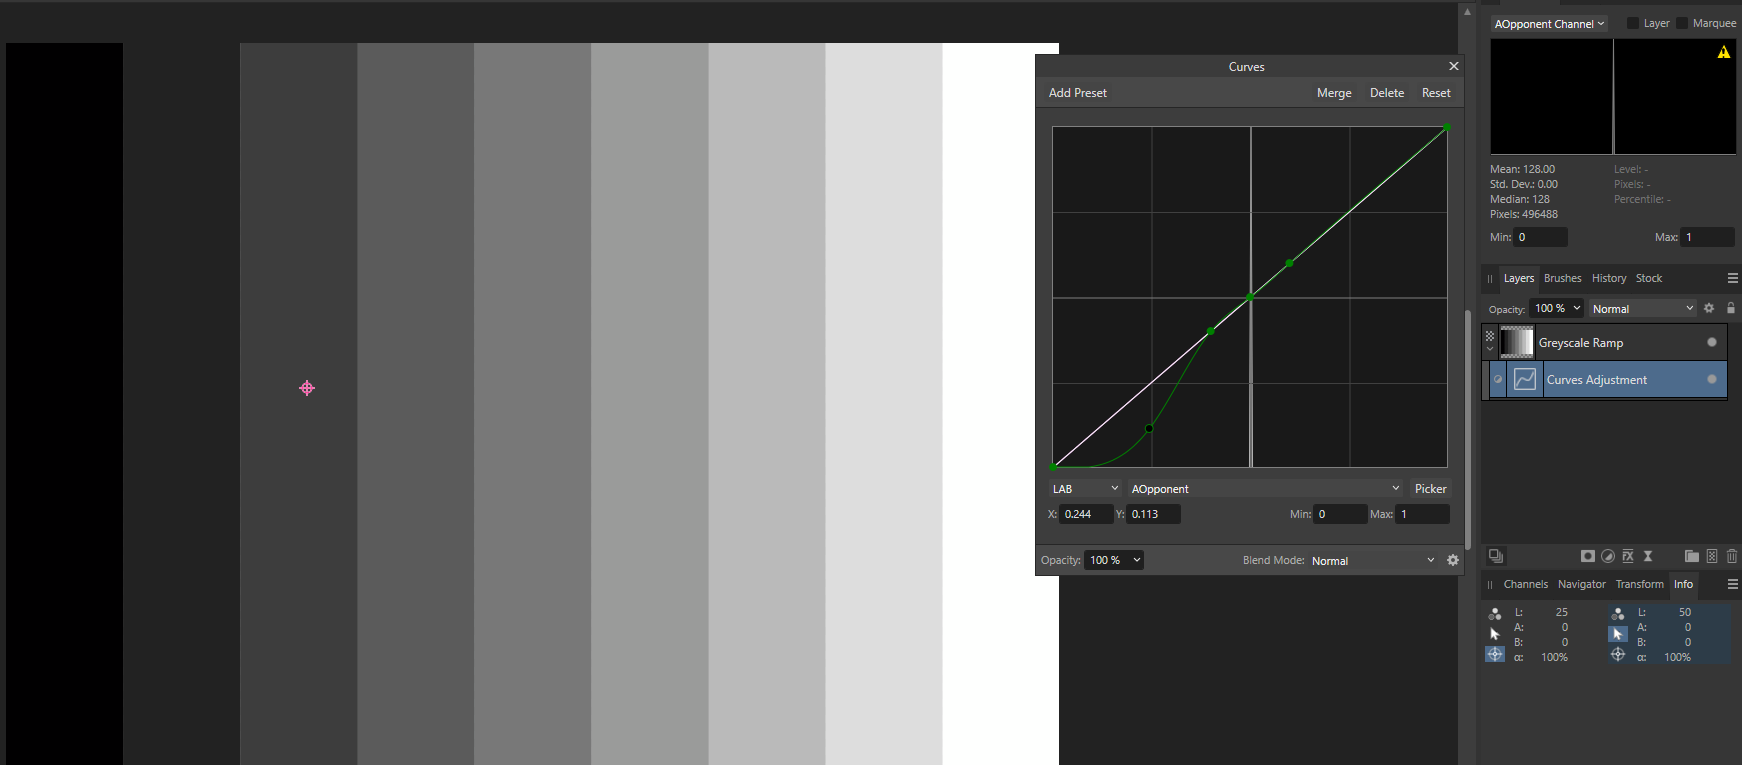
 Hi there, when applying a curves adjustment and then choosing the LAB color space in the drop down menu in the curves adjustment panel, the color picker picks the wrong values. OS: Windows 11 AP2: All versions (2.0 to 2.4.1) This holds true with proper conversion (Document>Convert Format/ICC Profile) or quick conversion (i.e. using the LAB color space in the curves adjustment without prior proper conversion). The image below show a greyscale ramp with nine stripes, i.e. the values of A/B channels for all the stripes are equal to 0. The Lightness value (L-channel) increases in steps of 12.5 from 0 to 100. You can verify this by looking at the info panel (bottom right) or by looking at the curves diagram: The A-channel shows only one peak in the middle (the value of 0, the range is from -128 to 127 where 0 represents neutral grey). Just to clarify: The horizontal axis represents the input values (-128 to 127, i.e. green to red) of the A-channel, and the vertical axis represents the output values of the A-channel. (When you are used to the RGB color model you might be thinking of shadows and highlights, but that is not what the axis are showing). No matter where you put the color picker now, the color picker (if working properly) should create a point on the middle of the curve, since only grey values (i.e. A-value =0 everywhere) are present. But the color picker does something different, it picks a point on the curve based on lightness value (L-channel), which is wrong and moreover, it just does not make any sense. For demonstration: E.g. in the above picture, I have put the color picker where the crosshairs of the info panel lies and the moved the curve down to add green in the picture. The color picker should have created a point on the middle of the curve, but it did not. Instead it created a point at the left of the peak (where I dragged down the curve). To keep the curve straight around the peak (the middle) I added three points around the peak to isolate the effect. Of course, nothing happens, they greyscale picture looks like before, because the change of the curve happens outside where the peak lies. There is no other color present than neutral grey. Don't confuse this with the RGB color model or even HSV or HSL. LAB strictly separates lightness (L-channel) from color (A- and B-channels). Thus, mapping any input value of the A-channel other than zero to any other value has no effect. Also don't be tempted to interpret the curve of the A-channel like: "It adds green in the shadows". That is not what the A-channel curve adjustment does. It maps input values of the A-channel (ranging from green to red, negative values greenish, positive values reddish) to output values of the A-channel. So to add green, I moved the middle point of the curve down (not using the color picker). It adds green everywhere in the picture (see info panel A-value=-64), not only in the midtones. This curve says: Input A-value 0 is mapped to output A-value -64. Anything else stays where it was. Mapping 0 to -64 in the A-channel means mapping grey into a greenish tone. Since the whole picture had the same "grey color" (in the LAB color space!!) everywhere, the picture now is turned greenish everywhere. You can see this is the histogram in the top right corner which shows the A-channel: In the picture above the peak is in the middle (=grey), in the picture below the peak has moved to the left (=greenish). I added the .afphoto file so that you can verify it yourself. This is a color picker bug and hopefully removed soon. Color Picker Bug LAB Curves Adjustment.afphoto
-
 For a while I had no idea why searching for texts with a specific color wasn’t working. Today I found out that Publisher gets confused with RGB/HEX? Finding RGB vs HEX.mp4
 -
 Since it's exported as an bitmap image due to the one "erase layer" used inside, which rasterizes the whole as an image then! <?xml version="1.0" encoding="UTF-8" standalone="no"?> <!DOCTYPE svg PUBLIC "-//W3C//DTD SVG 1.1//EN" "http://www.w3.org/Graphics/SVG/1.1/DTD/svg11.dtd"> <svg width="100%" height="100%" viewBox="0 0 105 61" version="1.1" xmlns="http://www.w3.org/2000/svg" xmlns:xlink="http://www.w3.org/1999/xlink" xml:space="preserve" xmlns:serif="http://www.serif.com/" style="fill-rule:evenodd;clip-rule:evenodd;stroke-linecap:round;stroke-linejoin:round;stroke-miterlimit:1.5;"> <g transform="matrix(1,0,0,1,-1199.87,-1716.75)"> <g id="_1" serif:id="1" transform="matrix(-0.209955,4.16334e-17,-4.85723e-17,0.209955,1681.07,1388.25)"> <g transform="matrix(-4.76294,9.44476e-16,-1.10189e-15,4.76294,2291.93,1564.63)"> <use xlink:href="#_Image1" x="0" y="0" width="104.583px" height="60.38px" transform="matrix(0.99603,0,0,0.989839,0,0)"/> </g> </g> </g> <defs> <image id="_Image1" width="105px" height="61px" xlink:href="data:image/jpeg;base64,/9j/4AAQSkZJRgABAQEAYABgAAD/2wBDAAUDBAQEAwUEBAQFBQUGBwwIBwcHBw8LCwkMEQ8SEhEPERETFhwXExQaFRERGCEYGh0dHx8fExciJCIeJBweHx7/2wBDAQUFBQcGBw4ICA4eFBEUHh4eHh4eHh4eHh4eHh4eHh4eHh4eHh4eHh4eHh4eHh4eHh4eHh4eHh4eHh4eHh4eHh7/wAARCAA9AGkDAREAAhEBAxEB/8QAHQAAAQUBAAMAAAAAAAAAAAAAAAMGBwgJBQECBP/EAD8QAAEDAwIEBAMEBgkFAAAAAAECAwQFBhEABxIhMUEIE1FhIkKBFDJxkSMzUnKSsQkVFhdTYnOColahwcLR/8QAFAEBAAAAAAAAAAAAAAAAAAAAAP/EABQRAQAAAAAAAAAAAAAAAAAAAAD/2gAMAwEAAhEDEQA/ALl6A0BoDQGgNAaA0BoDQQ54md7qbtRb/wBniFmXcktGYsZRyGU9PNWPTPQdyD2B0GfdwX7eNx1aRctTuGc9PQ4kpcU4SU5Jxwn5QOwGAOwGgsT4ZvFHVYtThWpuDJM2nuqDTVSdVl6P2BWr50epPxAZOSBjQXb81r/ER/ENAztp9yrb3KpEmfQXXEuRHi1IjPYDrfM8KiAT8KgMgj3HUHQPTQGgTkvsRmFvyXm2WkDK3HFBKUj1JPTQM6pbs7Z08qEm+rfynqlqah0j6IJ0HLZ332jecKEXtABBweJt1I/MpxoHBQNxrCrzwYpF4USW+ejSZiA4fwSSCfy0Dp0BoI18QO7VH2ptFc+SpuRV5CVJp8Mq++r9tWOYQOWfU4A65AZs3ZclXuy8H65cspcqTUCVqccIOOIYBA6DHIADoAAOQ0HGjtqTGnxVD9IkBWP3Tz/noPttWhVGs1qlQqUy5JmzZAbZZbT8RPEAB9ScaC6/9wW5f/Wjf8WgrlZl+1fZffapPxwpUaPNcizYpVhLrYXwqSfTmnIPYgH1BDRSw7uoN7W3Hr1uzm5UR5IyARxtKxkoWn5VD0+oyCDoOFvPujbm19sOVWsvoclrSfscFKwHJCv/AFSO6u3uSAQzo3a3UvTcCpf1nXay+Y7jqlR4SFFLTKM8uBPRPpnqccydAzCGzPeQt4utKaUptSl5xlOR9dB83C03TuMhKnnV4Tz+4kd/qdApIfXHEf7M8pBLIKylZ5kk9dBMGzW/N97bTW4ceUus0ctpdXAkklABAzwd0H936g6CfKl41LXFAU7T7XnGrFv4Wnnk+Slf7wHEoD90Z9uugqVuBeVwbhXfLrFzyVyJT7Si0knCWwBlKUgcgkDoPc9ySQa3GZLEVltJVIbKkj3T1H/nQLNurDaagE8Ty5CkKT2UCByx+egu14F9oFUiktbiV9giVIQpNJYWkfom1clPeuTzSn2Kjz4hgLWaDNfxi0H+zPiErD5azHnOCanI+8HQFLP8RWPpoGDal13dZT8l+2Lgn09XElGI7ykBxKs8OeEjI9j3OgcNtW1eW8d4pgKnzq1WHFZedfkFXJI+LK1nkEgjJJOMgBJzjQWGtzwWsKiJTcV0MpcT91MVlx0pHXHGpSB/w0D2pfhE27jthMyo1SVj9lmKgH82lH/voOifCdtH8sSppPr5zZ/mgjQJO+E3a5SSG3Ks0cciBFVj82DoIl3n8KsK0rZm3XQa6X2oA899t1ry3UozjKeE8CgM5KeFOcHCtBVCQEmLMyyltSX0jhBzwHmDz9OWgH3zHkQZHDxER05GevUfy0CVOBj1RkPYb58+I9AR/wDDoJ38ImzMjcWuJqVZjKTbNOkB2QskpL68cmkn35E+iT2JToNEY7LMeO3HjtIaZaQENtoSAlCQMAADoANB76Cov9IvZhlUaiXvGbJVHJgSiB8vxLbP4frfzGgphHmcQWh4hKfs/lpxnmU80/XOgnHwb3LHtneiliS6tMaegMLJPIeeAjiJ/wBUMj6k9tBoxoDQGgNBD3i8uOPRNnpcBagX6u8iKhHEAooB8x0j/Ygj8VDQZmx21SJKWisJUtWMq9dB7S3VLDTS0cK2U+WTnrgnQSjsdtPV92rzYiQQWaYw22qfMUglDKcYP4qOCAnuc9gSA0nsm2aPZ1sQrdoUYR4MNvhQPmWe61HuonJJ99B2dAaBubmWlBvmxara9QCQ3NYKUOEZ8pwc0L+igD7jI76DKy4LcmW3e0q3qxFUy/FkLYcbV2UMj68+/froEaPK8mfT30rIMZCy/jkQgE5GexweR7HB0Glnhs3Mi7j7fxn3JKXKxBbQ1OGebnLCXh7Lwc+igodtBKGg8IUlaeJCgoeoOdB5JAGTyGgzv8ZG6Sr4vlcGjPcdKpILUdSVAhaQsFTv+9aU46fC2g/NoIFm8KJLU5ofo3T5gHooHmPz0EmbK7MXBureDrNPSGKQ24HJc9Yy20hXP6qPPCRzPsMkBoxtpY9A2+tWPbtvRfKjtfE44rBcfcxzWsjqTj8AAAMAaBzaA0BoDQQR4otiGtyY7dw24I8W6IqcZX8KJaAOSVHssdAo8scjyAKQobeNgXtZE12LX6BOgrWC3l1khLg/ynor8UkjQOTYrcaobYXdTqzDUTHXluQw4rhS4nI8xtR7JPIgnPCoA9OLITz4tN5qZddp29BtCsy2W5BL01nyyhSHFFAbacBGDhPnHHNJwk8+WggHbDcy47MuSNW4VUW0I8kIdaSgNtOJ/ZWlAAUlWMHIJGcjmNBZbfzxO0SXt0KbaYlszKrGAlLcTwKZQofE22fmUeYLgykJ5glRA0FMKeqbU6jI4WXZD8pJQEtpzlRxwgDsOgA+mgsxsJ4Vbgrv2Wo7gNLpFISrzkxTylPZA+HhP6tPqVc/RPPIC69rW9RbXorFGoFNYp8BgfA0ynAz3JPVSj3JyT30HU0BoDQGgNAaBCfDiT4jkSdFYlR3BhbTzYWhQ9CDyOgh6/fDLtVdfG63SXaJJUc+ZTnOFGf9NQKAPZIToK87yeF+m2RThU4d3SpDSMqaZVDwUY5/e8wjr7DQQnTrMbqFUFOXUnkpcWVlXlg/F640FjNqfCNbdcpjdWq90znWFKx5DEVLauX+cqUP+Ogsrt3tJt/YSW127bsZqWgYEx4ea/74Wr7ufROB7aB86A0BoDQGgNB//9k="/> </defs> </svg> Instead rearange your file, so it will be kept as all vectors. Therefor add the parts together (for example as a compound) and there (-) subtract the yellow curve form (as a "normal layer") from then ... <?xml version="1.0" encoding="UTF-8" standalone="no"?> <!DOCTYPE svg PUBLIC "-//W3C//DTD SVG 1.1//EN" "http://www.w3.org/Graphics/SVG/1.1/DTD/svg11.dtd"> <svg width="100%" height="100%" viewBox="0 0 2481 3508" version="1.1" xmlns="http://www.w3.org/2000/svg" xmlns:xlink="http://www.w3.org/1999/xlink" xml:space="preserve" xmlns:serif="http://www.serif.com/" style="fill-rule:evenodd;clip-rule:evenodd;stroke-linecap:round;stroke-linejoin:round;stroke-miterlimit:1.5;"> <g transform="matrix(-0.209955,4.16334e-17,-4.85723e-17,0.209955,1681.07,1388.25)"> <path d="M2167.96,1651.75C2177.66,1658.02 2185.55,1675.06 2207.64,1685.82C2244.83,1703.93 2283.47,1622.5 2286.8,1627.52C2294.56,1639.22 2270.14,1804.13 2202.27,1820.9C2148.32,1834.22 2002.47,1939.58 1800.31,1625.08C1785.9,1602.66 1831.53,1562.57 1857.37,1569.08C1884.48,1575.91 1933.03,1657.29 1962.98,1666.06C1984.92,1672.49 2005.93,1650.35 2017.99,1645.52C2051.72,1631.98 2133.42,1629.42 2167.96,1651.75ZM1996.17,1698.08C1972.73,1717.61 2032.36,1818.02 2050.31,1822.08C2066.63,1825.76 2068.97,1801.24 2079.31,1797.08C2089.53,1792.96 2104.37,1792.24 2112.37,1797.08C2120.37,1801.91 2113.8,1825.42 2127.31,1826.08C2144.01,1826.88 2212.82,1726.18 2190.96,1704.85C2169.11,1683.52 2019.62,1678.54 1996.17,1698.08Z" style="stroke:rgb(38,38,38);stroke-width:7.5px;"/> </g> <g transform="matrix(-0.209955,4.16334e-17,-4.85723e-17,0.209955,1729.5,1402.75)"> <g id="_1" serif:id="1"> <g> <g> <g transform="matrix(1,0,0,1,-0.04773,-1.63002)"> <path d="M2082.69,1517.95C2084.44,1545.41 2079.83,1569.75 2068.69,1586.13" style="fill:none;stroke:rgb(38,38,38);stroke-width:7.5px;"/> </g> <path d="M2113,1540.57C2115.08,1552.36 2098.23,1566.94 2102.84,1580.13" style="fill:none;stroke:rgb(38,38,38);stroke-width:7.5px;"/> <path d="M2088,1585C2083.85,1599.11 2090.56,1618.33 2082.84,1629" style="fill:none;stroke:rgb(38,38,38);stroke-width:7.5px;"/> <path d="M2153,1582C2150.67,1596 2148.33,1610 2146,1624" style="fill:none;stroke:rgb(38,38,38);stroke-width:7.5px;"/> <path d="M2174.55,1603C2164.33,1635.11 2176.89,1645.33 2167.55,1662" style="fill:none;stroke:rgb(38,38,38);stroke-width:7.5px;"/> <path d="M2137,1641C2136.33,1651.67 2135.67,1662.33 2135,1673" style="fill:none;stroke:rgb(38,38,38);stroke-width:7.5px;"/> <path d="M2200,1614C2190.16,1624.67 2203.48,1634 2196.22,1644" style="fill:none;stroke:rgb(38,38,38);stroke-width:7.5px;"/> <path d="M2223.99,1660.63C2227.91,1694.02 2199.74,1709.8 2198.11,1740.38" style="fill:none;stroke:rgb(38,38,38);stroke-width:7.5px;"/> <g transform="matrix(1,0,0,1,-5.08321,4)"> <path d="M2235.47,1712C2238.81,1725.31 2227.49,1730.92 2234,1740.38" style="fill:none;stroke:rgb(38,38,38);stroke-width:7.5px;"/> </g> <path d="M2250,1591C2246.67,1596 2252,1604 2247,1607" style="fill:none;stroke:rgb(38,38,38);stroke-width:7.5px;"/> <path d="M2284,1581C2281.33,1588.33 2288.78,1594.11 2285,1603" style="fill:none;stroke:rgb(38,38,38);stroke-width:7.5px;"/> <path d="M2490,1614C2487.74,1627.56 2473.22,1643.67 2474.33,1658" style="fill:none;stroke:rgb(38,38,38);stroke-width:7.5px;"/> <path d="M2452,1694C2454.17,1704.31 2444.31,1719.21 2451.75,1731.09" style="fill:none;stroke:rgb(38,38,38);stroke-width:7.5px;"/> <path d="M2308,1581C2312.33,1585.53 2314.11,1590.62 2315.7,1595.23C2316.69,1598.08 2317.6,1600.75 2319,1603" style="fill:none;stroke:rgb(38,38,38);stroke-width:7.5px;"/> <path d="M2369,1586C2369.67,1593.67 2363.56,1595.89 2362,1603" style="fill:none;stroke:rgb(38,38,38);stroke-width:7.5px;"/> <path d="M2390.96,1594.5C2390.3,1600.17 2400.99,1602.5 2397,1611" style="fill:none;stroke:rgb(38,38,38);stroke-width:7.5px;"/> <path d="M2409.82,1694.97C2409.86,1710.31 2423.94,1719.18 2418,1730.19" style="fill:none;stroke:rgb(38,38,38);stroke-width:7.5px;"/> <path d="M2400.61,1737.38C2393.75,1745.59 2390.6,1755.53 2395.03,1765" style="fill:none;stroke:rgb(38,38,38);stroke-width:7.5px;"/> <path d="M2334,1740.38C2337.33,1750.59 2333.78,1760.2 2332,1765" style="fill:none;stroke:rgb(38,38,38);stroke-width:7.5px;"/> <path d="M2318,1740.38C2308.67,1748.59 2309.22,1757.53 2314,1765" style="fill:none;stroke:rgb(38,38,38);stroke-width:7.5px;"/> <path d="M2463,1630C2467.33,1644.17 2451.11,1659.06 2455,1672.5" style="fill:none;stroke:rgb(38,38,38);stroke-width:7.5px;"/> <path d="M2229.86,1603C2218.11,1608.67 2221.62,1620 2213,1624" style="fill:none;stroke:rgb(38,38,38);stroke-width:7.5px;"/> <path d="M2341,1581C2346.79,1589.51 2334.81,1588.74 2340.5,1603" style="fill:none;stroke:rgb(38,38,38);stroke-width:7.5px;"/> <path d="M2439,1660C2442.89,1670.89 2429.67,1694.67 2434,1711" style="fill:none;stroke:rgb(38,38,38);stroke-width:7.5px;"/> <path d="M2425.42,1624C2438.33,1629.67 2449.14,1644 2446,1648" style="fill:none;stroke:rgb(38,38,38);stroke-width:7.5px;"/> <path d="M2187,1671C2174.66,1680.04 2186.53,1711.09 2168.97,1719.12" style="fill:none;stroke:rgb(38,38,38);stroke-width:7.5px;"/> <path d="M2134,1563C2136.22,1575.56 2126.67,1575.67 2126,1594" style="fill:none;stroke:rgb(38,38,38);stroke-width:7.5px;"/> <path d="M2109,1603C2114.09,1617.44 2104.75,1623.56 2109.18,1639.35" style="fill:none;stroke:rgb(38,38,38);stroke-width:7.5px;"/> <path d="M2051,1555C2052.9,1562.11 2056.7,1576.33 2047.55,1581" style="fill:none;stroke:rgb(38,38,38);stroke-width:7.5px;"/> </g> </g> </g> </g> </svg> File to export2.afdesign File to export2.svg
-

Layer colour problem
Tony Webb replied to Tony Webb's topic in Affinity on Desktop Questions (macOS and Windows)
Hi Alfred, I could lend you some binoculars to see if they help. Silly me! Since posting this comment I have had a little play with my page. I noticed that in the colour wheel you can use RGB and it gives the numbers that I am using. However in layers you can only adjust the colours which show a percentage. I tried entering the umbers from the wheel but the selective colour box won't accept them (it reverts back to percentages). I also noticed that you can use hex with fill and stroke which means that it's only colour balabce or selection for layers doesn't use them. I think that's strange but then it might be me in wanting to do a strange thing!
-
I'd been working with decimal conversions all day and had decimal on the brain, a classic case of thinking one thing, typing another, i.e., thinking percentage, typing decimal... So my logic for #101D64 being correct was based on hexadecimal representation of percentage values, i.e., when the RGB sliders are set to percentage: For Each RGB Hex Pair: Take the decimal equivalent of the first character for each colour from the chart and multiply by 16 Take the decimal equivalent of the second character for each colour from the chart and add it to the first value get the R, G and B values So for #284BFF Red: 2 x 16 = 32 + 8 = 40 Green: 4 x 16 = 64 + 11 = 75 Blue: 15 x 16 = 240 + 15 = 255 Convert the RGB Values to Percentages: Red: (40 / 255) x 100 = 16% (15.68%) Green: (75 / 255) x 100 = 29% (29.41%) Blue: (255 / 255) x 100 = 100% Convert the Percentages Values to Hex Equivalents: Take the Hex equivalent for the percentage value from the chart for each colour Red: 16 = 10 Green: 29 = 1D Blue: 100 = 64 So when percentage is set as the colour mode #284BFF translates to a Hex value of #101D64 That's because I mistyped the Hex Code, #2B48FF instead of #284BFF... I've now corrected the original post to reflect this, apologies for that......
-
 Hi, I use to develop photos using ROMM RGB colour space (and 16 bit depth). I've setup the develop assitant and prefs that way. I'm trying to get the same colourspace when using Stack photos. But once the stack is made I always get an sRGB / 16bits document. I guess 16 bits is coming from the develop assistant, but I can't find how to change the default target profile from sRGB to ROMM RGB. Any clue ? Thank you for your help
 -
Bonjour @Delphine34140, Portable Network Graphics (PNG, prononcé officiellement /pɪŋ/ PING, prononcé familièrement /ˌpiːɛnˈdʒiː/ PEE-en-JEE) est un format de fichier graphique raster qui prend en charge la compression de données sans perte. PNG a été développé comme un remplacement amélioré et non breveté du Graphics Interchange Format (GIF) - officieusement, les initiales PNG signifiaient l'acronyme récursif « PNG n'est pas GIF ». PNG prend en charge les images basées sur une palette (avec des palettes de couleurs RVB 24 bits ou RVBA 32 bits), les images en niveaux de gris (avec ou sans canal alpha pour la transparence) et les images RVB ou RVBA en couleur sans palette. Le groupe de travail PNG a conçu le format pour le transfert d'images sur Internet, et non pour des graphiques imprimés de qualité professionnelle ; par conséquent, les espaces colorimétriques non RVB tels que CMJN ne sont pas pris en charge. Un fichier PNG contient une seule image dans une structure extensible de morceaux, codant les pixels de base et d'autres informations telles que des commentaires textuels et des contrôles d'intégrité documentés dans la RFC 2083. _____________________________________________ Portable Network Graphics (PNG, officially pronounced /pɪŋ/ PING, colloquially pronounced /ˌpiːɛnˈdʒiː/ PEE-en-JEE) is a raster-graphics file format that supports lossless data compression. PNG was developed as an improved, non-patented replacement for Graphics Interchange Format (GIF)—unofficially, the initials PNG stood for the recursive acronym "PNG's not GIF". PNG supports palette-based images (with palettes of 24-bit RGB or 32-bit RGBA colours), grayscale images (with or without an alpha channel for transparency), and full-color non-palette-based RGB or RGBA images. The PNG working group designed the format for transferring images on the Internet, not for professional-quality print graphics; therefore, non-RGB colour spaces such as CMYK are not supported. A PNG file contains a single image in an extensible structure of chunks, encoding the basic pixels and other information such as textual comments and integrity checks documented in RFC 2083.
-
 Hi all! I can't tell you how lucky I am to have found this forum! You folks are really so kind and helpful! I am fairly new to design and wanted to have something printed today (making stickers) and learned that print is done in CMYK color format...well, whoopdidoo - haha - ya learn something new every day! I converted my project to CMYK and immediately a great deal of color vibrance was lost. My question is: 1. Does anyone have a good method or strategy to convert a design already done in RGB8 to CMYK and get the look of the original design back?
 -
 original layer shows fine and i want found way recolour it beetween black and given colour. and bit hard show becouse is buyed element. but i tried found way thing what i not actually need when i can do it other ways. And i found gradient map allows this. and it keeps things transparency. only thing what i miss but procedural textures i know is solution. mapping image beetween colour and transparency mean for example image is opaque where i i want convert black color and white to transparency and greyscale vealues in are inbeetween values. in only need check rgb to greyscale converiso nratios (i have somewhere for ntsc/pal systems them). and also some other tricks where i can do suitalble alpha chanels. then case can counted solved even solution is elesewhere what i searched. procedural textures are indeed lot of things allowing thing even i miss better features what allows program own functions like programming language.(i mean more complex things what current possiblities allow).