Search the Community
Showing results for 'group text size'.
-
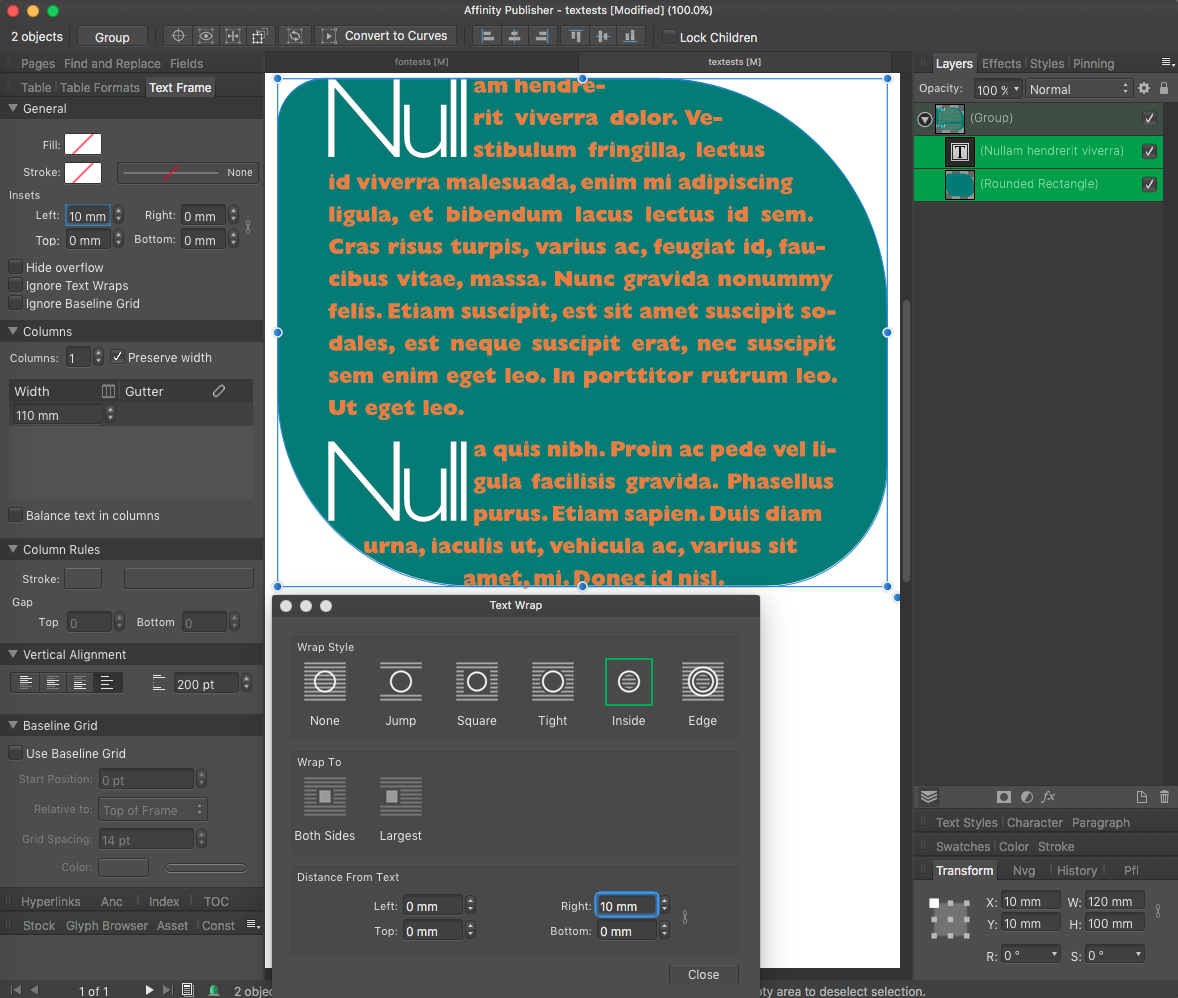
 You don't, it's a bug introduced in a later 1.9 beta, not sure which one but present in current beta Recipe1: New document Create text frame with text Use bottom-right extra handle to resize text bigger Group text frame (just on its own) Result: Text size increases immediately after grouping Recipe2: New document Create text frame with text Use bottom-right extra handle to resize text smaller Group text frame (just on its own) Result: Text size decreases immediately after grouping Bug report needs logging
 -

Feature request: Clipping mask on groups
jz2000 replied to jz2000's topic in Feedback for Affinity Photo V1 on Desktop
Yes but as I mentioned originally, it's a waste of memory , disk size and inefficient to have to apply the clipping the text to every image in a group. The file I uploaded was just a simple example. In the real world, I often have 25-50 layers inside of a group. To apply the clipping to every layer in the group is unreasonable. Additionally, the lack of support for the gradient layer (and probably other layer types as well) means that I cannot truly replace photoshop with affinity photo. IMO, they should implement these basic levels of compatibility or they will lose customers who have these types of images but have to keep photoshop around in order to edit existing material... -
We are pleased to announce an update for the Windows release of Affinity Publisher, version 1.8.4 Changes in this build The changes in Affinity Publisher for Windows 1.8.4 (over the last release Affinity Publisher for Windows 1.8.3) are as follows: Fixes & Improvements: General [Installer] Prevent installation into non-empty directory Fixed recent regression when saving Linked Image placeholders which was causing large document files Recoloured K-only images with transparency lose their transparency Stability and Performance improvements Fix for zero-height / width objects moving to the wrong pages when switching to / from 'Facing Pages' Text > Interactive - Options mismatched with Context Menu Can now import .afassets file via drag drop Layer / Blend modes list fixed to scroll with arrow keys Linked afphoto file shows wrong DPI when modified Pan Tool cursor persisted after using <Space> / Pan Fix for stale preflight results persisting when Pages are removed Multi-spread Allow immediate dragging of objects on other spreads Constraining while dragging objects between spreads now works correctly When dragging between spreads, snapping is now performed on the target spread candidates Dragging objects between spread using the Focal Point handle now works correctly Fixes for dragging curve nodes across multiple spreads Fixes for 'restart drag' when translating across spreads Fixed issue with auto-panning in the text tool Text Improved performance of text when rendering text Avoid generating infinite filler text when leading is zero Further improvements for ideographic line breaks, mainly for quote-marks Allow OpenType kerning between glyphs with different settings (if they are the same font and size) Fixed 'Indent To Here' not working if lines are broken by drop cap or wrap shape Fixes for line-breaker around Fixed Spaces Index Find - match words with following punctuation Index Partial loss of parent topics when adding pages from file Fixed crash after editing text styles if changes caused pinned objects to move between spreads Option to preserve Text Frame width when changing Column Gutter in the context toolbar Double click multi-word selection could leave the original word not selected Fixed handling of local objects pinned to master page text when subsequently unpinned Improved line breaking for ideographic languages Chinese Font names now show in Chinese Character Panel - Font Category changes after changing font or deselecting object Import IDML Import - Text frame corners are now scaled correctly IDML Import - Fixed instances where text wrap path could fail to import, or be scaled incorrectly IDML Import - Generic OpenType features not being imported from IDML file IDML Import - Effects settings not scaled correctly on master page items IDML Import - En-Space in numbered list imported as a 0 IDML Import - Elements could be positioned incorrectly in some instances IDML Import - Question mark in file path breaks link during the import IDML Import - Initial Words not scaling correctly IDML Import - Placed EPS files are slightly clipped IDML Import - Better handling of master page items with overridden properties XLSX Import - Fixed hang with cells with gradient fills PDF import - Improved performance PDF Import - Improved handling when importing password restricted PDFs PDF Import - Import now allows creation of Artistic Text if 'Group lines of Text into Text Frames' is switched off PDF Import - Import now provides fallback if the used font doesn't define space PDF Import - Fixed text positioning which could be incorrect due to spaces being treated as tabs under certain conditions PDF Import - Fall through to alternative mappings when importing text, if necessary PDF Import - Better handling of restricted files SVG Import - 'ClosePath' doesn't have to be followed by a 'Move' SVG Import - Now treats gradients with one stop as solid fills SVG Import - Other fixes for specific files, including malformed files Export Fixed vector export of text occasionally filling characters PDF Export - Better support for RGBA16 and RGBAUF images PDF Export - Export could fail for glyph ids that happen to match surrogate pair values PDF Export - Fixed issues exporting to PDF/X-4 with content with embedded profiles SVG Export - Fixed source of numeric overflow causing curves to be exported incorrectly in some cases Earlier changes and fixes in 1.8 since 1.7 (including the new 1.8 features) are listed in some detail in this 1.8.0 update announcement and the 1.8.2 update announcement UPDATING TO THIS VERSION (Free for existing customers) The software version can be seen on the splash screen and the About dialog (in Help > About Affinity Publisher). If you’ve purchased from the Affinity Store— each time you start the Affinity Store software it will check for updates and offer any available update. The latest update will install over the top of any earlier version, with no need to uninstall. You can download the latest installer by logging into the affinity store here and find the order in your account and use the "Download" button in there. Alternatively, this new release (and previous versions of Affinity Publisher for Windows) can be downloaded from this link (that installer is NOT for Windows Store purchases and needs a product key). If you’ve purchased from the Microsoft Store— Microsoft Store updates are done automatically by the operating system (each time you start the application). If this does not happen for you, open the Windows Store app and click the three dots in the top right corner of the app and then go to Downloads and Updates. Click Get Updates. This should hopefully force the update to show.
-
 So I just started with Affinity Designer and struggled with few things so I imported a drawing that had a bunch of #s (text) I wanted to be able to turn on/off, I was able to selected each layer and right mouse click to "create group" and it did but now I had many many layers called "Group" and could not find it to turn it off. Feature request> give option to name group before it becomes a needle in a haystack. so searching for that group by looking at images was impossible with black and blue on dark grey preview but I found the option to show checker. ok better, but maybe white should be an option too. Feature request > white and maybe light grey as an option for preview background color. next I saw an option to change size, great! uh oh, didn't exactly help, it only made one preview tile bigger and not the rest. bug? how do I make all preview tiles bigger? feature request > option to make all of them bigger. Thanks for the great program and looking forward to learning more .
-

How do determine the currently selected brush?
Guest replied to zBernie's topic in Pre-V2 Archive of Affinity on Desktop Questions (macOS and Windows)
One option would be to steal what apps like Pages, Word and even Publisher (attempt to) do with text styles. If you modify an existing style the app provides a visual marker indicating that while you are using this base style, you have made changes that aren't reflected in the current style settings. At this point you could choose to revert the style to the original settings, update the original style to match the current settings, or create an entirely new style based on the existing settings. Creating a similar workflow with brushes in the Affinity apps would be most welcome. You could even automatically group brushes by their parent so that you could immediately see all of the brush variants created from the original—kind of like drilling down in a layer group, but it would be a brush group. For example, you could create a number of pen variations including brush size and hardness based on one parent, which could all be accessed by selecting the parent and looking at the existing variations. This way you could create common sizes, variations that you use often and keep them associated with the original, default brush. -
 You got it in one. You can't apply a Group to any text, I would start with a Group (Base) and a Paragraph Style (Bulk Text) and apply the Bulk text to the text and build from there. The great thing about Group having everything set is that as you work you can change the Font size for all the paragraph styles in one place. Go from 12 point on 14 point leading to 10 on 11 with changing the Group and then the Bulk and the First and Last (and maybe the Lists and Information as well) will automatically change. You can use Find and Replace to search for Fonts and replace them with Styles, so your collaborator can just use a font for headings (Gill Sans) and a font for the text (Times) and you'll search for Gill and replace it with Paragraph Style Chapter Heading using what ever font you have for that (Avenir). He won't have to worry too much about Styles in his documents. Just send you Rich Text format files. Caveat: It is stupid early here on the Wet Coast of Canada so be aware that I am still decaffeinated.
 -
Not that I cannot do without group styles it just makes life easier. I set up a group to have 90% (or more) of the text formatting so if I wish to change the justification from ragged right to full I only have to change it in one place. If I don't like the colour of the text on the page and choose a new font family or weight I only have to change it in one style, the group style. I use a group for the text of a book. I have it set up like so; Group Bulk: < Justification, widows and orphans, font family, font size, leading etc. All the stuff you need in all the text. Paragraph Styles; First Paragraph < zero indent and perhaps initial words or drop cap Space Before Normal Paragraph < one em indent Last Paragraph < one em indent text decorations Space After Character Styles; Italic < italic Bold < bold Initial words < perhaps small caps and bold Drop Cap < a particular font Group Heads < Justification, font family, font size, leading etc. All the stuff you need in all the headings. I wouldn't bother with a group for Captions or annotations I probably would for Footnotes or End notes.
-
 Affinity Publisher 1.9.2.1035 on Win10 Hello everyone, this is a longer story, but I try to make it short. I have recently imported several .afpub files into one project in publisher, to combine them into one pdf (for a job application, my cover letter and my CV). I used the baseline grid to keep all my text automatically spaced (with "line spacing = 1,2 time font size"). However, I used a different grid for each file, as I used different font sizes (might be a beginners mistake, but it was necessary due to work count etc.). Since I used the baseline grid, I did not adjust the line spacing for each frame text. After the import I noticed that the line spacing of some blocks was off and back to the standard, apparently "line spacing = font size". Trying to use the baseline grid it destroyed my layout, due to the different font sizes. My first question now is: is there a possibility to set the baseline grid individually for different pages in a project? E.g. Page 1, spacing 12pt, page 2, spacing 14,4 pt etc. The second thing I noticed was, when trying to correct each frame text individually and manually, that the change of line spacing doesn't work with groups. For a better overview, I grouped the different layers in my CV, as in Group 1: headline 1, textblock 1.1, textblock 1.2, Group 2: headline 2, textblock 2.1 etc. When clicking the group in the layers window and then trying to adjust the spacing via the paragraph window, it didn't change anything. I had to select each layer and change the spacing individually. Selecting several frametext-layers and changing them at once was possible, but tedious. Using the select all function did only select the upmost groups and didn't help. My second question is thus: is there a way to either select EVERY layer (and I mean, every one) or bulk-change the line spacing for the frame texts. Note: I didn't use paragraph-styles, unfortunately, as I said, still a beginner and I didn't think about it until it was too late. I included a .afpub file so you can try it at home, maybe the problems become clearer then. Thank you for your help! line spacing problem.afpub
 -
 What I did was select the Group I wanted to save and exported the selected area as an SVG. The reason the images were loaded was to process them, but in the end I wanted to crop the overall size. In other words, instead of the 8.5" x 11" artboard, I just wanted to crop the canvas size to a rectangular area surrounding the character selected (which was made up of a bunch of selected curves). The reason was to give the character breathing room (white space around each character), but because of the update to Photo, Photo was no longer available (possibly because it was now a different version number than Designer). I could have set a text frame around the character with the breathing room I wanted, and then added that to my selected layers, but I wanted pixel depth control of the crop which I do not get in Designer. I want that level of control so that I don't have to resize each character when I reload them in another program such as Publisher, I just place them. The bonus is that I can use them at any other size anyway as an SVG, but just trying to make things easier in the long run because I will be using these characters over and over and I would like a default, defined size, aspect ratio and dpi. Of course, each character is a different size, either height, width or both. So, I am just trying to get a default size in Photo. Of course, I have a hard time explaining things without getting wordy. My fault. None of that has to do directly with why I want to be able to define my preferences, it was just the process I was going through at the time when I kept running into the fact that I can't define the user preferences. Sorry.
 -

Rounded corners on text frame
loukash replied to ConnectCreative's topic in Feedback for Affinity Publisher V1 on Desktop
This is weird: I can't reproduce that anymore. That kinda sorta almost works. But… The most straightforward workaround seems to be: create your plain text frame with text put a rounded rectangle of the same size underneath set Text Wrap of the rectangle to Inside group both The group then behaves as a single object, so when you resize the group frame the text will rewrap. You can set insets on the text frame to wrap strictly to the underlying rectangle or "Distance From Text" in the Text Wrap window which is relative to the roundings. Or combination thereof:
-
 A good answer will depend on what you mean by the words “group”, “fonts”, “scale” and “all”, but a quick answer, if it will help, is that you can select all of the Artistic Text layers, or Frame Text layers, and then use something like “*2” or “*0.5” (without the quotes) in the Font Size field in the Context Toolbar to change the size of the text (when put in simplistic terms). If you want something different, and/or more specific, then you will probably need to give us more details about what you have and what you want to do with it.
 -

Publisher crashes every few minutes (so does photo)
MercurioBebop replied to Daley's topic in V1 Bugs found on Windows
I'm also having a lot of crashing issues. Like I-can't-work-anymore lot. -I tried to uninstall the updates but my computer doesn't have none of those (I'm on Windows 10, Publisher ver. 1.10.5.1342 Spanish) -I've stopped writing the font's name, just scroll -I choose the font size by mouse scrolling or writing -Now I drag&drop the images instead of using the menu -Hardware acceleration is disabled And after all, after loading the file, the app closes as soon as I interact with anything that visually changes the file in any way -preview, click a layer, select something- so frequent saving is not an option. In this case, is a three-page default-style A4 with some text boxes, images, and a chart (the images are not inside the chart, but in a group above). No master pages, elaborate edition or too many elements, just to avoid crashing. Is there a way I can still use the app? Thank you...
-
 Hi all, Wonder if anyone can shed some light on this for me? I'm creating Symbols in AFD on the Mac but its just not working for me: I'm creating labels and have created a base, which I've grouped and then clicked 'Create' to create a symbol of that group. I then drag out the symbol to other areas of the artboard to replicate. But... The font sizes are all wrong in the symbol copy; for example - text a is Montserrat and size 14, in the symbol its size 8. text b is Times size 18, in the symbol its size 6. Have added a screenshot to what I mean. Does anyone know why it could be doing this? Cheers
-
 Hello, Is it possible to select a group (containing layers of different kinds, including curves and text layers), and set the font size of all the layers in this group in one go, without needing to select singly the text layers? I can't figure out how to do this.. Thanks !
 -
 Status: Beta Purpose: Updates and Fixes Requirements: Purchased Affinity Publisher Windows Store: Not submitted Download: Download Auto-update: Available Hi, We are pleased to announce that Affinity Publisher Customer Beta 1.9.0.874 is now available as a download from the link above. If this is your first time using a customer beta of an Affinity app, it’s worth noting that the beta will install as a separate app - alongside your store version. They will not interfere with each other at all and you can continue to use the store version for critical work without worry. This beta is significant update from the 1.8 version available for purchase - we strongly recommend that you do not use this beta for real work as data could be lost and the files you save are not guaranteed to open in previous or future versions of Affinity Publisher. --- Fixes And Improvements General Fixed issues with Assets Panel Fixed display of and snap to Column Guides Snap to Object Geometry snapping to curve intersections was broken Document profile PDX Export preflight tweak, falls back to CMYK profile for RGB / LAB documents (Win) Fixes various issues with mishandling of CJK fonts in the UI Selection Context Menu (Win) Fixed crash when using Ctrl+Right Click on empty area (Win) Only dig into containers when the Secondary modifier is not held down (Win) Parent node added to top of submenu Rendering Fix for rotated or skewed filled rectangles not rendering correctly under OpenCL compute Master Pages Pinned objects from Master Pages were not showing in bleed Resizing a single page master could cause spreads that used it to be resized incorrectly Guides lost from Master Page when changing from facing to single pages (Win) Paste as Content into Master Page Picture Frames was disabled (Win) Fixes for margins setup on a Master Page Images and Resources Fix for xlsx import currency parsing Fixed issue opening heic files with extended characters in the file path Fixes for specific PDF import failures PDF Passthrough not automatically set if PDF drag dropped from Finder / Explorer Fixed warnings about over-size export files Resource Manager could scale cropped objects on Replace Resource Manager now shows Artboard names instead of Page Numbers for placed Artboard documents Resource Manager 'Replace' for Picture Frame content was not working correctly (Win) Passthrough PDFs could fail to print (Win) Inconsistency with the 'Include Bleed' option on the Export Dialog (Win) Resource Manager now highlights group of selected resource if group is collapsed Text Text Frame button missing from context toolbar for Text on a Path More consistent handling of mid-word punctuation Text wrap settings on images could become distorted after a document save and load Fixed issue adding tab stops to the Text Ruler Fixed issue where grouping could change text size due to anomaly in layer setup RTF export / copy paste was losing hyphens under certain circumstances (Win) Fixed selection highlighting issue in Text Styles panel (Win) Current Formatting box in the Text Styles panel was not always updating correctly TOC Style changes not always picked up as out of date for TOC Bookmarks created by TOC not in the correct order when exported to PDF Data Merge Fixed Data Merge crash with no source selected --- Release Notes for 1.9.0.863 Release Notes for 1.9.0.850 Release Notes for 1.9.0.843 Release Notes for 1.9.0.829 Release Notes for 1.9.0.822 Release Notes for 1.9.0.798 Release Notes for 1.9.0.796 Release Notes for 1.9.0.742 --- To be notified about all future Windows beta updates, please follow this notification thread To be notified when this Publisher update comes out of beta and is fully released to all Publisher customers, please follow this thread
- 12 replies
-
- 13
-

-

-
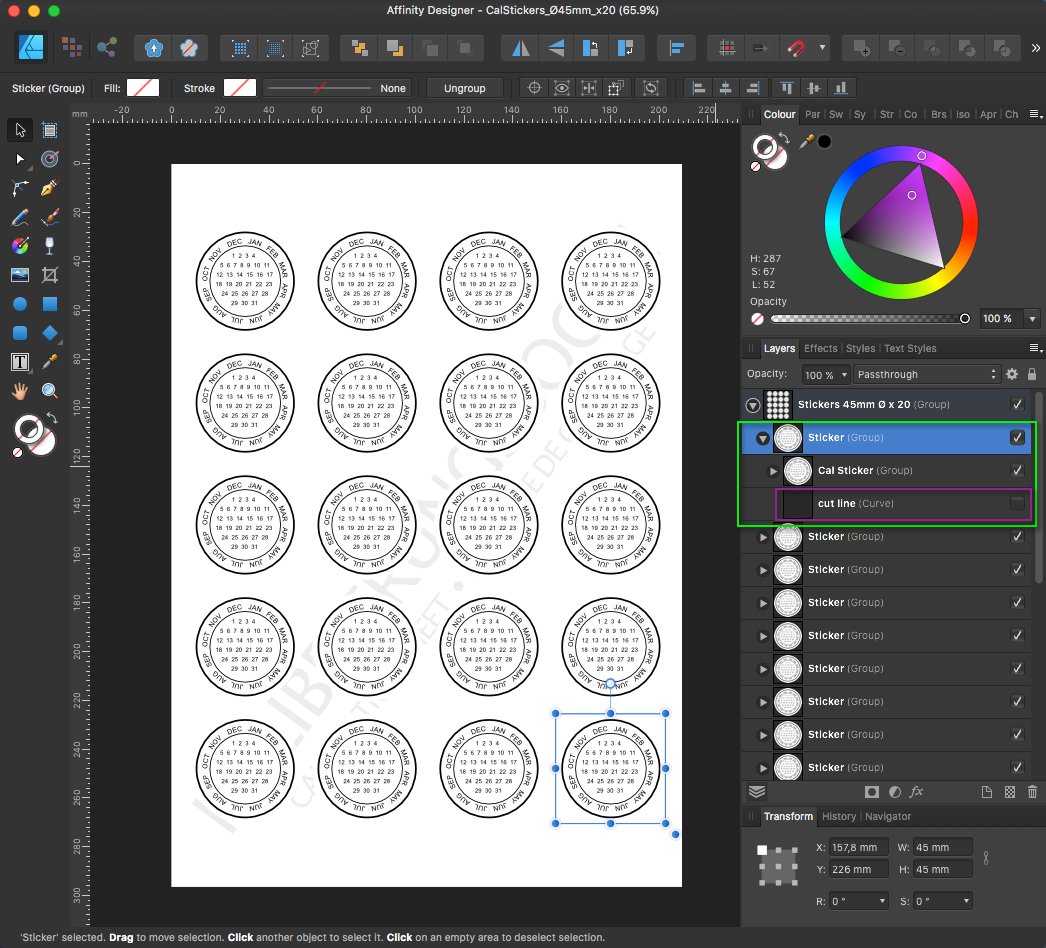
Here are some calendar based round reminder stickers, which can be used to place/glue on important dated things not to forget. Like for example " ...don't forget to sending the damned package until a specific date to someone..." and the like. The initial Sticker created here is a Ø45 mm one (...but can of course on demand be also scalled up to other sizes since it's vectors...) ... Personally I tend to print such reminder Stickers out on matching rounded Avery label sheets (in this case on Avery sheets of Ø45 mm x 20 round labels) ... ... here each of the same 20x Ø45 mm Stickers is in it's own Sticker-group, which in turn has a hidden cut line curve, since the later (a cut line) is not needed when printing onto Avery round label sheets. The sheets background text layer can be hidden or deleted before printing! - If needed you can of course adapt these Calendar-Stickers to other Ø-round sizes, since there are a bunch of different size Avery label sheets available! Hint/Tip: Before I forget, I mostly mark the reminder dates afterwards manually by hand, but you can also mark those directly inside ADe etc. if needed. For some marker colors see for example this Touch Twin Markers Palette and the like under the forums Resources section! Here are the corresponding Affinity Designer template files: Sticker-1x-Ø45mm.afdesign (1x Sticker Ø45 mm on white background) Sticker-1x-Ø45mm-transp.afdesign (1x Sticker Ø45 mm on transparent background) CalStickers_Ø45mm_x20.afdesign (20x Sticker Ø45 mm for Avery round labels sheet) - Have fun!
- 3 replies
-
- 7
-
-
-
- affinity designer
- vector
- (and 5 more)
-
 So I am not sure if this is a bug or some feature that I just can't find. When I group a "Frame Text" to another group of two "Frame Texts" the font size of the single one increases a lot. I attached an example file. Just select the top "Frame Text" and the below group and right click --> group. 2021-02-12_group.afpub
 -
 Hi. I did, but from what I see this option is just minimizing the code and I don't think that's the reason of my issue here. I tried to uncheck this option and it added a lot of <tspan> For example, the SVG code from an Inkscape SVG file was <text xml:space="preserve" style="font-size:4.23333311px;line-height:1.25;font-family:'Segoe UI';-inkscape-font-specification:'Segoe UI';text-align:center;opacity:1;vector-effect:none;fill:#000000;fill-opacity:1;stroke:none;stroke-width:0.26458332;stroke-linecap:butt;stroke-linejoin:miter;stroke-miterlimit:4;stroke-dasharray:none;stroke-dashoffset:0;stroke-opacity:1" x="329.70169" y="328.74991" id="labelConsoChateau1" inkscape:label="labelConsoChateau1"> <tspan id="tspan4644" sodipodi:role="line" x="329.70169" y="328.74991" style="font-size:4.23333311px;line-height:1.25;font-family:'Segoe UI';-inkscape-font-specification:'Segoe UI';text-align:center;vector-effect:none;fill:#000000;fill-opacity:1;stroke:none;stroke-width:0.26458332;stroke-linecap:butt;stroke-linejoin:miter;stroke-miterlimit:4;stroke-dasharray:none;stroke-dashoffset:0;stroke-opacity:1">Château 1</tspan></text> was converted to <g id="labelConsoChateau1"> <g> <text x="931.07px" y="1120.6px" style="font-family:'SegoeUI', 'Segoe UI', sans-serif;font-size:16px;">Châte</text> </g> <g> <text x="971.96px" y="1120.6px" style="font-family:'SegoeUI', 'Segoe UI', sans-serif;font-size:16px;">au 1</text> </g> </g> after some modification in Affinity I also found that the ids from the text are often put to a parent group created by Affinity during the export
 -
 Select the group, then drag the outer handle at the bottom right corner of the selection (the handle that seems to be floating outside of the rest of the box). Note that when you do that, currently Affinity apps do not display the scale factor in the UI, so you have no idea if and by how much a text frame is scaled. This weakness has been often bemoaned on the forums, and indeed it can lead to some confusing results with linked text boxes. I understand your preference for numerical scaling (which I generally share). Unfortunately, I do not know how you can scale numerically (as a single operation) in a way that text scales as well. Off the top of my head, if absolutely I absolutely needed that, this cumbersome workaround might do the trick: Duplicate the group. Resize the copied group numerically (the text will not be resized). With snapping turned on, drag the outer handle of the original group until its size snaps to the duplicate. Delete the duplicate. Anyone with a better idea? Anyway, the request for improvement in this area seems valid to me.
 -
 You have to select all layers inside the group, go to Character panel and change the font size. Please note: You have to select the single layers of the group and not the layer (possibly called) group and you can only set one font size for all text layers. Unfortunately percentage won't work here.
 -
 Hi @sbe, Currently that's not possible since it will reflow the text in the text frames. In those cases place a guide to be used as reference point/limit for where the group should scale to (or use an rectangle to decide the area you would like the group fill in), then use the detached handle of the selected group to increase the size up to the guide (or up to the boundaries of the rectangle). Make sure snap to guides (or snap to object bounding boxes in the case of the rectangle) is enabled in the Snapping Manager.
 -
Number four is something I never use. It is for pretty much everything that can be drawn on a page. I set up a Group style for broad categories, there is the Base which I use for the Paragraph Style which will take up most of the publication. Headings gets its own Group. Captions, Notes, Tables, Pull Quotes/Callouts, Tables of Contents, Index, Bibliography.... may all get their own Groups. These are groups of text that are going to be sufficiently different from each other that it is worth my while to set them up so I can easily play with fonts size spacing and weight etc. and know the only those styles in the that group are going to changed. Each Paragraph Style within a group may have only one thing changed, most of the changes will be in the spacing section First Line Indent, Space Before or After, then there is the flow section Start at ... Keep together, Keep with next x lines.... Groups have pretty much everything set explicitly and then the Paragraph and Character Styles will have very little to change. For example the Character Style Italic has no change for everything except for the fact that the Italic checkbox is ticked, Bold only has the Font Weight set to Bold, everything else is set to inherit. Magazines may have no use for Groups beyond a Base as all the Articles will have one Main-text style, Heading style, caption style which are unique to that article.
-
Here is how to reproduce: Add a line Add a stroke and extremely large arrowheads to it (eg. the Bar type at maximum size) Add an Art Text layer Mess with Constraints and create a symbol (Constraint Group) from both Now the arrowheads are not taken into account in the bounding box computation and appear clipped. Additionally, maximum size for the Bar arrowheads is capped at 500%, even when higher values are typed into the text input field. In certain instances, this can be too small. Same on both Mac and Windows.
-
 Hi carlos santana Unfortunately Affinity Designer doesn't have the option to Split paths into grids, nor does it currently support Warp features such as Wave. You could create this effect manually, I've attached a screen recording of my steps taken below - Create your text (make sure it has a fill & a stroke) Draw a rectangle that surrounds the text (make sure this has no fill or stroke) Select your text, then use Convert to Curves on the Context toolbar. Ungroup the newly created group, which should select these curves. Go to Layer>Expand Stroke Delete the 'fills' from the text, leaving behind the outlines only. Select the previously drawn rectangle and in the Height box of the Transform Studio type /10 (this will divide the height by 10) Duplicate this smaller rectangle (CTRL/CMD+J) and move it downwards, snapping to the outline above it Without deselecting duplicate the object again using the shortcut, you should find that Power Duplicate automatically carries over the transform function, meaning this third rectangle is below the second. Repeat the above step until you have 10 rectangles, these should equal the same size as the original rectangle. Select the Curves which make up your text and group these. Select both this group and the rectangles and group these all together. Duplicate the group and move the text upwards Select the bottom rectangle and delete it. Select the rest of your rectangles and use the Add boolean operation to combine them into one shape. Give this rectangle a fill (any colour will do, but an object without a fill cannot be used as a layer mask) Drag and drop the filled rectangle onto the thumbnail of the grouped text, you should see the following indicating the rectangle will be clipped & masked to the group layer - Repeat the above process, deleting an additional rectangle per copy. 2019-09-16 12-48-31.mp4
-

Make Scale with Object a default setting?
Bespired replied to thisldo's topic in Older Feedback & Suggestion Posts
Okay. So now I want to copy one drawing to another page with other drawings. Thanks to poor GUI design I now have to spent my afternoon selecting all curves one by one, tick the stroke pulldown, tap the "scale to object" checkbox. So my transform "tool" will visually scale te drawing to the size I need it in to match the other objects. And no, making a transform group does not help, the text stays the same size. I now need to go in and change the font sizes of all text one by one. I can't beging to describe how bad GUI design this is.