Search the Community
Showing results for 'ROMM RGB'.
-

pictures too dark in develop persona preview
Chris B replied to Martin Liam's topic in V1 Bugs found on Windows
@Fritz_H - ROMM RGB is a wide gamut profile. Do you have a wide gamut capable monitor? If not, I'd recommend switching back to sRGB. Your Histogram will likely look correct then. @ALe5 - Have you checked your 32 bit panel to make sure you aren't set to Unmangaged? Did you resetting the app as mentioned in my first post. Please attach one of your images so we can try and replicate this. It might be the environment or an actual improvement that needs to be made. -

pictures too dark in develop persona preview
Fritz_H replied to Martin Liam's topic in V1 Bugs found on Windows
@Ron P. I downloaded the .NEF - File provided by @Sunshine1868 On his/her screenshot the small preview in the "Navigator" is fine, the main-view (?) is far too dark. His/her histogram looks like this: On my Computer the file is shown properly but compare the histograms! (same RAW-File, no changes, no automatic whatever..) 1.) the histograms and the figures below the histos are completely different - why? If judged only by the histogram my display should be too dark - but it isn´t. 2.) my histogram is far less spread. ?? perhaps because my RBG-Profile-Settings are both ROMM RGB ? kind regards Fritz
-
 With the View Tool (the hand) selected, what values do you see in the Context Toolbar for each document's color mode and ICC profile? I suspect that one will show sRGB as my example above does, but the other will have a different ICC profile, possibly Adobe RGB or ROMM RGB.
- 2 replies
-
- 1
-

-
- rgb
- rgb color space
- (and 4 more)
-
 Hi everyone, I'm still very new and am having an issue with photos exported from Affinity Photo. Everything looks great locally, but after uploading to my website the images look much darker. What am I doing incorrectly? My document settings are RGB/8 and ROMM RGB Thanks so much in advance for the help, I really appreciate it.
 -

Lurid Green images
smadell replied to DaveyTee's topic in Pre-V2 Archive of Affinity on Desktop Questions (macOS and Windows)
Here's something else to look at: Open one of the images that turns green when Affinity Photo opens it. Make sure the Hand tool is selected, and check the "Context Toolbar" just under the Toolbar. This should give you the size of the image, the color format (e.g., RGB 16), and most importantly the Color Profile that the document is using. What color profile is the document using? If the document is set to anything other than sRGB, Adobe RGB, or possibly ProPhoto or ROMM, you should choose "Assign ICC Profile..." from the Document menu and assign the photo the sRGB profile (for simplicity sake). Does that help anything? By the way, DON"T choose "Convert ICC Profile" - make sure you choose "ASSIGN ICC Profile" when you do this. If that was the problem, go the the Affinity Photo Preferences and choose the COLOR tab. Make sure that the RGB Profile (the topmost choice) is set the sRGB or Adobe RGB, because that may be where the problem is/was. -
 According to the manual it should be possible to set a color profile when exporting a document. However, I have found no such setting. It should also be possible to create an export setting that includes a color profile, but I can’t find that setting either. The whole color profiling is a bit mysterious for me. Of course I do understand what it is used for, but how all the settings interact is less understandable. At the moment when I develop a raw image, I will use the RGBA/32 (HDR) ROMM RGB setting. As far as I understand this will guarantee that I will keep the maximum color information in the document. When exporting the document I should give it a color profile that corresponds to the use of the exported document. sRGB should be fine for web images, a color profile for Fuji paper (for instance) when I export a JPG to be printed. Using such profiles will remove color information, so I understand. When I visited the website of the European Color Initiative, I noticed that they have the eciRGB profiles for digital photography, however these are not incorporated in the standard Affinity software. (I did install them). I’m still trying to find some kind of publication that will explain how color profiles for monitors, printers, and documents (“JPG” etc.) interact.
 -
.thumb.jpeg.6f143e8223547aba974205ef53397036.jpeg) Hi @grunnvms, as @Murfee mentioned above you can choose a colour profile on export under the More options dialog. I'm not so sure about converting to a Fuji paper profile on export, however—my understanding is that you should use that during the print process (via the print dialog) for print colour management. E.g. on Mac, you have the choice of using printer colour management or ColorSync. With the latter, you can specify a colour profile, and that's where you would use the paper profile. You can always preview the effect of the paper profile by using a Soft Proof adjustment layer, but don't forget to hide/disable it before exporting your image. Finally, I would recommend against using 32-bit unless you have a specific need for it. By all means, use ROMM RGB to avoid clipping colour values (and then export to sRGB for web), but 32-bit is a linear compositing format as opposed to nonlinear. This means adjustments, filters and tools that perform tonal modifications will behave differently. Because 32-bit is unbounded, you can also run into issues when using certain adjustments or blend modes that do not clamp properly (although we're working on making this more user friendly). Improper clamping may result in NaNs (not a number) rather than colour values, or negative values, both of which may cause issues when converting to a bounded format on export. Unless you work predominantly with HDR imagery, 3D renders or astrophotography, I would advise staying away from 32-bit, 16-bit will give you more than enough precision for 99% of image editing cases. Maybe this article on Spotlight might be worth a read if you're trying to figure out colour profiles and colour management? https://affinityspotlight.com/article/display-colour-management-in-the-affinity-apps/ Hope the above helps!
Hi @grunnvms, as @Murfee mentioned above you can choose a colour profile on export under the More options dialog. I'm not so sure about converting to a Fuji paper profile on export, however—my understanding is that you should use that during the print process (via the print dialog) for print colour management. E.g. on Mac, you have the choice of using printer colour management or ColorSync. With the latter, you can specify a colour profile, and that's where you would use the paper profile. You can always preview the effect of the paper profile by using a Soft Proof adjustment layer, but don't forget to hide/disable it before exporting your image. Finally, I would recommend against using 32-bit unless you have a specific need for it. By all means, use ROMM RGB to avoid clipping colour values (and then export to sRGB for web), but 32-bit is a linear compositing format as opposed to nonlinear. This means adjustments, filters and tools that perform tonal modifications will behave differently. Because 32-bit is unbounded, you can also run into issues when using certain adjustments or blend modes that do not clamp properly (although we're working on making this more user friendly). Improper clamping may result in NaNs (not a number) rather than colour values, or negative values, both of which may cause issues when converting to a bounded format on export. Unless you work predominantly with HDR imagery, 3D renders or astrophotography, I would advise staying away from 32-bit, 16-bit will give you more than enough precision for 99% of image editing cases. Maybe this article on Spotlight might be worth a read if you're trying to figure out colour profiles and colour management? https://affinityspotlight.com/article/display-colour-management-in-the-affinity-apps/ Hope the above helps! -
 I am sorry to get back to this old topic but, since my Dslr produces Adobe RGB RAW files, is it a waste to choose ROMM RGB (ProPhoto) as my Output Profile/Develop Persona? Should I choose Adobe RGB (1998) instead to develop my RAW files? The "Output" here is the Colour Space to output the RAW file from that specific Develop Persona? The same question for the Photo Persona; do I need to Convert or Assign the same ICC Profile as the chosen one from the Develop Persona? Or the Photo Persona uses the Output Profile from the Develop choices? Thanks.
 -
Jon, you likely can reproduce it if your RGB profile was also set to ROMM RGB profile used in Chrisw5's set up. That's probably the cause of the issue. This is a screen shot using sRGB as the Convert profile as it displays in my PDF.
-

[1.6.0.74] Wrong fill colour
Alfred replied to Alfred's topic in [ARCHIVE] Designer beta on Windows threads
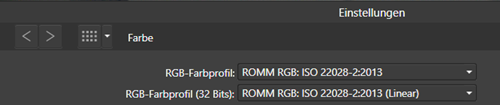
Thanks, Mark. My new document in AD – where I originally saw the effect – had a non-sRGB colour profile (ROMM RGB: ISO 22928-2:2013) set for the document. My new document in APh – where I didn't see the effect – was set to sRGB IEC61966-2.1; changing this to ROMM RGB: ISO 22928-2:2013 makes the same problem show up (and changing the colour profile to sRGB IEC61966-2.1 in AD makes the problem go away). -
 Sorry but I'm still slightly confused ~ so fill in the blanks for me ~ So, I load a RAW file into Affinity Photo in the 'Develop Persona' - Question 1 ~ What Profile do/ should I choose at this point sRGB 1EC61966-21 - ProPhoto RGB or ROMM RGB or One, which I have calibrated for my iMac using an i1Studio calibrator Next - I finish Developing my RAW File and I transfer it to the 'Photo Persona' where I carry out adjustments until I am happy. When happy I go to File ⇢New where upon a New Document Dialogue box appears… So, at this point… Question 2 ~ What should already be in the Colour Format & Colour Profile boxes? Question 3 ~ Do I need to change the Colour Profile to one of the previously mentioned Profiles or a completely different icc? - (I have a Canon iP8750 Printer & I use either Photo Paper Plus Glossy II or a 3rd Party equivalent). If I have the answers to the above questions then I simply copy and paste my image into the New Document ⇢ Then ⇢ Go to File ⇢ & follow Printing procedure. Hopefully this is now much clearer to answer. Thank you in advance Digby.
 -
 Looking at your Affinity Colour Chooser dialogue, it looks like the Affinity Designer document’s colour profile is ProPhoto RGB, rather than sRGB—which is likely where the discrepancy is between the third-party colour picker. If you go to the ‘Info’ panel, does it show the document colour profile as ‘RGBA/8 - ROMM RGB…’ at the bottom of the panel? Edit: Thinking about it, I'm not sure that Affinity Designer has an ‘Info’ panel like Affinity Photo does, so perhaps File > Document Setup to bring up the document settings and look at the document 'Colour Profile' listed there.
 -
 I am confused by quite a few things. Not the least of them is, for the _DSC6609.afphoto file I downloaded from Dropbox, what happens to the document's colors when I convert it from the original RGB (16 bit) color format to the RGB (8 bit) one without changing anything else about it, & when I do the same after flattening it. Histograms for each: In all cases, the color profile remains ROMM RGB, but as you can see something odd happens when the color format is changed, & without flattening the file the Affinity Photo histogram does not even show the correct number of pixels for the 6016 x 4016 px file.
-

poor quality JPEG export
Richard Liu replied to Martin Feiss's topic in Feedback for Affinity Photo V1 on Desktop
My problem: I am developing and processing NEF (Nikon RAW) files in Affinity Photo, then exporting them as JPEG to upload them to a site to which a professional photographer and fellow students have access. The JPEGs are poor, not what I expected judging by what Affinity Photo displays. Colors are a bit pale, images aren't as sharp, and in some cases the exported photo seems "milky," as when viewed through a slight veil. I am including two screen shots, but they make the discrepancies seem minor. Preview_on_AP_aphoto depicts a JPEG (left) produced by Affinity Photo (left). The JPEG is being displayed by Apple's Preview app, whose window I moved over Affinity Photo before making the screen shot with Grab. After opening the JPEG in Affinity Photo, I wanted to display it side-by-side with the pipeline that produced it. That isn't possible, so I made a screen shot of the JPEG being displayed in Affinity Photo, displayed it in Grab, moved the Grab window over Affinity Photo displaying the original, and made a screen shot of that. That's Grab_on_AP_aphoto. The imported JPEG does not look nearly as sharp and "snappy" as the original. I also flattened the whole pipeline. The resulting pixel layer seemed to lose something in the process, sort of like the JPEG after importing it into Photo. That might explain why neither the file type nor the sampling method seemed to make much difference. The results are poor. Finally, here a longish summary of my experience, my equipment, and how I use Affinity Photo. Setup Nikon D7200 Shooting NEF (Nikon RAW) + JPEG Profile Adobe RGB Picture control Neutral MacBook Pro (17-inch, Late 2011, model ID MacBookPro8,3) 2 TB SSD, 16 GB RAM macOS Sierra 10.12.6 Apple Thunderbolt Display (27-inch) Both monitors calibrated to D50 L-Star 160 cd/m² Software basICColor display Hardware Xrite i1|Display Pro Affinity Photo 1.6.7 Minimal processing in Develop Persona Configuration of Assistant RAW Engine: Serif Labs Lens corrections: Apply lens corrections Noise reduction: Apply colour reduction RAW output format: RGB (32 bit HDR) Tone curve: Take no action Exposure bias: Apply exposure bias as initial state Processing Basic: Pull as much detail from NEF onto histogram Exposure: usually only Blackpoint (-5% or so) and Brightness (up to 20%) Shadows & Highlights: Prevent clipping of highlights and shadows Profile: ROMM RGB: ISO 22028-2-2013 (Linear) Lens: All except Post Crop Vignette Details: Detail Refinement: Usually Radius 50%, Amount 30% Noise Reduction: Usually as is, sometimes Luminance ca. 40% Noise Addition: When Luminance Reduction performed, ca. 3 - 5% Gaussian Main processing in Photo Persona Adjustments Levels White Balance HSL, Shift Brightness/Contrast Vibrance Exposure Shadows/Highlights Curves For printing Adjustments to prevent clipping in printer/paper color space Soft Proof Canon ImagePROGRAF PRO-1000 Profile supplied by Canon for above printer and paper that I intend to use Live Filters (in which order are these executed, does order matter?) Clarity High Pass Unsharp Mask Rarely: Denoise + Add Noise for luminance noise Me (Yep, I’m an integral part of the “setup”) and photography 2003 - 2011: snapshots with various pocket cameras 2011 - 2016: first DSLR, Nikon D7000 Mostly JPEGs NEF + RAW for special courses and projects 2013 - present: father’s Leica M3 + 35, 50 and 135 mm lenses I only shoot black-and-white with the Leica One month Ilford XP 2 Super chromogenic so film could be developed and printed on color equipment at specialty shops Two months Ilford Delta 100 developed (carelessly) by a professional Since the so-called professional ruined a film, I have developed at home and enlarged in an equipped studio. I scan negatives to digital as a backup. I have not yet begun to process them digitally to print. 2016 - present: successor, Nikon D7200 NEF + JPEG Decided against full frame DSLR: Lenses too heavy to carry up mountains. 2018-07: Affinity Photo First exposure to developing NEF No previous experience with Photoshop, Lightroom, etc. Have used Apple’s iPhoto to catalog and view photos to modify photos (ever so occasionally) Interested in landscape, architecture and available light photography Thanks Preview_on_AP_aphoto.tiff Grab_on_AP_aphoto.tiff -
Profil « Pro Photo »
R C-R replied to eegler's topic in Pre-V2 Archive of Affinity on Desktop Questions (macOS and Windows)
I don't have an iPad that will run AP so I am not sure if it includes this, but if you have a choice identified as "ROMM RGB," perhaps with an ISO suffix, that is just another name for the ProPhoto profile. (ROMM stands for Reference Output Medium Metric.) -
There have been topics posted about this already, and the bug has been acknowleged. The Develop process, when developing to RGB/16, is assigning a linear ICC profile rather than the proper profile. If you check the context menu in Photo Persona you'll see it says "ROMM RGB ISO... (Linear)". Until the bug is fixed you can go to Document > Assign ICC Profile... and assign the non-linear version of the profile.
-
 Hi laurentia, The unbounded space is a full-float linear RGB space with our own primaries - although, because the RGB values are floating point and can happily be < 0.0 and > 1.0, the primaries are (generally) irrelevant - nothing is ever lost. For some stages in the pipeline, we need to switch to a non-linear space.. For this, we use something very similar to ProPhoto (ROMM). It's pretty much impossible for anything captured by a sensor to fall outside of the ROMM primaries, even after exposure / black correction - but because gamma response curves are naturally bounded by 0.0 and 1.0, we will throw away data outside those bounds. The only truly "lossy" part is when you hit develop at the end - we will convert into whatever "Output Profile" you have chosen in the Develop Persona (this should default to whatever you have set in Preferences). If you want to retain the full unbounded quality of the image, I recommend setting "32-bit" output in the Develop Assistant. We're confident that what we have done here is a good thing - we get better results with this develop pipeline than the previous 1.4 version (by a lot) - but we're certainly willing to listen if anyone has any queries or suggestions! Hope this helps, Andy.
 -
 Sad but looks to be true, I recall the bug report thread about that theme! - So talking here about using Adobe RGB or ROMM RGB in the Develop Persona is actually pretty meaningless.
 -
Hi, I think I have the same question as @kwebble. I am uploading a .NEF, an .aphoto and its corresponding .jpg, and a .dop and its corresponding _DxO.jpg (Archive.zip) and would like to ask the forum what I can do to make the .aphoto more similar to the .dop. Technical background: Affinity Photo 1.6.7, DxO Photo Lab 2 2.1.1 build 17, macOS 10.13.6 running on 2018 MacBook Pro 15". Photo: Taken Dec. 6, 2018 at 16:11 from one of the two towers of the Basel cathedral. It had rained off and on the whole day, the sky was just clearing and the sun just setting. The camera is configured to use Adobe RGB. Affinity Photo is configured to use ROMM RGB. The .afphoto seems "muddy," particularly in the foreground, and lacks the "punch" of the .dop. I am sure that most of the difference can be attributed to my inexperience. Affinity Photo is configured not to use a tone curve when importing a RAW file. In the Develop persona I do some minimal sharpening, tame blown out highlights and try to "spread" the histogram. In the Photo persona I try to first get the colors right before I mess with sharpening, but invariably find that I spend more time on sharpening. Photos like this one stand to benefit from dehazing, but dehazing and sharpening seem to introduce enough visible noise that avoiding and/or mitigating it soon becomes important. I hesitate to use DxO as a substitute for Affinity Photo's Develop persona. I tried exporting from DxO to .DNG, and importing it to Affinity Photo. Yes, the file was recognized as RAW, but it bore little resemblance to what I was seeing in DxO when I exported it. A mix-and-match approach to developing RAW "film" and "printing" "negatives," although perhaps logical, would seem to be fraught with pitfalls. Thanks in advance.
-
Another name for ProPhoto RGB is ROMM RGB. https://en.wikipedia.org/wiki/ProPhoto_RGB_color_space
-
Hi, I took advantage of Black Friday sales to purchase DxO's Nik collection. I followed the installation instructions for installing the plugins into Affinity Photo. They show up Preferences > Photoshop Plugins, "Allow 'Unknown' plugins to be used" is checked, "/" is in Plugin Support Folders and "Authorize Global" is greyed out. When I select a pixel layer in the Photo Persona I can select only one of the plugins that appears in Filters > Plugins > Nik Collection, "HDR Efex Pro 2". All the others are greyed out and cannot be clicked, not even the two that have status "Working." HDR Efex Pro 2 did run when I clicked it. I am running Affinity Photo 1.6.7 on macOS 10.13.6 on a 2018 MacBook Pro 15" with Touch Bar & Touch ID. The pixel layer is "Background," generated by the Develop Persona. The file that was developed was a Nikon RAW (NEF) created on a D7200 using Adobe RGB. The Develop Persona uses the ROMM RGB profile for output. Neither Lightroom nor Photoshop is installed on the machine.
-
 Well, that's correct. I got sRGB in one document and ROMM RGB in the other, and I didn't recognize that. Thanks for your help!
- 2 replies
-
- 1
-

-
- rgb
- rgb color space
- (and 4 more)
-
 Hello, with me the "HDR from a picture" does not work, despite multiple exactly as in the instructional video (tutorial) made procedure. Development Assistant is set to 32bit HDR, but the RAW image (RW2 of FZ1000) does not allow it to be active in Studio HDR. But it is displayed as a field. Profile was also set to ROMM-RGB. What can be the mistake here? My System is WIN 10. Thanks for your help. Dieter Maybe move to error.
 -
 @αℓƒяє∂ A new document is made from FILE>NEW>OK. I selected web type, 1280x800, RGB/8,ROMM RGB profile. Go to LAYER>NEW LAYER. Select paint brush OPACITY=HARDNESS=FLOW=100 Click on the two overlapping circle color chooser on right top under color tab. The color chooser rectangle box pops up. I see Hue inside the selectable tab. Enter same value for R,G,B. I entered 0, 64, etc to creat a greyscale brush of this desired value. So, the value thus selected is for the brush greyscale.
 -
 @Friksel the ROMM RGB is automatically assigned when creating a image from the clipboard. The clipboard holds the screenshot and is created with Alt-PrintScreen with the program open.