
.jpeg.1b727463d44a0d52bc3499597e28d11c.jpeg)
James Ritson
-
Posts
855 -
Joined
-
Last visited
Posts posted by James Ritson
-
-
On 8/12/2020 at 9:06 AM, Roland Rick said:
Affinity Photo's Tone Map is awesome good and I use it on each of my landscape images. - It has only one thing to be complained, and that's the noise introduction.
If possible, it would be very welcome if that could be reduced in future versions. Thanks in advance!
Hey @Roland Rick, it's worth asking whether you are applying tone mapping following on from an HDR merge, or whether you're just applying it to single exposure images? A resultant HDR merge will typically be much cleaner (as it's equalising then merging exposures based on the most detailed pixel information), I'd be surprised if you were getting very noisy results from a bracketed set of images.
If you're tone mapping using single images it would make more sense that local contrast especially would bring out noise. If that's the case, have you tried the Clarity filter instead? It's not quite the same effect, but might be suitable for your requirements. You can use the destructive version (Filters>Sharpen>Clarity) which will let you apply it quite aggressively, or you can use it non-destructively (Layer>New Live Filter Layer>Sharpen>Clarity) which will apply it dynamically at the expense of overall strength (the effect will be less aggressive).
You may notice on the HDR Merge dialog there's an option for noise reduction–this is typically recommended when merging RAW images, so perhaps ensure this is enabled if that's what you are doing. With JPEGs however, there's typically some in-camera noise reduction that has already been applied, so I would avoid applying more noise reduction (although every camera is different, so always try for yourself!).
Hope that helps.
-
On 9/23/2020 at 7:20 PM, Zyl said:
I want color information to be saved in sRGB.
More precisely, I want all color blending operations to happen in linear RGB, and color display and export to happen in sRGB.
Embedding the correct color profile into the file is not sufficient, as converting every channel to byte is already a highly lossy operation.
How can I achieve this?
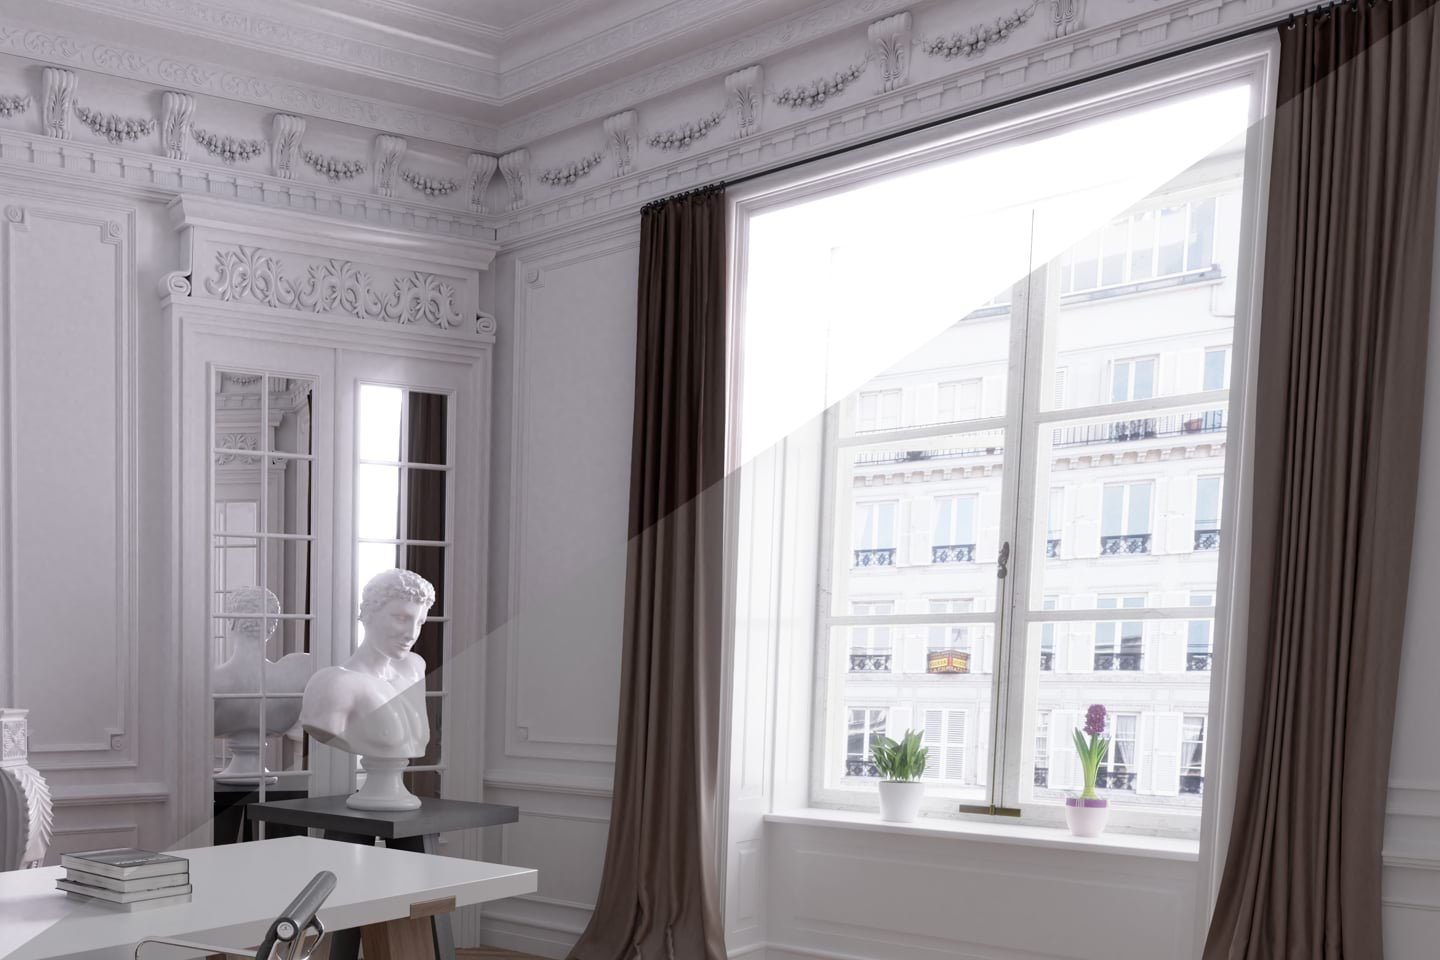
Apologies if I’ve misunderstood this, but couldn’t you just use 32-bit format for your document? 32-bit in all the apps uses linear compositing but has a gamma-corrected view transform applied non-destructively so the document view looks consistent with the exported result (as you would typically export to a non-linear format with gamma encoded values). You can toggle this behaviour on the 32-bit preview panel if you need the linear unmanaged view (or an OpenColorIO transform) but it defaults to ICC Display Transform which is the exact workflow you describe: all colour blending operations happen in linear space, with a final view transform to non-linear space.
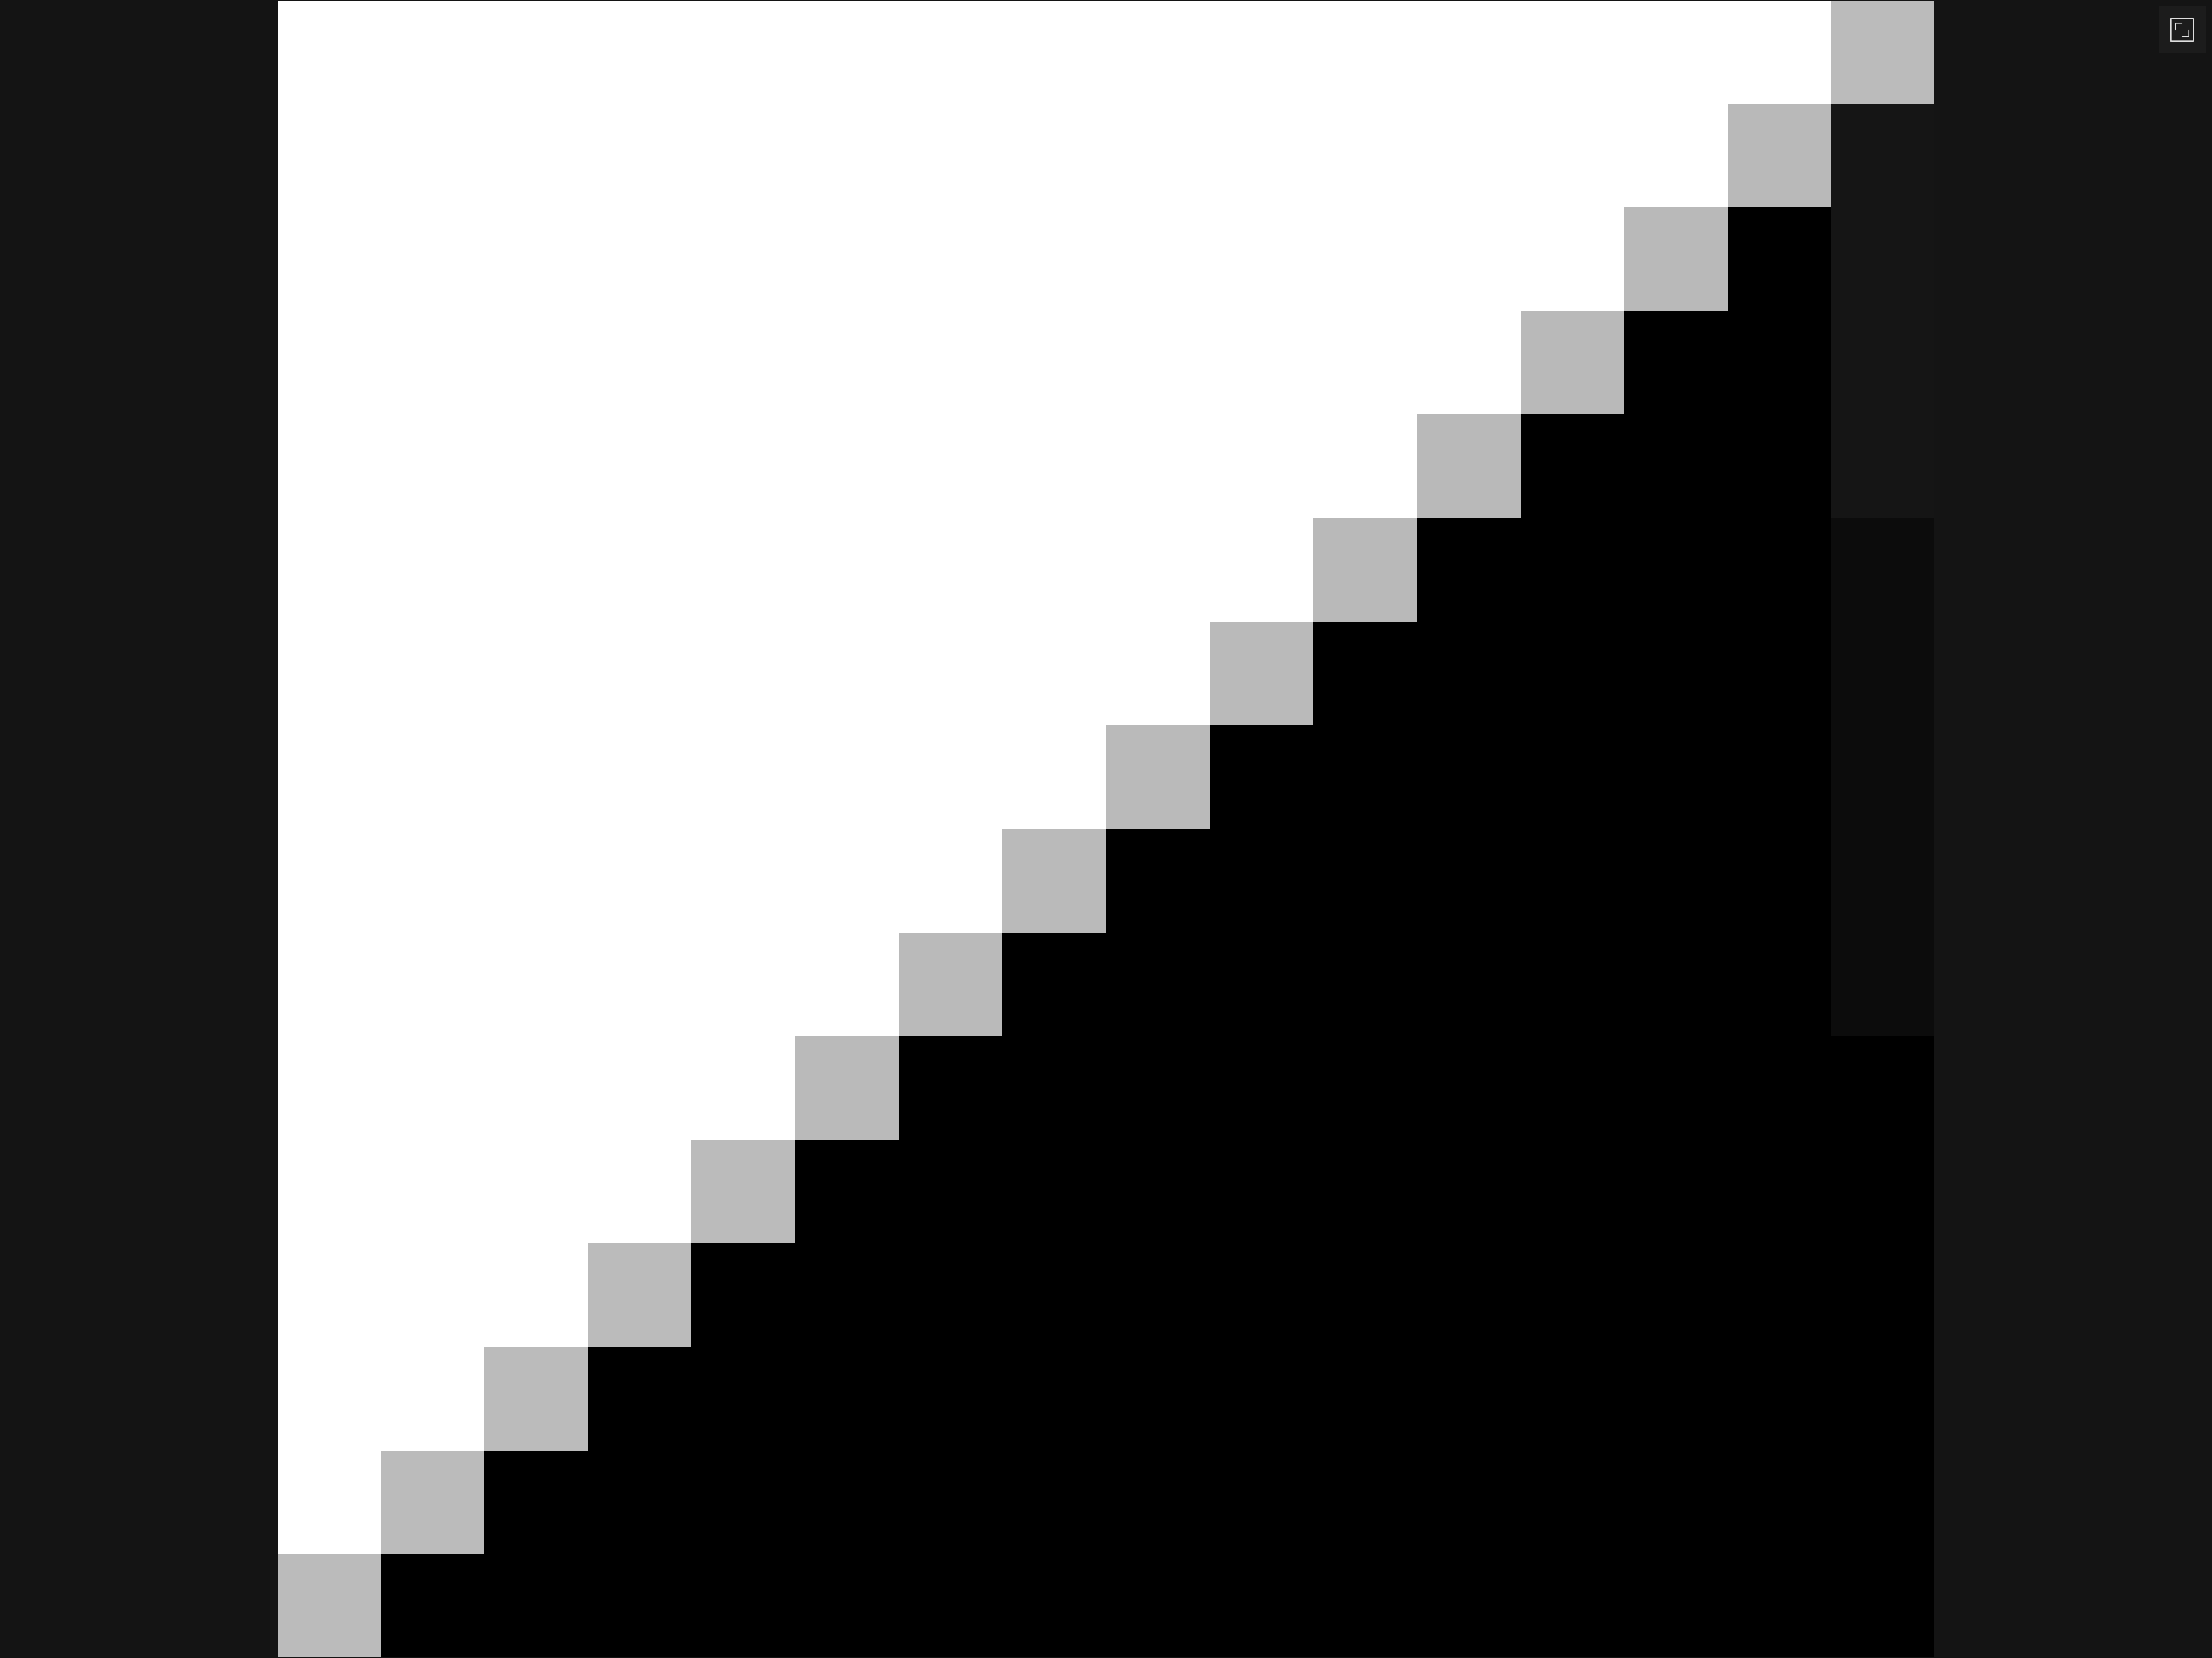
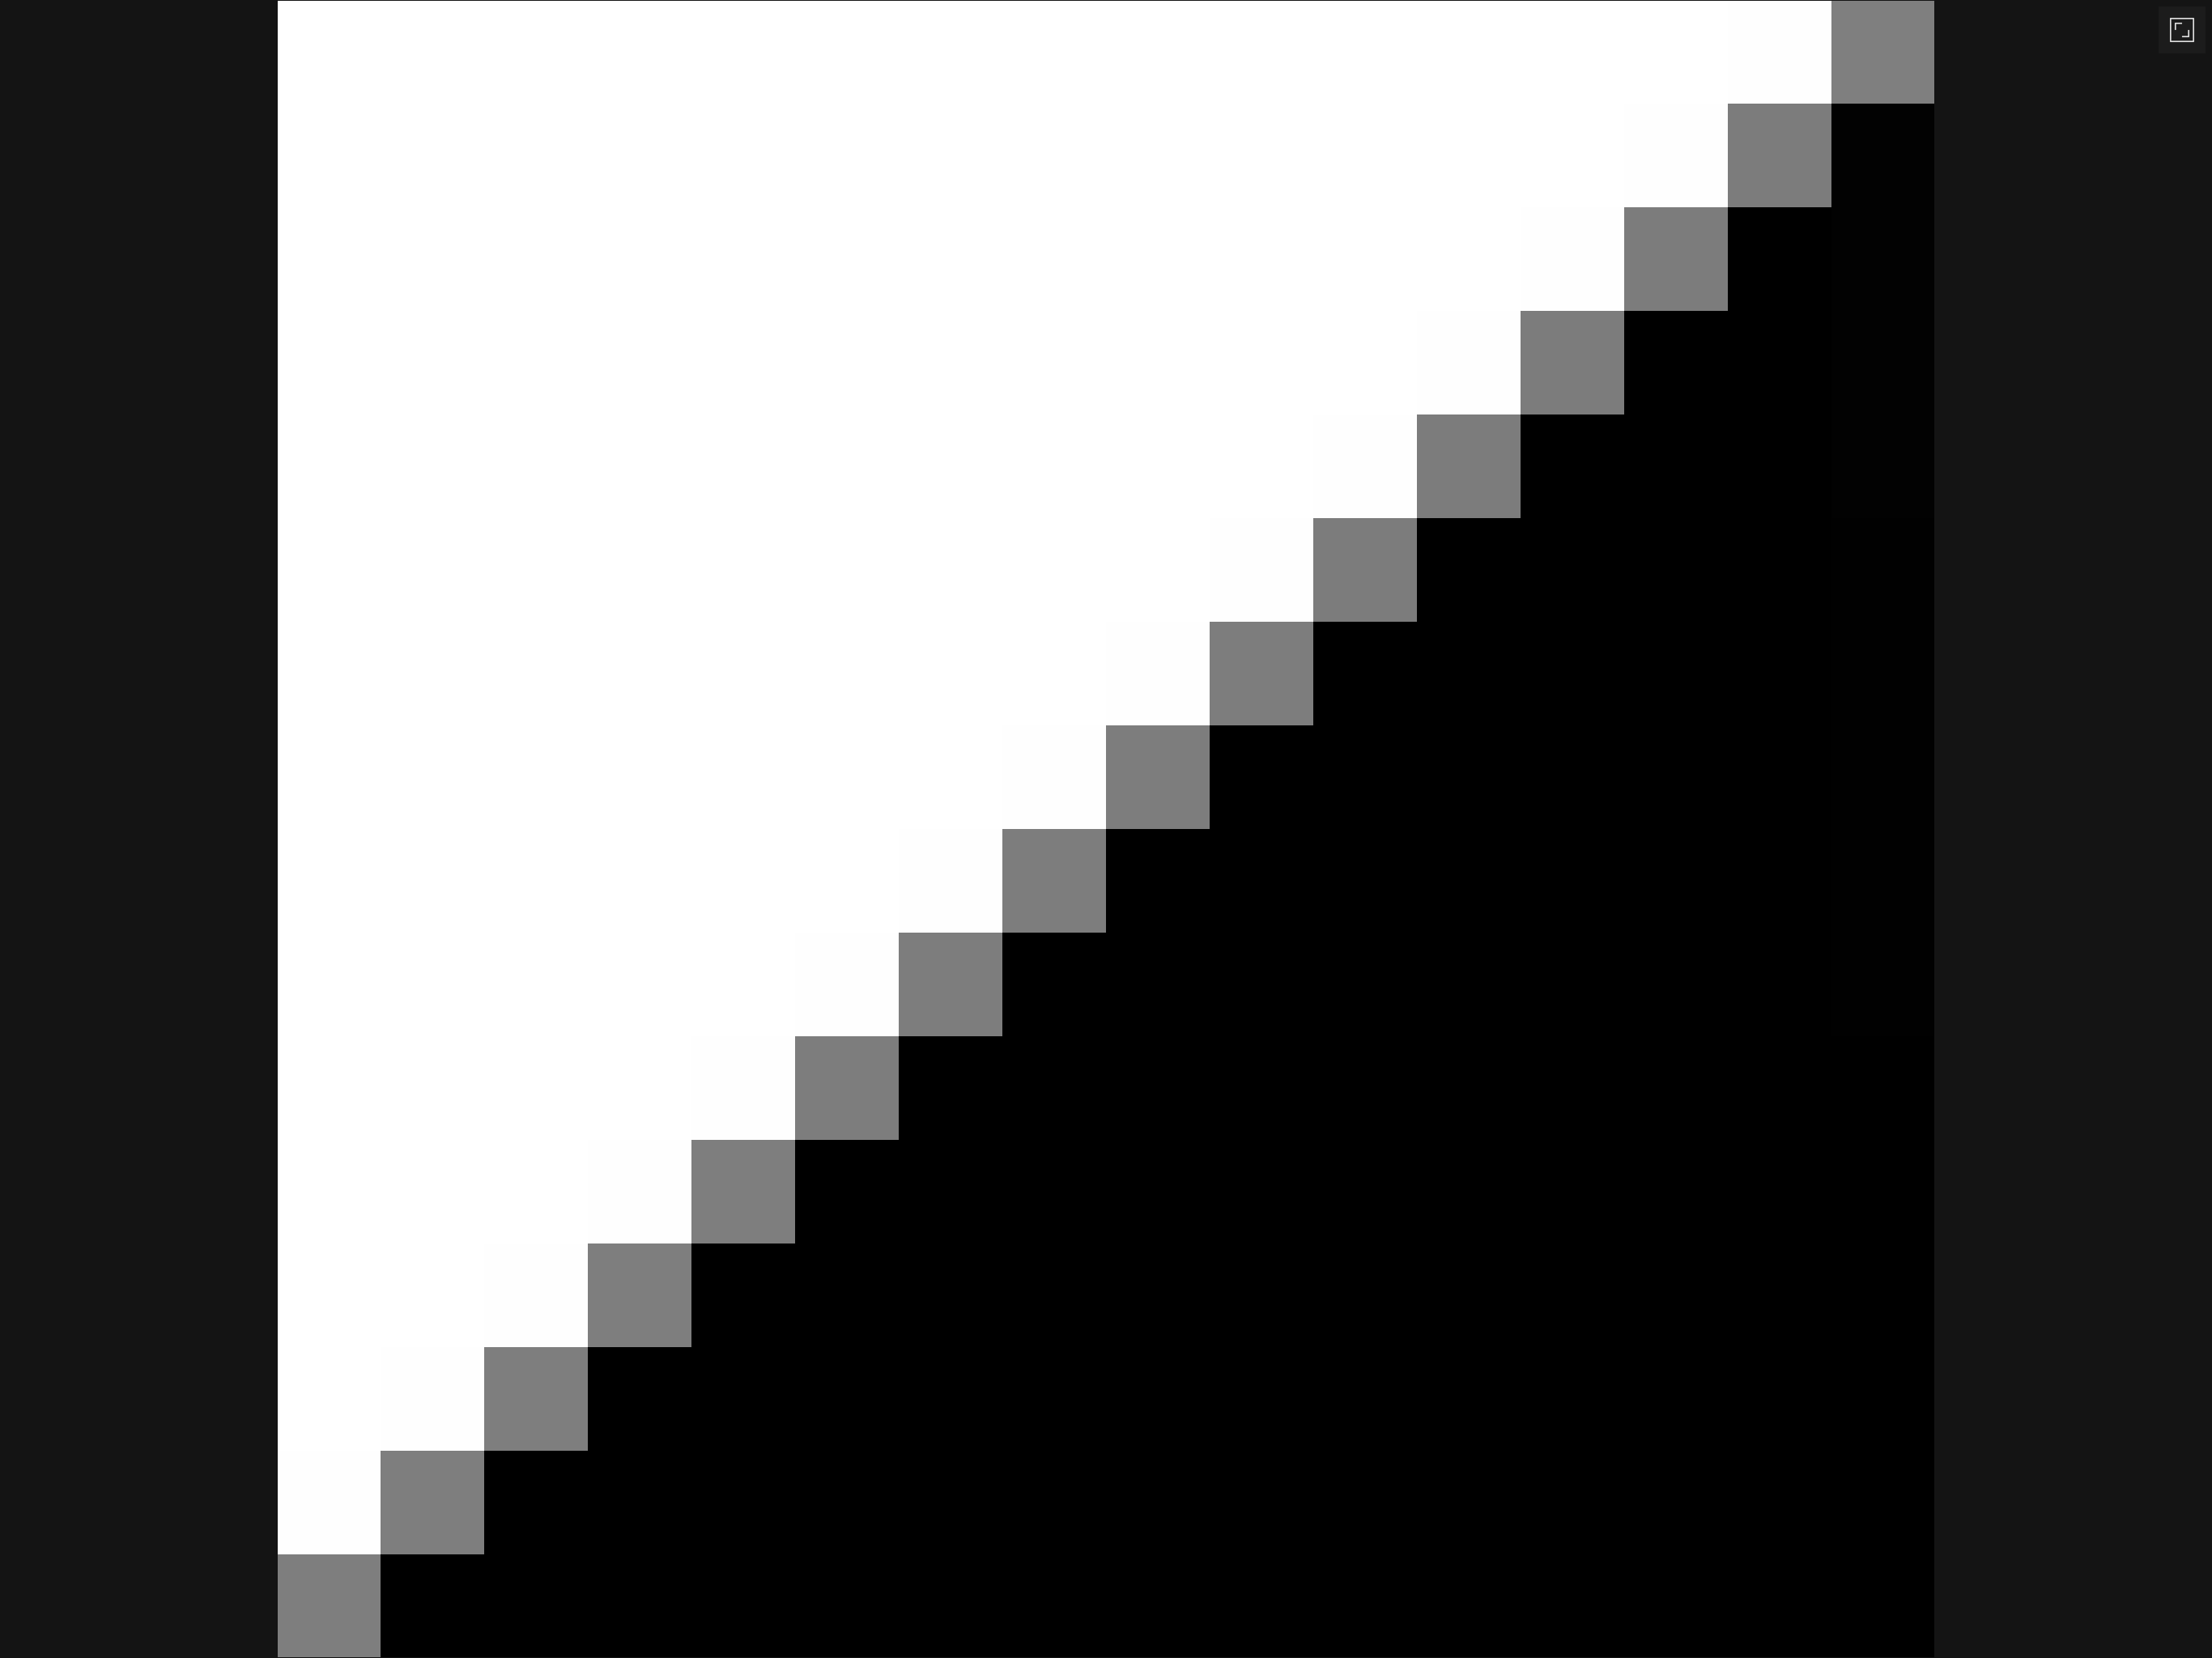
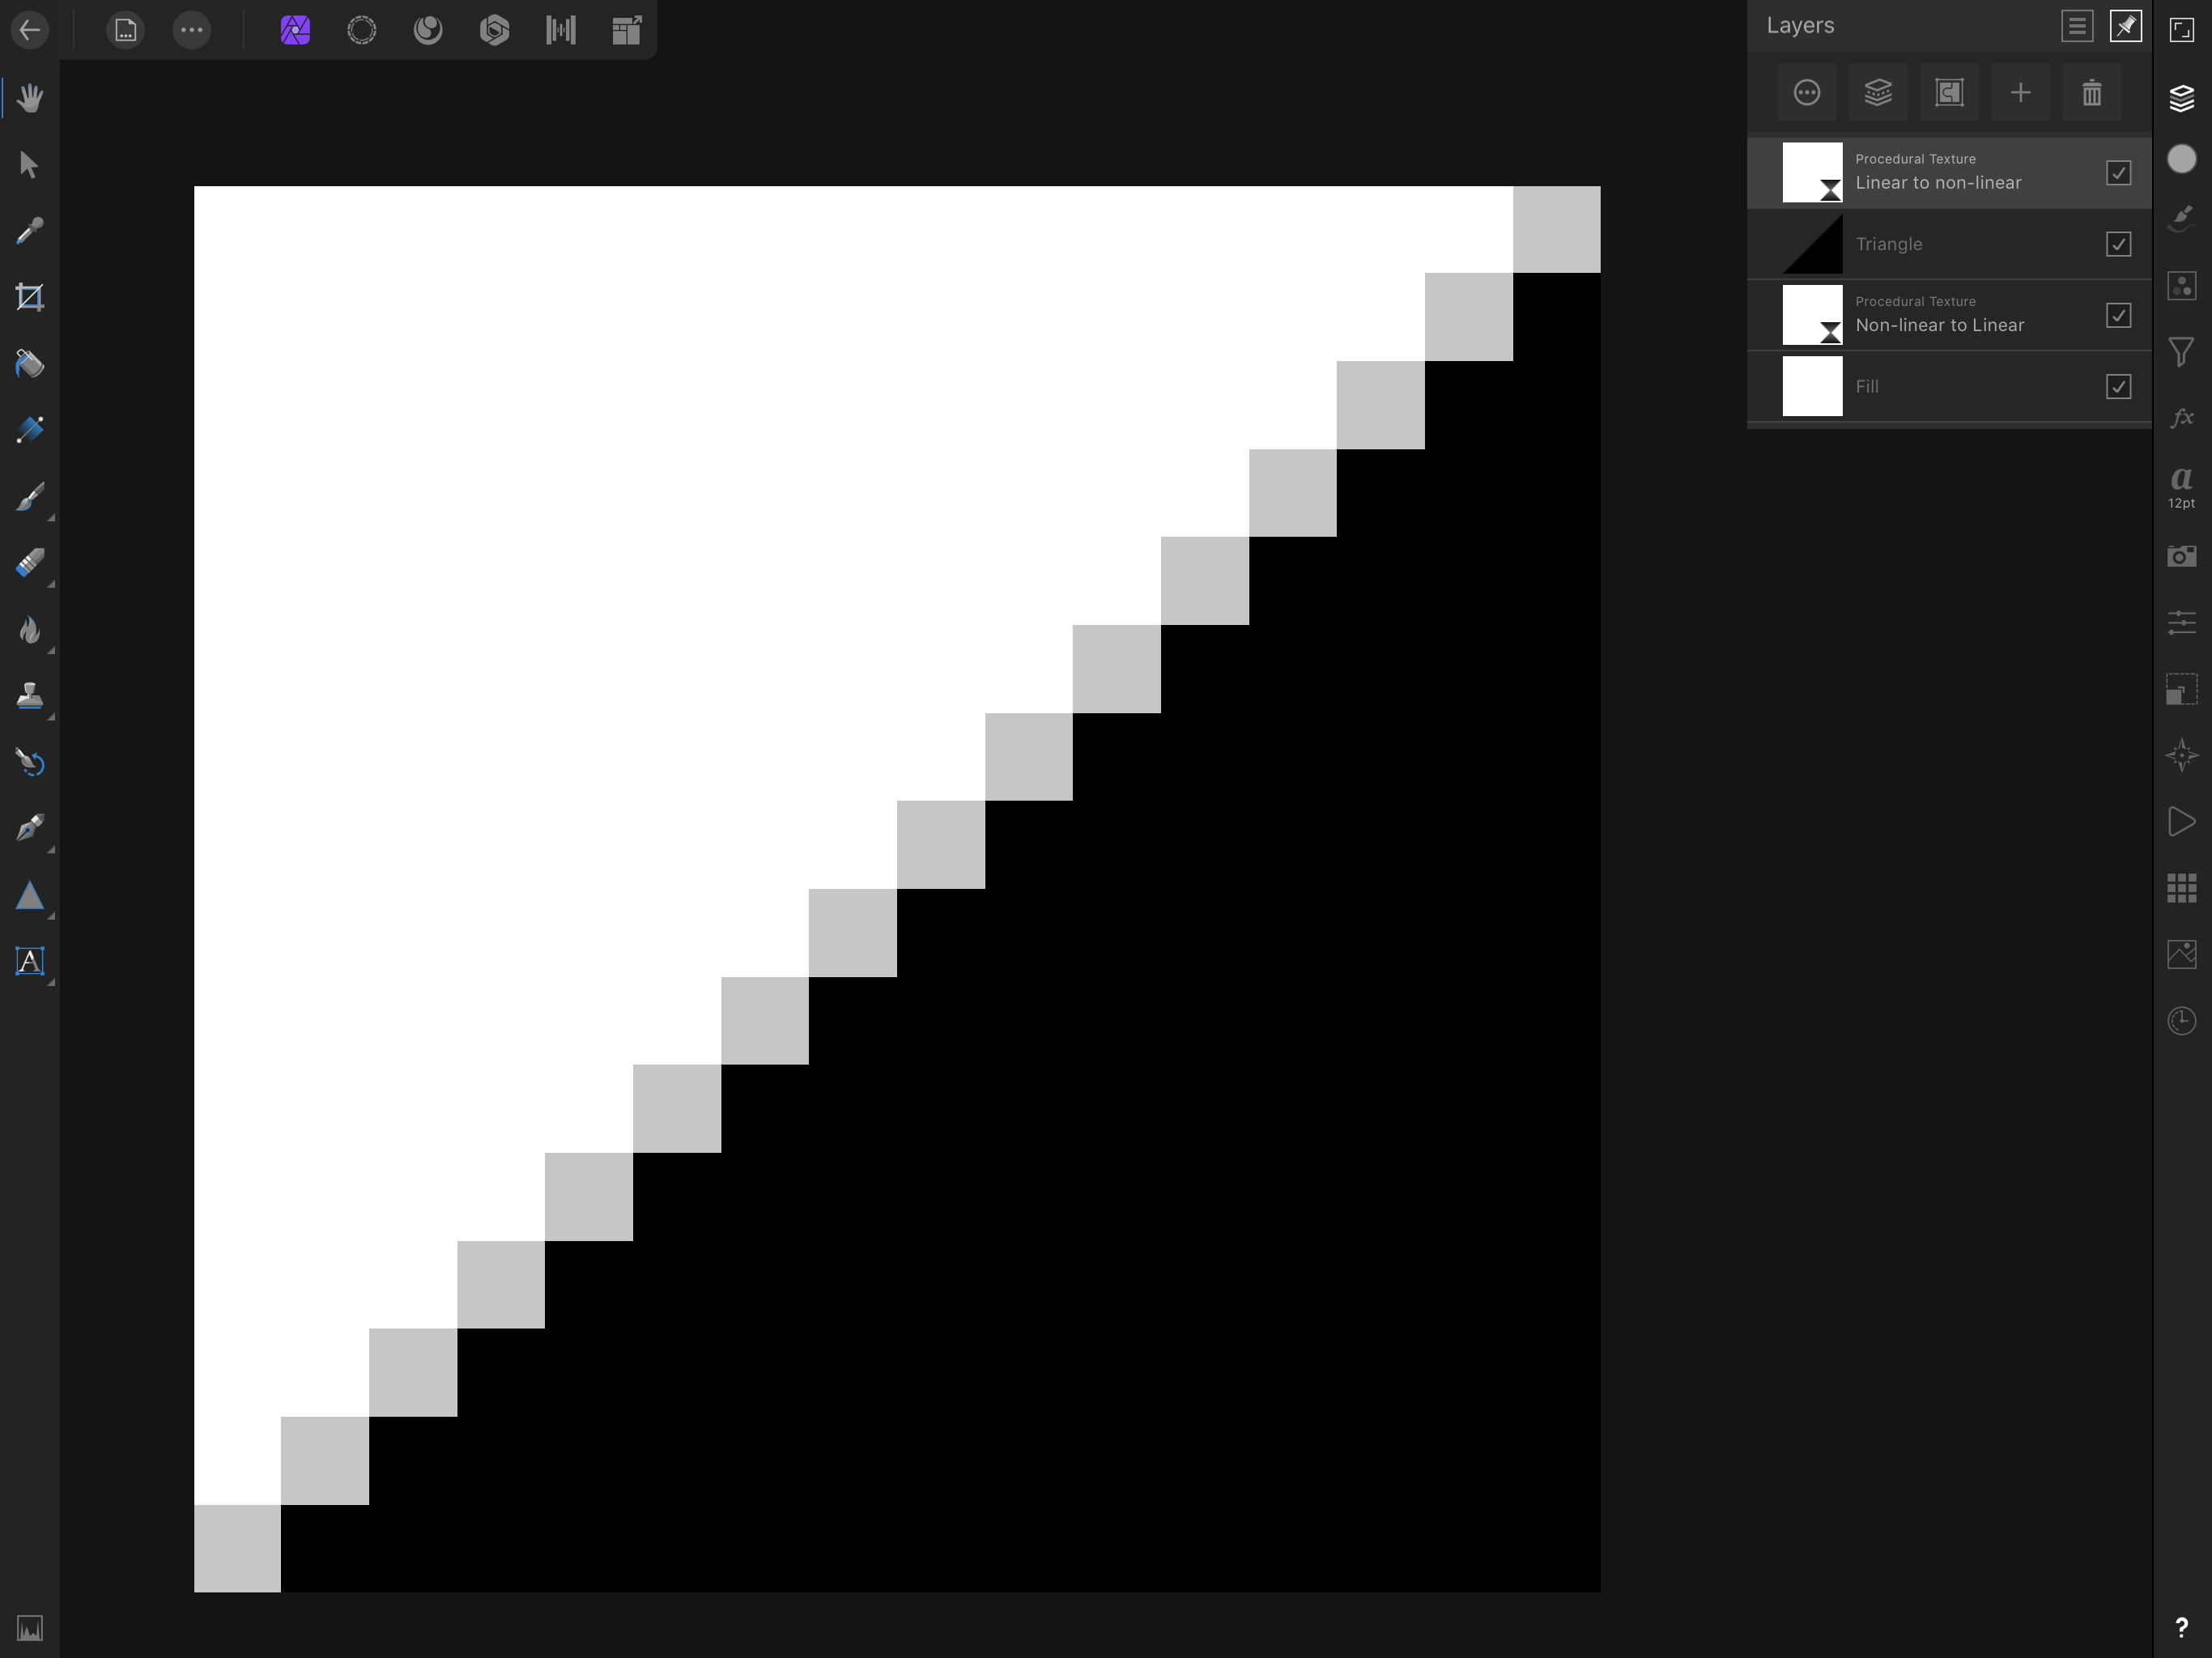
If you wanted linear compositing within a non-linear RGB document format (so 8-bit or 16-bit), you could approximate this by using two live Procedural Texture layers: one underneath the layers you wish to blend in linear space, and one above. The one beneath you would create equation fields for each channel and transform the channel value by 2.2 (e.g. R^2.2), then the one above you would transform by the reciprocal power value, so R^0.454 etc. Just an approximation, but perhaps close enough for your needs?
I’ve attached some screen grabs: I exported two 16x16 images with a black triangle—one composited in 32-bit, one in 16-bit. To visualise them, I loaded them back into Photo and screen grabbed the resulting document views:

Finally, here is a 16-bit non-linear sRGB document using the live Procedural Texture technique I mentioned above:
Hope that helps! -
Hi @stephen2020, Windows Photos is not colour managed so you may notice slight differences for sRGB colour space images—the difference you're seeing is more dramatic though. I noticed on your export settings dialog that the ICC Profile option is empty, which is strange as it should default to "Use document profile". Could you perhaps try and set this option then re-export and check again? Failing that, also try setting it to "sRGB IEC61966-2.1" and exporting.
Also, you may want to try previewing your images in a colour managed application—I'm not up to date with Windows solutions nowadays but you may want to try Irfanview (which I believe has optional colour management you can enable) or perhaps a web browser like Firefox which should colour manage with profile-tagged images by default.
Hope that helps!
-
22 hours ago, DQ_C said:
Sadly, my monitor does not support HDR so I can't use that particular feature yet, I am looking to change to a proper HDR10 one but they're expensive. The proper ones, not gaming half-assed HDR monitors. I also don't put much accent on HDR workflow because it has a ridiculously limited audience, so it's far from a priority right now.
However you have something that is just insanely useful for me: OCIO Display Transforms. I can sync up lookdev between Blender or Maya and Photo, that really is crazy useful for me. I think there's a way to do that in PS too but I don't recall ever using it or it wasn't very obvious how to do it.
I prefer working in 32-bit EXR as much as possible, so for compositing I use PS and EXR-IO to load a multi-layer EXR, AP for editing because it's easier, faster and can tweak multiple layers at once, then move back to PS with a flattened 32-bit EXR for ArionFX which is essentially Camera Raw for 32-bit but focused on CGI instead of photography, and this is usually my last step in the process. A bit of a faff to constantly switch between apps but it is what it is.
I found working with multi-layer EXR very hit-or-miss but in Photoshop there is an extremely useful plugin called Exr-IO which is free, sadly isn't detected by Affinity Photo but what it does is it loads multi-layer EXR and Cryptomatte groups for you, those are extremely useful for compositing. If there's any plugin or functionality I recommend integrating for 32-bit workflows, it's Multi-layer EXR and Cryptomatte support, these are basically essential for my workflow. Multi-layer EXR can always be saved as individual files for each pass and then loaded up in a bunch, which is fine, just less convenient. Cryptomatte is a bit trickier though but still manageable, at least for my requirements.
Other times I've had to re-composite lighting, so that means working with premultiplied Alpha 32bit EXRs and composite those on top.
Another thing I occasionally do is edit HDRIs and colour-tone them at multiple EVs to get a nicer result than in-camera balance. Even with a proper grey card and MacBeth chart, it still sometimes warrant some tweaking.
I hope this helps a bit, It really depends, I have a relatively straight-forward workflow, it's been very reliable in Affinity Photo but if there's anything specific you'd like me to test for you in 32-bit workflow, please do let me know.
Hi @DQ_C, just chipping in as I'm a big 3D enthusiast and I do a lot of supplemental work around retouching workflows with Photo. Having native multichannel EXR support in Photo is really useful, but I agree that proper Cryptomatte support would be great too.
ArionFX sounds interesting—I always find working with tones more difficult in 32-bit because of linear compositing. I developed a couple of techniques to help with this, such as using live Procedural Texture filters to non-destructively transform to non-linear, do some tonal work (e.g. brush work with blend modes, adjustment layers), then transform back to linear.
The other thing I did was develop a set of macros to recreate the Filmic transforms without any OCIO dependencies, so you can non-destructively apply the log transform and whichever look you want. Because the Filmic transforms take the document colour values into bounded space, you can then use all blend modes and adjustment layers without worrying about creating negative values. Glow and Reflect in particular do not play nicely with unbounded values.
Hopefully that helps a lot of Blender artists out because Photo's OCIO view transform (32-bit preview panel) causes a lot of confusion—it's not designed for exporting straight from Photo to gamma corrected formats. For that, you need to be using ICC Display Transform with OCIO adjustment layers (and LUTs) to apply the transforms.
Blender's OCIO configuration causes an issue with Photo because it specifies "None" as a device transform—which Photo defaults to 😑 so instead of at least seeing a gamma corrected sRGB transform, you just see linear unmanaged values when opening an EXR with that configuration active. Many users will set up OCIO, never realise this (or the fact that there's a 32-bit preview panel to configure it) and then get a nasty surprise when they finally export their work to 8-bit or 16-bit formats.
Anyway, I tend to use those Filmic macros for pretty much any tone mapping now! (3D or just general HDR photography). Sometimes I'll just do the Log transform to compress the tonal range and then use adjustment layers until I get a decent look.
Bloom/diffuse glow I tend to achieve a couple of different ways: if I have a Bloom layer (e.g. as a pass from Eevee) I'll composite that above the composite render layer with an Add blend mode, then clip an Exposure adjustment into it and tweak until I get the right look. Alternatively, I'll use a live Gaussian Blur filter with an Overlay blend mode, then take advantage of Blend Ranges (parametric tonal blending, the cog icon next to the blend mode dropdown) to blend the effect out of the shadow tones so it doesn't overpower and darken the entire scene.
That despeckling feature from ArionFX looks really useful actually—do you know if it tackles path tracing noise? I do a lot of volumetric lighting in Blender and whilst the composite render pass is denoised, I'll sometimes use the render passes to enhance areas—e.g. transparency passes for foliage, or the volume passes to add atmosphere/mist—and they're typically very noisy unless you render with a huge amount of samples. Sometimes that's nice as it lends a bit of texture to the scene—sometimes not!
Anyway, sorry for the ramble, just wanted to share a few ideas etc. I'm always keen to learn how 3D artists are using Photo in their workflows, and I'm certainly happy to help address any issues or suggest techniques.
P.S. I notice you mentioned premultiplied alpha—just wanted to mention in case you hadn't seen them, but there are a couple of things to help with this. Preferences>Colour has an option to associate alpha channels with the RGB information, which is premultiplication, and then on the Filters>Colour menu you've got options to multiply and divide alpha as well.
- DQ_C, Mark Ingram and Chris B
-
 1
1
-
 2
2
-
On 8/15/2020 at 10:38 PM, A_B_C said:
That was extremely helpful, James! Thank you so much! 😀
I think the 5300M can indeed only have 4GB. When just using the internal display of the MBP 16", I haven’t run into any performance issues so far. And since my external EIZO screen still has one of the low-density resolutions, I haven’t had the impression of any performance drops here either. The real-time processing of live filters and blend modes with Metal Compute enabled is just stunning. You guys did an amazing job in this area. 😀
(I actually decided to get the baseline MBP 16" model, as the new Apple-Silicon-based computers were already looming at the horizon, so I wasn’t sure whether it would make sense to invest in a top-performance model at this moment in time.)
If your Eizo monitor is 2560x1440 (or 2560x1600 for 16:10) then you'll be in an even better position performance-wise! Probably a wise choice given the ARM MacBooks. I have an almost maxed-out 16" MacBook for work—it performs well but the thermals are terrible, the fans are almost constantly active if I'm working in Photo or anything else for that matter. I've had previous MacBooks with the older Polaris GPU architecture (and CPUs with fewer cores!) and they were much quieter. Cannot wait for the ARM models..
On 8/15/2020 at 11:19 PM, R C-R said:The new 27 inch 2020 iMac model that comes with an 8 GB Radeon Pro 5500 XT as standard can be factory configured instead with either an 8 GB Radeon Pro 5700 or a 16 GB Radeon Pro 5700 XT.
So, aside from the difference in graphics memory between the two 5700 options, for use with the Affinity apps can I expect to see any better performance with one of them vs. the standard 5500XT?
I believe compute performance will increase going from 5500XT - 5700 - 5700XT, since each model has a greater number of compute units and stream processors. Whether the performance increase is meaningful is another matter—a 5500XT will likely be sufficient for most workflows since even older mobile Polaris GPUs (e.g. the 455) could easily hit over 100fps when compositing, say, a live motion blur filter.
It's dependent on your screen resolution, typical document bit depth and your workflow however. If you work with lots of high resolution layers, you may want to opt for a more powerful GPU, especially if it has more VRAM. If you just develop RAW files, add a few adjustments and filters then call it a day, you would be fine with any modern baseline GPU—even integrated solutions.
It's worth noting that not every operation is hardware accelerated as of yet—vector layers like a Curve path or quick shape for example. If you use these in conjunction with complex live filters, you'll be bottlenecking the render pipeline with CPU operations, therefore losing the advantage of compositing purely on GPU. It will still be faster than software, just not excessively fast—in this sense, you can't really "brute force" performance with a faster GPU, so don't be too concerned with spending large amounts on a top of the line model.
-
On 8/3/2020 at 4:50 PM, A_B_C said:
Hi everyone,
yes, I am aware that there are quite a few threads on the difference between Metal and OpenGL. But maybe some kind soul out there could nonetheless provide an answer to my questions.
- What are the preferred settings for Display and Hardware Acceleration in Preferences for a 16" MacBook Pro 2020, baseline model with AMD Radeon Pro 5300M?
- Should I use Metal wherever available?
- Are there any benefits of using OpenGL? What is the advice “Switch to OpenGL if you encounter issues” supposed to mean? Why can you expect that switching to OpenGL will cure any issues that may arise?
- Is there a difference in power consumption between the two modes?
Somehow this is still a bit puzzling to me. Thank you in advance,
Alex 😀
Hi @A_B_C, for a modern Mac system with a reasonably powerful GPU that has sufficient VRAM, you should absolutely use Metal Compute (hardware acceleration) where possible.
The main hurdle to overcome is graphics memory. macOS will use a certain amount of VRAM to simply drive the display—the amount is dependent on your screen resolution. Previous 15” MacBook Pro models would use a resolution of 3360x2100 I believe (1680x1050 logical resolution) but the 16” models use a slightly higher resolution. Be aware of this memory usage if you plan to use an external display at 4K or 5K—even more so if you run an external drive whilst keeping the lid open to use the internal display as well.
In addition to this, the Affinity apps will demand graphics memory for the Metal view context. With Metal Compute, this memory requirement increases because the GPU is also being used for compositing, and this is typically where you may run into slowdown if you max out the VRAM—you’ll then be eating into swap memory which incurs a performance penalty.
Under everyday editing circumstances, you may never run into any memory issues. If your editing experience suddenly becomes very slow and laggy, however, you may have run into the limitations of your graphics card. I know you can configure the 5500M/5600M models with 8GB, but am I right in thinking the 5300M can only have 4GB? In which case you will simply have to work in your usual manner and try for yourself!
As an example, I do a lot of work with 32-bit OpenEXR multichannel documents—I typically have about 20-30 layers in a document that averages 5000-6000px in width (and usually similar in height). On top of all that, I run a 5K monitor. This combination is a little extreme, but I can edit comfortably with 8GB VRAM most of the time. I previously had a MacBook with a 4GB VRAM GPU however, and I did find it wasn’t quite sufficient—I ended up borrowing an external GPU enclosure with a card that had 8GB VRAM.
For most editing, including compositing in 16-bit with multiple layers, I think you will typically be fine with 4GB—again, though, this is also dependent on your screen resolution and document resolution.
The advice about switching to OpenGL is typically just a troubleshooting step, but it has more meaning for Photo since you have to disable hardware acceleration to use it—thereby alleviating the significant GPU memory requirement and potentially speeding up older systems where the GPU’s capabilities would not be meaningful enough anyway.
Hope that helps!
-
@Luke_LC3D I'm guessing you are "placing" the ID pass EXR into the colour pass document (File>Place or drag-dropping)? In this regard, it becomes an embedded document and the Flood Select Tool won't work on it. This is actually unique behaviour to the Windows version—on Mac, it's placed as an Image layer instead (so Flood Select works as expected). Previously, Flood Select wouldn't work on Image layers either (meaning you had to rasterise them to Pixel layers) but this was fixed.
I'll enquire as to which behaviour is correct. In the meantime, there are a couple of ways to solve this:
- Right click your ID pass layer and choose Rasterise to convert it to a pixel layer (you can also use the top menu, Layer>Rasterise).
- Open your ID pass as a separate document, copy and paste the RGB layer into your colour pass document.
Hope that helps!
-
@kyle-io apologies for bumping an old thread, but I found it and realised that this issue has been long solved.
Firstly, I've done a tutorial on the main Photo channel which covers how to apply any Filmic look you want using the OpenColorIO configuration:
Second—and this may appeal more—I set about producing some macros which allow you to apply the Filmic looks with no OpenColorIO dependencies—so you can add them to a fresh installation of Photo and get the looks instantly.
Here's a video which shows how to use them, and also gives you some workflow tips:
You can grab the Filmic macros from my website resources page here: http://www.jamesritson.co.uk/resources.html
Hope that helps!
PS the above will make it redundant now, but the issue with your above screen grabs is you're transforming from Linear to Filmic sRGB—you want Linear to Filmic Log, then add the look LUT, then finally the sRGB device transform to linearise the values. I’ve edited my original post to update the instructions!
-
Try @kirkt's suggestion of rasterise and trim. I would presume you opened an image (diagram/plan?) then cropped it to a square ratio? In which case you have pixel information outside the current canvas bounds—usually you would see the rest of the image, but in this case it appears to be solid white that was perhaps cropped away.
-
Hi @Gru, I'm not familiar with the end step—make the shadows?
Do you mean the content aware replacement once you have your stars selected? I usually do:
- Select>Tonal Range>Select Highlights
- Select>Grow/Shrink (somewhere between 6-12px)
- Select>Smooth (optional, depending on image)
- Edit>Inpaint
The last step will inpaint all the selected stars out and typically replace them with dark sky detail.
Other things you may want to try:
- Duplicate your pixel layer (e.g. Background), go to Filters>Sharpen>Clarity and use a negative value, then apply the filter. Change the layer opacity to alter the strength of the star removal.
- Select>Select Sampled Colour: useful for selecting dimmer stars, especially if they have colour fringing (e.g. red/purple). Similar procedure to the inpainting technique mentioned above.
- Layer>New Live Filter Layer>Blur>Minimum Blur, or alternatively use the destructive Filter menu version on a duplicated pixel layer. Mask away from the important areas like your deep sky objects to ensure you don't remove too much information.
Hope that helps!
-
Hi @srg, your Pentax camera is actually exhibiting quite a few hot pixels, most of which are automatically remapped by Affinity Photo. I'm guessing it's the 30 second long exposure which is causing the sensor to heat up and exhibit these hot pixels.
The offending area near the middle of the image doesn't get remapped however because it's actually two hot pixels next to each other of differing intensities:
Because of this, the pixel arrangement could potentially be genuine useful information within the image, so Photo doesn't remap it.
Hopefully this issue wouldn't show up with most images, just those shot with a long exposure. Some cameras will remap pixels at the bayer level as they're written to the memory card (the Sony E-series cameras do this I believe), and some don't. Sony cameras get a bit of flack for this from astrophotographers—they've been nicknamed "star eaters"!
Unfortunately I think the only course of action for you is to quickly inpaint out the hot pixels once you've developed the image—alternatively, you can use the Blemish Removal Tool in the Develop Persona and just single-click over the hot pixel area.
Hope that helps!
- Patrick Connor and Chris B
-
1
-
1
-
On 7/6/2020 at 11:43 AM, Dmi3ryd said:
Hello.
Once again I want to thank the Affinity Photo development team for amazing package for working with graphics.
I have a very simple question.
After rendering, I have an alpha channel as a separate file (render pass file).
Could you please tell me how to quickly convert an image (layer) into a channel for selection?
Most importantly, when converting an alpha image with to spot channel, there should be no loss in white gradation.
Or use this alpha image as a brightness mask, where white hides the image, black leaves.
Thanks.
Hi @Dmi3ryd, the video Gareth posted would help with making selections from Material/Object ID render passes (or Cryptomatte in its bitmap form). However, it sounds like you just want to convert a pixel/image layer to a mask, is that correct? If so, copy/paste or place your alpha image into your document, then go to Layer>Rasterise to Mask. Alternatively, you can right click the layer thumbnail and Rasterise to Mask will be on that menu too.
Once the layer is a mask, you can mask other layers with it (drag-drop over the layer thumbnail, not the label text), and you can CMD-click (Mac) / Ctrl-click (Windows) the mask layer to create a selection from it. Finally, with the mask layer selected, you can also go to the bottom of the channels panel and right click [Layer Name] Alpha then choose Create Spare Channel. This will create a channel from the mask which you can load into other masks or into your active selection.
PS if you want to invert a mask, just select it and use Layer>Invert, or CMD+I (Mac) / Ctrl+I (Windows).
One final note: if you need to multiply or divide alpha by the colour values, you need to flatten the mask into its parent pixel layer first. With a mask clipped to a layer, right click the parent layer and choose Rasterise. Now, on the Filters>Colours menu, you have Multiply by Alpha and Divide by Alpha. You can also do this non-destructively with a Live Procedural Texture filter, but that's for another day 😉
Hope that helps!
-
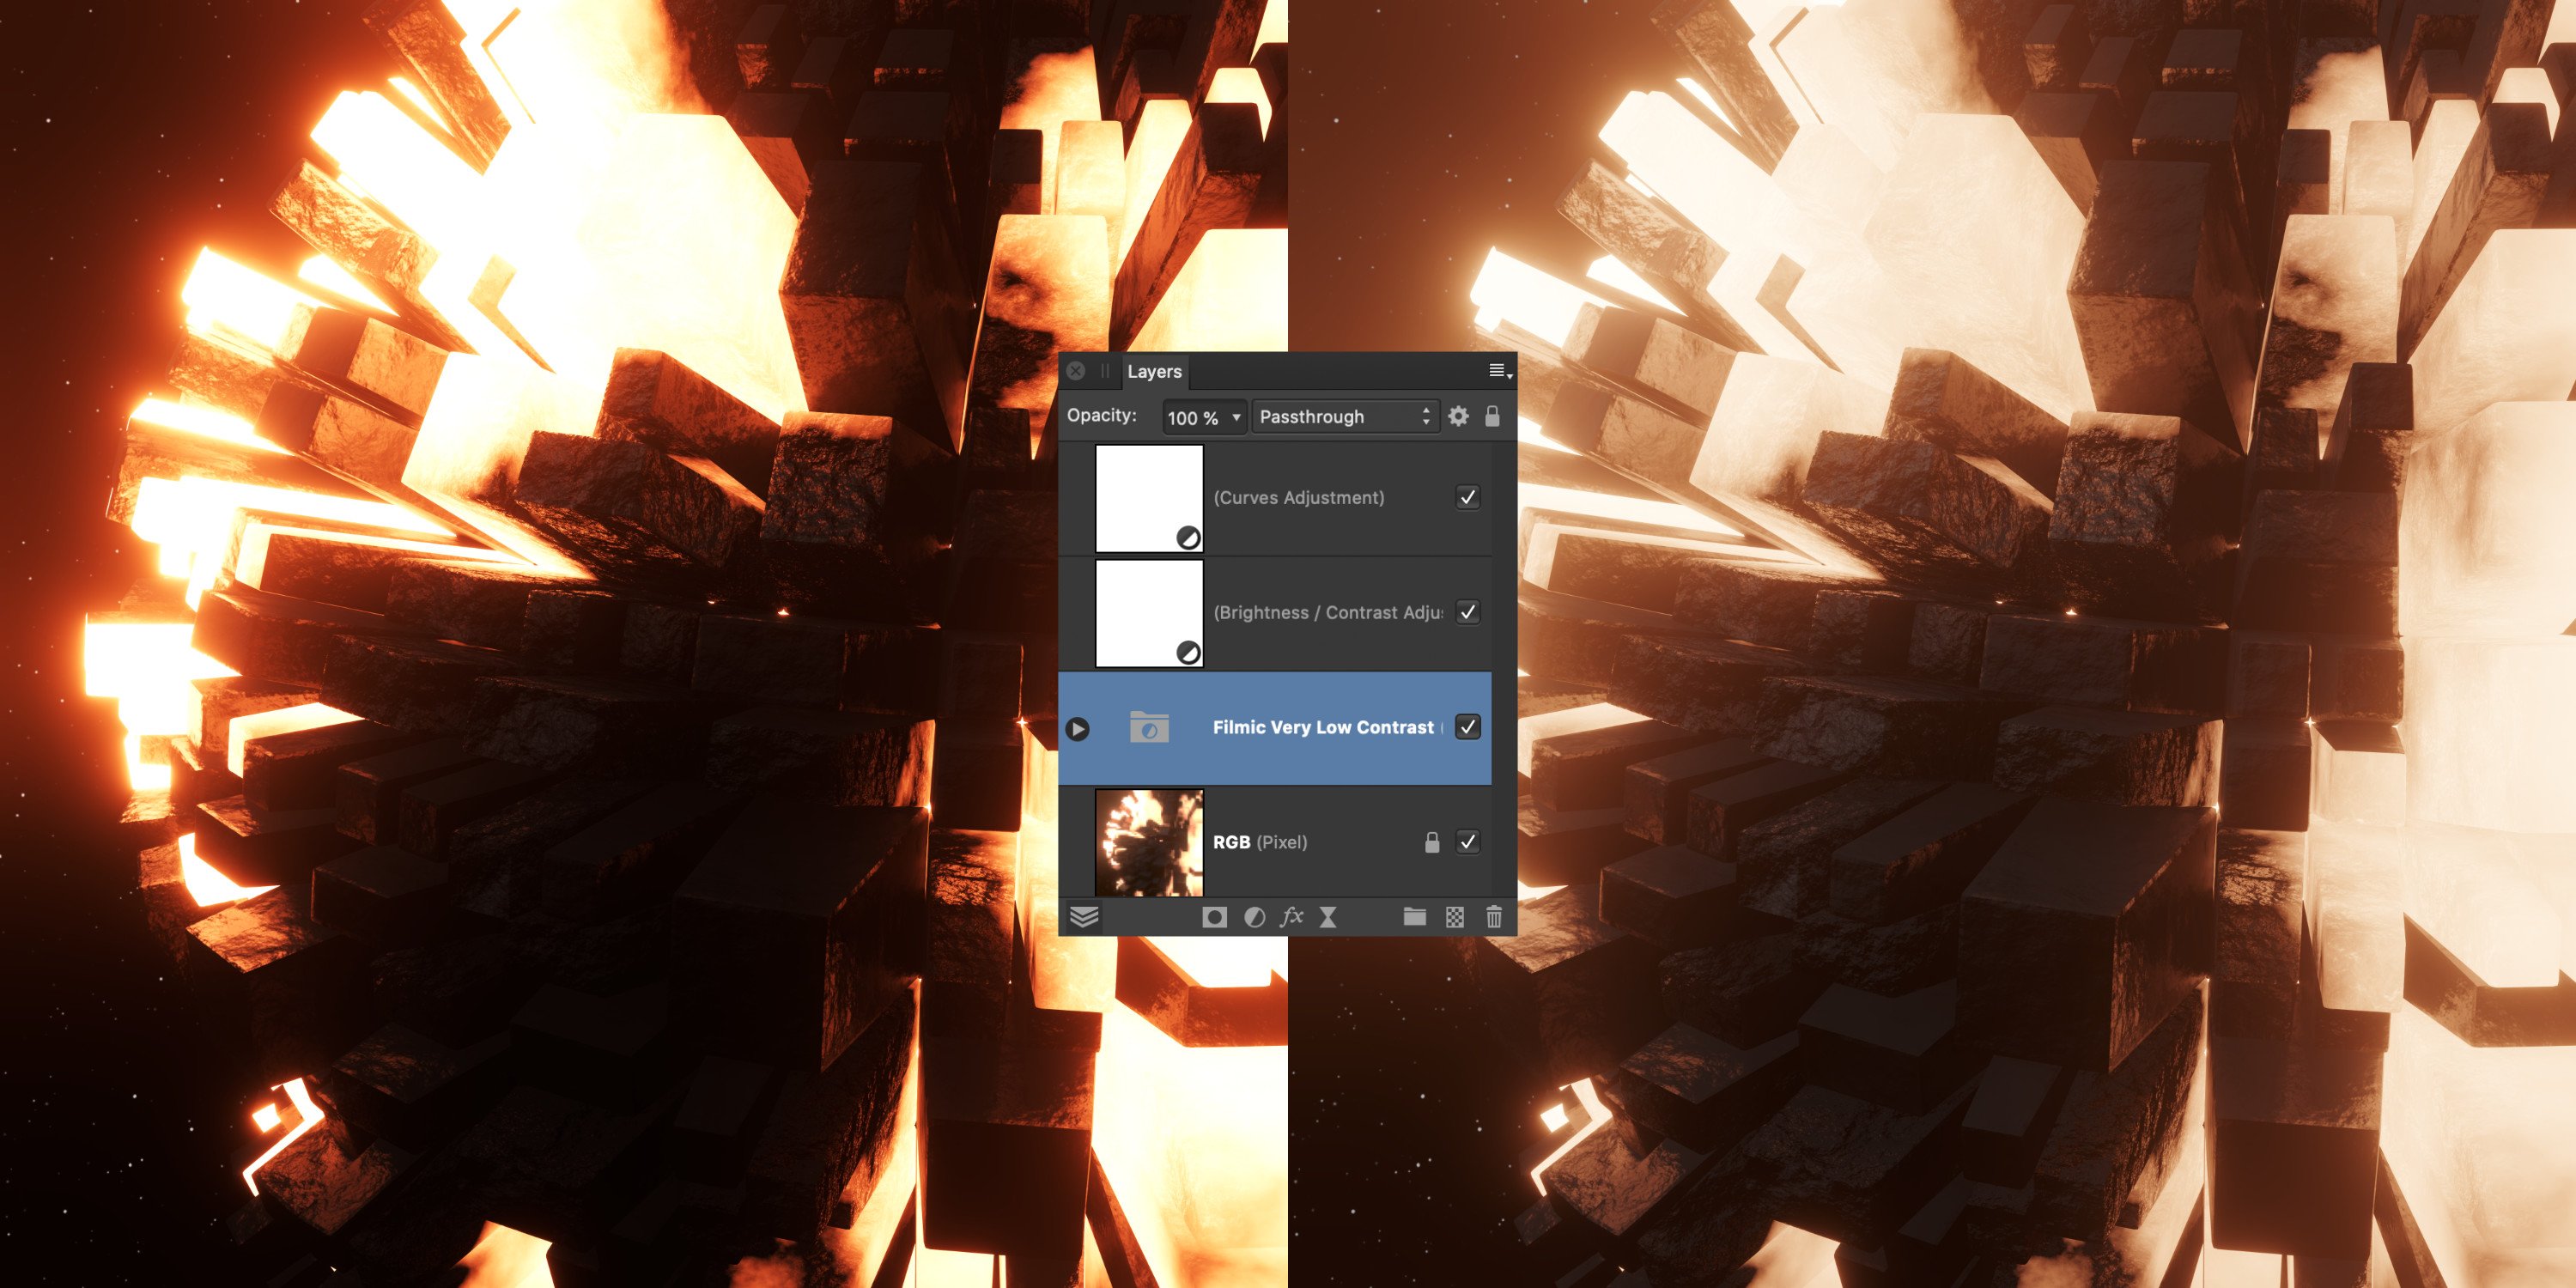
Hi all, I'm pleased to share with you some macros I've been working on—these are predominantly intended for users of Blender who are retouching their renders in Affinity Photo, but you can also use these macros with EXR/HDR renders from other 3D software and even merged HDR photographs from bracketed exposures. They enable you to easily achieve whichever Filmic look you require in Affinity Photo with just one click—no messing around with OpenColorIO configurations, no confusion with which colour management option to use, and certainly no flattening and converting to 16/8-bit to apply any kind of final transform!
The macros and accompanying readme can be downloaded here: http://jamesritson.co.uk/resources.html
Here are the main talking points of this macro set:
- Emulates the Filmic view transform and looks (e.g. Very High Contrast, Low Contrast) that you can apply in Blender.
- These macros are intended for HDR documents (OpenEXR, Radiance HDR). When saving to these formats, Blender writes out linear scene-referred values, so you do not get the Filmic view transform and looks applied.
- Applying the Filmic view transform and looks in Affinity Photo is possible but complicated, and involves copying the Blender OpenColorIO configuration files and pointing Affinity Photo to them.
- Instead, these macros can be added to a fresh install of Affinity Photo—no other dependencies like OpenColorIO—and you can apply the Filmic look you want non-destructively.
- If you want, just apply the Filmic Log transform—no look—and shape the tones yourself using Affinity Photo's adjustment layers.
- For convenience, move between different colour spaces non-destructively (Rec.709, Rec.2020, ROMM RGB, ACES CG, DCI-P3). Profiles are included in the macro file so are portable—no dependencies.
I've also recorded an instructional video here:
And some comparison images:
Thanks very much for reading, hope you find them useful!
-
Hi @Steven T, just so I understand—using the manual white balance feature on your Nikon won't work correctly, even if you point it at some foliage (or whatever you want to be your artificial "white point")?
Bear in mind that most cameras will actually report an error—my Sony A6000 does this and I previously used an Olympus Pen that did something similar—but will apply the white balance shift nonetheless. Perhaps just double check if that's the case? If your image looks fairly grey and neutral but the sky has an orange/red tint you're in the right ballpark.
What infrared pass is your Nikon, or is it full spectrum? Either way, you can shoot at 590nm and get plenty of false colour in the red spectrum—just use the White Balance picker in Develop and pick an area you want to set the white point from—regardless of how extreme the shift, it will be applied. If you don't manually white balance (and so your entire image will be mostly red), the auto exposure on your camera will avoid clipping the red channel, but this will underexpose the blue and green channels and so your overall image may be noisier when white balanced. Not the end of the world, just not ideal!
Filter strength depends entirely on your artistic choice, really—if you want false colour for that "Goldie" look, 590nm is great. 720nm is a nice balance but colours aren't as rich, then 800nm upwards is more tailored towards black and white conversion.
Regardless, you shouldn't have any issues within Photo, it can white balance any type of infrared image.
Hope that helps!
-
Hi @norbre, try setting your output on the Selection Refinement dialog to New Layer or New Layer with Mask.
The preview you are seeing includes colour decontamination—which means the background colour contribution to edge pixels is disregarded, eliminating the typical halo effect you would see. However, if you output to a selection or mask, Photo cannot perform this since it’s not manipulating the pixels of the layer—just masking them.
Using New Layer or New Layer with Mask allows the edge pixels to be decontaminated—hopefully this should solve your issue. In fact, if you choose New Layer with Mask and then turn off the mask layer, you will see exactly how the edge pixels and surrounding areas have been treated!
-
12 hours ago, London said:
I played with these macros a bit today. they worked great in ICC Display Transform mode. (After your earlier comments about ICC DT vs. OICC DT, I kept with ICC. And I just read your note in the PDF about doing that if you've already set up OICC, which I'd done
). If you have the time for it, I'd love to understand what each of the layers is doing in the transformation. I'm not sure I know what crosstalk does for this (or at all).
In the process of testing this, I used an older file, one I'd previously toned and printed (love the soft proof node: I was able to use the printer's profile to make sure everything was how I wanted it). I realized that while I thought I'd saved the file, when using an .EXR, it doesn't seem to actually save the file. I just tested this and, indeed, the saved file was the same as the original (this is really obvious because my 3D app saves EXR files as about 12 stops over exposed and I'd put in a LUT that changed the color to be much warmer). Is there a way to force Photo so save EXRs in afphoto format, or ask?
Hi, it was a case of studying the OCIO configuration and picking it apart—that only gets you so far, unfortunately. Filmic uses a normalised log2 transform which has to be approximated at the moment in Affinity Photo, and there are transforms either side of that which are just basic maths. They're not exposed in the OCIO configuration file, however, so a bit of digging was required..
The 3D LUT is what performs the crosstalk—essentially, emulating an organic film-like response. In the digital domain, a colour becoming more intense would just become more saturated. The LUT emulates an organic response: instead, as these colours become intense, the channels "crosstalk"—so an incredibly bright red colour would gradually start to desaturate as it mixes with the blue and green channels. That's my understanding, anyway—might not be correct!
The "looks" are actually just 1D LUTs that are applied once the colour values are in Filmic Log space—then there's an sRGB device transform at the end (another LUT) which completes the chain.
Photo has a write-back feature for most bitmap formats (JPEG, TIFF, PNG etc) when you Ctrl+S or CMD+S to save. Seems this applies to EXR files as well. The workaround is just to use File>Save As and save as a native .afphoto document—hope that helps!
-
To clarify the information in this thread based off a subsequent discussion in another thread, it's most likely caused by using certain blend modes whose mathematics do not interact well with unbounded floats—typically yielding negative values.
An easy way to test this is to produce a 32-bit document with two rectangles that overlap. Set both rectangles to pure red, then increase their intensity—for example, increase one by +1 and the other by +2. You could use any float values here greater than 1, e.g. 2.54 and 5.43. Scroll through the blend modes on the top-most rectangle and you will quickly see which blend modes produce negative values: Screen, Overlay, Soft Light, Hard Light, Vivid Light, Exclusion, Subtract, Negation, Reflect and Glow. We've discussed adding warnings to these blend modes in the dropdown when a user is in 32-bit, and potentially clamping them as well, with the understanding that this would clip the unbounded value range.
@London your issue should be somewhat mitigated by using those Filmic transform macros I've provided, since all of the transforms will tone map to 0-1 range. Just place any composite layers with the problematic blend modes above the Filmic transform group and you should be good to go!
-
Just bumping this @London — I've revised the macros because I was working off an inconsistency. Looks like LUT transforms with GPU acceleration on Mac aren't performed correctly. I've adjusted all the macros to render correctly across Windows and Mac when in software (CPU rendering). Not sure which platform you're on?
It may not be a huge deal, since the difference can be slight for most image cases, but if you're on Mac and you absolutely want a 1:1 recreation of the Filmic looks, you'll have to disable Metal compute for now. You can do that through Preferences>Performance, where you can uncheck "Enable Metal compute acceleration". If you're on Windows, no worries, continue as usual 🙂
Revised macros are available at the same download link above..
-
Hi @London, I'd appreciate your feedback: http://www.jamesritson.co.uk/downloads/macros/jr_macros_blender_filmic.zip
I'll make this available low-key for now to see how people get on with it. There's an included PDF with installation and usage instructions. A couple of things to note:
- The first run of a macro whenever you start up Affinity Photo will take a couple of seconds (or possibly longer) before you see a result—this is due to a complex 3D LUT being loaded. Subsequent macro applications will be instant.
- Don't expect an absolute 1:1 match with blender—this is designed to allow people to bake Filmic looks into their 3D renders when using ICC Display Transform (traditional document-to-screen colour management). This colour management differs to the sRGB EOTF device transform within Blender, so I don't believe you could ever get a 1:1 match. Even TIFF files with a Filmic look baked in look different in Affinity Photo when compared to Blender. In short, you can match any exported bitmap image from Blender (e.g. a TIFF with Very Low Contrast), but you might not be able to match exactly what you see in Blender's viewport.
I could have gotten a slightly closer match to Blender by using an OCIO adjustment layer, but that would be dependent on the user setting up Blender's OpenColorIO configuration within Affinity Photo—something I wanted to avoid. Instead, these macros use a bunch of maths to approximate a log transform 🙂
Let me know how you get on! Here's a comparison I'll use for forum posts etc:
-
On 6/16/2020 at 7:56 PM, London said:
Thanks, @JamesR_Affinity, I was going to submit a bug report, but when I tried to reproduce it with new images, I couldn't. I opened up my early files and the problem is still there, so I don't know what's going on. With both the new, working and old, bugged images, I use lighten mode to stack the outputs from each light in the scene on top of the environmental pass. The attached image shows the problem with my original files. Re: the troubleshooting, since I'm using multiple light passes, things look different if I set one to normal, since it's only part of the light. However, the darker image is set to normal with only an exposure node above it (my renderer outputs EXRs at +12 stops)—the problem persists. Enabling EDR does show the overwhites as white in ICC mode but not in OCIO mode (without Enabling EDR, the overwhites are displayed as in the attached images with either OCIO or ICC)
Thanks for the tip on ICC Display Transform vs OCIO. I am using Photo to composite and finish my renders before exporting them as JPEG for posting. Looking at the two files I opened to compare old vs. newer images, there wasn't a huge difference between them, but it explains why my exported images weren't always matching what I was seeing on screen.
I'll anticipate your macro pack…and am going to spend some time with your tutorials. My last project taught me my decade+ of Photoshop experience doesn't necessarily mean I know how to do things in Photo. That was often to my great frustration (the amount of time it took me to make a mask almost made me switch back), but also revealed some powerful new approaches (procedural textures, at least once I figure out how to use them properly).
Hi again, the macro pack is pretty much finished so I need to test it cross-platform and then I'll upload a test version—I would be really grateful if you could give it a try and let me know how you get on! It's quite exciting because I've implemented the log transform using existing Photo filters and functions, so you don't actually need the relevant OCIO configuration set up—anyone can use these macros and get the Filmic looks without having to extract the configuration files from blender.
Straight away, I suspect Screen mode is your problem. The maths involved mean that it would be very easy to produce negative values. For example, let's say you were blending two float pixel values that were both out of range (greater than 0-1). Take 1.323 and 5.12 as an example:
1-(1-1.323)*(1-5.12)This results in a pixel value of -0.33076.
If you want to blend light areas on top of your main pass (for example, I do this with the bloom pass you can now get using Eevee), just use Add. Simple addition means you won't end up with negative values. Use Opacity or an Exposure adjustment clipped into the layer to control the blending strength.
By the way, regarding EDR—do you have an actual EDR/HDR capable display? If not, there's not much point to EDR, since it will simply "unclip" the pixel values from the document colour profile, which by default is sRGB. The overwhites you might be seeing will be outside the coverage of sRGB. If you are actually using an EDR display (or an HDR display with HDR compositing enabled) then ignore this 🙂
Finally, procedural textures are awesome, especially for 3D and compositing workflows! I'll post back here once I've organised those macros.
-
Hi @London, I've looked through your post history to get an idea of your workflow etc. I work with blender and OCIO quite frequently but I only come across strange colour artefacting when I'm using blend modes that don't work well with unbounded float values (e.g. Screen, Soft/Hard/Vivid Light). Certain tonal adjustments (e.g. Selective Colour, HSL) may also saturate colour values very quickly in linear space, which can often lead to unwanted results.
Are you using any particular blend modes or adjustment layers to produce the dark blue? If you grab the colour picker and pick one of these offending colours, you will often find that one of the channels has a large negative value, or the readout may in fact say "nan" (not-a-number). This is normally a sign that you're using a blend mode which doesn't work well with unbounded values (typically >1).
Just to troubleshoot, if you open up your EXR document and make no changes apart from configuring the OCIO device and view transforms, do you see any odd colour values or does everything look correct?
One final thing worth mentioning: Affinity Photo's OCIO integration is mainly for pass-through editing (e.g. when you want to slot it into a post-production workflow chain with other software that uses OCIO). If your purpose is to export a retouched render from Photo to a non-linear format (e.g. 8-bit JPEG, 16-bit TIFF), you will instead want to use ICC Display Transform as this represents how your document will look with the typical document-screen profile conversion.
This does of course complicate things when you want to match the Filmic transforms (or indeed any other OCIO transforms you might be using), since the transform chain for these usually involves a non-linear transform at the end—sRGB OETF, for example. Add this on top of your existing non-linear view transform (using ICC Display Transform) and everything ends up looking too bright. You can use a live Procedural Texture to perform a 2.2 power transform on the RGB channels which will counteract this. Alternatively, I'm almost finished with a small macro pack for adding Filmic transforms and will link to them here shortly...
-
On 3/22/2020 at 10:16 AM, Murfee said:
Hi In 1.8.3.175 there is an annoying issue when a greyscale mask is introduced, the greyness sliders take priority over the other colour adjustments when you select a normal layer. The only way that I have found to stop this is to unlock the greyness sliders, then lock the RGB sliders, then change to the colour wheel...the problem is that you need to go through this cycle at least twice before the colour wheel stays when you swap layers 🤔
If I've understood correctly, this is the automatic switch over to the greyscale box colour model whenever you select a mask layer? (And the subsequent annoyance it can cause when trying to perform colour manipulations on other layers)
I believe it's easier to fall foul of this on Mac because there's a UI issue—whenever an enclosure layer is created (e.g. new mask layer, live filter layer) it doesn't appear to be selected on the Layers panel UI, thus you naturally click it again to ensure it's highlighted. In doing so, you "reselect" the mask layer, and this breaks the toggle back to the previous colour model you may have been using.
Whenever you add a mask layer, try selecting another layer type that isn't a mask without clicking again to actively highlight that mask layer. You should hopefully find that it toggles back to the previous colour model.
This tends to be less of an issue on Windows, since the Windows UI correctly highlights an enclosure layer when it's added. The layer is still technically active on Mac (so you can paint on/off the mask) but is not reflected in the UI.
I've also noted an inconsistency with the lock colourspace feature and the way it interacts with the model switching.
Is this the correct issue you're referring to, or is there another behaviour?
-
Hi @kyle-io, a screenshot of your layer stack and also your 32-bit preview panel might be useful here, but generally speaking the steps outlined in my video you posted should work as long as you're using ICC Display Transform and not OCIO. The OCIO transform in Photo is non-destructive and does not affect the colour values in your exported document, so if your goal is to convert/export to a non-linear format (8/16-bit) then you need to be using ICC Display Transform.
I've got a slightly different approach that you can try which allows you to apply the Filmic looks:
- Configure OCIO with the blender configuration (e.g. extract it from the application folder)
- 32-bit Preview Panel, Display Transform to ICC Display Transform
- Add an OCIO adjustment, go from Linear (scene linear) to Filmic Log
- Add a LUT adjustment and browse to where you put the blender OCIO configuration files. Look in the filmic folder and you'll have several spi1d LUTs that correspond to the looks, e.g. Medium contrast, Very High contrast etc.
- The values go from lower to higher contrast, so filmic_to_0-35_1-30.spi1d is very low contrast, filmic_to_1.20_1-00.spi1d is very high contrast. For Medium contrast which is the default in blender, pick filmic_to_0-70_1-03.spi1d
- Finally, add another OCIO adjustment and go from sRGB to Linear. This linearises the values to account for the display colour management that Photo performs (to ensure the 32-bit view looks consistent when converted or exported to 8-bit or 16-bit nonlinear formats). This is why you need to ensure your view transform is set to ICC Display Transform and not OCIO Display Transform.
That should get you much closer to the Filmic view transform and whichever look you're using. One way to check everything before exporting is to quickly flatten (Document>Flatten) and then convert to 16-bit or 8-bit (Document>Convert Format/ICC Profile). This will switch from linear to non-linear compositing, and will show you what your document will look like when exported to a non-linear format like PNG or JPEG. There shouldn't be any tonal changes when doing this—if there are, you may need to check your 32-bit preview settings and make sure you're not using OCIO Display Transform.
Hope that helps!
-
Hi @Fritz_H, the issue is not related to a 10-bit panel, wide gamut display, anything like that. I simply think it's your colour preferences and how your workspace colour settings are configured.
I appreciate you want to work in ROMM RGB for more intense colours, but because you have changed the default colour profile (rather than changing it on a per-image basis whenever you develop a RAW file), you must take into consideration how this affects all imagery you bring into Affinity Photo.
Normally, with panorama stitching, the colour profile will be inferred from the images you provide during the stitching process. For example, if you are stitching JPEGs tagged with Adobe RGB, the final panorama document will be in Adobe RGB. This is true, even if your default RGB Colour Profile in Preferences>Colour is different.
However, there are circumstances when your RGB Colour Profile choice will be used: if the images do not contain any colour profile tagging (you will typically receive a message in the top right explaining your image has been assigned a colour space), or if you have explicitly enabled Convert opened files to working space in Preferences>Colour.
The only way I could reproduce your issue with panorama stitching is by going to Preferences>Colour and enabling the Convert opened files to working space option—could you check your own preferences? If that option is enabled, disable it, then see if your colours are correct. Note that it is disabled by default, so at some point I suspect you may have manually enabled it?
Hopefully that will solve your issue. However, do be aware that I'm unsure as to whether your Xiaomi smartphone JPEGs are intended to be in sRGB or a wider colour space—similar to iPhones and how their images are tagged with Display P3. If you open a single JPEG image, what does the colour profile entry read in the top left?

brush from pixel selection
in [ARCHIVE] Photo beta on macOS threads
Posted
You can create an intensity brush from a mask layer—bear in mind however that it will use the document bounds for the brush unless you make an active selection of the mask contents first (CMD-click). I’ve queried this behaviour as I can’t think of any scenario where you would want the entire document bounds being used for the brush contents..