London
-
Posts
25 -
Joined
-
Last visited
-
Is there a modifier key, preference that can be changed, or something else to bring placed files (or files dragged in from the Finder) centered? It's a fairly small thing, but anytime I bring a file into an existing file, it's off-center because I don't click or drag quite the the middle. I can't think of any circumstance where I'd prefer my placed and drag-imported images not to be centered in Photo—my initial clicks and drags aren't going to be precise enough for that to save me time positioning later in the rare cases where things I'm bringing in won't be centered.
-
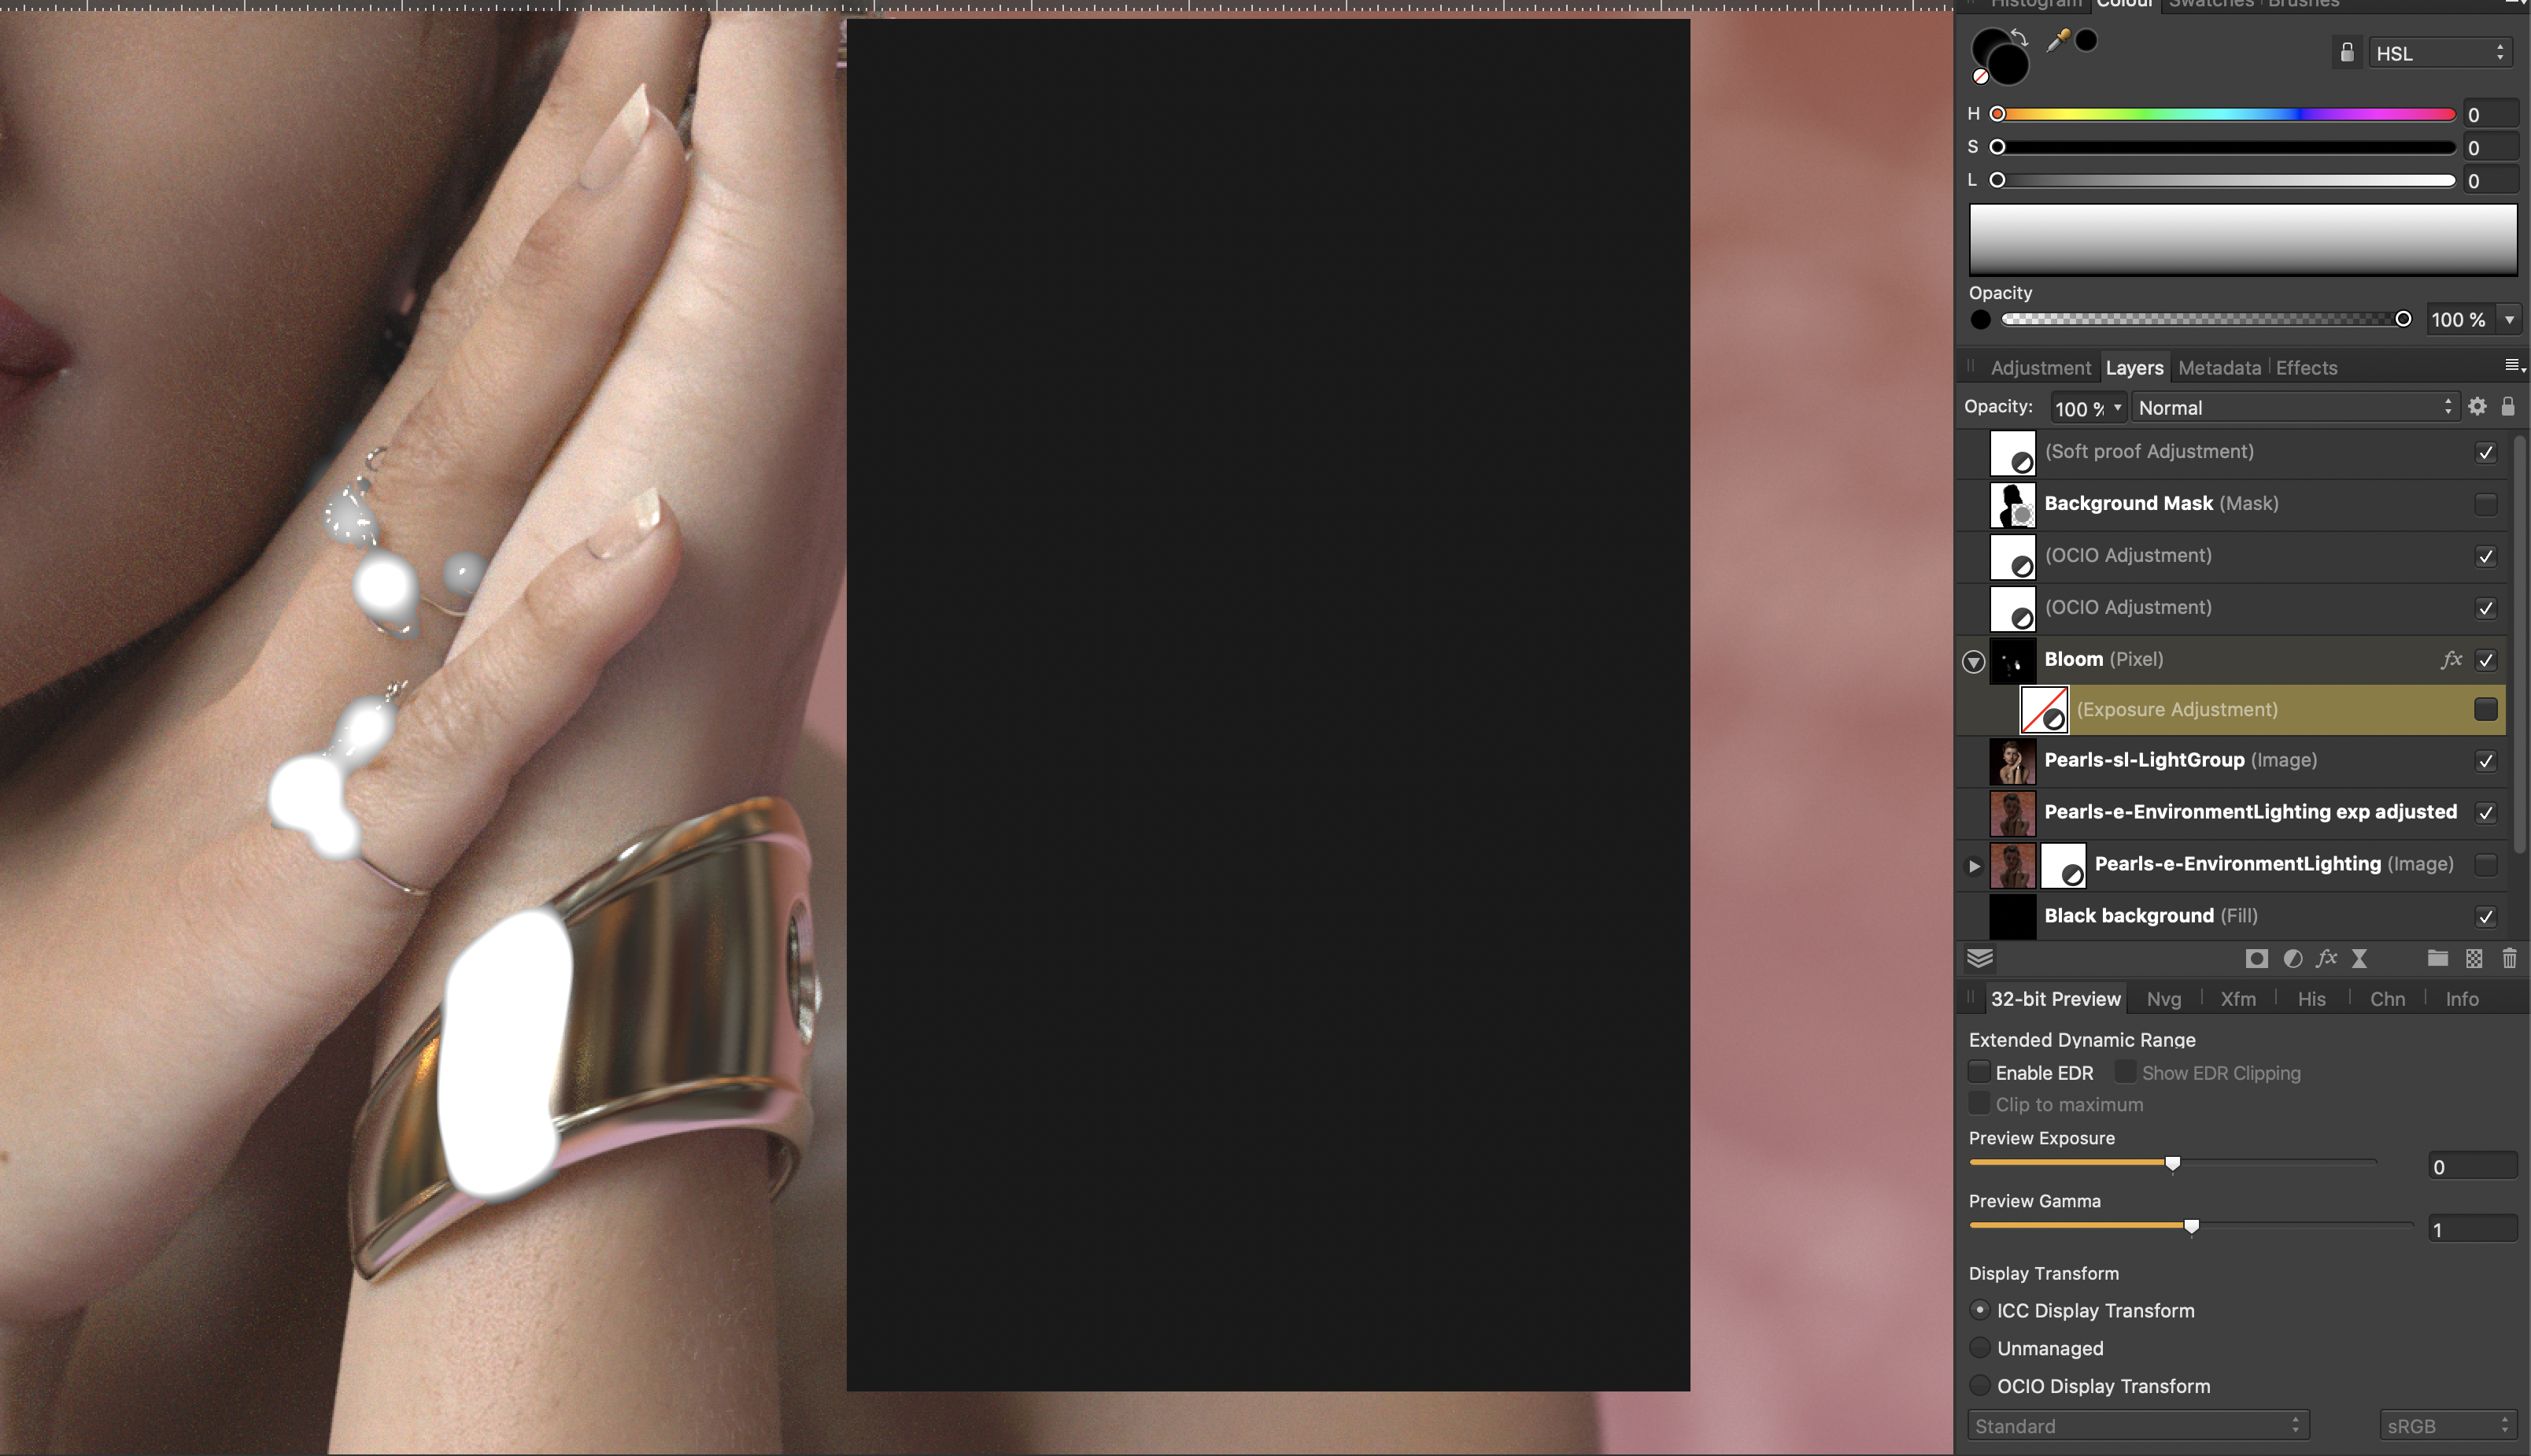
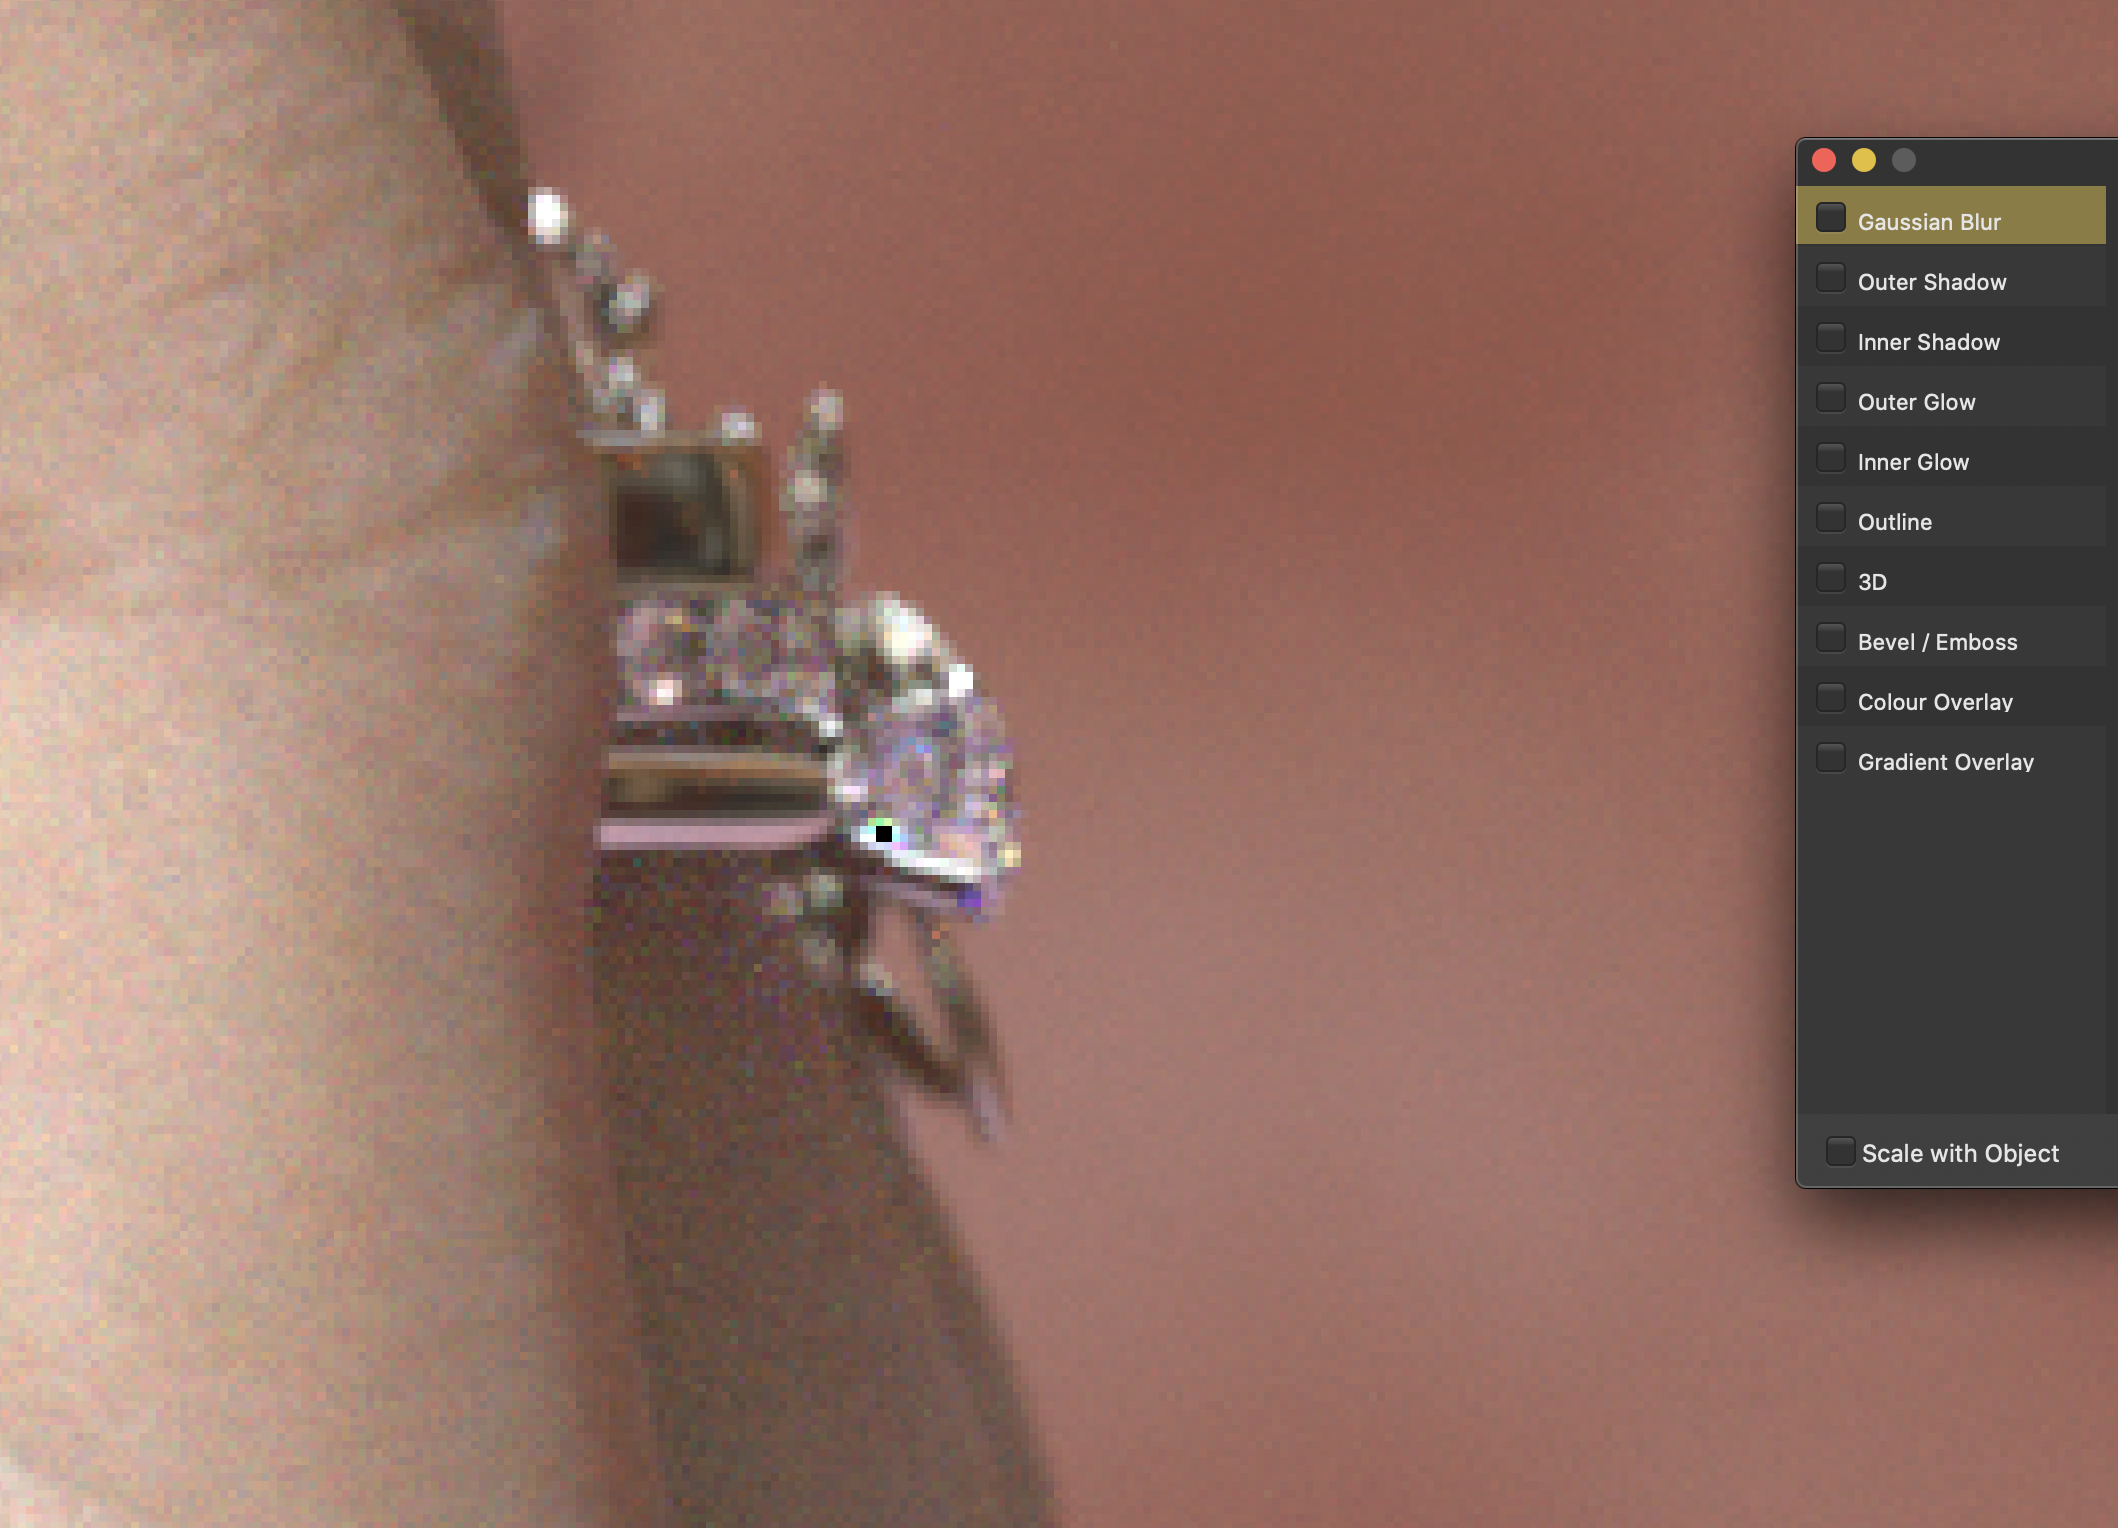
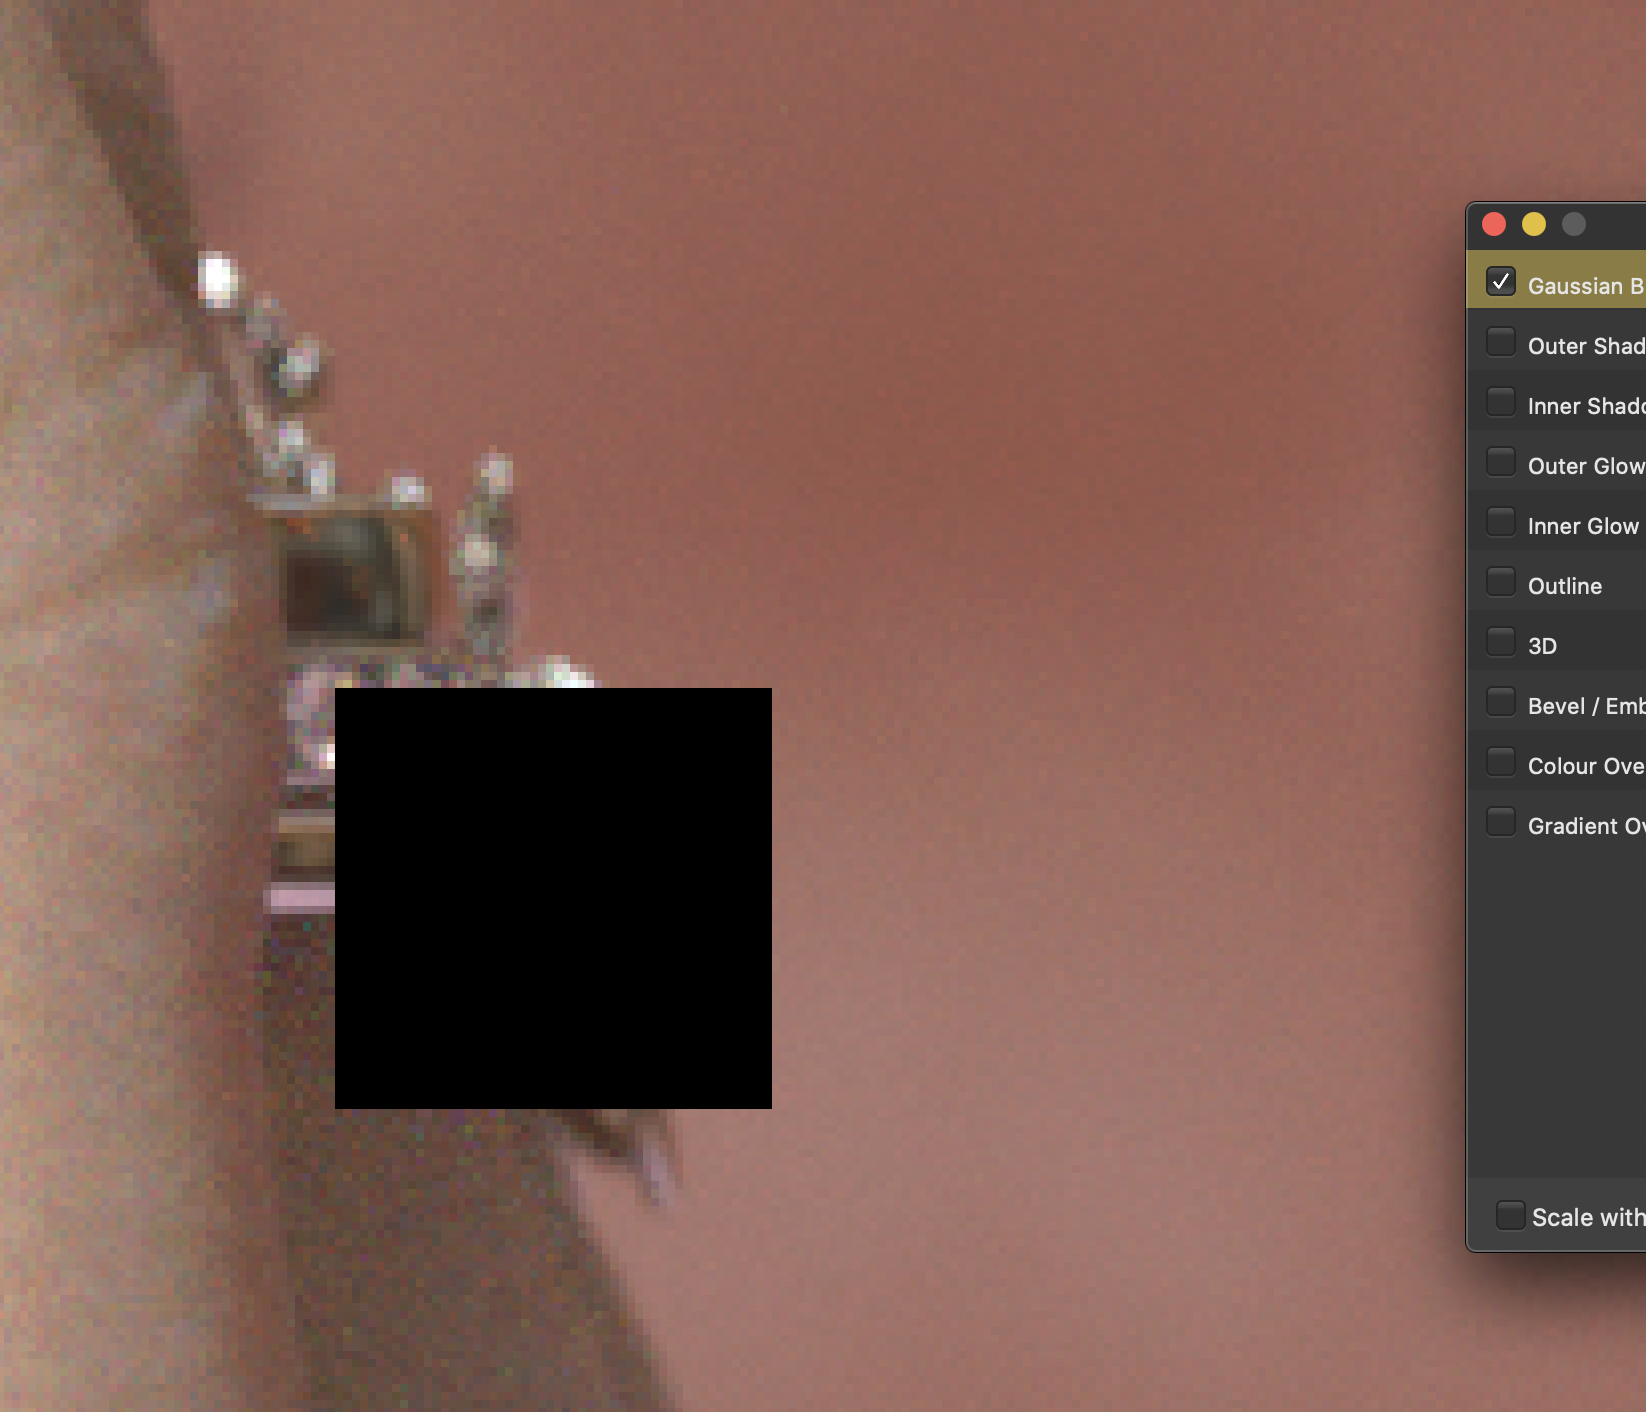
I run into several issues with 32-bit exr files and parts of the image that are >1,1,1/100% white. Normally, when I load my overexposed exr files (my renderer outputs files that are overexposed by about 12 stops for reasons I don't understand) and slap an exposure layer on top of it, everything is fine. However, today, I put in one of my light outputs and the overwhite part turned black with a blue fringe—a problem I'd gotten before by setting a layer with overwhites to screen (which apparently produces divide by 0 errors—I worked through this in earlier posts here and here). I double and triple checked to make sure the layer was set to normal, but it still produced the weird error, so, in frustration, I opened the file in Photoshop, corrected the exposure, and saved the file. It came in perfectly—or so I though until I tried to make some bloom. My bloom techniques uses a macro to create a mask of all the overwrite areas, which I blur and then use an exposure layer to control the intensity. Two problems arose, one of which I often encounter: the blur goes rectilinear and hard as the blur distance goes up, like the underlying algorithm really doesn't like values greater than 1. The second is a black rectangle showing up when the blur values got above 0.8 pixels. Eventually, I realized this was because there was one small area of the image with the overwhite-goes-black problem. I don't know if this is a related problem and I don't have screenshots of it, but I've also run into random rectangular areas that are darker or more saturated when I output some large file to jpg or png. I don't save the bad files, and the problem is fixable by outputting to a different format. But it's annoying because I both have to export more than once and the errors aren't always obvious, so I sometimes have posted them to an art group forum before I spot the issue. I'm using Affinity Photo 1.8.6 on MacOS 10.15.7 on a 2017 MacBookPro with 16 GB Ram and Intel HD Graphics 630 plus AMD Radeon Pro 555 GPUs.

-
PS, the ability to see the monochrome mini-preview along with the red-overlay on the main image makes it much easier than not having the mini-preview.
-
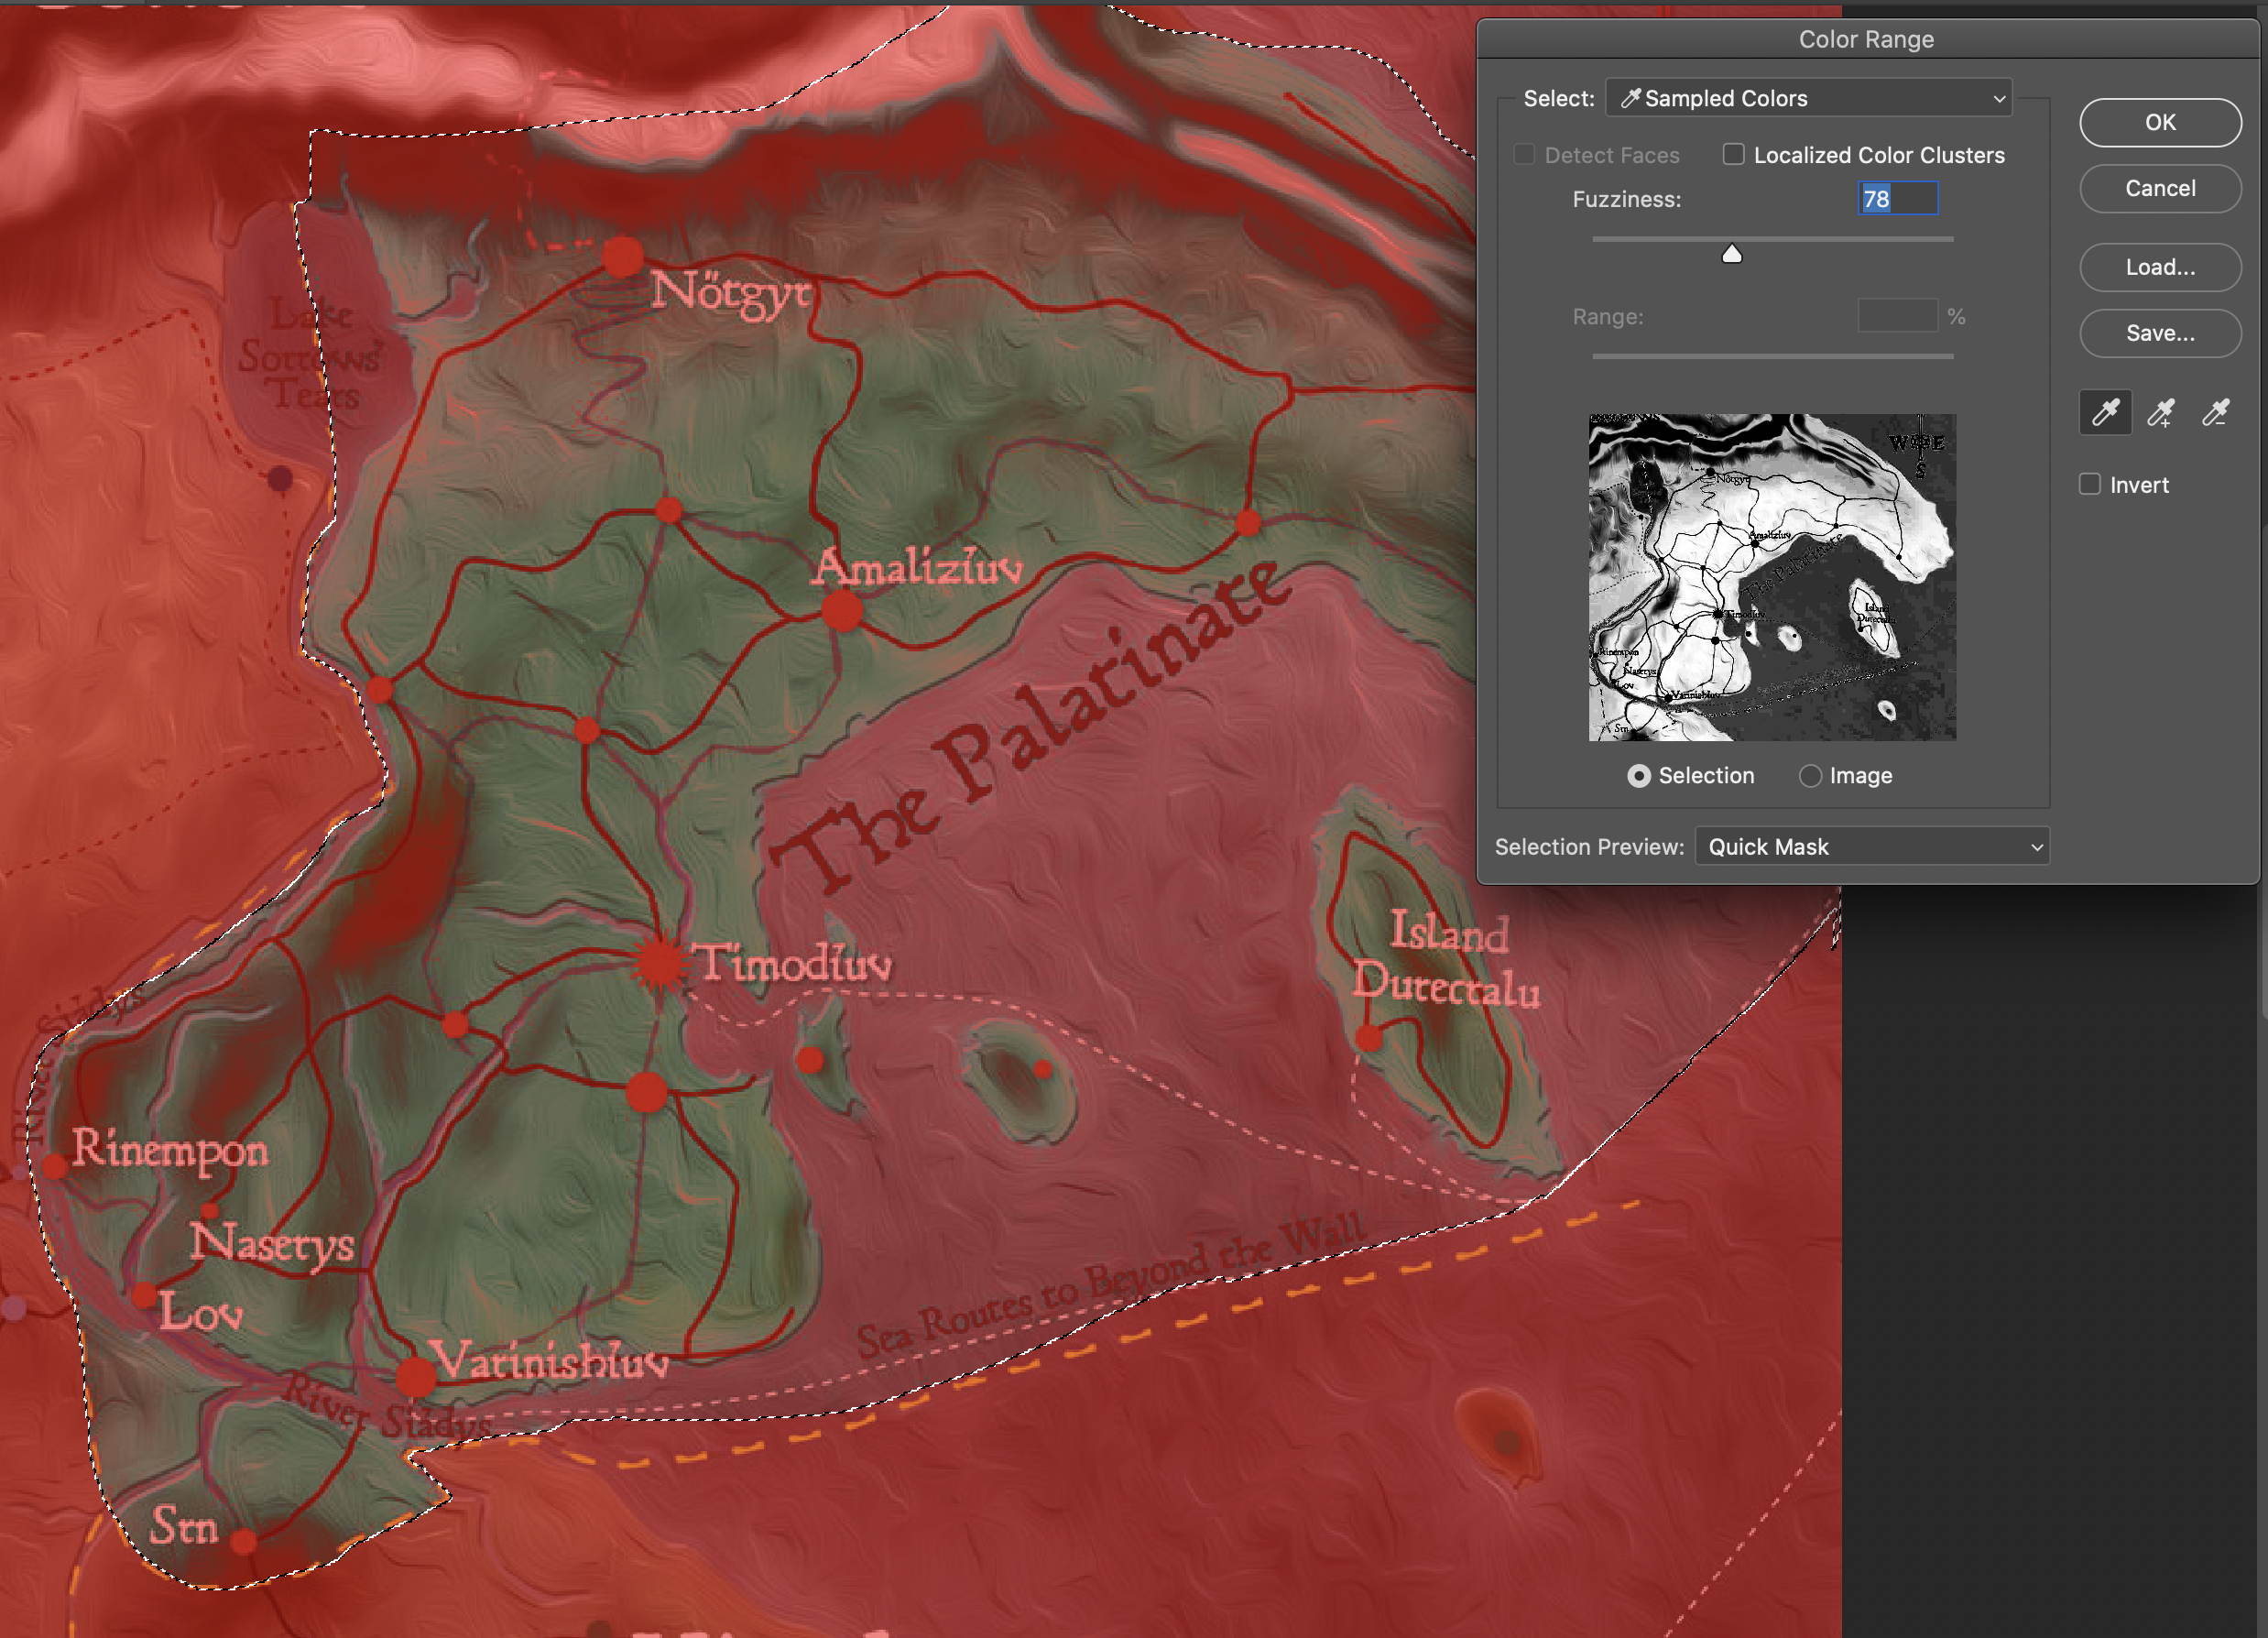
I took a very tricky to mask thing into Photoshop and quickly masked out a selection for a color overlay. I'm not super brilliant at this and this was a quick-n-dirty job, so I didn't take some steps that would clean up some of the trickier elements (or paint them out of the mask). This isn't hair against a similar colored background hard, but still a tricky test. (The numbering on the images shows the order of my steps). The Select and Mask panel (#5) is a separate tool. It's wonderful, but kind of my main complaint is that the basic color select panel in Affinity just isn't as robust and easy-to-use as the one in Photoshop. I got so far with this mask just by tweaking fuzziness and adding and subtracting colors. 1. Initial map 2. Initial selection: 3. Decrese fuzziness to isolate blues 4. Decrease fuzziness even more and use "Add Color" picker to add back greens and browns 5. Finish with Select Color tool, use Select and Mask to refine selection (mainly the contrast tool) 6. After some light painting to refine the mask, use it to create a color overly.
-
That's a work around for selections that creates twice as many new layers as you want (or one new layer you don't need). I played with that and tried the flood select tool (which created hard, pixelated edges I couldn't use) and still ended up wanting Photoshop's tools. Sometimes when I'm frustrated with Affinity Photo, I accept it has it's own way of working and my issue is that I'm still thinking like a Photoshop user, not a problem with Affinity's tools. But in this case, I think Photoshop just has better tools. (Or perhaps Photoshop has a significantly superior UI for it's slightly inferior tools.) Affinity's different color modes are brilliant (although why no luminosity mode? so want that), as is the clever formula-based selection tools, but there's no substitute for being able to limit selections to a previous masked area and the add and subtract colors in the color selection palette itself. Erm, unless I'm wrong and just don't know the Affinity Way.
-
How do you limited the selection tools to a pre-selected area? Literally 100% of the time, if I have a pixel selection and then use selection tools, it's because I only want to select colors in that area. I do this a lot, but at times am forced to go into photoshop to make a mask there, because I can't figure out how to do it in Affinity Photo.
-
Ah, my Photoshop knowledge is haunting me once again! That approach makes sense in a certain way, but how do gradient and less than 100% white/transparent masks work? Like if I have a grayscale image I want to use as a mask, with values spanning the entire 0-100% spectrum?
-
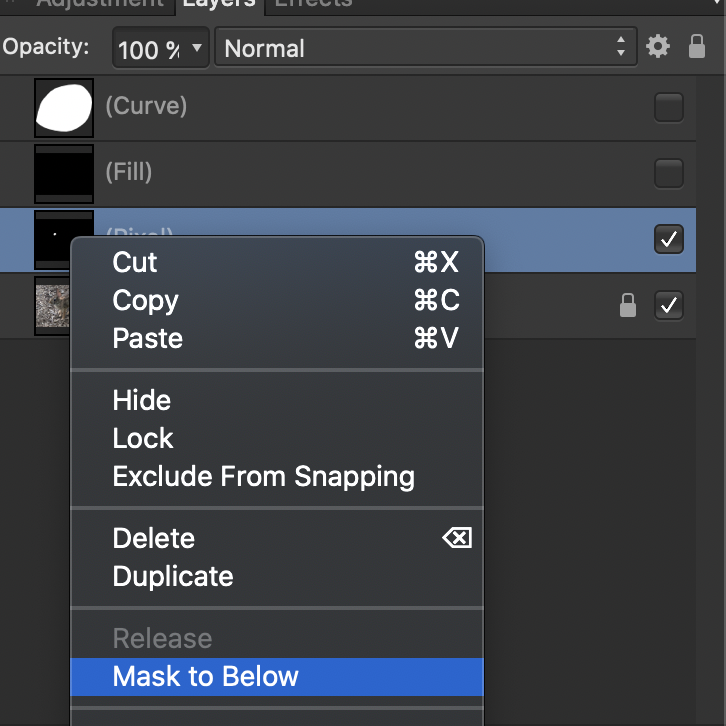
I did a work around that didn't involve the gradient for that particular file, so didn't have it saved with the masks to share. Attached is a new photo with the same masking problem. The vector mask worked as expected (and desired) when I dragged it so the blue bar showed up on the right side of the layer icon. However, the pixel layer didn't work either by dragging or when using the "Mask to Below" command. A related question: how do you make a vector mask with holes? When I've created a vector path mask, setting the fill to white, and then tried to subtract and interior area, I get a new path layer and I haven't been able to get that to subtract from the original layer. The only way I've been able to make that to work is by creating a lower black fill layer and merging visible, which makes the vectors irrelevant and then I run into the problem I've mentioned in this thread. Bunny_Mask.afphoto
-
Thank you, @firstdefence and @appearsharmless. That's exactly what I wanted and what my subpar searching skills weren't finding.
-
I ran across an old color photography technique called photochrom and I'd love to figure out a way to emulate it. My first thought is to duplicate the image and make a monochrome version, then use a live procedural texture on the original to create a number of single, non-CMYK/RGB color overlays, but I'm not quite sure how to create the procedural texture to do that. Has anyone done something like this? Is there another approach I could experiment with?
-
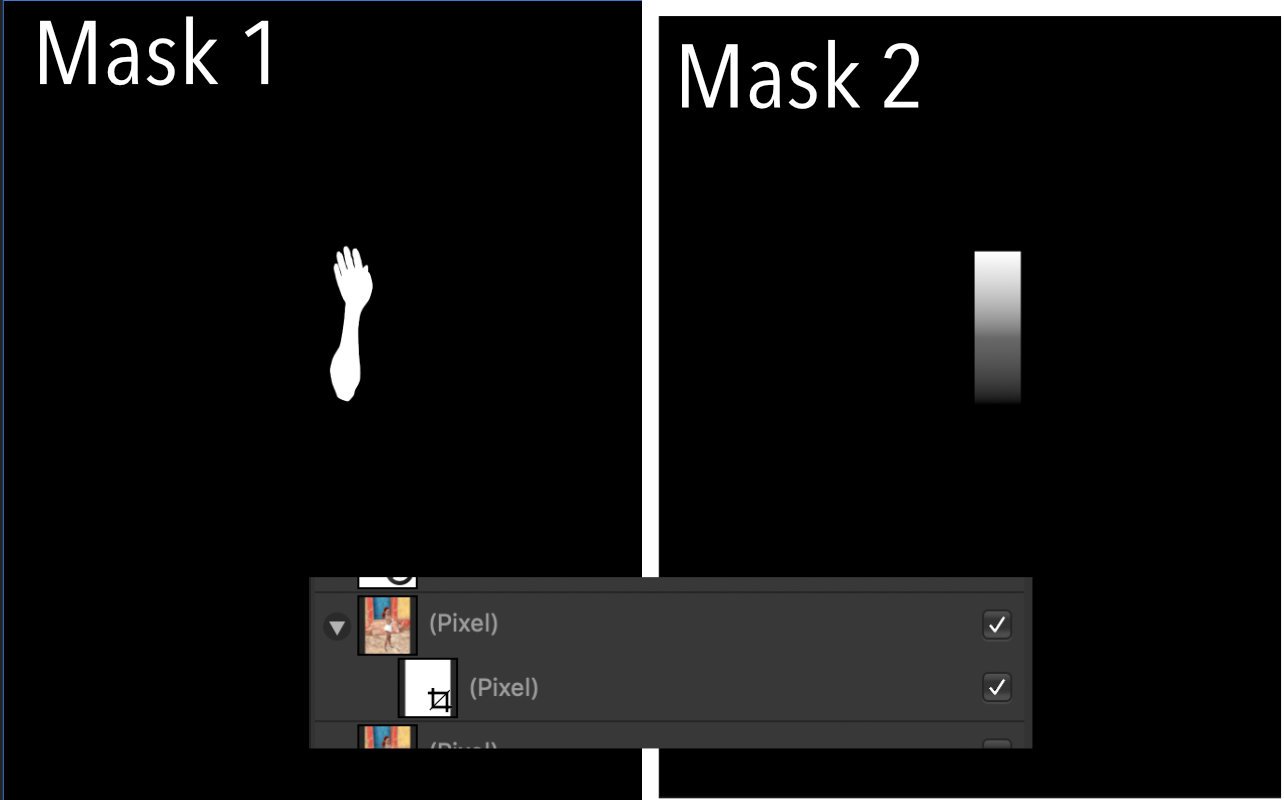
I'm going batty trying to mask things in Affinity Photo. I don't know if this is because I'm a Photoshop veteran trying to use PS techniques, if there's a bug, or something else. In the attached image, Mask 1 was made by drawing a path and then merging it with a black fill because I couldn't get the path to mask anything (I filled it with white, but that didn't work). After I made Mask 1, I right clicked and selected "Mask to Below," which moved it under the layer beneath (the same way dragging it with the vertical blue line works) but the layer wasn't masked.(As shown on the inset layers screenshot.) I worked around this frustration by selecting the white area and copying that portion of the image. Then I made Mask 2, which I want to select to mask a motion blur, but I don't know how to select the gradient. In Photoshop, I'd use select color with a high value to get the entire gradient or click on one of the channels to select it. I can't figure out what to do in Photo to get that as a selection.
-
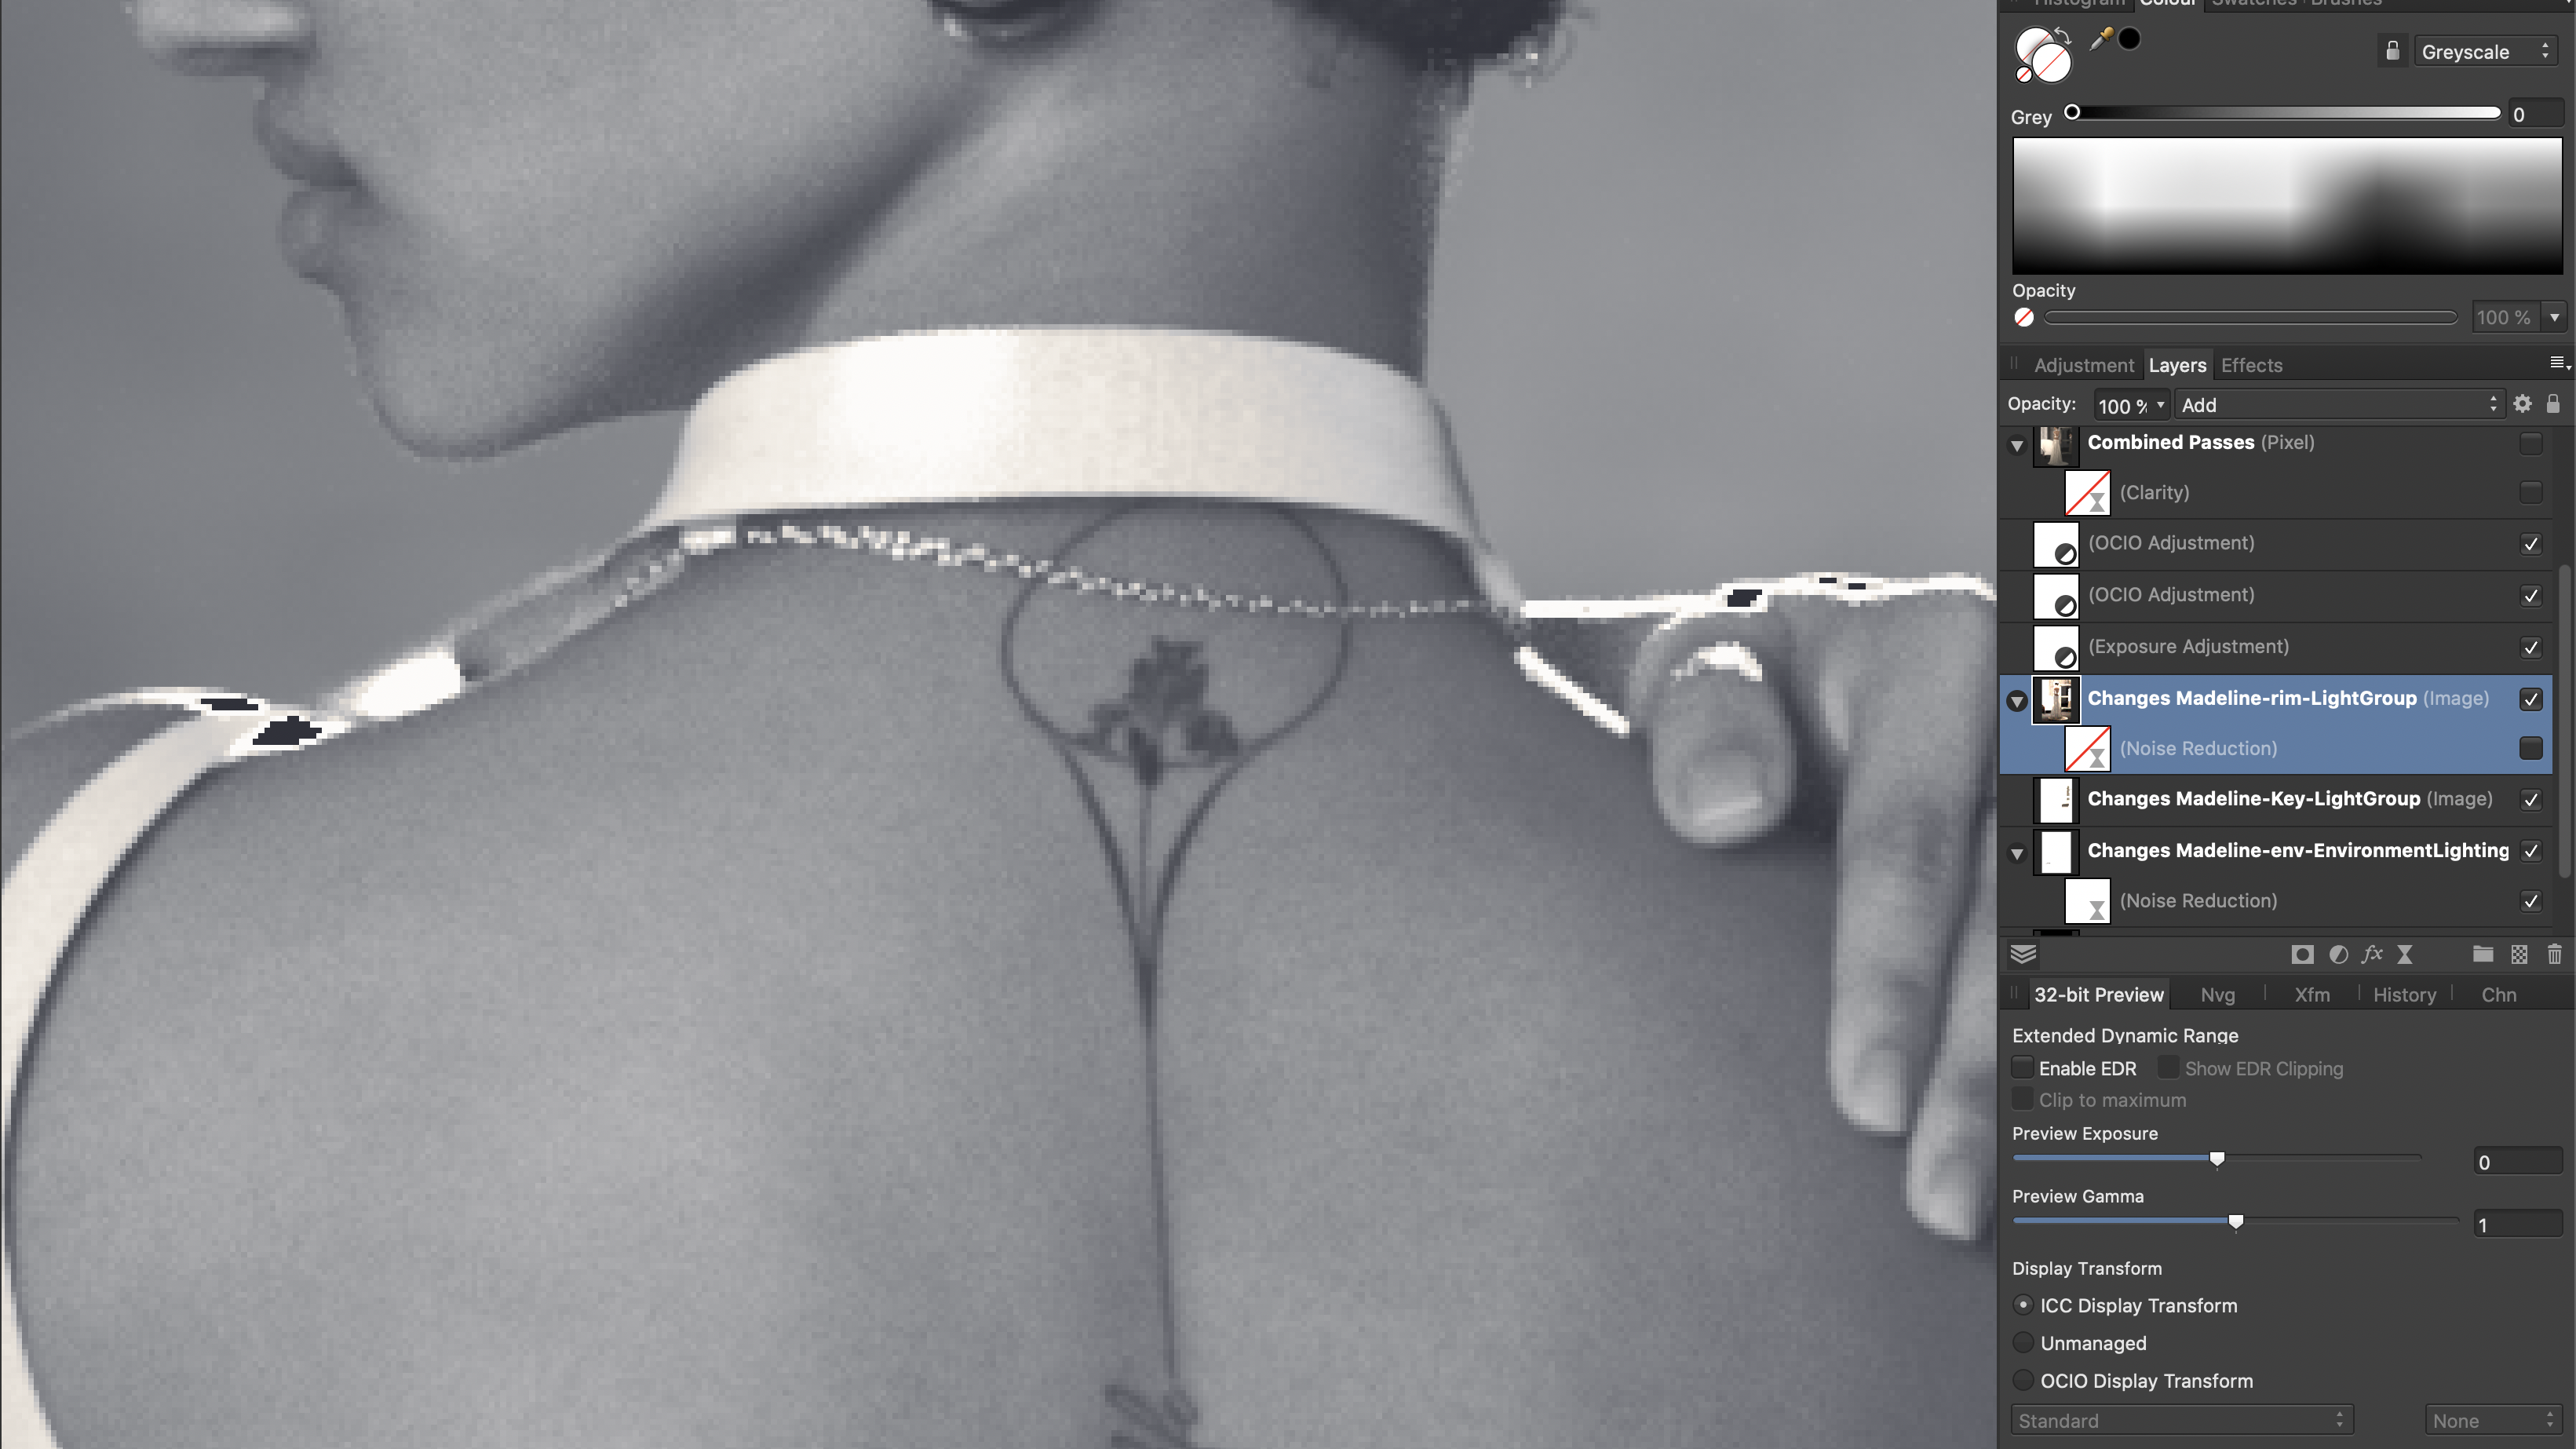
Hi @James Ritson, unfortunately, the 32-bit compositing bug isn't limited to Screen and Lighten. I didn't use your macros for an image I was compositing today (for reasons I forget) and ran into the problem using Add. Actually, every single color mode that lightens the image (Screen, Lighten, Color Dodge (not sure of the exact name), and Add) all produced errors. I'll go back and use your macro to fix this image, but wanted to make you aware of the issue. In the two screenshots, the lighter image is the problem-creating layer (which definitely has over-white highlights) set to Add over the other compositing layers. the darker image is it set to Normal mode. The 32-bit view is set to ICC and I used your double OICC transforms (Linear-sRGB + sRRG-Linear) trick in layers above this. I also forgot to turn off the black and white LUT stacked on top of that, but the glitch disappears when I turn this layer off.
-
Thanks, James. Your support has been fantastic.
-
I played with these macros a bit today. they worked great in ICC Display Transform mode. (After your earlier comments about ICC DT vs. OICC DT, I kept with ICC. And I just read your note in the PDF about doing that if you've already set up OICC, which I'd done ). If you have the time for it, I'd love to understand what each of the layers is doing in the transformation. I'm not sure I know what crosstalk does for this (or at all). In the process of testing this, I used an older file, one I'd previously toned and printed (love the soft proof node: I was able to use the printer's profile to make sure everything was how I wanted it). I realized that while I thought I'd saved the file, when using an .EXR, it doesn't seem to actually save the file. I just tested this and, indeed, the saved file was the same as the original (this is really obvious because my 3D app saves EXR files as about 12 stops over exposed and I'd put in a LUT that changed the color to be much warmer). Is there a way to force Photo so save EXRs in afphoto format, or ask?
-
Thanks for the update, @JamesR_Affinity. I am on a Mac, so I'll try to remember to switch off Metal compute when I try this. I rendered something out yesterday, but had an annoying geometry error. Hopefully, I'll be able to get that fixed and test this later today. i'm definitely excited to give it a go and report back!