Search the Community
Showing results for 'Separation preview'.
-
I feel that separation preview is very important to see what i am going to print
-

Overprinting black for text - Not working
prophet replied to Andrew Heath's topic in V1 Bugs found on macOS
Confirming on my Mojave Mac. When viewing PDFs with with Acrobat's (10.1.16) Separation preview, neither "For print" or "Press ready" presets show black text overprinting. But as @Gabe mentions, when viewing in the Color Warnings preview, the text objects indicate they will overprint. So…we're saying it's an Acrobat issue? With that rare jewel, PackZView, all PDFs look fine in separation view. -

Fraud?
4dimage replied to Marko Grafiko's topic in Pre-V2 Archive of Affinity on Desktop Questions (macOS and Windows)
Hi guys, I worked with Adobes suite of graphic software for almost 25 years until i found a nearly comparable professional alternative - Affinity. In this period of time i paid thousands of euros for Adobe software upgrades. For professional users this is the common deal: if you want to have excellent tools - pay the developers for their work. Give the software a chance to evolve. As PaulIEC mentioned, Affinity Designer, Publisher and Photo "do an excellent job and are reasonably priced". Of course, there are a lot of "little buggers" that anoy me when working with these tools for a whole day. But since 10.x i encountered no major bugs in Designer or Publisherso far. Compared to the three Adobe flagships Photoshop, Illustrator and InDesign the Affinity Tools do a great job! And some features are far better then the Adobe stuff. The Studio functionality in Publisher is an excellent idea and saves a lot of time compared to InDesign! During the last three years I almost replaced my whole Adobe workflow with the new Affinity tools! Yes it's possible - but if you regularily have to exchange data with printers or other creatives who (stil) use Adobe, things become difficult 😕 But at least it's possible to open Photoshop, Illustrator, PDF or some InDesign files with Affinity! Please think about this: I payed about 54 EUR for each of the three software tools in 2017 (Publisher 2019) - all perpetual licenes. Since then, we got a bunch of free updates and fixes AND additional features. Compare this to Adobe Creative Cloud. There you have to pay about 60 EUR EVERY MONTH for a big bunch of software that you possibly never use (video, 3d, audio, XD, ...). And since the introduction of the Creative Cloud the Software evolves very slow. It seems Adobe is not longer interested in creating "the best graphic software ever". They only want to make money. And if you can not longer pay the Adobe fee, their software will STOP working after 6 month! That's the bad thing about subscriptions. You can't even open your old files! For freelancers like me the Affinity Suite is a good set of tools which can do nearly every graphics jobs. Of course there are a lot of missing professional features (e.g. color separation preview, better spline handling, better interactivity for PDF, and, and, and, ...). But i hope, in the next version there will be a pack of new additions. And i will of course pay for these upgrades! Because i always want and need better tools for my daily work. cheers :-) -
 Hi @ all La séparation de couleurs et l'aperçu des surimpressions est très utile dans un studio. Cet ajout serait également bienvenu. The colour separation and overlay preview is very useful in a studio.This addition would also be welcome.
 -
 I like working with Publisher. The software is clear and intuitive in many areas. My wish 1): The possibility to take over full tone channels from PSD image files and to be able to assign them to a global colour as desired. My wish 2): A real design mode. Affinity seems to save previews in the project file. Nevertheless, all images are reloaded in the background every time, even if they are only linked. This costs an enormous amount of RAM and slows down the computer during this time. My wish 3) A separation-preview.
 -
 Yes, PLEASE, install a SEPARATION VIEW in Preflight Mode in Publisher! This is sooo important to get away from adobe's Acrobat Pro, which is sooo expensive! A real Alternative to Acobats "Output Preview" will push Affinity to a REAL Alternative to Adobe! We NEED it!!
- 7 replies
-
- 2
-

-
- prepress
- colour separation
- (and 1 more)
-

CMYK : Color Separations preview
AdrianB replied to ponce068's topic in Feedback for Affinity Designer V1 on Desktop
+1 for me too. I had to dig up an old Acrobat Pro 9 on an old Mac just to be able to do separation preview. -
 Now I'm back. My screenshot below is from Export - PDF export settings - more... Above "honor spot colors" this selection should be not chosen. This is by the way my export setting for a regular print job with two spot colors, without any CMYK color. To your other question - unfortunately I don't know any budget tool to check if sepations are correctly. That's why I and many others are trying to push Affinity to give us at least some kind of separation preview inside Publisher. I'd even pay for another Affinity tool which would compare to Acrobat - having preflight, separation and overprinting preview/check. At the moment I'm using my good old Acrobat CS4, but I'd love to get rid of that.
- 13 replies
-
- 1
-
-
- affinity photo
- affinity publisher
- (and 1 more)
-
We've come across this before I think the preview may be not telling us the whole truth - here's a response from teh resident expert :- " Use Output Preview in Acrobat, and make sure the Simulation profile is correct. If you preview Separations, then it will show without overprint. However, if you switch Preview to Colour warnings and check Show overprinting, then Acrobat does highlight the correct areas as overprinted. If you switch Preview to Object inspector, and click on an area intended to be overprinted, it will list all the colours at that point and the overprinted colour will say "Overprint=true". You will also see that the overprinted colour has a profile. If you then re-export the same document with Export profiles unchecked, the Object inspector shows the overprinted colour space as Default CMYK with no profile. The Separations preview will show the overprinting as expected. If you export with a PDF/X preset, then the PDF gets a colour intent which has a profile. Colour shapes get exported as Default CMYK, which uses the document intent, so they don't get their own colour profile so Acrobat Separations preview shows the overprint. This explains why PDF/X can behave differently to other PDF presets. " We have an issue logged to hopefully improve the situation regarding the separation preview
-
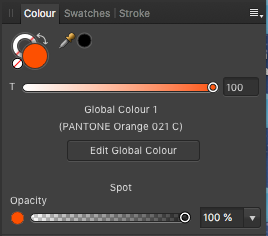
 As part of a test to learn about the behavior of spot colors in Publisher, I just tried to use the Gradient Map adjustment layer to recolor a Greyscale image in Publisher, and then to export a press-ready PDF. I uncovered a number of issues that need immediate attention: Pantone spot colors do not display accurately in a CMYK Publisher document. Appearance seems to be fine in either CIE Lab space or in RGB spaces. Working with the Swatches Panel is a very tedious and fiddly experience. The number of clicks required to add a spot color to one's document palette should be reduced. Although I applied Pantone 173 to my Greyscale image, Pantone 021 got added to my document palette. Spot colors added to the document palette are identified generically as "Global Colour x" rather than by their proper name. When one highlights the generically named spot color in the swatches palette and then selects the Pantone swatch book from which the color came, the color chip is not highlighted or identified in any way among the thousands of other Pantone color chips. The only indication of the spot colors actual name comes if/when one switches to the Colour Panel. There doesn't appear to be a Channels Panel or a Separation Preview Panel that would enable one to check color separations prior to exporting to a press-ready PDF. And FINALLY, I exported my test document (wherein I applied a spot color to a Gradient Map to recolor a greyscale image) as a press-ready PDF, opened the PDF in Adobe Acrobat, used Acrobat's tools to inspect the color separations and found that an empty frame filled with Pantone 021 separated onto a spot color plate for Pantone 021, but the spot color applied to the greyscale image using the Gradient Map adjustment got separated into the four process color plates, CMYK. All of this needs immediate attention prior to the official release of Publisher. Please rethink the behavior of the Swatches Panel in terms of efficient workflows, accurate spot color labels, highlighting selected document spot color swatches within corresponding spot color swatch book. Correct the display of the spot colors on screen, regardless of the color space of the document. Make sure that spot colors separate to a corresponding spot color color plate. Give the designer the means to determine within the document swatch palette whether or not a used spot color should be preserved as a spot upon color separation or should be converted to 4-color process plates. Please provide a set of print preview tools within a Print Preview Panel that would allow a designer to check things like color separations prior to sending press-ready PDFs to a professional offset printer. Please ensure that spot colors applied to greyscale images using the Gradient Map adjustment separate properly onto the corresponding spot color plates. Thank you. Spot Seperations.mov
-
 @Old BruceI ran your PDF through an online color separation tool here, and it showed as 4-color black. I also ran it through the app PDF Output Preview created by forum member Lagarto (see this thread), and it too said the blacks are 4-color. So...whatever you did to the PDF didn't work. I also checked a PDF exported from Publisher using the "Press ready" preset. It was a page that used a music PDF from Dorico in Passthrough mode. Both the online checker and PDF Output Preview show the blacks as 100% K. EDIT: One of my students (who's a professional book designer) checked the Passed-through PDF in Acrobat Pro, and it did indeed separate to black only. So unless there are other mitigating factors I'm not yet aware of (and there well might be, as I'm a beginner), Passthrough seems the way to go.
 -
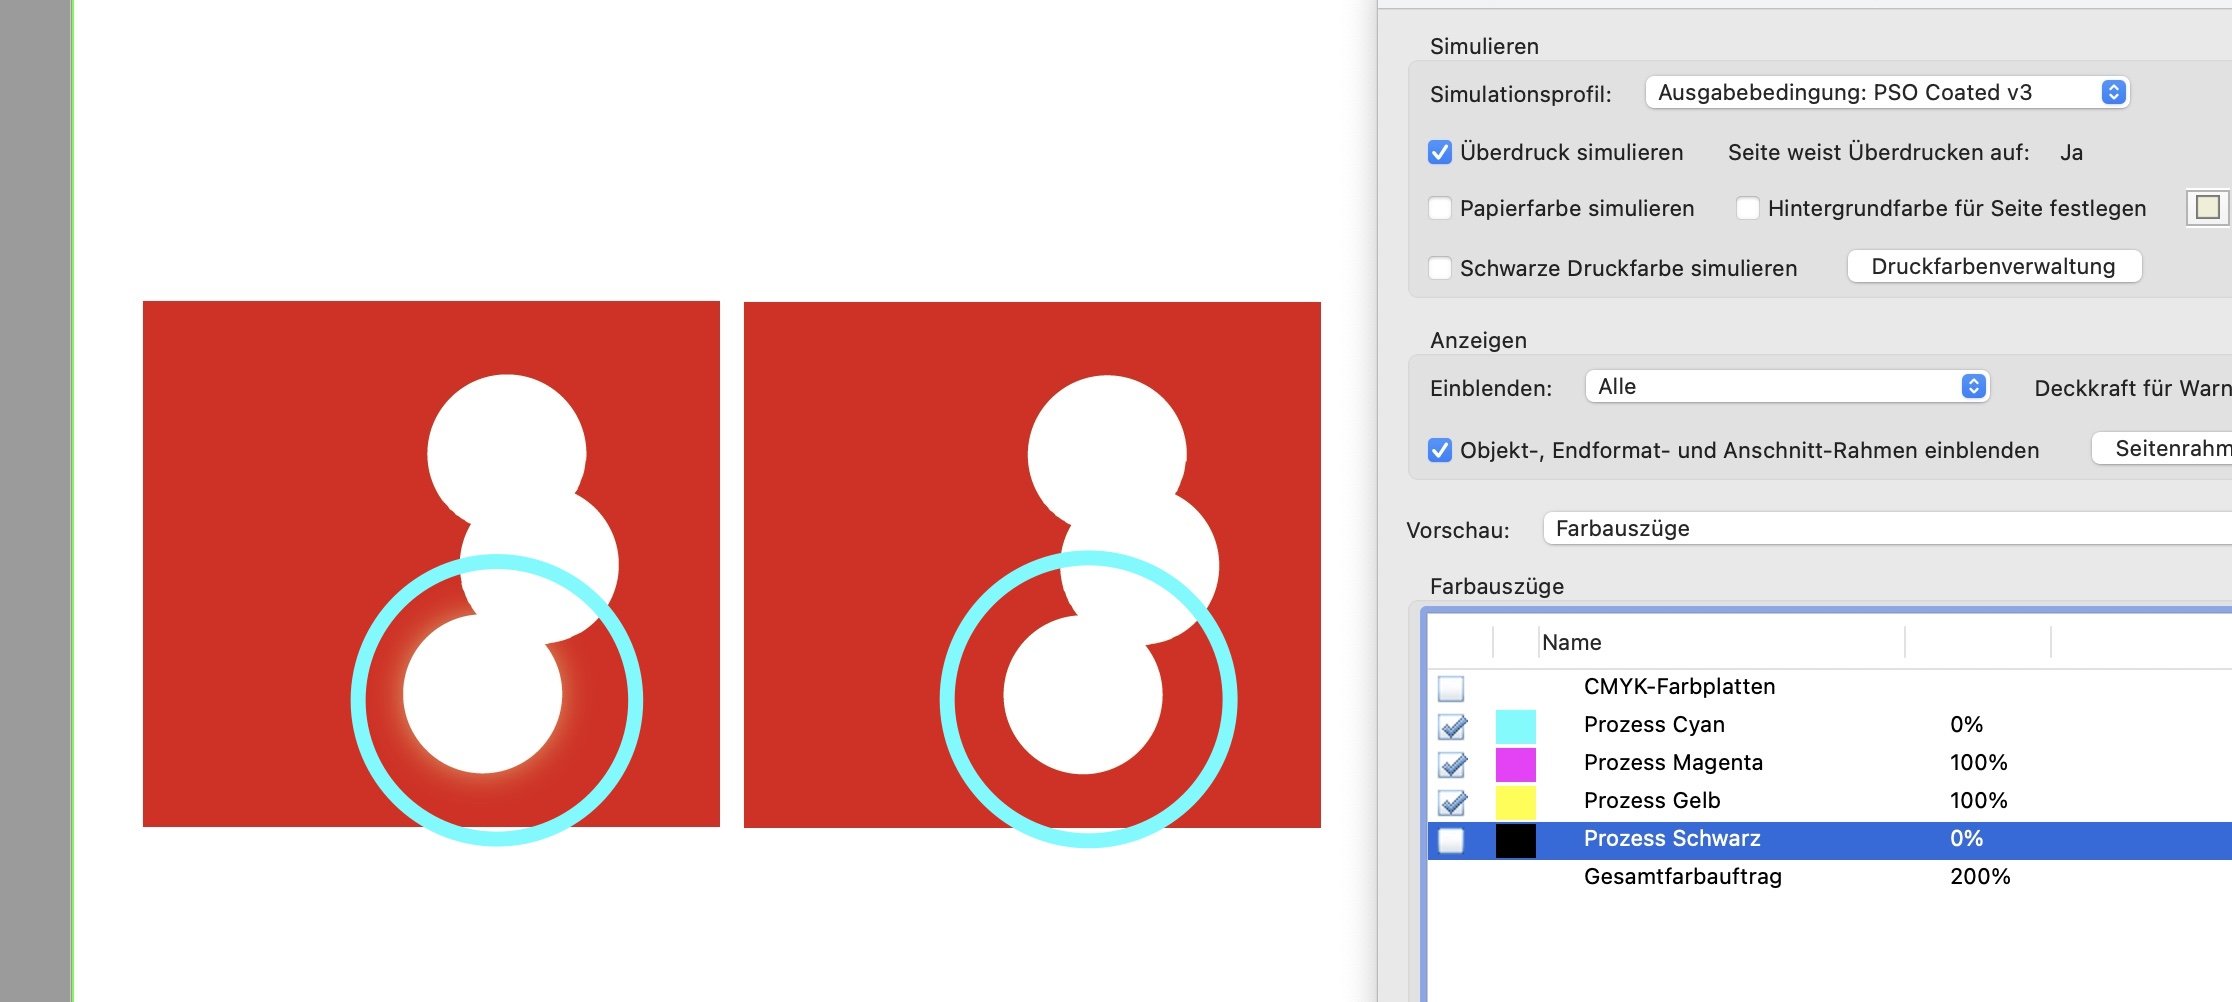
 Hello, I've posted that before, but in the current beta version the bug is still there and apparently got worse. If you assign a black drop shadow to elements (50% opacity, 100% K, darken) and then create a PDF X1a with the standard settings, then the last shadow is left out instead of added. You can see this in the separation preview in Adobe Acrobat. I have marked this with blue circles in the screenshot. On the left I used Outer Shadow. For comparison, I used Outer Glow on the right and the problem doesn't seem to exist here. Is this behavior really expected? What I then tried was to create a PDF X4 with the standard settings. Here all shadows in the separation preview are left out. Is that intended? Can anyone else reproduce this bug or am I the only one who has this happening? flattening.afpub flattening-x4.pdf flattening-x1a.pdf
-
Dear Affinty-Team How can I perform a soft proof on my calibrated monitor? About all pages in the document? With the current softproof function, this only applies to the current page. Not suitable for the control of several pages. Please insert the soft proof as a menu item that will help us to check all pages. Additionally, please also integrate the CMYK or spot color separation as a preview. As in Affinity Photo, we can hide the channels (eye icon), such as black, and check them before exporting to PDF/X for the print shop or large printing. These two functions help us a lot in the team. It helps to produce not wrong print data. Please do not wait for it. Thanks
-
AP crashes reproducibly when attempting a frequency separation. I usually do this from inside a macro that implements a widge filter. Interestingly the preview works, but as soon as I apply the macro it crashes. It also crashes when using the frequency separation directly. System info inside crash report: Crash report, Callstack etc is attached. CallStack_etc.rtf
-

Overprint preview
Lorox replied to jocstone's topic in Feedback for Affinity Publisher V1 on Desktop
No, obviously (and sadly) there is no separation preview yet. I wish there was, as these "details" as you put it are quite annoying to me , too. I'm actually a bit tired to have to run my Affinity exported PDFs through Acrobat Pro (which I fortunately have, but many among us may not) several times to hunt down those spots where these separation issues occur (most of due to Black not overprinting as it should). As to your example screenshot: are you sure that "Global Colour 155" you apllied to your text is actually just 100 % K and nothing else? More often than not I find that the colour applied to text that I was quite sure I had chosen Black (from the swatches panel) for wasn't actually 100% K but some "rich" Black containing degrees of CMY. I suspect that when I convert to or assign a CMYK colour profile to my document the grayscale swatches (including Black) don't get by default converted to just 100 % K (for Black) or percentages thereof (other grayscale tints). Or maybe elements which had been made "Black“ before retain their "old" mix-of-CMYK Black as those Grayscale swatches don't seem to be global by default. This certainly is harming me an my joy of using the Affinity apps, too, as each and every time when I finally check my PDFs meant for printing there seems to be some issue of this kind – something that has been an absolute exception during 15+ years of working in InDesign... -
I hope Separation Preview will come to Affinity Publisher. The only reason I still have Adobe InDesign on my Mac is for this feature. I import a PDF from Publisher in inDesign to check separations.
- 1 reply
-
- 3
-
-
 Yes, it is confusing, especially in dark UI mode. It is even worse when there are toggles: these two are basically clear as if i I click it, it will be chosen (even if I cannot be sure about the state just looking at the options). I think that Affinity apps -- when they export to commercial press -- always convert native colors to CMYK, even when it is not required (e.g. when exporting using PDF/X-3 or PDF/X-4). Raster graphic is normally placed in RGB format, and converted to CMYK if requested (or when required by specs, e.g. PDF/X-1a). I also always convert raster graphic (photos etc.) to target CMYK at export time so that the resulting file is DeviceCMYK, meaning that there is nothing to be resolved when the file is ripped, and I can check on my end that everything works as it should. Embedding the ICC profile makes the export file ICC-based, meaning that its color values need interpretation. As noted, this is confusing when using Adobe Acrobat Pro Output Preview, as you need to run a preflight report to first check which color profile is the CMYK target and then activate it to see the actual [= passed through, non-interprted] color values. But in addition to that, embedding the profile appears to confuse Ghostscript separation engine, and who knows if it can do the same with some ripping software, too, when rasterizing the file. Also, using Packzview, it can be seen that the profiles involved in creation of the exported file are included even when "Embed ICC profile" box is not checked, so i really do not get the point of embedding the profile, as it only causes problems. [EDIT: I mean: if a specific target is applied at the time of ripping for yet untranslated RGB colors, like photos, the colors would be converted correctly = "as expected", even if the target profile were not embedded. But because of this ambiguousness, I personally prefer delivering everything in target color space, not leaving any question marks.] But I might be wrong: in lack of proper documentation I prefer to produce in the "safe way", trying to simulate what I am accustomed to for decades when using Adobe apps. There the plain vanilla "press quality" has the following settings, which I typically use also when exporting from Affinity apps (possibly using the default PDF version 1.7, which would support best PDFs placed for passthrough (being the biggest version number supported): in Affinity apps the equivalent would be using PDF (press ready), forcing images to be converted to CMYK, and not embedding the ICC profile. Using a low PDF version (1.4) is failsafe and some printers may require it, but as mentioned, would cause problems if you have PDFs placed for passthrough that use a later version number. Using PDF/X based export methods would otherwise be "safe" but they are problematic as they easily mess placed PDFs (causing rasterization).
 -
 Pretty good to view seps in PDFTRON, but one essential tool is missing from separation preview - Total area coverage view - which I'm using a lot on the current job I'm working on, as the print service provider for this job will only accept pdfs with a 280% max ink density, I've even worked with printers that will only accept 260% so this feature is a must - it's really great that it can be sorted in a few minutes in publisher using a 160% global rich black and blend ranges which can be pasted throughout a document - would be a real pain in Adobe although you could run blend ranges as an action. Just out of interest, does anyone have an easier method of keeping within a low max ink density?
 -
Seven years (last Friday 1st October) and still can't print CMYK or nice sharp vectors to a capable postscript printer or rip without Affinity rasterising and converting to RGB - Maybe we'll get this capability when we get separation preview? fingers crossed
-
You probably mean a setup where UV varnish is defined as an overprinting spot color and then applied selectively on some shapes or text objects. If so, you would choose Add Global Color from the context menu of the Swatches panel, and then specify something like this: After the swatch is created, you would then apply it on the desired objects: When you export, ensre that spot colors are honored (in the More options of the PDF Export dialog box), so that you would get this: As the varnish is defined as overprinting, it does not knock out color from the underlying objects. Basically it could be defined using any visual color as it only marks the spots where the varnish will be applied. There might be point in making it a very bright color (rather than light yellow as I did), to make it stand out as to not be used accidentally. However please confirm with the printer how they want the UV layer to be marked, as it could be done in other ways, too (and is sometimes wanted to be delivered as a separate PDF rather than as a separation "color", or as separate pages in specific order). Or it may be that it must have a specific spot color name exactly, to be recognized as a varnish. It could also be specified as a PDF layer, in which case you would apply it on a "Layer" layer (one that can be created by clicking "Add Layer" button at the bottom of the Layers panel), and then export so the "Include Layers" option is checked in the "More" options of the PDF Export dialog box (in certain export modes this option is not available so the varnish then needs to be marked differently, e.g. as a spot color, as shown above, or exported separately). Affinity apps do not support overprint preview so you'd need to turn off the UV varnish layer to see the actual colors beneath it during editing and then remember to turn it on before exporting.
-
 I missing that I am referring to Designer. Having a correct preview of the color separation and color combination it a must to have!!
 -
Hello, I'm a photography and editing enthusiast. I've been learning this craft for a while and I'm a firm believer in sharing information so others can learn, and adapt it to their own needs. Many of the techniques I used to create these brushes and macros were not pioneered by myself, but I did create the brushes and macros contained within here myself. Installation Brushes Enable the Brushes studio panel if it is not already, click View > Studio > Brushes. Click on the Brushes studio panel, then click the Waffle icon. Click Import Brushes, and find the downloaded brush file on your system. A new brush category called "Retouching" will appear in the Brushes studio panel. Macros Enable the Library studio panel if it is not already, click View > Studio > Library. Click the Library studio panel then click the Waffle icon. Click Import Macros, and find the downloaded brush file on your system. A new macro category called "Retouching" will appear in the Library studio panel. Modifying Brushes Right click a brush and click Edit Macros Enable the Macro studio panel if it is not already, click View > Studio > Macro. Right click one of the macros and choose Edit Macro. Some steps allow you to click a gear and alter values. If you need to modify more in depth, unfortunately you will need to re-record the entire macro. I highly recommend opening a text editing program, and writing down each step in a macro before beginning to re-record. When done, you will need to click the button to Add to Library, or Export as an individual macro. What's Included Brushes Markup Pencil Brush Useful for making "notes" to yourself. 3x High Flow Brushes Hard, Satin, and Soft brushes. 3x Medium Flow Brushes Hard, Satin, and Soft brushes. 3x Low Flow Brushes Hard, Satin, and Soft brushes. This brush collection is sorted into each flow group by brush size (64, 32, 16) for easy identification when choosing a new brush. Choose a brush and resize it to the size that you need. Each brush has Pressure dynamics enabled for use with Art Tablets so that they offer a higher flow with more pen pressure, although they can also be used by mouse users. Macros Any Macro appearing with a *** warning text will run slowly and be very intense on your computer's system resources. I highly recommend letting these macros run, and just waiting for them to complete without attempting to do more work, or alt-tabbing to other programs. Luminosity Masks *** This macro manipulates channels to generate MASK LAYERS (not pixel layers), and deletes all created spare channels afterwards to avoid bloated files. To use one of the mask layers, drag the mask out of the folder and over another layer's picture icon so that it creates a vertical blue bar. Alternatively, drag the mask layer so that it appears normally in the layer stack (as if it were not clipped), right click the mask, then click Mask to Below. If you need more than one copy of a particular mask, right click the mask and click Duplicate. If you are interested in modifying the macro, I highly recommend watching Robin Whalley's video which is where I learned how to do this process within Affinity Photo. Black & White Generates a Black & White adjustment layer which is extremely close to an alternative B&W conversion method using a 50% grey layer set to Color. Shoutout to Ezra & Ally who teach the technique here this merely automates the process they taught. Solarize Generates a curve meant to be used to check color consistency across gradients, as well as useful for finding tricky dust spots / blemishes. This is not meant to be a creative effect, only useful for editing purposes. Dodge & Burn Generates curve layers with masks for dodging and burning. Use a white brush on the mask to reveal the effect. I've tweaked the blend ranges so that each effect rolls off, i.e. dodge will not effect the bright tones as much as it does the dark tones, burn will not effect the dark tones as much as it does the bright tones. Color Correction Generates a curve in both RGB and CMYK color space for basic color correction. Open the curve layer, use the picker tool inside the adjustment properties and click on the area of the image you wish to correct. Some knowledge of color theory is useful here. Contrast Simple curve layer with an S-Curve to boost image contrast. Local Contrast & Sharpening *** Do you enjoy the Clarity filter, but hate how little control it gives you? Give your image some punch while being able to dial in the amount of local contrast boost and sharpening independantly. For more effect, feel free to duplicate either layer. Use a mask on an individual effect, or the whole group. Frequency Separation - Bilateral *** Some editing workflows prefer using a different blur to the gaussian method of the built-in filter. Because of limitations of how Macros work, the blur will not generate an actual preview. If you need to preview what you are doing, please create a merged visible layer (Ctrl + Alt + Shift + E), then run the Bilateral Blur filter. Record the values you find to be useful, then delete the merged layer and run the macro. FAQ Reserved for future questions that may come up Retouching Dynamic.afbrushes Retouching.afmacros
-
 Unfortunately this is not possible. Have addressed this topic before as this is a function that is also very important to me. I, too, have long wanted the separation preview in all three programs, because I also need this function for checking. The only way you can currently have is to open the file in Affinity Photo and see the preview of the individual color channels there. Unfortunately I was not able to see real colors like this.
 -
 Status: Beta Purpose: Features, Improvements, Fixes Requirements: Purchased Affinity Photo Mac App Store: Not submitted Download DMG: Download Auto-update: Available. Hello, We are pleased to announce the immediate availability of the latest beta of Affinity Photo 1.7 for macOS. Photo 1.7 is a (very) significant change to the currently shipping 1.6 version, so, as ever, I would strongly urge users to avoid the 1.7 beta for critical work. This is a pre-release build of 1.7 - we will release more builds before 1.7 ships. Things will be broken in this build - please use it to explore the new features and not for real work. If this is your first time using a customer beta of an Affinity app, it’s worth noting that the beta will install as a separate app - alongside your store version. They will not interfere with each other at all and you can continue to use the store version for critical work without worry. It’s also worth noting that we aren’t done yet - we are still working through reported bugs from previous releases and hope to fix as many as possible before the final release of 1.7. With all that said, we hope that you will enjoy the new capabilities introduced in this release and we look forward to any and all feedback you give to us. Many thanks (as always), Affinity Photo Team Ps. I promised to shorten this massive post but forgot, because I went skiing. I will sort it out soon! Changes This Build - Significant stability improvements when working on non-local files (network shares, USB drives, etc.). - Added support for 12bit TIFF files. - Resizing a document will treat Live Filters correctly. - Tidied drawing of layer tag colours. - Fixed some UI which was moving around when changing UI from light to dark (!). - Drag & drop from browsers will now work properly again. - Double clicking an asset will now switch to the place tool. - Fixed some crashes caused by the new metadata library. - Fixed some vector export issues (excessive rasterisation). - Assorted Metal performance tweaks. - Clone tool fixes (when using layers-beneath with transformed destination layer, etc.) - Denoise improvements. - Ability to drop things into the assets panel directly from Finder. - Assorted vector tool improvements. - Improved adjustments responsiveness. - Patch tool now supports arrow keys for rotate / scale. - Fixed live perspective tool drawing when resizing document. - Fixed blend modes on adjustments when Metal is enabled. - Paint mixer tool remembers settings. - Fixed Export Persona sometimes rendering a black surface. - Faster rendering of Styles panel previews. - Fixed some double-click-on-slider-to-reset bugs in adjustments. - Fixed inpainting preview not showing if you have a pixel selection. - Fixed liquify not prompting for save sometimes. - Fixed rasterise command sometimes moving layers. - Fixed lock-children bugs. - Fixed Brightness / Contrast in 32bit RGB mode. - Assorted other small fixes. - Improved help. - Localisation improvements. Changes In Previous 1.7 Beta Builds - All ICC transforms are now performed using Metal, hence many times faster. - Introduced new metadata mining - completely rewritten to improve performance, flexibility and correctness. - TIFF export now has user selectable compression method. - When using selection tools with no pixel selection, default to New / Add as appropriate. - Add a button in general preferences to open a folder from which Photo will read LensFun-style XML files - if users wish to add / experiment with their own lens profiles. - Compatibility with latest Designer / Publisher builds. - Missing icon for Procedural Texture tool. - Can assign keyboard shortcut to new Assets panel. - Light UI improvement for advanced history view. - Toggling “Apply tone curve” in develop assistant will correctly update the histogram. - Improved rendering of mask thumbnails when layers panel is set to checkerboard previews. - Can now drag .afassets into Photo. - Fixed loading of monochrome RAW. - Fixed some select tool issues (mainly bounding boxes, duplicate issues, undo issues). - Pen tool / node tool improvements. - “Lock guides” added to menus. - New look for persona icons. - Fix issues with bitmap fills when Metal is enabled. - Fixed long standing issues with TIFF / RAW files opening in the wrong persona. - Tidied up the colour tagging UI for layers. - Implemented layer colour tagging PSD import / export. - Fixed issues when trying to paste images copied from Safari. - Fixed issue when toggling rulers in Develop persona. - Assorted other small fixes. - Localisation improvements. - Help improvements. - Added an “Assets” panel to Photo. - Ability to lock brush symmetry. - Layers page - removed the glow around thumbnails. - Layers page - added option for transparent background for thumbnails. - Layers page - added multiple thumbnail size options. - Layers page - added ability to tag layers with a colour. - New ability to control how macros are scaled / aligned when playing back. - The History page now has an “advanced” mode - which shows thumbnails and time info. - Metal rendering performance improvements. - Fixed issues when dragging the HSL adjustment wheel with no range selected. - Added “Rasterise & Trim” into right-click menus. - Tool shortcut improvements. - Prevent Frequency Separation from being “faded”. - Fixed bugs with mask rendering. - Fixed lazy update of opacity / blend mode on adjustment dialogs. - Added ellipsis to adjustments flyout in layers page. - Improved macro recording of paint mixer (again). - Dragging the crop tool frame will always pan. - Crop tool - pressing “reset” will revert to “initial-drag-to-set” mode. - Tone map white balance sliders should reset on double click. - Fixed “Colour dodge” blend mode in 32bit RGB. - Fixed import of PSD documents with groups containing only masks. - Improved support for CR3 RAW in the Core Image engine. - Fixed issues when live filters were placed inside vector layers. - In the Develop persona, the state of the clipping toggles is now correctly updates when switching documents. - Portrait images now work properly with the undo brush. - Fixed inability to manipulate the lighting filter inner cone if it has been moved too far. - Fixed issues where red inpainting previews could linger. - Reduced memory footprint when developing RAW. - Noise reduction slider range improvements. - Improved stack alignment. - Numerous other small fixes. - Localisation improvements. - Help improvements. - Fixed some mask rendering issues. - Fixed 32bit vibrance / saturation issues. - Added a “Reveal Canvas” checkbox to the crop tool - defaults to off. - Shorted the length of some crop tool context bar items. - Crop tool remembers settings for darken, reveal, overlay. More to follow. - Develop tool remembers the state of clipped shadows / highlights / tones. - Metal stability fixes when under extreme memory pressure. - Support for drag dropping .afstyles into Photo. - Support for drag dropping .afpalette into Photo. - Added new “Transform object separately” mode into Move tool. - Sub-brushes can now added by dragging from the main Brush panel. - Sub-brushes can now be drag-reordered. - Fixed some dark mode UI issues. - Potentially fixed some colour rendering issues (reported by ronnyb). - Live field blur control handle fixes. - Voronoi filter Metal implementation optimised - hopefully fixes issue where only part of it would apply on some GPUs. - Tool cycling will now start with the last remembered tool in the group. - Fixed Linear Burn blend mode issues. - Improved speed of painting with Wet Edges in 16bit mode with Metal enabled. - Removed extraneous “Filter” from live filters menu, added ellipsis. - Implemented subtract blend mode for LAB. - Fixed issue whereby setting clone brush to “Current Layer & Below” would produce hard edges. - Clone brush origin now follows cursor properly when using Aligned mode. - Fixed various issues with resizing documents - mainly to do with masks or filter effects. - Fixed copying areas on rotated documents not copying the correct area. - Frequency separation can no longer be “faded”. - Numerous other small fixes. - Help improvements. - Fixed occasional temporary corruption when using brush tools. - Fixed crashes with Apple Photos extensions. - Added round dot type to the halftone filter. - Grouped tool shortcuts now default to needing the shift key held to cycle (option in preferences). - Fixed orientation issues with tone mapping preset thumbnails. - Improved inpainting stability. - Add “Fill with Primary / Secondary” to the Edit menu for fast access. - Allow adding an empty group from the Layer menu. - Made more commands show a meaningful progress bar. - Fixed erratic behaviour when continuing to drag after shift-clicking for a straight line in brush tools. - Fixed failure to apply blend mode to Levels adjustment if Metal compute is enabled. - Improved UI colour controls when working in RGB/32. - Levels histogram how shows more visible black / white lines in light UI mode. - Blend mode flyouts are now ordered and grouped. - Fixed brushes with a “Final” texture looking different when used inside a pixel selection. - Switch to next view now works in separated mode. - Switch to previous view can now be assigned a shortcut. - Fixed issue with White Balance rectangle becoming detached from mouse position in Develop. - Fixed “New Stack” creating a blank document when “Align Images” is not checked. - Fixed issue whereby freehand selection tool can get stuck when using polygonal mode. - Fixed issue where rotating RAW can result in it getting clipped after developing. - Fixed issue where the move tool can report incorrect boxes for pixel selections. - The crop tool now obeys the global snapping enable state. - New “Duplicate Selection” item in Layer menu (old behaviour). Duplicate now duplicate the whole layer ignoring pixel selection. - Straightening in the Develop Persona now creates an undo entry. - Spacebar-pan now works properly in Develop Persona. - Numerous other small fixes. - Fixed gamut clipping issues in develop. - Develop now respects the output profile when previewing. - Fixed CMYK render issues when using Metal. - Fixed PSD import / export of 32bit masks. - Fixed some PSD path import issues. - Further Soft Light blend mode fixes. - Fixed Diffuse Glow when Metal is enabled. - Fixed blur issues with Mesh Warp. - Histogram accuracy improvements. - Made auto-rasterisation more consistent across tools / filters. - Fixed HSL adjustment failing to clamp saturation and lightness properly. - Adding a Live Denoise layer from the layers panel now uses the improved new algorithm. - Added support for CR3 RAW when using the Core Image engine. - All brush tools can now be axis constrained once brush has started - not just the pixel tool. - The flood select tool now has a refine button. - The symmetry lines number is now more correct / meaningful. - Attempted to fix crashes with mixer brush etc. - Small Touch Bar improvements. - Fixed macro recording of brush commands (again). - Fixed issue which occasionally produced blank panoramas. - Improved selection refinement in 32bit RGB. - Improve healing brush performance. - New cube setup mode for grids. - Focus merge now correctly respects ICC profiles. - Fixed potential infinite loop in inpainting. - Better inpainting of transparent parts of a rotated image. - Fixed artefacts in the Patch tool. - Alt / Option is now used to make a pixel selection from layer luminance. You can now also hold shift to add the result to the current selection. - Fixed 16bit luminosity blend mode. - Liquify now updates the UI properly and remembers settings on a per document basis. - Inpainting now remembers the source mode properly. - Fixed issues with the default “G” shortcut (gradient, fill). - All brush tools now offer primary / secondary colours in the colour page. - Fixed issues with some Fuji RAW files showing at the wrong size. - Fixed colour picking issues in Edit -> Fill (mainly with CMYK). - Attempted to fix some Core Image RAW loading issues. - Attempted to fix slowness issues when doing a lot of painting. - Try to fall back more gracefully if Metal fails for a particular operation. - Numerous other small fixes. - Help improvements and search fixes. - Significant improvements to selection refinement. - More tools will now rasterise non-pixel layers on use. - Fixed histogram statistics (was including alpha channel in calculations incorrectly). - Improved TIFF import support. - Fixed some localisation issues on the Glyph Browser panel. - Small UI alignment tweaks. - Fallback to 96dpi for imported JPEG, PNG - not 72. - Fixed mesh warp blurry issues when Metal disabled. - Fixed Metal implementation of Diffuse Glow. - Fixed some PSDs which would not import due to path issues. - Fixed CMYK rendering (again) when Metal is enabled (blacks would go weird). - Attempt to fix the odd black square appearing in the view. - Further improved Scale / Rotate stacking alignment. - Fixed orientation issues with some panoramas (upside down). - Reduce file sizes by discarding old snapshots properly. - Fixed recording of resize document sampler method in macros. - Fixed recording of paint mixer brush in macros. - We now use Ctrl+number to change flow in the brush tools - not Cmd. This fixes Cmd-0 zoom etc. - Fixed resize document issues with layer effect scales. - Fixed liquify tool auto-commit issue when switching persona. - Crop tool Touch Bar fixes. - Assorted small fixes. - Help improvements. - Hide / Show / Show All Layers options in layers menu. - Remove new destructive modes from crop tool (for now - will revisit). - Fixed crash when RAW contains malformed GPS data. - Fixed levels adjustment alerts. - Fixed 32bit issues with Soft Light blend mode. - Fixed flood fill bugs when colour is not opaque. - Fixed various TIFF files which tried to load into develop persona. - Fixed Voronoi bug if image has alpha channel. - Allow Cmd key to be held when typing numbers in a brush tool (will change flow instead of opacity). - Fixed remaining LUT export bugs. - Small memory management improvements. - Fixed red-eye correction in develop. - Develop noise reduction performance improvements. - Improved visibility of selected hue range in HSL UI in light mode. - Fixed issues where sub-brushes could get reset. - Sub-brush spacing / size sync buttons work properly. - Dark / light UI improvements in brush editor panel. - Fixed more Radeon R9 issues. - Fixed more CMYK issues. - Fixed some PDF import bugs. - Numerous other small fixes. - Help improvements. - The crop tool now defaults to the old behaviour (destructive). - Added lens correction data for more cameras. - More double click support for resetting adjustment sliders. - Further HSL improvements in 32bit mode. - Fixed issues when using Edit -> Fill with a transparent colour. - Fixed issues exporting HDR files when some pixels have negative values. - Fixed TIFF ZIP compression issues. - Fixed a sporadic crash when exporting PSD. - Fixed lens correction for Panasonic DMC-TZ60. - Fixed orientation of RAW images during HDR merge. - Fixed noise reduction in non-RGB documents. - Fixed scale + rotate alignment mode in stacking. - Reduce develop memory usage and further improve loading speed. - Fixed recolour adjustment slider colour issue. - Fixed displacement map “load from beneath” sometimes including the current layer. - Fixed CMYK rendering on Radeon R9 GPUs. - Fixed motion blur etc. disappearing in 16bit documents with Metal enabled. - Fixed equation transforms not working in macros. - Fixed incorrect RGB / BGR / Red-major-order export of LUTS. - Ability to either rasterise or rasterise and trim a layer. Previously recorded macros will trim. - Fixed issues when parsing autofocus rectangles in RAW develop. - Show which autofocus rectangles were in focus and which were selected by the camera (yellow, green respectively). - Fixed inability to open photos from Apple Photos from file -> open. Now correctly asks for permission. - Threshold adjustment will always present an intensity histogram. - Improved histograms on curves and levels adjustments. - Fixed LAB issues with edge detection filters. - Switching between adjustments and filters will close any existing panels accordingly. - Fixed incorrect ability to drag a locked layer when there is no layer selection. - Fixed loading of 8/16bit images with linear RGB profiles. - Can now double-click most sliders in adjustments UI to reset the individual parameter. - Make it obvious which nozzle is selected in the brush editor UI. - Other small fixes. - Improved Metal stability / performance with large documents. - Fixed a number of dark mode issues. - Fixed preview glitches in split preview mode for filters / develop. - Fixed batch processor not obeying dimensions correctly. - Improved Procedural Texture UI in light mode. - Allow brush rotate / size key changes while dragging. - Numerous text engine improvements. - Fixed cursor issues with HSL and other adjustments. - Fixed issues with some menu shortcut keys. - Improved PDF export. - Improved localisations. - Numerous other small fixes. - Fixed CMYK rendering when using Metal. - Fixed loading of huge JPEG files. - Added “Alpha Similarity” to Select Sampled Colour tool. - Fixed a number of crash bugs in the adjustment panel. - Fixed issues with some existing user documents crashing in 1.7. - Assorted other fixes. - Show the Curves / Levels histogram in the correct colour space. - Fixed some GPU memory management issues. - A further attempt to fix the HSL UI crash. - Improve performance on Intel Iris Pro GPUs. - Improved help. - Numerous other small fixes. - Fixed hardware acceleration issues on certain iMac devices. - Fixed a number of brush bugs. - Fixed hang in HDR merge with GPU enabled. - Fixed HSL adjustment UI crash, - Fixed Procedural Texture UI issues when switching from dark to light UI. - Fixed Curves adjustment clamping issue when GPU is enabled. - Fixed 3DLUT adjustments when GPU is enabled. - Fixed issues with sub-brush UI. - Numerous other small fixes. - Added pixabay.com to Stock panel. - New welcome screen graphics. - New persona icon graphics. - New splash screen. Changes Since 1.6 Release Performance - The core processing engine in Affinity Photo has been rewritten to take advantage of the powerful discrete AMD GPUs in modern Mac hardware. It will now automatically use any compatible discrete GPU, alongside the Intel GPU support present in 1.6. Typically this improves compositing / editing performance by at least 1000%. Performance when using integrated Intel GPUs has also been massively improved. - External GPUs (eGPU) are also supported - including hot-plug-and-unplug support. - Multiple GPUs are supported - if you have more than 1 GPU (ie. Intel + AMD in MacBook Pro, or Intel + eGPU in other Macs) Photo will use them all, at the same time, to improve performance. There is no limit to the number of GPUs which can be used. Brushes - Photo 1.7 introduces a new “sub-brush” mechanism, developed in conjunction with Paolo Limoncelli (DAUB® Brushes). This exciting feature allows any brush to have a list of other brushes attached which will draw at the same time. Each sub-brush has a fully separate and customisable set of dynamics. You can control when the sub-brushes are drawn and how they blend with the main brush. - The brush engine in Photo has been rewritten to use the new GPU architecture described above. With GPU support, even huge brushes with 1% spacing will perform well. All brushes / brush tools are accelerated. - Symmetry (up to 32-way) is now supported - including on-canvas controls and optional mirroring. We have more symmetry features on the way - so stay tuned during the beta process. - Wet edges and accumulation are now available on colour brushes and brushes with HSL variance. - Brushes with multiple nozzle textures have always chosen the nozzle at random. In 1.7, the nozzle choice has a dynamic controller and ramp for greater control. - All brush tools now support left and right arrow keys for rotation - a common feature request RAW - The RAW processing engine in Photo has been rewritten - producing better results and improved performance. It also takes advantage of the GPU architecture changes described above. - RAW files now load much more quickly - especially if you have a compatible GPU. - Reimplemented support for XTrans sensors. - The denoise algorithm has been rewritten. It produces better results and takes advantage of the new GPU architecture. - Hot pixel removal is now automatically performed by the Serif Labs engine. - Profiled lens correction are more stable, apply more quickly, and can be toggled in the Develop UI. - The histogram in the Develop persona is now presented in the output colour space - as opposed to always being linear. Filters - New “Procedural Texture” filter with advanced presets support. - New “Voronoi” filter. - Denoise, Clarity and Shadows / Highlights filters have been rewritten (using technology from the Develop Persona). - More filters are now available as Live Filters - including the new Procedural Texture filter. - Live filters have been rewritten to improve performance - especially when multiple filters are used in a document. - Improved Polar to Rectangular and Rectangular to Polar filters. Adjustments - The HSL adjustment layer has been rewritten. It now supports custom hue ranges, a new algorithm, new UI and picker controls. - The Levels adjustment layer now supports output levels - a common feature request. - The White Balance adjustment layer has been rewritten. - The Selective Colour adjustment layer has been rewritten. - PSD import / export of adjustments has been improved. - The Vibrance adjustment layer has been rewritten. - The Recolour adjustment layer has gained a lightness slider. Tools - The Crop tool has been rewritten - it now supports resolution changes, absolute pixel size and has a much improved preset mechanism. - The Sponge Brush tool now gives more correct / pleasant results. - A general tools overhaul has been performed - providing editing of grids, guides, page origin, across multiple tools (not just in the Move tool) General - “Alternate futures” for document history have been added. Traditionally, if you roll back the undo history then do something else all your changes after that point are lost. Photo will now display a small branch icon in the history tab when you do this. Pressing that button will cycle between all the different “futures” after that history entry - meaning you will never lose work you have done. - HEIF images can now be loaded directly into Photo. If they contain a depth map, this will also be loaded as a second layer. Because depth maps are typically lower resolution than the main image, optional “smart” upsampling will be performed. - A large number of new cameras are supported for RAW development (we will provide a list of the new supported cameras as soon as possible!). - The batch process dialog now fully supports expressions for height and width - available constants are “w”, “h” and “dpi”. - Photo now supports custom document presets - a popular feature request. - A new blend mode - Linear Burn - has been added. - New “Move inside / outside” commands have been added - useful for quick operations on clipping masks etc. - The Hard Mix blend mode has been improved. - New provider options have been added to the stock panel - support for Unsplash and Pexels. Both of these providers offer full-resolution stock imagery which is free to use. - Metadata is now dynamically synchronised with your document - so if you resize then export, the values will be correct. - Numerous text improvements have been made - including new features. - Significant PDF import / export improvements and fixes. - Numerous other bug fixes - too many to list!
 -

Overprinting black for text - Not working
Andrew Heath replied to Andrew Heath's topic in V1 Bugs found on macOS
Hi Prophet, as I mentioned earlier. I only have Acrobat reader. So can't see separations. Previously, I had used the preview in Affinity Photo but that did not give an accurate separation as far as I can see. I am only going from what the repro people at the printers are telling me is the situation with the pdfs I have been sending. If, the settings that I have mentioned above work... then it looks like overprinting the text in black can work.