Search the Community
Showing results for tags 'affinity photo'.
-
 Hi! I just got the Email informing about the new version and updated my Affinity Photo. It said in the email that I would see a link for the free content download when opening the app. However, that link didn't show up. How can I access that link?
 -
Hpapy Halolewen (Affinity Photo) http://b-bertuleit.de/hpapy-halolewen/
-
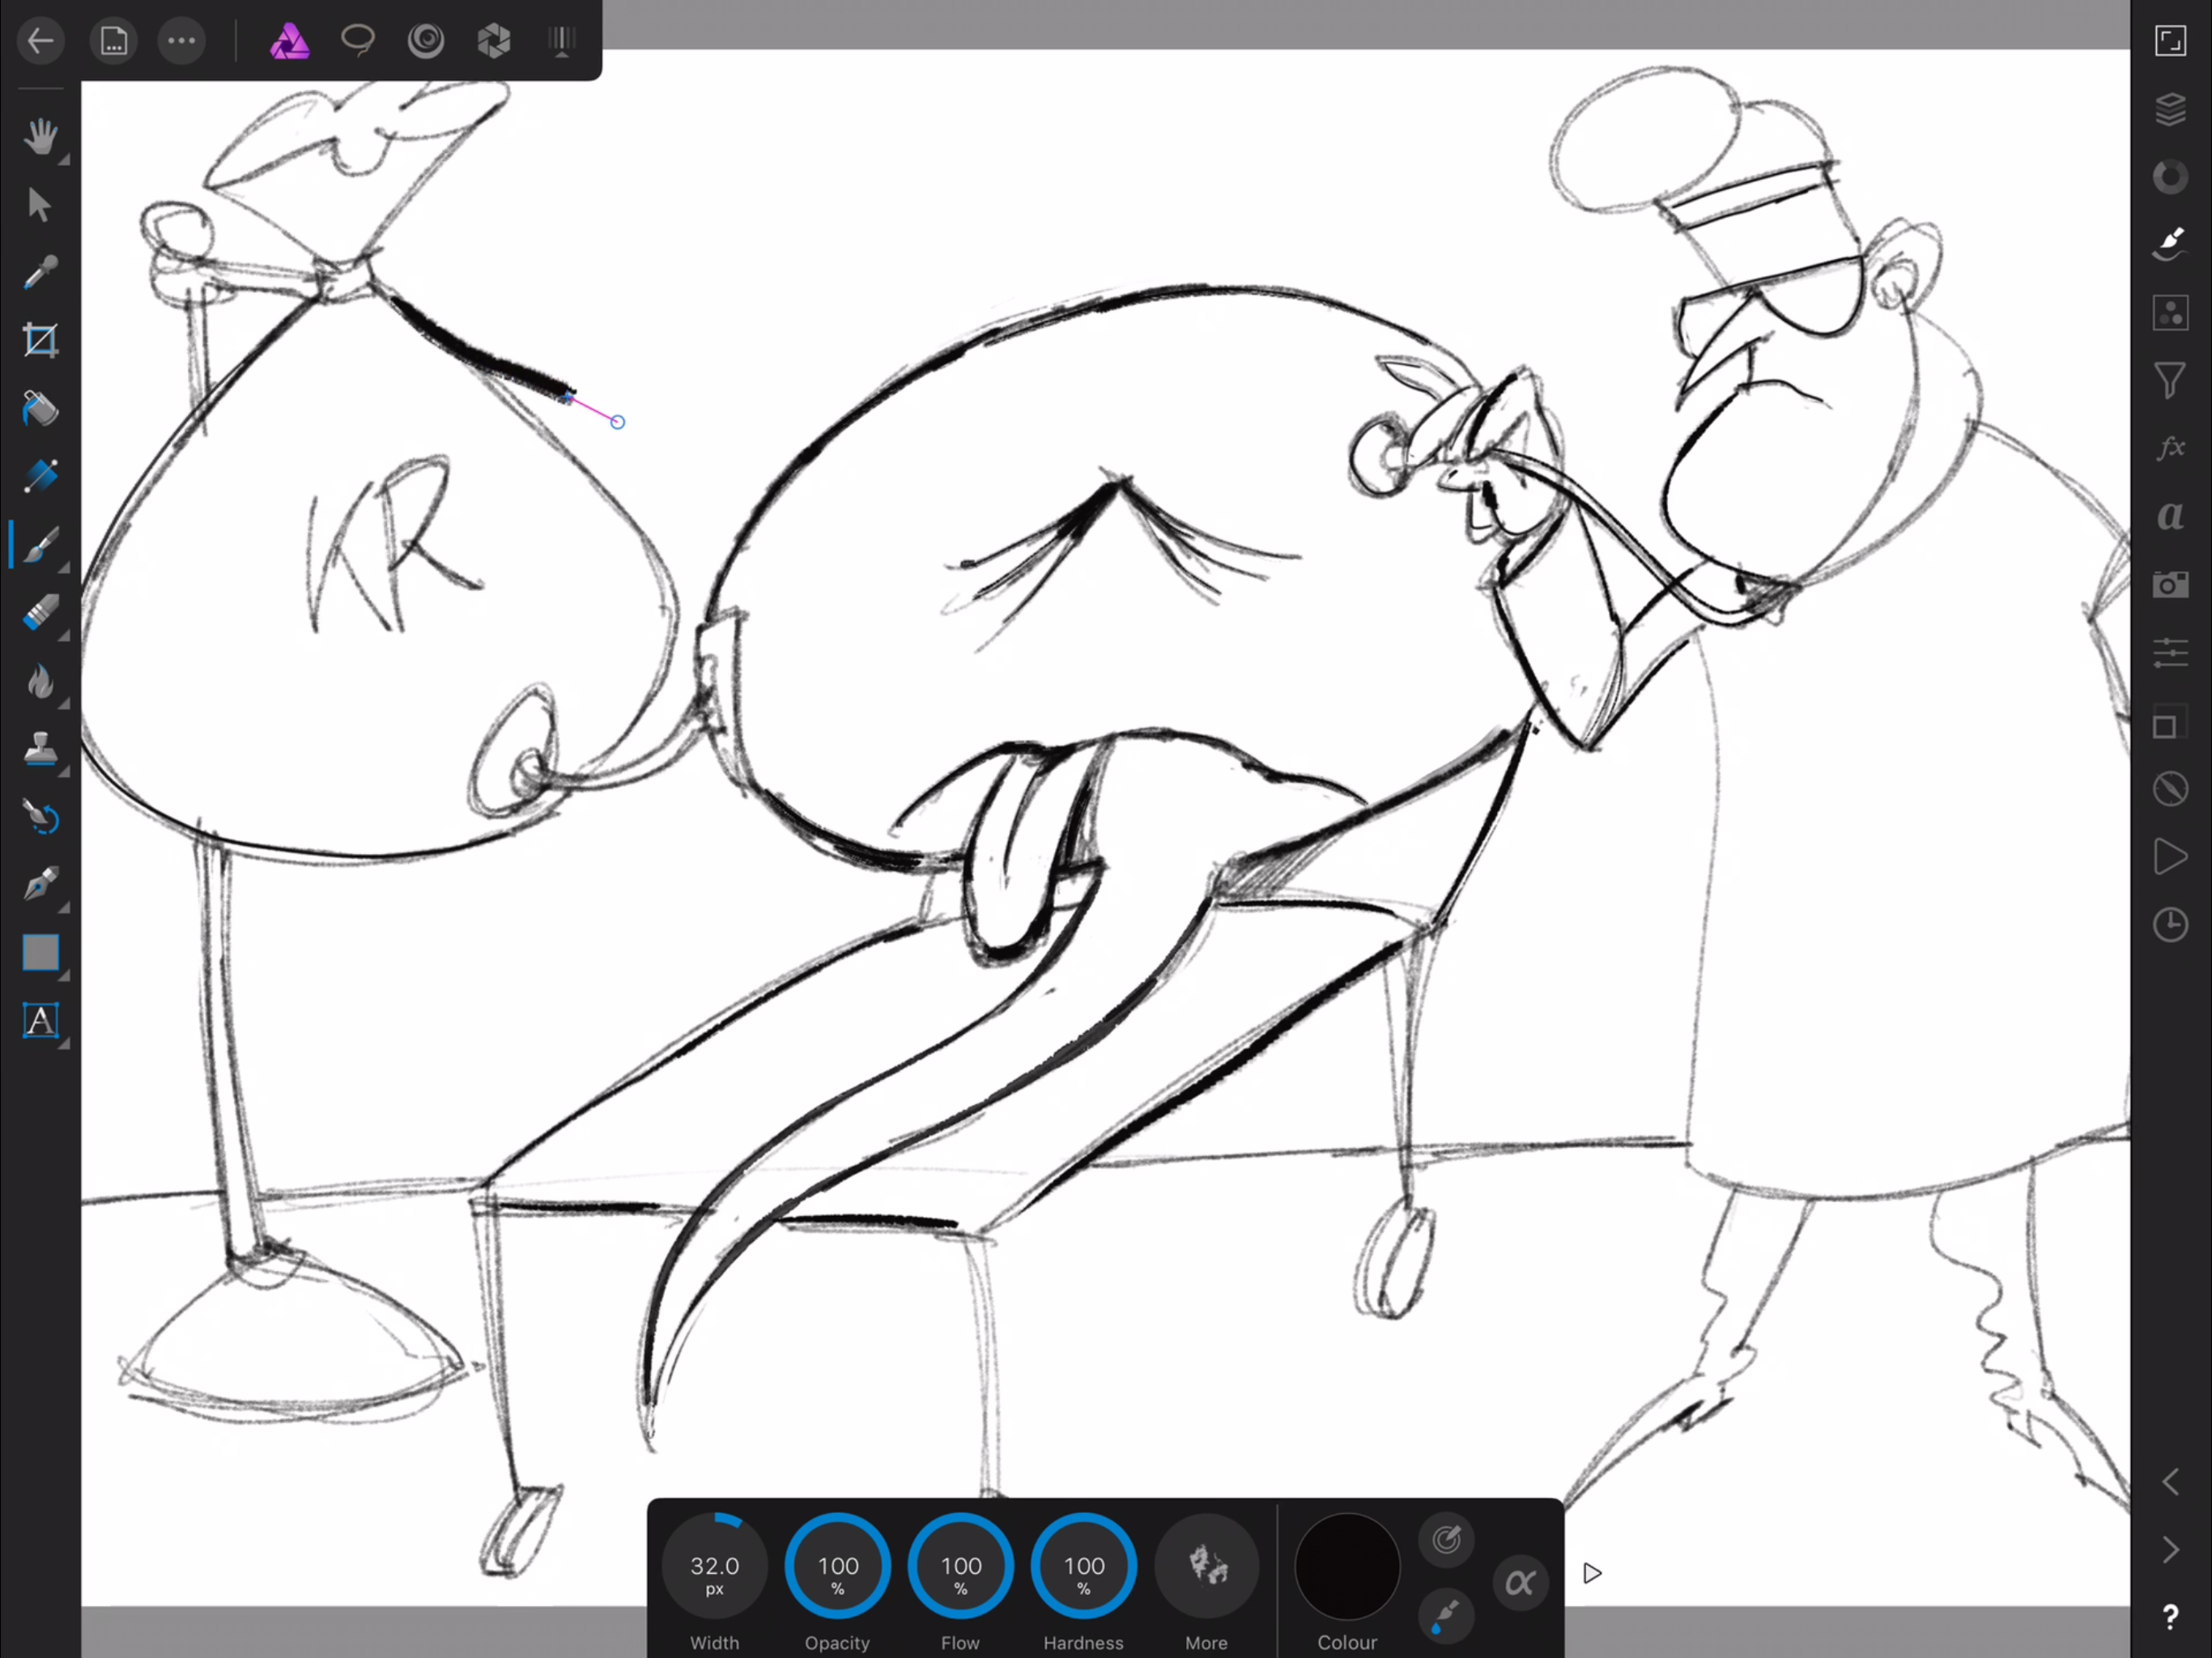
 So far I had only used AP for photo editing on my iPad Pro, but finally got around to draw and paint in it yesterday, and I was enthusiastic! This was as close to draw on paper as one can get on a screen, I thought. Better than Procreate even, which I’ve been using for my daily work since I bought the iPad Pro when it first came out - but I was disappointed today and had to give up on it and shared the drawing I had started with Procreate and finished it there. What went wrong? Well, it started to lag. The line was dragging several millimetres behind the tip of Pencil and it made it impossible to draw with quick strokes as is my manner. There is still plenty of space on the iPad, more than 80 gb out of 128 and the drawing wasn’t that large, either. So, anyone else experienced this? Is there a fix? I’ll attach a short screen recording which shows what happens. ADFC4E31-3A27-4ED0-97C2-A065AF00998F.MP4 The screen recording didn’t play on my iPad at least so I attach a screenshot, too.
-
 Hi, i’m using an iPad Pro 12.9” and iOS 11 the most recent version, plus the most recent version of Affinity Photo. i’ve noticed That when I use the Patch Tool or the Healing brush tool do more than just their usual duty and also slightly blur the part of the image I use them to paint over. It kind of kills the detail of the picture. Am I doing something wrong? Is there a setting that effects this? often times I use the frequency separation filter and when I do, my hope is that the high frequency layer will remain in clear detail, but the Healing brush or and patch Tool just blur everything...
 -

affinity photo little bit playing with Affinity Photo...
Tom Schülke posted a topic in Share your work
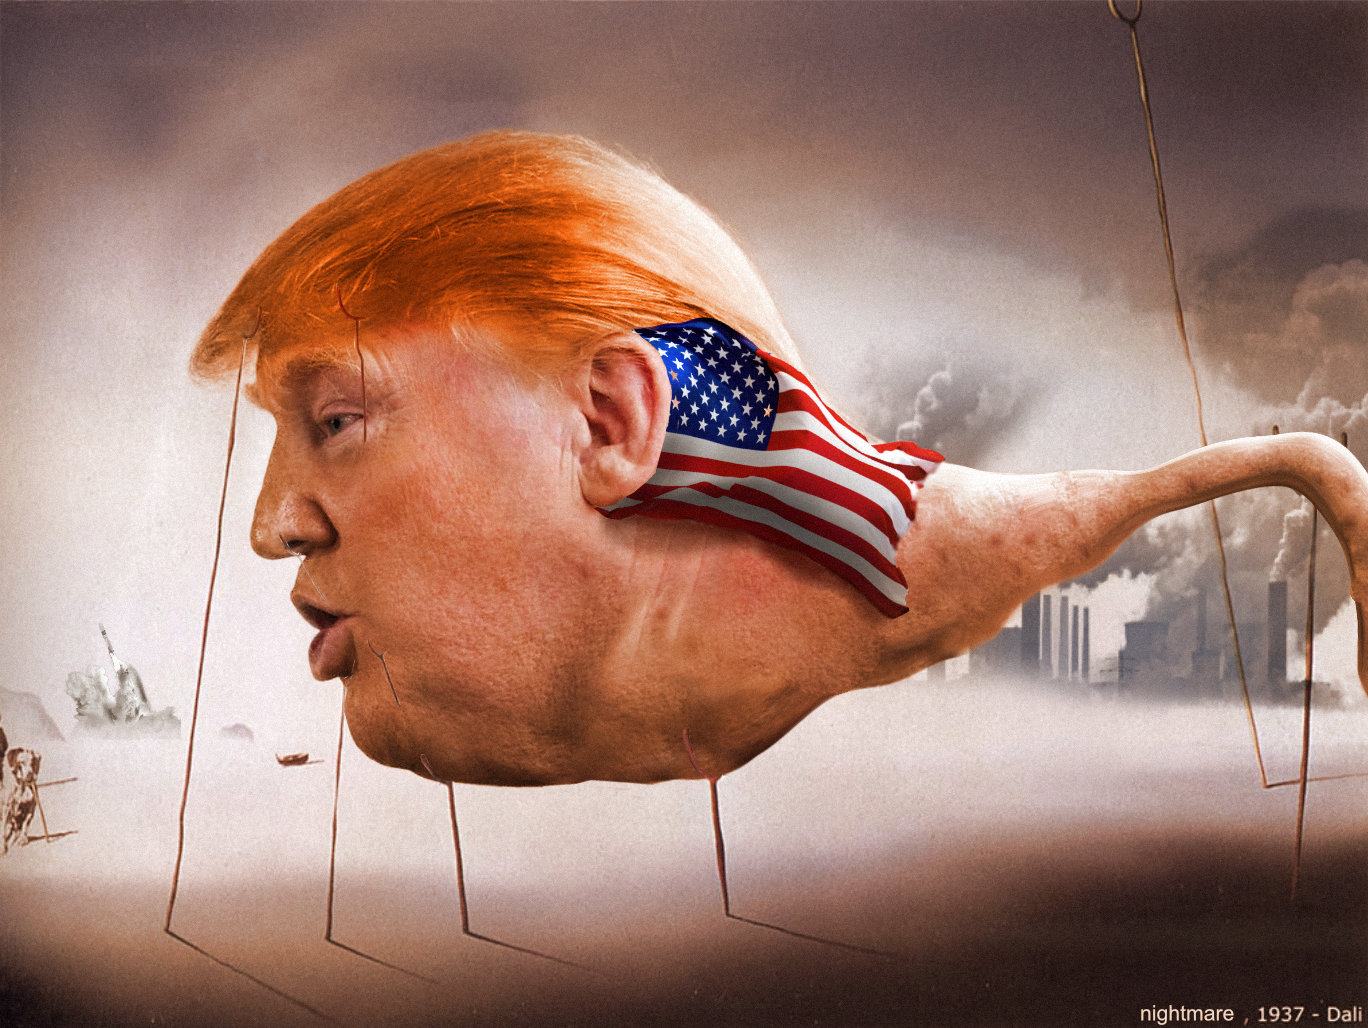
ok.. its not a real "Salvador Dali" but somehow the original Photo i found of this very special Guy.. remembered me of Salvador Dalis immage... " sleep".. so i just played a bit.. greetings.
-
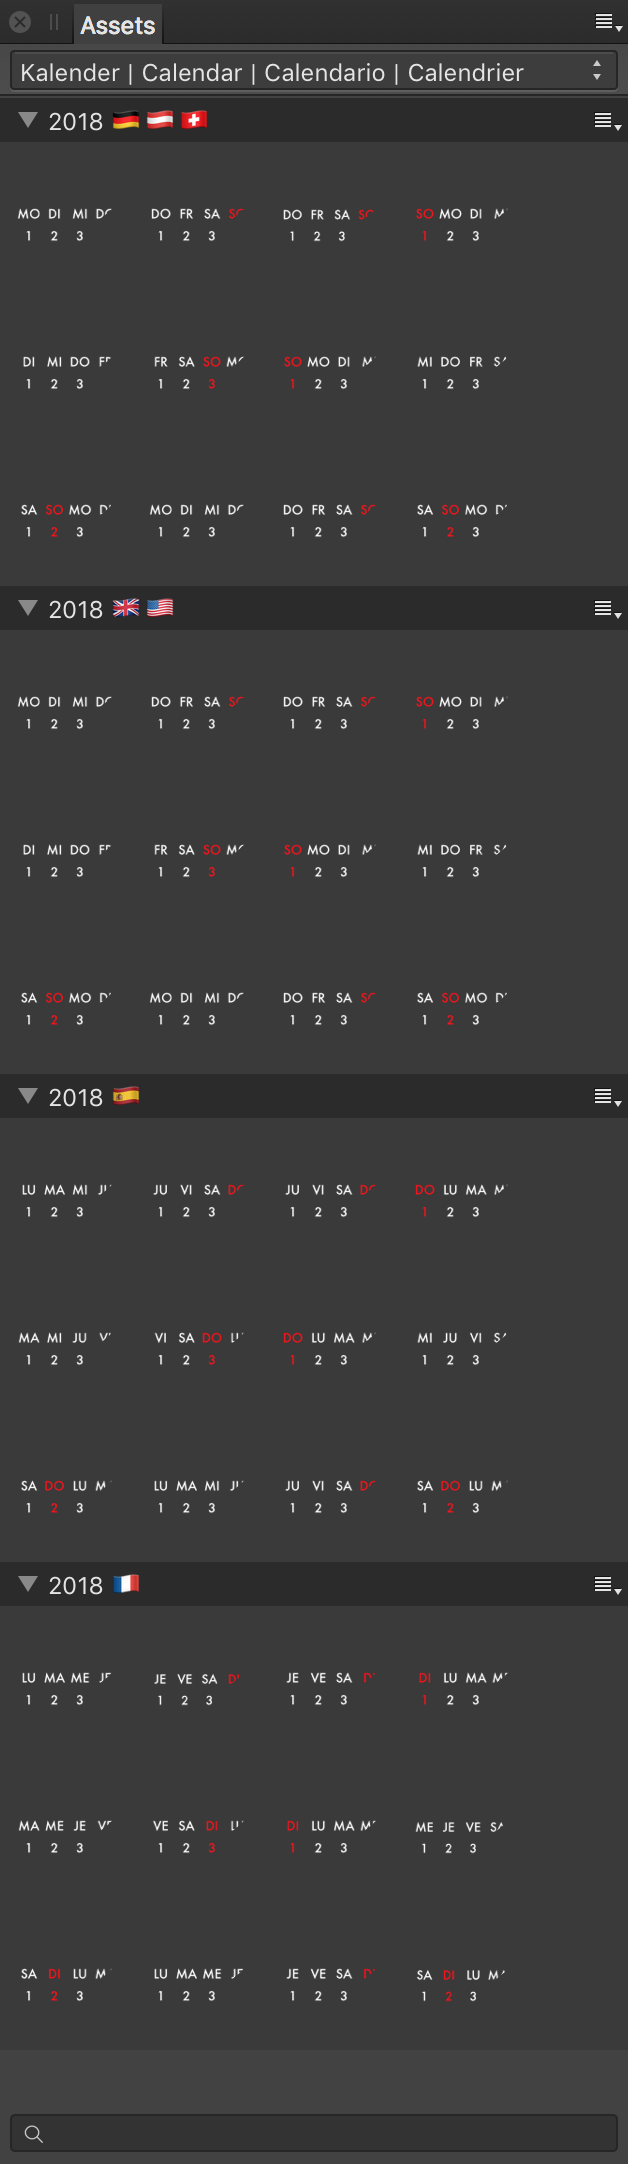
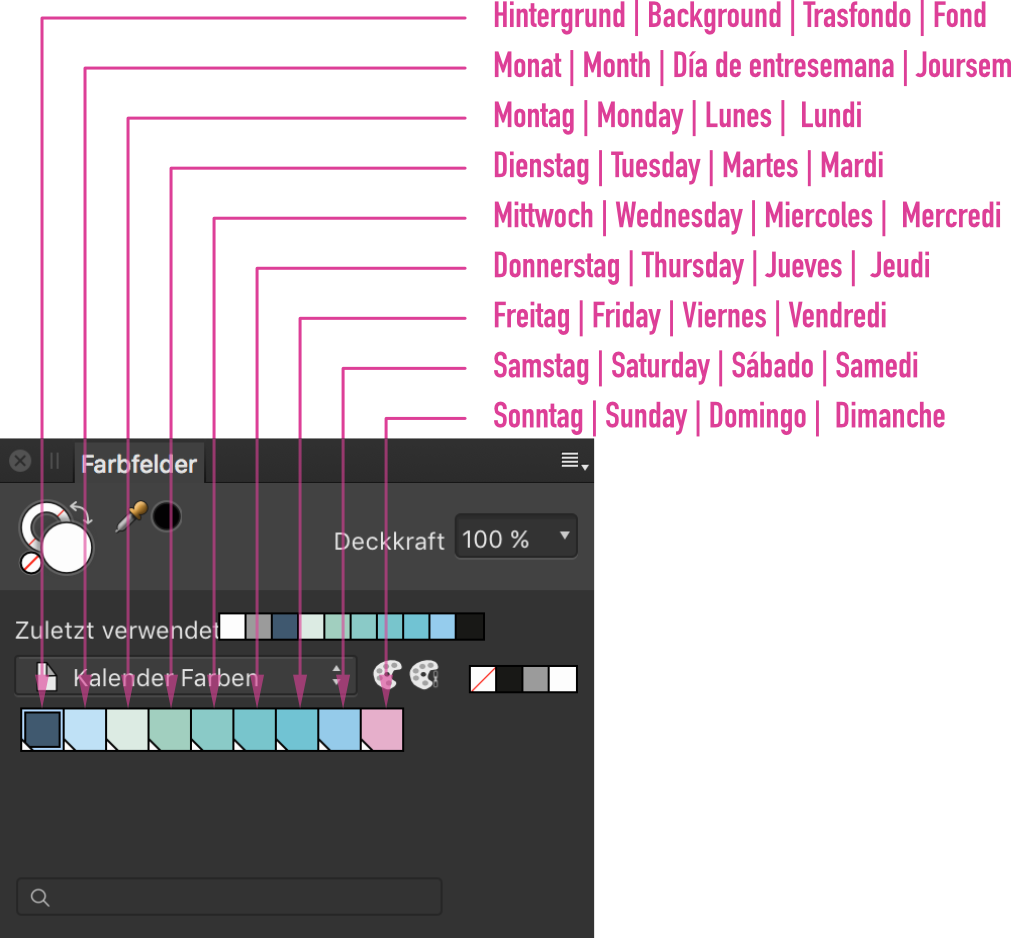
 If've created some calendar templates, assets (DE, EN, ES, FR) and a document color palette to create calendars for 2018. Content of the zip archive: ▾ Assets ◻︎ Kalender-2018-DE-AT-CH-EN-ES-FR.afassets ▾ Color palette ◻︎ Farbpalette | Color palette | paleta de colores | palette de couleurs.afpalette ▾ DE ◻︎ DE_Kalender-DIN-A2-Hochformat.afdesign ◻︎ DE_Kalender-DIN-A2-Querformat.afdesign ◻︎ DE_Kalender-DIN-A3-Hochformat.afdesign ◻︎ DE_Kalender-DIN-A3-Querformat.afdesign ◻︎ DE_Kalender-DIN-A4-Hochformat.afdesign ◻︎ DE_Kalender-DIN-A4-Querformat.afdesign ▾ EN ◻︎ EN_Kalender-DIN-A2-Landscape.afdesign (Endformat W x H: 594 mm x 420 mm) ◻︎ EN_Kalender-DIN-A2-Portrait.afdesign (Endformat W x H: 420 mm x 594 mm) ◻︎ EN_Kalender-DIN-A3-Landscape.afdesign (Endformat W x H: 420 mm x 297 mm) ◻︎ EN_Kalender-DIN-A3-Portrait.afdesign (Endformat W x H: 297 mm x 420 mm) ◻︎ EN_Kalender-DIN-A4-Landscape.afdesign (Endformat W x H: 297 mm x 210 mm) ◻︎ EN_Kalender-DIN-A4-Portrait.afdesign (Endformat W x H: 210 mm x 297 mm) ◻︎ Kalendarium-DE-AT-CH-EN-ES-FR.afdesign ◻︎ Kalendarium-DE-AT-CH-EN-ES-FR.pdf All afdesign files have a bleed of 3 mm and use the color profile ISO Coated v2 300% (ECI). Please contact your printing house before ordering and check the bleeds and color profile. You will find an instruction (GERMAN) on my YouTube channel: Hopefully these freebies are useful for you. Feel free to like and share... Keep on drawin' Norbert
-
- 4
-

-
- affinity designer
- affinity photo
- (and 3 more)
-
 Whenever I try to export or save an image from Transparent background to flat background (JPEG) the color of background always change to black instead of white like in Photoshop is there is any setting or way so if I export a PNG file or save a jpeg file as flatten the background color should be white.
 -
Hello all, I did this halloween graphic to practice working with affinity. I am getting the hang of using a masking layer and creating effects with brushes
-
 What are the license terms on using the Affinity Photo Samples from the Welcome page for both commercial and non-commercial projects?
 -
How do you make the samples in the Welcome page of Affinity Photo writable/editable? Right now it says 'Read only'. That is probably why I can not select the 'Daub!' layer in the 'The Meeting' sample, even with the select tool and using alt keys with it.
-
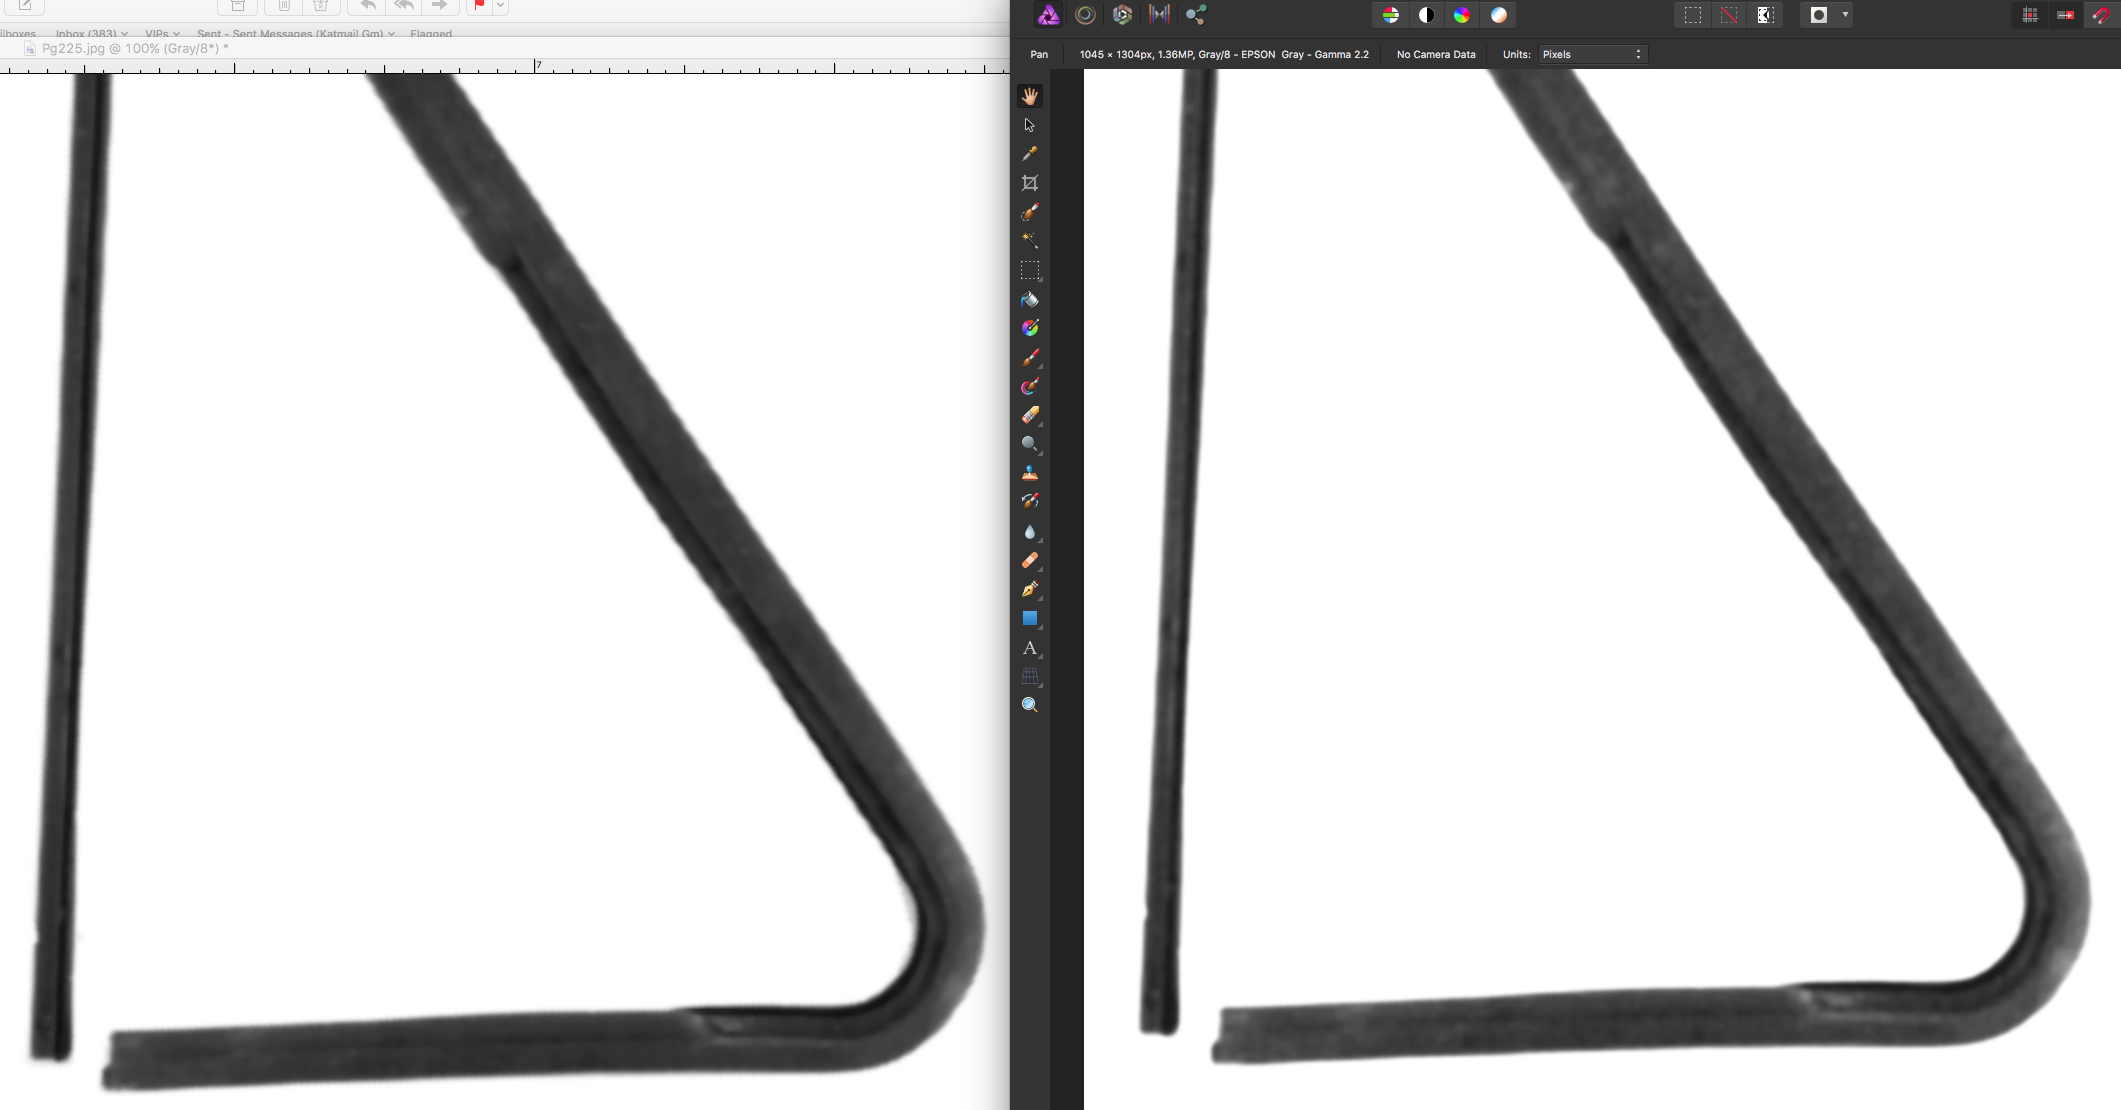
 Greetings Affinity Photo experienced users! I've three questions, plus a little mention that I hope may be helpful for those of you doing the same thing, about a successful experiment with a series of "descreening" steps. I've attached an image, comparing results of Adobe Photoshop vs. Affinity Photo. First question: can anyone direct me where to access the image size function in Photo? Second question: what is the default image size that typical high-res photos come in at using Photo? In other words, do most high-res images by default come in at 300 pixels, until you wish to resize to a relative new proportion? I used to rely on this function all the time in Adobe Photoshop, and I'm sure it's somewhere accessible in Affinity Photo. To illustrate better what I'm seeking, here is an example: the path in Photoshop for the current image I'm working on is: Image > Image Size ... Document Size: Width: 8 inches, Height: 10 inches, Resolution: 600 pixels/inch (this high of resolution is necessary for a particular paper catalog digital conversion job, including text, that I'm working on). If desired, I can retype the image pixels as 300/inch, and see the relative width x height change to 16 x 20. Or I can retype the image pixels as screen res at 72/inch, and see the width x height change to a relative 66.667 x 83.333 inches. Basically, I just need access to this same function to see what I've got in Photo. Advice? Third question: is there access to scripting Actions of some sort in Photo? I do not think there is an Actions ability in Photo, am I correct in my assumption? Regarding my success an experimenting with steps to descreen scanned film images by hand in Photo: I have a large catalog digital conversion job. The images I'm given are all dot-screened, and the company scanner does not include a setting to automatically descreen film while scanning, so it must be performed within a photo editing program. I've been working it out quite well, so far in Photoshop. But I recently purchased the Affinity suite, and am trying to get on board with performing these functions in Photo, and permanently move over. Currently, I have open two identical images in both Adobe Photoshop and Affinity Photo (see screen shot below). I'm comparing their abilities and steps involved to descreen scanning film images. You will see that I'm not starting with super-crisp images to begin with as provided by the auto parts company, but it's a huge job, I've more catalogs to come, and if I can work it out and move this process over to Photo, I'll be SO happy! I've been using an Action that I set up in Photoshop to descreen: a series of steps involving Gaussian Blur, Median, and Unsharp Mask. This series unfortunately introduces "jaggy" artifacts on some edges, so I must follow up frequently by hand-smoothing using the Smudge Tool. It's kind of a pain, but relatively quick, being that I could rely on creation of an Action in Photoshop. By comparison, in Photo, I'm learning and experimenting on my feet to perform this same set of actions for a bulk load of photos. First, I tried to push Dust & Scratches and clean up following with Gaussian Blur ... but I found that in this series of steps, despite being thrilled that I only had to perform 2 of them, and no jaggies were introduced with edges nicely smoothed, I lost a little too much highlight/contrast detail. No matter what I clicked around on and tried, I couldn't seem to fix the loss of detail and highlight within the (admittedly murky) image. Next, I tried another combo of steps. It requires MORE steps, but is looking quite well. I'm so far finding a combination of 4 steps from Dust & Noises, Gaussian Blur, Unsharp Mask and Lighting that seems to pretty much fulfill what I've accomplished using Photoshop. I am thrilled to report that in using Photo, I am avoiding much of the introduction of the jaggies that would appear in Photoshop, following similar steps to descreen. I wish I were able to push a bit more using a "median" tool in Photo. However, once scaled down to the size the company's updated catalog edition will print at, the difference will be remote. What I'm seeing on screen, a slight "blotching" from not pushing the Gaussian Blur too far, won't be perceived on paper. I think it's a satisfactory trade-off, considering I'll save a lot of time not having to use Photo's version of the Smudge Tool on the edges to smooth them! I know this is a long and involved post. Thank you in advance for any advice, and I hope you might find some use in the discussion about descreening experiments above. If interested, I have more details about the descreening process and coordinates used. Cheers! -ka
-
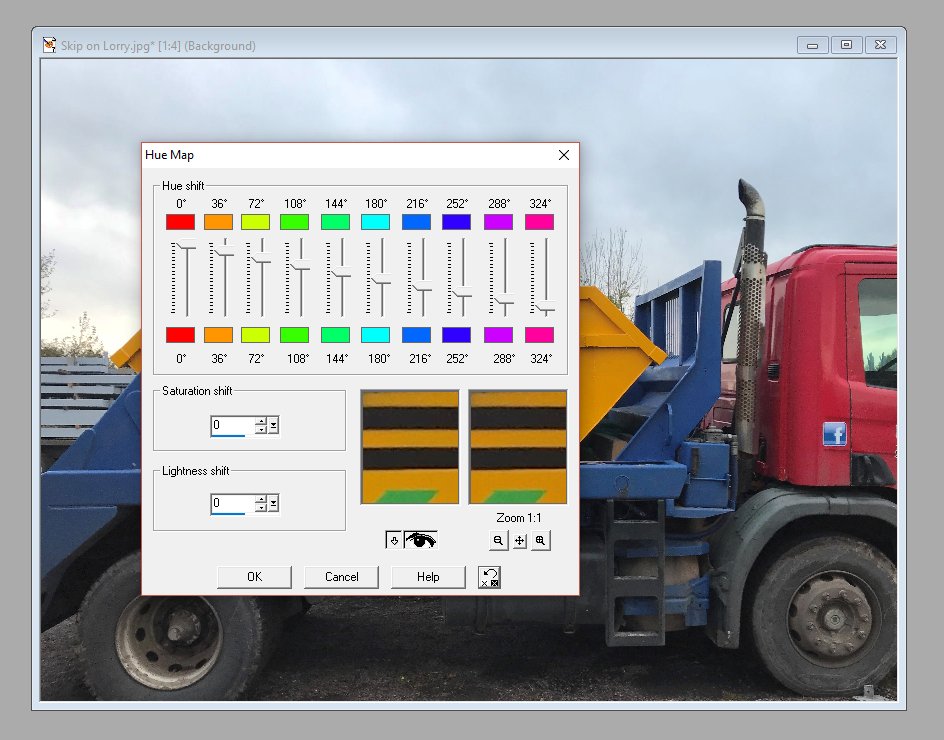
 I've been trying to replace a particular colour in an image with a different hue in Affinity Photo. I've been playing around with the 'Colour Replacement Brush' tool and the 'Selective Colour' adjustment layer, but neither of these achieves the process as simply as the 'Hue Map' in Paint Shop Pro 7. In PSP, I simply go to the 'Hue Map' option and adjust a slider (or two) based on the colour I need to change (see example screenshots). Is there an equivalent in Affinity Photo that doesn't require any selection or time-consuming brush work?
-
Where can I download the sample photos used for the video Tutorials (like
-
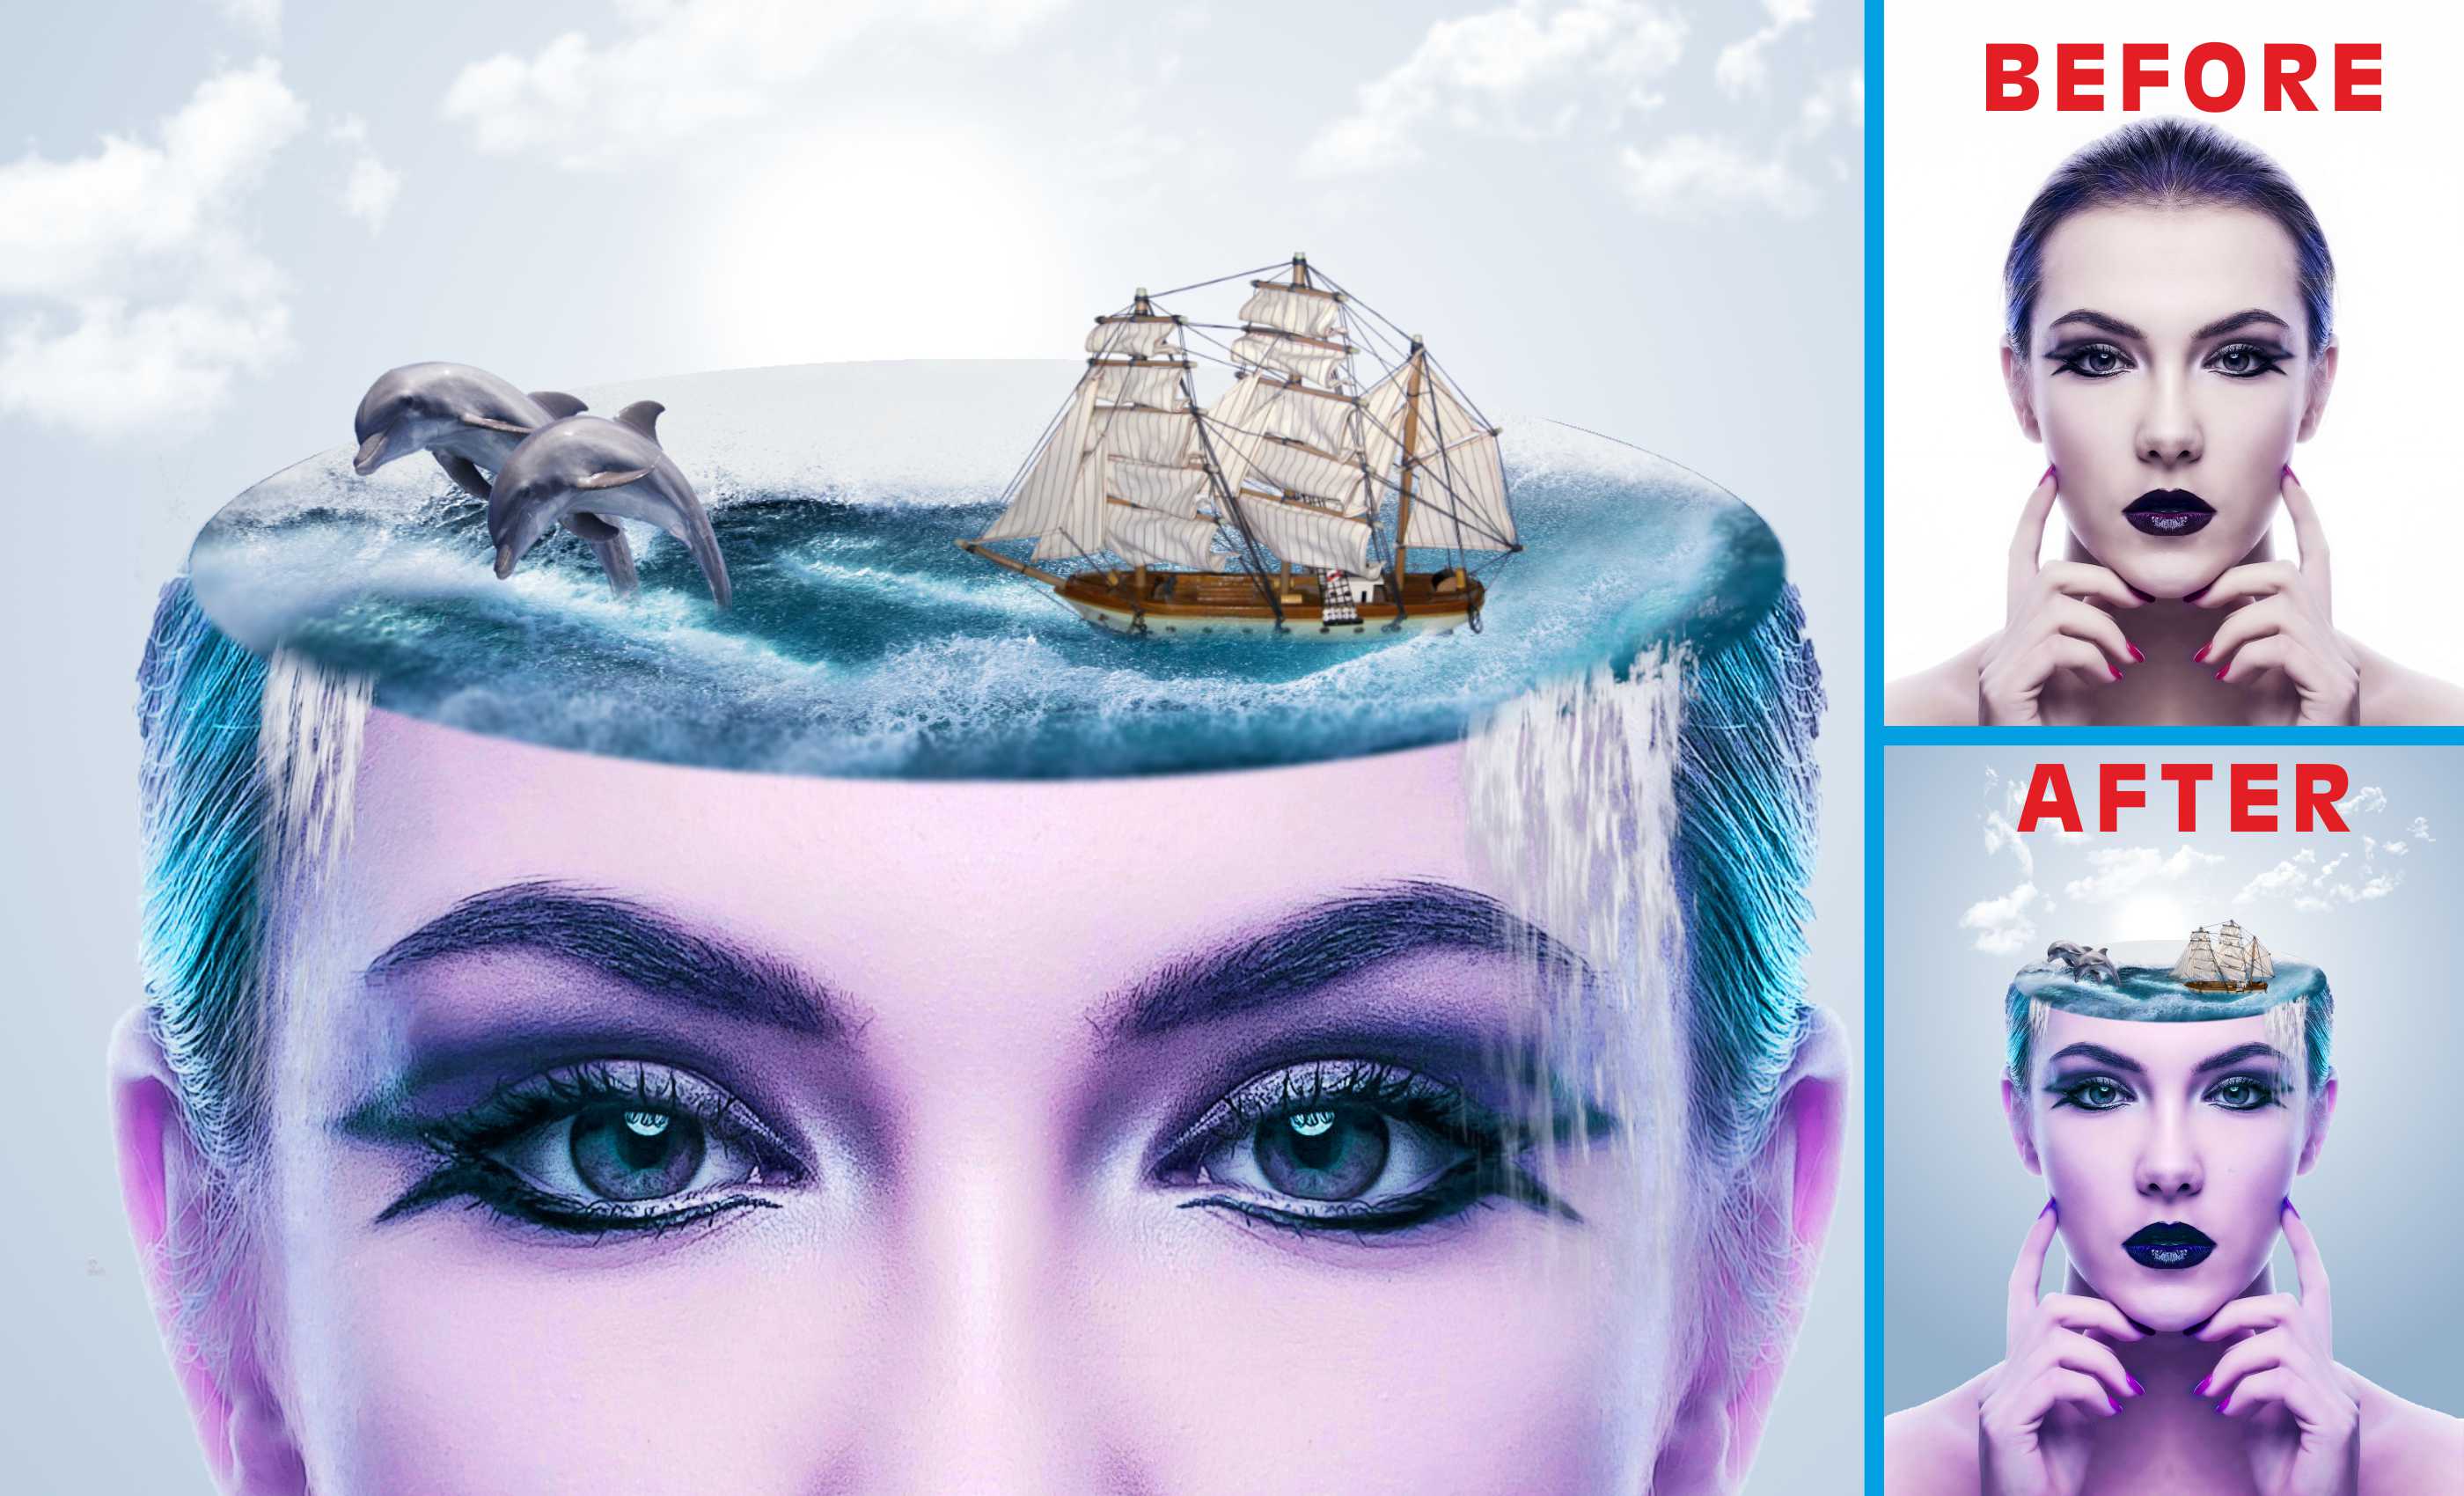
 Here is available an attractive "Water Head" "Photo Manipulation" like Water Dispersion in Affinity Photo. It is an easy to understand "Affinity Photo Tutorial". In this tutorial you learn how to remove or change background a photo and then manipulate into an "Amazing Portrait" Here is see the tutorial : Link
-
- 1
-
-
- tutorial
- photo manipulation
- (and 2 more)
-
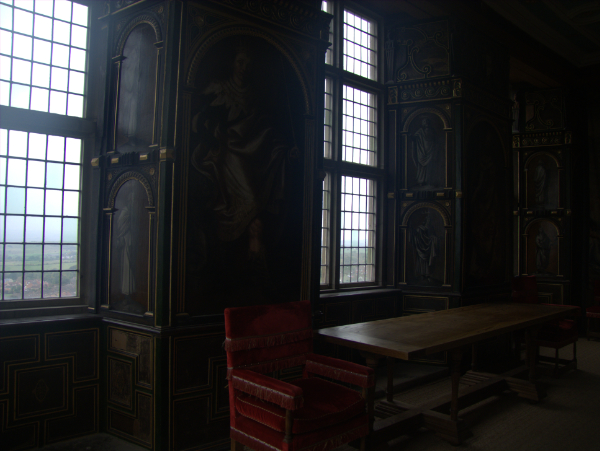
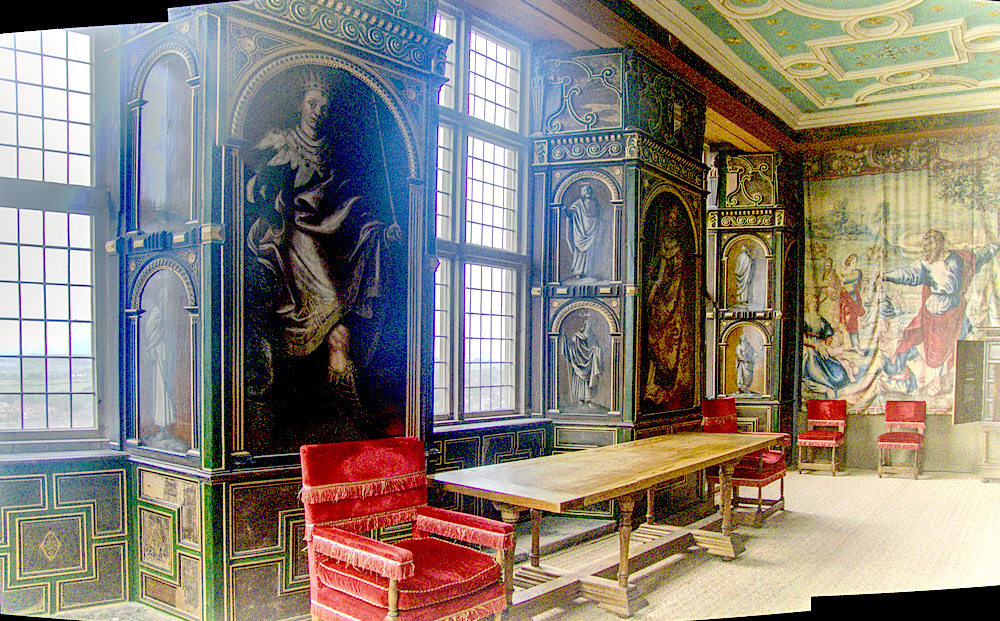
I went to see Bolsover Castle a few weeks ago, a 17th century stately home in Derbyshire, England (http://www.english-heritage.org.uk/visit/places/bolsover-castle/). The day was dull and dreary, and the interior photos I took turned out to be tricky: the glare from the windows was pretty bad, and some of the rooms were quite dark. Ideally, I'd have had a tripod, but they tend to frown on that kind of thing in most old houses -- they don't want us ham-fisted photographers poking holes in their parquet or ripping up their rush matting. So ... a couple of hand-held shots with crossed fingers, then check the image and the histogram ... This is a straight Raw to JPG conversion of one of the shots: there's a bit of detail outside, and all else is in deep shadow. Fortunately, there was still enough info to get a reasonable result. I opened the two images in AP with 'New Panorama', and when the blending was complete, I duplicated the layer and opened the Develop persona. Here I upped the exposure by two stops and clicked 'Develop'. I repeated this with a new layer, then one last time, increasing by just one stop, as it became too washed out after that. I saved each layer as a 16-bit TIFF, closed the file, and brought my TIFFs into 'New HDR Merge'. After a little adjustment, I got a fair result (part-cropped): This is a much better result than I got from developing a single layer. (But maybe next time I'll sneak my tripod in!)
-
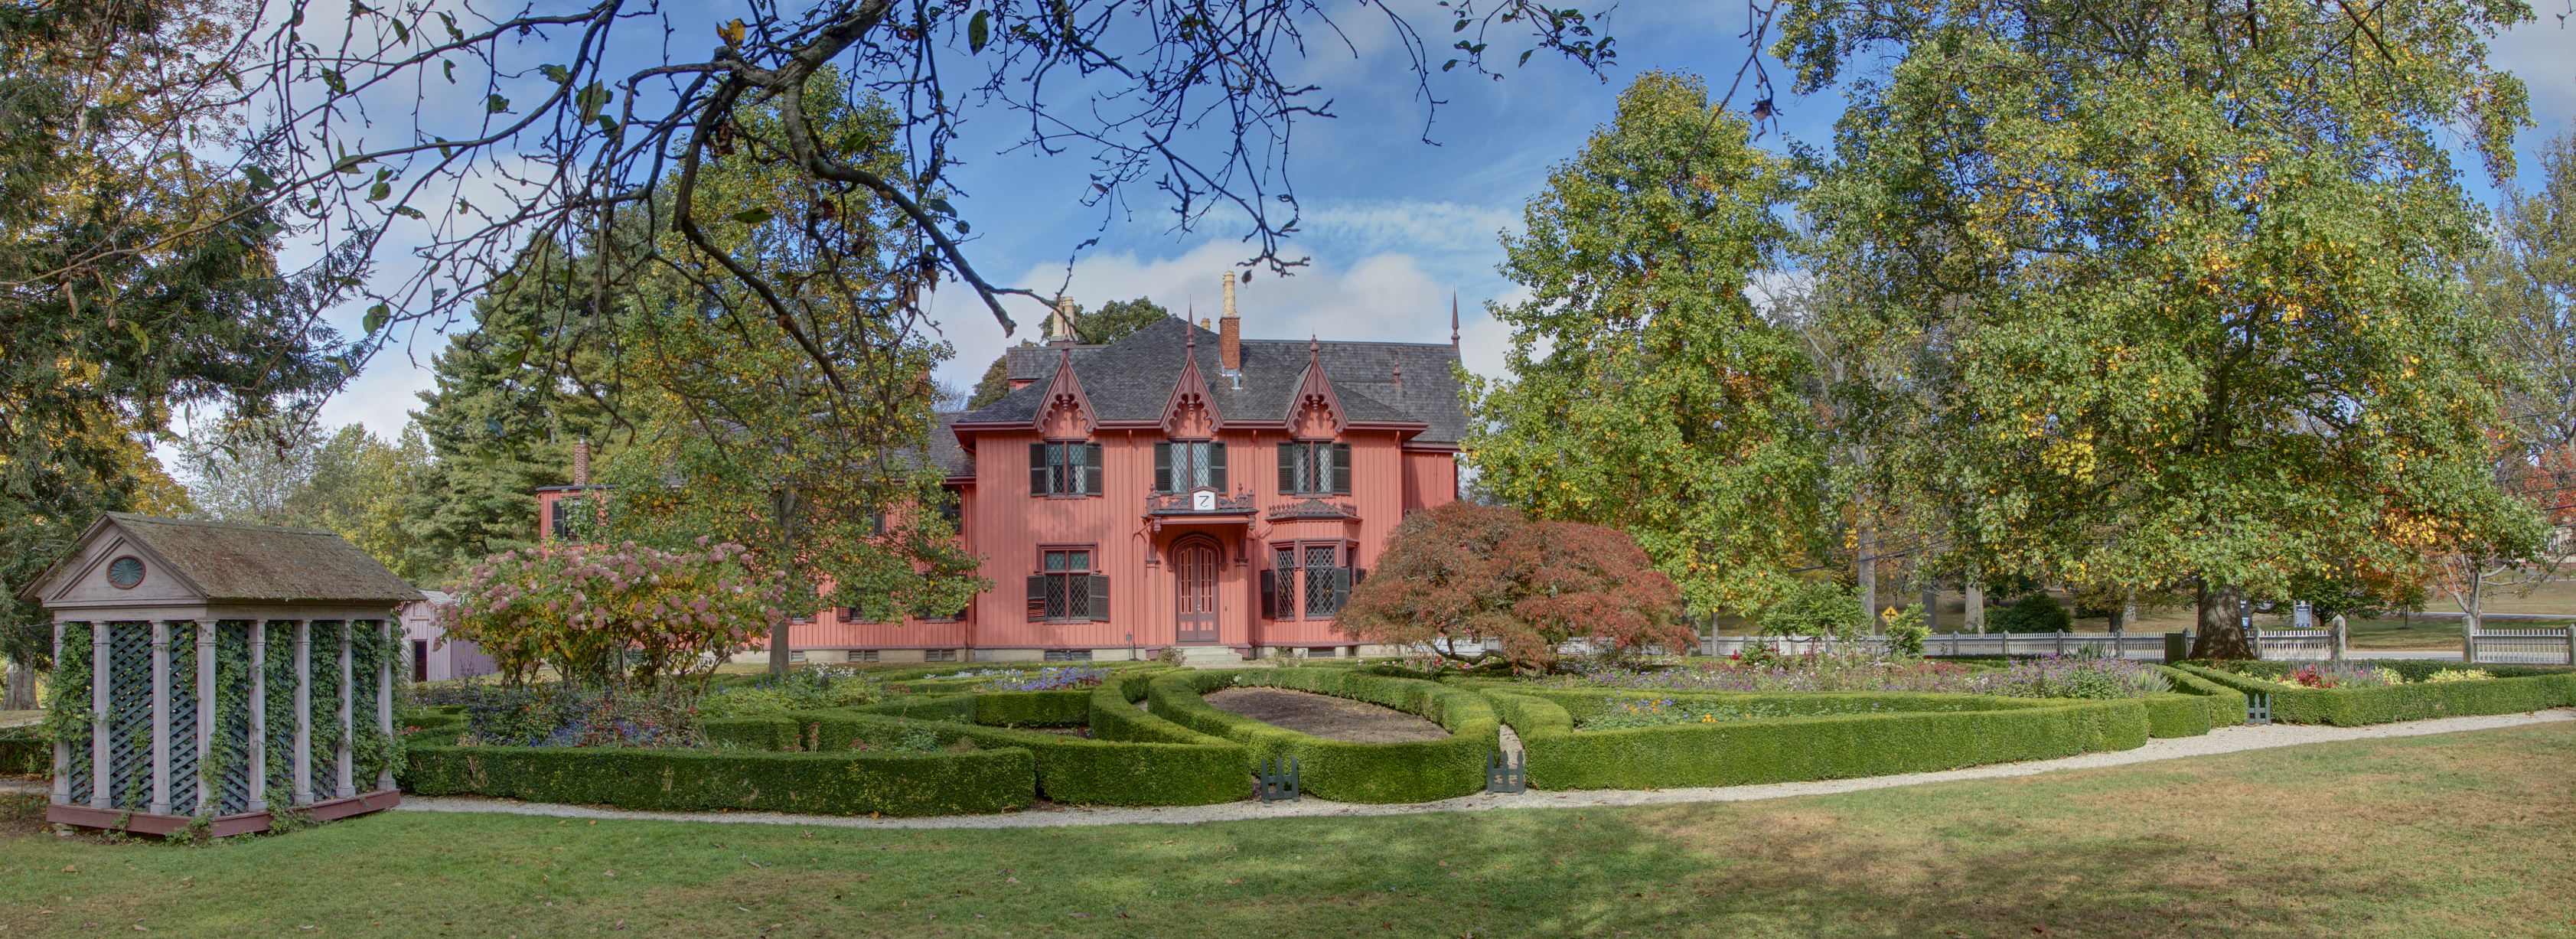
Alas, the growing season is over, but the panorama persona nicely stitched three raw frames taken hand-held while standing on a park bench @ Roseland Cottage in Woodstock, CT. Straightened some verticals (18mm wide angle lens) and did some minor tone work and sharpening.
-
Masks, everybody has to do them, why not manage and utilise them in a meaningful way? We could bring in external masks/alphas paint grayscale layers or have selections saved as channels. We could bring them in as linked images or embed them to the document. Each time we create a new adjustment or filter layer we have to either go through the channels, create a selection from a channel or rasterise an existing grayscale layer to a mask. That's the inefficient time-vampire kind of way. How about letting us store and manage channels in a meaningful way? Example: I have a mask drawn and want to move on from it to recall later. I could right-click and select "Store as Single-Channel… > Select / New channel" or "Store as Multi-Channel" for additional RGBs like normals or object coordinates for relighting. (In the channels list RGB sets would be displayed as a channel group, users can also create channel groups, RGBs are just automatically generated for the user) When I need that selection in a tool, the tool would just have a dropdown menu listing all the available channels (incl. RGBA) and I could select the mask I've just made. If I make changes to that mask, all tools using that mask update automatically. No hassle, no extra time cost.
- 2 replies
-
- 1
-
-
- affinity photo
- masks
- (and 2 more)
-
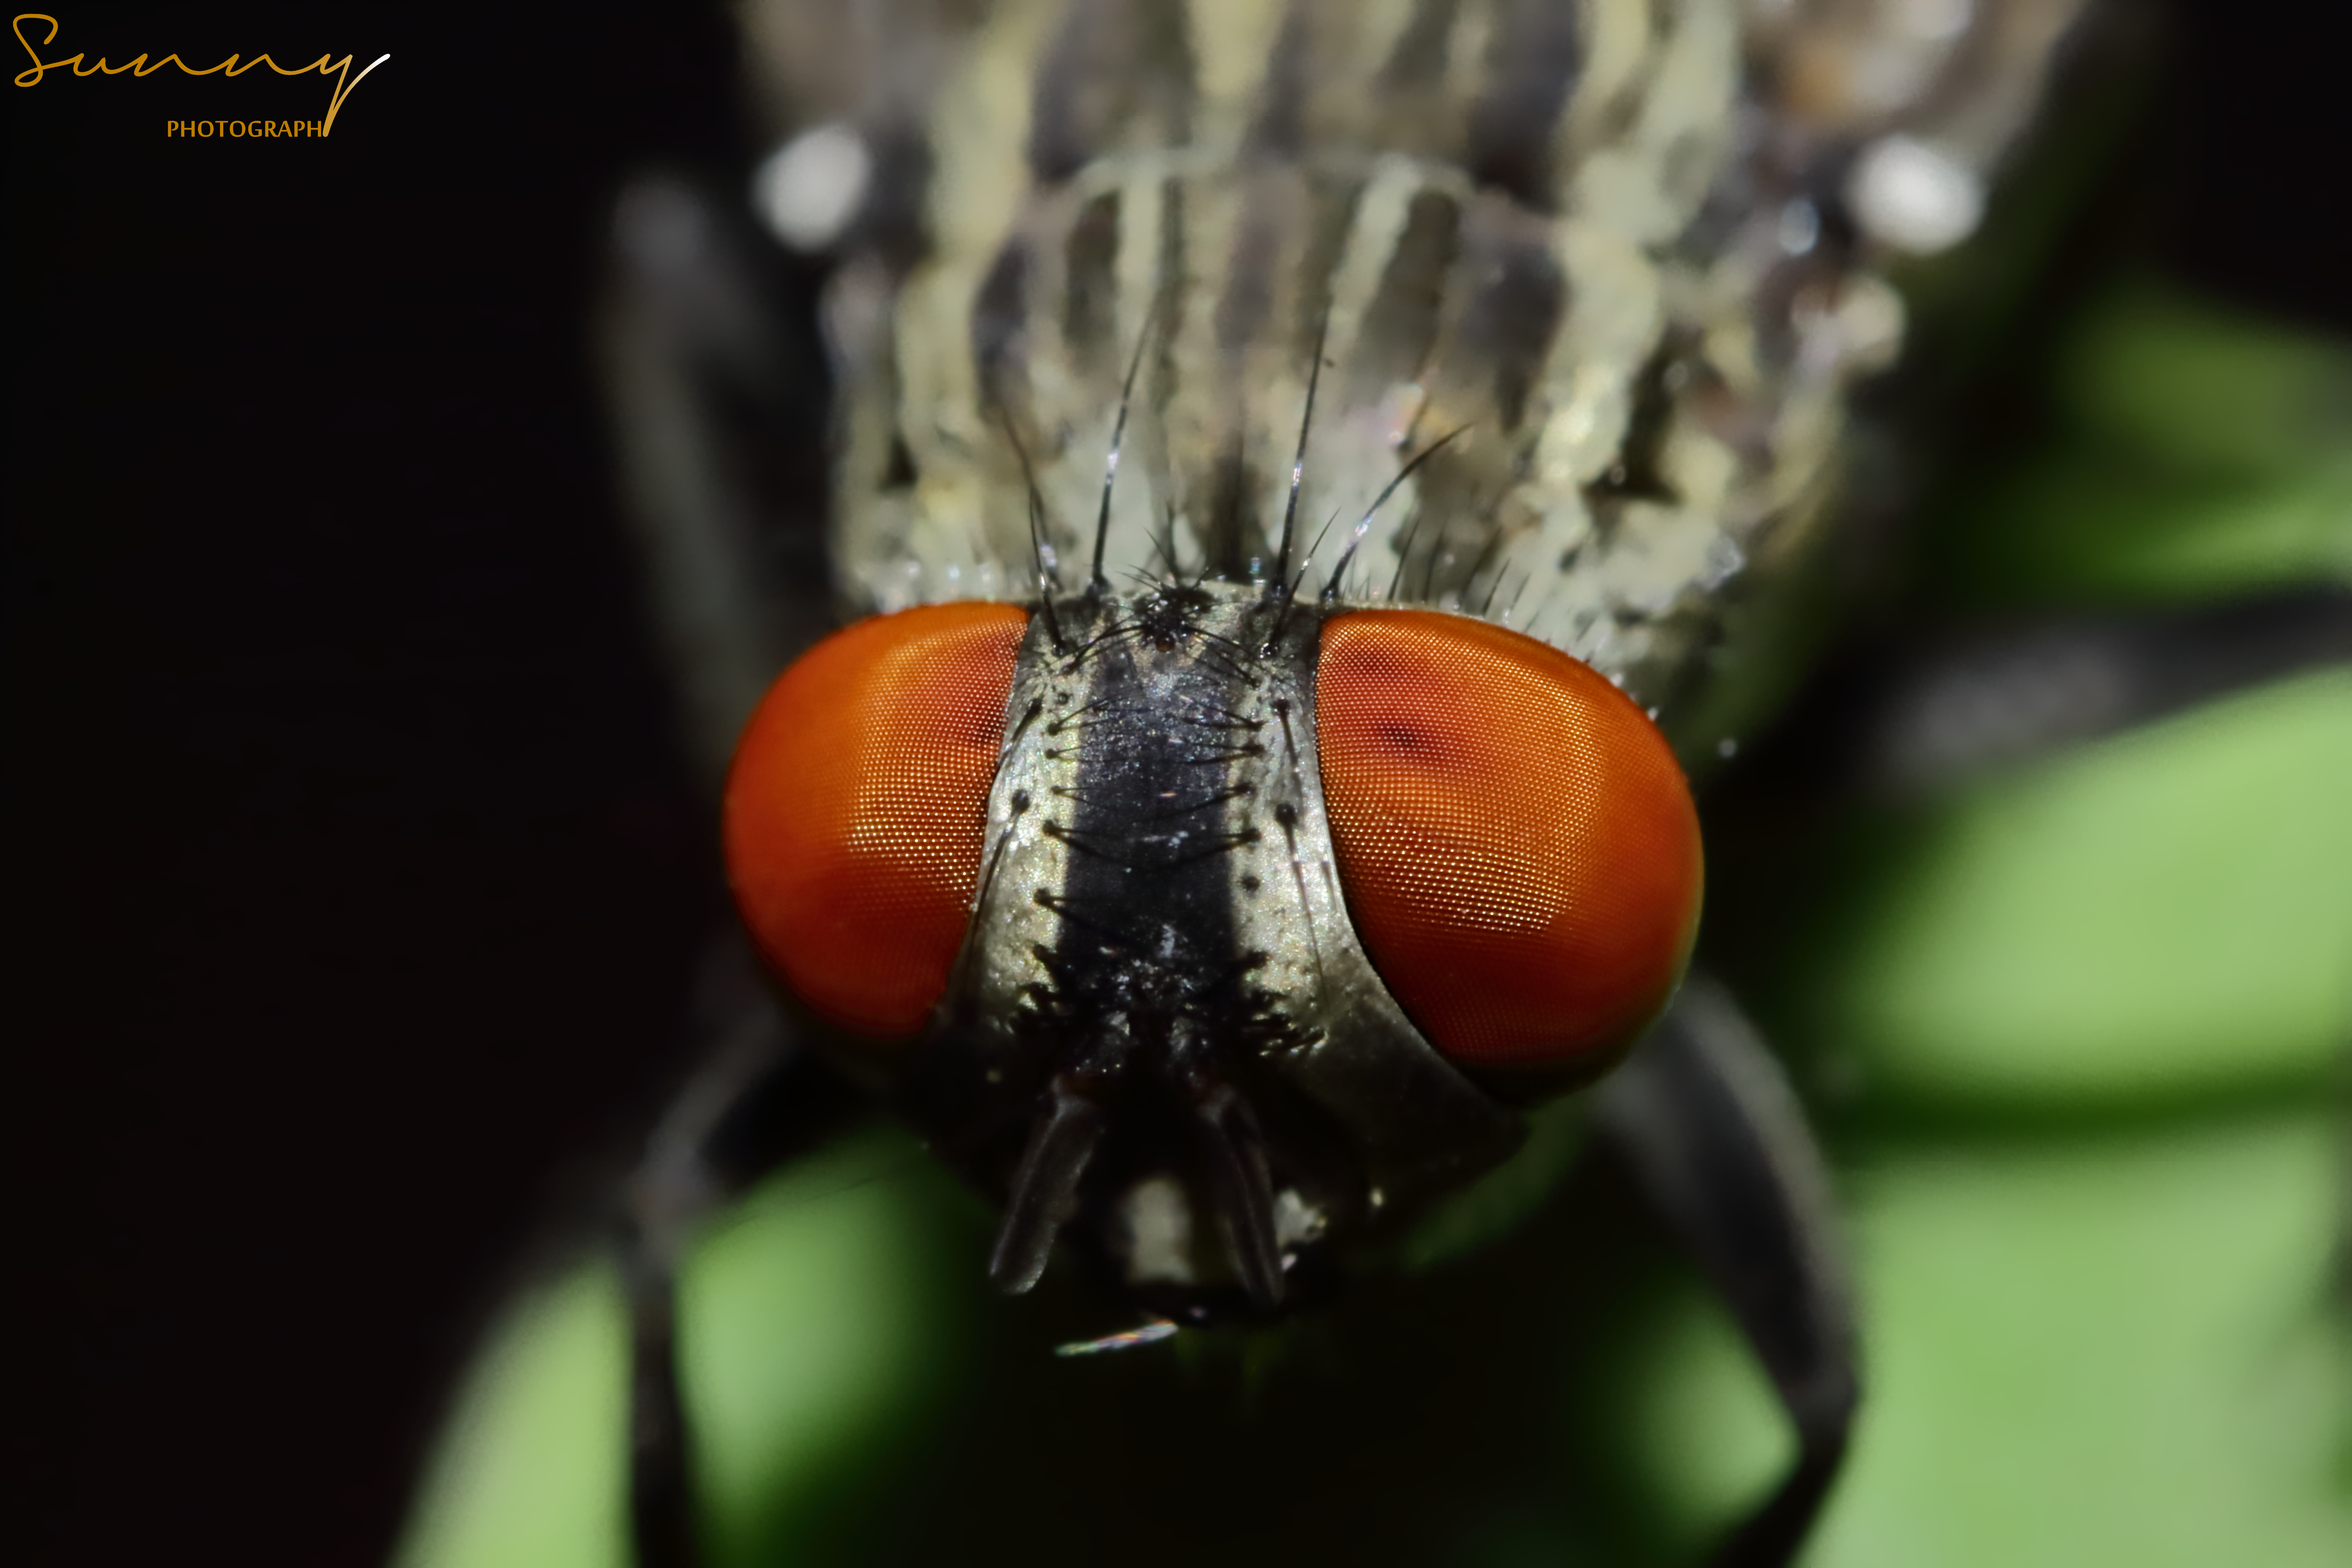
 Hi all, New to AP. Relatively new to serious photography as well, but it has always been a hobby. First of all...big thanks to the Serif team for providing such a professionally crafted app at such an amazing price. Eagerly awaiting what's in store for the future. Anyway, just thought I'll say an introductory Hi with some recent shots RAW developed with AP. Cheers P.S. All criticism, advice and suggestions much welcome and appreciated.
- 4 replies
-
- 3
-
-
- reverse lens
- animals
- (and 5 more)
-
 G'day from Australia. A few weeks back I purchased Designer and Photo. I have been working hard at learning Designer. What a great program. I have now created 56 Designer files, which are A3 landscape files. CHALLENGE I need to add a watermark/copyright image over all the images and save the images as PNG files. I have not yet used Photo, so I wonder if some of the experts could tell me if what I want to do is possible, either in batch mode or as a macro. If it is possible to do this, then could some kind soul show me what to do in extremely simply directions. I have now reached the big 70, I am slowing down a bit :D , so please be patient. Thank you for you help. Of course if this is not possible I will do it manually, but I need this done ASAP. Best wishes and I look forward to hearing from you soon. Hooroo for now. Paul.
 -
This is a still life photo l took using as a central focus one of my turnings and elaborated with affinity photo. I really appreciate any comment and ideas. thanks.
-
 Hello, Do you think you could tell me what "Soft Proof" is? I click on it and the default preset looks quite nice on the photo. Should I use it for just getting a certain look or is "Soft Proof" something else that I shouldn't touch? Thanks!
 -
 So after learning how to use the Cutting Out method from a video here under tutorials, I used two images, one was close to 1000x? pixels and the other over 4000x? pixels. After moving the cut out deer from one image to the building image, I see it is highly pixelated when enlarged. even though the finished image when exported as a jpg, was lowered to near the 1000x? pixel image size. To recap, I used an image 1/4th the size (deer) of the image of the building, then saved saved by reducing 75% and still have major pixelated deer on building. What did I miss? And now I'm editing to add I see you won't be able to see the pixelization as enlarging is not allowed, but its there.
-
 I download trial but dont start! Why? I wont to buy but if dont start.... (mac pro + macosx 10.7.5) many thanks!!!!! Help!
 -
I went for a stroll yesterday -- without my camera. But I had my phone and took one or two snaps -- before the battery ran out. At the end of a pretty country lane which follows a little stream is this green verge. The dynamic range is not brilliant on phone cameras, but I took a coupe of shots, one exposed for the highlights and one for the darker areas.. When I tried to merge the two as an HDR job the results were disappointing, so Plan B: take the better-exposed shot and play with it. I copied the sky to a separate layer, then applied a little tone mapping to the bottom layer, warming up the white balance and slightly overdoing the saturation. Then I applied a tone mapping to the sky, banging the local contrast up to 100%. Although I couldn't find a blend mode I was happy with, a little fiddling with the transparency of the sky layer gave me a result that worked for me. A little bit of fun rather than a serious photo, and destined for FaceBook. Oh, I almost forgot: there was half a car on the right: you can probably see where I hastily cloned/inpainted it away.
-
 Hi guys! I played a bit more with AF Photo and tried to import files from AF Designer. A look at the screen reveals that on iOS AFP seems to have problems with text within symbols. At least within duplicated ones. In the desktop version everything is fine. It's a minor thing, but it should be mentioned. Cheers!