RuralKat
-
Posts
13 -
Joined
-
Last visited
-
 scatterbrain73 reacted to a post in a topic:
Text inside circle
scatterbrain73 reacted to a post in a topic:
Text inside circle
-
UnicornTapestry reacted to a post in a topic:
Text inside circle
-
megalofauna reacted to a post in a topic:
Hide Outlines Command
-
Asteres reacted to a post in a topic:
Text inside circle
-
typopaul reacted to a post in a topic:
Text inside circle
-
How to Convert / Resample "Image Size" in Photo
RuralKat replied to RuralKat's topic in [ARCHIVE] Photo beta on macOS threads
Thank you kindly, Andy Somerfield for your helpful info! I will investigate. I think I'm used to looking in certain places for tools in Ps, not to mention much of our knowledge from the Adobe software resides in the 'ole keyboard shortcut muscle memory ... so it's all in the transition. Cheers! -
How to Convert / Resample "Image Size" in Photo
RuralKat replied to RuralKat's topic in [ARCHIVE] Photo beta on macOS threads
This is fabulous news, MEB! Many kind thanks for your expert guidance! I really look forward to checking out "Macros" in AP. Cheers :-) -
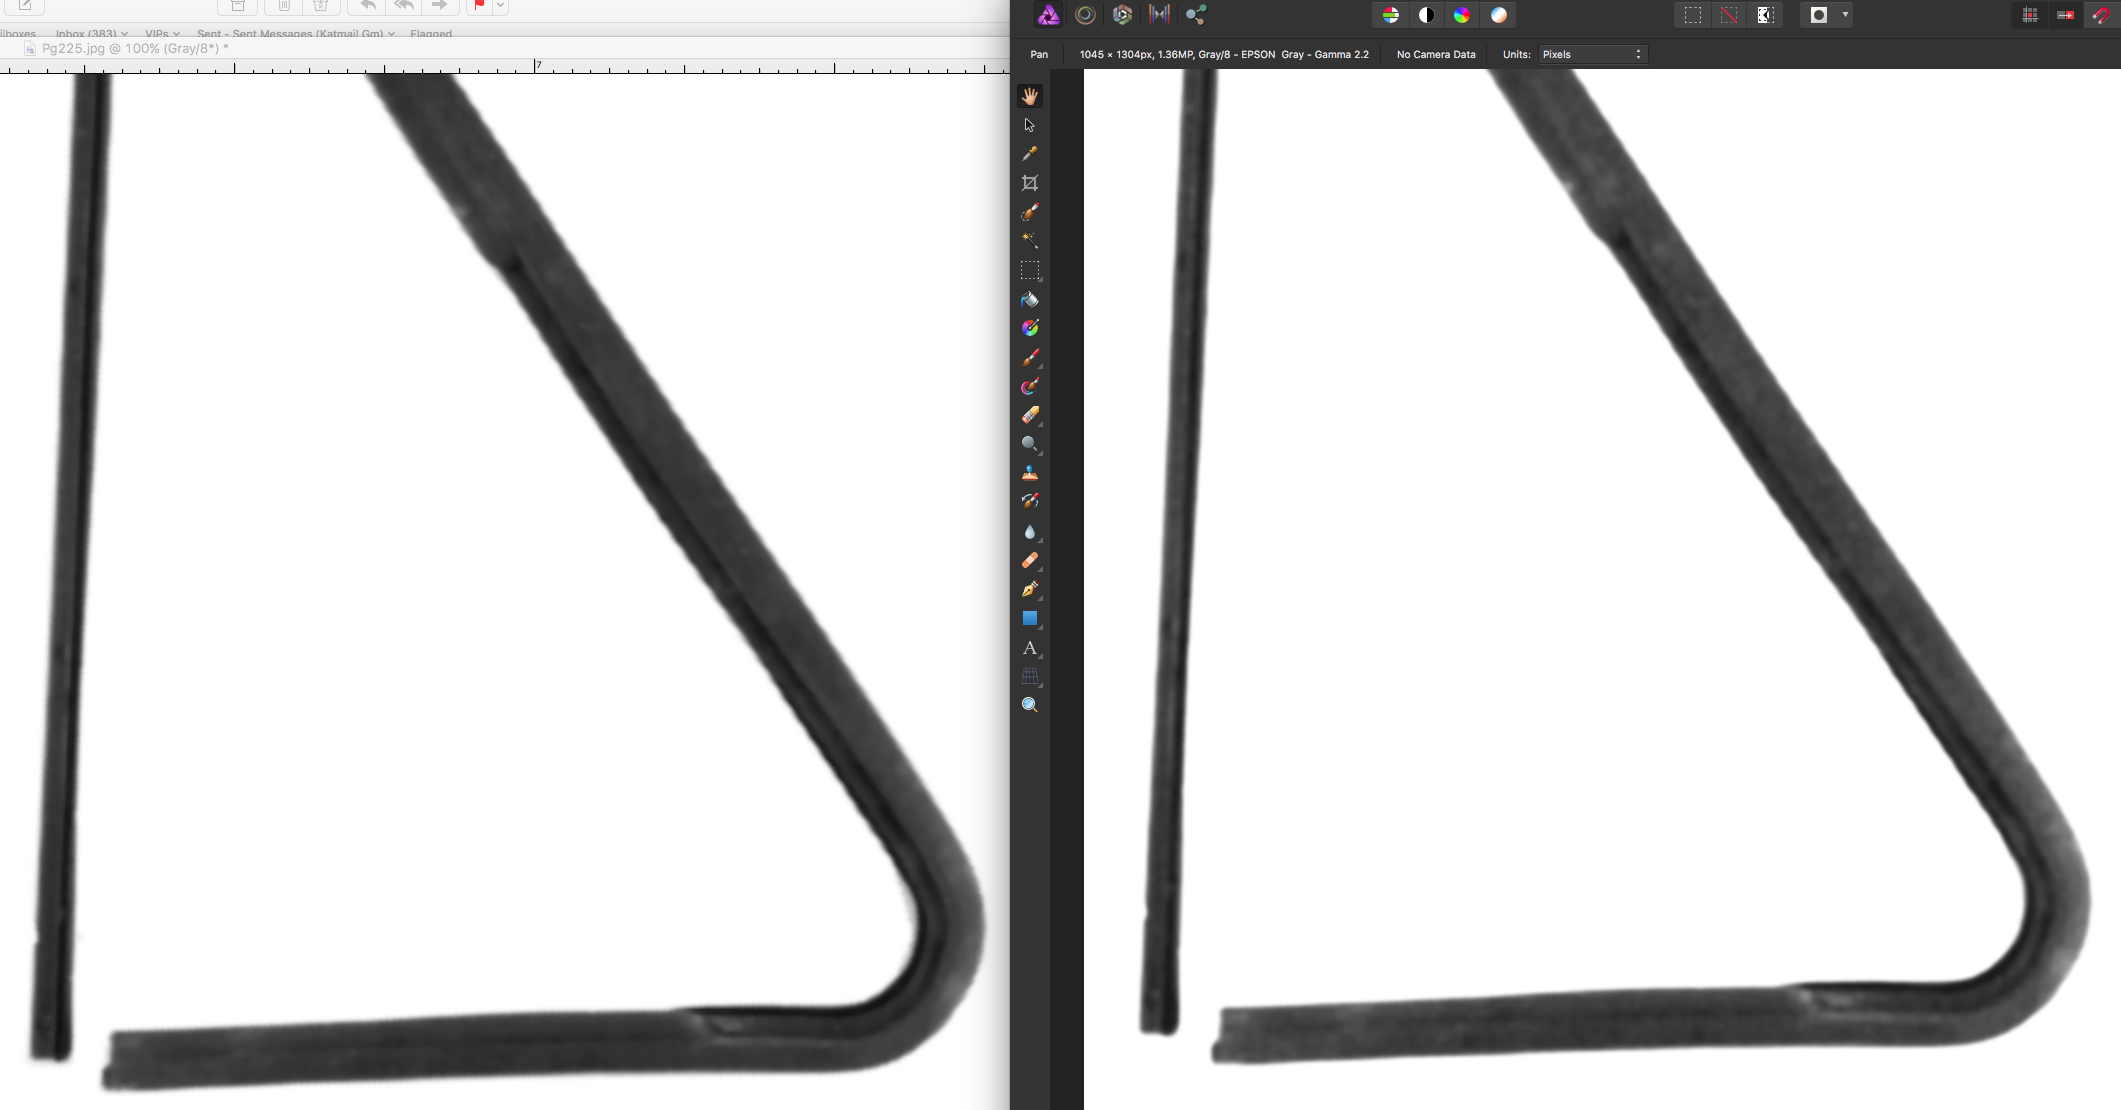
Greetings Affinity Photo experienced users! I've three questions, plus a little mention that I hope may be helpful for those of you doing the same thing, about a successful experiment with a series of "descreening" steps. I've attached an image, comparing results of Adobe Photoshop vs. Affinity Photo. First question: can anyone direct me where to access the image size function in Photo? Second question: what is the default image size that typical high-res photos come in at using Photo? In other words, do most high-res images by default come in at 300 pixels, until you wish to resize to a relative new proportion? I used to rely on this function all the time in Adobe Photoshop, and I'm sure it's somewhere accessible in Affinity Photo. To illustrate better what I'm seeking, here is an example: the path in Photoshop for the current image I'm working on is: Image > Image Size ... Document Size: Width: 8 inches, Height: 10 inches, Resolution: 600 pixels/inch (this high of resolution is necessary for a particular paper catalog digital conversion job, including text, that I'm working on). If desired, I can retype the image pixels as 300/inch, and see the relative width x height change to 16 x 20. Or I can retype the image pixels as screen res at 72/inch, and see the width x height change to a relative 66.667 x 83.333 inches. Basically, I just need access to this same function to see what I've got in Photo. Advice? Third question: is there access to scripting Actions of some sort in Photo? I do not think there is an Actions ability in Photo, am I correct in my assumption? Regarding my success an experimenting with steps to descreen scanned film images by hand in Photo: I have a large catalog digital conversion job. The images I'm given are all dot-screened, and the company scanner does not include a setting to automatically descreen film while scanning, so it must be performed within a photo editing program. I've been working it out quite well, so far in Photoshop. But I recently purchased the Affinity suite, and am trying to get on board with performing these functions in Photo, and permanently move over. Currently, I have open two identical images in both Adobe Photoshop and Affinity Photo (see screen shot below). I'm comparing their abilities and steps involved to descreen scanning film images. You will see that I'm not starting with super-crisp images to begin with as provided by the auto parts company, but it's a huge job, I've more catalogs to come, and if I can work it out and move this process over to Photo, I'll be SO happy! I've been using an Action that I set up in Photoshop to descreen: a series of steps involving Gaussian Blur, Median, and Unsharp Mask. This series unfortunately introduces "jaggy" artifacts on some edges, so I must follow up frequently by hand-smoothing using the Smudge Tool. It's kind of a pain, but relatively quick, being that I could rely on creation of an Action in Photoshop. By comparison, in Photo, I'm learning and experimenting on my feet to perform this same set of actions for a bulk load of photos. First, I tried to push Dust & Scratches and clean up following with Gaussian Blur ... but I found that in this series of steps, despite being thrilled that I only had to perform 2 of them, and no jaggies were introduced with edges nicely smoothed, I lost a little too much highlight/contrast detail. No matter what I clicked around on and tried, I couldn't seem to fix the loss of detail and highlight within the (admittedly murky) image. Next, I tried another combo of steps. It requires MORE steps, but is looking quite well. I'm so far finding a combination of 4 steps from Dust & Noises, Gaussian Blur, Unsharp Mask and Lighting that seems to pretty much fulfill what I've accomplished using Photoshop. I am thrilled to report that in using Photo, I am avoiding much of the introduction of the jaggies that would appear in Photoshop, following similar steps to descreen. I wish I were able to push a bit more using a "median" tool in Photo. However, once scaled down to the size the company's updated catalog edition will print at, the difference will be remote. What I'm seeing on screen, a slight "blotching" from not pushing the Gaussian Blur too far, won't be perceived on paper. I think it's a satisfactory trade-off, considering I'll save a lot of time not having to use Photo's version of the Smudge Tool on the edges to smooth them! I know this is a long and involved post. Thank you in advance for any advice, and I hope you might find some use in the discussion about descreening experiments above. If interested, I have more details about the descreening process and coordinates used. Cheers! -ka

-
pixeldroid reacted to a post in a topic:
Hide Outlines Command
-
Text inside circle
RuralKat replied to MriKay's topic in Pre-V2 Archive of Desktop Questions (macOS and Windows)
Thanks, Dave Harris! Great to know these tips -
Text inside circle
RuralKat replied to MriKay's topic in Pre-V2 Archive of Desktop Questions (macOS and Windows)
Hi Uncle808us, I'm sorry to have missed your message earlier -- and yes, you are correct. That is the tool in question. When you hover your stylus pen or mouse over the button, after a second a window pops up that announces, "Reverse Text Path" to indicate title of the tool. Cheers :-) -
Text inside circle
RuralKat replied to MriKay's topic in Pre-V2 Archive of Desktop Questions (macOS and Windows)
Hi Bri-Toon, I believe you are correct and it does flip the text. I dragged the red triangle to slide the text down to the bottom. This is useful for a CD design job, with legal type encircling the perimeter. -
Bri-Toon reacted to a post in a topic:
Text inside circle
-
Text inside circle
RuralKat replied to MriKay's topic in Pre-V2 Archive of Desktop Questions (macOS and Windows)
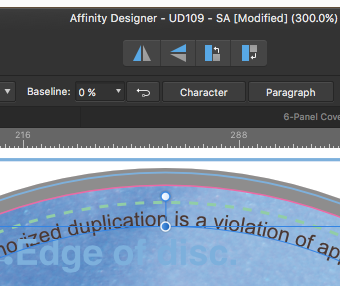
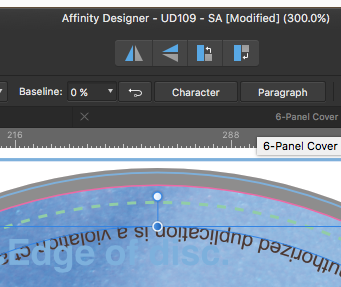
Hi @MriKay, I can help! Just figured it out! I think I know exactly what you are looking for -- how to INVERT the text, to flip it to appear on the inside. I spent half an hour trying to figure this out! Gah! Then, I noticed this little button at the top of the Affinity Designer window ... and I thought, What the hell is that for? Hmm! I clicked it, with my circle and text selected, and VOILA! Exactly what I was looking for! Try this: at the top of the Affinity Designer window, in the area of Text Tools, click on the "Reverse Text Path" tool. It's a little nearly-miss-it curvy line with node ends, between the Baseline selector area and the Character button. Here are my screen shots showing before and after! Cheers k
-
Updating linked images
RuralKat replied to RuralKat's topic in Pre-V2 Archive of Desktop Questions (macOS and Windows)
Ok, thanks @R C-R. In Illustrator, you just click to update the linked image after conducting some Photoshop tweaks. In other words, if you work on an image outside of Ai in Ps to tweak it, and then return to Ai, it can be set in preferences to automatically update. It's handy and efficient. I think I'm getting that with AD, you open the file in AP FROM AD, in order to tweak it; but I'm confused as to how to single out a placed image that is layered in AD. It seems to come into AP as one flat image. I know I've got a learning curve to relearn tools and unique methods. I do appreciate not having to do Command-7 or Command-8 anymore to mask; masks are automatic in child layers. Interesting! -
Hello, I've made some edits to an image in Affinity Photo, and wish to update the link in Affinity Designer. I've searched through the AD "Help" section, but cannot seem to find a way to do this. Can anyone point me in the direction of where to find an "update link" type button? Thanks!
-
Aammppaa reacted to a post in a topic:
Hide Edges - seeking feature
-
Hide Edges - seeking feature
RuralKat replied to RuralKat's topic in Older Feedback & Suggestion Posts
Ok, thanks @Aammppaa and @dutchshader! It's helpful in the meantime for a quick judgment. Cheers -
Hide Outlines Command
RuralKat replied to pbass's topic in Feedback for Affinity Designer V1 on Desktop
Agreed! I relied heavily on Command-H in Ai. Having the choice of seeing the vector nodes and bounding boxes assist in making clean, decisive judgments about optical composition while working on the screen. I am encouraged by the great strides Serif is making! Thanks for working hard to advance this excellent software. Down to the details, but the details are important. -
RuralKat reacted to a post in a topic:
Hide Outlines Command
-
RuralKat reacted to a post in a topic:
Hide Outlines Command
-
RuralKat reacted to a post in a topic:
Hide Outlines Command
-
RuralKat reacted to a post in a topic:
Hide Outlines Command
-
RuralKat reacted to a post in a topic:
Hide Outlines Command
-
RuralKat reacted to a post in a topic:
Hide Outlines Command
-
Hello, I'm seeking a Hide Edges feature to toggle on and off. I relied heavily on this function in Illustrator, with the keyboard shortcut Command-H. It was immensely helpful to not have to always see handles or selected edges highlighted, distracting me from making decisions. Can you tell me how to find this feature, and if it is not in AD, please will you consider adding it in the future? Many thanks for a great program!