scatterbrain73
-
Posts
27 -
Joined
-
Last visited
Recent Profile Visitors
1,707 profile views


-
 +1 again, 5 years later. Please consider adding this feature!
 -
 scatterbrain73 reacted to a post in a topic:
Replace Symbol functionality
scatterbrain73 reacted to a post in a topic:
Replace Symbol functionality
-
scatterbrain73 reacted to a post in a topic:
Replace Symbol functionality
-
I'm getting huge performance issues as well. It starts off fine, but once I start building my files it gets slower and slower as I accumulate objects. And It's not like I have a ton of high-res placed images, either. We're talking simple vector shapes and symbols (see example). If I start moving any of these objects around, picture an animation running at like 6 frames per second.

-
scatterbrain73 reacted to a post in a topic:
Separate Curve from Multi-curve Layer
-
 scatterbrain73 reacted to a post in a topic:
Pen Pressure not working
scatterbrain73 reacted to a post in a topic:
Pen Pressure not working
-
commaimagination reacted to a post in a topic:
Replace Symbol functionality
-
AfdolGravt reacted to a post in a topic:
Replace Symbol functionality
-
scatterbrain73 reacted to a post in a topic:
Simplify Paths
-
ra.skill reacted to a post in a topic:
Replace Symbol functionality
-
Alex W reacted to a post in a topic:
Replace Symbol functionality
-
chessboard reacted to a post in a topic:
Replace Symbol functionality
-
Merci! Je viens de le trouver.
-
scatterbrain73 reacted to a post in a topic:
How to export PNG with transparent background
-
scatterbrain73 reacted to a post in a topic:
Export persona prefix and suffix for all slices
-
I second this request. It would be helpful when exporting different layer configurations of the same artboards.
-
scatterbrain73 reacted to a post in a topic:
Text inside circle
-
simonlayfield reacted to a post in a topic:
Replace Symbol functionality
-
scatterbrain73 reacted to a post in a topic:
Replace Symbol functionality
-
scatterbrain73 reacted to a post in a topic:
Replace Symbol functionality
-
I'd like to bump this post. This feature would be crazy useful for designing maps and game assets. Please consider adding this!
-
Join two points (fuse, weld)
scatterbrain73 replied to quadcat's topic in Feedback for Affinity Designer V1 on Desktop
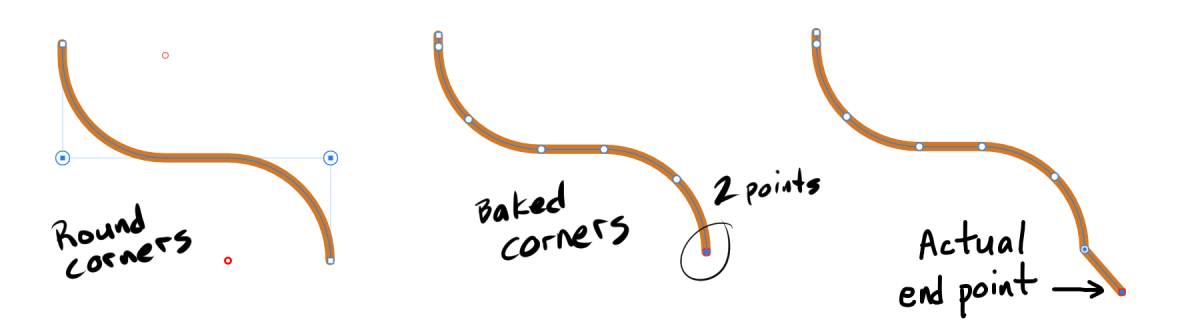
I struggled a bit with this too. You need to make sure you only have one point at the end of your curve. This can be problematic after you round a corner all the way and then bake it.
-
Eh, not so much. I just tried it and it rasterized a good chunk of my file. The main issue was anything with effects applied to it. For instance, in Designer I had a bunch of objects grouped together and applied an outline effect to the group. Saved it as a PDF, then opened the PDF in Illustrator. The group was rasterized. Went back into Designer, removed the outline effect, and tried it again. This time the objects remained as vectors. So... in short, yes and no. You can do it but if you want to preserve all your vector paths you first have to remove all effects from objects. An incredible pain, I know, but it can save you from having to start completely over.
-
Macros/Actions in Affinity Designer
scatterbrain73 replied to rachmac's topic in Feedback for Affinity Designer V1 on Desktop
+1 -
Artboards Pannel?
scatterbrain73 replied to Petar Petrenko's topic in Feedback for Affinity Designer V1 on Desktop
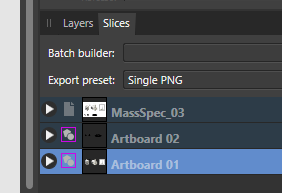
The closest thing I've found to this is going into the Export Persona (top left), and that will get you the Slices panel. In the Slices panel, the top item represents your whole document, and the ones below with the pink box icons are your artboards.
-
Macros are your friend! They can be huge time savers.
-
I've been trying to create an intensity brush from a png, and have gotten it to almost work the way it should. The problem is that the image texture is squished along the stroke, disproportionate to the image. I realize that the image will stretch and compress a little bit as you change the stroke length, but I'm getting two different results when I use the same image with the same settings. The image brush gives me correct proportions, but the intensity brush doesn't. As you can see, using an identical stroke, the image brush repeats 3 times while the intensity brush repeats 4 times. They're both 64 pt and have the exact same settings in their brush properties. What am I doing wrong? I've attached screencaps of my settings, of the stroke samples, and the texture image itself.
-
Keyboard shortcut list
scatterbrain73 replied to ianrb's topic in Pre-V2 Archive of Desktop Questions (macOS and Windows)
Yeah, I could really use a text-searchable pdf that just lists them all. Like, is there even a shortcut to cycle pen modes? I want to customize them as little as possible, because I use a Razer gamepad for all my hotkeys and I can just program those buttons to match the program I'm using. -
artfabrique reacted to a post in a topic:
Constraints Group is getting cliped
-
Feature request — oct 2017
scatterbrain73 replied to benjaminduall's topic in Older Feedback & Suggestion Posts
I completely agree with all of these feature requests. Free transform and mesh transformation of vector objects would be crazy powerful. And let me also add that I think you all have done an excellent job building this program from the ground up. I still love Designer! -
zarusoba reacted to a post in a topic:
Feature requests: select same, offset path, scissors tool
-
I second this request! Offset Path would be super useful.