Search the Community
Showing results for 'group text size'.
-

affinity designer Infected & Comic Book Toolkit
StuartRc replied to StuartRc's topic in Share your work
It was not my original intention to sell resources...but as there are so many sets it might be something to consider. I was trying to create a full toolkit for sketching and drawing comics or Comic like artwork. In reality the brush sets have 3 large toolkits (Inking | Concept | Comic) The Brush and Vector Assets were set up to support the process of comic artwork but it has been a bit of a learning curve. Changed the way brush sets are used with access to a library of base textures. Inker | Concept and Comic all have access to the pattern library!. The toolkit itself is not yet complete. There are a few extra assets I would like to add!.. However I believe the brush sets for this project are!. The latest set (PB 32 Pencilling) was sort of an after thought. Currently working on some new drawings for 'Untamed' but finding that I was still jumping around between sets to get to the brushes needed...So I made a new one just for pencilling | initial sketching which includes an eraser section and making use of the new 'Distance' feature in dynamics + 'Cycles' + Graph. Outstanding: Colour Palettes | Texture Styles |Perspectives Grids from Warp Group |Text Styles |Text bubbles and page comments | Vector Brushes | Page Templates Complete: Brushes: Existing (PB 19 Inker Sample Set (In resources) |PB 31 Base Texture Toolkit (In resources) | PB 19 Inker) New (PB 30 Comic Grunge | PB 32 Comic Sketch | PB 32 Comic Dot TK | PB 32 Comic Penciller) Assets: Vector Patterns: Patterns| Pattern Fills | Seamless Pattern Fills ( Dot | Grunge | Grid) Vector Grunge Borders 48 Vector Grunge Patterns (From painted grunge patterns) Set at A4 3 Tier Panel Size Pages: A4 Comic Pages A4 Rectangular Page Layouts (Tier and Panel Combinations) | A4 Angular Page Layouts (Tier and Panel Combinations) A4 Page Masks Rectangular (Vector) A4 Page masks Angular (Vector) A4 7 Sketch Templates A4 7 Page Sketch Templates (match Publisher Template Page) A4 Comic Panels: Single Panel Sets Rectangular and Angled | Tier Panels Sets Rectangular and Angled Helpers - Positional Palette (Global Swatch Basic Colours including rich blacks) Some of the new features in 2.1 are are extremely useful in this process.- 51 replies
-
- 1
-

-
- affinity 2.0
- inking
- (and 3 more)
-
 This may be a very niche need for most Affinity users so I won't get my hopes up, but I think the implementation would be easy enough that its worth mentioning. The SVG markup that Affinity generates is .... unwieldy, to say the least. Particularly for anything that is text-heavy. Its not uncommon for redundant and ultimately removable svg tag attribute data to represent 80-90% or more of the exported file size. All the redundant markup makes it very hard to use the exported SVGs as-is for any use case where one might edit or use the markup directly (for me this has been mostly web / interactive design). None of these problems are really unique to affinity when it comes to design software so i'm not miffed by this BUT I wonder if there was some way for you guys to leverage this super effective and common open source tool that is often used to check for and clean up markup in these contexts. https://github.com/svg/svgo Incorporating functionality like this would make doing svg / web stuff with Affinity so much nicer! Even for pure curve/vector art , the ability to set limits on curve vertex precision and to group and thoughtfully re-format transforms and other elements makes an enormous difference for anything destined for the web thanks ! keep up the awesome work
 -
 Here are some notes which may help you (I hope) it is a bit of a work in progress about best practices. The various Styles (Paragraph and Character) which are in the program from the start are for me pretty much useless. I delete them and roll my own for each project. Having said that I should point out that there will always be a <no style> for both Paragraph and Character Styles. I set mine up to have Courier as the font at size 11 on 12 point, ragged right. Do that by putting some text in a frame and setting it up like that then go to Edit > Defaults > Synchronize from Selection and then go to Edit > Defaults > Save. This will set all new documents to having only <no style> for Text Styles and the font will be the Courier 11 on 12. With Publisher 1.8.x we now have Templates and these can have tons of styles and guides plus text frames and picture frames and ... already applied. You will want to set these templates up if you plan on doing lots of variations from the same basic starting point. In one Template I have a Group Style (I name it Base), it consists of the font family and weight and size (+leading) which I intend to use for the bulk of the text in the project. I then set up First Paragraph, Bulk Paragraph and Last Paragraph styles based on this Group Style. The three Paragraph Styles have different indents and space before and after applied as I see fit. The Last Paragraph has a single line for a 'decoration' and other than that it is identical to the Bulk Paragraph. You could set up the Base Group for most of the text and then set up another Group Style for Headings and another for Captions/Callouts or what ever you will need for the book. Headings could be used for Chapters and sections and page numbers. The best way to work is to choose the most stuff to be set and then base other Similar styles on that style. Set up a Paragraph style called Base and set everything you can then change it to a Group Style and base your Paragraph styles on that. Base (Group) Font Family Font Weight Size Leading Alignment/Justification Set for Align to Baseline Indent Space Before/After Decorations Initial Words Drop Cap Ligatures Numbers ... Bulk Text (Paragraph) based on Base (Paragraph) Change only what needs to be changed, may well be nothing. First Paragraph (Paragraph) based on either Bulk Text or Base Change Indent and maybe choose Drop Cap or Initial Words. Change Space before, maybe set it to start in an new frame or on a new page... Last Paragraph (Paragraph) based on either Bulk Text or Base Headings (Group) Same sort of stuff from the first Group Style Chapter Heading (Paragraph) Change what needs to change, Type Size, Leading, Alignment, Space Before/After ... Chapter Sub-Heading (Paragraph) Change what needs to change, Type Size, Leading, Alignment, Space Before/After ... Section Headings (Paragraph) Change what needs to change, Type Size, Leading, Alignment, Space Before/After ... Page numbers if you think it necessary Callouts if needed Captions if needed
 -
 In designer 1.9, when you group a text frame and a form with transparency gradient, the final text size is larger than the original if the text frame has been resized previously. Steps to reproduce result: Create a text frame and write some text Enlarge the text frame dragging the resize handler (The one that enlarges both frame and text) Create a form and apply a transparency gradient to it Group the text frame and the form. Text gets enlarged in the same proportion that it was enlarged before. Note that this only happens when grouping (with menu, contextual menu or command+G), but it does not happen if you manually place the text frame into the group moving its layer, so the error is in the group action itself and the resize being reapplied to the text..
- 2 replies
-
- 1
-
-
- transparency
- text
- (and 1 more)
-
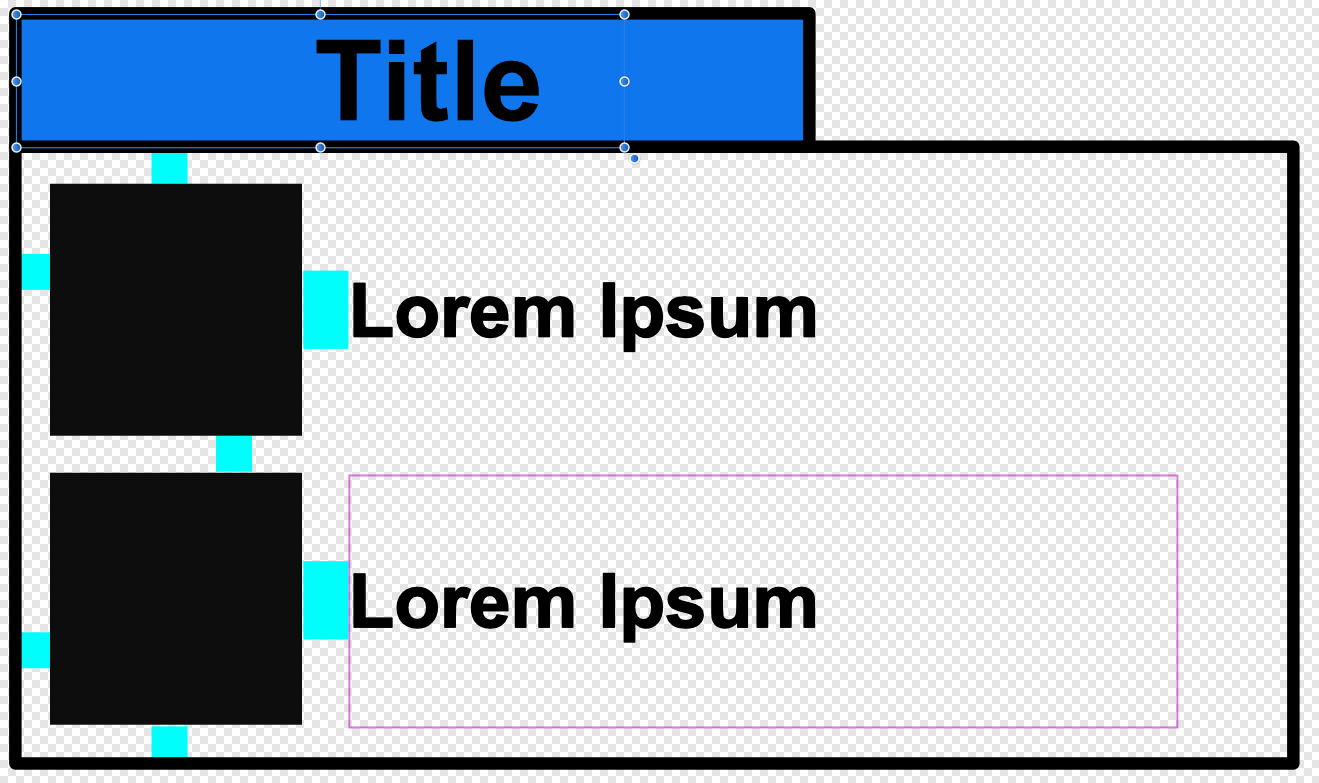
 Hello Designer fam, I just converted to using Designer from years of Inkscape. Love it. That said, I have a few questions that I'm sure you all can answer. I've searched online for each, but didn't find a great answer. Part of the answer to my questions might be saying that I'm asking the wrong question, thinking about this stuff in the wrong way and just need to rethink the problem. I'm making a basic newsletter with just a few elements: Title Text, Body Text, Black Square Image, Section Outline, Blue Title Rectangle, Group of Body Text and Black Square Image. You can see the basic format here: Here are my questions. Basically all of them are associated with me trying to compress as much content onto the page as possible by experimenting with different Black Square Image and Body Text sizes: Is it possible to select all of the text in the document and change the font and font size all at the same time? Right now, I have the Body Text in various groups paired with images and it is quite laborious to enter into each group and change the font one at a time. This also limits testing out various fonts quickly I've got about 50 of those Black Square Images in the document and I want all of them to be the same size. Is there a way to change the size of all of them at once without changing the size of anything else and without changing their position in relation to everything else? For example, this is easy to do in a Microsoft Word table where the image would be in one cell, the text in a cell next to it (on the same row). If the image changes size, then the row of the table will scale with the image and the cell containing the text and all images in rows below will also move down, thus keeping all content scaled correctly I added 'margin pads' (in aqua, which I will eventually make transparent) with the goal of keeping the margins consistent. Really, I just want to edit the margin around the Black Square Image times 50 occurrences quickly. I'd also like the margin around the Black Square Image to cause the Section outline (black line) to scale with it (thus if margin increase, the Section Outline increases, but the Black Square image stays the same size) Related - I'd like to just have the Section Outline automatically generated, kind of like a Table in Microsoft Word.. I tried to group all the content inside the Section Outline and mess with the layer effects/styles, but that didn't work with items in a group Minor issue: I'm using 'Frame Text Tool' for my Title text and I want the Title Text to simply be in the middle of the Blue Title Rectangle, but as I change the size of the Blue Title Rectangle, I have to move the Title Text Frame separately. Is there a better way to do this? Thank you in advance and sorry if these are dumb questions!
-
@norbinw I don't believe the grey box you are seeing has anything to do with setting the opacity of the group to 75% vs the opacity of the two objects inside the group. I think the issue is that your Black Marble background is an Adobe RGB file sitting in a CMYK document so when exporting the file you need to check the Convert Image Colour Spaces checkbox so all elements in the document are using the same colour profile. This for me at least removes the grey box on export regardless of whether Allow advanced features is checked or not. The advantage of using the Allow advanced features option in the PDF settings dialogue is that where possible it will maintain Vector elements as vector elements when exported to PDF rather than rasterising them (assuming that is what you are looking for). Currently because of the way you've created the Nails and Tails text, using Shadow and Outline fx, this text is rasterised on export regardless of whether you have Allow advanced features checked or not, this is because by default fx are rasterised. I'd personally be inclined to create the Nails and Tails text in the same way you've created the Cupio and Are text adding a standard stroke and a manual drop shadow (as per the attached file), that way all the text remains as Vectors on export to PDF and checking Convert Image Colour Spaces then means all elements are using the same colour profile resulting in no grey box. Having said that, I have noticed some oddites though... When applying a blend mode to a graphic which uses a standard Stroke, said graphic is rasterised on PDF export. When applying transparency to a Group (with Passthrough) rather than the individual items within the Group, this also rasterises the Group items on PDF export. Disabling Downsampling and Allow JPEG Compression reduces the file size of the exported PDf by about 6.3Mb! I have a feeling the first two may be known bugs but I'll take a look in the forum to check and if they've not already been reported I'll file a bug report. Nails and Tails.afdesign Nails and Tails AAF.pdf Nails and Tails DAAF.pdf
-

Tagged PDF support for accessibility
erssie replied to Chrysogonus's topic in Feedback for Affinity Publisher V1 on Desktop
I'm not a company, I'm just little ol' me but I design knitting patterns for charity. Some of them include charts and diagrams. Blind people do knit but those charts/diagrams are often inaccessible. I've just spent a few very long days translating a charted design into line by line instructions for knitting the stitches, and in my rough pattern in Word I have my alt text descriptions on my photographs etc. Word creates a pdf that my blind knitting group have told me is working with alt text on the photos etc. I would now like to lay that out in Affinity Publisher, was struggling as I am new to it, and could not find a place to put a text description of a photo, so have ended up here. I still want to do my work in Affinity Publisher and would like to avoid using Adobe products although i have a free Acrobat Reader DC. I understand that Affinity is not going to give me an accessible pdf as far as trying to put alt text to my photos, which is a shame. But if I create a PDF from Affinity, will it be editable by any editor to add the descriptions on photos afterwards to comply with various screen readers or Read Aloud software? And does that mean Id have to subscribe to a PDF Editor. I have spent days and days, with a hand disability and needing a lot of support, to try and make my patterns accessible. I'm willing to do what it takes, and I am not a company just an individual, but its frustrating to not find the tools to do so. And I cannot afford Adobe subscriptions or other ones out there, which is why I purchased Affinity. I was going to volunteer as well, free of charge as I work so slowly with my disability, to translate others knitting patterns or craft literature into accessible documents so that people with impaired vision can easily listen to instructions and knit along at the same time. I'm scared that I might get prosecuted in the future for doing that if I don't have the right tools. It'd be a crying shame if I have to go from doing my own layouts to just using Word again. That is an awkward thing to use, I hate it. I'm already complying with regards to text size, type and layout to standards set for knitwear designers, its just the alt text thing I can't do. I also cannot afford to pay accessibility editors to do it as I am volunteering anyway. Can someone tell me where after Affinity they are going to put their alt text on? And if its not available automatically, can I just put a readable caption below/or above the photo in line with it for it to be read out? -
First thing is that a Template is in essence just a document for making a new document. There is nothing which will be inherited in the new document if the Template is changed. There is no connection from the one to the other. I am going to assume that Stylesheets are the Text Styles; Group, Paragraph and Character. These are per document and are unique in that document. Four Documents can have a Paragraph Style called Fancy Heading and there is no guarantee that the font, or anything, will be the same in the four documents. This would be nice but is not present. I would set up one Template in Publisher for the book and define all the Paragraph and Character and Group styles in the template. There is a hell of a lot of planing needed, you'll need to know how many Headings etc you'll need. Bulk text, Drop Caps, Captions, Pull Quotes, Running heads, Running footers, Introduction, Index, ToC and on and on. These may change for different sections so setup Groups for things which will change. Have Introductory Material Group and Section one to three Group and Section four to seven Group and then within those groups you can have the Paragraph styles which will be different, perhaps the Captions or the Pull Quotes, perhaps the Drop Cap or Bulk text. You can cascade the changes down through Group/Paragraph/Character styles based on higher levels. Plan plan and plan some more. Lay out different sections with placeholder text, make them two or three pages and then look at combining documents to learn how the application doesn't do what you expect it to do. Work with cascading fonts (size weight leading...) and spacing and flow using No Change
-
 When you try and use a Callout Ellipse Shape, or any other shape, as a Text Frame you need to remember that the Centre Vertical functionality tries to centre the text within the vertical size of the whole shape, not just one part of it (in this case, the ellipse), as you have surmised. The shape isn’t ‘aware’ of what it looks like, or what it might be used for, it’s just a shape. If the shape is more complex than something like a rectangle or ellipse then you will probably need to do some manual centring to get it looking right. One other option is to ‘cheat’ by grouping an Ellipse and Triangle, adding an Outline Effect to the group, and then putting a Frame Text layer inside the Ellipse – see attached video and document. Note that this will be rasterised upon export because of the use of an Effect, and one of the shapes will need to be filled. 2022-11-17 09-40-20.mp4 callout.afpub
 -

Regular Expressions bug
Colin_Fredericks replied to Colin_Fredericks's topic in V1 Bugs found on macOS
Explaining group matching - feel free to skip if you know this. "Group matching" is when you surround something with parentheses in a regular expression. It captures the matched group so you can put it back in later ("group replacement"). For example, if I wanted to change <strong class="example">emphasis</strong> to <em class="example">emphasis</em>, and also change <strong style="font-size:large;">emphasis</strong> to <em style="font-size:large;">emphasis</em> at the same time, I could do this: Find: <strong(.*?)>(.*?)</strong> Replace: <em$1>$2</em> and it'll replace the <strong> tags with <em> tags and keep any of the attributes. The first group is $1, the second group is $2, etc. The (.*?) group says "any character, zero or more of them, don't get greedy." (And yes, I know, using regex with HTML is counter-indicated, it's just the first example that came to mind.) In this particular case: If you run that kind of replacement when there are lines in the "Find and Replace" studio panel that do not highlight their corresponding places in the text, you get the sorts of results that you see in the sample file. The groups that are replaced do not match up with the groups that are found, and I haven't found a reliable pattern to it yet (though there probably is one). The non-greedy qualifier issue: Now, in the example I gave above, the question mark works just fine. Try adding it to the case in the sample file, however, and the match becomes individual letters instead of words. Try it with .*? instead to see it match the spaces between letters (which I'm not sure should ever be matched by any regular expression). Not space characters " ", but the boundaries between one character and the next. I only found this because I routinely type (.+?) instead of (.+) by muscle memory to avoid matching, say, everything between two different sets of <strong> tags instead of just the contents of the tags. -
 Hey guys, I was recently designing a brochure in Publisher and I was simply trying to scale a group but for whatever reason it was not working how I thought it should work. Example - I had 2 placed images, a vector curve and some copy and headline text in a group. I wanted to scale the group proportionally and make it bigger, but when I did so the images and the vector curve scaled correctly and the headline text and copy pretty much stayed the same size. No matter which way I tried to do this it didn't work...I just ended up doing this manually (scaling the text manually and separately even though the headline and text was in a group) not sure what I'm doing wrong but I hope it's a simple fix..... This seems like a basic thing to be able to do (works in Indesign haha) Thanks in advance.
 -
 I think that Text Styles should be front and center for any long-form document, but Affinity makes it very confusing. It's hard to understand. I'll write some pointers, but keep in mind, I am no expert. Most of the time I feel that I am hitting far away from what would be "best practices." Start with a clean slate: Delete all styles. you should be left with: [a] is Character Style [P] [No Style] [a] [No Style] In the hamburger menu check "Show Hierarchical" and "Sort by Type" Paragraph Styles are for styling full paragraphs (paragraphs are separated with Hard Returns (Enter). A new line can be created within a paragraph with a Soft Return (Shift+Enter)). Character Styles are used for styling characters within a paragraph. A bold or underlined word would be Character styling. For any text box you have selected you will always see two styles highlighted: A Paragraph Style and a Character Style. Create a Paragraph Style with the +P in the bottom left of the Text Styles. Two things to do first: (1) Name the Style (2) Press "Reset formatting" in the Create Paragraph Style dialog. In the Edit Text Styles dialog, there is a "Style Settings" window always visible in the bottom right. You want to keep that as clean as possible! Don't have too much there. If you are having to scroll, you have too much. You will notice when you press "Reset formatting" all of that goes away. With "Style" highlighted in the left column of the "Edit Text Style" dialog, always take a look at "Based on." It should always say [No Style] unless you are explicitly and consciously making a style based on another style. If you have a Paragraph Style Highlighted when you press "Create Paragraph Style" (yes, there is always one highlighted) the Style that you are creating will be based on that highlighted Style. This is good to know and be aware of every time you create a style. On the Text Styles panel, there is a "Reset Formatting" button near the top right. It looks a T with a half circle. This button will be your friend! Press it whenever you have a paragraph that is styled in ways that you don't want and you cannot seem to make the styles go away. Do not confuse this with the "Reset Formatting" button I mentioned earlier. They use the same wording, but are not the same thing. *** Note: I am using the Beta as I am writing this, and some of the annoyances that make the Reset Formatting (T) Button necessary seem to be resolved. I hope that makes sense. Here is an example of a Group style that would make use of "Based On" feature: [ s ] is Group Style. Not sure why it doesn't use a G [ s ] Body Text (Font, Font Size) [ P ] Body (Body Text + No Changes) [ P ] Bullets (Body Text + List:Bullets) Above, you would use Body for all of your body type. When you have a Bullet list, you can use Bullets. If you want to change the font, change the font of the Body Text Group style. That will automatically change the font of every Body paragraph and every Bullets paragraphs. There are two different approaches for edited a Paragraph Style: (1): Open the Edit Text Style dialog by double clicking the Style in the Text Styles panel. Make edits and press OK to close dialog. (2): Highlight the paragraph you want to edit. Use the toolbars and Studio panels to edit the paragraph to your liking. When it is how you like it, press the "Update Paragraph Style" button at the bottom of the Text Styles panel. When you press that button, the paragraph style will be updated and applied across the document. I tend to use method (1). I do want to say, I have very little confidence in what I do is best practices. I did want to contribute to the conversation though. Hopefully some of what I posted will help bring clarity to you. I also hope others will contribute to help wrangle in my methods! Note: I refer to both a Create Paragraph Style dialog and a Edit Text Style dialog. They are the same dialog, but just named differently depending on when you see them,
 -
 Hi, I found a problem in Publisher version 1.9.0.932. I can't remember this problem with previous versions of Publisher. The problem is: if I resize all the objects selecting them and using the handle at the lower right, which allows resize of text size together with the rest of objects, if after I group some of the objetcs with text frames, the text size change. I found that if the resizing was to a bigger size, the unexpected text size change is to a bigger type. On the contrary, if I resize to a smaller size, the text size change is to a lower type. Doing this several times, the change of the text size is rather erratic. Is it me doing something wrong? or some else found the same problem? Thanks a lot. javier PS: sorry if this question was alredy posted. I couldn't find it.
 -
Today I alt+dragged a group do duplicate it. The group was pinned to a text (and with wrapping applied). As soon as I started dragging it, the copy was stretched to incorrect size. If I alt+drag the item un-pinned it copies correctly. I tried with other kind of grouped objects and all of them gets distorted. It happens on single shapes too. Steps to reproduce behaviour: mage a group of objects (In my case, a rectangle and two text boxes) Apply a text wrapping and place over the text (In my case a squared wrapping) Pin the group to the text Alt-drag the group to make a copy. The cloned group gets horizontal distortion I've attached a publisher document with the example used. alt-drag-issue.afpub Publisher 1.8.4 MacOS 10.15.7
-

Improve your canvas please
User_783649 replied to User_783649's topic in Feedback for the V1 Affinity Suite of Products
I made benchmark file for anyone who can be interested in measuring Affinity apps canvas performance with text layers. There are multiple groups of text layers each of them containing from 4 to 72 thousands of characters. To start testing, select any group you like and start dragging it around the canvas. If you're seeing good visual response from your system (in ideal it should be something around 60fps) then you may choose another group with more text. You can also select multiple groups of the same or different size. At some point you should start noticing significant performance decrease, delayed redrawing and fps drop. My observations: For some reason, all these drag operations are performed solely by CPU. GPU is not used at all (see that tiny blue line in screenshots below). This fact may explain the reason why performance is so bad with dragging text layers and any artboards or group of objects with text layers. I measured system load and recorded CPU and GPU activity (see the screenshots attached below). System was tested with i9-9900K fully enabled – 8 cores and 16 threads. And I also tested it with only 4 cores and 4 threads enabled, without Hyper-Threading. Visual response was nearly the same (low) in both cases which is quite surprising to me. Seems like no matter how many cores you may have, it will stutter and lag without proper help of GPU. Verdict: There's definitely a need for more intense usage of GPU in such operations like dragging and moving layers on canvas. P.S.: Also added diagnostics file about procedure calling stack (might be useful for developers). affinity_text_benchmark.afdesign resource_diag_during_text_layer_move.txt
-
 Hi there, I've got some lines and circles with various effects like inner and outer shadows which are grouped in multiple groups. Sometimes, also a group contains groups. When I want to scale those groups, I also want to scale all the strokes and effects. With strokes, that works fine: just select the top-most group and set the "Scale with object" checkbox in the stroke dialog. In the effects dialog, there's also such a checkbox and I can select it for a whole group. But the objects in the group don't inherit this. How can I toggle the "Scale with object" checkbox for multiple objects without having to select the objects each after another? The second question is: how can I scale multiple objects and also scale their stroke withs and effects without having to enable the "Scale with object" flag? For text boxes, this works with moving the second blue circle at the bottom right corner of the bounding box. It scales down the font size. But line widths and effect radiuses / offsets are scaled along only if the said flag is active. Sometimes, I have objects where this flag is turned off on purpose for normal operation. But when I want to copy-paste those objects into a new graphic and scale them to fit their new environment, this one single scale operation should also scale down line widths and effects. Is there any way to do this without having to toggle the "Scale with object" flag before and set it back afterwards? Thanks in advance for any helpful solutions. Best, Markus
 -
If I group text frames that have been copy pasted from another document, it will increase the text font size by roughly 405%. 9pt text will increase to 37.5 for example. 48pt text goes up to 200pt. The only work around is to create a new layer, group that layer with no content, then add all text frames to that group. Obvoiously not ideal when you need to group multiple text frames per page on a 300-400 page documen. As rather than select, then a single quick key, it becomes two quick keys, select, two more quick keys. I have seen other posts on this problem, none of which seem to have a fix. Is this a style or setting issue, or a bug?
-
 I've been at this stuff for a long time but only sporadically, so for all intents and purposes I'm a beginner. I'll give you a method that will get you started and perhaps more knowledgeable users will jump in with a better idea. AFAIK there's no way to format a text box to define fill, stroke etc. It's just a container for text. Off the top of my head the only way to achieve what you're after (formatted text on a formatted rectangle) is: 1. Draw and format your rectangle as before. 2. Select the text tool, click on the artboard and drag out a rectangle roughly the same size as the one you created. 3. Type your text in the text box, format as you like e.g. selecting center placement horizontally and vertically, size, text colour etc. 4. Notice that this operation has created a new text layer in your layers list tab in the "right studio" i.e. that tabbed section to the right of the screen. 5. With the move tool, select the text box and drag it so that it overlays your coloured rectangle. 6. Drag the edges of the text box so that it matches up with the rectangle beneath (or is centered therein or whatever relationship you'd like). 7. With the move tool, click and drag a selection that captures both boxes. That is, e.g. place the move tool outside the upper left corner of the rectangles, click and drag until it's past the lower right corner. You should now have both text box and rectangle selected. If you have the layers tab open you will see that both layers are selected. 8. You should see a "group" button on the tool bar, or you can go to the Layer menu and select "Group". Henceforth the text box and underlying rectangle can be selected and moved as one. If you double-click the object you'll be editing the text layer. If you select the object, then select only the coloured rectangle layer in the layers tab, you'll be able to edit its parameters. There are probably also keyboard shortcuts enabling one to select the next layer down, dunno about this. Worst case you can always select the grouped object and ungroup temporarily if you need to make a lot of changes to the underlying rectangle. Also note you can grab the side handles and corner handles of the selected object and resize the frame/rectangle without altering the text size, or grab the extra handle off the lower right corner (there's an official name for this of course) and drag to resize and reshape the object in a manner that re-scales the content (text) at the same time. Pretty cool. I'll see if I can attach a little, ugly example file here. TextOverRectangle.afdesign
- 7 replies
-
- 1
-
-
- affinity designer
- layers
- (and 3 more)
-
 I had a problem going into a similar direction when trying to change the language for text objects within a group. If I chose a group (with text objects inside it) and change the language in the paragraph panel that change only applies to the group itself, not the text objects inside of it. I'm not sure why it would make sense to have an attribute such as language to be assigned to a group, but not the objects inside of it, effectively not changing the property for any of the text objects (they still have the previous language selected). It would be great to have an option to have changes applied to a group (such as text size) propagate to all of it's elements. Selecting each element from the layers panel I find is not a good solution for complicated graphs, such as flow diagrams, etc. It forces you to give a name to each element so you can identify them, could be very cumbersome.
 -
We are pleased to announce an update for the macOS release of Affinity Publisher, version 1.8.4 Changes in this build The changes in Affinity Publisher for macOS 1.8.4 (made since the last release Affinity Publisher on macOS 1.8.3) are as follows: Fixes & Improvements: General Preparations to our macOS apps to ready them for the release of Big Sur later in the year Fixed recent regression when saving Linked Image placeholders which was causing large document files Recoloured K-only images with transparency lose their transparency Stability and Performance improvements Fix for zero-height / width objects moving to the wrong pages when switching to / from 'Facing Pages' Text > Interactive - Options mismatched with Context Menu Fixed Colour chooser UI 'Lock Children' wasn't updating correctly on the Context Bar Fixed Paragraph Panel 'Use Space Before' popup Page view doesn't change when double-clicking pages with OpenGL (Basic) display File > Edit in Designer and File > Edit in Photo customisable shortcuts missing Convert to Text Frame now handles stroke and fill correctly Fix for stale preflight results persisting when Pages are removed Multi-spread Allow immediate dragging of objects on other spreads Constraining while dragging objects between spreads now works correctly When dragging between spreads, snapping is now performed on the target spread candidates Dragging objects between spread using the Focal Point handle now works correctly Fixes for dragging curve nodes across multiple spreads Fixes for 'restart drag' when translating across spreads Fixed issue with auto-panning in the text tool Text Improved performance of text when rendering text Avoid generating infinite filler text when leading is zero Further improvements for ideographic line breaks, mainly for quote-marks Allow OpenType kerning between glyphs with different settings (if they are the same font and size) Fixed 'Indent To Here' not working if lines are broken by drop cap or wrap shape Fixes for line-breaker around Fixed Spaces Index Find - match words with following punctuation Index Partial loss of parent topics when adding pages from file Fixed crash after editing text styles if changes caused pinned objects to move between spreads Option to preserve Text Frame width when changing Column Gutter in the context toolbar Double click multi-word selection could leave the original word not selected Fixed handling of local objects pinned to master page text when subsequently unpinned Improved line breaking for ideographic languages Fixed shortcuts for backspace key Fixed Text entry issue in separated mode with multiple documents Import IDML Import - Text frame corners are now scaled correctly IDML Import - Fixed instances where text wrap path could fail to import, or be scaled incorrectly IDML Import - Generic OpenType features not being imported from IDML file IDML Import - Effects settings not scaled correctly on master page items IDML Import - En-Space in numbered list imported as a 0 IDML Import - Elements could be positioned incorrectly in some instances IDML Import - Question mark in file path breaks link during the import IDML Import - Initial Words not scaling correctly IDML Import - Placed EPS files are slightly clipped IDML Import - Better handling of master page items with overridden properties XLSX Import - Fixed hang with cells with gradient fills PDF import - Improved performance PDF Import - Improved handling when importing password restricted PDFs PDF Import - Import now allows creation of Artistic Text if 'Group lines of Text into Text Frames' is switched off PDF Import - Import now provides fallback if the used font doesn't define space PDF Import - Fixed text positioning which could be incorrect due to spaces being treated as tabs under certain conditions PDF Import - Fall through to alternative mappings when importing text, if necessary PDF Import - Better handling of restricted files SVG Import - 'ClosePath' doesn't have to be followed by a 'Move' SVG Import - Now treats gradients with one stop as solid fills SVG Import - Other fixes for specific files, including malformed files Export Fixed vector export of text occasionally filling characters PDF Export - Better support for RGBA16 and RGBAUF images PDF Export - Export could fail for glyph ids that happen to match surrogate pair values PDF Export - Fixed issues exporting to PDF/X-4 with content with embedded profiles SVG Export - Fixed source of numeric overflow causing curves to be exported incorrectly in some cases Earlier changes and fixes in 1.8 since 1.7 (including the new 1.8 features) are listed in some detail in this 1.8.1 update announcement. and the 1.8.2 update announcement UPDATING TO THIS VERSION (Free for existing customers) The software version can be seen on the splash screen and the About dialog (in application menu, Affinity Publisher > About). If you’ve purchased from the Mac App Store— updates are done automatically next time you run your software after it is available in the Mac App Store. If this does not happen for you, open the Mac App Store app and go to the Updates page and then Store > Reload page or press CMD+R. This should hopefully force the update to show. Apple sometimes phase roll outs around the world which can mean it may take up to 72 hours for your update to be available. If you’ve purchased from the Affinity Store— each time you start the software it will check for updates and offer to download and install any available update, or in the application main menu there is an option Check for Updates. You can download the latest installer by logging into the affinity store here and find the order in your account and use the "download" button in there. Alternatively, this new release (and previous versions of Affinity Publisher for macOS) can be downloaded from this link (that installer is NOT for Mac App Store purchases and needs a product key).
-
Thanks for the file. The slice you're exporting has been created from the Text Layer, and then manually resized to fit the page's size. When a slice created from an object is exported, it will only export the contents that the slice is created from and ignore anything above or below it. In your case, creating the slice from the Group object would allow the image to export, however that would break the automation it looks like you've tried to create. Off the top of my head you could make the image into a symbol (to save you updating the image multiple times) and then duplicate it for however many slices you need to create (based on the text layers). If you created a group for each set of images and text layers, you could then just create a slice from each group like the attached example. Example.afdesign
-
 We are pleased to announce an update for the Windows release of Affinity Photo, version 1.10.4 (replacing 1.10.3) (Note: 1.10.2 was an iPad only release) The changes in Affinity Photo for Windows 1.10.4 (made since the last release Affinity Photo for Windows 1.10.1) are as follows: Fixes & Improvements: Fixed Refine Selection as New Layer with Mask preventing rendering of Artboards Fixed Brush Hardness changing when swapping tools Fixed Live Filters with Radius or Distance spuriously changing the Azimuth anticlockwise Fixed Toggling 'Quick Mask' not updating until you toggle the mask off and on again Fixed 'Overlay Paint' and 'Overlay Erase' tools in Develop Persona not painting with correct spacing Fixed document with 'Save History' failing to save after promoting a Group to a Layer Fixed vector import potentially importing with the wrong document size Fixed 16-bit 'Saturation blend mode' displaying white pixels Fixed crash painting on empty pattern layer Fixed 'Levels' > 'Output black and white' using the same values when changing channels Fixed files losing quality after a merge or export Fixed potential crash opening an EXR document Fixed crash opening multiple FITS files at once Fixed DNG files not being displayed in Develop Persona with Hardware Acceleration enabled Fixed Astrophotography to cope with Unicode file paths Fixed PSD import of Linear Burn blend mode being imported as Multiply Fixed some occasionally fonts failing to be recognised at startup Fixed Borderless printing having a border Improved 'Uninstall Pack' flow to auto-select the pack Fixed 'Preset Manager' > 'Shape Presets' being unable to click Fixed hang on My Account page Fixed 'Defringe' > 'Also remove complementary colour' Fixed crash when closing the application Fixed potential crash on launch when a sync'd asset references an unavailable font Fixed document pixel resolution being stored in the wrong format within XMP metadata (breaks later parsing of the same data; hides the values from the metadata panel's 'Detail' view) Increased maximum defringe radius Fixed 'Convert to Curves' crash with underlined text, emoji etc. Fixed Astrophotography Stack failing on some DNG's with no warning Improved Astrophotography 'Make Align Layers By Stars' to work for layers in transformed groups Screen and UI corruption (in 1.10.3) on some desktops. App hanging on shutdown due to font cache problem. Help & localisation improvements. The improvements in 1.10 since are listed in some detail in this 1.10.0 Photo Windows update announcement UPDATING TO THIS VERSION (Free for existing customers) The software version can be seen on the splash screen and the About dialog (in Help > About Affinity Photo). If you’ve purchased from the Affinity Store— each time you start the Affinity Store software it will check for updates and offer any available update. The latest update will install over the top of any earlier version, with no need to uninstall. You can download the latest installer by logging into the affinity store here and find the order in your account and use the "Download" button in there. Alternatively, this new release (and previous versions of Affinity Photo for Windows) can be downloaded from this link. (that installer is NOT for Windows Store purchases and needs a product key). If you’ve purchased from the Microsoft Store— Microsoft Store updates are done automatically by the operating system (each time you start the application). If this does not happen for you, open the Windows Store app and click the three dots in the top right corner of the app and then go to Downloads and Updates. Click Get Updates. This should hopefully force the update to show.
 -
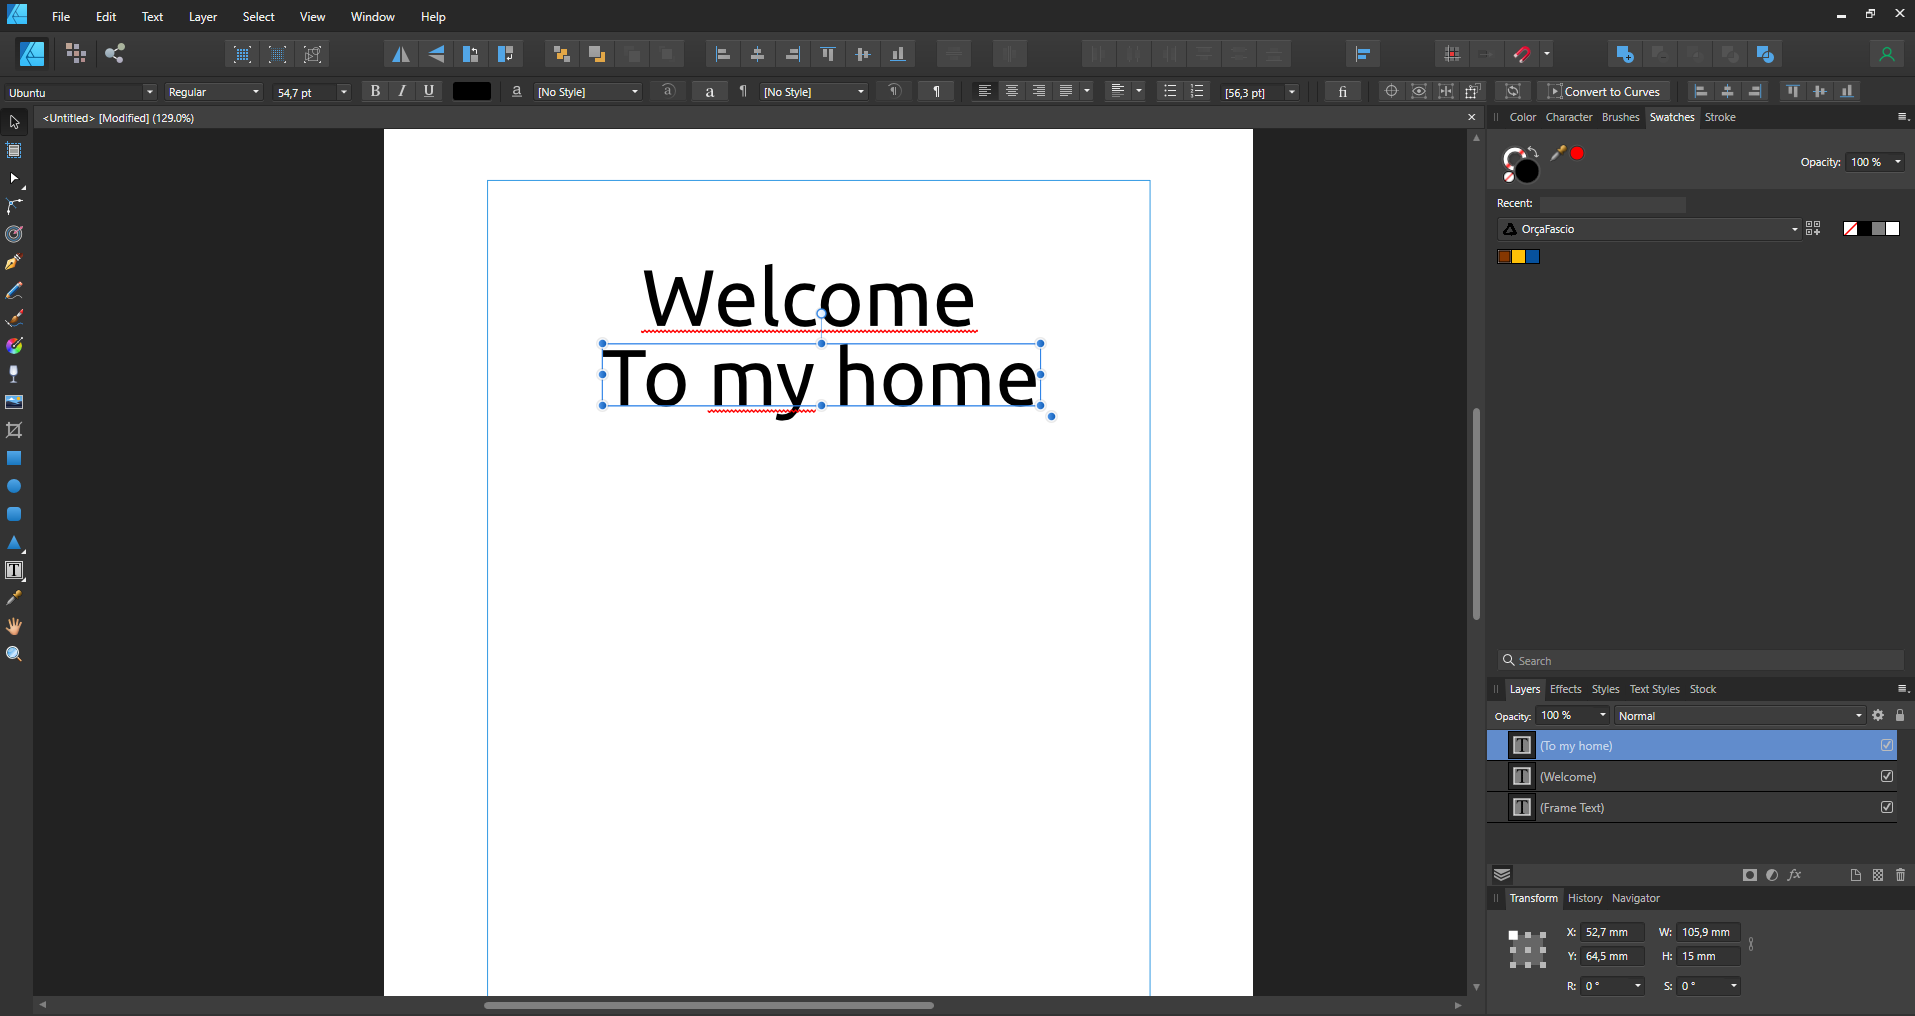
 Hi guys! After the update, when I try to group anything with a text or two text frames, the font size becames bigger and the text breaks to a second line. I don't know what to do. I've already unistalled the software, and the problem remains. This is the two text frames not in a group This is the two text frames after a only press Ctrl+G to group them. The text became bigger and breaks If anyone cloud help me I'll be great.
-
 I do agree with the definitions posted by @thomaso . In that definition it would definitely be a bug. I refuse to believe that it works as intentionally designed. Perhaps just badly designed and sort of an accidental design flaw. Proof of my statement is the following. Selecting multiple shapes (i.e. an instant grouping) transforms everything in scale. - This is logical. You could create a group and transform but this is faster. Selecting multiple shapes and selecting "Transform separately" implies a equal transformation (either relative or absolute) for all selected items. Just transforming 1 item out of the larger selection makes no sense as you could just select one item to have the same effect. So why design this function to work in this way. Selecting multiple text fields and changing the font size results in all text field changing the font size. Not just one. also does it not do a relative font size change. So the application has different behavior in comparable use cases. In most Mac applications resizing multiple (non grouped) objects with entering a new absolute size results in all objects getting that size. So this is de expected behavior. I can think of no reason of why it should work the way it does. If only developers can decide of something is a bug then nothing would be a bug. In my many years in software this is also very uncommon practice.
 -
Hello: I'm starting to use now Photo v2 for my day to day work (web graphics) and I'm experiencing multiple crashes (2- 4 times) for very simple workflows. I work on files less than 2,000 pixels size and do some Copy and Paste, clone/ impaint retouch and add some Text (Frame). I then add maybe a Levels Adjustment Layer and finally Group some layers to stay organized. Pretty much that's what I do in Photo. v1 was very stable but now I'm getting these crashes with the new version. I'm working in a Late 2015, 21.5-inch iMac . 2.8 Ghz Quad-Core Intel Core i5 with 8 GB of Ram Graphics: Intel Iris Pro Graphics 6200 1536 MB MacOS Monterrey v 12.6.1 Hope this helps, fjv