Search the Community
Showing results for tags 'Bleed'.
-
 What title says. Steps to reproduce: place picture stretch it to cover bleeds, switch to Photo, marque selection can't be drawn on bleed. However when moving existing marque it can overlap bleed with no problem.
 -
 Hy :) I working with a document on affinity publisher with bleed 3 mm , and I have made the background as placed affinity designer document but the placed doc has not the bleeds and I don't know how to include those bleed when I import document as a linked :)? Thank's you :)
-
In version 1.6 it was possible to include bleed on selected Artboards, in AD 1.7.1 the checkbox is grey.
-
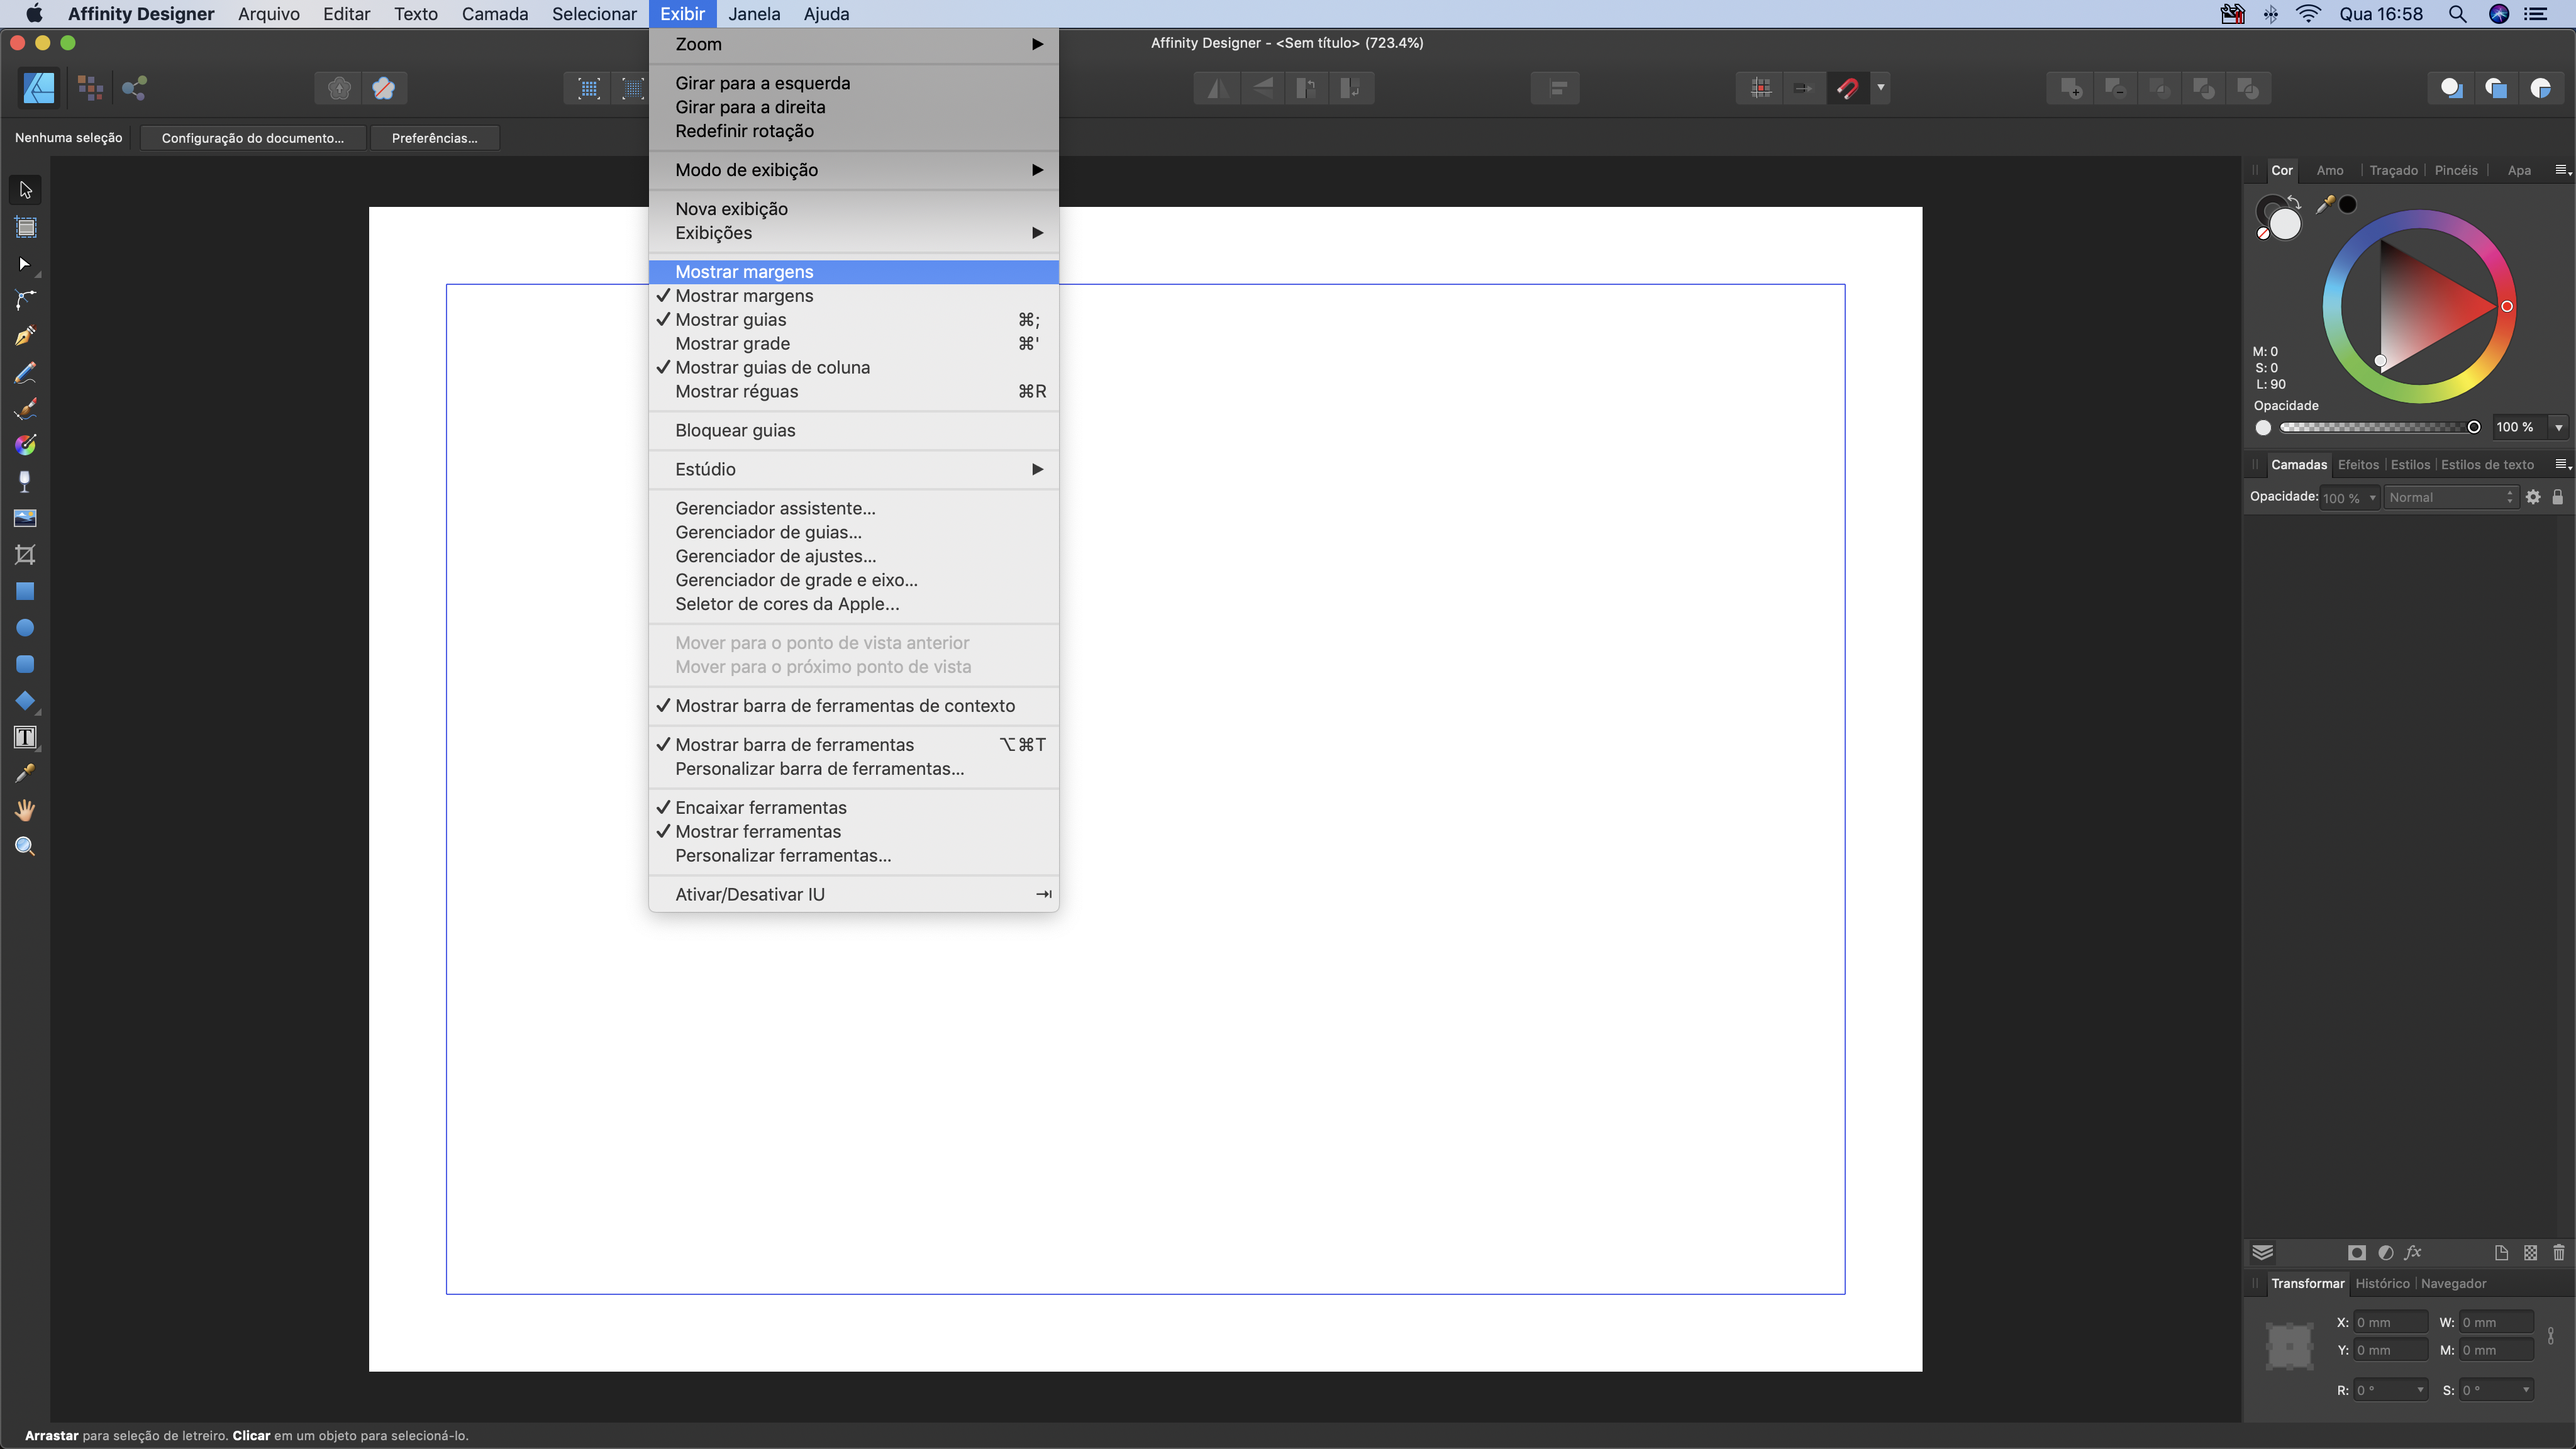
Hi, This isn't a bug, just a translation error that I, as a Brazilian user of Affinity Designer, noticed so, please, include the correct word in the next update. In the English translation, under the VIEW menu, you can read SHOW BLEED and SHOW MARGINS commands. But in the Portuguese translation - yes! In Brazil we speak Portuguese, not Spanish! -, under the EXIBIR menu, you can read MOSTRAR MARGENS twice. The correct would be MOSTRAR SANGRIA (for Bleed) and MOSTRAR MARGENS (for Margins). I would really appreciate if the translation team could pay attention to this detail that sometimes makes me choose the wrong option on the menu. Thanks in advance!
-
In Designer for iPad - when exporting PDF - the bleed is not showing - even if the Bleed is set to 3mm (or any other value). The crop marks and everything is there, but not the bleed. This is really essential for using the app for any serious print work.
-
 In publisher I use 'spreads' view. The printing company wants me to set a 1 mm bleed and export as pages instead of spreads (option: 'all pages' on export page). The thing is that my exported PDF shows the inside bleed of the next page instead of its own. Same for the next page (shows bleed from previous page). [see picture] I'm no expert in publishing but this looks weird from my point of view. Is this the normal behaviour or is it a bug? I want to be sure before sending my file for printing. Thank you
-
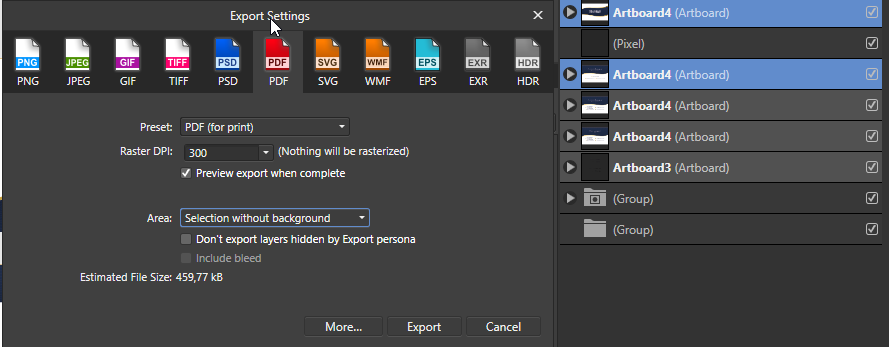
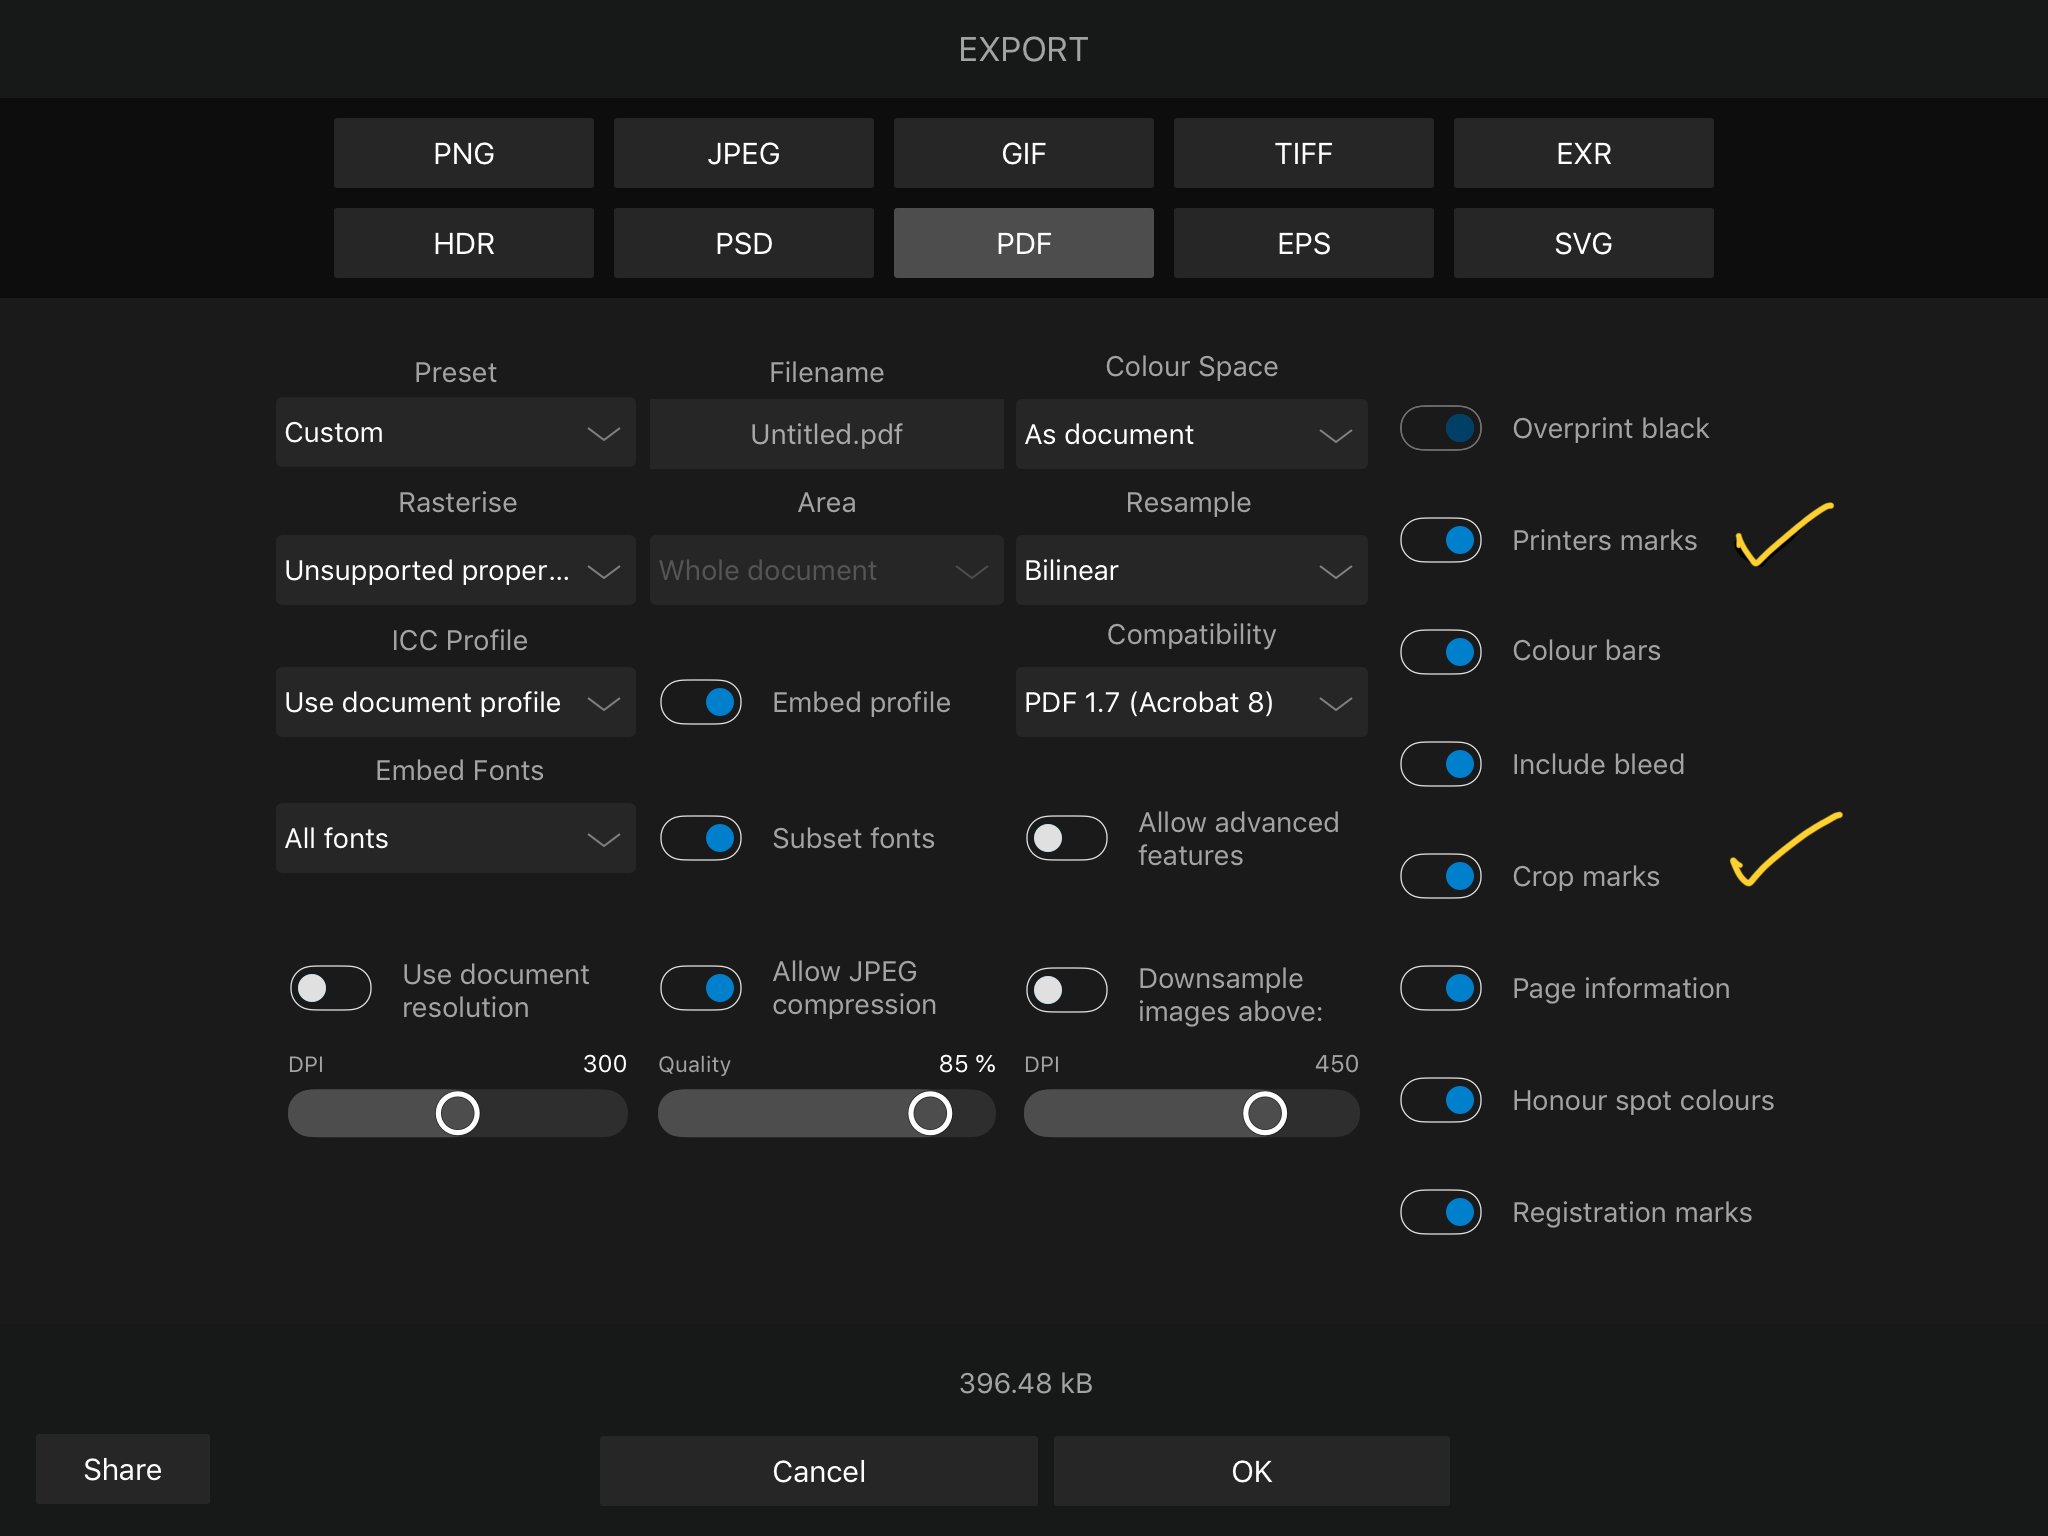
 I've just been trying to export 5 PDF artboards using the Export Persona and I can't find the 'include bleed' option. It was a tick box in AD 1.6 but now it is not an option in the Export Persona unless I use the File > Export option
 -
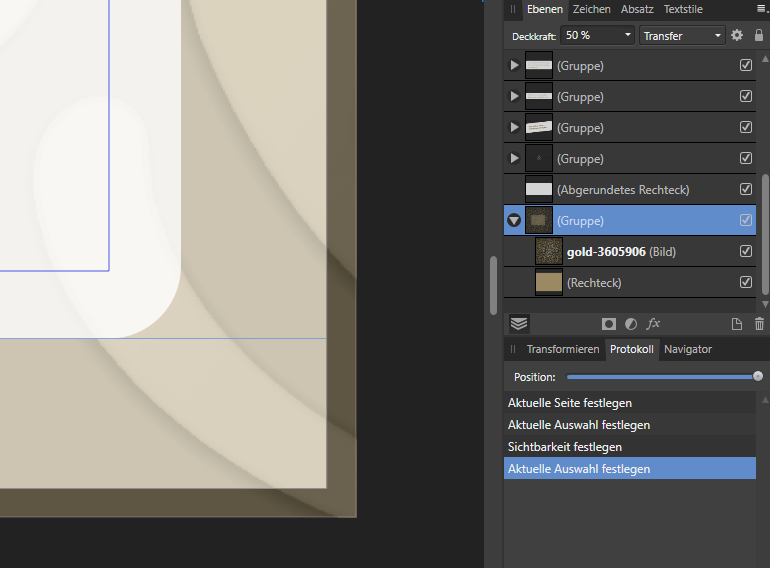
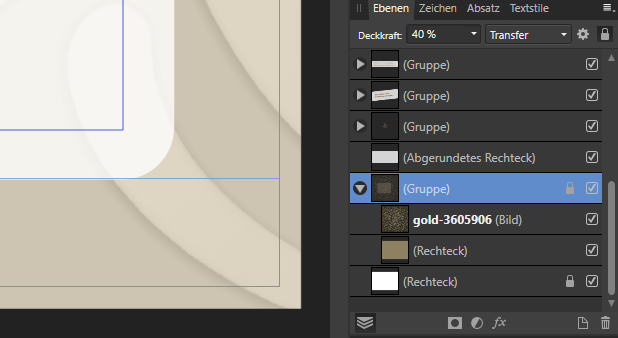
... looks like this: (layer "gold ..." -> 56 %, background rectangle -> 100 %; background-group: 50 %) For correcting I added a 100 % white background (outside of the group) and adjustet the transparence of the group:
-
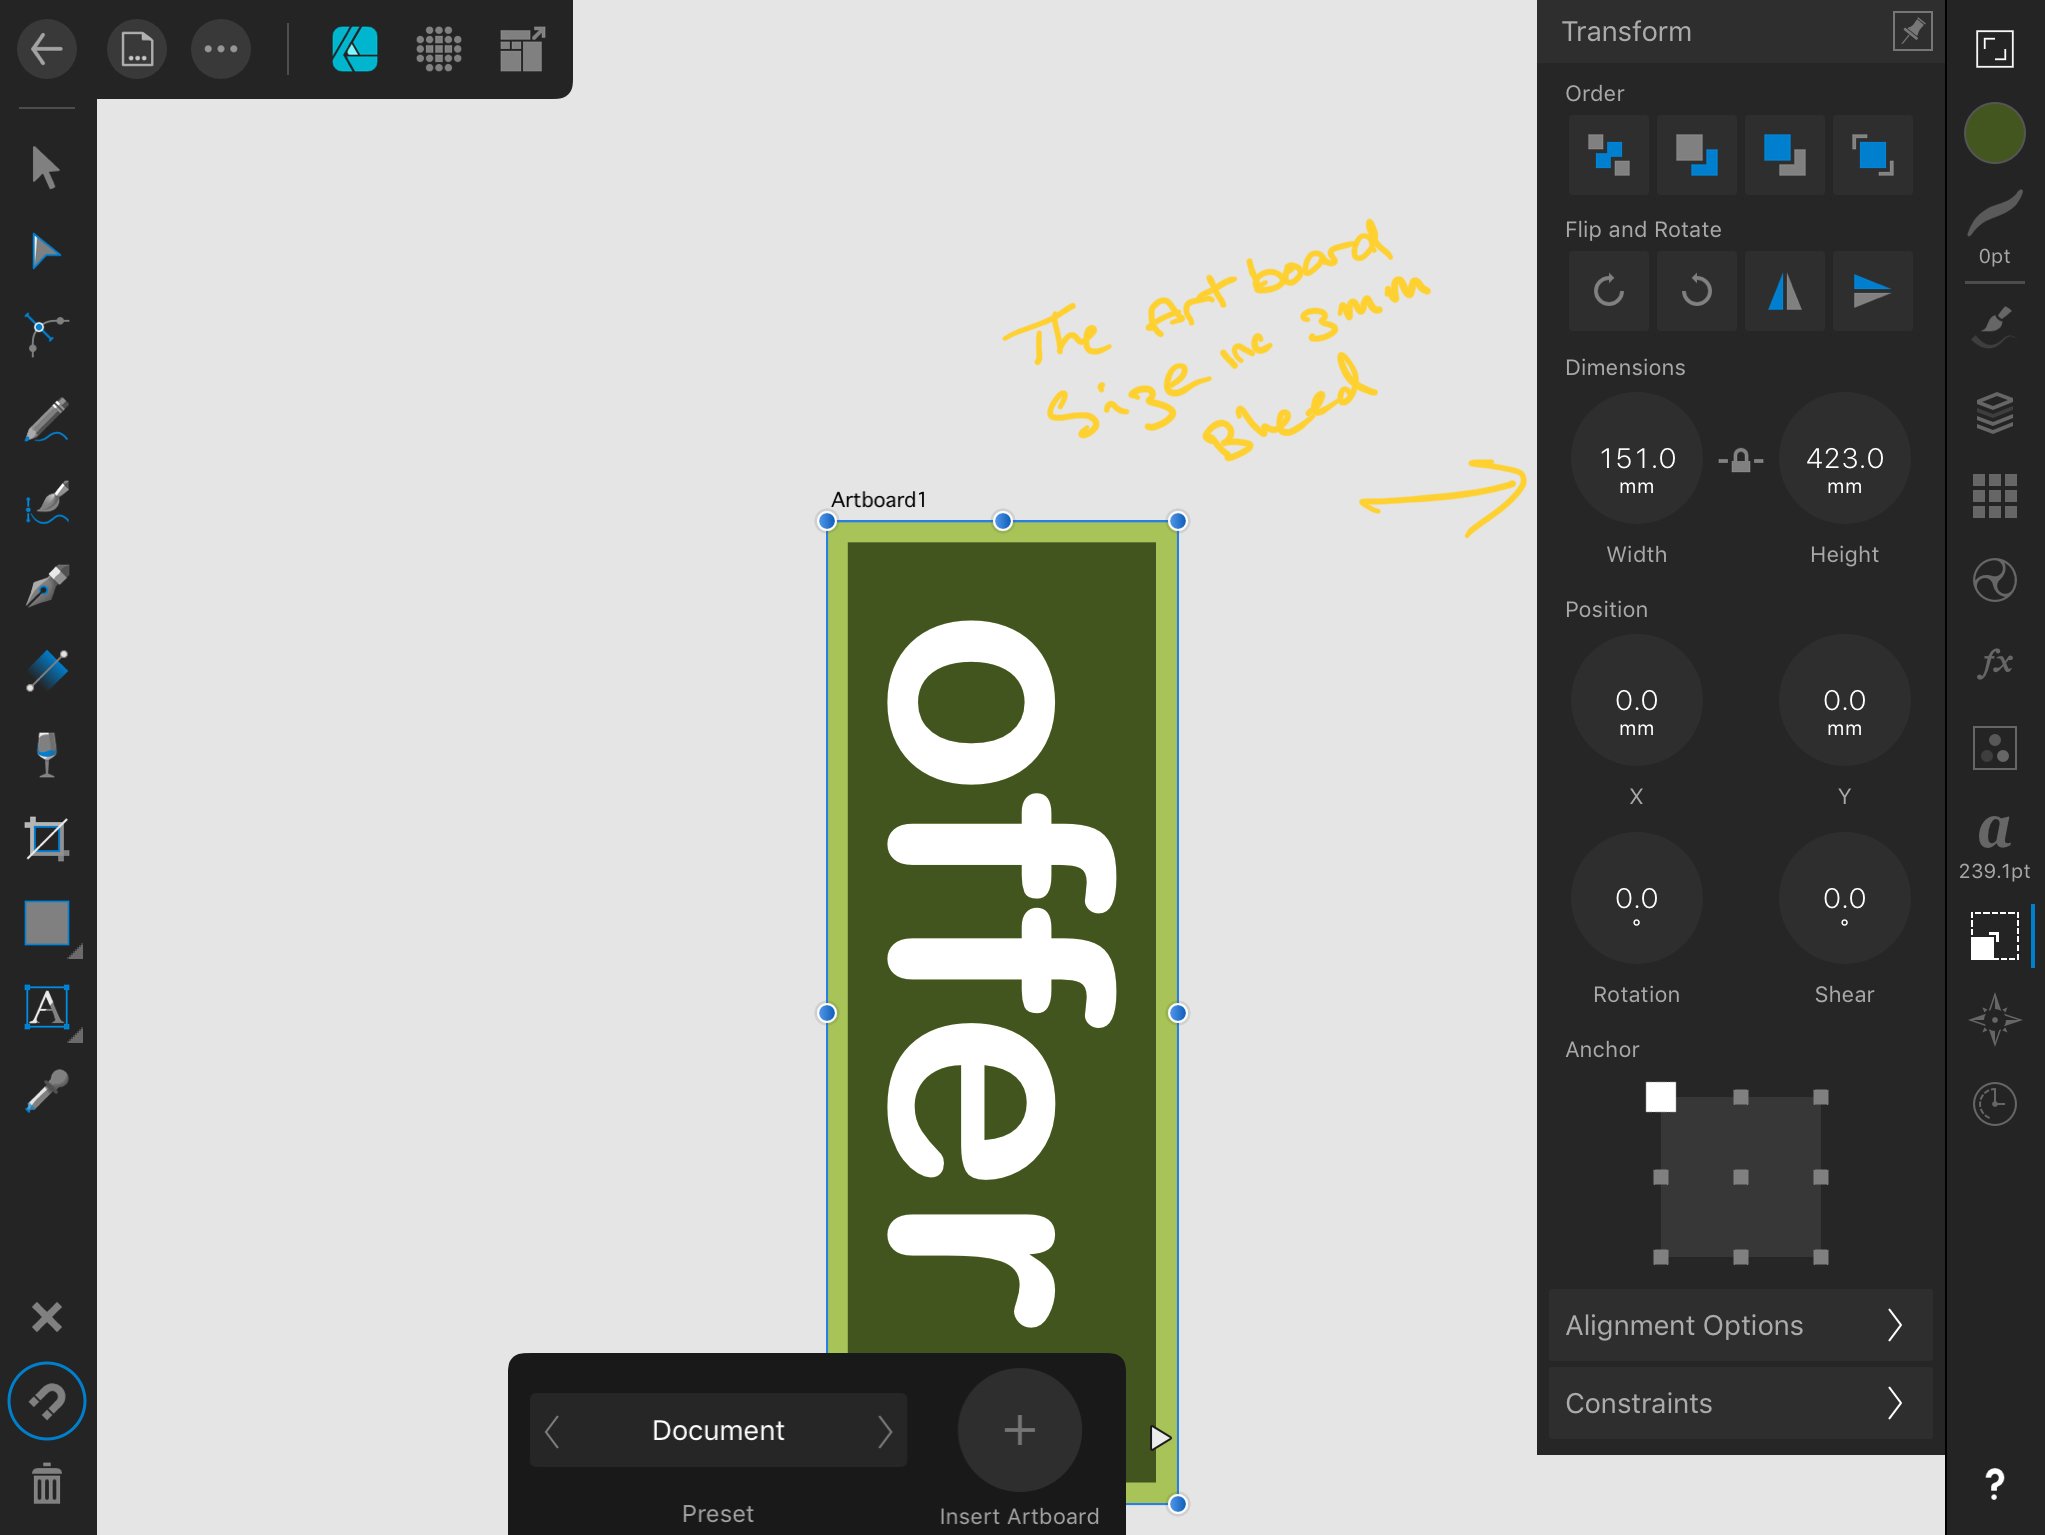
 How can I get crop marks while working with artboards? I've added bleed to my document/artboards, but because artboards act like a mask, there is no way to extend my document to the bleed lines. Any ideas?
-
 I've been testing out printing my art prints from Affinity Designer iPad. Sometimes I've exported to my computer then printed, and one time I printed straight from the iPad. I want to print an 8x10 sized print, with some white space around. I have previewed the document with crop marks only, with bleed marks only, and with bleed and crop marks checked. Registration marks has been checked through all scenarios. I can't seem to get the print with the correct crop marks so that when I cut it I still have a margin of white space around the print. Does anyone know how I can fix this? Is there a setting I'm missing?
 -
 Hi Guys, I am trying to find the correct way on how to set up the bleed and crop marks in Affinity desiner iPad. However I have played with couple of setting and I can not get the crop mark to be set correctly. Please see the following print screens for problems. Thanks
-
Hi, When I export to print to include crop marks and 3mm bleed it only shows the 3mm bleed on the Top, RHS & Bottom?
-
When placing a PDF (advert) with bleed and crop marks, Affinity Publisher only places the file as cropped. Is this intentional? This is very unexpected and I can see how it can be useful in some situations. However, It is far more useful to me to have the bleed and crop marks showing. I have only been able to resolve this by converting the file to eps.
-
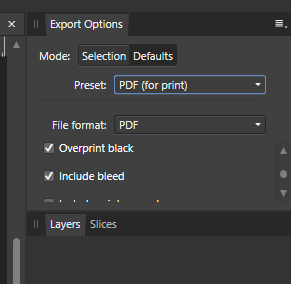
 Hi, How should I use the Include bleed in the Export Persona of Photo? I couldn't find any option to add bleeds. So, what is the actual purpose of this? Also, is there any workaround in Photo to export a document as PDF with standard bleeds? Any help would be appreciated.
-
I would like to see some changes to the PDF export in Publisher regarding bleed. I would like to be able to change the bleed setting in export in the "more" dialog. This way I can set bleed (and a specific bleed value?) for a specific export-preset. This can not be done now, and I still have to check or uncheck bleed regardless of the preset. Having the ability to change the bleed value in the export settings would be very useful, as printers have different requirements for these things.
-
 Hello, In AD, I created an artboard that is 8.5" X 11" (standard paper, 3300x2550px) and placed two 5"X7" images (1500X2100px) into the artboard. File attached. When I export to print, I see the option to automatically add crop marks and bleed to the artboard. However, it adds these marks around the artboard and not the actual images. In this situation, is my only option to add the crop marks and bleed to the file by hand? Or, is there some automation feature that could help me with this? If I need to do by hand, is there a preferred way to do that? The result would be a PDF that could be printed using 8.5"X11" paper and have marks where the image should be cut. Thanks! 8.5X11artboard.afdesign
 -
 Hello all, please I have problem with bleed, specialy print crop marks in export to PDF. I have document (business card) and size of document is bigger in every size by +3mm. For PDF export I need put into this document crop marks with bleed 3mm ( this crop marks go -3mm to the documet) and give me pure bussiness card size. If I set in >docoment setup "bleed" to 3mm, in export I have set "include bleed and include crop marks", after export pdf with this settings NOTHING HAPPEND = crop marks are always in maximum document size not -3mm inside document. (I try put against 3mm / -3mm / and diferent numbers...nothing happend). Please help!!! Im mad, because in PS it was 2 click in PDF export and it was done, here I cant handle it easy way. TY for your help
-
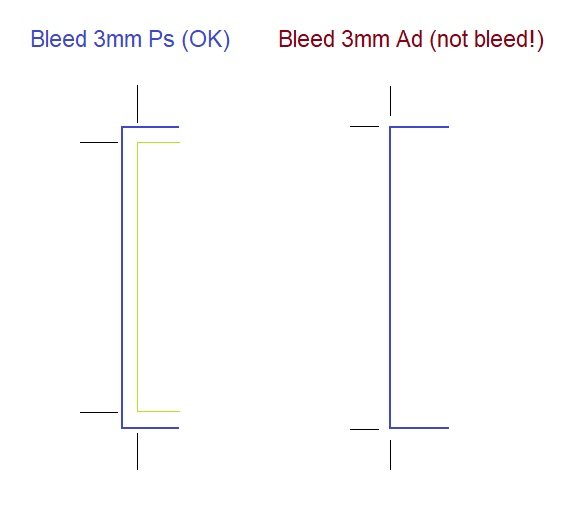
 I have created a document in Affinity Designer and sent it to a printing company who have replied and said it is not in the correct format. It is an A5 document and as per their guidelines I created a 3mm bleed. I have exported it (and clicked 'More' and 'Include Bleed) but when I export it as a PDF it has a white border around it. I have scoured these forums for answers, I have tried exporting it about 10 times now using different settings- with and without printers markers, as a preset 'PDF for print' to name a few. I even created a slightly larger document (a few cm bigger than A5) to see if that worked! I just need the background colour to go all the way to the edge of the PDF and not have a white border! The company won't print it until I send it without this so I need to sort this out as soon as I can! :o
 -
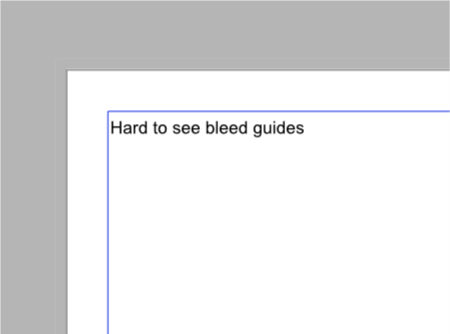
Hi many thanks for the update. I am pleased to report this is the first version that has not failed during the install process, however I still had to right click and run as administrator (this is also required by other installations as this PC fails to create directory). A new anomaly this time was the icon pinned to the start menu did not pick up the new version, I had to remove it from the start menu and create a new item. Another difference is the splash screen no longer appears when the program is open, cannot find option to show at start (but have not checked help out as yet) I have not done many production projects on Publisher as yet so not used bleed in practice and testing. I use the light interface and the paste board quite light as it works better with my astigmatism but the bleed guides are almost invisible, is there a setting to change the colour of the bleed guides or thickness?
-
 Hi, I think I have encountered a bug when outputting a PDF for print. Here's how my artwork is set up and (hopefully) how to replicate the bug: Create new document with a bleed value and multiple artboards Create objects that overlap bleed area File > Export and select PDF Select 'PDF (for print)' preset. Though this may occur on other presets Select an Area of one of the artboards Tick the 'Include bleed' checkbox In the 'More' section select to 'include printers marks' Export the file The resulting PDF features the single artboard artwork and all the printer's marks but no bleed. This can be remedied by selecting the 'Area' in the PDF export dialogue to be the 'Whole document'. Then the 'include bleed' setting seems to be honored. Please let me know if you need any further details to reproduce this bug. I've attached the source artwork and the resulting PDF, sans-bleed. PS Also, on a point of English, should the label "include printers marks" be "include printer's marks"? multiple artboards.afdesign Art2.pdf
 -
 Hi! I understand through quick online searching that it is possible to create bleeding edges on Affinity Designer. Is this possible on Affinity Photo? I can't seem to find out how.
 -
 Hello, I've been trying to make bleed work for a long time, searched this forum thoroughly, and never found a clear answer. I have an artboard of 24*36 in for a poster with a gray background. I'm adding a bleed of 0.125 in on every side in the settings of the document. I'm increasing the width and the height of the artboard by 0.25 in, in order to make my gray background extend into the bleed area. I export the artboard in PDF while checking the "include bleed" and "include cutting marks" setting. RESULT : the cutting marks are placed at exactly the limits of the 24*36 poster, INSTEAD of the desired 24.25*36.25 limits. How can I make this work? Thank you
 -
 Hi, I had an unexpected behavior when creating a document that was 6.75” x 10.25” with a 0.125” bleed. I tested with other document sizes and the behavior is repeatable. If the bleed value is not a whole number (in pixels), the exported document size is incorrect when the “Include Bleed” option is selected. For example, if a 300 DPI document has a 0.125 inch bleed, then this is equivalent to a 37.5 pixels bleed. When the document is exported, and “Include Bleed” is selected, the size (in pixels) is incorrect — it’s one pixel less than expected. The size should be equal to the “Dimensions” size (from the “Spread Setup” ) plus 75 pixels (i.e. 37.5 + 37.5). Instead, it is equal to the “Dimensions” size plus 74 pixels. The bleed value of 37.5 appears to get truncated to 37. To recreate the behavior, do the following. Create a new document. Set documents units to PIXELS. Set the PAGE WIDTH = 2025 px. Set PAGE HEIGHT = 3075 px. Set the BLEED = 37.5 px on all sides. This should create a document that is 2100 pixels x 3150 pixels including the bleed. (i.e. 2025 + 37.5 + 37.5 = 2100 and 3075 + 37.5 + 37.5 = 3150). Select EXPORT from the FILE menu. Select the PNG file type and check the “Include Bleed” box. Observe the size is 2099 x 3149 and not 2100 x 3150 as expected. Thanks, Matt
 -
 Under macOS 10.13.6 with Publisher 1.7.0.206, Publisher doesn't use the bleed settings I'd set up in a Designer file. I opened my Designer and converted to Publisher spreads. This conversion works, but the bleed settings were changed to zero in the Publisher file.
 -
I understand that docs with artboards don't currently display bleeds. Working on non-artboard docs, the bleed functions as expected. It would be great if the bleed area would be dimmed/made translucent to a user specified percentage, or at least have a hard line to inform the user that the artwork extends into the bleed. Currently there is no way to see where the bleed area begins and the page ends. Thanks for your consideration