Search the Community
Showing results for 'brushes missing ipad'.
-
I just got AD for iPad a couple of days ago and think is pretty neat. However, it made me realize that the Pixel Persona is not necessary at all (in either desktop version and iPad version). IMO this Persona approach just adds some unnecessary steps to do most things (in the case of AD). The main difference between both Personas (Designer and Pixel) is basically the tools each Persona have. But keeping in mind that the tools on the Pixel Persona are so FEW, I think it is not the best approach to have them separate in another Persona. Because that brings some drawbacks, and having to switch between both Personas back and forth can quickly became a hassle (specially in some types of workflow). I think it would be better to just have the "pixel" tools and the "vector" tools in one toolbar (on a single Designer Persona). The "pixel" tools can be easily stacked in 4 or 5 tools (the same way they are in AP). Maybe they could be kind of "separate" from the others tools in a logical way: Also most of the Menus are basically the same thing in both Personas. There are just a few commands that are missing in the Pixel Persona, but they are pretty small things: Edit > Defaults Edit > Create Style Layer > Promote Group to Layer View > Show Bleed View > View Column Guides And these little differences just bring more "issues" than anything IMO. For example, the other day I had spent several hours doing some heavy texture work (with pixel brushes) for a printable artwork. When I needed to check my bleed guides I started to search for that option in all the menus. I just couldn't find it... I spent a good amount of time searching here and there after I realized that that option is only available in the Designer Persona (for whatever reason). Why do we have to change Personas just to do something like that? There are a lot of similar cases where you have to change Personas to do pretty elemental stuff (things that you should be able to do ANYWHERE in the program) like: Using the Appereance panel Just placing some text Using the Text menu (which is not in the Pixel Persona) Also there are essential shortcuts that do not work in both Personas or others that work in a different way: "Convert to Curves" shortcut (Ctrl+Return) do not work in Pixel Persona "Select All" shortcut (Ctrl+A) works different in both Personas (I am not sure if this can be a good thing, but some people can find that confusing) I have other things in mind about all of this, but honestly I think this is already long enough and do not know if anyone is going to read this 😅 Thanks.
-

Light Mode UI for iPad
dmtp14 replied to mackleys's topic in Feedback for Affinity Designer V1 on iPad
I also add my voice for a light mode it...its absolutely crucial in a design programm to be able to see black assets eg....as with other crucial things missing in AD for ipad like a ruler, import of colour palettes, genuine vector brushes etc...I have to admit that I loved to work with Affinity programmes and even recommended it to other artists...but after a while working with the programme as a kind of power user I wonder if I did the right step to leave Adobe completely... -
 It appears like the sub-brushes tab is missing from the brush settings. On the mac beta the brush settings has General, Dynamics, Texture, and Sub Brushes. On the ipad beta I only see tabs for General, Dynamics, and Texture.
 -
Hi, I started to use Affinity Photo for painting on the iPad lately and I am really surprised that is contains so many annoying issues. The reason I started trying AP is that Paolo Limoncelli / Daub, whose brushes I love in ClipStudioPaint, was raving about AP's new brush engine and offered nice brush sets for it. So I went ahead and bought AP and the brushes. And also Frankentoons nice Neptune Kit. And indeed, AP's capabilities look promising. But working with AP feels like using beta software, really. Below I am listing a couple of the issues I am repeatedly seeing. 1. When changing to a different brush and starting to paint often AP will start a straight line from some random point to where the canvas is touched with the pencil. This cannotbe undone with undo, but only by selecting an older state from the timeline. Also if for some reason it is not immediately recognized and you see the line only later, it needs to be removed manually, because the painting has progressed in the meantime. 2. Sometimes when changing to the browser to search for a reference without having saved explicitly, the previous changes to the painting will just be "forgotten". 3. Resize rectangle for selection disappeares without reason 4. Playing a macro (when editing a photo this time) pretty often crashes the app. The same macro will not always crash the app, though. 5. Doesn't support iOS' screen split (ok, no bug, missing functionality) 6. UI elements continue to be shown (layer rectangle when trying to move a layer). Needed to stop and restart AP to get rid of it. 7. Ignores changes to brush settings (tried changing the associated tool of a brush to "erase", which had no effect) 8. Sometimes toggles off controls when I just select a tool, like erase or brush. 9. If I really switch off controls intendedly with the icon at the top right, they will come back pretty soon on their own The above list only contains those issues I noted down after really becoming frustrated. There might have been more. The last update to AP is 2 month ago, any chance of getting an update to a more stable version soon? I do not think I want to use the software as is more. In addition to the above bugs I think the intuitiveness of the UI needs to be improved as well. Just a few examples of functions were I needed to search on the net, which I did not need for any other painting program for such basic functions ever: - Naming a layer - Removing a layer group which was mistakenly added (only possible via timeline, or maybe I did not even find the intended way) - Picking a color (reference spot is under the finger, instead of being slightly shifted and seeing the actual place in the picture to choose from) - Selecting and working with the selection (changing personas all the time, argh) The above might sound harsh, but I have used multiple painting apps now (CSP, Artstudio Pro, Sketchbook, Paintstorm Studio, MediBang Paint) and AP feels almost as being the least mature. PSS is not really ideal also, but hasn't crashed or malfunctioned as often as AP did for me. I saw that there is a sub-forum to report bugs, but with such a long list, I really do not feel like doing for each individually. All of them should be easy to reproduce. Feel free to move to that forum if more appropriate. Environment: iPadOS 13.3, iPad Pro 12.9 latest gen. Regards, FrayingCanvas
-
 Status: GM Seed Purpose: Features, improvements and fixes. Requirements: Purchased Affinity Photo Mac App Store: Submitted Download ZIP: Download Auto-update: Available Hello, We are pleased to announce the immediate availability of the final build of Affinity Photo 1.9.2 for macOS. If this is your first time using a customer beta of an Affinity app, it’s worth noting that the beta will install as a separate app - alongside your store version. They will not interfere with each other at all and you can continue to use the store version for critical work without worry. This beta is an incremental update to the 1.9.1 version recently released to all customers (although it still installs parallel to the released version, as described above). We recommend that you use this beta in preference to the store version if you are affected by any of the issues listed below. Affinity Photo Team Changes Since 1.9.2.229 - The recent Metal changes have a couple of undesirable side effects. We have disabled them for the shipping version of 1.9.2. They will get cleaned up and reintroduced in the next beta cycle. This means the benchmark version remains at 1900 for 1.9.2. - Fix potential crashes on M1 devices (introduced earlier in the 1.9.2 beta). - Enforce ISO country code character limit. - Fixed crashes with malformed ICC profiles. - Improved the reliability of panorama stitching. - Fixed bugs which were preventing Unsplash stock page items from working. - Improved PSD import from recent versions of PS. - Output levels (in the levels adjustment layer) are now correctly exported to / imported from PSD. - Fixed missing EXIF data for EOS 300D RAW. - Fixed a HEIC crash. - Assorted tweaks to the new LUT import / export features. - Assorted small fixes. - Localisation improvements. - Help improvements. Changes Since 1.9.1 - Added ability to organise LUT adjustment presets, including support for multiple categories and import / export as “.afluts” files. - Added ability to drag / drop all adjustment presets to reorder them. - Added support for OpenType reverse chaining contextual single substitutions. - Significant performance improvements for assets (import, export, organisation, etc.). - Typography panel performance improvements. - Minor improvements to Gaussian Blur performance when GPU is enabled. - Assorted visual fixes in the adjustments panel. - Further fixes for deadlocks with multiple GPUs. - Restored ability to plug an eGPU in while the app is running. - Fixed issues introduced in build 227 for users with multiple GPUs. - Fixed occasional screen corruption introduced in build 227. - Fixed potential deadlock issue when loading large files. - Fixed assorted small registration page issues. - Fixed the size of the “General” section in preferences. - Fixed localisation issues in preferences. - Fixed inability to add / rename / delete export presets. - Fixed issue where UI would remain hidden when a studio page was enabled from the menu. - Hardware acceleration has been improved to better make use of Metal (specifically to batch commands together into chunks, which gives the driver a better chance to optimise commands and provides a higher degree of abortability). The benchmark has also been tweaked to use multiple command queues for the Single GPU test, which makes it more representative of “real world” use. This change affects both real-world performance and benchmark score. The benchmark version has been changed to 1920 - this means that results from this build should not be compared to results from previous builds with benchmark version 1900 (other than to measure the improvements which these changes yield). Once the iPad and Windows builds have been validated with these changes and new beta builds produced, a new forum thread will be created for 1920 benchmark results. - Assorted performance improvements for assets. - Assorted content download improvements and fixes. - Added ability to optionally sort brushes by name. - Improved performance of export and merge visible, especially in documents with Live Filters. - Fixed a crash when using File -> Share after File -> Export. - Fixed a bug where some Live Filters would appear to move after save / load. - Fixed a crash when opening a brush category context menu with no selection. - Fixed a bug which caused adjustment to fail to apply easily when clicking with a stylus. - Assorted other small fixes. - Localisation improvements.
- 1 reply
-
- 6
-

-

-
 I just rewatched the Affinity Photo for iPad tutorial on the Dodge, Burn and Sponge brush tools. In that video, it appears as though when James selected “Highlights” and brushed over an area only the highlights were affected. The same seemed true when he selected “Shadows”. I tried to adjust a photo of mine using the dodge and burn brushes, but even if I select “Highlights” or “Shadows” everything I brush over is affected. Has something changed since that video was made? Or am I missing something in the technique? Thanks you in advance.
 -
 Is there a way to import color swatches from Designer on Mac to Designer on iPad? I tried AirDropping the swatch file and also to load through Dropbox but don't see an import area like for brushes. Am I missing something? Thanks in advance for any help.
 -
 Hi, I have to say that I really like the new content sync feature in Affinity 1.9! On my iPad 6 running IOS 14.4, I have done a full reinstall of Affinity Photo 1.9 and logged in and downloaded my purchased assets, brushes, etc. from the Affinity store. However, while I can see all of my other purchased content, the Assets panel is completely blank. I also own Affinity Designer on IOS, and it shows all of my purchased assets after downloading. Is it possible to use my assets in Affinity Photo? Thanks in advance, G
 -

Affinity photo ipad brush questions.
e_peachy replied to e_peachy's topic in Pre-V2 Archive of Affinity on iPad Questions
I think there is just some functionality missing from the brushes settings. I agree that I would like to be able to duplicate a brush, and make another one with slightly different settings, there also seem to be some weird file access functionality where you cannot pick from photos on the ipad, which currently, trying to make new brushes extremely hard. I have some success loading smaller abr files over from photoshop, so I guess if someone was trying to import over brushes, you'll have to keep the size down, or do it in batches? (which at this point with the lack functionality to edit brushes) you will just end up with different groups, and have to switch around to try and find brushes. Also the information ported over from photoshop brushes seems to be mostly just the brush shape, and all other settings are a bit of a hit and miss, requiring you to really work to make something similar to maybe a super heavy texture photoshop brush. On the topic of textures, I was wondering if anyone know if there might be more than one texure layer mode, apart from on and off? I think at this point we can only wait and see if these are added on in a later update. -

Boolean issues with Add
Boldlinedesign replied to Boldlinedesign's topic in [ARCHIVE] Designer beta on macOS threads
@Sean P echoing @fde101, I know I've posted numerous times in the forum for the last few years about the serious need for a blob tool equivalent. I've also been vocal about the issues regarding boolean operations freezing the app and/or creating the massive node overloads and complicated adds. I've suggested several times we could use another boolean operation that accomplishes what Illustrator's merge" operation does. (cookie cutters overlapping fills, would allow for fast fill color behind an expanded black outline of a character by merging, etc) true vector eraser, true vector brush support, text warp (contour path and "find and replace" as well but they are now in the 1.9 beta) Those seem pretty universal regardless of design industry. I'd love to see bitmaps like in Adobe and the ability to print separations. We also really need a blend tool. I don't know how to link in another thread topic inside a chat like this, so added a link to one for example. https://forum.affinity.serif.com/index.php?/topic/23254-make-blend-tool/ The blend tool was requested in 2016 (I'm sure other threads date back further) and MEB mentions at one point early on that it will be out before the 2.0 release according to the projected roadmap. Year after year, people circle back to ask for an update and there are basically crickets from Affinity on that topic and many others. The roadmap may have added some pressure to the developers at Serif, but it at least told the consumer base were were being listened to and that Affinity is worth the long term investment. There are always more features the consumer base is going to ask for. I'd love to see a symmetry tool, 3d text, smooth tool, vector trace, (screen record - now in 1.9 beta) etc. I can do my professional work without them and so they are low priority in my opinion. I share a common goal with many on here to have a set of tools in the Affinity Designer app that allow us to drop Adobe completely and sell others on that fact. Lower priority to most would be the new ability to share brushes and the like across different computers on the same account, the screen record, the anti-aliasing. Just my opinion. I know I'm not alone is saying there is a strong perception that Affinity Designer has taken a backseat in priority to the focus on developing Photo further and getting Publisher out on the ipad. I know Affinity wants to "get it right" before shipping a new tool and I understand that. We're in a pandemic year that has slowed production, I get that also. Many of these features are considered basic and are already in other vector apps. Asking the consumer base to be patient as new features are added is normal and understood, taking 5-6 years or longer to add basic features without keeping the consumer base informed seems to invite criticism and frustration. Surely Serif can understand that adding features at such a slow rate over 6 years is going to discourage the base and end any real passion and momentum the apps carry? Some like myself are holding on to CS6 - so we don't have to pay for an overpriced subscription. I'm spending a lot more time in apps like Corel and Vectorstyler Some have been more colorful in their anger and frustration than others. I don't think we should be blasting Serif, but I'll keep repeating the same requests as respectfully but bluntly as I can in hopes we are heard. I have convinced several people to buy in to Affinity, I use Affinity whenever I can until missing tools force me to go to other apps to get the job done, I still believe Affinity is the future and will be a better option for most people than Adobe or Corel long term. At the same time I look at new apps like Vectorstyler and marvel at the progress they make in short time. Vectorstyler still lacks a polished and smooth UI and workflow, but it has everything we've collectively been begging Serif for in Affinity Designer. What holds back Affinity from being like Vectorstyler in that regard? -

Give us a useful Blending/smudge tool
Gregory-CJ replied to Gregory-CJ's topic in Feedback for Affinity Photo V1 on iPad
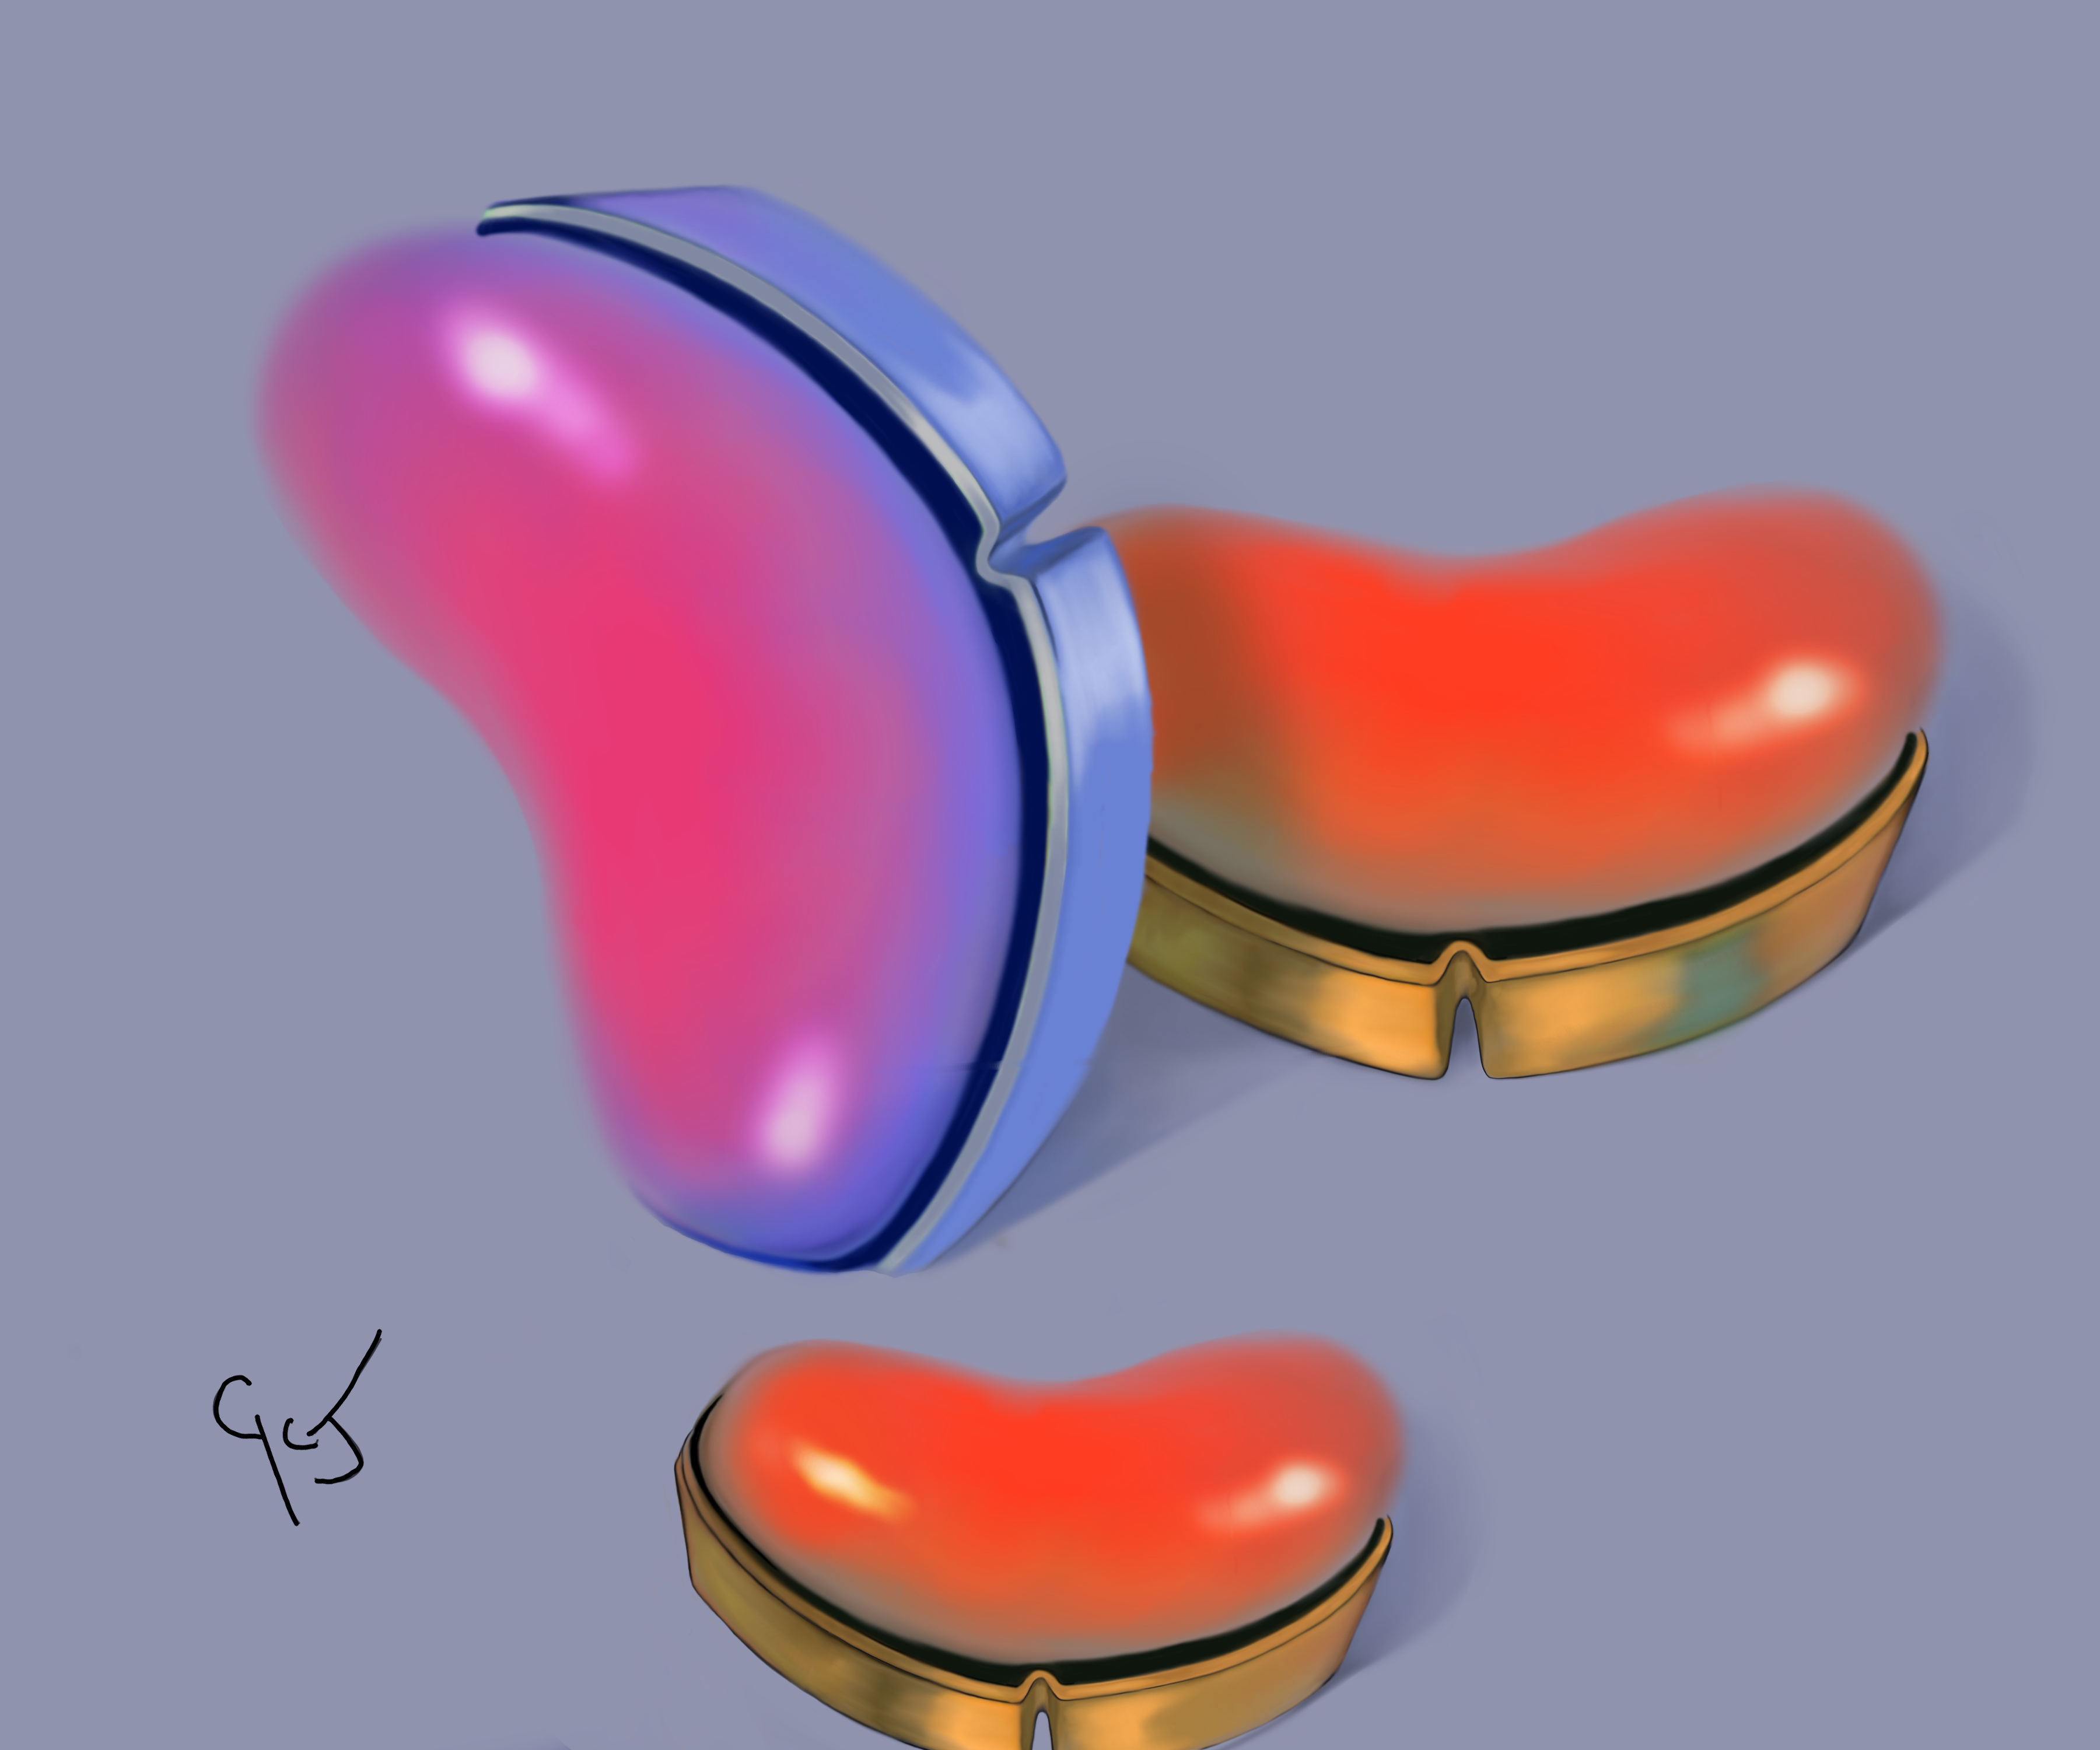
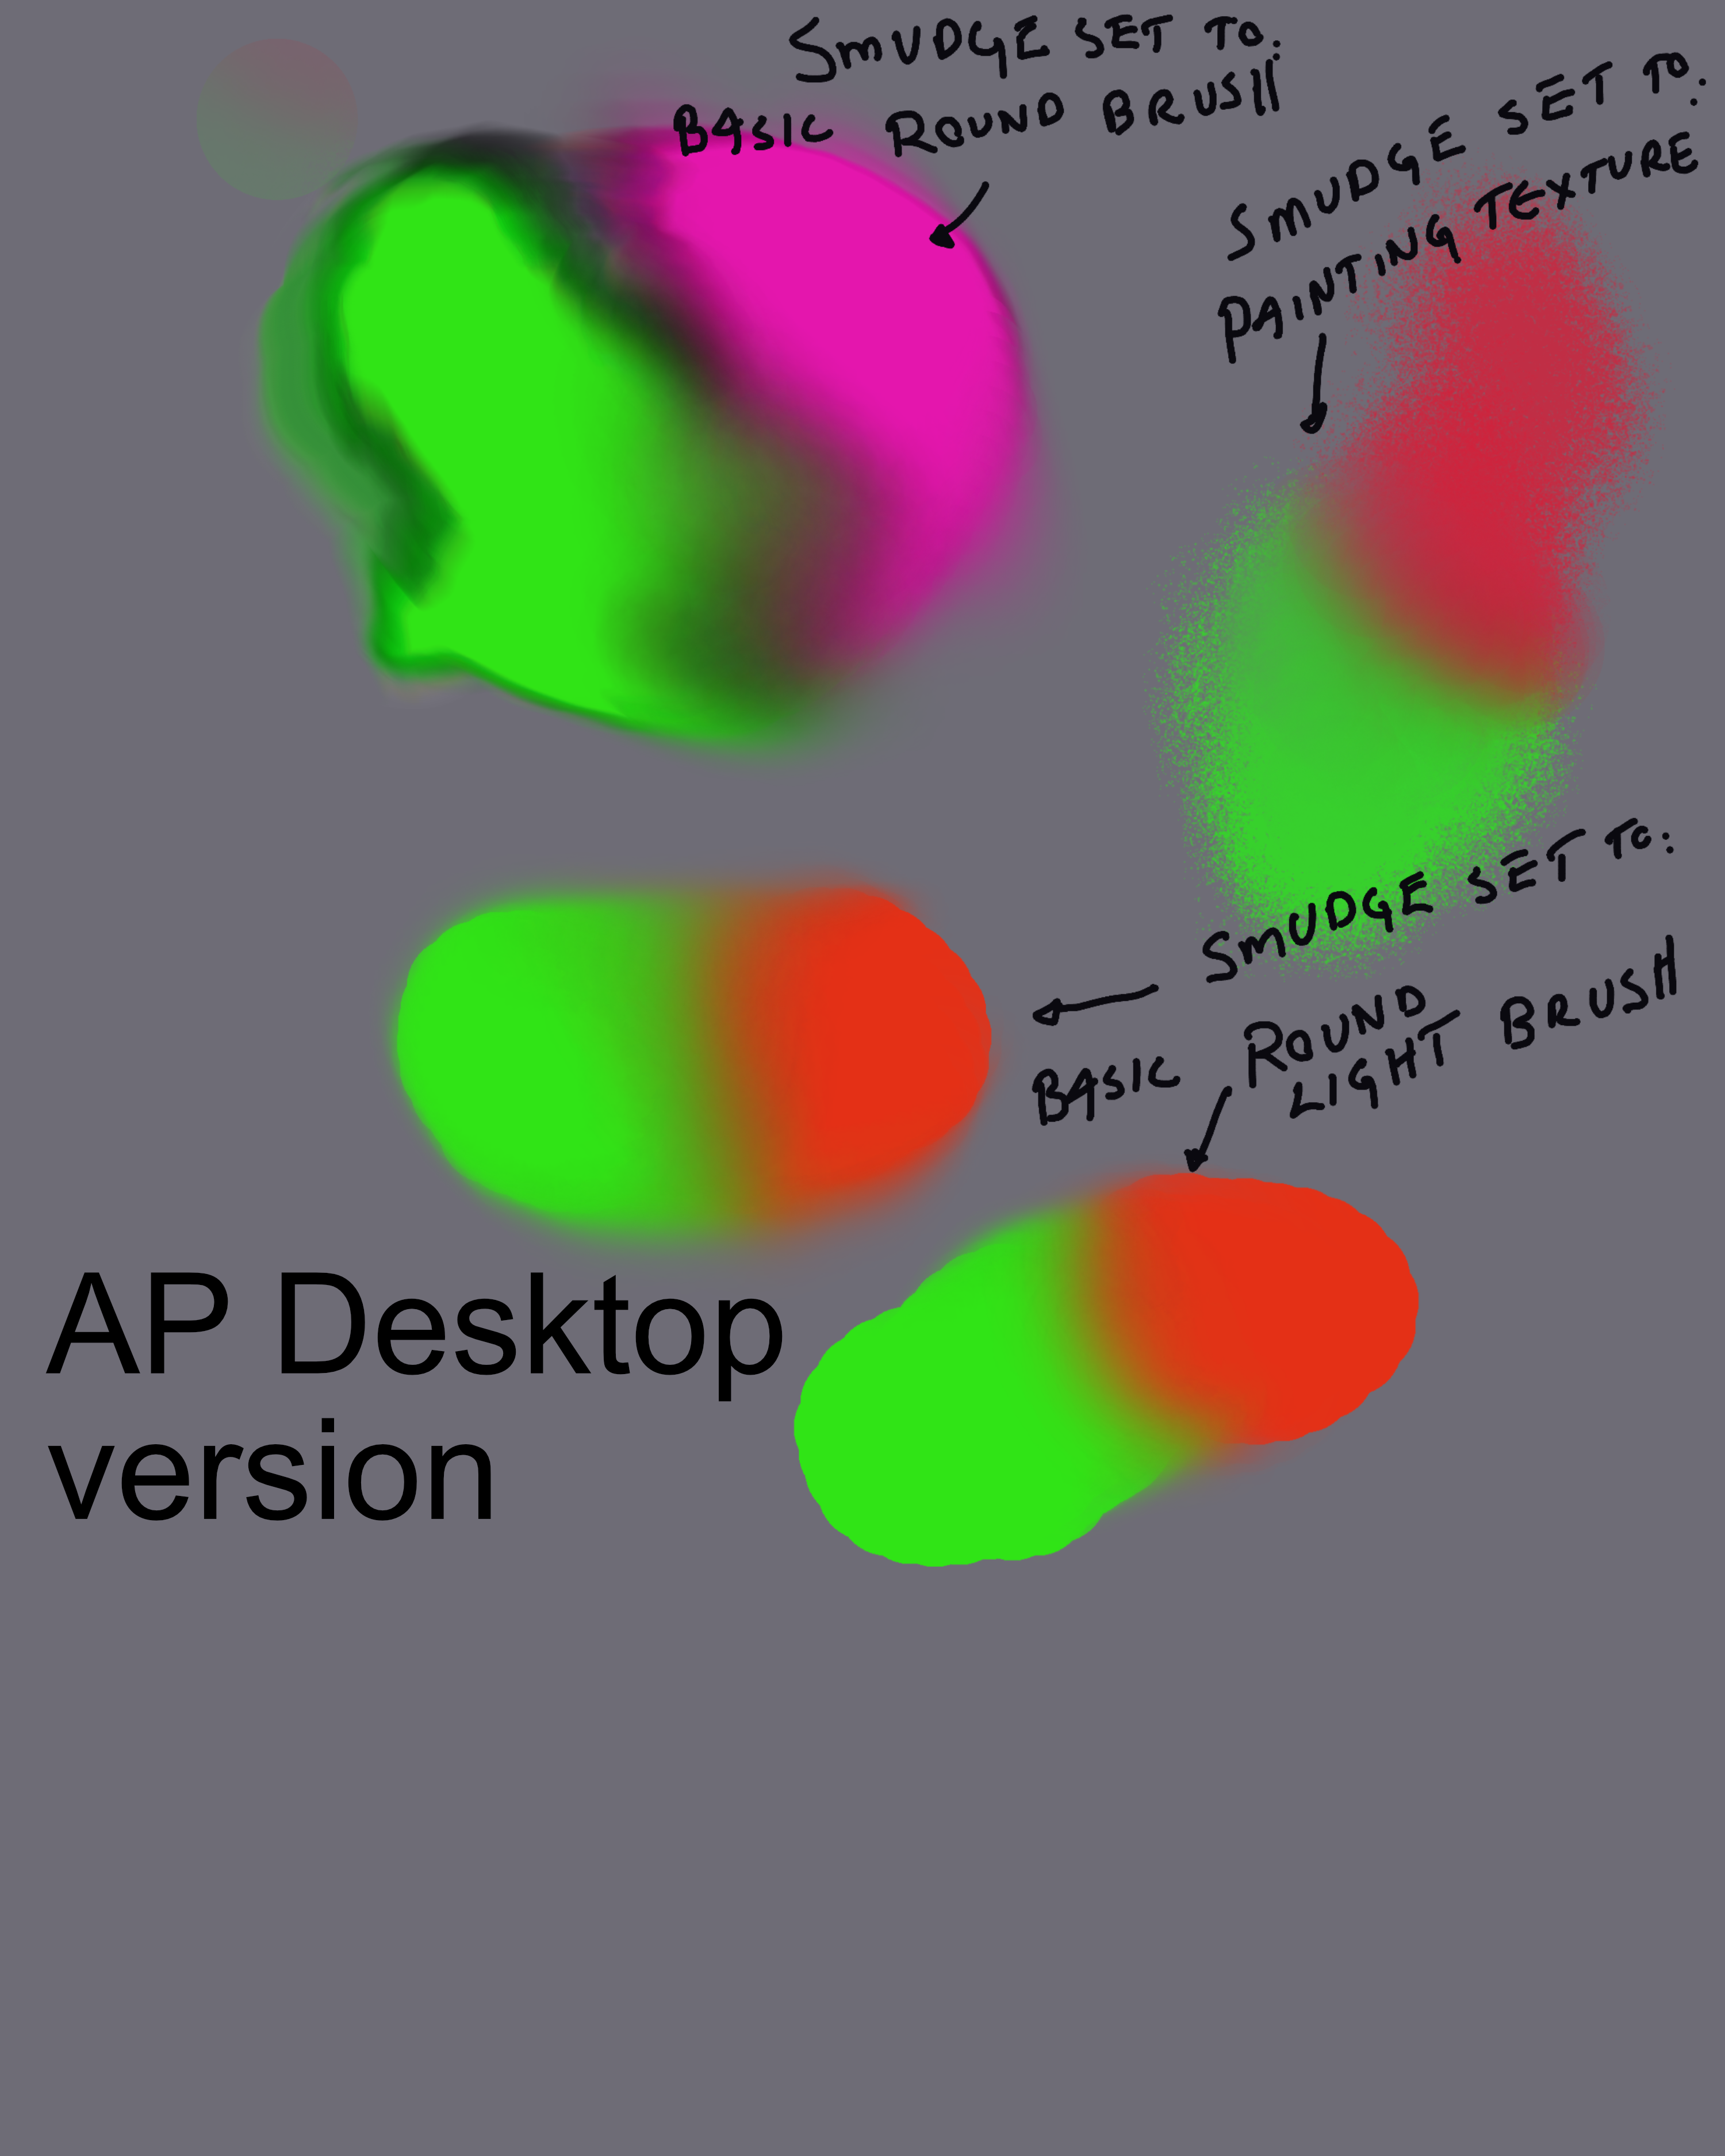
Okay, a preamble before I tell you what I have found. I use blending a lot in my artwork and what I previously found with the AP smudge tool is that it did a relatively OK job on large areas of blending but didn't do well on any blending with a brush size smaller that 75-50 pixels. ( which I need) Notpill's response to my query about a better AP blender sent me back to AP to see if I was missing something... well yes... indeed. What was holding back the performance of the smudge tool was the type of brush it was set to. Any brush setting with a texture or/and grain produced an OK blend for large areas but fell short of anything acceptable for smaller blend areas <75 pixels. The solution, I found, was to make sure that the smudge tool was using a brush that had no built in texture or grain.. ie. use the basic set of brushes. For the IPAD version of AP: I found that the Basic> large Round Brush works the best For the Desktop version of AP: I found that the Basic> Round light brush works best. Of course you have to you have to play with width, flow and strength settings. So there you have it.. Buried within the AP toolset is a wonderful Blender for digital painting! Now the smudge tool works perfectly and can stand next to Procreate's blender. The first image is something I did in AP on the Ipad, with the basic >large round brush as the blending tool. ( okay, I got carried away by the fun of using my newly found AP blender) The second image done on the Mac desktop using the AP round light brushes. Sullyman, I tried your brushes and although they worked well, the effects were not quite what I was looking for ,, but thanks anyways! Notpill, I too broke into digital painting using PS 2.5... and if I recall, didn't have layers... which came in version 3.. if I remember correctly.
- 13 replies
-
- 1
-
-
- blending brush
- blending tool
- (and 4 more)
-
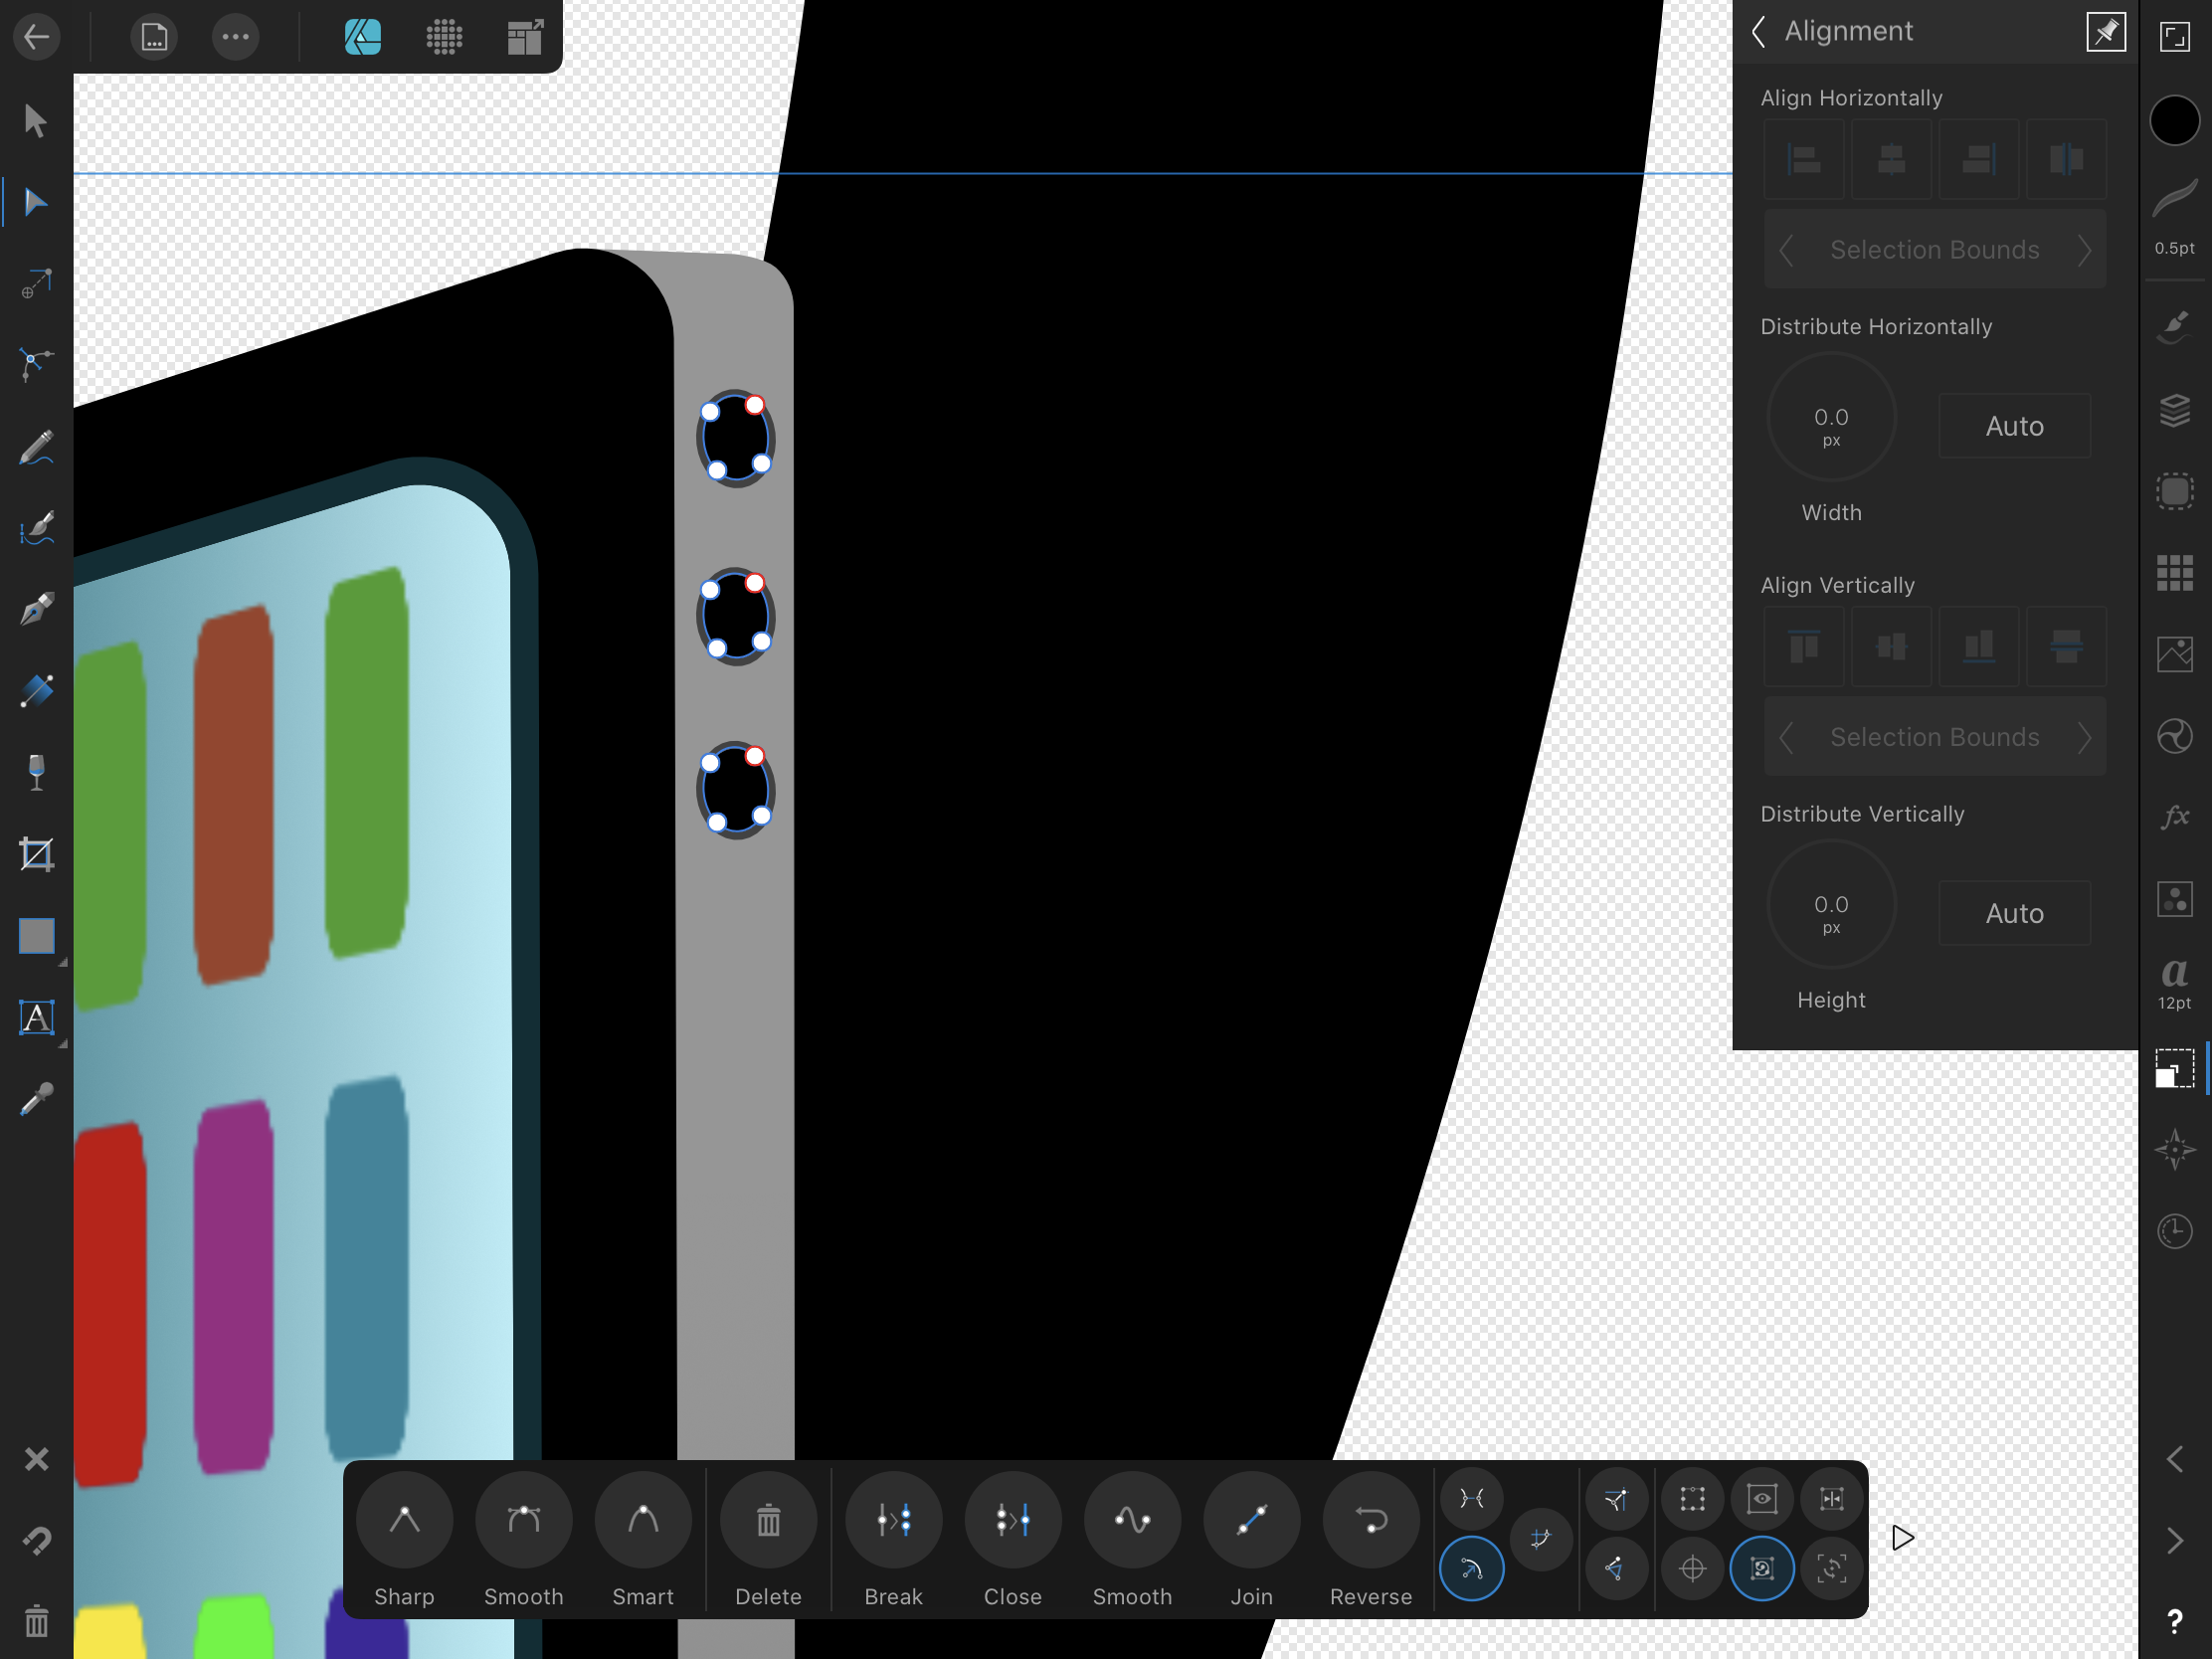
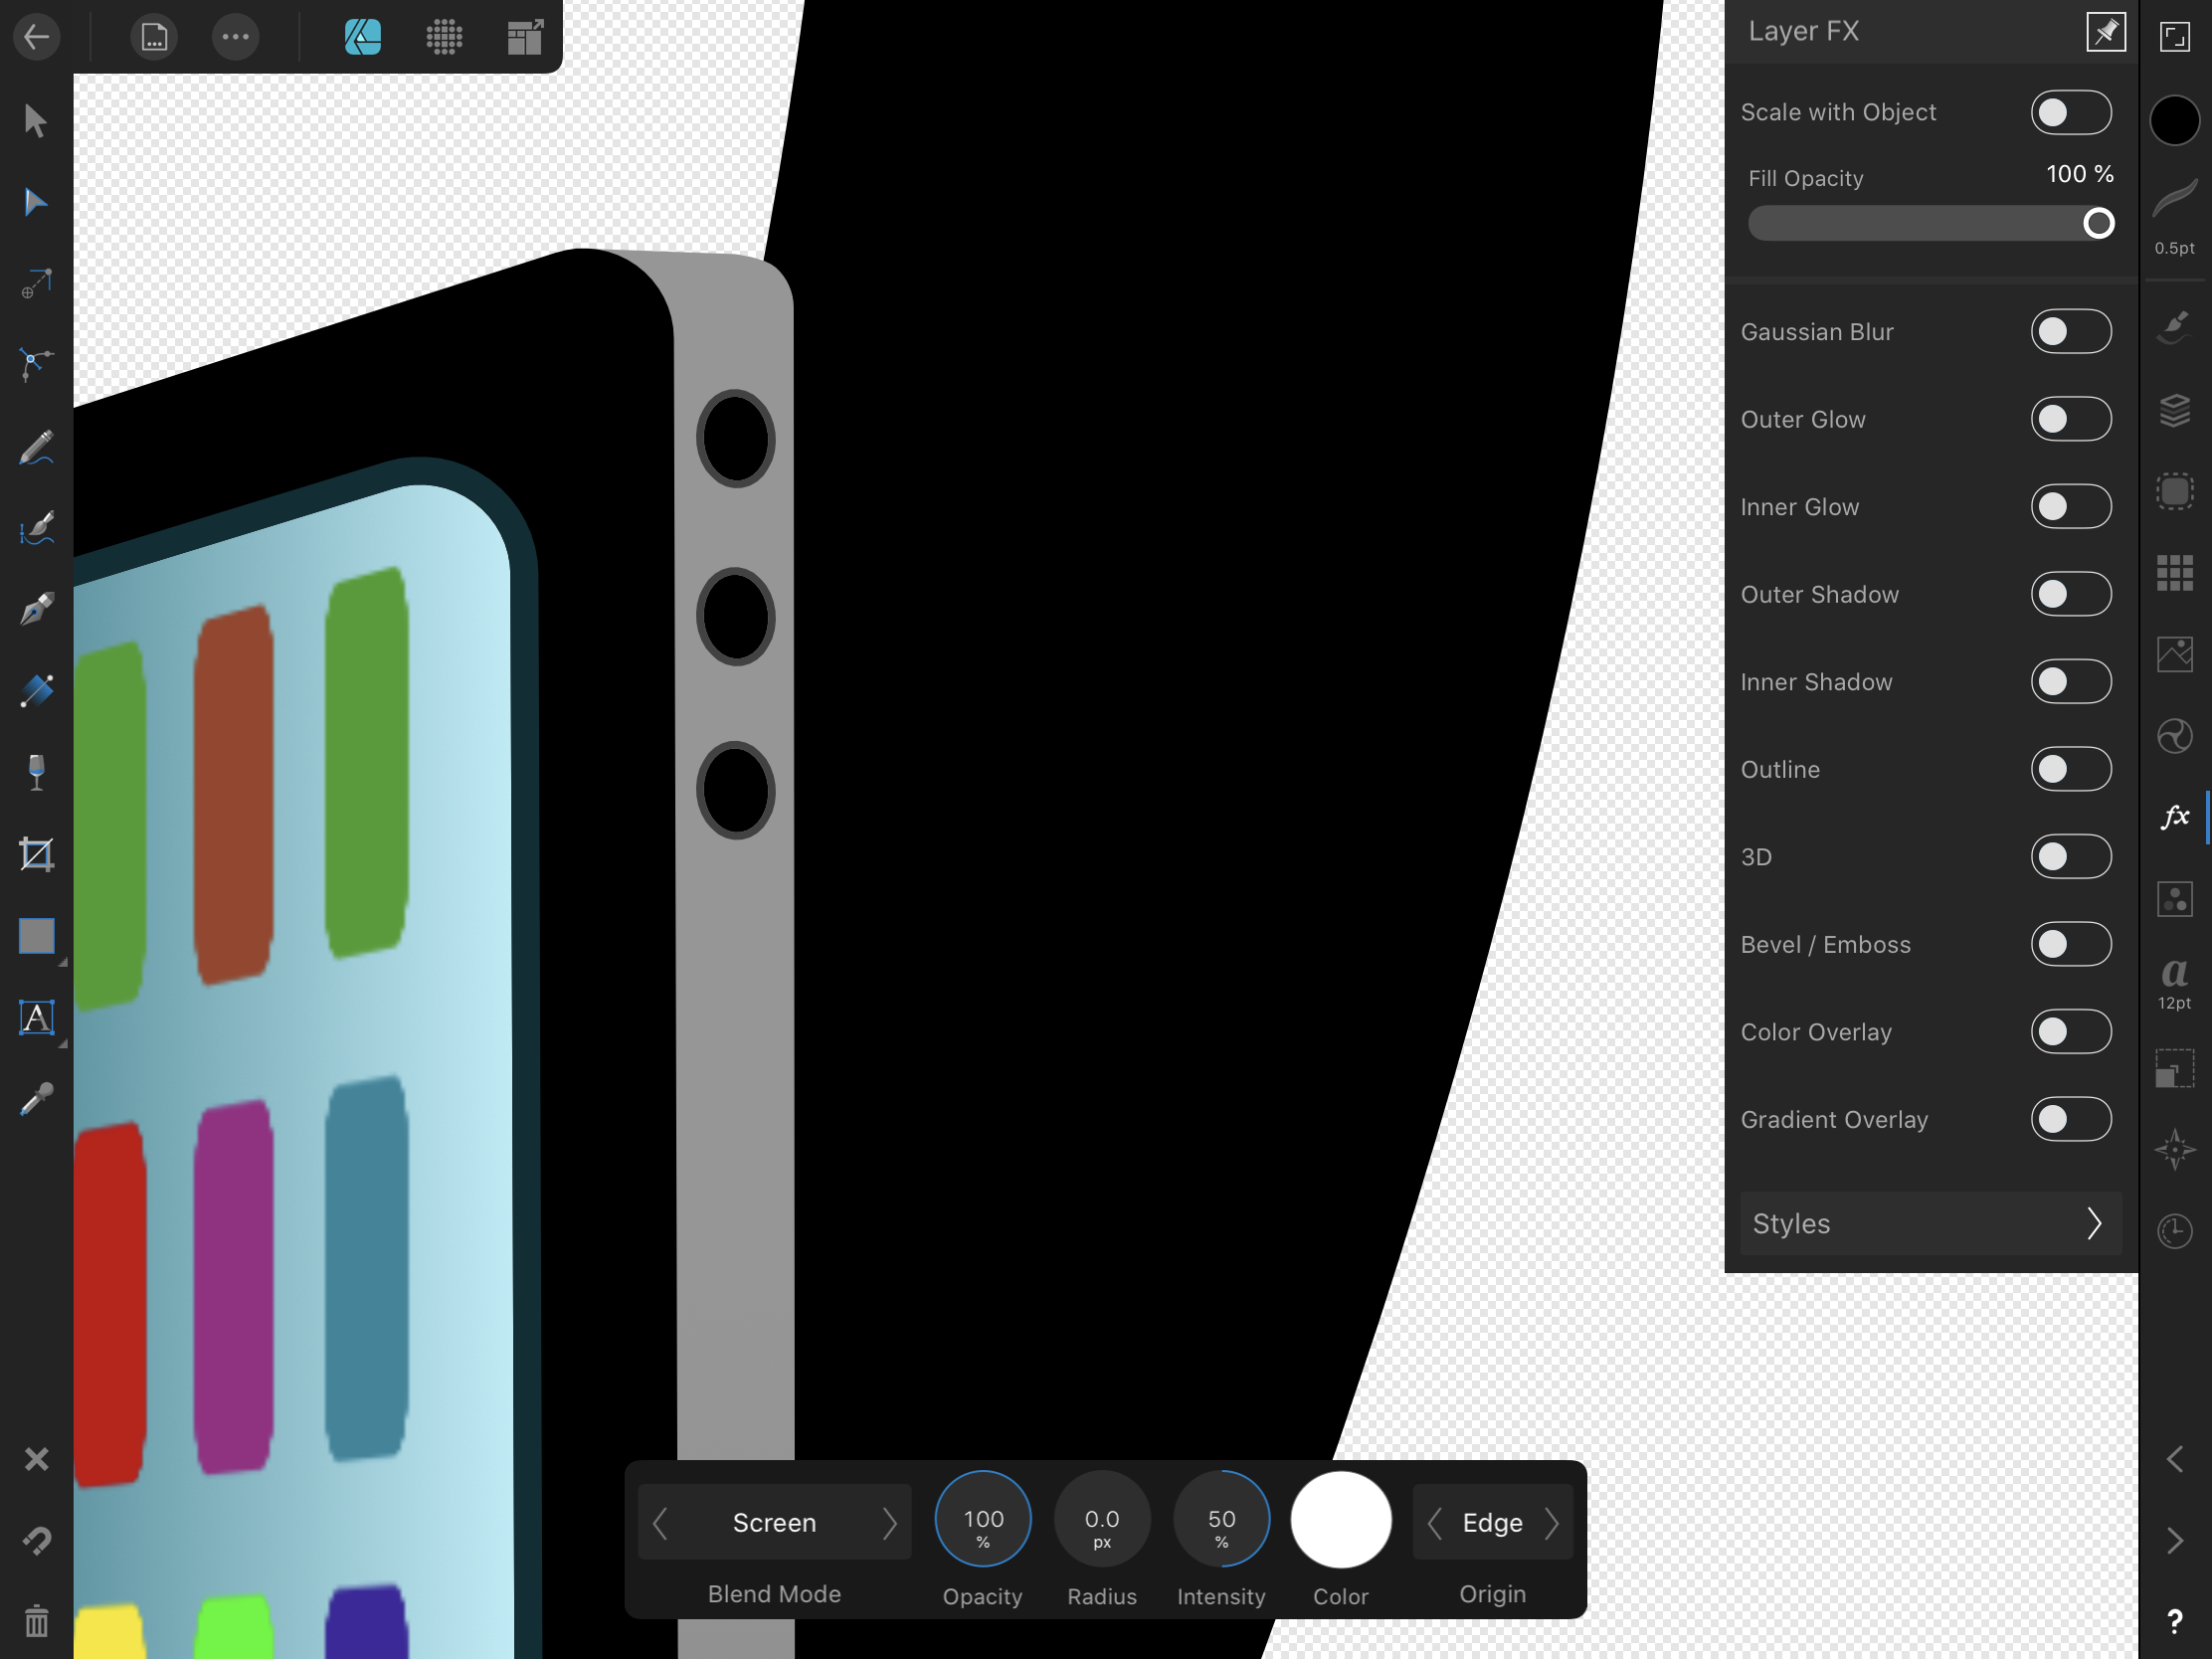
Hi Sean, I don't think these issues are inherent of complexity and form factor restrictions. You see, in other parts of the AD UI, you follow the principles we are talking about without any hiccups. Please, Look a the first screen. In the alignment tab, AD behaves just like any modern software does, if there are at least two objects selected but they don't have a bounding box, then the options are greyed out and the artist can't change values. Greying out gives the user a visual feedback indicating that a requirement (firstly select at least two objects to align and then select them with the move tool) hasn't been fulfilled yet. The artist will realise that the objects are selected with the node tool and once they change to the move tool the options will come to life. That is the expected system behaviour, but on a side note, perhaps (everything is perhaps until we test with real users) it would be ingenious, if AD went one better and just were a bit smarter to "assume" that if the artist now is opening the transformation studio without having changed from node or any other tool to move, it is because they intended to select the move tool and forgot it and so the system should change the selection from node to move temporarily and then revert back to the users original selection upon the user closing the transformation tab. But wait a minute, you guys already implemented this smart behaviour elsewhere in AD. Just create an object with no stroke and then go to the colour studio and select a stroke colour and hey presto, AD automatically adds a stroke for the colour the artist chose: IMG_0319.MP4 Now go back to the strokeless object and open the colour studio again, don't pick a stroke colour, just try to change the opacity or noise. See what happens now? Nothing happens, much much worse, AD allows the artist to move the slider and plays all the interaction design roles (the button turns blue to show it is being tapped and is active, it slides, the percentage value changes) and then as soon as the artist releases the button it springs back to zero. This illustrates what the issue with Serif products is, it is not complexity but UX and consistency: IMG_0320.MP4 In the example above, Serif could have copied one of two behaviours you guys already use in AD: 1) grey out the opacity and noise sliders or 2) add a thick (black?) stroke automatically as one slides the controls. In this specific instance, I would go with option two for several usability reasons: using an initially thick black stroke would warn the artist they still need to pick a colour and select a size; changing a system selected colour is not a big effort and; it is less disruptive. Instead a third behaviour was created, one that unintentionally deceives people and wastes people's effort whilst not giving them any clue of what they need to do. Now please take a look at the second screen: By looking at the UI, can you tell which objects are selected to receive the effect? Can you tell which effect I am working on? Can you tell which tool I had selected initially? This is another example of lack of a consistent interaction and visual design language which has nothing to do with software complexity or platform limitations. Starting from the end, I understand one has to start from somewhere but from the moment you crossed the device threshold, you need to be more mobile-first (at the moment AD is mobile-also but not mobile-first) and refer less to the desktop as your point of reference. As a customer, although I have the desktop version, I only started using Serif products on the iPad and only because unlike Adobe you didn't butcher your vector software and repackaged it into two or three dwarf apps. Referring to the limitations and complexity, I believe we are well past this kind of argument not only from the moment you yourselves set the example by porting AD and AP to the iPad but also because as I illustrated above, the issues AD has are basic and elementary UX which, I suspect, spring up from not going deep enough into a mobile-first Product Design mentality. Just as an example, in the AD preferences menu, you have an option for "shortcuts" which are all desktop-based, I’d rather have “gestures” with the option to switch two and three fingers gestures with pencil taps and presses instead. How about a pen area? Like an empty circle underneath the studios, where designers who work holding their tablets with one hand or have motor disabilities can tap and each tap emulates a finger pressed on the screen. How about contextual menus that show all my layer functions like Procreate and Autodesk Sketchbook do? This is the sort of mobile-first thinking that is missing in AD. Yes, I find the consideration for use cases where creatives are using varied digital formats (pixel and vector) to do their art commendable, but that kind of shows that the idea of segregating features and brushes between “personas” based on whether one is using pixels or vectors doesn't work because that is not how creatives work and think (but that is another thread); that is how developers think, and now you find yourself having to create holes in the dividing wall between personas so that the real and most times chaotic creative process may flow. Finally, perhaps I didn't express this the right way. I never suggested that you took any functionality away, yes allow artists to do vector operations in any mode even in export mode if you will. The problem I am highlighting is that 1) it is a basic principle of software design that if a function is not available for an operation then don't offer it until it is ready, just grey it out until it is available: what is the use of having the corner tool available and displaying its contextual menu when the object selected is a raster object? See third screen: 2) The focal point I am making is that on top of not greying out a function that is not available, AD is duplicating the same function on the same screen and the duplicated function doesn't work like its copy. Once again please see the fourth screen: The solution is either a) you grey out the duplicated function that doesn't work like its copy or b) you make the duplicated function work equally as its copy as I have illustrated in the beginning of this thread with the fifth screen, which is something AD already correctly does:
-

how to restore deleted brush?
stokerg replied to Brac Lei Ang's topic in Pre-V2 Archive of Affinity on iPad Questions
Hi Brac Lei Ang and Welcome to the Forums, There should be 20 brushes in that category, so it doesn't sound like you've deleted any. The only way to reset the brushes on the iPad, would be to remove Affinity Designer and reinstall it from the Mac App Store. Just make sure you've saved/export any of the work from the homescreen of Affinity as these would be removed when you remove Affinity. But as long as you have 20 brushes in that section, you are not missing anything -
I'm using the latest release of Affinity Photo for iOS with the latest iOS software and just noticed that desktop version of Affinity includes an icon of the brush next to the line example, however, the same icon isn't included in the iOS version. Is this a bug? Is it by design? If by design can it be changed? I have a lot of stamp style brushes that I can't tell which one is which by looking at the line example. It really makes it hard for me to fully utilize Affinity Photo on the iPad. Thank you!
-
I’m new to Designer, and I don’t do a lot of vector work. Since I have an affinity for Photo (see what I did there?) on iPad and I’m looking to update my brand, I thought what better way to familiarize myself with Designer than to give it a go on iPad. So I’ve been checking the tutorials and YouTube for hand lettering using Designer and most of them seem to start with vectorizing raster lettering, which would be ok since that is how I did my current logo using Procreate and the trace feature in Illustrator. It seems Designer does not have tracing. I would actually prefer to do the lettering directly in Designer as vector with the brushes available. If this is possible and I’m just missing it, please educate me. I’m very impressed with the interface of this app and hope to see some of the elements come to Photo on iPad. I guess Publiisher will come first.
-
 Congratulations – Photo for iPad seems like an incredibly capable tool that finally opens up iOS for more professional work. My iPad Air is not supported, so here are my initial impressions based only on the tutorial videos (which do work fine on iPad Air). These are what I think are the most pressing issues that, if fixed, would get this thing even closer to perfection ;) Putting something like "Deselect" into a contextual menu isn't that great – I think if each Persona had a few buttons next to the Persona selector for quick access to very frequently used operations, that would be much more fluid. This would also solve having the "Develop" command being only visible when you have the Hand tool active and having to dive into a menu for toggling clipping preview, which is something that is often used in a "switch it on, change something, switch it off to check how it looks, switch it on again" type workflow. Maybe it's just the videos, but I didn't see any way to use a brush to paint selections. It would be good to have a setting that switches the Adjustment and Filter studio panels to a simple list or icon view, or, alternatively, add buttons to the Layers panel that show popovers with filters a iPhone-style sliding categorized navigation list. The current design seems to require way too much scrolling and also has very colorful icons that distract from the document. If I just want to add something fast, the current design is not great. Also, a "previous filter" item at the top like on the desktop version might be a good idea. Levels does not have any histogram whatsoever – if the intended use is to just use the scopes panel, some kind of indicator where the selected black and white points fall inside the histogram/waveform is needed for precise control, as well as a way to make the histogram/scopes bigger than they currently are. Quick access to clipping highlights also (which would actually make more sense as a global option that's available in the other Personae as well, excluding Liquify). Output levels are missing as well. Double tap to fit to screen is nice, but quick pinch to fit like in Procreate seems more fluid to me (it might just be that my middle finger is somehow abnormally long, but two-finger taps are often recognized only after the second or third try for me) Straightening seems a bit fiddly – it would be nicer to be able to drag out a line and then have the end points movable even after you release the touch. Basically with an "Apply" button instead of committing right away. Right now, if you get it wrong or wonky, there seems to be no way to cancel and no way to get it really precise. Similar problem with the Inpainting and Mask Refinement brushes – an "apply on release" check box would make this more convenient. If disabled, it would allow you to paint multiple strokes and then press an "Apply" button. Same on the Desktop – I can't count the number of times I've used one of these brushes, hit the screen edge and had no way to scroll the document without the incomplete operation being applied, leaving no way but to undo and repaint a potentially complex selection. The curves UI in Develop (and possibly the regular Adjustment, it's not shown in the videos) seems to be too small for precise adjustments. A button that pops it out over the full screen like Procreate does by default would be very nice. Also, like with Levels, there needs to be a way to see where a point falls on the histogram/waveform, numeric coordinate inputs and a clipping warning for it to be really useful. It would be much more useful if dragging on the layers would adjust Opacity instead of doing multi-select. Selecting could be implemented either by having an additional column with checkmarks permanently shown to the left of the layer name, or by having a "Select" mode that makes that column appear after press of a button like in many other iOS list views to prevent accidental selection. That would also be more intuitive for new users. A "Hide Selection" option would be very useful to see what selection edges look like after an adjustment. Goes for Desktop as well. This is nitpicking, but the square buttons in the Layers panel don't match the round look on the other buttons, like "Return", "Document Menu" etc. The Inpainting Brush "Inpainting in progress" overlay seems like it would get really annoying if you have to do a lot of inpainting because it would make your screen flash after every brushstroke. It also makes it harder to compare before and after since you get to stare at that blurry wall instead of before/after images in direct sequence. A smaller progress indicator like the non-intrusive "Marked as Pick/Reject" feedback popups in Adobe Lightroom or a global progress bar next to the Persona selector would be a lot less distracting. A lot of the Develop UI is really colorful and could distract from the image. I already mentioned the Adjustments previews as another case of this. In Develop, for instance, the RGBCMY sliders could just have their knob colored instead of half the slider (background of the slider indicating the percentage could be gray instead of R/G/B/C/M/Y), or maybe the colored part could just be a thin line like on standard iOS sliders. It's not clear from the tutorial videos if this is there, but a "double-tap any numeric input, slider or option to reset to default" feature would be great. On the desktop as well. Or alternatively or additionally, a "default" button in the popup calculator would seem like a good idea to me. Develop seems to lack an option for numeric inputs. This is essential for precise corrections. It would be nice if the popup calculators could do basic maths, like those in Flame. So something like "current setting * 1.5" would be really easy to do. History seems to have no "Purge History" button that would save storage space on complex documents, especially ones with a lot of paint strokes. The only way to do this currently seems to be to do a "Save as". Also, having the initial document state in the history list would be useful. And an option to use the great split-screen compare mode with history steps would be nice (though admittedly not essential). The size of the application bundle is extremely large, more than a GB. Anything you could do to reduce this would be greatly appreciated since storage is usually extremely limited on Apple devices, there is no way to use memory cards, and the images being worked on potentially get rather large, especially considering that they are saved with history by default and that 41 megapixel raw files are within the norm these days. Hope this feedback is helpful, congratulations on the spectacular launch! :)
 -
 I've been through just about every painting program out there. In general, Clip Studio Paint is unmatched in efficiency. The brushes perform great and so do all the filters etc. It has most of the basics you need. However, it has one missing feature or at least a very weak method. What I'm talking about is dual brushes. This is where one brush bitmap creates the daub shapes and another bitmap creates the textures within the brush shape. There is an app on the iPad called Procreate which has fantastic power in these terms but Photoshop is very good as well. The second texture within the brush shape needs some basic editing, for example jitter etc for maximum effect. Then you get beautiful brush textures. Affinity Photo has this dual brush idea to some degree but it's not as effective as Photoshop and Procreate. Clip Studio Paint has a much more static and weak looking secondary texture (it seems to actually just provide two tones) to add texture to brushes. It doesn't cut it unless you are happy with a much smoother look. Affinity Photo is a better than Clip Studio Paint in this respect. However, I've just posted about using Photo for painting. The brushes are not fast enough, at least on the machine I have tested on. This is an area where it appears that Photoshop still rules over Photo. Clip Studio Paint is the fastest performer in general for all brush work but Photoshop has a stack of features which comes in handy just for painting and it has decent dual brushes. So this is my main disappointment with Photo.
 -
 Hello, and welcome! I believe the Affinity Store version is identical to the Microsoft Store version, only the registration and update processes are different. Note: Part of the reason you are probably having trouble is that, unlike FireAlpaca and Medibang Paint, Affinity Designer is, at its heart, a vector program rather than a paint (raster) program. There is a Pixel persona, which is more like your paint/sketch experience, a raster/paint environment within Designer. You could use only the Pixel persona, and create only pixel layers to paint onto, which would be more like FireAlpaca or Medibang Paint, but you would be missing out on much of the power of the Designer program. Choose between Personas by clicking on the Persona icons at the top. Here's a tutorial example of only working with the Pixel persona (credit: Frankentoon). Oh, yeah, Personas - think of two artists working closely together, one cuts out pieces of paper and pieces of string and pastes them onto layers (the Draw persona), the other one (the Pixel persona) paints on those paper shapes or onto transparent layers (your previous experience). Each artist uses different tools and has different ways of working. You've only ever worked with the Pixel persona in your paint programs, now you are also dealing with its more technical sibling, the Draw persona (draw as in using a pencil with various shaped rulers, or even scissors with paper, more or less, not draw as in freehand sketch). From a painting viewpoint, you might start by thinking of those vector objects as permanent selection areas - you are firstly creating your selection areas (vector shapes, pieces of paper), then manipulating them or painting onto (into) them - it's not exactly true, but it's one way to start thinking in vectors. If you've made good use of the curve snap, panel material, and panel tools in FireAlpaca and Medibang Paint, those are a couple of baby steps into vectors. Working with vectors, the Draw persona, can be incredibly powerful once you've got your head around it, then combine it with raster tools - see a similar approach in video here (both examples by Frankentoon (Enrique Figueroa) - I'm a big fan of his work, tutorials, and brushes - hmm, the Gallery is broken for me at the moment). A few starting points: Affinity Designer official (Serif) tutorials (for the desktop version, not the iPad) The Affinity Designer Workbook (available in print only, no ebook)- information and project-based tutorials for the desktop (not iPad) version The free vector inking chapter from the paid but not expensive Advanced Illustration ebook (yes, Frankentoon again) 2 hour, 42 minute tutorial on YouTube There are several Affinity Designer courses on paid platforms like Udemy, Skillshare, etc Points you mentioned: The undo equivalent is Ctrl+Z or Edit menu > Undo, or use the History Panel to pick any point to undo to (you could multiple undo with a single click) or use the History slider. No, there is no undo button. The gradient fills are very powerful (not just linear or circular, multiple colours, and you can edit them at any stage of your artwork, not only when you first create them). You still have "normal" layers in the Layers panel (they are labelled "Layer"), but it also shows each object on that layer - instead of "painting" on a layer (remember, you can still do that), a lot of the time you're sticking many paper cutout shapes , or strands of wool or wire, "onto" (into?) the layer, and you can still have access to any one of them (you can also paint on them). Colouring "normally" - you could create a new Pixel layer, change to the Pixel persona, then paint as "normal", as shown in previous links, or you can learn to do it the vector way: first you create a coloured shape with your vector tools (it's like a selection already filled with a base colour), maybe change it to a gradient or other fill rather than a flat colour, then maybe paint onto that shape. Sketching: Probably use the Pixel persona for that.
- 1 reply
-
- 2
-
-
Hi, <EDIT> Replaced by 1.6.3 in the app store </EDIT> We are pleased to announce the App Store release of Affinity Photo for iPad, version 1.6.2. The change-list is as follows: - Enable RAW loading from Photo Library. - More robust auto-save of new documents. - Allow Photo Library images in new stack, HDR merge, focus merge and panorama dialogs. - Improved stability with complex documents. - Stroke stabiliser for the paint brush tool. - Allow deletion of red-eye, blemish removal sets in develop. - Allow editing of brushes from the brush studio. - Missing icons in the patch tool. - Fixed text shooting off screen sometimes when editing. - Fixed crashes when inpainting large areas. - Faster tone mapping. - Liquify works properly with rotated / flipped layers. - Fixed odd develop artefacts with some Canon D60 images. - Fixed failure to export JPEG from some RAW files. - Missing levels functionality. - Halftone filter - UCR and GCR now work. - Improved CMYK blend modes. - Fixed develop basic studio sometimes having no sliders. - Missing delete buttons in field blur, deform and gradient tools. - DoF and Lens Blur filters now apply more quickly. - Prevent focus merge, HDR merge from starting with no images. - LUTs fixed. - Fixed develop WB slider bug. - Paste inside implemented. - Fixed a layer studio crash. - Localisation improvements. - Numerous other stability and visual improvements. Thanks, Affinity Photo Team :ph34r:
- 18 replies
-
- 21
-
-
NOTE This beta is now complete and 1.6.4 is now live on the App Store Status: Beta Release. Purpose: Fixes, improvements, features. Requirements: TestFlight Acceptance. App Store: Pending Hi Guys, The sixth beta of 1.6.4 has been deployed on TestFlight. The changes are detailed below. You can download the App Store version at any time to stop using the beta - and download the TestFlight build at any time to go back to the beta. The next build of Photo will go to the App Store (we have found the odd issue with this build which means we must build again) - we believe that what we currently have is a worthwhile update for general users. Once this is done, we will switch to Xcode9 - so we can beta iOS11 specific features (including extensive drag & drop support). Thanks, Affinity Photo Team Changes this version - Allow Focus Merge to use RAW sources. - ABR import now works even if you have PS Sketch installed. - The “Curves” adjustment now responds properly to dragging on the document to set node positions. - The “Curves” adjustment spline editor now presents an intensity histogram. - Develop now has the same crop tool options as the main crop tool. - Show adjustment groups, mask groups properly in the layers page - just like the desktop version. - Significant memory handling improvements when using Core Image RAW. - Fixed full-colour brushes and brushes with HSL dynamics. - Fixed selection “marching ants” flickering on zoom. - Fixed the grid becoming less visible on light areas of the document. - Brush tools now have a more natural pressure falloff. - Fixed “Channel Mixer” UI bugs - context toolbar was too big on 9.7” devices. - Fixed embedded document update issues. - Fixed issues where the text tool would cause the document to pan to a silly position. - Fixed snapping dialog oddities (saying “Custom” when the setting matches a preset, etc.) - Fixed drawing issues with colour buttons. - Photo library chooser will reload when external changes occur. - Don’t get stuck when the user has no internet connection and uses Interactive Introduction. - Fixed some truncated localised labels. - OpenType improvements. - Improved Metal memory management. - Selection brush fixes & improvements. - PDF export / import tweaks. - Help update. - Localisation improvements. - Numerous other tiny fixes / tweaks. Changes since last App Store release - Implemented “on-screen modifiers” (enable in preferences - adds an extra context bar group to many tool, simulating modifier keys). - Increased the maximum size of the liquify brush tools. - Switch between button menus (document, command menus for example) now only requires one press. - Allow “Place Image” to place original images from Photos. - Fixed blend mode issues introduced in last beta. - Fixed issue where photo library appeared empty after initially giving permission to use it. - Font size chooser dismisses on pressing return. - Missing fonts are consistently shown with a “?” prefix. - Some radial sliders were showing numbers as ellipsis. - Fixed black screen when opening documents in OCIO colour spaces. - Fixed mixer brush introducing too much black. - Improved adjustment previews. - Fixed vignette artefacts. - Numerous other small fixes. - Improved localisation. - Selection refinement performance improvements. - Show progress when committing a refined selection. - Fixed rendering of adjustment layers with blend modes. - Further efforts to reduce the size of the application binary. - Handle layers with 0 width / height more correctly. - Improved PDF / vector export. - Further efforts to reduce the size of the application binary. - Improved TIFF loading correctness. - Fixed some “Effects” brushes looking wrong on masks / adjustments. - The “Undo” brush should do nothing on masks / adjustments. - Support malformed 8bit grayscale TIFFs (which were loading as sRGB). - Swap the liquify pinch / punch icons. - When creating a document from the camera, metadata is now available. - Fixed UI for macros with many arguments. - Fixed tiny memory leaks. - Numerous other small fixes. - Localisation improvements. - Added "Export LUT" to document menu. - Added "Convert to Curves" to command menu. - HEIF/HEIC import support for iOS11. - Wet edges can now have a custom interpolation spline. - New pinch gesture support for grouping / ungrouping layers in the layers studio. - Passthrough blending is now supported for groups. - Fixed some invalidation issues when moving layers. - Fixed clone / heal brush tool origin marker issues. - Fixed aperture / FNumber metadata parsing. - Fixed pasteboard issues. - Improved interactive macro playback when the macro has many arguments. - Selection refinement stability / performance improvements. - Fixed HDR merge of portrait images. - Improved HDR merge of RAW images. - Icon improvements, especially in text studio. - Fixed numerous small memory leaks. - Move tool transform nodes can now be hit more reliably. - Fixed some Live Filter drawing artefacts. - Fixed some LUT R/B channel swap issues. - Styles page will remember list mode state correctly. - Localisation improvements. - Numerous other bug fixes. - Macro studio (import / playback for now, recording coming soon. Supports interactive playback.). - Significant improvements in performance for large / complex documents. - Selection marquee tools support extra-finger-constrain. - Improved reading of DPI from files. - Exposure adjustment now operates in stops, not % and has wider range. - Arrow tool has more options. - Fixed B&C adjustment in CMYK, LAB. - Lighting tool tweaks. - Paragraph leading UI improvements. - Improved loading of images from photo library. - Fixed a couple of UI memory leaks. - Fixed issue where a document failing to load would prevent subsequent loads (again). - Fixed painting onto masks / adjustments. - Numerous other small tweaks. - Photo library now shows all user albums / folders. - New option to dither gradients in preferences - defaults to “on”. - Significant pan / zoom smoothness improvements. - Directional lights in the lighting filter can now be directed using on-canvas handles. - Further fixes for the inpainting tool occasionally leaving red marks. - Fixes for liquify (and other tools) cancelling if you drag off the edge of the screen. - Smart selection brush improvements. - Selection refinement improvements. - Fixed welcome screen not reloading sometimes. - Avoided a (rare) deadlock case. - Fixed crashes when a font has no traits. - Adjustments / filters preview react to changes in canvas size. - Avoid crashes on app exit (which nobody will ever have noticed!) - Fixed issue where if a document fails to load it can prevent other documents from being opened in this session. - Further memory management improvements. - Localisation improvements. - Numerous small stability improvements.
-

Help with pencil brush
DM1 replied to Brimar's topic in Pre-V2 Archive of Affinity on iPad Questions
Paolo, what 'features' are missing in the iPad? It would be great to have your wonderful brushes work on the iPad, as you originally designed them to work on the desktop version. Perhaps we can post in the iPad features request thread and have this shortcoming addressed. -
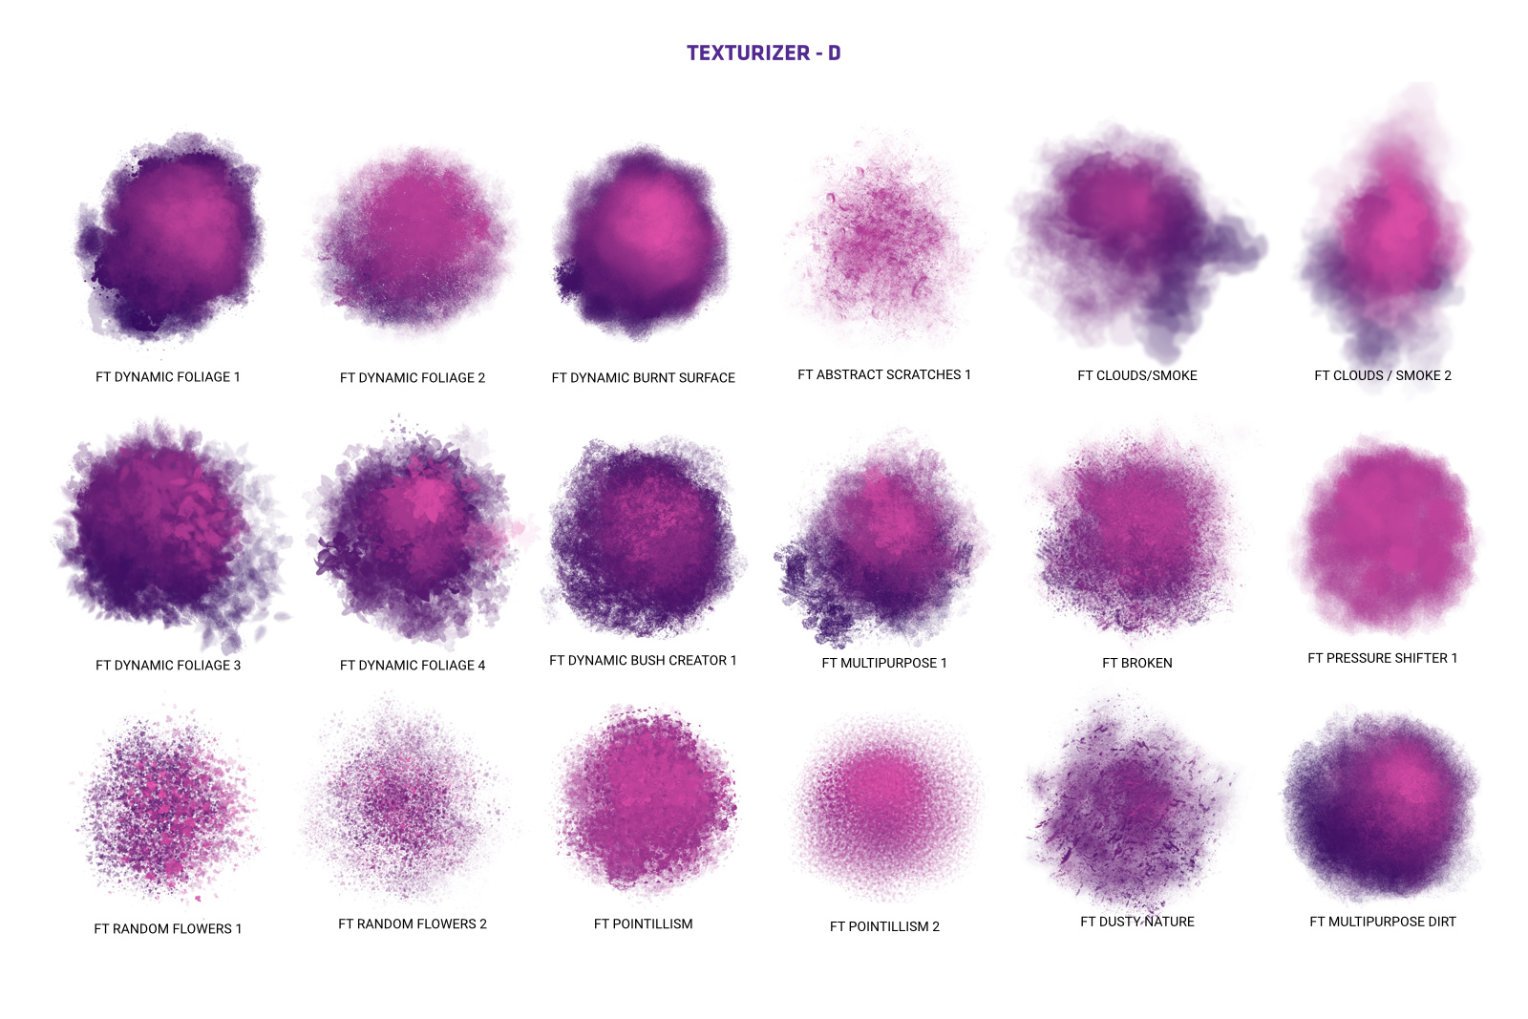
Which version of Affinity Designer are you using? I have the Texturizer brushes, but I didn’t have them installed in the iPad version of AD and brush import isn’t currently working for me. Here’s the ‘Texturizer-D’ page from the cheat sheet, clearly showing what the missing brush should look like:
- 6 replies
-
- 1
-
-
- frankentoon
- brush
- (and 2 more)
-
 Hex Color support is still missing in action. (O.k. I admit that was more of a feature request ). The samples did not load well on my iPad Pro also. but I guess its maybe because of higher demand then usually maybe. The Brushes feel very good, just a slight "lag" at the end of the stroke sometimes. (I record a Video after work). Overall I am very impressed with the new features so far and cant wait to test it further later. Good Job again!
 -
 So far affinity photo for iPad is looking great! This is almost exactly what I have been looking for ever since the iPad pro first came out. I know it's mostly positioned as a photo editing app, and not a painting and illustration tool but there are a couple of things that would make it perfectly suited to painting if they were there: Easier colour sampling - I've seen this mentioned in other threads for the mac version, but I can't really overstate how important the eyedropper tool is for digital painting. 90% of the time in procreate I am just sampling and painting. In Affinity I have to tap the eyedropper, then tap the brush again - the ability to toggle between brush and eyedropper is really what's needed. Whether that's a button on screen like in procreate or holding down the alt key like in Photoshop. Customization the key-commands. I'm sure this is already on your list, but being able to do absolutely everything from the keyboard would free me up to always have one hand for switching tools and one hand on the stylus at all times Pressure sensitivity for opacity - I was amazed when I saw all the controls for each brush, but opacity is the one thing that's missing in there. I know flow is similar, but I find sometimes opactity is what I really want to vary Disable finger input for brushes all together: Palm rejection works okay, but in every app I've ever used it's still not good enough to 100% prevent random input from my palm. A lot of apps have added the ability to make it so only the Pencil can make brush strokes, which solves this problem Rotate and zoom with multi-touch without 'rotation mode' - when I am painting I'm basically constantly rotating the canvas, and it would be more seamless for rotation to be always on like zoom for multi touch gestures Undo with multi-touch: Other people have mentioned the two-finger tap for undo is so ingrained in my me by procreate that I find myself doing it in every single app (sometimes when I am drawing on paper too!) - I think that would be a good feature to copy I hope it's not too annoying that every thread is filled with these little complaints. The truth is Affinity photo is a great app, it brings almost every advanced feature I have been looking for to iPad. Especially masking! I look forward to seeing how the app progresses now that it's arrived.
 -
 I have set up an iPad pro with Apple Pencil as second screen and tablet to a Dell Windows laptop with an app called Duet Pro. In the Duet Pro setup, I can see the pencil works as a pressure sensitive device. No problem getting Affinity Photo running with the studio tools located on the laptop screen accessible by mouse and the canvas on the ipad pro accessible by mouse/finger/applepencil - so far so good. I am using this as a sketching illustrator not as a photo editor and I can scribble on the screen with either the mouse or with my finger or with the apple pencil . . . BUT the apple pencil is not giving pressure sensitive effect to the brushes - there is no difference to the line on the screen whether I use mouse, apple pencil or my finger I hope I am missing something simple? Any help gratefully received. Cheers Nick