Search the Community
Showing results for '100%K'.
-

switch back from AD to Apub
bbrother replied to kat's topic in Affinity on Desktop Questions (macOS and Windows)
@kat one important thing to note is that when you use a Persona in Affinity Publisher, they do not give you the access to 100% of the tools from Photo or Designer. On the other hand when you use File → Edit in, the file is opened in the selected app like @Brian_J said and you will have 100% tools and all the functionality that the app offers to your use. -
 Big problem, surely a bug?: Any gradient on any object will render all selection boxes invisible in the entire Affinity suite. It happens 100% of the time, on all files. I can select objects, but there are no visual cues in the Document View window. I've had the problem since I bought Affinity in December last year. It took me a long time to figure out what was happening. I haven't found any solution on Google or in existing forum posts, so I decided to write my first post here. I hope someone can help. Please read my explanation and watch my screen recording. * Recipe: Just add a color gradient to any object, e.g. text or a picture frame. After that, no selection boxes will appear when selecting one or more objects. I can still select objects with my mouse or using the Layers panel (Right Studio). I can see in the Layers panel that one or more objects are selected. And if I use, e.g., the move tool, I can easily move them. But there are no selection/bounding boxes around the selected object(s). This obviously makes it difficult, confusing and frustrating to edit files with many objects and layers. Please note that removing the gradient will make the selection boxes reappear! In short: Any gradient on any object will render all selection boxes invisible in Publisher, Photo and Designer (in both 2.4.2 – the newest version – and 2.3, which I installed back in December). * Screen recording (50 sec) using a new demo file: The demo file has two text frames and one picture frame, all having solid fill color. When I click on and select one or several of them, a selection box appears. So far, so good. As you can see, if I then change the color of one of the objects (the blue text) to a gradient, the selection boxes disappear. As you can see, I can select any of the three objects, but there is no box or outline around any of them. In the last step in the video, I remove the gradient on the blue text and select a solid color instead. Since there are no gradients in the document anymore, the selection boxes are again visible. 1. What Application are you using? Affinity Publisher, Photo and Designer 2. Are you using the latest release version? Yes, 2.4.2 (also happened in 2.3). 3. Can you reproduce it? Yes, 100% of the time on all files using any of the three Affinity programs. 4. Does it happen for a new document? Yes (see demo file and screen recording). Machine, operating system and extras: macOS Monterey (12.7.3) on a 5K iMac (Intel) with 16GB of RAM and plenty of internal storage. No additional hardware, just standard keyboard and mouse. No font managers or display managers. Hardware acceleration? I tried both ON and OFF. The problem persisted. Note: My iMac is working well and I don't have any issues with other programs. I did a fresh install of macOS Monterey in December, just before I bought Affinity. I have very few third-party programs installed: just Affinity plus Firefox, FileZilla and Stellarium (planetarium). Irrelevant background info: I've been following Affinity and cheering for them since 2018. I finally bought the V2 Universal License in December 2023, and I have spent the last few months testing the software and watching a lot of YouTube videos. I've previously used Adobe's software for editing photos, making illustrations, and designing books, but I decided to switch to Affinity. I like many things about Affinity! Sadly, I can't use Publisher for designing books (the text justification is absurdly poor, even with the Norwegian hyphenation dictionary correctly installed and activated). But I really want to make it work for my upcoming wall calendar as well as posters and other "simple" projects. If Affinity is able to show which objects and layers are selected also when using gradients, Photo and Designer will become very useful to me as well. I like both the features and the performance of Affinity. Screen_Recording.mov test.afpub
 -
 The reason for this question is that I plan to make edits to layer 101 from time to time. In Affinity v1 it seems Export Persona could only export individual layers or individual groups, so using that software I would have had to copy layer 101 into 100 groups (one for each layer to export) and then batch export the groups instead of the layers. However it would be tedious to manually copy layer 101 into 100 groups after every time I've made an edit. Is there a more effective solution for this in Affinity suite v2? (I have Photo and Designer) BR Leo
 -
 I am still unsure what you want to achieve with the red lines + arrows. If the red lines are a custom Grid then 'simply' change its definition in the Grid Manger as wanted. If they are Guides I doubt their is a simple way and you might need to delete + recreate them. Regarding the objects: if you want each of them to be 100 mm you could use the new V2 feature to set a certain absolute size (10 mm) for several selected objects via the "Make Same" option in the Alignment dialog. I guess you start the process with a key object that got set to 10 mm already.
 -
What document resolution (DPI) do you use? [If it would be only 1 dpi then 100 px result in 2.45 m. I don't see a way to achieve your 8.5 m.] If you mean 8.5 mm instead then scaling by 10 / 8.5 ≈ 1.17647 would result in the wanted 10 mm. However, note that, regardless of the current document DPI, a px to mm conversion is hardly as smooth as, for example, mm and m, and therefore you may need a scaling value with multiple decimal places and/or rounding and not achieve perfect 10.000 mm. – Alternatively you could set an absolute value (10 mm) instead of scaling with a multiplication (8.5 x ...). But honestly I might misunderstand your goal, especially the drawing and its red arrows appears unclear to me.
-
Which one? To me both links work from this and another device without issues. I think we can't simply compare the "Press Quality" / "press ready" presets of the two different applications. We would need to consider not only the exact compression rate but also colour / profile handling, which may influence the rather small difference of ~10% in your example of 9 vs. 8 MB. As mentioned, I am not sure if ID's "maximum" exports indeed with 100% quality, though I don't know what compression rate gets in fact used. Since the compression % is quite relevant especially for high quality (100 – 90%) we need to know & consider the actual compression rate for a useful comparison.
-
 And for 99% set to off is the safer way. Unless you are into watercolor painting look. Getting this setting to on by accident leads to issues like not reaching 100% brightness or deletion.
 -
 I've been playing around with the settings on vector brushes to get good size variation with pressure for some time now and I've never been able to get a decent performance on my iPad Air with the Pencil 2nd gen Apart from the garbage it always seems to produce at the start or end when I take the pen off the canvas I just can't get any decent size variation - I'm playing around with the brush settings and setting the pressure variation to 100% and trying different Controller Profiles and the brush strokes all seem the same with hardly any variation in size ! Do I need to buy some of these Pen Tips or a Pen Mat ? How do you get good results with pressure variation on the vector brushes ?? it's so bad it's almost not worth bothering to set the pressure
 -

AI generative Fill in Affinity
davide445 replied to WMax70's topic in Affinity on Desktop Questions (macOS and Windows)
After testing all this tools, I can say from my perspective I returned 100% using Affinity for my needs. AI is great and probably with more available effort I would have been able to get out something useful, but so far - Krita UX is totally counterintuitive/buggy/inconsistent so that even trivial activities like using a mask become a pain - AI diffusion plugin never generate what I was needing/expecting due to bugs/inner complexities - AI instant segmentation and selection was working farily well, but refining the results with Krita needed a huge time with subpar results - Using the web UI never took off in my usage needs Of course all of these are marveleous tools with tons of beautiful features, but my experience is they need much more effort than expected to get out something useful.- 467 replies
-
- 1
-

-
- artificial intelligence
- ai
- (and 3 more)
-
 Publisher creates really large PDF files, up to three times larger file sizes than InDesign. That is, a similar document with one large image, 300 dpi, LZW, RGB, 100 JPG compression: InDesign 1 Mb (Acrobat 5 or 8/9) and Publisher 3.4 Mb (Acrobat 8). What could be the reason? Publisher's PDF files sometimes have to be further compressed in Acrobat Pro 🤔
 -
That's the brush spacing setting. I'm almost sure. With the smudge tool, you still can choose (and modify) the brush on the Brush list panel (you can smudge with any kind of brush). For example, you can double click in a basic round smooth brush, and a window will pop up where you can establish the settings. Just remember that those changes stay (unlike just changing those in the top bar). So, remember that you did so for the next time that you use that brush for any other purpose. Or, duplicate it and create so one specific for this purpose, whatever preferred. I am almost 100% sure that this is happening to you because the brush selected is one that by default has like 25% or so set as value in "SPACING", in that specific brush settings. Just change it to something like 5% (1% for super smooth, but it can lag, then, specially with big brushes) in spacing, and you should be fine. Smudge brushes could lag in sizes like 230px or so, anyway, but can still be functional for the purpose. I would recommend to also try and do it in several passes with the smudge brush, over the already "smudged" trace, like "insisting", it allows more finesse and curious effects. But it depends on what are you after. Also, for this kind of stuff I would work on a RGB/16 bits per channel kind of file. Not in the usual RGB/8 bits. You have a lot of more room for gradients and this kind of effect. I suppose that's the case even more with RGB/32 bits, but I have not experimented much with those in Photo (just made a fast test now and seems a lot better), just because I'm completely fine already in 16bits per channel. It's always way more "room" for editing. But... it can make files processing slower, be aware of that, when performance is too tight. I paint (drawing, painting, not photo retouch) in other apps that only support 8bits per channel (CSP for example), and for painting is totally fine, but for image editing, you have more "room" in several types of edits when the software (like Affinity Photo does) allows 16bits or 32bits per channel, not only editing related to smooth gradients, smudging or subtle shadows, but many more matters. But files are bigger, heavier to process, etc, so, thread carefully. Pls, let me know if that (the brush spacing setting) solves I, am curious. (it solves it here, in a fast test I just made. I'm on desktop, though, Windows).
-
 I draw a square with 40 x 40 mm. I apply the distortion tool Arc to it and set it to 100%. After that, as expected, a clean semi-circular arc should emerge. Unfortunately, however, there is a small gap on both outer sides. If I create two arcs and rotate one by 180 degrees, I should get a perfect circle of 120 mm. Unfortunately, when I place a clean circle on top of this construction, the two arcs are not congruent. I have attached an example file in the appendix, where it becomes clear. I am using the latest version of Affinity Designer. The bug can be reproduced at any time. My computer is a MacBook Air M1 (2020, 16GB) with OS Monterey 12.6. Hardware acceleration is on, the bug is independent of that. Bug.afdesign
 -
 Serious Bug. Exporting Pages as Jpgs. Publisher Ver 2.4.2. While exporting pages as jpgs, to post a sequence of jpgs on a web gallery..... Affinity Publisher allocates the name per page as the FileName plus sequence number..... but... a very basic error.... the sequence number needs to have leading zeros. Otherwise, the images will have the wrong sequence... eg, 8,9, 10 will appear in the sequence 10,8,9..... The sequence should be 08,09,10 or 098,099,100 .... depending on the number of numerical digits. See the attached example. I did not notice this at first.... as Windows seems to recognise the sequence in which the files were created... and Adobe Lr sorts the images automatically in date of capture, but the Adobe Web Gallery sorts in strictly Alpha sequence... leaving a mess in the gallery.... as the images lose their very valuable sequence. So, Affinity Publisher is processing the pages in the correct sequence... creating the jpgs in the correct sequence, allocating the correct sequence number.... but is not filling in leading zeros for the sequence number.
-
I have raised Accumulation to 100% as suggested. There was no effect. Problem persists.
-
JPG Quality / File Size Comparisons
thomaso replied to Ldina's topic in Affinity on Desktop Questions (macOS and Windows)
It seems that's why @NotMyFault posted the links . – At least since Photoshop's values 1-12 (not 0-100%) it might be obvious that there is no absolute unit for jpg quality/compression. – This article, comparing Photoshop/Gimp jpg compression & subsampling may even more surprise: https://blogs.gnome.org/raphael/2007/10/23/mapping-jpeg-compression-levels-between-adobe-photoshop-and-gimp-24/ Possibly Serif has no interest to publish Affinity code or sources … but a "licenses.rtf" file in the app package might indicate that IJG is involved at least. (and note: it is forbidden to call it "IJG" ;•) I wonder what this arithmetic coding option may be? (or has been, considering the age of this article and/or code).- 11 replies
-
- 1
-
-
- affinity photo 2
- jpg
- (and 3 more)
-
@davidj1 If you increase the Accumulation back upto 100% does that make a difference?
-
 Hallo zusammen, ich hab ein Problem beim Freistellen von Bildern / Hintergrund entfernen. Hab mich an die vielen Tutorials gehalten und mein Originalbild (ein Schriftzug „ECHO“) über Pixel Persona freigestellt. Also mit dem Pinsel die Bereiche nachgezeichnet, die ich behalten möchte, in der Hoffnung, der Rest außenrum verschwindet. Danach klicke ich in der oberen Pixel Persona Leiste auf „Verfeinern“ und wähle „Maske“. Bei mir erscheint der jetzt eigtl. freigestellte Hintergrund nicht mit diesen typischen Rauten, sondern orange (in der Vorschau - s. Screenshot) und weiß nach bestätigen. Wenn ich dieses Ergebnis dann als PNG exportiere, hab ich ein quadratisches Bild in Originalformat mit weißen Hintergrund das zu 100% nicht freigestellt ist - s. Screenshot. Any ideas? Irgend eine Einstellung hab ich bestimmt, die das Freistellen verhindert. VG Philipp
-
This is the correct behaviour - the stroke panel will always show the stroke's width, and not the width at the current point. As the Line Width Tool functions by adjusting the pressure curve then decreasing the width, will decrease the pressure at that point. However as the pressure is 0-100% of the current stroke's width then increasing it past this point HAS to increase the stroke's width to accommodate the value you are pushing it too. If you look under the options on the context toolbar you will see a 'Lock Line Weight' button - this will prevent you from pushing the stroke past its currently set width.
-
It's 2023 and we still get frequent request to "edit the alpha channel as normal color channel", and export / import files where the alpha channel is used for e.g. depth information (z-axis) or something else / not for alpha. I support these feature requests to allow easier editing of alfa channels using all brushes, filters, adjustments etc. Never the less, it is perfectly possible to do this even today with Affinity Photo, Designer both in V1 and V2. Opening a file The key is to separate alpha channel as greyscale layer once you open such a file, and fill the alpha channel to recover RGB pixel values where alpha was 0. Open a TGA, PNG, TIFF file which contains exactly one RGBA layer. Assuming the layer name is "background" Use channels panel, click on background alpha, and "create greyscale layer" Use channels panel, click on background alpha, and "fill alpha" Rename the greyscale layer to "alpha" You can now edit the alpha layer with all tools. Notes: keep the alpha channel in background always at 100% (if not: channels panel->fill). keep the alpha layer in greyscale (all pixel should have identical values for R and G and B channel for one pixel, do not colorise) (if not->HSL adjustment, set SAT to 0, merge down) In case you want to see the alpha channel acting as traditional alpha channel: Create a channel mixer adjustment Choose alpha channel (output) Set "red" input to 100% (all color channels should have identical values) set „alpha“ input to 0 Nest channel mixer layer in masking position to alpha layer Nest alpha layer to background layer You can continue to edit both layers individually, but you see a preview of the document using alpha layer as alpha channel. Exporting the file To export the file: unnest the alpha channel layer from background layer, move it to top rasterise to mask The file should have exactly 2 layers: alpha on top (mask layer), background on bottom (RGB channels, alpha filled 100%) Export as TGA, PNG, TIFF etc Closing notes Gamma is not handled correctly for alpha channel when simply mapping from alpha to color channel or vice versa. RGB channels need gamma correction (normally 2.2), whereas alpha stays linear for rendering. If the difference is critical, you can correct the gamma with help of a procedural texture filter. I have tested the import and export steps repeatedly with TGA files in Photo V1.10, V2.04, V2.1 This method was not invented by me, I simply wrote this tutorial to have a URL which I can use if someone raises questions or feature request concerning this topic. Edge case (added 24.04.2024) It is not possible to correctly export with empty mask (alpha zero for all pixels).
-
 I have imported a dwg file into affinity and modified a couple of things. I would like to export this drawing to pdf format as a full size drawing, but pdf files that I generate are about 1/3 the size of my original drawing. Is there a way to export this file at 100%? Side Corrected 1.afdesign Side Corrected 1.dwg Side Corrected 1.pdf
 -
Here's a list of some of the bugs which have been fixed in beta build 2.5.0.2402, since 2.4.2 (2371) Please reply in this forum only to comment on any fixes which are in this list (in particular to let us know if you notice that something we say is fixed isn't!) To report any new bugs please do that against the relevant new feature post, or if unrelated to new functionality in the Other New Bugs and Issues in the Betas forum. (A) Bug fixes which affected all platforms User file- Importing PSD file fails to load and causes high RAM usage AF-2621 Select options in Photo Persona are offset based on bleed AF-1973 Cut and pasting Anchors creates a new Anchor, breaking Cross References to the original Anchor or Paragraph AF-1911 SVG rectangle with width="100%" height="100%" is imported incorrectly as 1x1 AF-1899 Eight digit SVG hex values not being parsed correctly AF-2152 Exporting to PDF with Tagging enabled fails when a text object is visually cropped with a vector mask, inside a group that is visually cropped with a vector mask AF-2112 Resource manager: OpenAsset image status shows as "Pending" User file- Importing PSD file fails to load and causes high RAM usage AF-2621 Paragraph > Spacing > Leading can be set to a negative value Selections in Publisher's Photo Persona are offset based on bleed [AF-1973] (B) Bug fixes which affected Desktop (Windows and macOS) Blur Tool: blur effect quite subtle if Metal compute acceleration is enabled AF-2268 Text Styles Panel not displaying decorations correctly with CMYK values Text Style Editor: Shouldn't each Stylistic Set be a On/Off/No Change value rather than a number Text Style Editor: Caps to Small Caps/Petite Caps shows as Normal Caps in Style Settings Text Style Editor: Stylistic Sets and Character Variants are not capped to the font max Text Style Editor: Deleting a Shear or Scale value will set it to 'No Change' but doesn't remove the value from the style Text Style Editor: Desired Word (and Letter) Spacing is not capped by Minimum and Maximum Word (and Letter) Spacing options Text Style Editor: Bullet List font cannot be removed (or added) by checking 'Use Selected Font' Text Style Editor: Initial Words end characters cannot be set to 'No Change' after modifying Text Style Editor: Bullet List font cannot be removed (or added) by checking 'Use Selected Font' Text Style Editor: Desired Word (and Letter) Spacing is not capped by Minimum and Maximum Word (and Letter) Spacing options AutoCorrect - Capitalise first letter of sentences issue AF-2340 [User File] Placing .xlsx causes app to hang and never recover AF-2374 Running headers and paragraph style that is used in more than one paragraph in a row AF-1940 Hyperlink panel displays the same/first anchor for all if multiple are setup AF-1647 Find & Replace- Searching for words with an Anchor/note/index marker inserted will fail to find the word with 'match whole word' enabled AF-1928 Text styles panel doesn't show the text stroke outline unless you've also set the fill colour on MacOS AF-2186 Editing a TOC heading and updating TOC creates a new anchor incorrectly AF-1912 Develop Persona- Sigma 150-600mm f/5-6.3 DG OS HSM | C Lens profile not identified in the lens panel AF-2132 Importing a multi level list into Pub with various text styles AF-1832 HEIC files with transparency import with a solid black fill in place of the transparency Show Column Guides and Show Pixel Selection toggles are missing in the pixel persona AF-2119 Table Format's text style appears blank if the original style has been renamed [macOS/Win] Resource Manager panel doesn't update automatically New Stack with images using 'bottom right' metadata orientation are stacked upside down AF-996 [User File] Placing .xlsx causes app to hang and never recover AF-2374 Linked multi-page PDF files default to Page 1 when re-loading the document, changing passthrough policy subsequently causes an app crash AF-2662 Importing IDML and flowing text to new frame applies text scaling unexpectedly [AF-1342] Flowing Story text is scaled unexpectedly after changing the documents DPI [AF-1288] (C) Bugs fixed which specifically affected Windows LAB/Greyscale values are showing with decimals AF-2327 Edit Text Style dialog does not always fit on screen & cannot be resized, hiding OK / Cancel options AF-2351 When inserting a Cross-Reference the Search from start files is not active AF-1747 Email Hyperlinks with multiple email addresses (CC & BCC) fail to validate / export AF-1736 Brush Previews are drawn within the Colour Picker Loupe when using the ALT modifier with Brush Tools Clear User Data dialog does not fit on screen for smaller displays AF-2217 Undesired Colour Conversion when using 'Performed by Printer' AF-1633 Buttons disappearing from preflight panel AF-2643 Menu Edit > Fill...: pressing Enter to validate choice/close dialog no longer works AF-2232 Text Style Editor: Outline stroke style doesn't have the ability to set 'No change'. Text Style Editor: Scrollers on Alternates page have a different max value on macOS than Windows [Japanese] Multiple panels show clipping [Spanish] Multiple panels show clipping Edit Text Style: There is a red dot bleeding through under Outline Export Persona: you can lose the Variable and Description fields in the Token flyout Publisher When export to PDF the UI progress bar freezes but the PDF is exported Right click on Masked layer's icon on parent layer does not select mask layer Edit > Copy Merged is incorrect for Portuguese AF-2188 Difficulty dragging a layer to the top of the stack AF-2144 Grid and Axis manager always uses 3 decimal point values when adjusting using slider, regardless of UI setting AF-2450 Mouse Scrolling the Angle field in FX does not visually update changes on canvas when cursor is over the Angle value itself AF-2121 Overprint Swatches when Show as List enabled do not visually clip the ellipse used to denote the Overprint state AF-1323 Pressing Esc whilst dragging on Transform panel controls causes the controls to start reacting to mouseover Colour Studio in Slider view offers 16bit / Percentage options for HSL and LAB incorrectly AF-2424 Changing Colour Studio view from Sliders changes colour mode settings applied in Slider view AF-2423 Can't print multiple artboards with bleed AF-2358 Export Palette option is not greyed out in Swatches Studio menu with a Pantone Palette selected New Document dialog: No X to close documents in List View Overprint is not enabled when creating a Global Colour, and disables when edited 'Search' fields do not offer a right click context menu 'New from Clipboard' fails with SVG code on the clipboard AF-854 Stroke Well in Colour Studio cannot be clicked in the centre of the icon AF-2070 Layers Panel- Shift selecting multiple layers after using the Select > Select Bottom/Top command does not function AF-1820 Right click on Masked layer's icon on parent layer does not select mask layer Select all layers keyboard shortcut not set by default Cannot reapply the highlighted text style to multiple paragraphs (D) Bugs fixed which specifically affected macOS Placing any multiple page PDF and setting duplicate to display a different page will always show page 1 when saved and reopened AF-1726 'Characters Including Spaces' only shows as 'Characters' in the Status bar AF-1958 Colour modes in Colour Studio Slider view incorrectly share display settings, causing incorrect colour values to be shown AF-2421 Edit Text Style - Position & Transform baseline jumps to negative value AF-1691 Procedural Texture- 'rgbtoi' function canvas rendering inconsistent with metal enabled AF-1963 Text Style Editor: Setting Outline Stroke style to No Change doesn't appear to fully revert the values Layers Release option in context menu becomes greyed out when you have more than 30 objects selected Copy To Category missing from Brush context menu AF-1666 MS Word doc with page range index references aren't supported AF-1618 CMYK Color sliders in colour chooser inconsistent AF-657 Chinese and Japanese characters fail to show on 'finger tooltip' Trash Can icon on Anchor Panel is too small on macOS Document Setup missing from File menu in Pixel Persona AF-839 (E) Bugs fixed which specifically affected iPad Appearance > Options > Colour Wheel causes a crash Korean Text does not get input/combined correctly on iPadOS AF-1268 Layers Studio menu missing 'Release' and 'Mask to Below' commands AF-1919 Top ruler is missing when stage manager is active AF-1338 White flash shows on loading the in-app iPad help Copy To Category missing from Brush context menu pop-up dialogs from adjustments do not turn translucent when dragging the slider AF-595 Resource Manager Details page doesn't update automatically Chinese and Japanese characters fail to show on 'finger tooltip' iPad edit / document menus conflict with brush settings CMD+S shortcut doesn't work on the magic keyboard with Zhuyin input AF-669 Able to set negative values on Corner Tool slider If you have reported a bug and it is not yet fixed, please do not report it again. More fixes will be made during the 2.5 beta cycle.
-
 When you Place an image you get all its pixels, and if you place it at 100% of its original size the DPI will match the original image. If you Place it at a smaller size (for example, 50% of the original size) you still have all the pixels, but they are squeezed into a smaller space. Logically, therefore, the DPI must increase. When you Export the file as a PDF, you can specify in the Export Options whether such images should be down-sampled, and in what way:
-
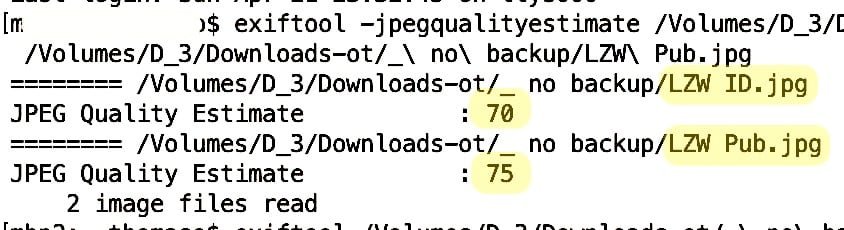
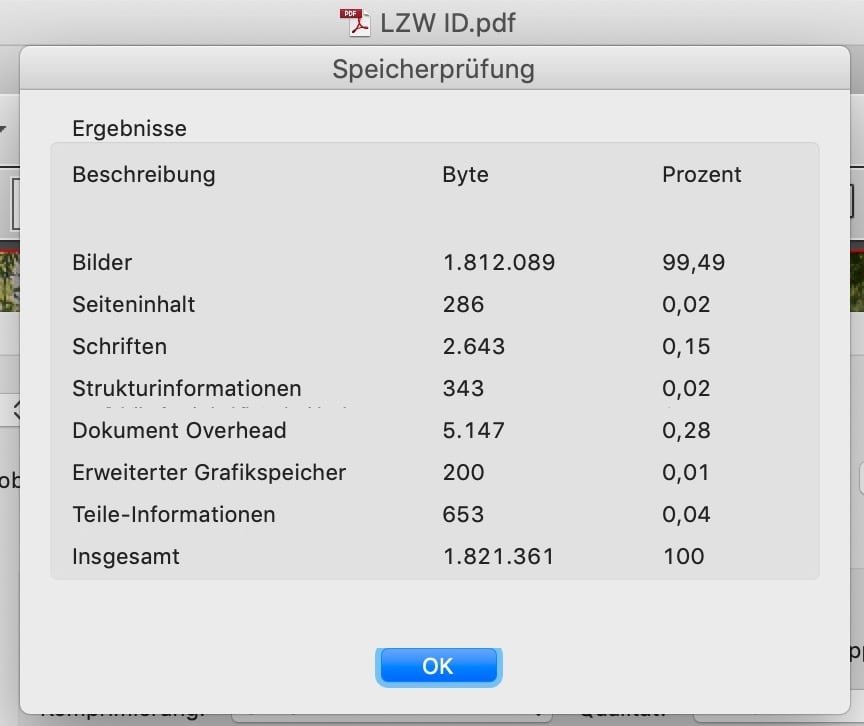
This maybe a misunderstanding. Especially with high quality / low compression the file size differs massively with a little change of compression. Have a look at this website with interactive comparisons of various motives, compression rates and resulting file sizes. Though it is for Lightroom it may explain the principle of the non-linear change of file size though Affinity may use different methods / algorithms for resampling or compression. Accordingly a comparison of your image, extracted from the apub.PDF + exported at different qualities (100%, 98%, 95%, …, 70%) influence the resulting file sizes quite differently: At the high end, 10% less quality results in a 50% smaller file size. Also the Exiftool reports a different compression / quality estimation for the two JPG files after extracting them from their PDFs. While it is an estimation only it obviously notices a quality difference in this two files of same motive and nearly same megapixels: And regarding subsampling Exiftool reports different methods for ID/APub: ID: YCbCr4:2:0 (2 2) APub: YCbCr4:4:4 (1 1) Comparing the PDF data in Acrobat it appears the different file size is caused by the image with 99% of the file size, which again seems to indicate different qualities / compression rates: I am not aware of such a low limit for single files, if their is any it is far above 2 MB. Possibly it is related to the number of posts you did in the forum. For certain file types (.e.g. JPG) it also may help to upload them as ZIP to prevent the forums / server software to do any changes (e.g. recompress, strip profiles).
-

force wordbreak (split for visibility)
MikeTO replied to lharby's topic in Affinity on Desktop Questions (macOS and Windows)
No Break and Justification cannot be used together - it will do exactly what you're seeing. You're asking Affinity not to break the text and keep it all on one line. Do not use No Break. You want to tell Affinity to break between any pair of characters and not add a hyphen which is something word processors and page layout apps don't normally do. There is a way to do this but it takes a bit of work. There are two ways to do this. First the hard way: add a Zero-Width Space (U+200B) between every character which will treat every character as its own word so Publisher will break anywhere. But adding that ZWS is tedious. I'm sure I could use grep find and replace to make this easy but that would require thinking harder, and I haven't had my second cup of tea. The easy way is to change the Justification settings. First, replace all the spaces between words with a Third Space (Text > Insert > Spaces and Tabs > Third Space). You could also use a quarter space or an en (half) space if you want less or more space. You can insert one of these spaces, copy it to the clipboard, and then use Find and Replace to search for regular spaces. If you paste the clipboard into the Replace field then you can replace the regular spaces with third spaces. Then go to Paragraph > Justification and change the first row of options from 80/100/133 to 0/0/0. Cheers -
Good afternoon, I have to go over the mask twice with a paintbrush to get it clear. With white back over the mask I have to go over it twice to undo it. everything is at 100%. The question; where do I need to change something to get this right. A.P. Version 2.4.2 on Windows 11 Thanks for the answer