Aammppaa
-
Posts
1,808 -
Joined
Everything posted by Aammppaa
-
 Data Merge is a feature of Affinity Publisher. https://affinity.serif.com/en-gb/tutorials/publisher/desktop/video/494072789/
 -
affinity designer Clown Triggerfish (stylised)
Aammppaa replied to NoLongerHere's topic in Share your work
So crisp and yet so grimy at the same time. Love it. -
You need to use the Contour Tool.
-
Contour tool needs improvement.
Aammppaa replied to Pixelplucker's topic in Feedback for Affinity Designer V1 on Desktop
Having to duplicate the original shape prior to adding a contour is a terrible workflow! What if I want 3 contours on my hexagon, equally spaced. And then the client asks for a pentagon instead. There are so many unnecessary steps in Affinity to make this change when compared to competing software. I came from Xara, where the change requires 1 click of the mouse wheel to change the underlying shape from 6 sides to 5, and all 3 contours immediately follow suite. -
Was frustrated again today by the lack of interaction between Power Duplicate and the Point Transform Tool. Please Serif look again at this. You have 2 useful tools that don't work together, and there isn't a good workaround.
-
@kalmdownI really think that The point transform tool is the solution you are looking for.

-
@kalmdownHave you looked at the point transform tool? https://affinity.help/designer/English.lproj/pages/Tools/tools_pointTransform.html
-
A bit more explanation...
-
It would be interesting to see the original AI generated image. That way the work and skill you put into the retouching would be apparent, and it might help others see what is possible with AI and human interaction?
-
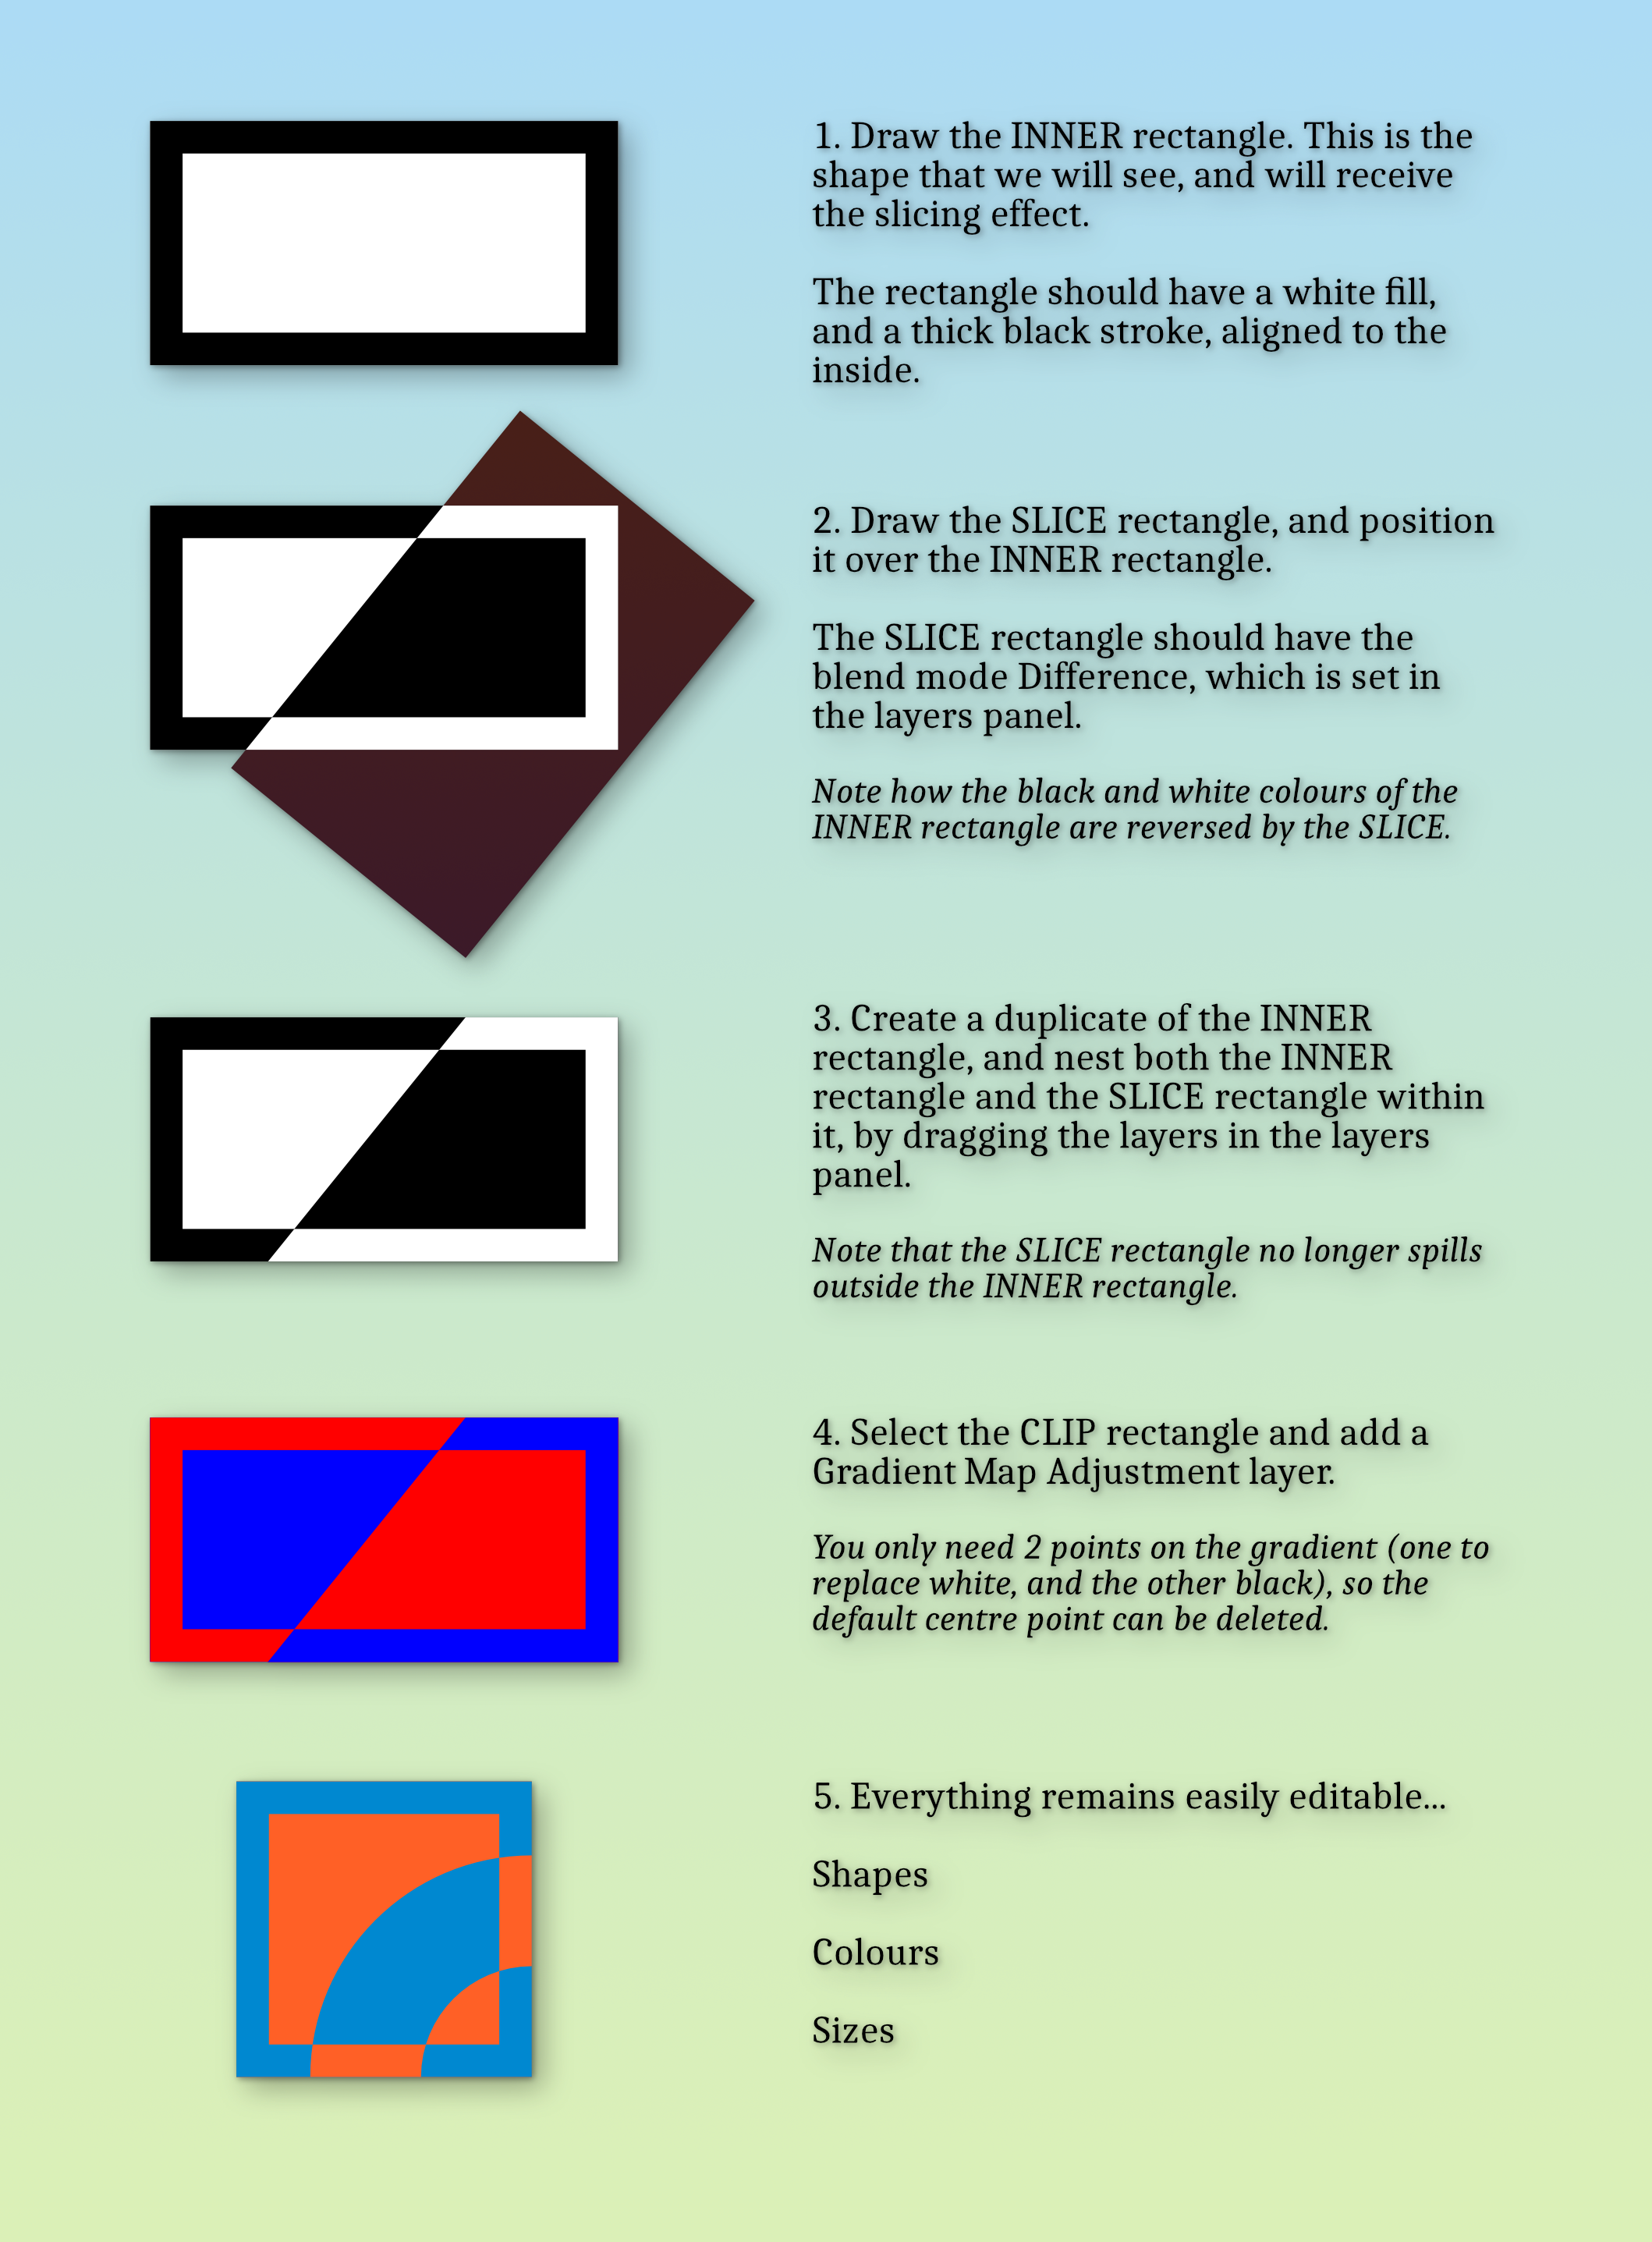
Here is a fun way... You will have to tear the various layers apart to see what is going on. The underlying geometry is a horizontal rectangle with a diagonal rectangle overlaid. The diagonal rectangle has the blend mode Negation, so inverts the black and white of the fill and stroke of the horizontal rectangle. These two rectangles are enclosed in a 3rd rectangle which clips the diagonal to the correct dimensions. Ensure that the inner horizontal rectangle has its stroke set to Inside, so that we can still see it. Finally a gradient map adjustment is used to colour the black and white geometry. The benefit of this approach is that everything remains easily editable... Want to change the stroke thickness? Just change the stroke of the Inner rectangle. Need to reposition the diagonal slice? Just move the diagonal SLICE rectangle. Different colours? Change the colours of the Gradient Map. And it all moves and resizes as a single object. Hope this helps! Diagonal Invertion by Gradient Map.afdesign
-
Separate FX to a layer
Aammppaa replied to a3creative's topic in Pre-V2 Archive of Desktop Questions (macOS and Windows)
It might help to understand why you want the fx to be separate, as there may be a different workflow that would achieve a similar result? -
Making vector look raster
Aammppaa replied to Sweatman's topic in Pre-V2 Archive of Desktop Questions (macOS and Windows)
The Designer persona, vector brushes can be rasterized, making them a pixel layer. You can then paint over them in Pixel persona, by checking Protect Alpha. It is not an ideal workflow as it is destructive, but might work for you? -
Realised I've never said thank you for sharing this palette. Has been my default swatch in Affinity for years. Just love it.
-
Folders for symbols
Aammppaa replied to Dimenta's topic in Feedback for Affinity Designer V1 on Desktop
Totally agree, and it seems such a simple thing to add since various other panels already have folder / list view / sorting functionality! Sadly this hasn't been acted on in the past 8 years... -
Here is a non-destructive method using a contour and a compound shape. 1. Draw rounded rectangle 2. Clone and add a contour of desired width 3. Draw 2 rectangles (as a + shape) to act as cutters 4. Create a compound object (hold Alt as you click the Boolean subtract)
-
multi My first exhibit with Affinity (mainly Designer and Photo)
Aammppaa replied to Bentox's topic in Share your work
Looks fantastic. -
Hi Tritus, welcome to the forum. There are quite a few modifier keys for working with nodes, so hopefully you can find a workflow that works for you. Hover over a node (with the node tool) and the status bar will show you what you can do. For creating node handles I usually just grab the line with the node tool and drag it. New handles are created and can then be tweaked accordingly. On Window the right mouse button is used as a modifier to change node to a smooth node. I don't find this the easiest operation as the left click right click has to be done pretty quickly. Not sure why Alt + Click couldn't toggle between Sharp and Smooth - but I digress! Also worth watching a tutorial or two about the pen and node tools. This one might be a good bet...
-
@Kevin Jacobs An offset tool (called the contour tool) was added to Designer in 1.9 and allows you to type an offset, or add an offset visually. https://affinity.help/designer/English.lproj/pages/CurvesShapes/contouringShapes.html
- 17 replies
-
- 3
-

-

-
- offset path
- affinity beginner tutorials
- (and 2 more)
-
I realize that I didn't answer your actual question! A use case for Divide: breaking an image into chunks so that it can be split apart like shattered glass. Use case for Add: would only make sense if the image had been clipped, so that adding would reveal more of the image.
-
Geometry operations on an image leave a resulting shape with a fill of None. This (sort of) makes sense as an image has a fill type of None. But if you convert to curves first, the image becomes a rectangle with a bitmap fill, and we get different behavior. Here the resulting shape has the bitmap fill but it jumps to a different size and position (which is often outside the shape, and so not visible. This is a bug! I have a memory of seeing this reported a couple of years back. IMHO it should not be necessary to convert to curves first - this is exactly the role that the Assistant should perform on our behalf as the intention is clear. This would be in line with other tasks that the assistant carries out. And of course the bug should be fixed!
-
affinity photo Helga the Conqueror
Aammppaa replied to Frozen Death Knight's topic in Share your work
Looks great! Far better than anything I could produce, but if I were to nitpick… There are a couple of tangents that irritate my eye: the foot aligning with the edge of the throne, the hand crashing the edge of the image. And the crack ending right at the hair. Still, inspiring stuff! -
Good catch - I can remove those two from my list! 😄
-
That's my entire point! None of these actions have an entry in keyboard shortcuts, so they can not be configured. Instead we have to search out tiny icons on the toolbar.
-
There are many missing keyboard shortcuts. I started keeping a list of things I'd like to access from the keyboard. - Toggle Transform Center - Toggle Lock Children - Hide selection while dragging - Transform objects separately - Lock aspect ratio (Transform panel) - Isolate layer - Make symbol - Toggle symbol sync - Merge curves - Separate curves Many of these are things I'd like to toggle while in the middle of an operation. For example, we have the 'hack' of holding the spacebar to hide selections. Wouldn't it be useful to hold the spacebar while dragging to hide the selection?