

Michael117
-
Posts
119 -
Joined
-
Last visited
Posts posted by Michael117
-
-
AF Pub v1.7.0.283
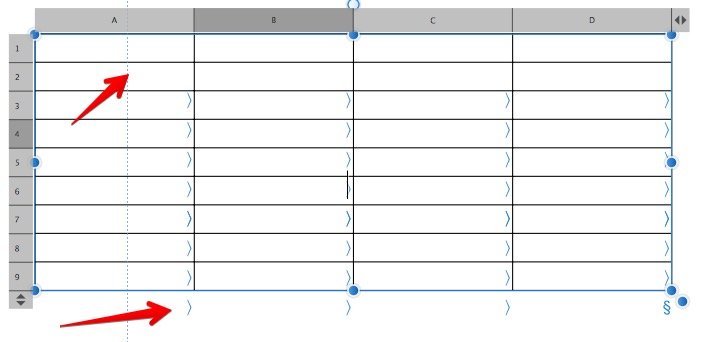
Mac OS X 10.13.6I'm trying to create a new table:
- Turn on Text>Show Special Characters
- Click the Table tool to insert a new table.
- Draw the Table on the page.
- The special characters for the cells of the table are not where they should be. See the screen capture below.
As you can see there are no special characters in the first two rows and a row of special characters shows up under the table. The Text Style box shows that there are two text styles applied to the table text: Text Box+REB-RuleEndOfBlock. The RuleEndOfBlock style is used to put a ruled line at the end of the section as a visual queue that the reader is at the end of that part.
Table Body + REB-RuleEndBlock + Align paragraph: Left; Align to baseline grid: On; Left indent: 1 in; Right indent: 0.1 in; First line indent: 1 in; Paragraph decorations: off
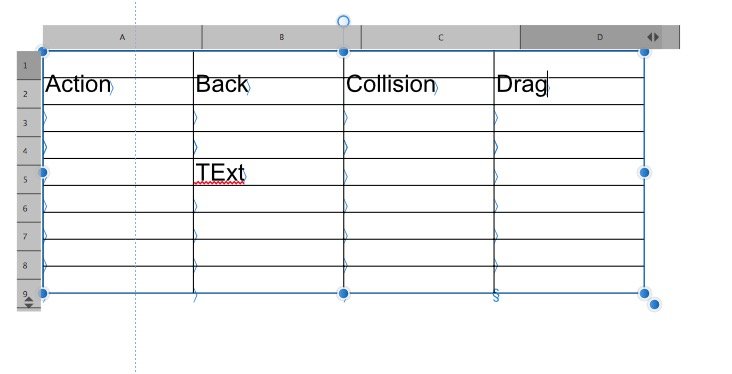
I detached the table paragraphs from the text styles, then reapplied the Table Body text style. When I applied the Body text style to the text paragraph above the table, the table text style changes to become Table Body + Body. The text style now shows:
Table Body + Font size: 11.3 pt; Default tab stops: 0.944 in; TabStop: 0.944 in; TabStop: 1.889 in; TabStop: 2.833 in; TabStop: 3.777 in; TabStop: 4.722 in; TabStop: Right 5.666 in
The second image is what I see when I try to enter text in Row 1. Also note that the column letter cells are not lining up with the body columns.
Even if I detach the text styles, the text is misaligned with the table.
I attached the sample file that I'm working on.

-
@Eugene Tyson Have you checked out the latest beta version of AF Pub? The table controls have a way to easily add and remove rows and columns. Instead of the box at the end of the column letters and at the bottom of the row numbers, there are a set of up and down arrows that allows you to add or remove the columns and rows. This makes it a ton easier to create the tables. Coming soon (I think) are the anchors that allow you to position a table with a piece of text and the table will flow with the text it's anchored to.
-
4 hours ago, Uba said:
- Is there a way to automatically add linked text frames and new pages when placing a long text document rather than manually adding a frame/page at a time? This would be very useful for book and magazine work in particular.
Great write up with lots of good suggestions. The one item above is possible currently. To automatically create linked text frames hold down the Alt/option key when clicking on the flow icon on the right of the text frame.
-
5 hours ago, Rick G said:
I'm not seeing those icons on the betas here ... (?)
I think you missed the version number: 1.7.0.284,5--meaning, he made it himself.
-
7 minutes ago, Jon P said:
Hi,
Can both of you try the recent beta here and see if it has resolved either of your issues?
@Michael117, I've followed your steps and it didn't result in a crash here, if the new beta still has this behaviour for you I'll look into it, but a video of the steps you are taking could be useful to maybe double check i'm not missing a step you are taking.
@thetasig, If the file still crashes in the latest beta can you upload it here and i'll take a look.
Thanks!
I'm not seeing it happen in the 270 version.
-
2 hours ago, Old Bruce said:
You might get a byte for every dozen or so bits you have lying about.
When I first got started in IT, my job was to empty the bit bucket out in the computer room. First thing in the morning and last thing at night, schleping out to the computer room and emptying that dang bit bucket.
-
20 minutes ago, Wickedly clever fantasy said:
Not sure what i did but i got it working by deleting all paragraph styles and character styles and started over again. Still not sure exactly what went wrong but as WASP said there is a flaw in the system somewhere that affinity needs to look at as he was able to duplicate the problem, but not sure if affinity even reads these forums.
Jim
The Affinity team do read these forums and respond as needed. If this is a repeatable bug, someone may move this over to the Bug forum. You may want to include the version of AF Pub Beta you are using along with the OS Version that you are running on your computer. There is a forum for Windows bugs and one for Mac bugs. And I would second Walt's recommendation that you include a sample document that shows the problem you were having.
-
-
@Christophe There is a pinned item on the first page of this forum asking for the ability to import docx files.
-
I used AF Pub to make my wife's Doctoral research poster. It's a single page 36 inches by 48 inches and it had imported graphics and photos along with a couple of tables. The PDF I generated was used to print the poster on a vinyl sheet and everything worked perfectly. I did mirror everything in Scribus as a backup in case I ran into problems with AF Pub (I don't have ID or Quark). There was only one odd thing that happened in the whole process: at the FedexKinko's where I had the poster printed, the software they use to import the PDF seemed to have an issue displaying the PDF in a thumbnail view. It came up blank but printed perfectly.
The template that the University gave her for the poster was set up on a page that was 13.25 inches by 7.5 inches. I'm still scratching my head on those dimensions. I started out on that format but decided to scale it up to the finished 36 by 48. The scaling worked perfectly, resizing the fonts and images. The only downside was that the text styles were still based on the smaller format. I had to go in and reset the styles to the new font sizes and spacing. Fortunately, I only had a few paragraph and character definitions.
I can see how this is going to be a really great package of applications once all of the apps are up to the 1.7 baseline. Well done, Affinity team!
-
I like these ideas. One Use Case I've been thinking about using this application for is to build Wedding and Special Event Photo Albums. There are lots of tools out there to build those books, but with the integration of Photo and Designer, this one would totally crush the competition. Adding in all the images to be used in the album and then using the resource manager to manage that those images have been used would be a great way to manage that project.
-
I think the name needs to have some pep, some movement, some je ne sais quoi! How about Affinity Enpagerizer. It's 98% faster at enpagerizing than the competition. No enpagerizer is like it on the market. It not only enpagerizes, but it slices and dices and makes mounds and mounds of Julienne fries! Act now and you will receive a free sham-wow towel to go with your purchase. Not sold in stores.
- AdamW, angelhdz12, Dazmondo77 and 1 other
-
 1
1
-
 3
3
-
On 3/13/2019 at 11:36 AM, AdamW said:
Hi TooOldForThis,
Thanks for your post. We're aware that the way masters are currently managed when adding and inserting single pages in facing page documents isn't ideal for every scenario. We're investigating possibilities, probably to offer user options, as to how masters should be re-assigned (or not) in theses cases.
@AdamW Can you explain the Use Case your team was using for the development of this set of features? I'm not sure I understand where they were coming from for how this works.
-
@dmont76 have you looked at the File>Document Setup dialog? You can set up your document to have facing pages. When you print the document, you set the output to be 2-sided and you get your front and back images. Most books, and I'm assuming Comic Books are like this too, are oriented in a portrait format with the first page of the document starting on a right hand page, with an odd page number, like 1. You'll see terminology like Odd Pages and Even Pages. You can then set up the page layouts for the two types of pages.
The image below is from the Pages studio in AF Pub. View>Studio>Pages
Hope this helps.
-
I would like to request that a new field be added to capture the Section or Chapter number. When building Figure and Table captions, our standard is to combine the Chapter number with the sequential item number.
Examples:
Figure 2.1 The Workflow Process
Table 4.5 Parts and Function of the Spread Dialog.
-
@Papatez Thanks for bringing this up. This was driving me crazy the other day. When you have a facing page layout, the spread controls list an inner and outer margin, That makes perfect sense. I have Master page layouts for a First page, Left-hand pages, and Right-hand pages where the inner margin is wider than the outer margin. At first, the pages are laid out correctly. Then I inserted a new Left-Hand page and it kept the Righ-Hand page layout.
@GabrielM--The problem I have with that expected behavior is that it doesn't make sense that the application would pick a layout that is not equal to the side of the document the page is being added to. When I added a Right-hand page, the margins were placed where they should be. The spread controls already have the layout for the Left and Right pages, shouldn't it automatically pick the correct one in the Spread? Personally, I think this is a bug and not a new feature.
-
I agree with you both. The "A" shape of the 1.6 icons and the interior design both let you see at a glance what those applications are for. I just don't get what the Publisher icon is trying to represent. I don't see sheets of paper in the icon and with the square design it's a little harder to see the "A". The other thing that bothers me a bit is the color. Both Designer and Photo's icons have colors that pop. I'm not a Marketing person, so I can only speak for my personal perspective but I'm not a fan of the new iconography. instead of straight lines, I think it would look more representative if the lines were curled, like when you are flipping through the pages of a book or magazine.
-
Hi, Luis,
First off, can you tell me a little more why you are starting on the left page and what you are trying to accomplish? The Document Setup dialog controls the overall document settings. There is another dialog that you use to control the spreads, the pages in the document. The third item you need to do is to apply the master pages to the pages in the document. Right click on the page in the Pages section of the Pages studio and then select Apply Master... to use the Master page layout on the body page.
Hope this helps.
-
1 hour ago, mahoye said:
I hear you. I'm the same. I even have more trouble seeing the cursor for the margin sometimes. I looked all over the preferences and couldn't find any way to adjust the width of it.
Someone gave me a way to change the size of the font for the Text Styles. On the hamburger (3 horizontal lines) next to the Text Styles tab, you can turn off the See Samples option and the font on the text styles resets to the base font. And for your cursor comment, it's even harder to see in table cells.
-
13 hours ago, Wosven said:
If you disable in the hamburger menu "show samples" (or something similar between "show hierarchy" and "sort by type", my version is in French), since you named your styles as "line above", "Line to Left", it should be large enough to read the styles' names and know what they are.
That solved it. Thanks!!
-
I'm old, so those teeny tiny special characters are hard to see. I also put in a request for making the Text Styles entries larger. For some reason, they end up very small on my monitor and I almost have to use a magnifying glass to see them.
-
11 hours ago, Old Bruce said:
Do I understand that you are putting the ToC in the text frame(s) with all the copy instead of a separate text frame on Page 1? I think that is the problem.
You are correct. I had been trying to create a TOC within the same text flow as the text. I don't have ID to know if that is possible there, but I know that both Pages and Word allows you to generate a TOC in the same text flow as the text you are working in. Also, AF Pub should handle that situation more gracefully than just crashing.
-
I'm trying to create a Table of Contents for my document (see attached document).
Steps to recreate:
- Generate some text.
- Go to the first page, and create a space to insert the TOC. I used a page break to push the first H1-Heading 1 paragraph to Page 2.
- From the Text menu, select Table of Contents > Insert Table of Contents
- Select Text Flow from the Look in: option.
- Clear the checkmark in front of H2-Heading2
- Select Chapter Title
- Select H1-Heading1
- Application crashes.
Attached: Crash log file and sample document that I was working on.
-
Is what you are asking for different than the tabs control on the paragraph style dialog? I set the default tab stop to 1 inch, then clicked on the + (plus sign) button under the Apply box to get tabs set at 1-inch increments. I did have to click the plus sign 6 times, but that didn't take that long to do.


GUIDES
in Feedback for Affinity Publisher V1 on Desktop
Posted
You can also use the guides manager to put them precisely where you want them. Having said that @walt.farrell, it would really be helpful if you could see the the Guide in the ruler as you are moving it. I think this might be an enhancement, or really a bug, but when you are moving the cursor around on the document, you get a line in the rulers showing where the cursor is, but once you click on the guide, the line goes away. I'm running version .283 on Mac 10.13.6. Looks like the problem only occurs for the vertical guides.
@Ernesto José Here's a screen capture of the guides manager showing how you can set the precise spot where you want the guide.