Search the Community
Showing results for tags 'effect'.
-
 Hy everybody, I'm struggling with a common effect I cannot reproduce in AD up to know (I'm new to AD and didn't find a possibility). Often I have to use some kind of glitter that is scalable -> it has to be vector and (this would be best) a style or whatever so that I can just apply it to other objects. Here is a tutorial I found for Adobe Illustrator - how can we realise exactly this effect in AD? https://design.tutsplus.com/tutorials/how-to-create-a-vector-glitter-text-art-effect--vector-6133 Thank you so much in advance for your help! Best, Foxi
-
 Hi! I'm here for the first time! I admire the work on the program and keep my fingers crossed for further development I would like to ask if there is an option in the program or any plugin that would allow me to make a "jitter" effect? Something like shaking in animation. Currently, I draw two pictures and then place them in a video editing program next to each other to get that effect. However, the process of drawing twice the same image is time-consuming. If there was a possibility of moving lines/making jittery/wiggly in in the finished picture, it would speed up my work at least twice #1 Edit: Oh,I am using Windows 10 It's more or less the effect I'd like to get:
 -
 Hi there! I'm astonished with Affinity Designer for ipad! I'm almost completely transitioned from my PC to iPad, just need a few more options. Suggestion #1: Select BY SAME FILL COLOR This is very important for professional work :) For example, if a group of objects (or shapes) are overlapping, what we need to do is to select them all, and divide them. After they are divided, we need to click on "Add" to merge the shapes together, and that's fine. But if we have a LARGE number of SMALL shapes, merging one by one can take forever.So, option "Select by (the same) Color" is very important and time saving for us designers. How I think it should be done: Solution 1. Click and hold the color (from toolbox) with pencil, or with finger, and while holding it select (with your left hand) three dots icon "..." and then choose "Select all" Solution 2. Add a new icon named "Select Same Color", or similar. Suggestion #2: SHAPE EFFECTS For me, as a Vintage illustrations and Logo designs fan, I would like to have a ARC LOWER, ARC UPPER, AND (possible) ARC tools. For example: Netflix logo. How I think it should be done: 1. After typing "Netflix" for example, convert curves, and than click on new icon set named "shape effects", than click on "Lower arc", or "Upper Arc". OK, that's for now, If I missed these options, if they already exist in same/similar form, please let me know.
 -
 In this short tutorial of a user request, I'll show you how to create an incision/ cut info graphic in Affinity Designer 1.6.1 and how to use it in Affinity Photo 1.6.7 as an image brush or as a vector graphic with the place function. Keep on drawin' Norbert
-
.thumb.jpg.dabc15530a2a67d371244c9bef26f8da.jpg) I'm trying to make some sporty text logo and was wondering how best to do the warp effect where the top is straight but the lower edge/baseline of the text is curved. In illustrator you go to Effects > Warp > Arc lower, but was wondering if Designer has something like this?
I'm trying to make some sporty text logo and was wondering how best to do the warp effect where the top is straight but the lower edge/baseline of the text is curved. In illustrator you go to Effects > Warp > Arc lower, but was wondering if Designer has something like this? -
Hi guys, Are there any plans on updating Affinity with a feather effect for vector objects? That would really be awesome for PSD output, if we use gaussian blur it simply rasterizes the shape, and that's a no no Thank you for a great product, Chris
-
 Hi! Please, help me figure out how to add little noise on the objects edges in AD, like would do Spatter effect in PS? I wish it can be done non-destructively with vector objects, without brush strokes outline, because I need lots of objects clipping and sometimes gradient fills.
-
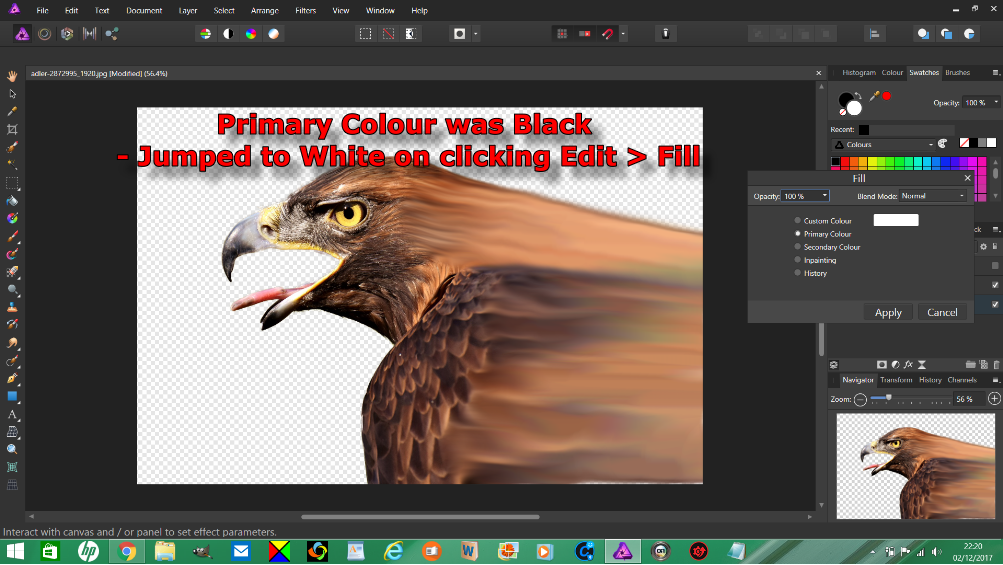
 Affinity Photo Workbook arrived in good condition Beautifully designed and produced. The disappearing blues lines are a bit of a niggle when trying follow where they go. The lessons are good and pretty easy to follow but naturally there is heck of a lot to remember. So repeating the lessons is essential for me. This not for dummies. I am having problems with the Disintegrate Effect (Page 398 to 399). On Page 396, Paragraph 2, the instructions read: 'On the Layers Panel select the Smudge layer, click Mask Layer and then chose Edit > Fill. As we've set the Primary colour in the Swatches Panel already, ensure Primary Colour is enabled to fill with black; this hides the entire layer for now but we'll paint it back later. Click Apply.' I follow all instructions faithfully but on selecting Edit Menu > Fill, the primary colour Black switches to White of its own accord. I have repeated the lesson numerous times and always get the same result. Am I a dummy or are others experiencing the same problem? Any help would be appreciated.
-
 Hi I have been experiencing something that I am not quite sure why it is the case. When I have a layer selected and when I want to make an adjustment/change say brighten it, the entire image changes instead of just the layer. How do I do this so only the layer itself changes? If I have a png layer image that has opacity on some areas if I make changes on that image shouldn't it change that image only? Thanks in advance!
 -
 Hi, id like to ask if is possible to have in Affinity Designer a effect similar to Ai Zig Zag? Maybe with custom brushes, effects or some kind of trick, maybe? Is that even possible? Thanks
-
Dear Affinity Photo users! I'm glad to announce that Filter Forge 7.0 is released. It supports Affinity Photo 1.5, and will support AP 1.6 as soon as Serif officially releases the update. All the new features with descriptions are here https://www.filterforge.com/features/ but I'll list them here as well. For all the users: 1. We've made Filter Forge faster by improving sample caching. 2. Copy and paste images between Filter Forge and any graphic editor. So it means you can use Filter Forge with AP 1.6 even before the update is released. 3. Generate and preview all active channels during rendering and export all of them to files at once. For filter authors: 1. Instant component search will help you to find and add any component faster and easier. 2. We refreshed 47 existing components, made their list and slider inputs mappable. Now there's even less boundaries for your creativity. Try all these new features https://www.filterforge.com/download/ and let us know what you think.
- 19 replies
-
- 1
-

-
- plugin
- filterforge
- (and 2 more)
-
Hello all, I did this halloween graphic to practice working with affinity. I am getting the hang of using a masking layer and creating effects with brushes
-
I've been wanting to do a color double exposure for a while but all of the tutorials are for photoshop and the steps don't translate to Affinity Photo. Can anyone explain this to me? here is one of the videos I've seen. https://photoshoptrainingchannel.com/color-double-exposure/
-
 Some editors has a nice feature that uses mouse cursor detection. It allows user to move mouse above the image while adjusting the effect (like curves, HSL etc) and mouse On or Off will flip between "Before" and "After". Having a this feature, it would be nice to be able to have a mouse cursor above the adjustment dialog (like HSL) for adjusting and the preview would be shown like now. But when you would move mouse away from dialog to top of the image then it would turn to "before". So you could quickly move mouse above dialog and image to see it switching between to help evaluate the adjustment change.
 -
Current tools for new live layers or effects has a buttons on top right for "Merge", "Delete" and "Reset" But to toggle between adjustment I need to move mouse to layer list and then toggle there the eye. So could that eye to be linked next to "Reset" so the effect can be quickly toggled On/Off with mouse without aiming small box on layer list, and then if not happy, reset it or delete it (as it i between delete and reset)? Edit: Need to add that the "Delete" is so great in that dialog as you might very well notice that the adjustment has no wanted outcome so it is easy just to "reverse" the whole idea by deleting it, without applying it first and then going to list to get it deleted. That "Delete" is a function that makes it so pleasant to use the effects as it is just under mouse cursor. So having a capability to flip it On/Off from same dialog window would IMHO be a big benefit to compare a effect before and after. See as well this idea: https://forum.affinity.serif.com/index.php?/topic/39855-live-effect-preview-beforeafter-with-a-mouse-hover/ That would be more difficult with a touch screens and pens, why a button to "before/after" would be nice.
-
hey guys I recently was using Adobe illustrator and I was using the specific tool in it such as effect menu but when I started using affinity I notice that there is no effect panel like illustrator, for instance, to make zig zag effect or wrap extra
- 1 reply
-
- 1
-
-
- illustrator
- effect
- (and 3 more)
-
 Based in a topic here at the forum I made this tutorial to cover how to create a glow effect in letters. ;) https://www.youtube.com/watch?v=ejB93TiS4mU The language in the video is portuguese with english subtitles. Hope you enjoy the video, Pedro
-
- 3
-
-
- affinity photo
- glow
- (and 5 more)
-

[ADe] Contour setting for effects
fernandolins86 posted a topic in Older Feedback & Suggestion Posts
I've been trying to recreate some older work in AD but I'm deeply missing the Contour setting for shadows and glows. I couldn't find anything similar reading the Help topics. This would be analog to the Photoshop feature where you can specify a graph for how the intensity of the effect changes over its spread. This is a picture from an old PS version just to illustrate the setting.
-
 I use the gradient overlay effect quite effectively, but often it stops working after three or more edits in the gradient colors. I can continue to bring up the effect dialogue window but clicking on the Gradient color box no longer brings up the dialogue box that lets one edit the two or more gradient colors, etc. I must quit AD and bring it up again. It then works for a few edits (sometimes up to 7 edits but often 2 or 3) but then I no longer get any response by clicking the Gradient color box. I remain on the correct layer while doing this, the gradient effect is chosen. The main Gradient Overlay effect dialogue window always appears but I cannot go further into editing colors or other gradient settings. Is this a bug or is it soaking up too much memory?
 -
 I want to create the effect bellow with Affinity designer: In Adobe Illustrator i just go to effects-arc-bulge. Is there a corresponding way to do this in Affinity?
 -
I have swapped to Affinity from AI because of the one time flat fee, and I love it. It was so easy to pick up to learn, but I still feel there are some features missing. One thing I would like to see added ASAP is an effects dropdown (in the menu with file, edit, AND WHERE THERE SHOULD BE OBJECTS, etc.) Relating to effects, I would also like to see an Appearance panel added.
-
First let me say, I love Affinity Designer so far and am very excited to have a quick, responsive, reasonably priced vector graphics tool available for Mac & Windows. I am currently using the Windows Public Beta and it is already the central tool in my design toolchain. There is one feature I use all the time in Inkscape and pretty much the only thing I find myself leaving Affinity Designer to accomplish, at least in my all-vector work. The ability to take an arbitrary path or set of paths and arrange them along another path. Below are some visual aids from the inkscape manual showing some of the possible uses of this effect: See the manual entry here. And if you want to try it for yourselves, the menu option in Inkscape is as follows: Extensions -> Generate from Path -> Pattern Along Path I would love to see this functionality inside Affinity Designer, and I think many many creative professionals either already rely on this or don't know about it :ph34r: Thanks again for all your hard work. I am (well, have been) a UI/UX designer and find what you guys have accomplished so far to be spot on. I don't think the way Inkscape presents this dialog is as intuitive as it could be, so if you guys decide to pursue this feature, keep that in mind. I like what you've done so far so I won't bias you with my input, but if y'all want any suggestions for how I would work this into the current Affinity Designer interface, I'd be happy to help.
-
 Hi! When I increase intensity in layer effects such as outer glow and outer shadow, especially more than 90%, color softness decreases and colors in borders become jagged and stepped; and It occurs in both pixel and curve layers! Versions tested: 1.5.0.23 beta, 1.0.5.26 beta
-
 Hello - I need some help I attached some photo's to better explain the problem I am having. I am printing a Art Board with my finished work - it looks just fine on screen - but when I print it, the finished result is very different. One problem is text is much larger then what is seen on Art Board. The Text has a Bevel/Emboss Effect, but when printed it's all strange and cut off. Under the text is a shadow which was done by copy/paste/flip and then converted into curves to align, grouped and then given a Linear Gradient Fill. The image of the car was given the same Bevel/Emboss Effect and the shadow is the same as the Text. I've never had a problem when I print - this is the first time since the latest update. Am I doing something wrong? Any help would be greatly appreciated. Thanks
 -
Hi, I was missing an obvious option to remove a layer fx, for example by: 1. context menu (RMB) 2. an entry in menu layers (plus shortcut) 3. via drag 'n drop (like in Adobe Phoooooop) Up to now, I had seen me forced to click on the fx icon and then deselect all used fx (in worst case all 10) to get rid of the fx. Together with all the mouse movements too much clicks and precise mouse work. WORKAROUND (I just found today): w1. CMD+C on an element with no layer fx (and no style) w2. CTRL+CMD+V to paste the fx So now this feature request can be seen as low-prio/cosmetic :) Keep continue working on this great piece of software, Stefan. see also: https://forum.affinity.serif.com/index.php?/topic/24663-toggle-layer-fx-onoff/