Search the Community
Showing results for tags 'Layer'.
-
 Hi guys Please watch the 1 minute video. What am I doing wrong? I have no clue. Please aware this is a Group in a Group. Switching Passthrough to Normal also has no effect. All replies appreciated. Video: Grouped Adjustment Layers having no effect
 -
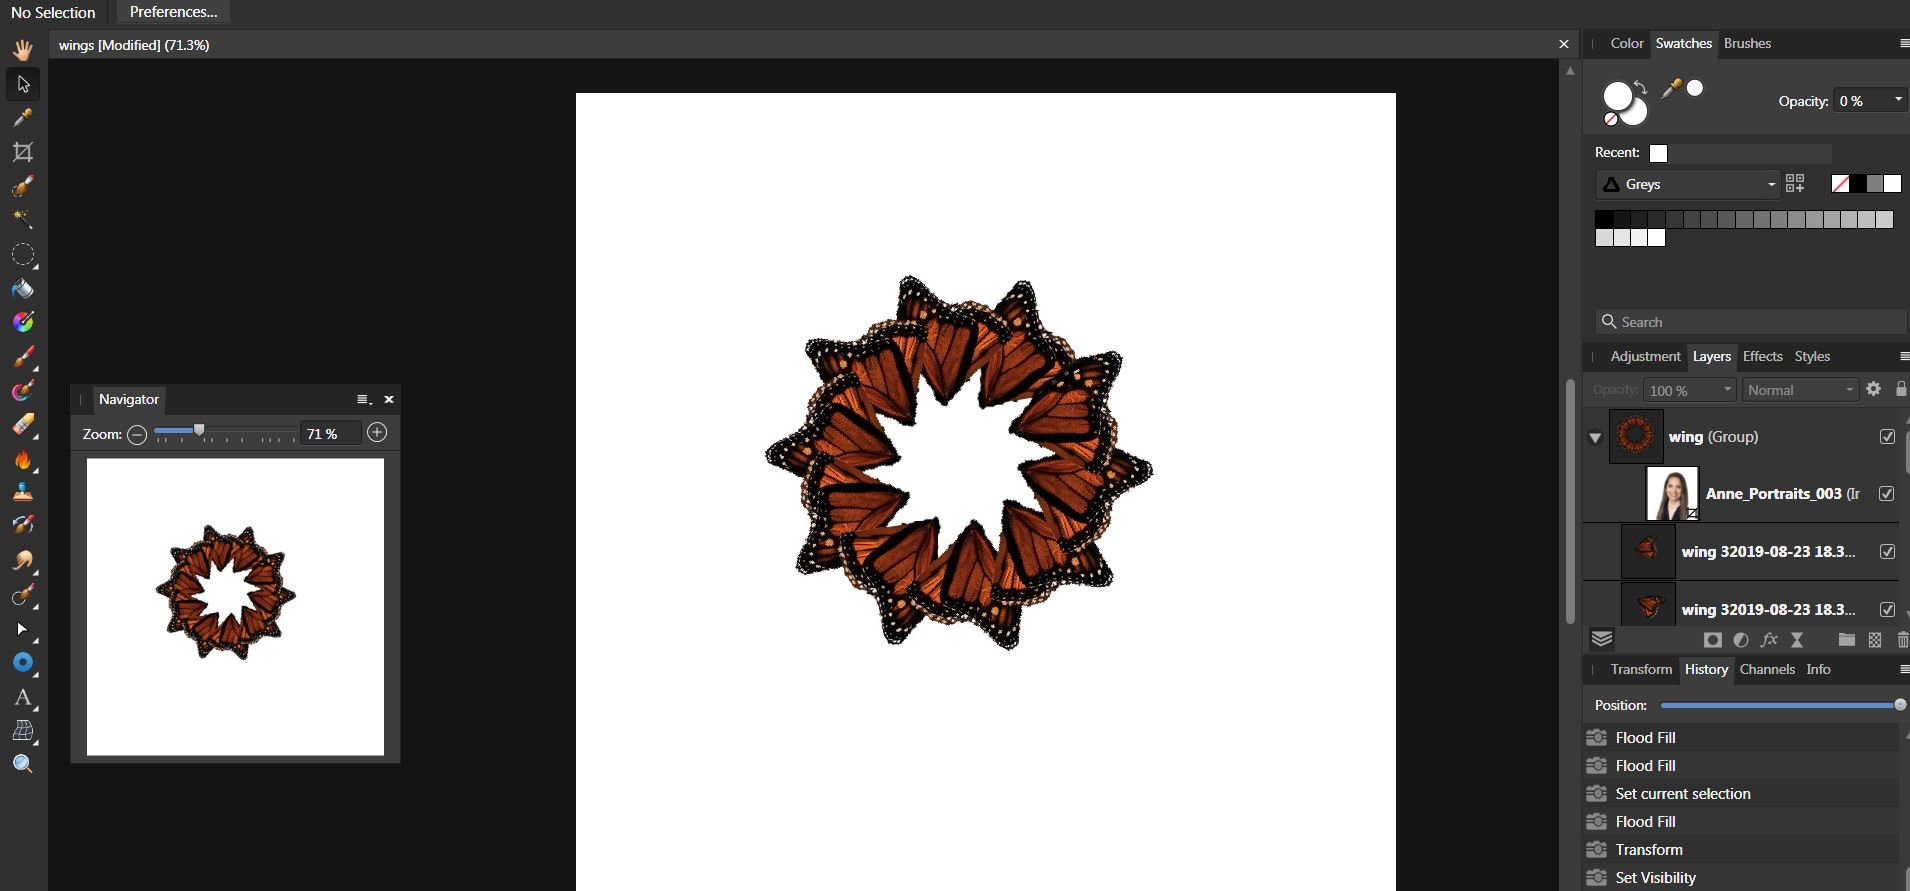
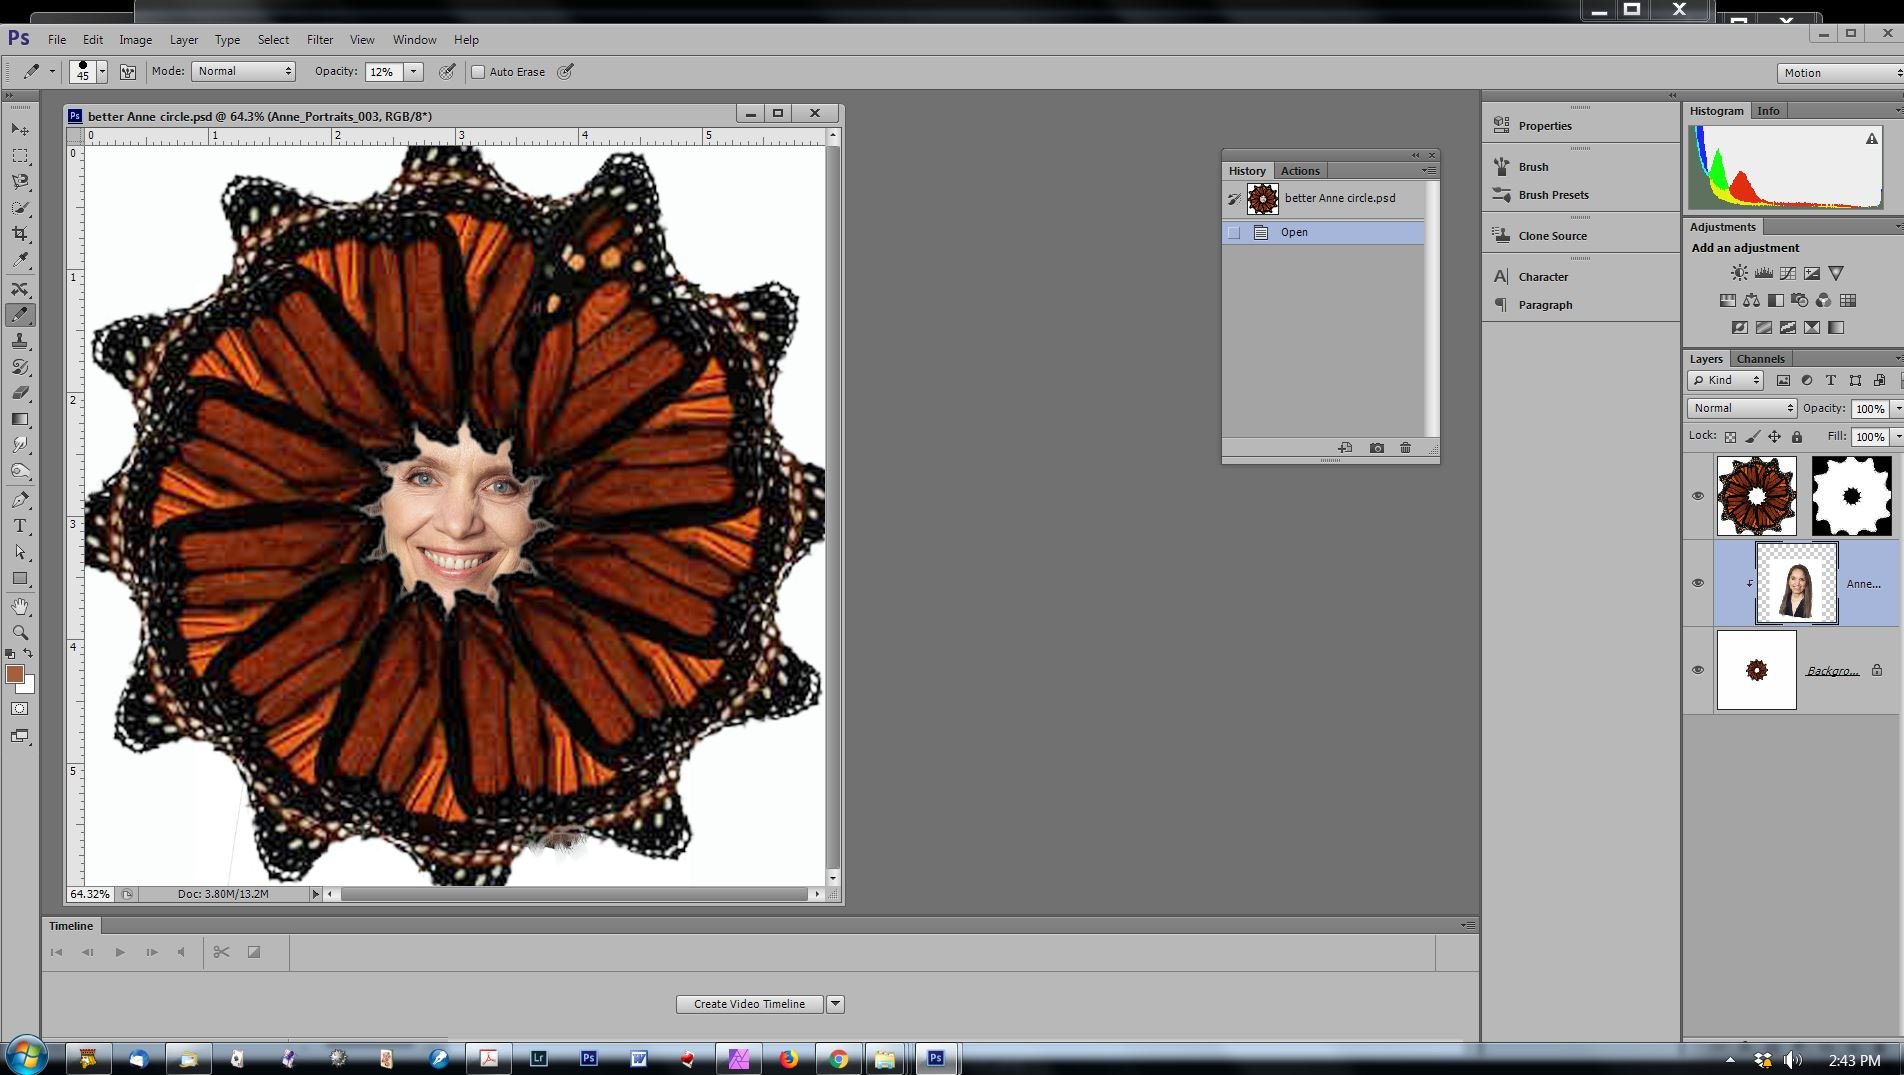
 I have used clipping mask function in past but I up-dated to v. 1.7.3.479 and now the clipped image is not visible. If I place it on the layer below--hanging out from behind--I see the image but as soon as I clip it, it vanishes. I repeated a butterfly wing around a circle and in the hole in the center, I want to clip a face (I tried it in PS CS 6 and it worked. The portrait was a smart object and I rasterized it. ) The portrait is of my daughter and is copyrighted to my grandson Will Ross. I drag the portrait icon up to the wings group icon and get the blue line and it is inset as a child layer.
-
 Hello! I'm new to Affinity Photo and am surprised with the following: If I group two adjustment layers and associate a mask layer with that group, it seems that the mask layer will be affecting the underlying pixel layer rather than the group of adjustment layers. See A.png. It works as I expected if I associate the mask layer only with one adjustment layer. See B.png. I'd like to have a mask layer affecting the group of adjustment layers. What am I doing wrong? Thanks!
-
I have installed the new 1.7.2. and have opened the last file working on..... did see only grey place until I have unchecked all layers with MASKs! Mask totally do not work! Please how can I quickly return to previous version, this is a TOTAL SHOW STOPPER! Thanks Jindra
-
 When processing a 114 mb 16 bit tif file, in Affinity Photo, after various adjustment layers are made and then flattened, the file is exported as an 8 bit tif file with the size of 57 mb as you would expect. However when the crop tool is used to reposition the image to cut the bottom part of the image and leave a blank area at the top of the image for later filling in using the clone tool, the size of the exported 8 bit tif is 76.2 mb. The dimensions of the image is correct, just the file size is 'wrong'. The crop parameters are exactly the same dimensions as the original. Before exporting I have added other adjustment layers and then flattened the image, but whether I do this or not, the output size is still 76.2 mb. If I open this exported 8 bit file in Photoshop it shows as 'Layer 0' and if I then flatten it in Photoshop it then saves as a 57 mb file. The only conclusion I can draw from this is that Affinity Photo is creating an invisible layer when the crop tool is used in this way and this layer cannot be flattened within Affinity itself. I have used this technique now on a few images, each with different amounts of crop used and the output file is always the same - 76.2 mb.
 -
In AD after duplicating a layer, how do i flip it? I was following a tutorial for the pen tool but they use AD for the pc but in the iPad version I don’t know where i go to flip my duplicated layer. Thx
-
Hello, I have noticed a problem in Affinity Designer where layers will suddenly have a 1-2 pixel border that shares a color with the next lower layer. It almost looks like aliasing in a raster layer, however I am seeing this problem with vector layers. The "border" is not a real border that would be added with the border menu (I have that set to no border), and it changes thickness when zooming. It is most apparent when zooming out. This occurred for me after some extensive use of the color picker tool. Details: Are you using the latest release version? Yes, according to the pinned forum post that tells how to check. 1.7.1.404. Can you reproduce it? This happens occasionally, seemingly only if I work on projects for a long time and change the colors frequently. When this happened I was using the Color Picker Tool for trial-and-error color testing, and when I finally found colors that I deemed satisfactory, this problem started. It almost looks like aliasing, but this is a vector project. It should be visible in the project I attached. The screenshots give an idea of what to look for. Does it happen for a new document? If not do you have a document you can share that shows the problem? This happens seemingly at random. I haven't noticed a pattern yet. If I copy and paste affected layers into a new document, sometimes the problem carries over, and sometimes it does not. The document setup seems to make no difference. I included an example project file that on my computer definitely has the issue, as well as screenshots. My usual non-print document settings (including for this one) are 72 DPI and RGB-8. If I start a completely unrelated project, the problem does not occur. What is your operating system and version? Windows 10 Version 17763.615 GPU is an AMD Radeon Vega FE. CPU is an AMD Ryzen 1700x. Monitor is an HP Pavilion 22cwa. 16GB RAM. What happened for you (and what you expected to happen) Small 1-2 pixel borders appeared around layers that reflect the colors of the layers underneath. These borders grow thicker as you zoom out, and thinner as you zoom in, but they are always there. Normally, this would not happen, and shapes that have the same color will look like they are one piece, and shapes that are different colors will not have traces of each other. I am certain that for the black shape in the example project, the shapes meet exactly. I made them simply by copying layers and deleting unrelated nodes. For the tan layers in the example project, the colors are identical. They should look as if they are one piece. Provide a recipe for creating the problem (step-by-step what you did). I was just using the color picker tool somewhat frequently to try out different color combinations on different layers. After a while this problem appeared and could not be reverted. None of the layers are supposed to have borders of any kind. The border option is set to none. Any unusual hardware (like tablets or external monitors or drives that may affect things) or relevant other applications like font managers or display managers. No, but I listed my GPU and CPU above just in case. This is a desktop PC (not a laptop). Did this same thing used to work and if so have you changed anything recently? I have experienced this issue before seemingly at random on earlier releases of Windows 10. I've been using Affinity Designer since January. Nothing about my PC has changed, software or hardware, for at least a few weeks. I have seen threads about a similar issue in Affinity Photo (not Designer), however it seems as though the problem could not be reproduced. Hopefully my attachments will help. Older threads of a very similar-looking issue in Affinity Photo: https://forum.affinity.serif.com/index.php?/topic/83340-all-images-get-a-visible-border-when-at-certain-zoom-levels/ https://forum.affinity.serif.com/index.php?/topic/87790-all-images-get-a-transparent-border/ ProblemExample.afdesign
-
 A colleague and I were creating some tutorials for our end users when he went to a layer in Photo, right-clicked on it and chose Delete. We then noticed that there was no UNDO under the Edit menu for that operation. The History tooltab was also blank suddenly. He then went to recreate the layer and suddenly the history reappeared and he was able to undo and get the layer back. We tried to recreate the scenario but could not. I'm certain it was a glitch but just wanted to make it aware to all.
 -
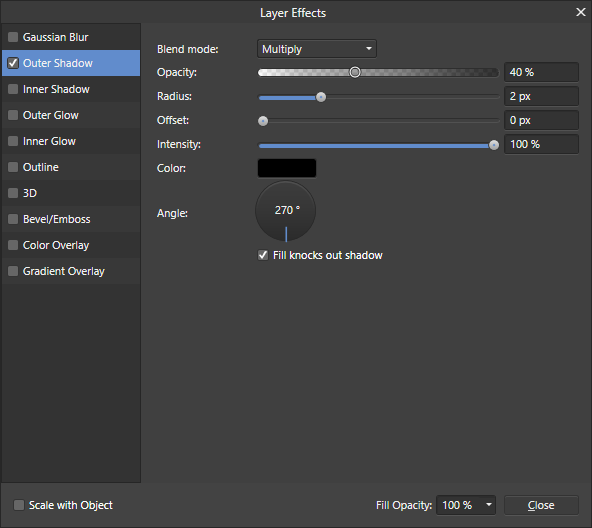
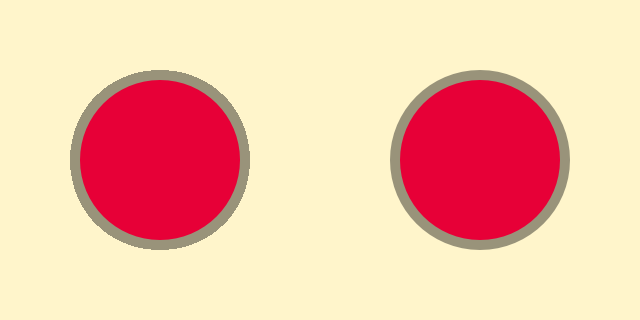
Affinity Designer 1.7.1.404 on Windows 10 64-bit The left circle has 2 px radius Outer Shadow. The right circle has a second circle mimicking the Outer Shadow. I get very different results. Here's the details of the Outer Shadow Here's the whole document, zoom 5 times. You can see then dimensions are the same. But depending on the export dimension (or even the zoom level in Affinity Designer), I get wildly different results. 2x: 0.5x: 1x: Here's the example file: Layer Effects.afdesign
-
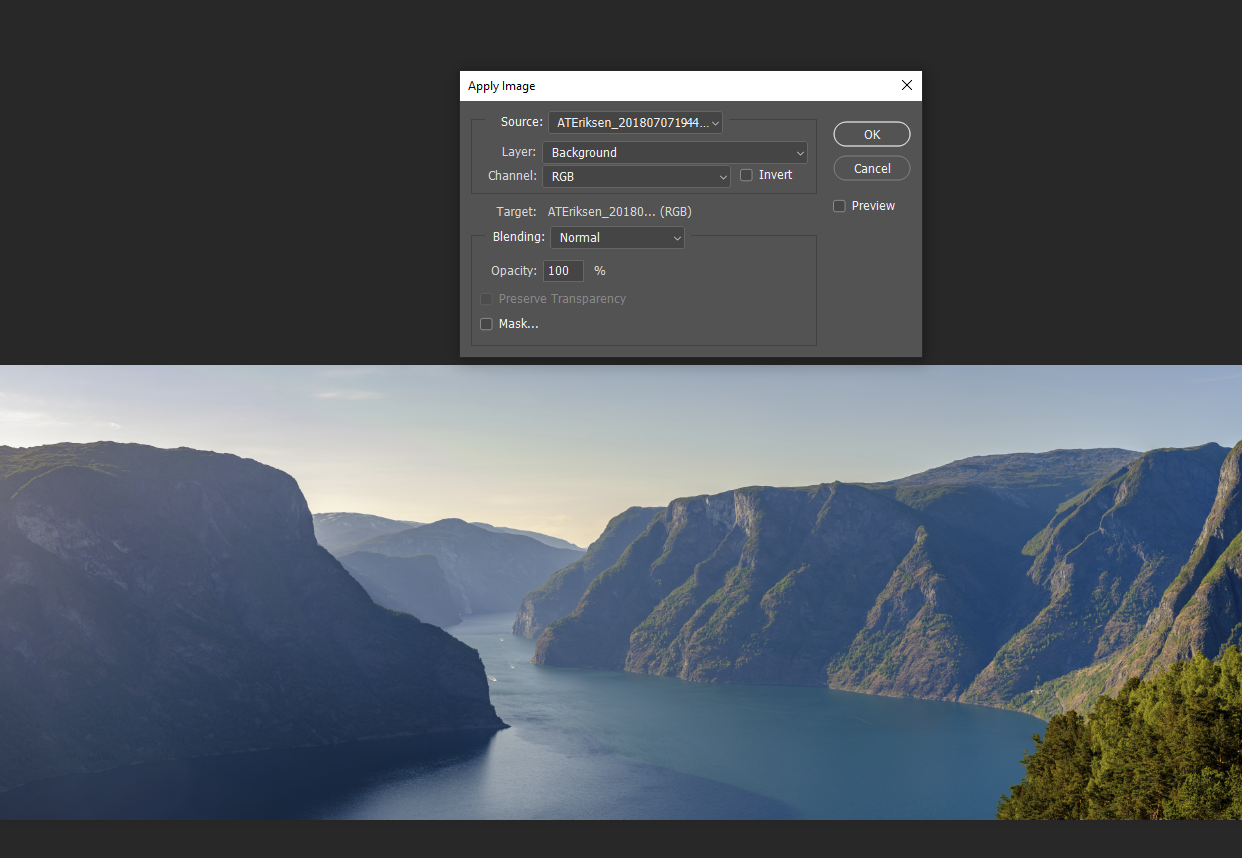
 Hello. Is there any "apply image" function in AP similar to PS CC's own "apply image"? I want to use it for "apply one channel of N layer to current selected mask", or "apply one channel to another channel for RGB mixing - with different opacity and blend modes", etc. It's one of my most used functions in PS CC. I use it almost daily in the winter when it's dark outside, just to give blue channel better SNR by replacing whole or part of the noisy blue channel. Thanks Aleksander
-
Would be nice if I could isolate multiple layers but only one. Sometimes I need to refer to some of layers to edit a layer. Probably Option+Shift click or something. https://affinity.help/photo/en-US.lproj/index.html?page=pages/LayerOperations/isolating.html?title=Isolating
-
 This relates to Designer and Publisher, and possibly Photo too (I haven’t looked). Sometimes, when I’m experimenting, I play around with a lot of the different values pertaining to a Layer Effect. For example, with the 3D Layer Effect I might change the: Radius; Softness; Shininess; Opacity; Ambient % and Direction. Most of the time - because I’m just experimenting - I get into a mess and just want to put the values all back to what they were before I started playing around. However, I can’t find a way of resetting the values in the Layer Effect to their defaults without resetting the whole layer formatting back to its defaults (“Revert Defaults”), which means I lose all of my other formatting: Colour; Stroke; other Layer Effects; etc. Is there a way of resetting the values for a Layer Effect to the defaults without affecting anything else? If not, can we have one please? This was mentioned a few years ago.. ...but, as far as I can tell, nothing has changed since then, but I could easily be missing something in the UI. P.S. Gaussian Blur doesn’t really need a reset function because it’s so simple but it wouldn’t hurt to have one to make the UI more consistent.
 -
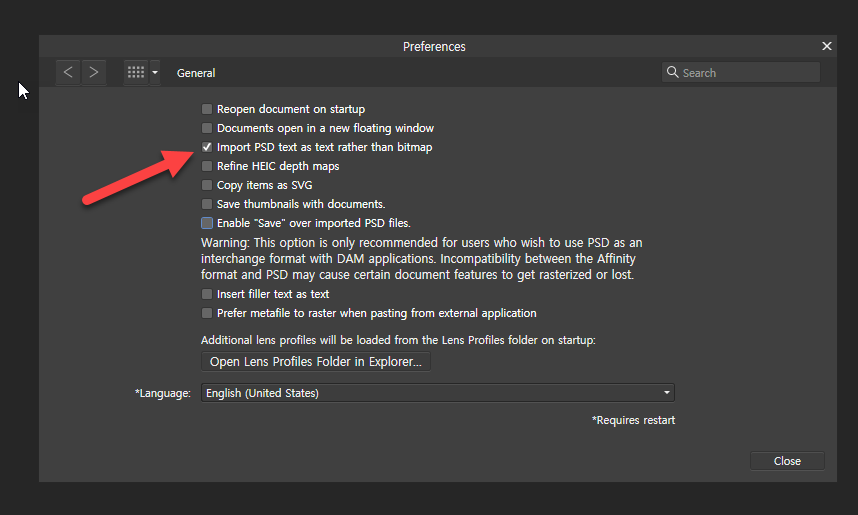
 1.text entered and saved as a psd file. 2. Open the psd file. 3. All text cannot be modified. --> photoshop and affinity photo what???????? What options should I set? I can't fix this even if I check the box. and I can't fix this even if I uncheck the box.
-
 Hi, I have a question about the layer order when I try to apply the master page to every single page in the doc. let's say that I want to put a stamp or watermark on every page which all cover by full-size image. And when I apply the master page, the stamp always put into the bottom of every single page. is there a way to put it on top? easily? not to have me to change the layer order every single page?
 -
Hi, AD 1.7, I think it's a new bug for me as I don't recall seeing this before. Couple of layers [also have 4 artboards]. The layer being dragged is set to erase. Dragging the layer on the canvas with the move tool makes the layer jump up in the layers palette. Have attached a movie that illustrates this. Watch the layer in the layers palette jump position. Bert AD_1.7_layer_drag.mp4
-
 I apologise if I'm missing something obvious, I've searched through the Affinity Photo online manual and the help forum and not found anything. Every graphics app I've used until Affinity has supported using multiple layers to constrain fills from the flood fill (paint bucket) tool - think of scanning in a line drawing, putting it on an upper layer, setting to multiply and using the line art to constrain fills on a layer or layers below. (I'm talking all pixel layers, BTW, no vector stuff). The flood fill tool has a control for tolerance and toggle for non/contiguous but no control to respond to single or multiple layers. Is there another way of doing this or is the feature not yet present?
 -
 Hello, First a disclaimer. I am using PS CS6 as a raster editing software in my workflow. It's working well.. Unfortunately, due to Adobe's policy it has to be replaced in a new feature. Moreover, it may not work on upcoming MacOs. I've been looking at Affinity Photo since version 1.0... it looked really great on paper. However, each version just massively disappointed me. It's missing the basics... Please remember, I'm speaking about my needs, which may not be yours.. I'm aware the software may work for some... However it does not for me. Many of my colleagues works the same way. Let's list some issues: Missing proper Tiff support. To get integrated in my work flow, the software needs to open and save tiff seamlessly. Affinity can not "Save as... (tiff)". Sure, it can export.. but this is not the same thing Now.. if one open a Tiff, do the editing and "Save": After some warning requester it works. However, if I do the same but quit the app, Affinity will offer me to "Save" the file, but it will actually want to save it as afphoto and not tiff.. The icon "New Group" does not work if no layers is selected. However, the same command, new Group, work from the menu. (Do you test your software ?) Mask feather: About 50 times slower as PS and limited to 100 px. It's so slow that you can not get any preview.. Mask... Well. I tried yesterday about one hour. I could not understand how they works. I could not create any Group mask. Most of the time I do NOT see the mask in the layers panel. and if it does, it's very difficult to see I created a curve layer with simple mask (with a selection). Then I painted using the brush in white to extend the mask -> this action actually removes part of the mask .. (????). Well, it's also bout 5 times slower as PS Level tool still does not work. In order to get the clipping preview (press alt), pro channel one need to set the master level at least at 1%.. Changing the brush size and hardness is not practical (it only shows a few circles but not the gradient of the actual brush..) and it's super laggy That's it... I did not tried yet path.. Affinity: I think this are basic features which photographers (imo) needs every day.. Without Affinity is jus useless.. Thanks for your understandings
 -
 Hello Team, Want to know if the add of Luminosity mask (Live) is planned for AfPhoto ? actually in beta cycle. Yes Luminosity masks will make life even better and easier for a lot of people, i've learned to use it and it makes a lot of things possible. I know people have said it is possible to mimic it but i'm actually asking about a native one and if it is planned to be implemented. Blessings !
 -
 When "Add Layer" is clicked, make it appear in the hierarchy next to a selected item. Also if multiple items are selected and if "Add Layer" is pressed, automatically put them inside the new layer.
-
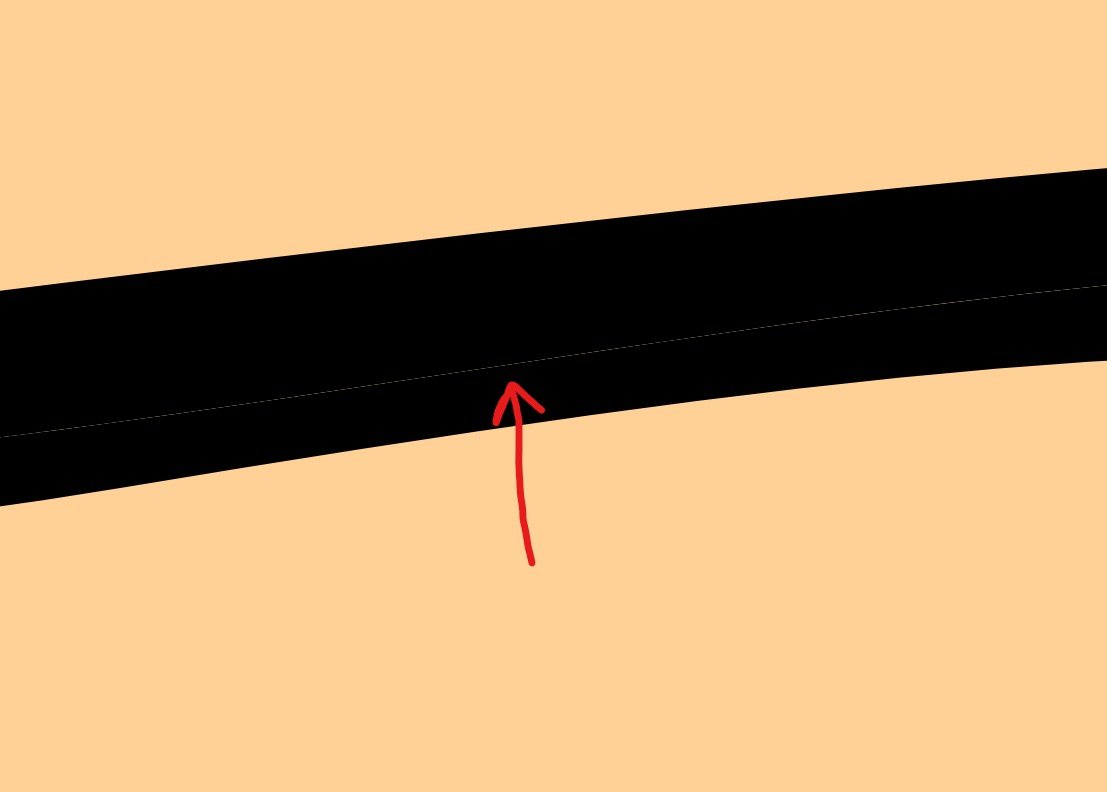
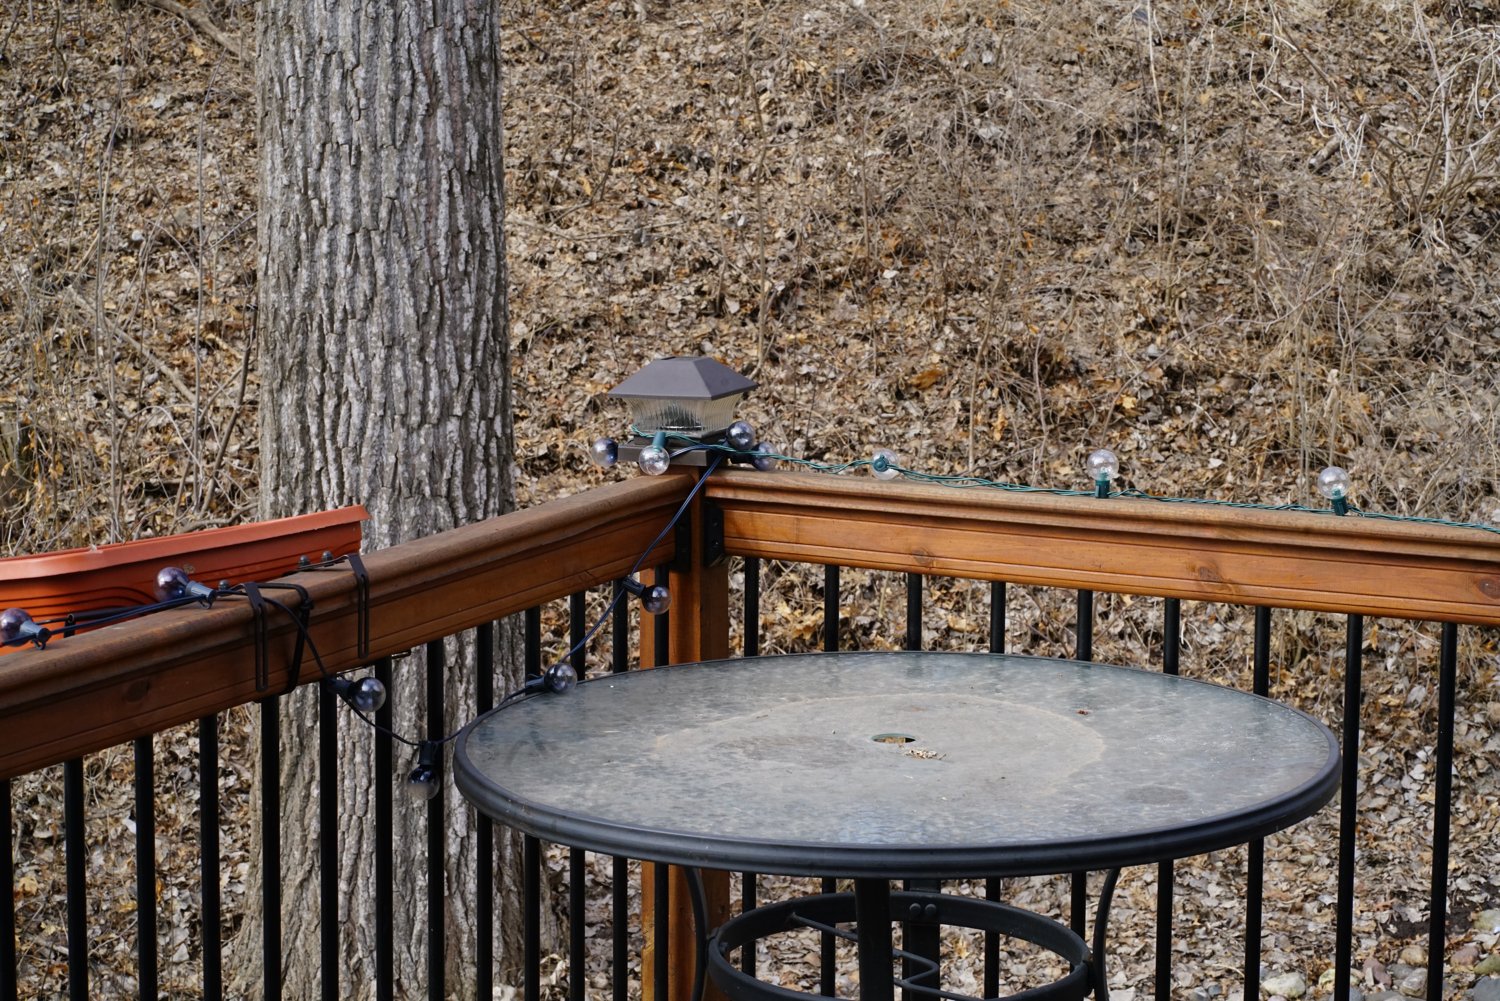
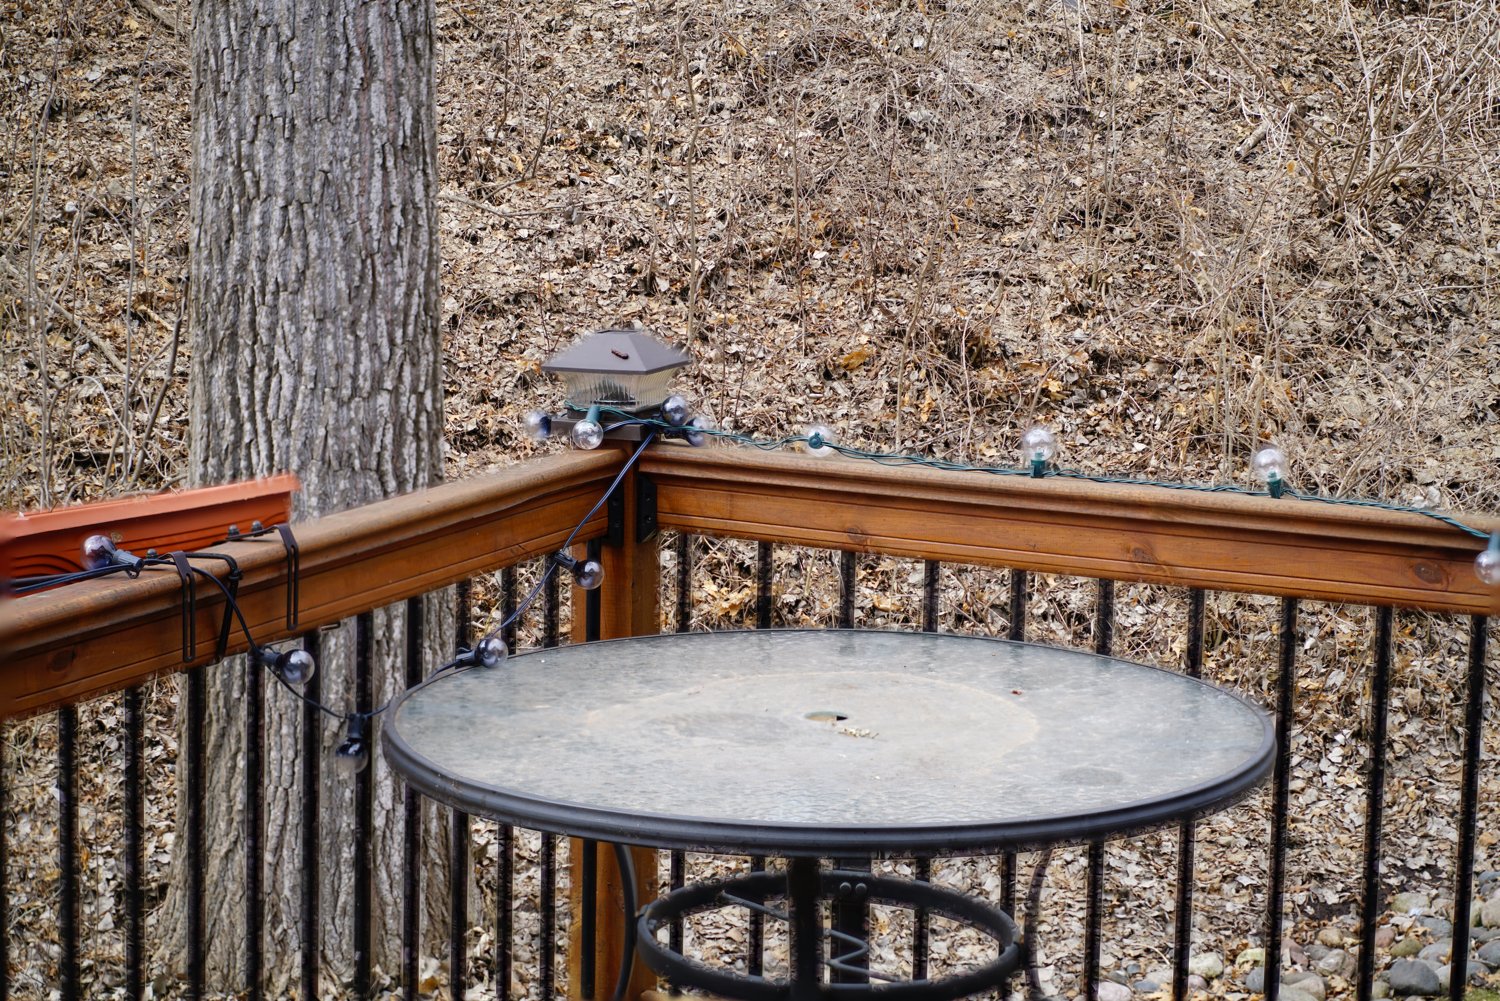
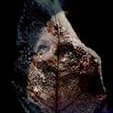
I am having problems with Stack Merge ... showing what appeared to be alignment problems but it looks more like ‘leakage’ through upper layers. I’m using 6 image from a tripod at varied distances ... at f2.8. (NOTE: A one-shot F16 captures fine, shown below, without the leakage.). Here are comparable images ... look for the leaf leakage in the second shot, in the black vertical rail posts, with background leafs showing through. What’s happening here? How to correct it? Program bug or me? This is on an iPad Pro with iOS 12.2. Thanks.
-
Hi all, I noticed that if I drag any image from the explorer, or Adobe Bridge or anywhere to my current document, the new dragged layer is not selected. Is this an intended behavior? Cheers, Juan
-
The current colors are really ugly, and intrusive. The Bright colors are distracting from the main artwork... I recommend soft pastels instead of the current options (something that doesn't contrast too heavily from the UI interface too)
-
 Is there an option how to merge selected layers and don't crop them to document size? (Desktop Mac, same is for iPad) Thank Radim
 -
I'm a new user of A. P. and I like it a lot. A few days ago I no longer have the button to group layers (the one on the left of the new level button). How can I restore it? Thank you
-
 Complicated illustrations that have a lot of shapes on a particular layer can take a bit of time to scroll through. Opening multiple layers can result in even more scrolling which, depending on how much memory/processing power your iPad has available, can slow things down sometimes. I’d like to suggest a button/control for the Layers Studio that would collapse all open layers/groups, giving users a place to start over when searching through the parts of a document. Also, how about a control, possibly for the contextual menu at the bottom of the screen, that would give users the option to “show object in Layers”. It would be a shortcut that would instantly open the Layers Studio and jump to the shape/group selected, once again minimizing the scrolling search for a particular item.