Search the Community
Showing results for tags 'Affinity designer'.
-
 I have a MacBook Pro late 2011 edition running Mac OS high Sierra . I recently purchased affinity designer after owning the iPad version for years . Right from the first time the app crashes and won’t open !!! I have attached the crash report . Please help ! text.txt
 -
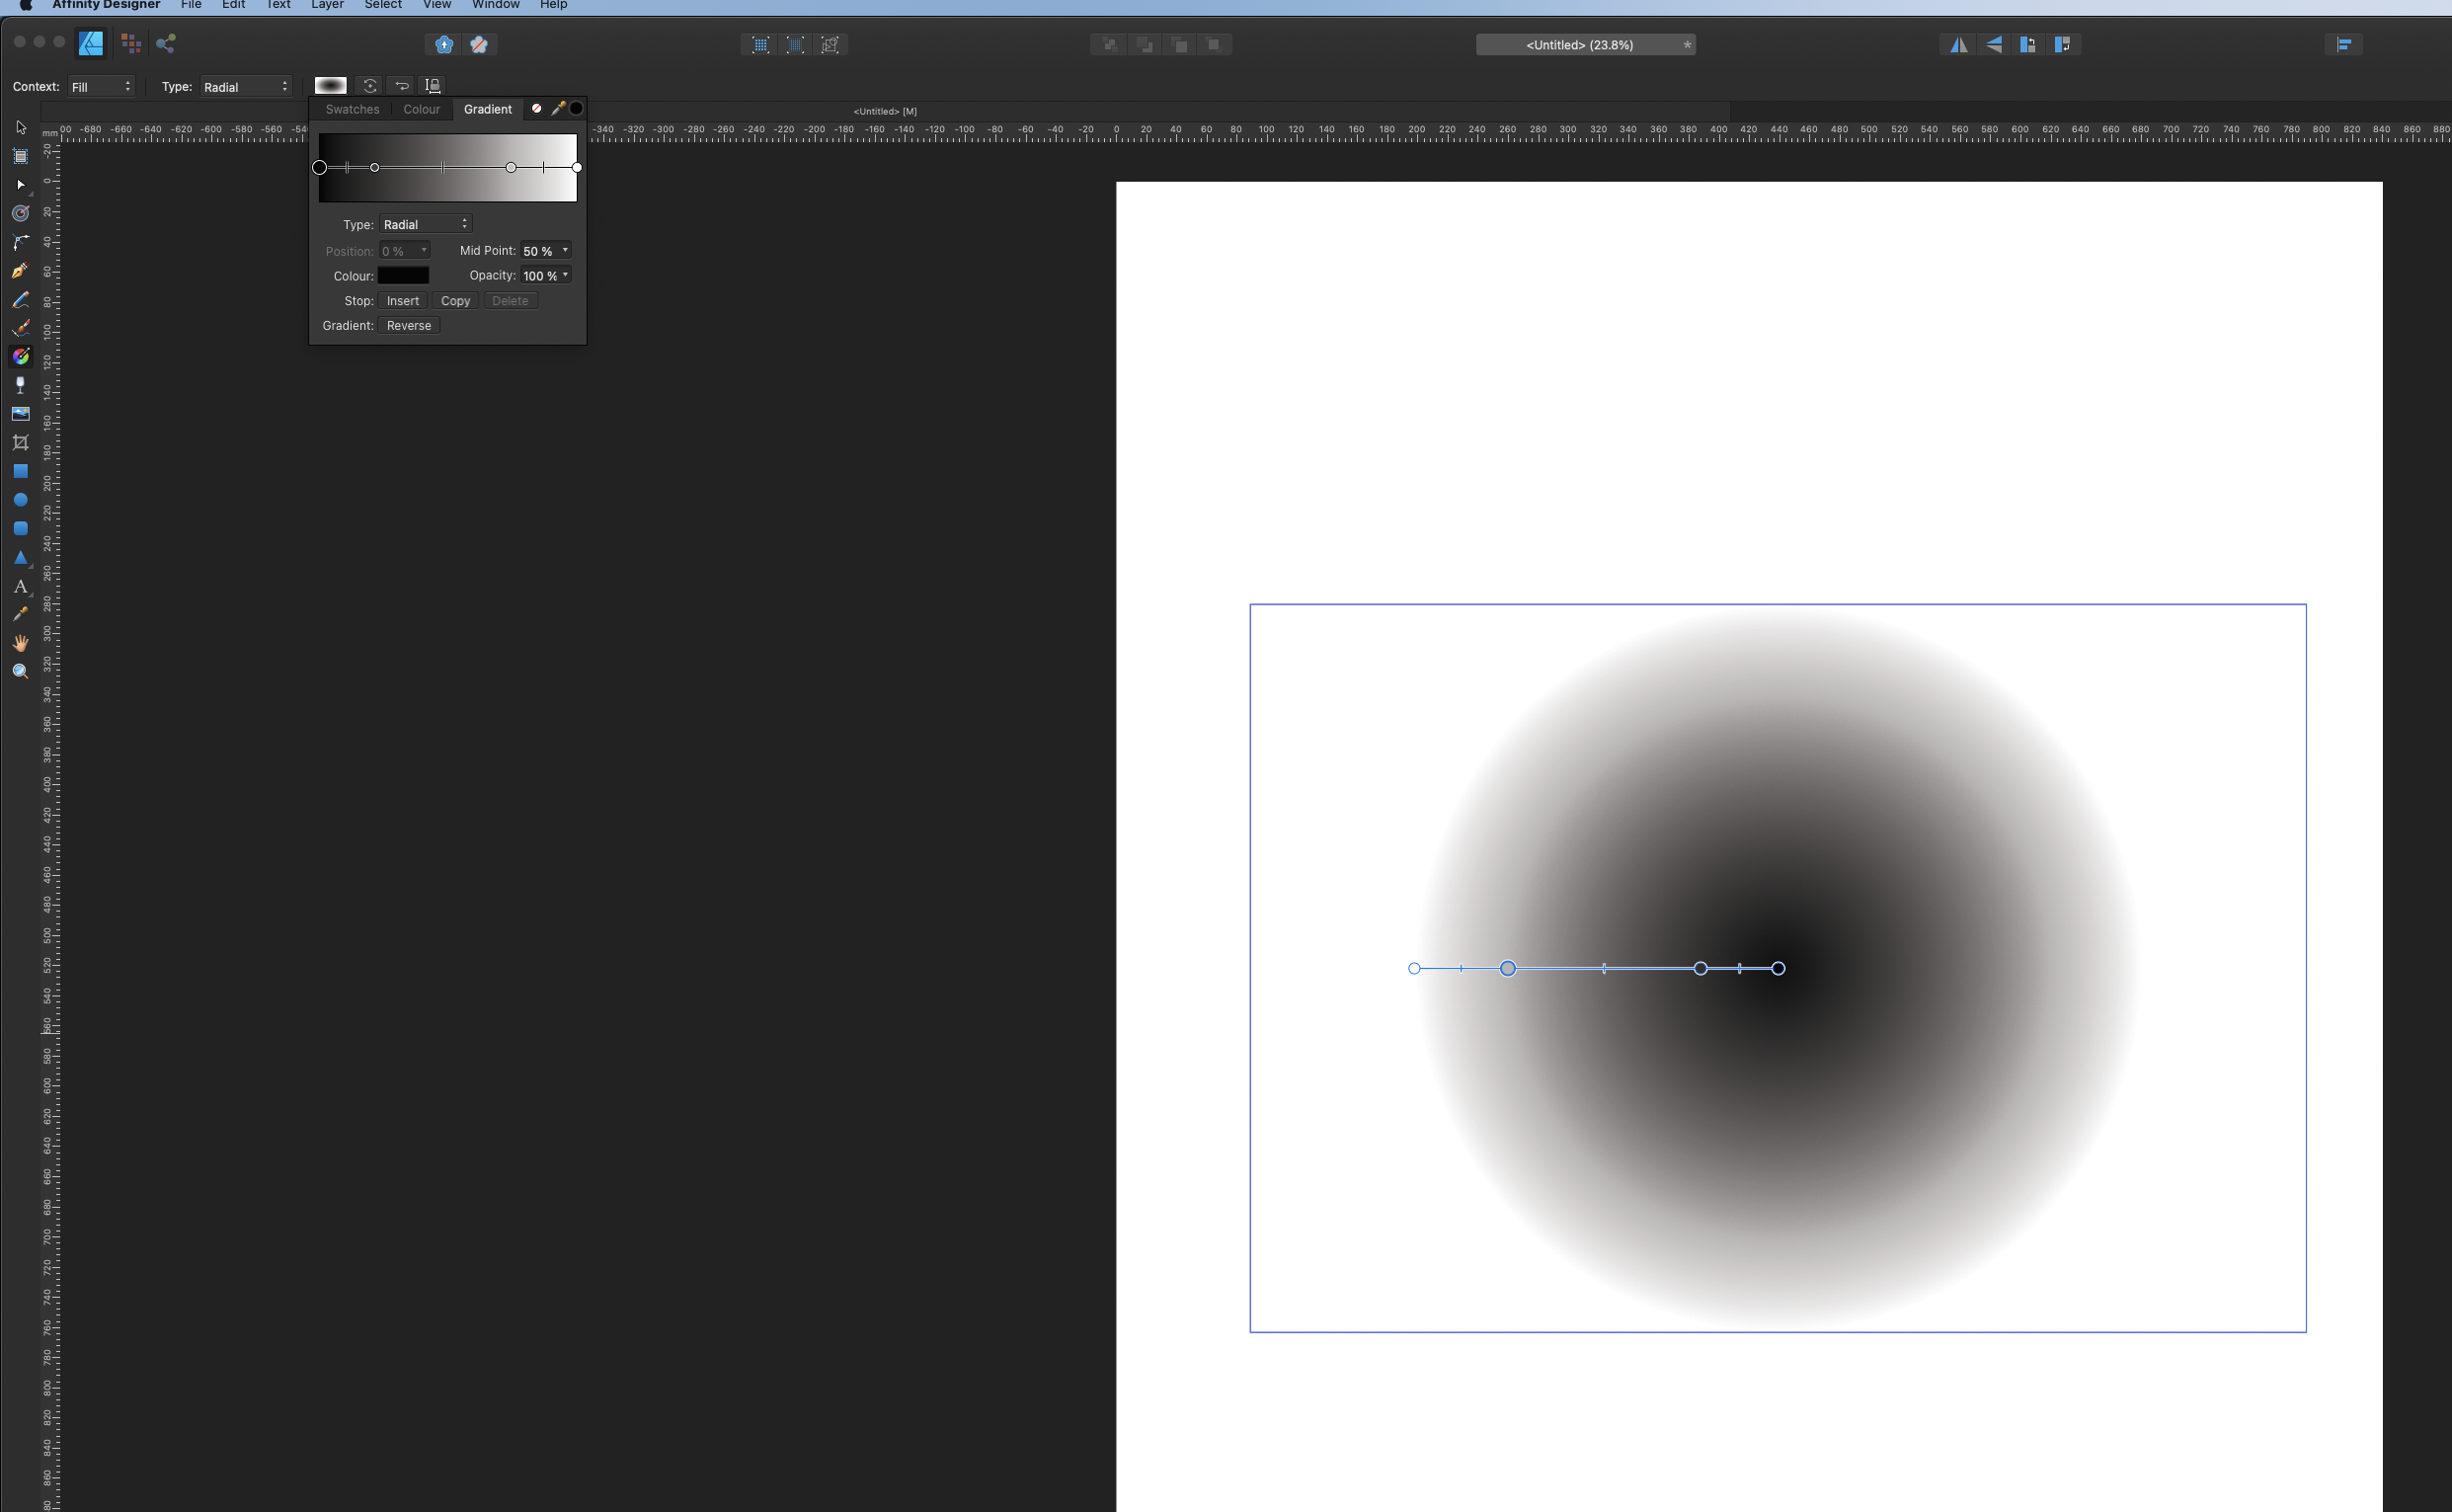
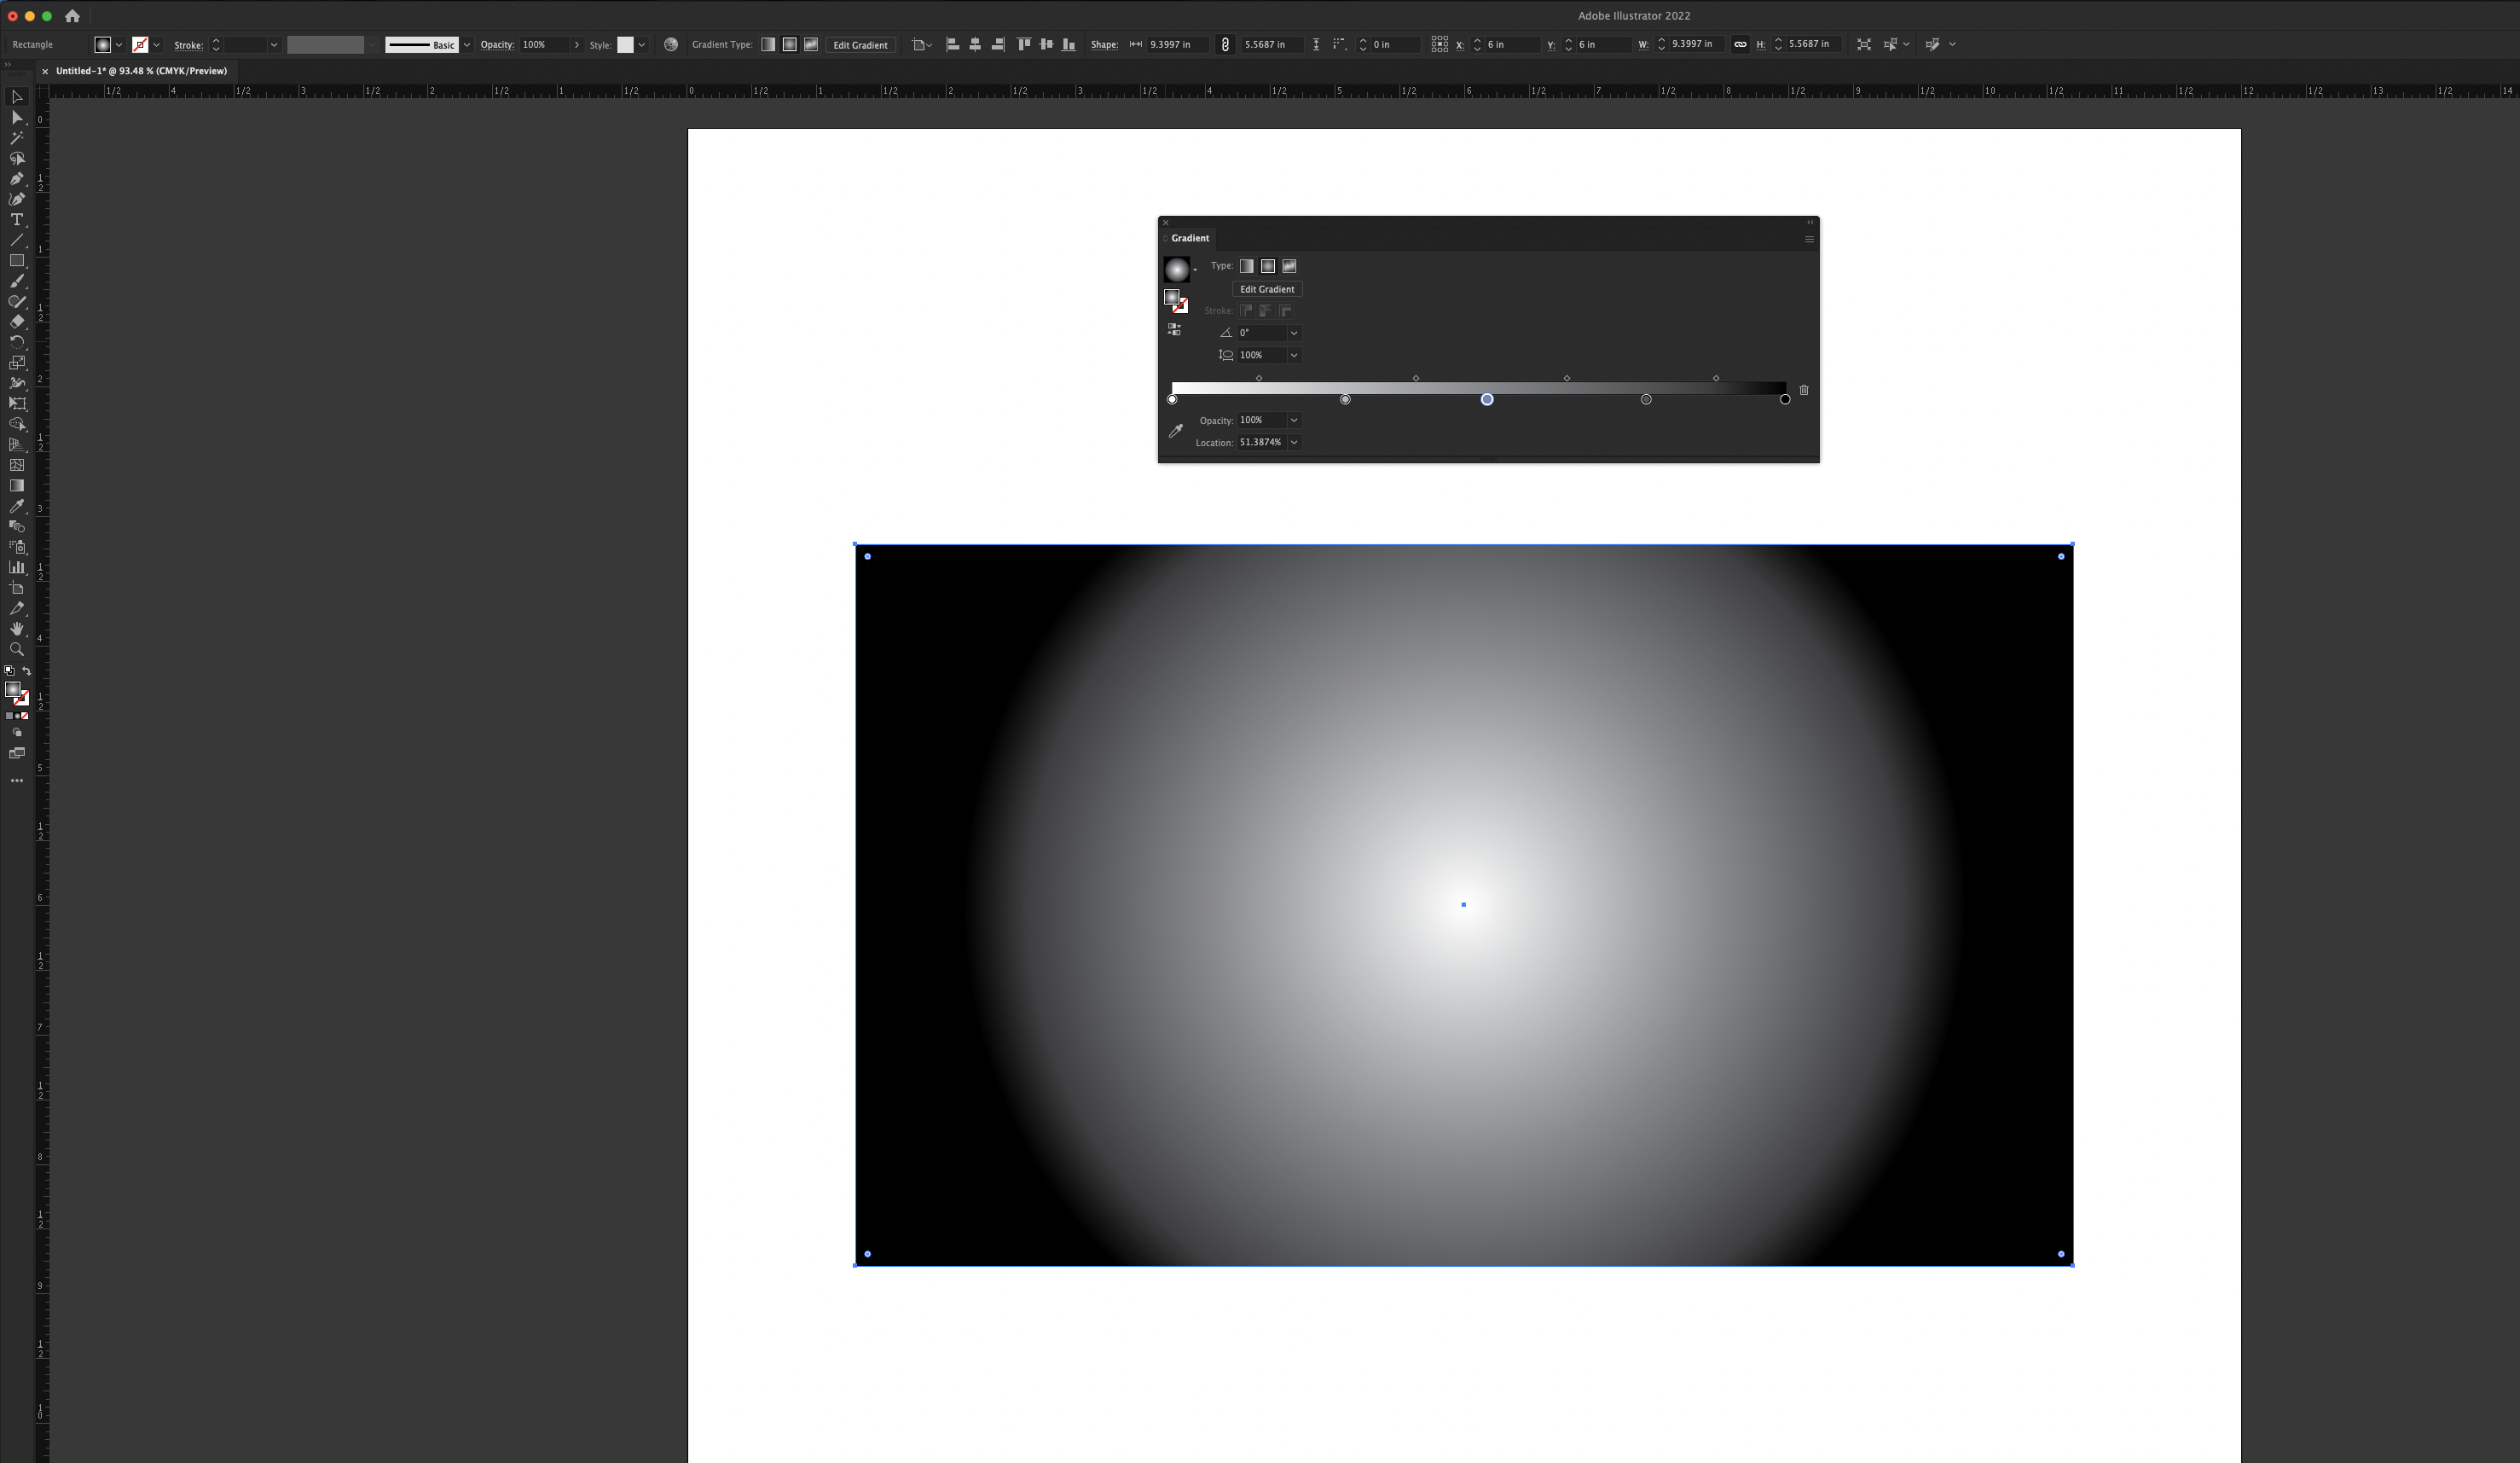
 Hello there, I have been having some issues searching not only the forums but the web for this answer as well. Attached is are two images of my monitor with Affinity Designer and with Adobe Illustrator open and with the gradient properties editor open in each. I have a 4K monitor, which of course makes everything smaller, but I need the screen real estate. I also know it is not necessarily fair to compare Designer to Illustrator, but I am looking for the Affinity solution compared to the Adobe solution. I have a gradient that needs multiple points. In this case, around but not specifically 20. When working with the gradient editor as it currently is, being only a small drop down from the bar at the top, this is nearly impossible to achieve without some massive mouse and keyboard acrobatics. I know that in Illustrator, I have the option of resizing the gradient editor and even detaching it from the menu as shown here. I need that huge gradient editor for the gradient I am creating. I really need to have the numeric values available to me since I have to place them precisely and set specific colour values for each point, like the image of Illustrator attached. I would like to know how to detach it from the top menu bar and make it its own flyout window panel, or put it in a different spot, but either way, be able to resize it so I have a very long gradient editor on which I can place tons of colour points and navigate them with ease, and again, set precise colour values for each. If this is not possible (which I doubt, Affinity is far better than Illustrator so far) then please help me find a work around. Thanks! -Kim
-
 ... or better: Behaving wrong. In my case it is an opened PDF generated from APu having a text frame containing text with 80% black and text with HKS 7 and there is a rectangle with HKS 7. 1. Switch to the Designer Persona (or Edit in Designer - makes no difference) 2. Click the rectangle and use Select > Select Same > Fill Colour 3. Now elements are selected. Use the Colour panel to change the percentage of the tint Result A: Even the gray text is changed although no HKS 7. Apart from that: 4. Revert history to the beginning 5. Select the gray text with the text tool 6. Select > Select Same > Fill Colour Result B: Same as Result A. Conclusion: Colour replacement is not working on text frames having text with different fills. colour-replacement.mp4
 -
 Hey! I love making transit maps and diagrams for in my spare time. Here is today's quick few hours design — my unofficial transitdiagrams of the tramway system in Конотоп/Konotop, Україна/Ukraine. What do you think? Feedback is welcome! Btw: Although I researched very thoroughly it might be possible that some station names are not right. Please tell me any mistake so that I can update the map! Have a nice day/evening! Chris
-
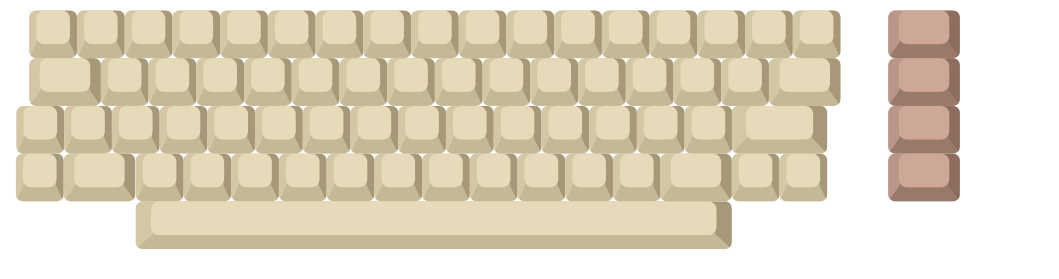
 On a project im working on, i am making a vector illustration of a Commodore 64 computer. I made the entire keyboard, but i forgot to bake in the rounded edges on the original template key i made, and not i am unable to scale it because the edges will go completely round if i scale down. is there a way that i can select the whole thing and apply the rounded edges? it would be a gratuities process to go through and apply this on each individual key. This is the keyboard at its full size This is what happens when i scale it down. Edit: I feel i should also specify that each individual key is a group and i am looking to apply the corner tool, and for future reference the outline tool ect ect, to the items within the group without having to ungroup everything.
-
 I've been given a print-ready PDF as a starting point for an update. Can I assume that if spot colours were used in the original document that they will appears as spot colours after importing to Designer?
 -
 Hi, I just wanted to check if there a way to see the list of fonts used in a Affinity Designer document? I generally convert all the fonts to curve before sending the file (PDF) to printer to avoid missing fonts issue. But some font's don't get converted with ctrl+select (eg. fonts used in symbols). Finding the list of fonts in the document would help to identify if there's still some fonts that are not converted. Thank you.
 -
Vector portrait of Crystal Reed as Sophia Falcone in Gotham, created in Affinity Designer. Update sequence and more info about how things are done can be seen in my portfolio blog: https://communicats.blogspot.com/2019/05/crystal-reed-100-vector-portrait.html and in my website: https://vectorwhiz.com/Vector.html Vector outline view
-
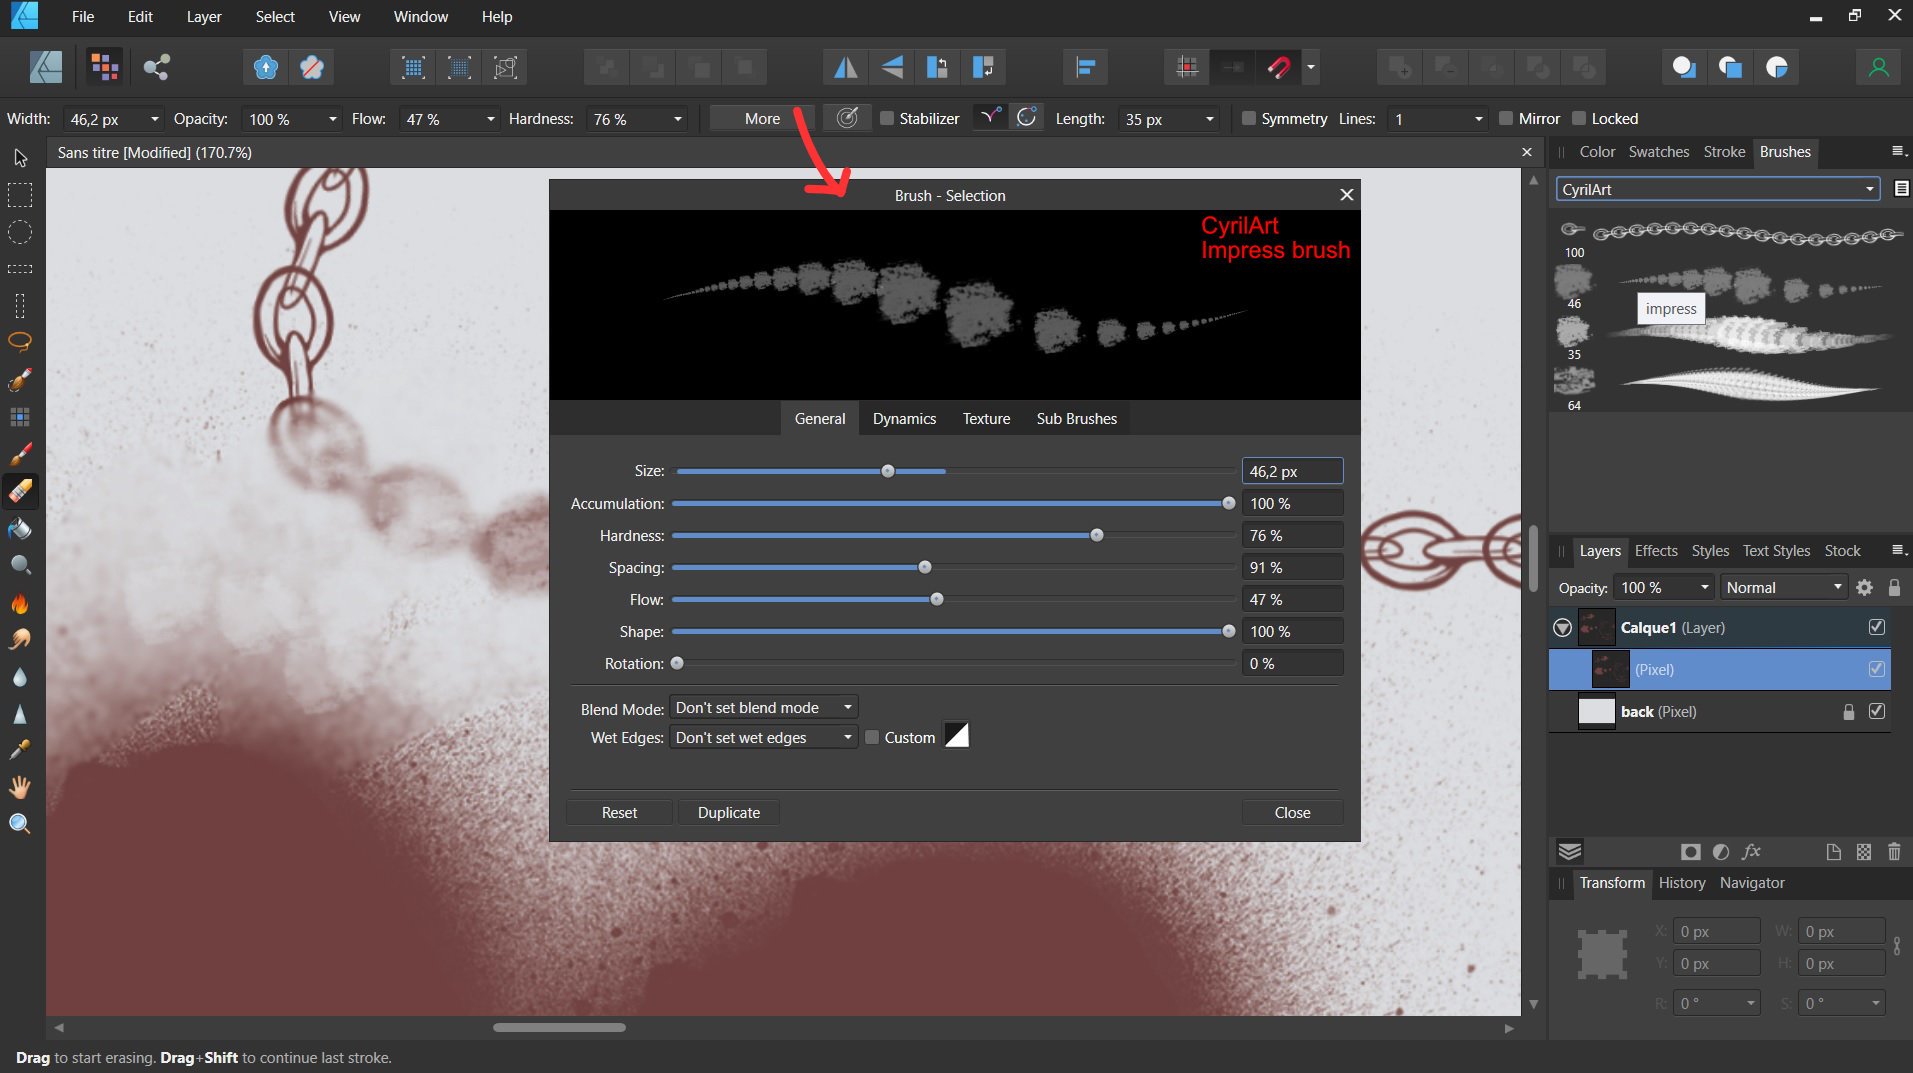
 Hello, I try affinity designer to make a digitalPainting in pixel mode, the configuration of custom brush is very cool but I didnt find where to see the current brush used... I only found through "more button" but there are not display category and title bush ? Where I can find the informations of current brush selected ? Thanks
-
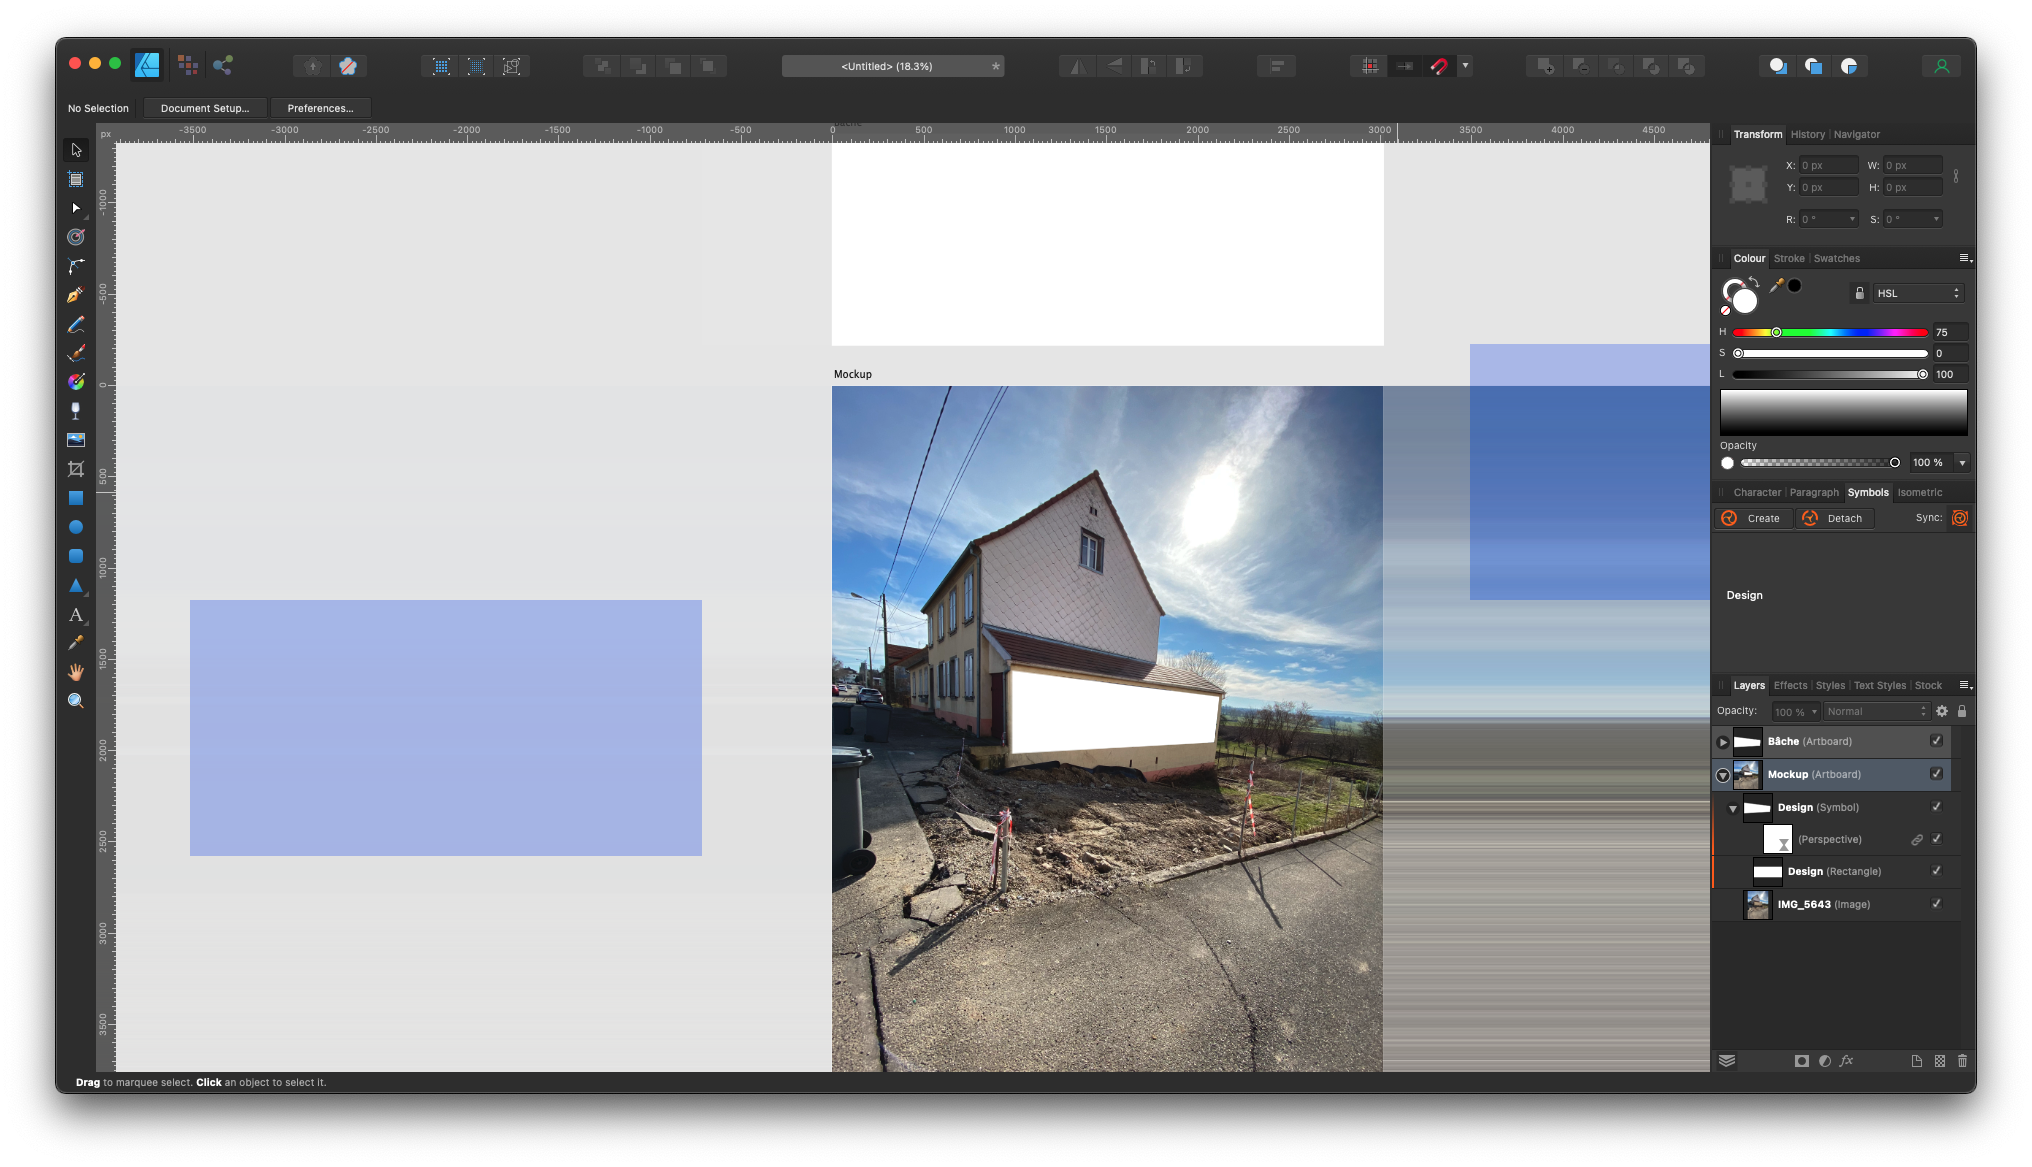
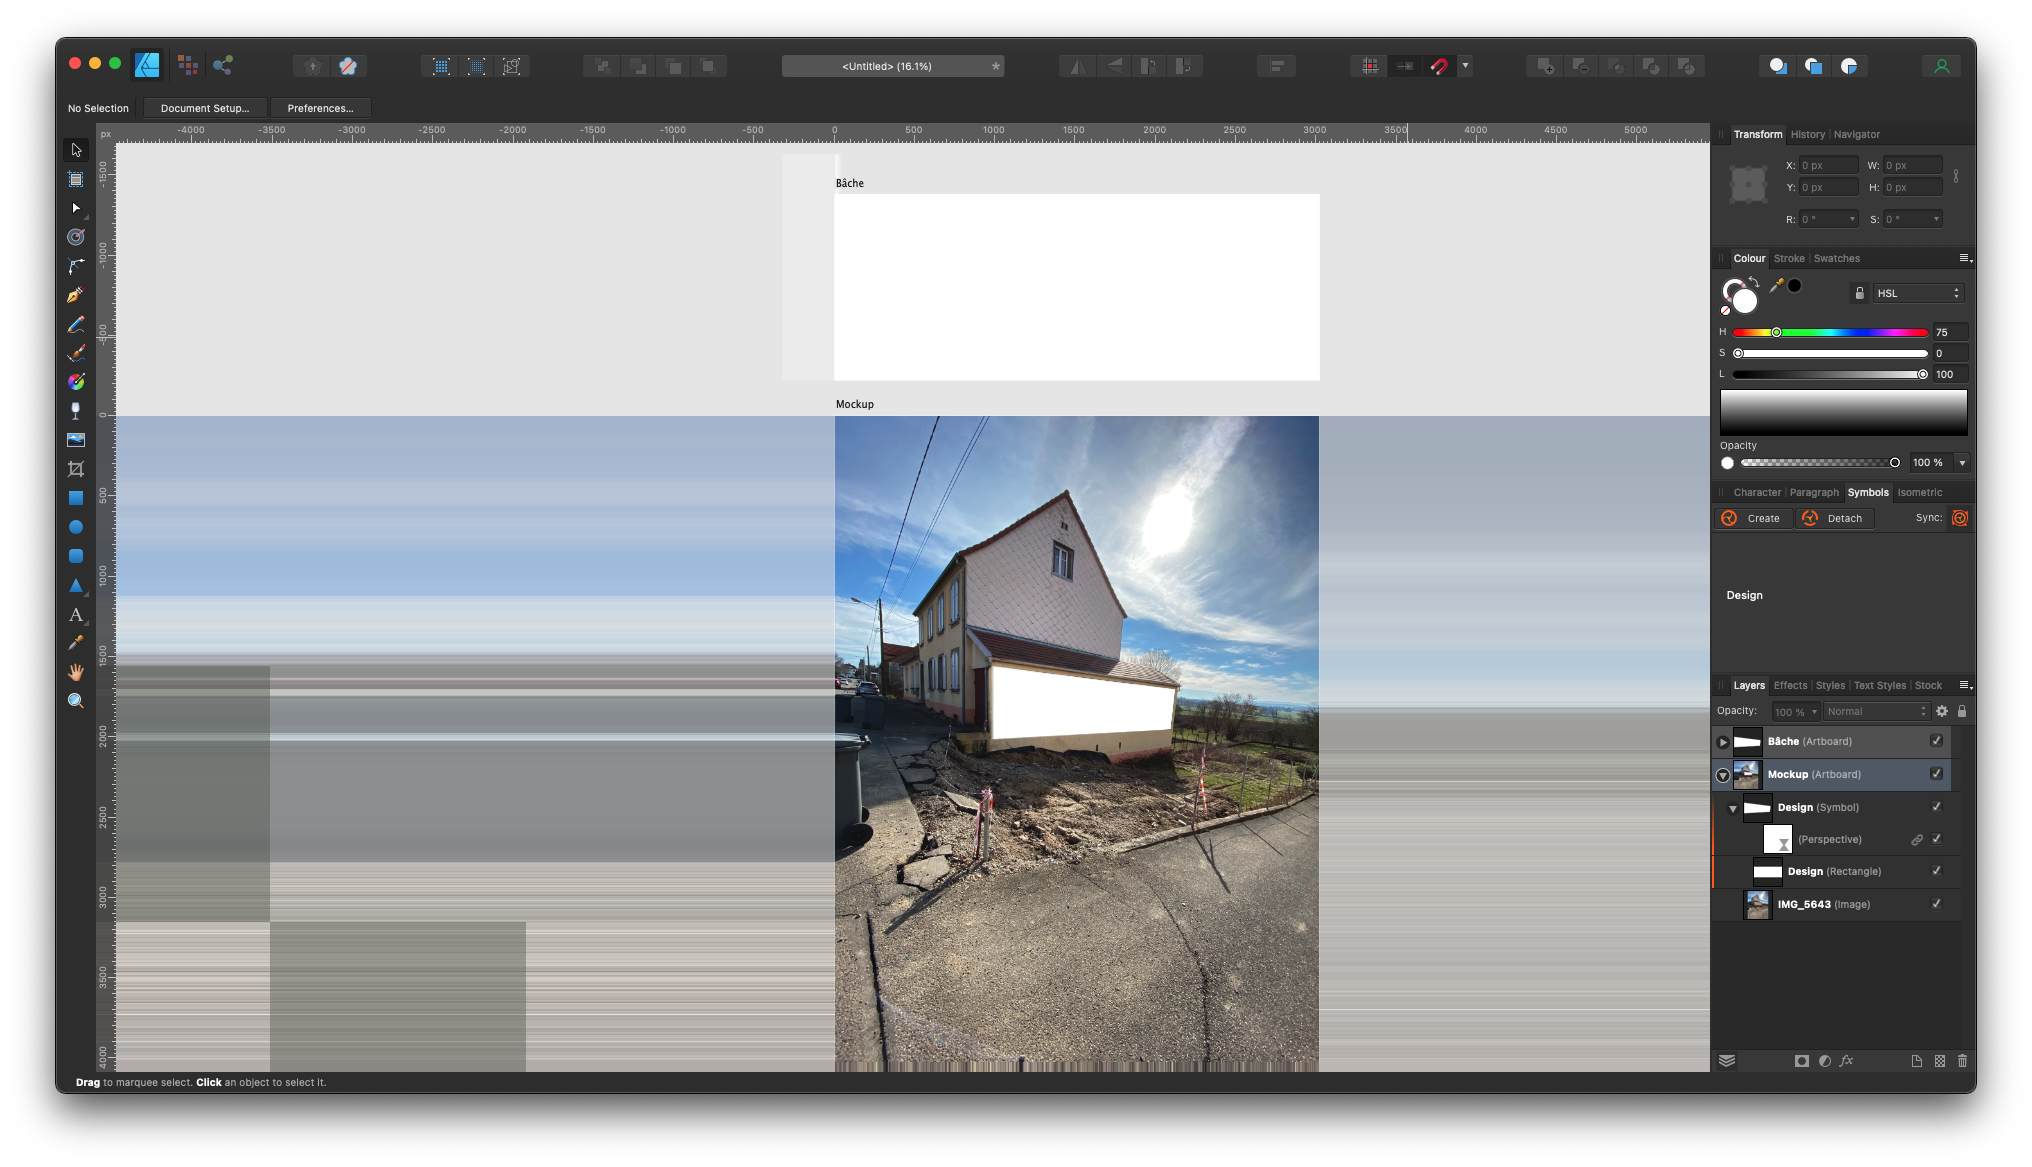
 I encountered a quite annoying UI bug in both Designer and Photo when using Live Perspective filter + artboards. It seems that render glitches appear on the canvas pretty randomly, in addition to a "border stretch" effect of what's displayed on the border of the artboard. The "border stretch" glitch can be somewhat workaround by reducing the size of the artboard content as to add some padding to the artboard. However the other glitches remain. Moreover, the glitches "update" on each canvas resize/zoom as you may see on the different screenshots attached. I am also attaching two files that show the issue. While these are .afdesign files, sending them over to Photos actually leads to the same glitches. These are using artboards, Live Perspective filter and symbols. Versions: - Designer 1.10.4 - Photo 1.10.4 - macOS 12.2.1 FYI, I tried disabling GPU acceleration, changing display rendering from metal to CPU, and any possible combination of both without success. Hope this can get fixed sometime! Mockup.afdesign Mockup.afdesign
- 2 replies
-
- 1
-

-
- affinity designer
- affinity photo
- (and 3 more)
-
Hello my fellow designers, I'm uploading my latest artwork of czech model in style that I really love and is quite popular nowadays. I hope you like it! If you would like to see more, please follow this link to my instagram: Marek Černoch (@mara.cernoch) • Fotky a videa na Instagramu
-
 Below you see two objects, each 7-pointed stars with different settings. One, as you can see, has been rotated. But where one light grey "element" meets the other, it should be exactly at the outer spikes of the darker star. Why isn't it, or rather: how can I get the spikes to exactly meet the inner points of the grey star? In the second pic you can see the misalignment even better. TIA, Helmar
-
 Designer 1.10.4.1198 on Windows 10. As you can see in my attached video, when I create a pixel selection in the Pixel Persona and switch to the Designer Persona, the selected area has been automatically cut from the pixel layer. I’m just wondering if this is expected behaviour as I can't remember doing this before. If it is expected, it it useful for anything? To try and be more specific, being able to manipulate the selection after switching personas isn’t unexpected (or unwanted), it’s the automatic cut operation that threw me a tad. I did a little bit of searching but the necessary keywords are so non-specific that the lists of search results are too large to navigate in a reasonable time. (Am I just having ‘one of those days’ and this should actually be totally obvious?) 2022-03-06 13-01-07.mp4
 -
Should do a bit more to the flesh but it will do for now. Did a bit more to it afterwards.
-
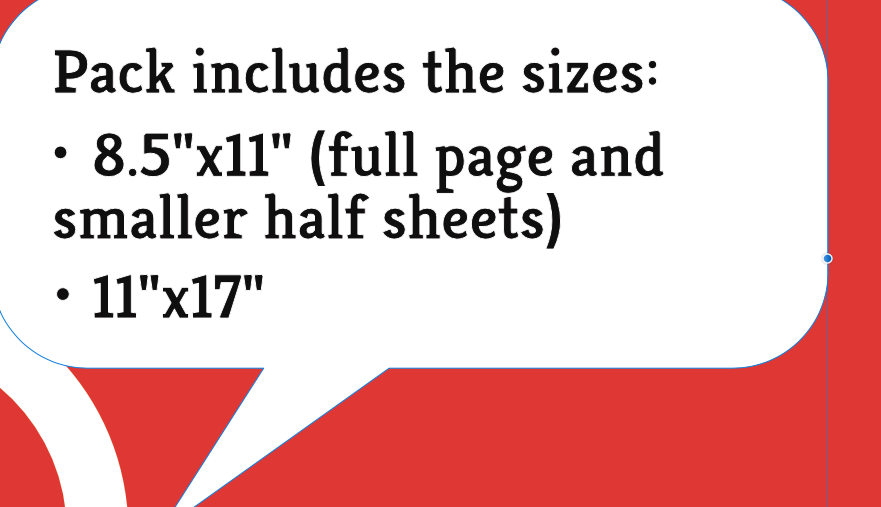
 Hi everyone. I don't know why I'm finding this so difficult and am not understanding other threads (most I've seen are for Publisher anyway). I am in Designer and am trying to get my second bullet line to be in alignment with the rest of the text. I have tried adjusting paragraph indentation and it just moves the bullet over. Any thoughts are helpful!
-
I’ve posted my latest project on Behance Made completely in Affinity Designer.
-
 On my iPad, iCloud backup has not been working for a long time. I opened a ticket with Apple Support several months ago. This past week, Apple developers finally narrowed the problem to a file or files created by Affinity Designer. According to Apple, there’s at least one file over 100 GB on the iPad that belongs to Affinity Designer. And because iCloud Backup does not support backing up files larger than 100 GB, this large file is preventing backups from completing. (iCloud Backup misleading reports that there is “not enough storage available” even though there is plenty of space available in my storage plan.) If I disable backing up files from Affinity Designer, iCloud Backup works fine. I was unable to find any such large files on my iPad by using the Files app or by browsing the iPad’s content from the Finder on my Mac. However, using a third-party file system browser, I was able to see some additional details, such as file creation/modification dates and folder sizes. Based on this information, it seems the Designer folder on the iPad is taking up more than 300 GB even though the files under the folder add up to just 228.81 MB. Evidently Affinity Designer is using more than a thousand times more storage than can be explained by the listed files. Apple developers were able to read some metadata about the >100 GB file that is preventing the iCloud Backup from working correctly. In these metadata, they found what looks like a date & time stamp: 20190516103049. (It might be part of a file name, but I’m not certain.) I have read several older threads about similar problems. It seems a work-around might be to move all Affinity Designer files to other locations (e.g., iCloud Drive or a computer), and then remove & reinstall the app. I would prefer not to do this unless absolutely necessary. I would also like Serif to help investigate this problem so that a permanent fix can be found.
 -
 Hi. I just made mini tutorial for affinity designer. Scale and rotate multiple objects separately. hope you like it.
 -
 As the title says, when I try to create, delete or rename a preset through More ▸ Manage Presets option in the Export dialogue box, it is greyed out and unavailable. This happens in Publisher, Photo and Designer, all versions 1.9.0, on an iMac running 10.14.6. Does anyone have an idea on how to fix this?
-
 I have that menu and when I open it in designer dotted lines are too long and it goes over the picture. I tried to check and uncheck pdf options when opening file and when both "favour editable text over fidelity" and "group lines of text into text frames", are unchecked, dots disappear completely. It openes normally in Adobe illustrator. Why is that? Fonts aren't missing. On uploaded screenshot first on the left is original file in acrobat, then is opened in affinity designer and illustrator on the right.
-

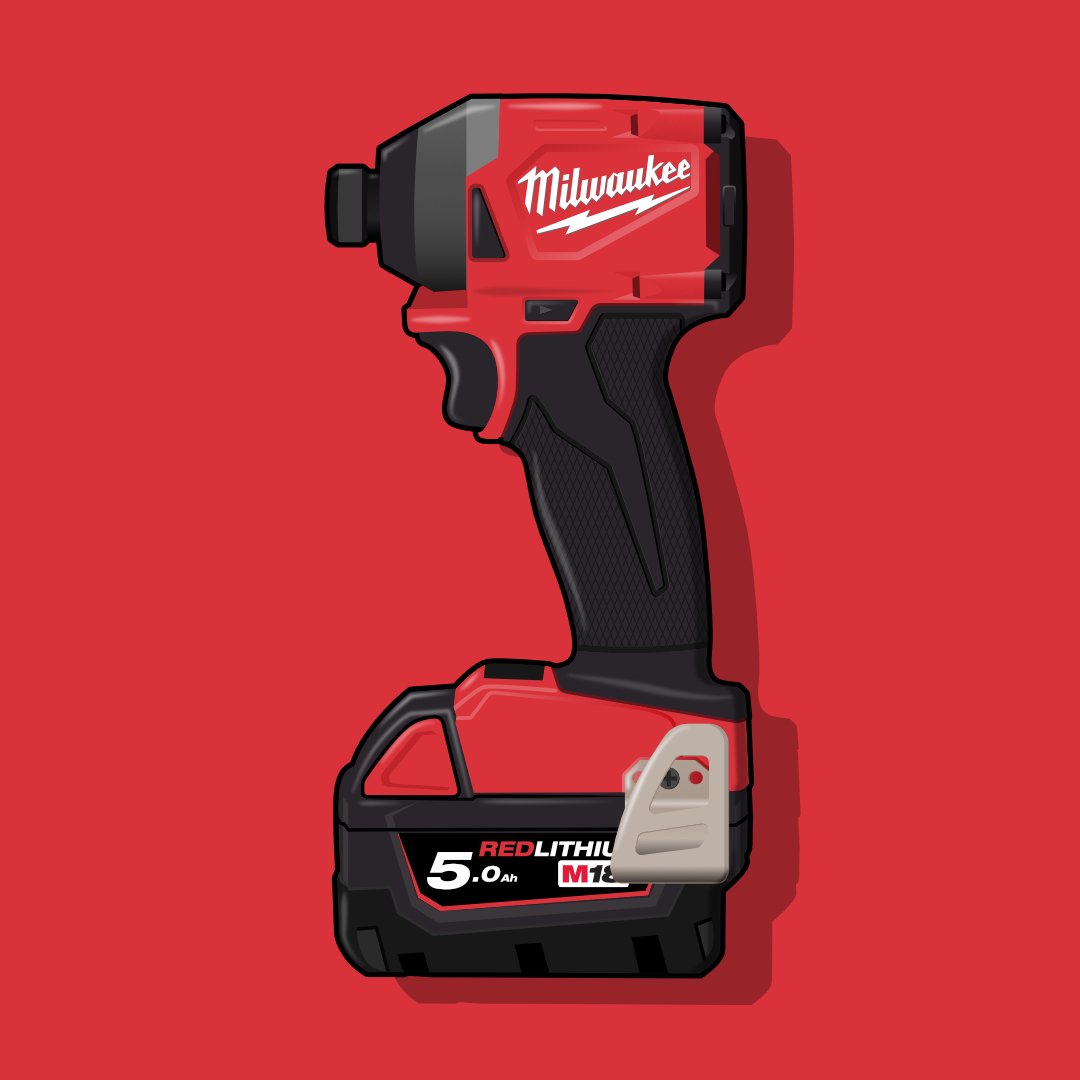
affinity designer Construction workers favourite tool
GenewalDesign posted a topic in Share your work
Disclaimer : I wasn't inquired by Milwaukee to create this artwork. It was only for myself. Also, don't start a war between Makita and DeWalt fans, please 😁
- 1 reply
-
- 9
-
-
New version 1.2. Attached is the latest user guide for my application Canny Vectors. The guide was written entirely using the Affinity applications – Publisher, Designer and Photo. Constructive criticism is welcome as I would like the next version to be even better. You can install the application via the links here: https://forum.affinity.serif.com/index.php?/topic/143089-free-vector-tools-for-windows-10-users/ Canny-Vectors-User-Guide-1-2.pdf
- 9 replies
-
- 9
-
-

-
- affinity designer
- affinity photo
- (and 1 more)
-
 Hello all, I've been trying for the past few hours to snap a curve to a grid using 1.10.19 of Designer on iPad. I'm fully aware of the separate snapping menu for the pen tool as well as the snapping menu but for the life of me I can't get a node to snap to where a horizontal and vertical lines of the grid meet. In the snapping menu I have snapping enabled and am not forcing pixel alignment. Snap to grid is turned on and I've tried both high and low levels of tolerance. I'm not trying to snap the node to other things as noted in this video https://www.youtube.com/watch?v=hntb-PMGUEA and I've read these threads: https://forum.affinity.serif.com/index.php?/topic/149534-asking-for-tips-about-snapping-with-curve-nodes-in-designer/&tab=comments#comment-835695 or https://forum.affinity.serif.com/index.php?/topic/62713-cannot-snap-curve-nodes-to-grid-in-designer/&tab=comments#comment-325078 https://forum.affinity.serif.com/index.php?/topic/102450-tutorial-for-node-functions/&tab=comments#comment-549935 I just need a node to snap to where horizontal and vertical lines of the grid intersect!. Could someone please tell me how to do this?