Search the Community
Showing results for 'ROMM RGB'.
-
 In lack of Adobe Acrobat Pro or other tool that you can use to directly convert a CMYK output to sRGB, I would first export a PDF/X-4 file from Designer, which will produce an all CMYK file using the color gamut you are seeing on your canvas. Then I would open that file in Designer in RGB color mode and export to RGB color mode PDF and SVG. The colors should be pretty close to ones you have in the original CMYK mode document. equalizing_cmyk_and_rgb.mp4 2. LOVE SAVES THE DAY for inflatable flat for printing color copy_pdfx4.pdf 2. LOVE SAVES THE DAY for inflatable flat for printing color copy_rgb.pdf 2. LOVE SAVES THE DAY for inflatable flat for printing color copy_rgb.svg
 -
 Thank you @old bruce that's weird but I see you are right. I usually create in RGB I think, but even when I don't and I use the export settings and make it RGB, it doesn't usually change the colors. But this time it is. Do you know how to make it so the colors stay the same no matter what? I want it to look the way it does in the AD file. Thanks!
 -
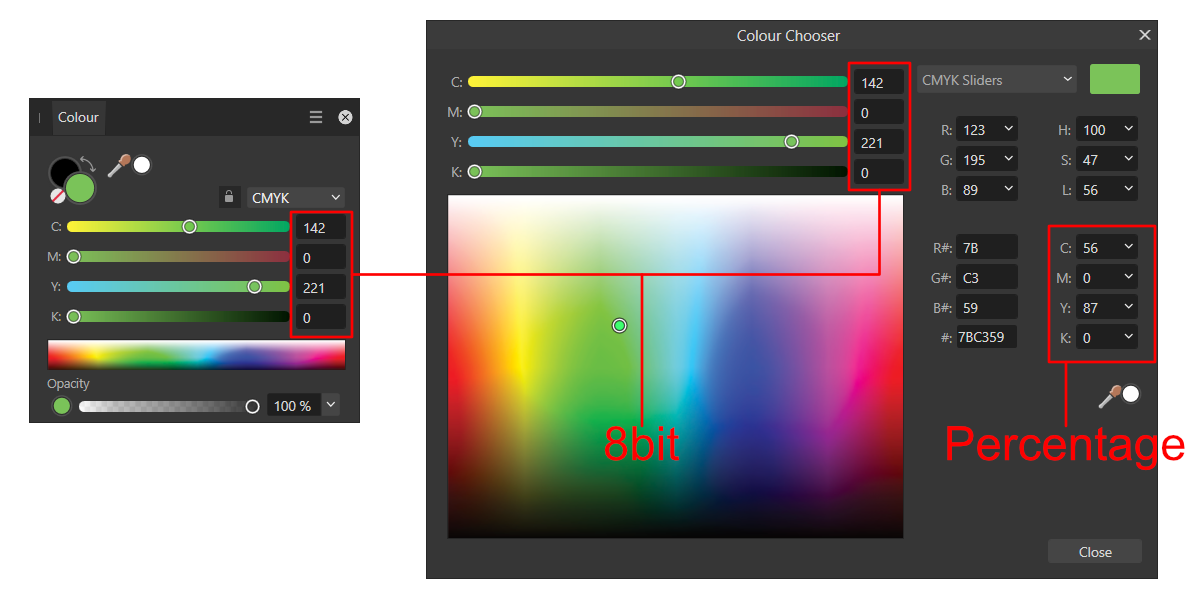
No problem at all! I'm not previously familiar with RGB565 but I can verify that Affinity has always displayed '16bit' HEX values as #RRRRGGGGBBBB on both macOS and Windows - so I understand this to be the expected behaviour. I see, that's definitely interesting! Your maths appears to check out in this regard, though the app should not be displaying the HEX with this percentage conversion at all - as it simply shouldn't be possible to set RGB HEX to percentage. I wouldn't wish to give you incorrect information here - it certainly appears as though this is what is displayed, but as the behaviour itself is fundamentally unexpected/unsupported, I can't be certain that the 16bit value provided is correct or definitively represented of the colour value used in the file and therefore wouldn't want to confirm that directly, whilst the above logged issues still exist within the Colour Studio. I can verify that AFD-6355 was initially closed by our team as resolved in 2.1.0.1705, but later reopened for 2.1.0.1709 as a different method was found to cause these incorrect values to display in the Colour Chooser. Note 'AF-6355' is now converted to 'AF-2452'. I'll be sure to 'bump' this with the team for 2.4 now, as I expect the Sliders above the waterfall in the Colour Chooser to be displayed using your Colour Studio settings - though the values on the right side are unaffected by this, and should always be displayed as 8bit for RGB and Percentage for CMYK. This is the behaviour shown on Windows: AFD-6356 is a less encompassing version of AF-2421 - as the AFD issue was specific to CMYK, whereas the AF issue covered all Colour Modes in the Colour Studio. I'm unsure why AFD-6356 was missed by our team (and by me when searching for this issue internally ) however I can confirm that AF-2421 has already received an internal fix, which is awaiting our teams testing and therefore should hopefully be resolved in an upcoming update!

-

Layer colour problem
Tony Webb replied to Tony Webb's topic in Affinity on Desktop Questions (macOS and Windows)
Hi Alfred, I could lend you some binoculars to see if they help. Silly me! Since posting this comment I have had a little play with my page. I noticed that in the colour wheel you can use RGB and it gives the numbers that I am using. However in layers you can only adjust the colours which show a percentage. I tried entering the umbers from the wheel but the selective colour box won't accept them (it reverts back to percentages). I also noticed that you can use hex with fill and stroke which means that it's only colour balabce or selection for layers doesn't use them. I think that's strange but then it might be me in wanting to do a strange thing!
-
 In CMYK erstellte Tabellen, werden immer im RGB-Farbraum exportiert 1. Erstelle ein Dokument im CMYK-Farbraum 2. Erstelle eine Tabelle im CMYK-Farbraum 3. Exportiere die Tabelle als PDF/X-4 Die Tabelle ist im PDF im RGB-Farbraum aufgebaut. Tables created in CMYK are always exported in the RGB colour space. 1. create a document in CMYK colour space 2. create a table in CMYK colour space 3. export the table as PDF/X-4 The table is created in the PDF in the RGB colour space.
 -
 Hi @Evette and welcome to the forums, Is your document RGB or CMYK? Do the objects added to your document use RGB or CMYK colours? Which PDF preset are you using to export your file? Can you upload a sample Affinity file that demonstrates the issue you're experiencing along with the PDF file exported from that document?
 -
Hi, opening a HIF Photo from my Nikon Z8 give only very low contrast image. I use Affinity Photo 2.4 on macOS Sonoma. To get sufficient results I need to adjust white level (from 100% to 65%) and gamma (from 1 to 1.5). Affinity Photo describes the picture as RGBA/32 - SRGB IEC61966-2.1 (Linear) . However it is only RGB/10 and I guess its log (not linear). I assume a bug in Affinity Photo here while importing the 10Bit RGB HLG HIF file. It looks the color profile is wrong interpreted. In contrast opening the same picture with Gimp (after importing I get: Convert to RGB Working Space? From BT.2020 to GIMP build-in sRGB.) I get a correct result. Additionally in the build in preview of MacOS is see also a correct representation of the HIF file. Is this a known bug? Or miss I something? Addition: Same result on my iPad with AP 2.4
-
As you are on Windows, it is good to know that Affinity apps cannot create a CMYK print job, even if the virtual printer supported it (Adobe PDF does, but e.g. Microsoft Print to PDF, PDF-XChange or PrimoPDF do not so they always create RGB output). Many print shops however accept RGB PDF but then you also need to set up your design in RGB color mode and define e.g. text black as RGB 0, 0, 0. Otherwise (using CMYK color mode), your colors will basically be doubly converted (from CMYK to RGB and back to CMYK) and the results will be less than ideal. If the print shop requires CMYK, you could convert a properly created RGB PDF to an acceptable CMYK PDF (with RGB black text converted to K100, and colors converted to desired color profile) with e.g. PDF-Tools (by Tracker Software), which is not a free tool (costing currently USD82) but comes with a perpetual license. But complex things like overprinting (e.g. black text is customarily overprinted) could not be handled with that tool. All in all, considering all the extra trouble, you should be able find a print shop that outputs a standard page-based PDF output (created by exporting) to a booklet without extra cost.
-
 Your document is CMYK. This is at least unexpected and a probable cause or co-factor. Having document in cmyk, a rectangle with rgb based gradient, and sampling in rgb again introduces double-conversion (rgb to cmyk, cmyk to rgb) and rich black / K-only black issues.
 -
Seems so. On Windows (at least the latest version of Publisher) the check box is available. Note that within Affinity apps the native objects (shapes and text) are always converted to CMYK when exporting to PDF (in contrast of e.g. InDesign, where you can leave them as RGB as per relaxed specs of PDF/X-4). So if you do not have the color conversion option checked, you will get this (placed RGB images are left unconverted): ...and if you do, you will get this (placed images converted to CMYK, as well): As you mention that you typically have material from multiple sources, it is good to know that Affinity apps have serious issues with all PDF/X-based standard export methods, since they do not support passing through non-PDF/X-based PDFs, at all, disregarding their PDF version number, so what happens is that these files will be rasterized [You would need to let Affinity app interpret these kinds of files to avoid that, but then you take risks of having replaced fonts, ignored print settings, and misinterpreted/inaccurately rendered objects.]. In this sense, using the default export method (PDF (press-ready)) with PDF 1.7 compatibility level would be most compatible as it has no problems passing through any PDFs. All PDF levels starting from 1.4 allow mixed color spaces and live transparencies so PDF/X-4 is not anything special in this respect. But if you do not mind rasterizing (especially if you can afford exporting at e.g. at 600 DPI), then PDF/X-4 is basically "problem-free". You should also be aware of the fact that Affinity apps do not convert the color space of PDF content that is defined to be passed through (the default setting), so if you have RGB based PDFs, they will be left in RGB color mode when you export to press-targeted PDF even if you explicitly export to CMYK color space and force conversion of image color spaces (unless being rasterized, in which case they will be converted). This, too, is something you (or printshops) would not expect in light of having experience with other page layout apps (so instructions you get from printshops related to color conversions do not necessarily produce what is expected). [Note: In the screenshot above the color definition RGB 255, 255, 255 is of course wrong; the actual definition for the rectangle is obviously RGB 255, 0, 0, while the text is RGB 255, 255, 255.]
-
It should be your principal workflow to always place photos and other RGB images in RGB color mode and just have them (automatically) converted to CMYK at export time, using the correct CMYK color profile. You can have your press-oriented document in CMYK/8 color mode and place and define native shapes in RGB and then convert to CMYK (CMYK document color mode does not mean that the app automatically converts colors to CMYK when placed or defined; Affinity apps allow kind of dual-color environment, similarly as e.g. InDesign). There is typically no need to convert images to CMYK beforehand.
-
 original layer shows fine and i want found way recolour it beetween black and given colour. and bit hard show becouse is buyed element. but i tried found way thing what i not actually need when i can do it other ways. And i found gradient map allows this. and it keeps things transparency. only thing what i miss but procedural textures i know is solution. mapping image beetween colour and transparency mean for example image is opaque where i i want convert black color and white to transparency and greyscale vealues in are inbeetween values. in only need check rgb to greyscale converiso nratios (i have somewhere for ntsc/pal systems them). and also some other tricks where i can do suitalble alpha chanels. then case can counted solved even solution is elesewhere what i searched. procedural textures are indeed lot of things allowing thing even i miss better features what allows program own functions like programming language.(i mean more complex things what current possiblities allow).
 -
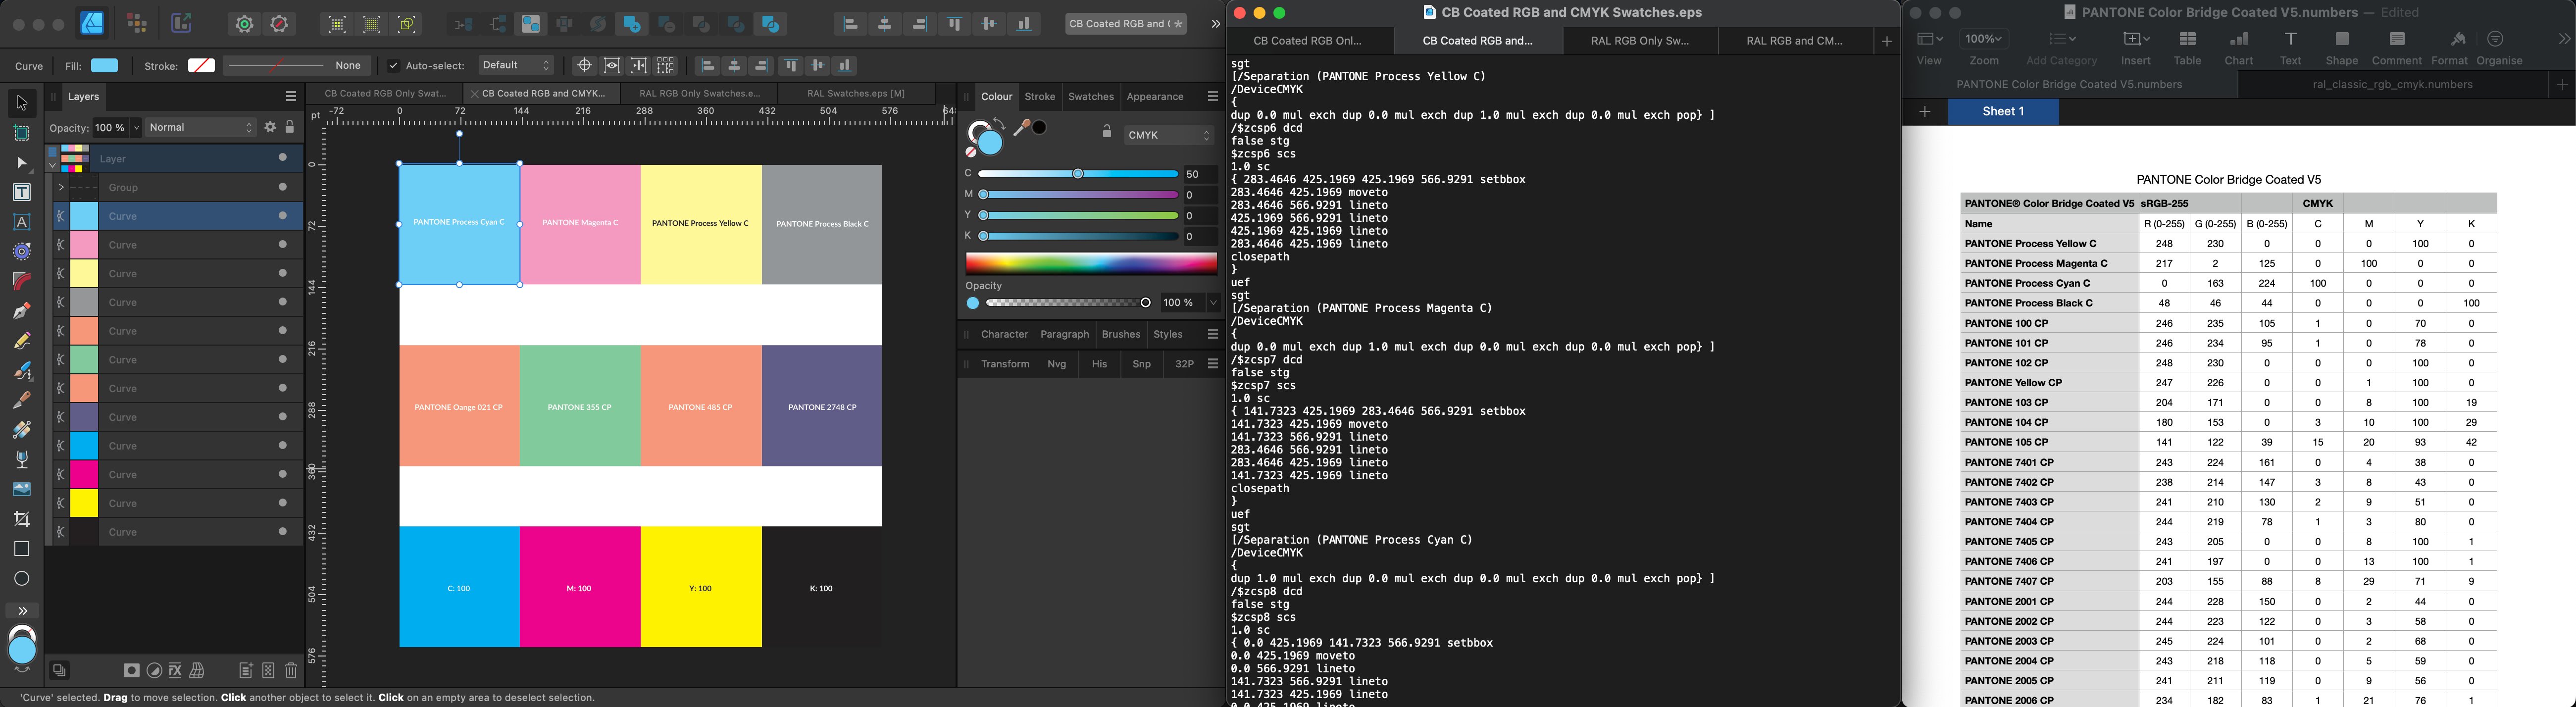
Hi @Dan C, I was unsure whether to raise this as a new thread or continue an older, potentially related thread, but decided to start a new thread because I now have, what appears to be a repeatable formula to reproduce the issue and so have linked the other two, possibly related, threads at the end of this post should they all need to be merged. The CSV Pantone libraries used by the Affinity apps are defined using either sRGB only or sRGB and CMYK colour values, i.e., these palettes combine sRGB and CMYK colour references in the same palette... PANTONE Color Bridge Coated V5.csv PANTONE Color Bridge Uncoated V5.csv PANTONE GoeBridge Coated.csv PANTONE Plus CMYK Coated.csv PANTONE Plus CMYK Uncoated.csv The remaining palettes use sRGB colour references only... There is a bug in the macOS version of the Affinity apps (appearing in a couple of different posts), logged as AFD-6216, where EPS files created in third-party apps, in certain circumstances, display CMYK values of 50% and above as exactly 50% when opened in Affinity apps. A few instances of this issue have involved EPS files created in Illustrator, though I've now created files in VectorStyler demonstrating the same exact issue. Note 1: I don't believe the issue itself is either an Illustrator or Vectorstyler problem and it is likely possible to create using any third-party vector software following the same process. Note 2: The EPS files open correctly in V1 of the Affinity Apps but incorrectly in V2. Note 3: EPS files created directly in Affinity Apps, using the same colour palettes do not demonstrate the issue when the exported EPS file is opened in either Affinity or third-party apps. As far as I'm aware the issue is Mac-specific and to date, I don't think there's been a specific formula to recreate the problem but some additional testing seems to suggest the following... Third-party apps generating CMYK EPS files using colour palettes defined using combined sRGB and CMYK colour values, result in DeviceCMYK colour definitions while those using sRGB only colour values in the colour palette result in DeviceRGB colour definitions in the exported EPS file, while in both cases, the colour is defined using CMYK values in Affinity apps. It appears that in V2 of the Affinity apps, any EPS file that uses DeviceCMYK as its colour definition incorrectly interprets CMYK values above 50%, regardless of the value between 50% and 100% and subsequently displays those values at exactly 50%. In the V1 Affinity apps, the same file is correctly interpreted. Testing this with any palette that combines sRGB and CMYK values in the same colour palette (whether an ASE, CSV, XML or JSON third-party palette), produces the same incorrect CMYK values in Affinity 2 apps. Device CMYK.mp4 When looking at both the DeviceRGB and DeviceCMYK colour values in the EPS files themselves, they are shown correctly and perfectly match the values shown in the respective palettes. Affinity Designer v1 - sRGB only Defined Colour Palette - DeviceRGB Colours Correctly Displayed Affinity Designer v2 - sRGB only Defined Colour Palette - DeviceRGB Colours Correctly Displayed Affinity Designer v1 - sRGB and CMYK Defined Colour Palette - DeviceCMYK Colours Correctly Displayed Affinity Designer v2 - sRGB and CMYK Defined Colour Palette - DeviceCMYK Colours Incorrectly Displayed Affinity Designer v1 - sRGB and CMYK Defined Colour Palette - DeviceCMYK Colours Correctly Displayed Affinity Designer v2 - sRGB and CMYK Defined Colour Palette - DeviceCMYK Colours Incorrectly Displayed Links to Two Other Posts Demonstrating Similar Issues Interestingly, the Illustrator files uploaded in both posts are missing their EPS Hex Signature but reinstating the correct signature makes no difference to how the same files appear when opened in V1 vs V2. Logo Italian Embassy CD Artwork Sample EPS Files CB Coated LAB Swatches.eps CB Coated RGB and CMYK Swatches.eps RAL RGB Only Swatches.eps RAL RGB and CMYK Swatches.eps
-

Curves Adjustment: LAB Mode -> Desaturation Bug
Ldina replied to stevenmiller's topic in V2 Bugs found on Windows
One last thought... If you convert from sRGB/8 to Lab/16 and choose "gray tone" from the conversion dropdown box (see screenshot), you get dead neutral RGB readouts in the sampler. If that's your intent, that gives you the L* luminosity you desire and 0a*/0b* values across the entire tonal range, without any color cast (whether that's an actual color cast, or just interpolation error). I presume that is what the gray tone options is designed to do.
-
 In the absence of (or in addition to) any other factors that might be an influence, my general practice* is to keep the color space as large as possible, for a long as possible, throughout my editing workflow. The reason is to, as much as possible, avoid potential gamut / conversion issues and maintain the most room for stretching, raising, etc., colors and tones with minimal artifacts. That's why I stay in ROMM RGB / ProPhoto until export. So generally I'd lean toward #3 but I'm no uber-expert (at all!) and there may be specific considerations that come into scope for your workflow. If you run into conversion artifacts upon export, maybe drop back to #2 but just prior to export (so you can check and mitigate). * Not specifically for print, but the same logic generally applies unless something specific overrules it.
 -
Curves Adjustment: LAB Mode -> Desaturation Bug
Ldina replied to stevenmiller's topic in V2 Bugs found on Windows
@stevenmiller If you first CONVERT your file to Lab/16, you can then neutralize the a* and b* channels, which will give you a dead neutral image, where all tones from black to white are fully desaturated. Now you are in Lab color mode and the curves possess their full range, without having to make multiple conversions. I suspect when working on an image in RGB and switching modes with Curves, Levels, etc, you are getting exactly what @NotMyFault reported. I doubt it was designed for desaturating an image. And as he mentioned, there are much better ways to convert from color to B&W. To preserve tonality, Channel Mixer works quite well. If you want more control over the tones, you can choose a B&W adjustment layer. Or, desaturate with HSL, then adjust tonality as desired with Curves, Levels, etc. -
Jpeg colour changes when uploaded to Social Media (Facebook)
Hangman replied to Beck's topic in V2 Bugs found on Windows
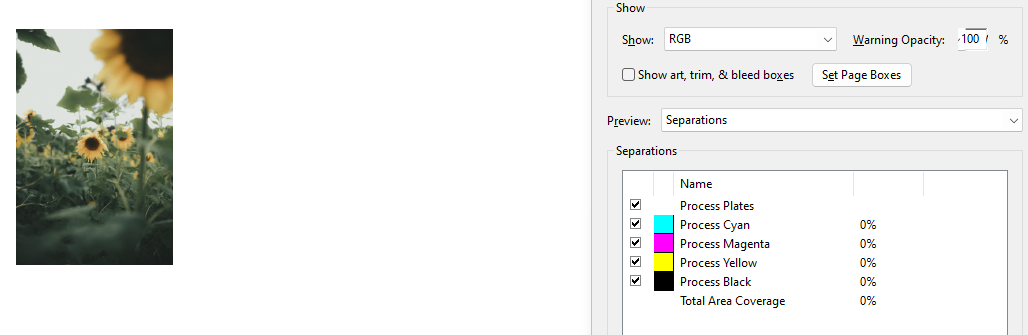
This is because your document is set up using a CMYK colour space and you are exporting your JPEG as a CMYK file... PNG files don't support CMYK so are subsequently exported as RGB which is why the PNG versions exported display correctly online but the JPEG versions don't... "While the most popular web browsers in use, Chrome, Firefox, Microsoft Edge (Windows 10) / Internet Explorer and Safari all support colour management Chrome and Firefox can set sRGB as the default colour space which means whether your image profile is embedded with an sRGB profile or not, it will be displayed as an sRGB image. Firefox can also show correct colours with the Adobe RGB colour space, though to make your Firefox and Chrome browsers display the intended colours, you need to adjust the browser’s colour management settings first. Internet Explorer, Microsoft Edge, and Safari sync with the monitor’s colour profile settings. Microsoft Edge can sync with your monitor’s profile correctly whether the image is sRGB or Adobe RGB." -
 Newer mind! Affinity Photo uses RGB 32-bit and Windows only RGB 16-bit. So changing it, fixed my issue!
 -

cropped rgb channels when exporting tga with mask
shibibd posted a topic in V2 Bugs found on Windows
Hi there, Firstly I have to say that you guys make great products. Unfortunately, I lost some hours of work with this bug after having edited without creating backups first. So I engage in loosing a bit more time on this issue in order to help improve the product so I can benefit from that fix when that comes out too. At least is what I'm trying to do here with this topic. I'm using Affinity Photo 2.1.1 on Windows 11 Home build 22621.2134 with an RTX 4080 (I know that it's overpriced :/) I've recorded the entire thing and added the file to reproduce the issue but here it goes the writen description. I tried to edit the alpha channel without afecting the RGB information. At first everything seems nice but when we open the file that affinity generates, we see that the rgb information was cropped in a box shape. I guess is due to the glitch that I also have when selecting different channels with that mask applied and zooming in and out. Hope that this can help to get that one fixed as soon as possible. Thanks for your time. 2023-09-07_10-30-40.mkv body_original.tga -
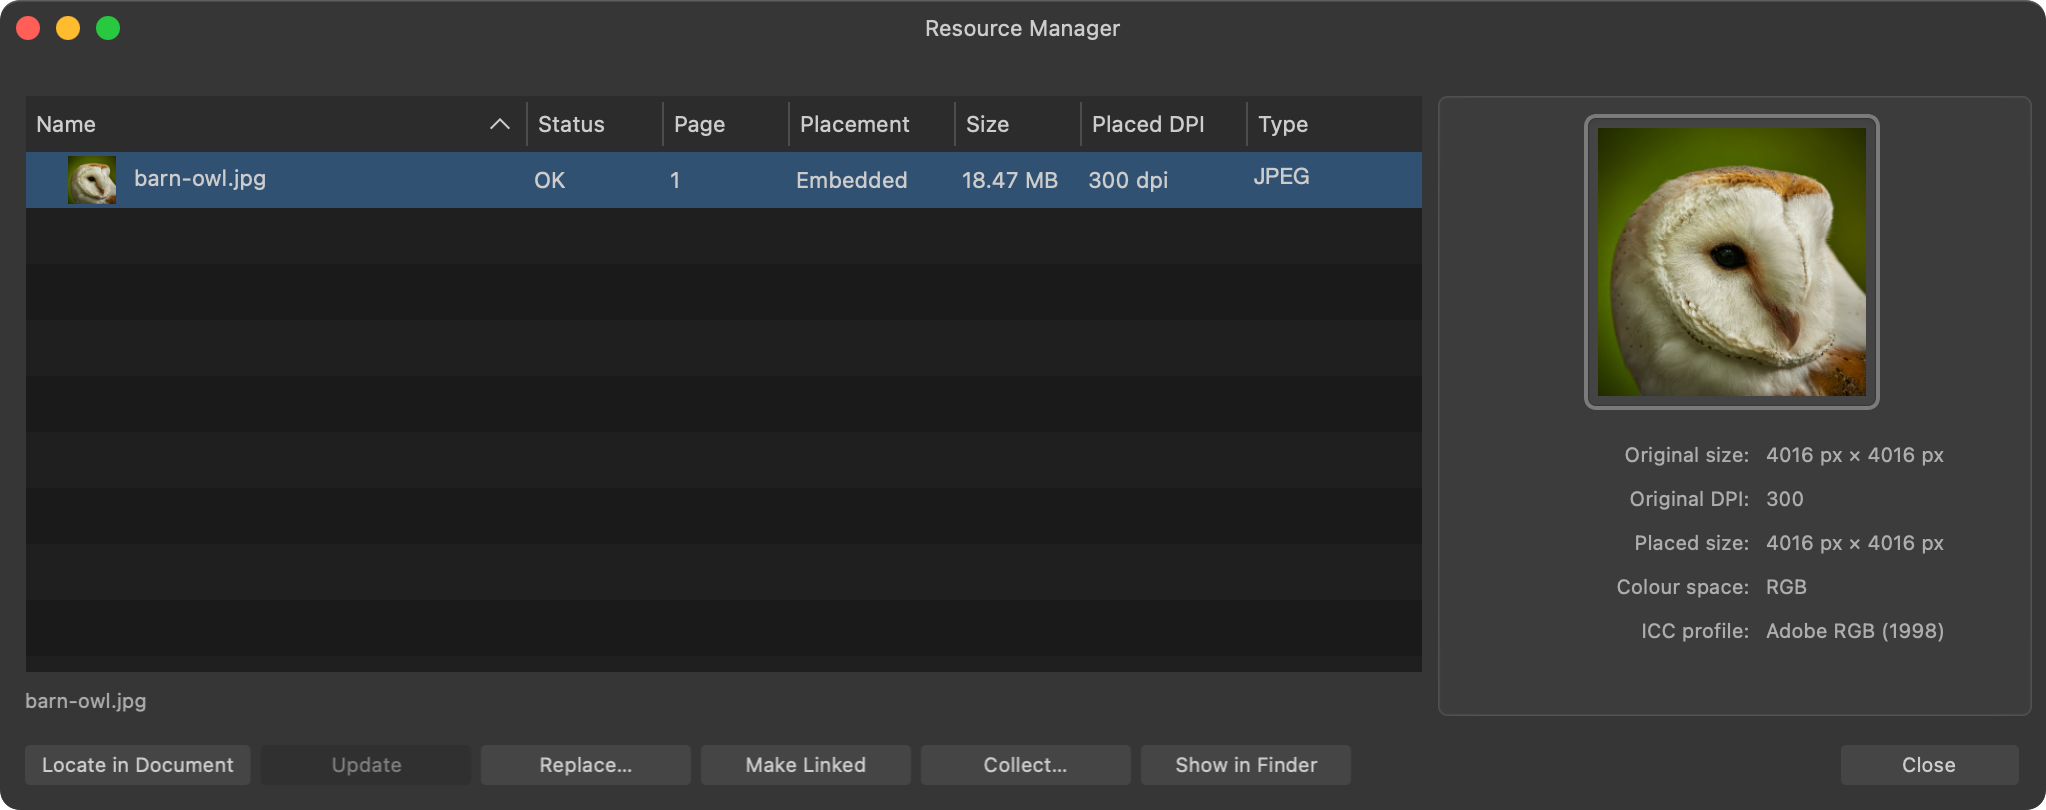
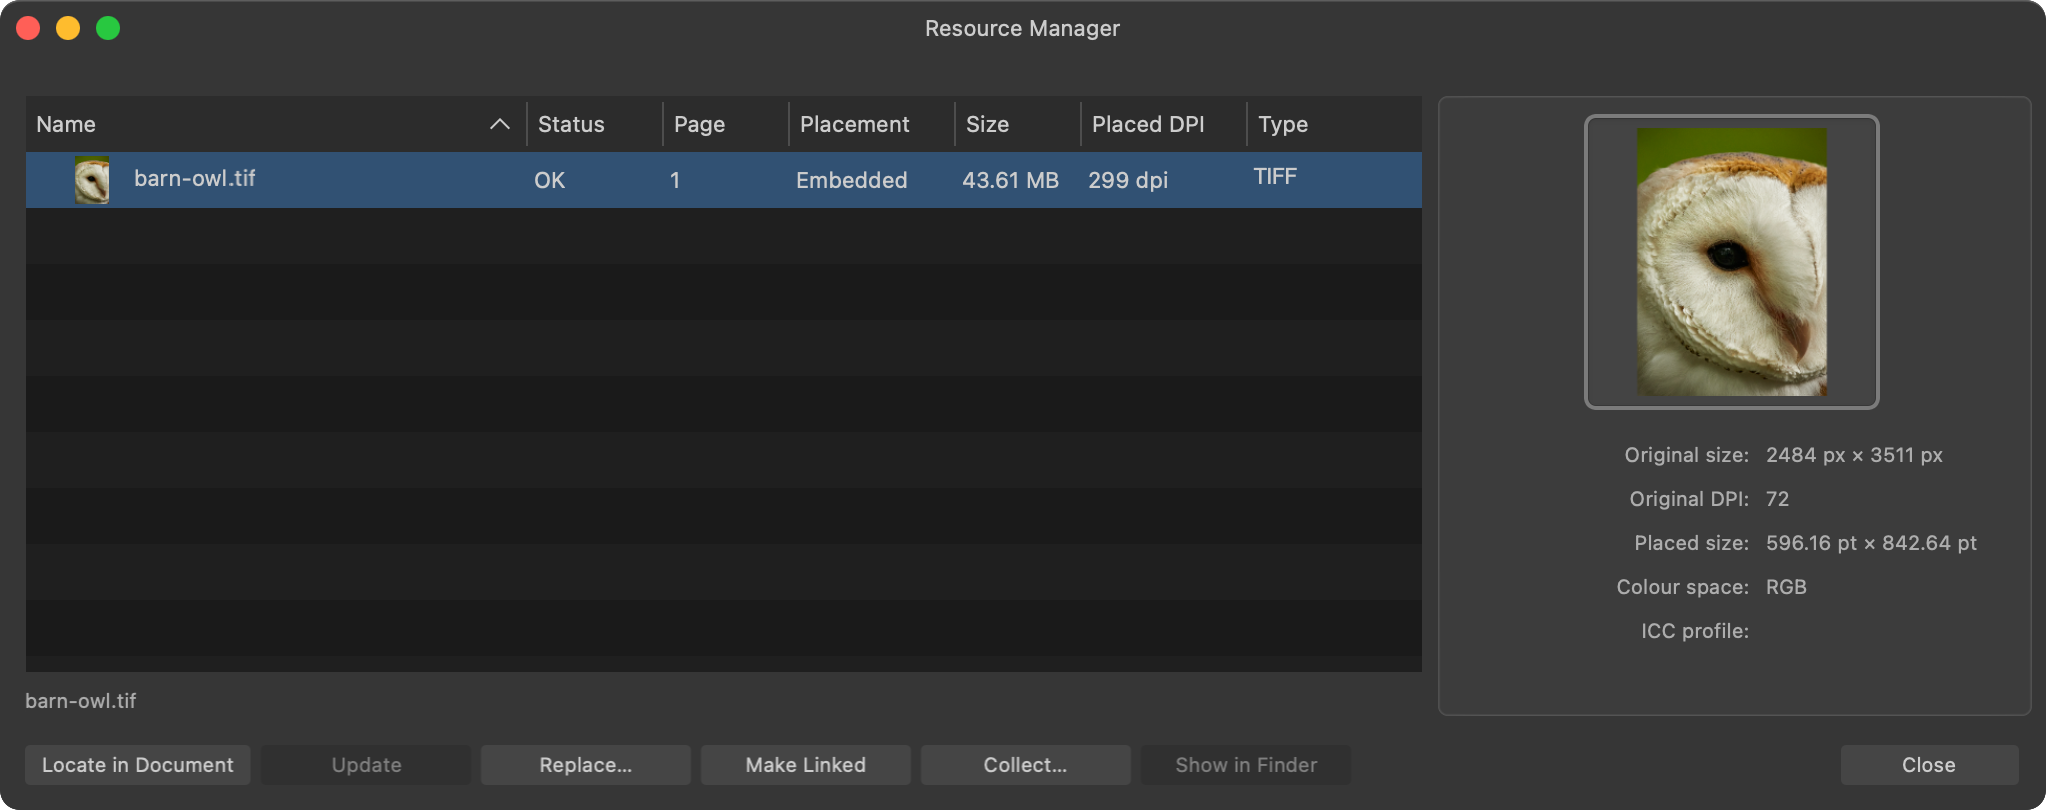
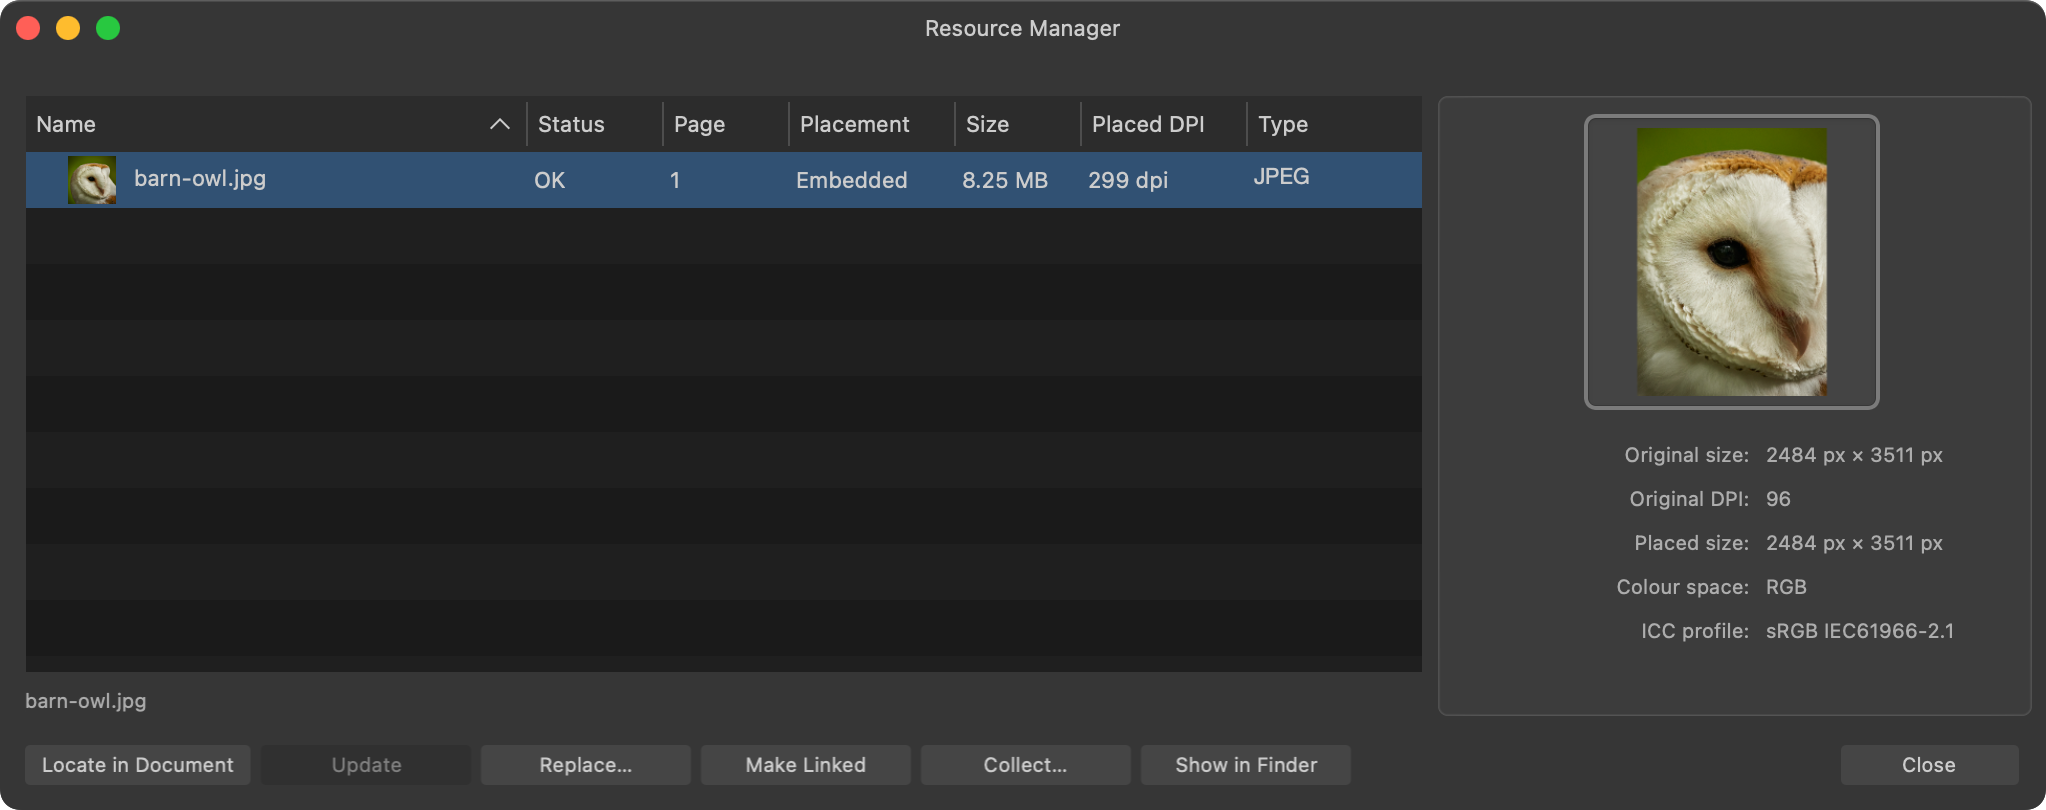
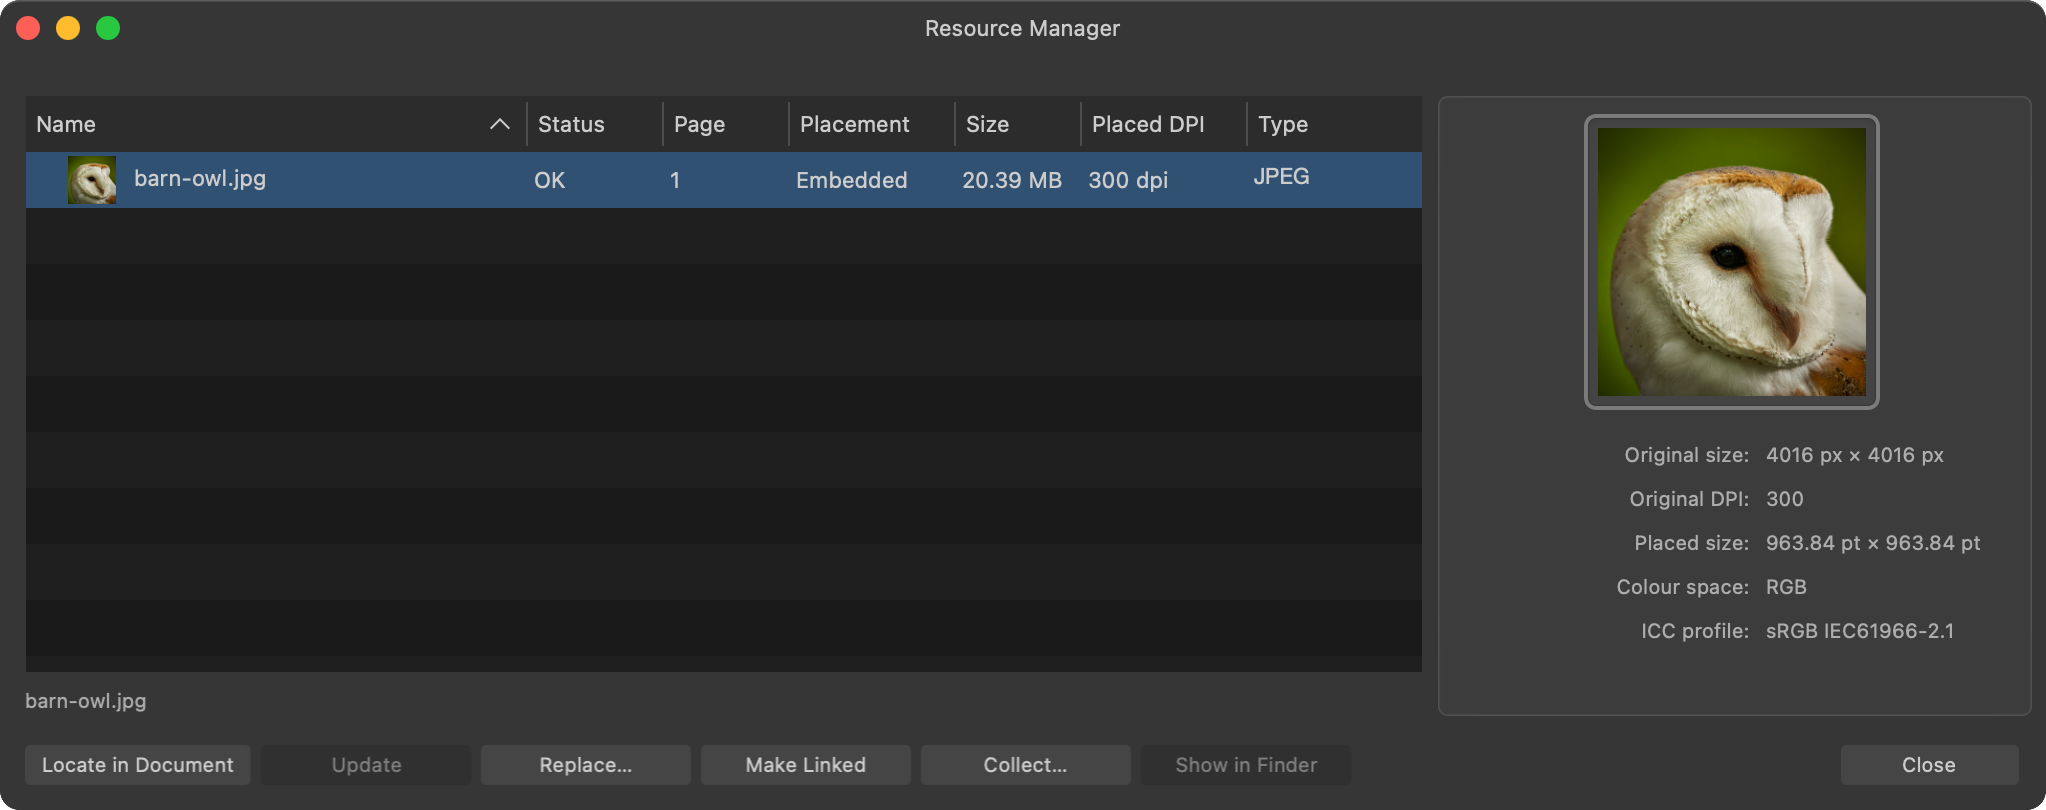
I'm unsure whether this has been previously reported or elements of it have... This is not unique to v2, it happens in v1 as well. Take a JPEG File, in this instance a 4,1016 px x 4,016 px, 300 dpi file with an Adobe RGB (1998) embedded profile, exported from Capture One and Place it unscaled into: An A4, 300 dpi RGB Publisher document with an Adobe RGB (1998) Working profile A Square 4,1016 px x 4,016 px, 300 dpi RGB Publisher document with an Adobe RGB (1998) Working profile Test 1 Export both files to PDF using the PDF (for print) preset with default settings and the colour profile embedded... Open both PDF files in Publisher with 'Convert opened files to working space' disabled... Resource Manager for both Publisher Files A4 PDF File Opened in Publisher The ICC Profile is incorrectly shown as sRGB and the Original DPI is incorrectly shown as 96 despite the source image being unscaled... the placed file is correctly shown as a JPEG file... Square PDF File Opened in Publisher The ICC Profile is incorrectly shown as sRGB and the Original DPI is correctly shown as 300... the placed file is correctly shown as a JPEG file... Test 2 Export both files to PDF using the PDF (for print) preset with 'Allow JPEG Compression' unchecked and the colour profile embedded... Open both PDF files in Publisher with 'Convert opened files to working space' disabled... Resource Manager for both Publisher Files A4 PDF File Opened in Publisher The ICC Profile is not shown at all and the Original DPI is incorrectly shown as 72 despite the source image being unscaled... the placed file is incorrectly shown as a TIFF file despite being a JPEG... Square PDF File Opened in Publisher The ICC Profile is incorrectly shown as sRGB and the Original DPI is correctly shown as 300... the placed file is correctly shown as a JPEG file... Source JPEG File used for Testing barn-owl.jpg.zip
-
Hi @Callum, Many thanks for investigating further and for the feedback from the dev team... I'm starting to feel bad about pursuing this as I don't want to take up anyone's time unnecessarily here though based on the feedback you've received there are still several contradictions so to try and better demonstrate these I've created a new file which I hope better demonstrates the issue... For total clarity, we are both talking about the exported pdf file and not the way exported pdf files are treated when reopened in Affinity apps which I assume honour the exported pdf? Based on the feedback you've received I think that is indeed the case but I just want to make sure we're not talking at cross purposes and it's not Affinity apps themselves that are stripping out colour profiles and changing image resolution purely when the pdf is reopened (which would make little sense and be quite concerning for print work)... The New Publisher File For the new sample file, I'm using a 300 dpi 4,016 px x 4,016 px CMYK Affinity Publisher document and I'm placing four 300 dpi 4,016 px x 4,016 px Image files into the file and scaling each by 50% so all four fit perfectly on the same page and mean none of the Image files are being cropped based on them sitting outside the page area... Artwork Specs The Publisher Document uses a Coated FOGRA39 (ISO 12647-2:2004) Colour Profile... The four image files use the following Colour Profiles, two with RGB profiles and the other two with CMYK profiles: Barn Owl - Adobe RGB (1998) Dormouse - U.S. Web Coated (SWOP) v2 Fox - PSO Coated v3 Scottish Wildcat - ProPhoto Each image file is added to the page and scaled to 50% so the Original DPI is 300 and the Placed DPI is 600 for each image... PDF Exports Settings Four variations of the file are exported to PDF using the PDF (press ready) preset... All exported files have Embed Profiles enabled... The only difference between the four exported PDF files is whether Allow JPEG Compression (AJC) and/or Convert Image Colour Space (CICS) are enabled or disabled denoted by Y or N if the PDF filenames... Publisher PDF Exported Filenames 01_Animals_AJC_Y_CICS N.pdf - 'Allow JPEG Compression' enabled, 'Convert Image Colour Space' disabled 02_Animals_AJC_Y_CICS Y.pdf - 'Allow JPEG Compression' enabled, 'Convert Image Colour Space' enabled 03_Animals_AJC_N_CICS N.pdf - 'Allow JPEG Compression' disabled, 'Convert Image Colour Space' disabled 04_Animals_AJC_N_CICS Y.pdf - 'Allow JPEG Compression' disabled, 'Convert Image Colour Space' enabled Questions for the Dev Team Regarding Publisher Exported PDF Files Reopened in Publisher... In many ways, I don't think the Original DPI shown in Resource Manager matters too much and it doesn't appear to be based on whether or not the image exceeds the page bounds, though based on the feedback from the dev team and considering in this example the images are not cropped and they use a different colour profile to the Document itself I am curious as to why when reopening Publisher exported PDF files in Publisher: Why RGB images are exported using a default dpi of 96 when there is no unnecessary bitmap data to be cropped and the colour profile isn't duplicated? Why CMYK images are exported using a default dpi of 72 when there is no unnecessary bitmap data to be cropped and the colour profile isn't duplicated and why does this differ from the default dpi for RGB images? The embedded ICC Profile is stripped and shown as sRGB IEC61966-2.1 in Resource Manager for RGB profiled Images despite that profile not being used for any of the images The ICC Profile is shown as Blank in Resource Manager for CMYK Images despite embedded Profiles being enabled on PDF export The embedded JPEG Images are shown as TIFF files in Resource Manager when Allow JPEG Compression (AJC) is disabled on PDF export The incorrect Document Colour Profile is shown when Convert Image Colour Space (CICS) is disabled on PDF export and which varies based on the image layer order in the source file The same exported PDF shows the correct Document Colour profile once extracted using the ExifTool command exiftool -icc_profile -b -w icc filename.pdf followed by exiftool filename.icc to examine the ICC profile (see screen recording below) The correct ICC Profile is shown for each Image when viewing the exported PDF in Acrobat or Packzview (as shown below) based on the Publisher export settings Initial Publisher File Setup File Setup.mp4 Publisher Exported PDF Files Reopened in Publisher Colour Profliles Resoure Manager.mp4 PDF Files Viewed in Packzview Packzview.mp4 Incorrect Document Colour Profile is shown when Convert Image Colour Space is disabled on PDF export ICC Profile.mp4 Sample Source Files Animals.zip Publisher Exported PDF Files Publisher Exported PDF Files.zip
-

Colour Model Definition For Hex Values
garrettm30 replied to Hangman's topic in V2 Bugs found on macOS
I’m struggling to see what you mean—not that it matters whether I can see it, since this is a bug report. But it might be clearer if you give a recipe or a demo video. Maybe part of the reason I am having trouble is following what you mean by “Hex values in Base 16,” since hex (short for hexadecimal) is by very definition base 16, so hex values should always be base 16. Also, I don’t see percentages in either view, but rather either the value expressed as decimal (from 0 to 255 in 8-bit color) or as hexadecimal (from 0 to FF in hexadecimal in 8-bit color). I do notice that the wheel view does show HSL (rather than RGB) in decimal on the bottom left and of course RGB as hexadecimal on the right. -

Hugh PDF file sizes
thomaso replied to Ross Hurley's topic in Affinity on Desktop Questions (macOS and Windows)
This sounds unclear. If the image files are 8 bit they maybe in colour space grayscale (1 channel 8 bit) or RGB (3 channels á 8 bit = 24 bit) – but this profile is a CMYK profile (4 channels á 8 bit = 32 bit). What colour space & profile is the layout document, and what space & profile are set for export? The large file size may indicate that the images don't get compressed on export. Also this two sounds strange and may indicate that the images are neither downsampled nor compressed on export. In particular odd is that exporting with preset "flatten" creates a smaller PDF than presets "print" or "press". EDIT: Not odd, considering the different quality/compression settings in the presets "flatten" (85%) versus "print" and "press" (above 90%). It appears useful that you upload your Affinity document with a sample image (embedded or as a separate file) for a closer look in your various settings. Or at least upload a sample PDF which contains one of the layout pages. -
 An exported PSD from an RGB/32 with a "Soft Light" Layer can't be opened by Photoshop. Following error appears: Example file: soft light heart.afphoto
-
The color assigned by the color wheel are always HSL / RGB based. If you want to use CMYK colors, switch the mode to sliders and choose from the colors there. As long as your document is CMYK, those wider gamut colors get clipped to CMYK gamut, but stay in RGB mode. By converting the document color format the wider gamut gets visible again. This applies to vector layers only.