- S -
-
Posts
832 -
Joined
Everything posted by - S -
-
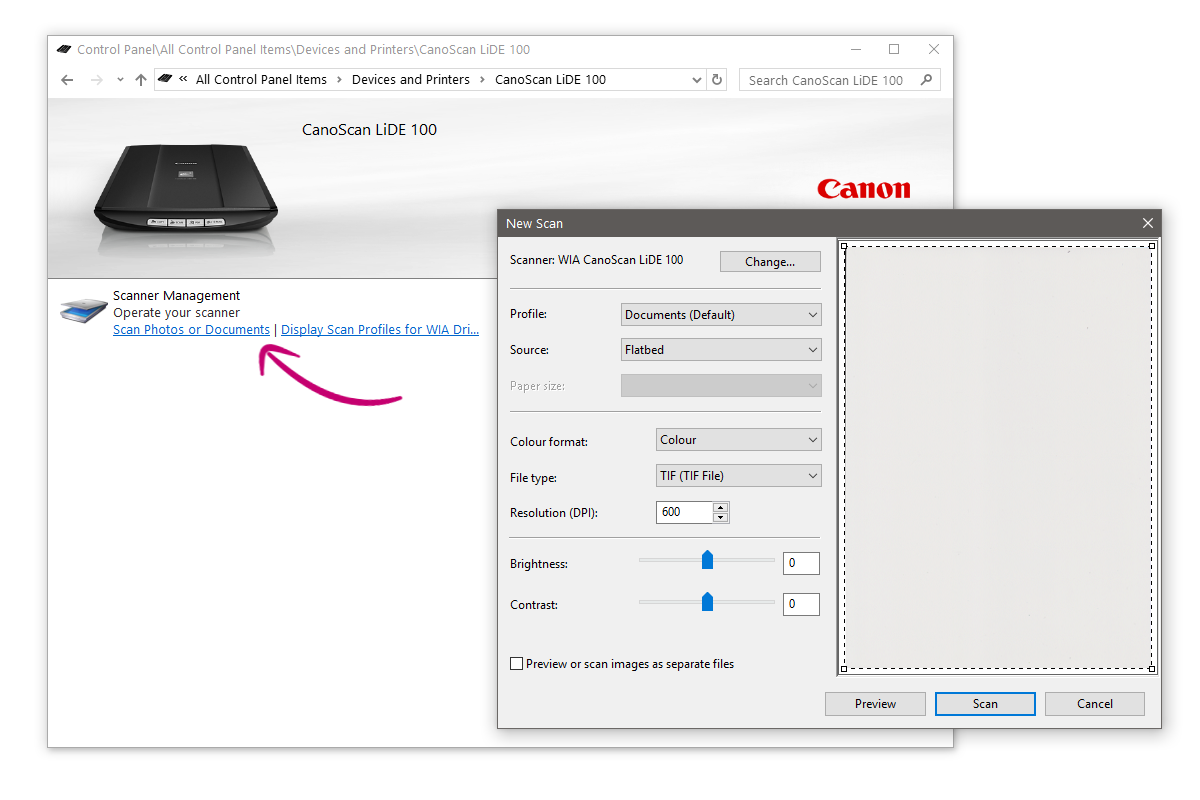
There's the Microsoft Scan app in the above post from v_kyr. Alternatively, the app in that link is more-or-less the same as the built-in Windows scan feature. To access it, go to Control Panel > Devices and Printers, then either right-click the scanner, or double click it to access the scanner functions. Isn't this all you're asking for?

-
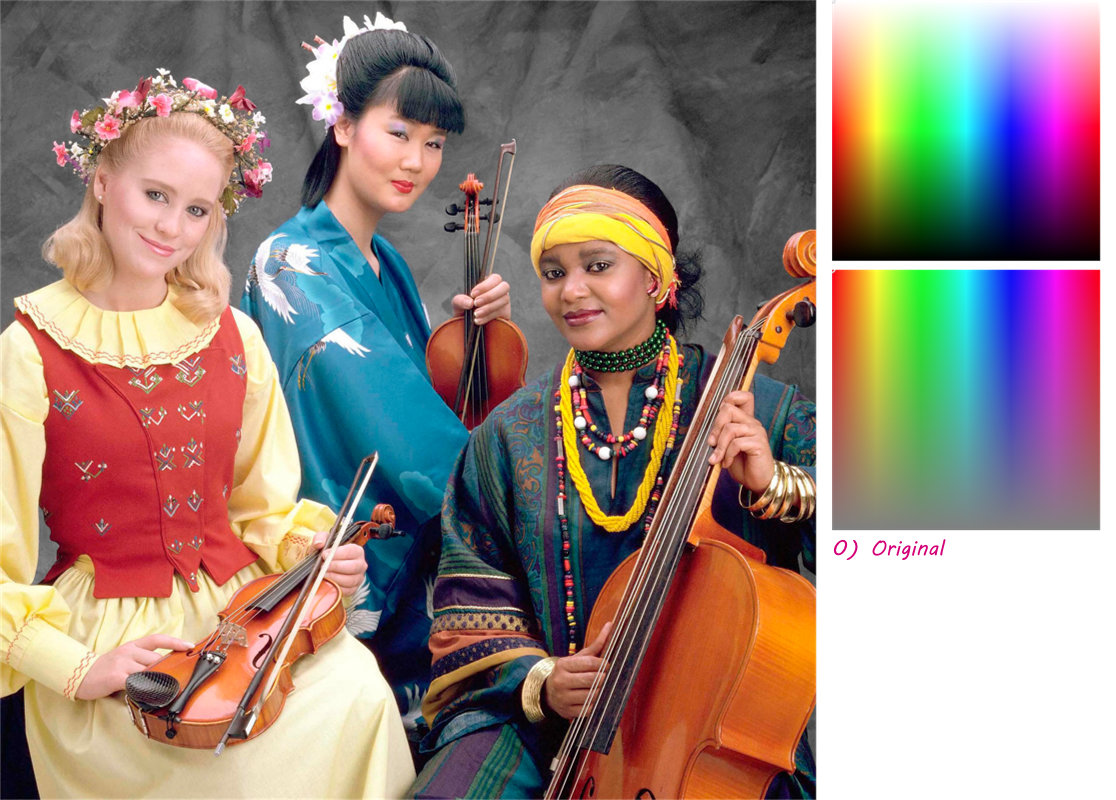
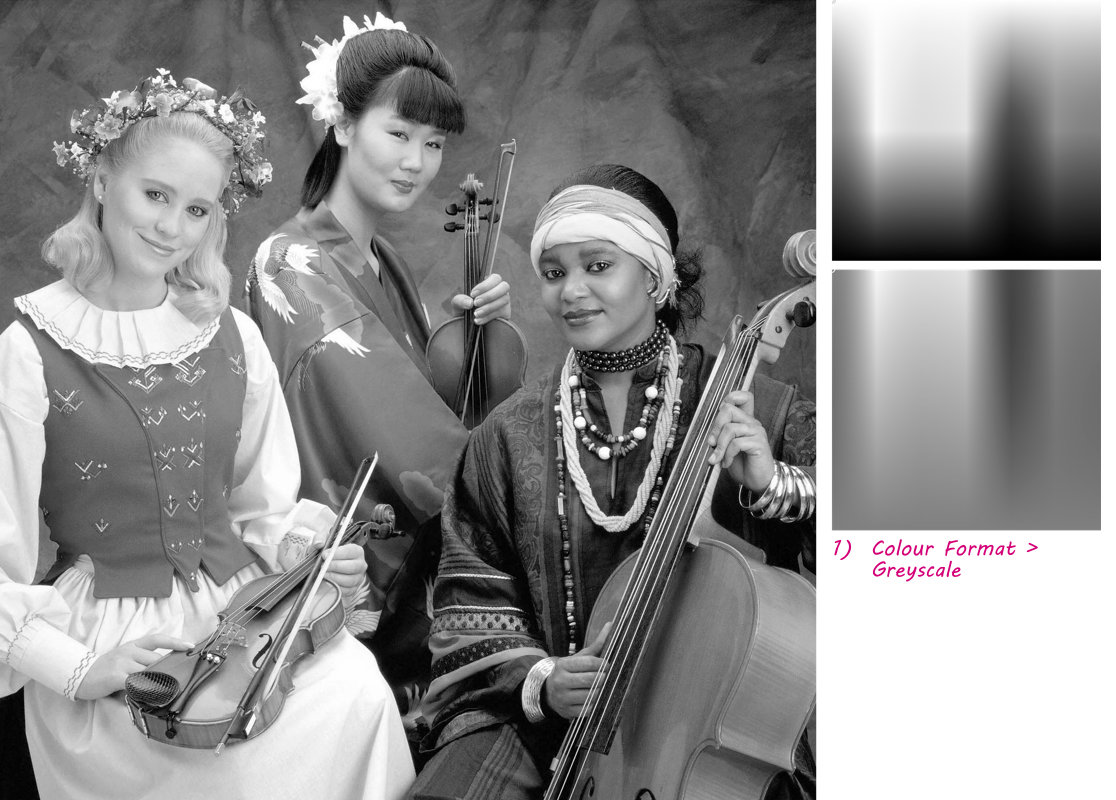
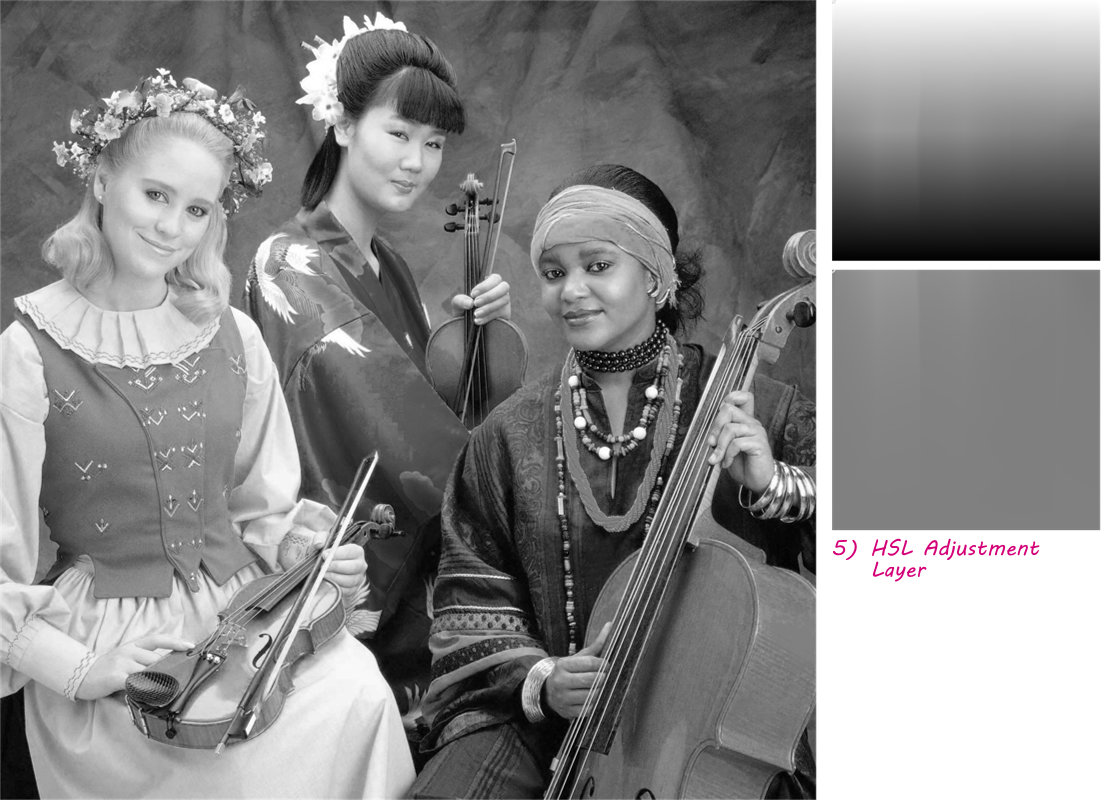
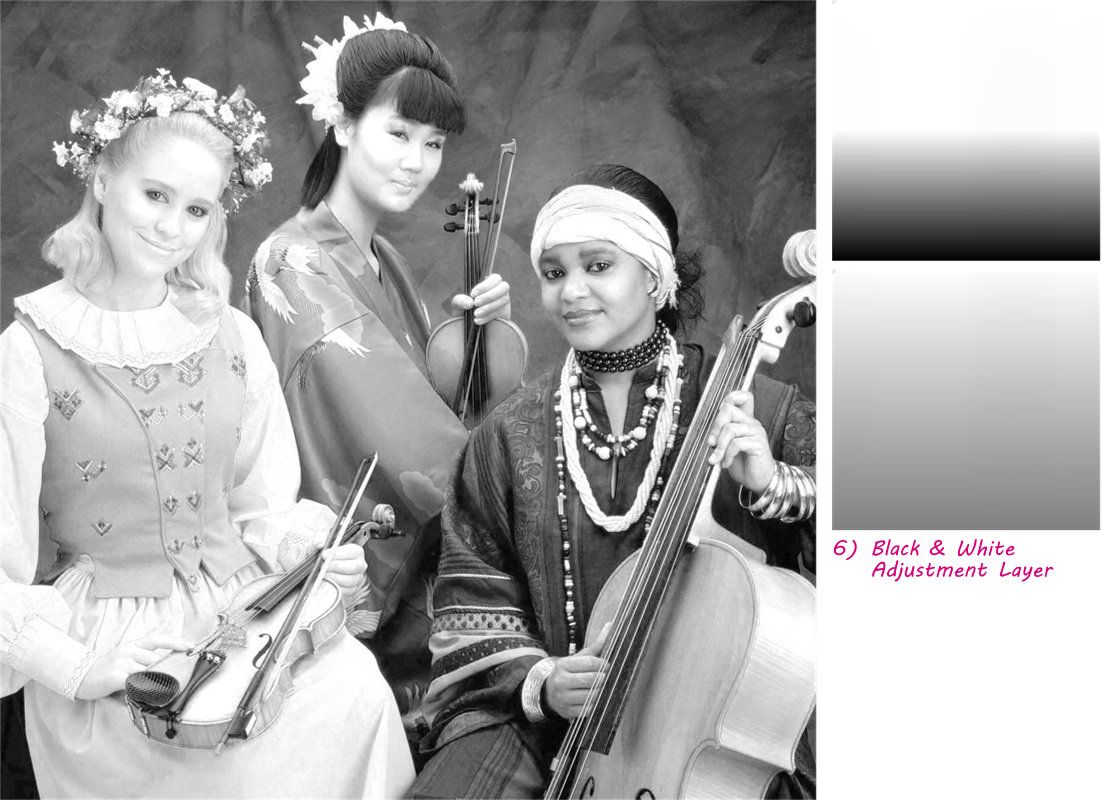
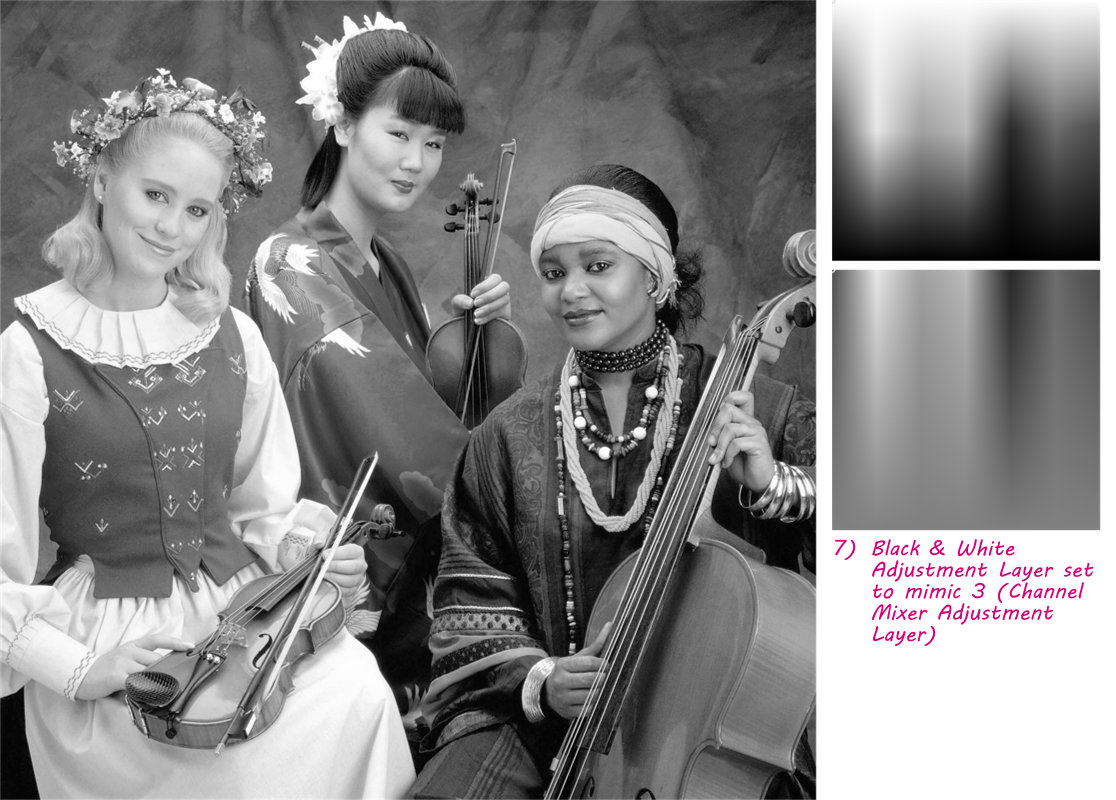
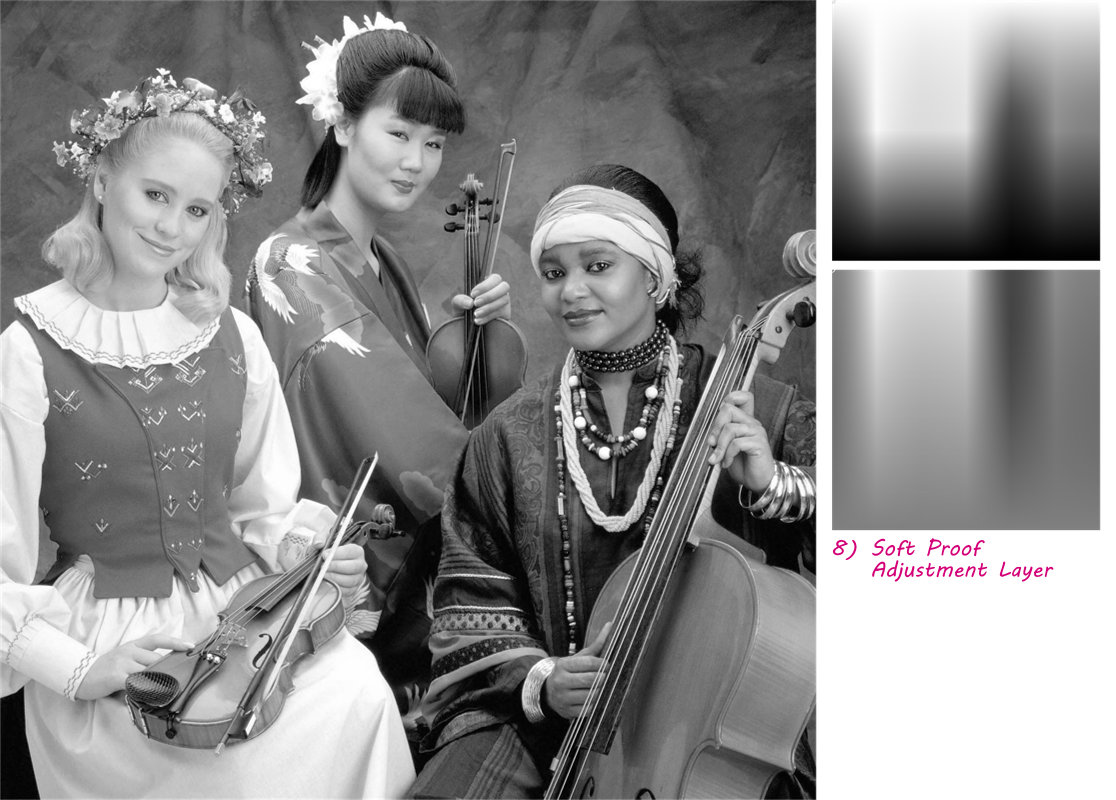
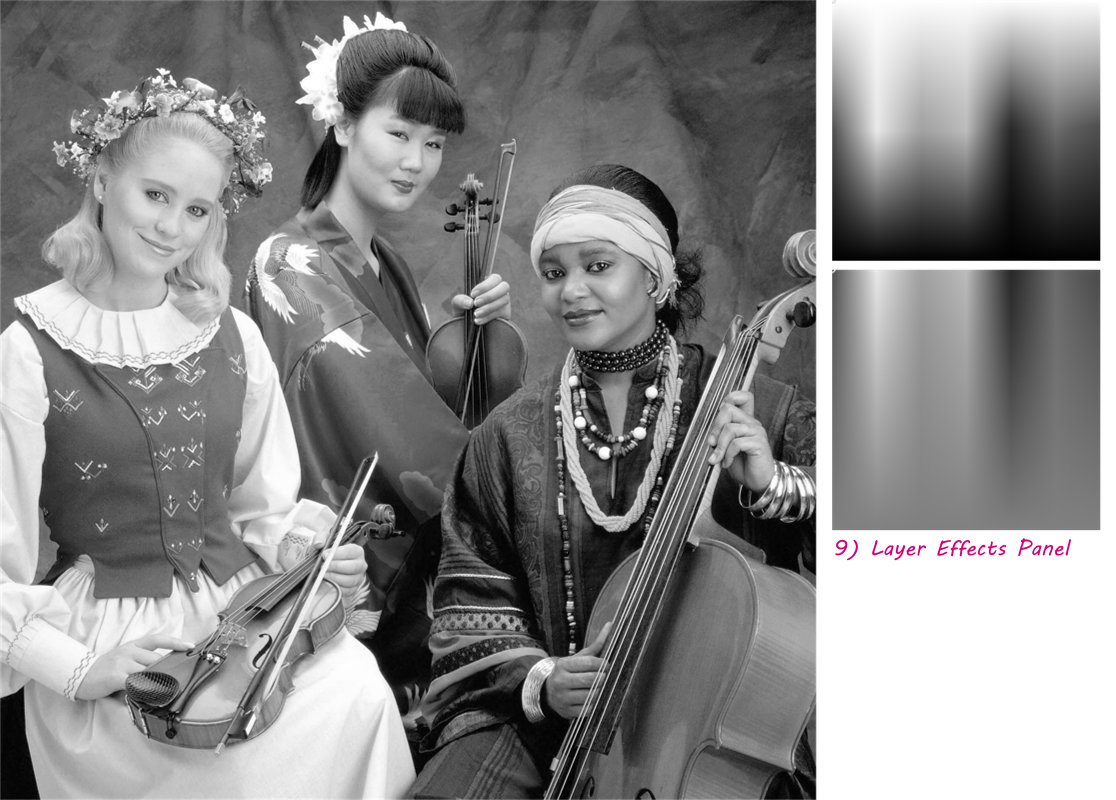
 There are a number of different ways to remove colour, however these are probably the most common ways: 1) Go to Document > Colour Format > Greyscale. Although I never use this as it's destructive and removes the colour information permanently 2) Go to Layer > New Fill Layer, fill it with white and set the layer blend mode to 'Colour' 3) Add a Channel Mixer Adjustment Layer and change the Output Channel to 'Grey' 4) Add a Curves Adjustment Layer, set the layer blend mode to 'Colour', then drag the bottom-left corner point of the curve to the top-left corner (so that it's a horizontal line) 5) Add a HSL Adjustment Layer and drag the 'Saturation Shift' slider all the way to the left (-100%) 6) Add a Black & White Adjustment Layer 7) Add a Black & White Adjustment Layer, and change the default values from 100%, to the following values to mimic method 3 (adding a Channel Mixer Adjustment Layer). R=29.8%, Y=88.5%, G=58.9%, C=69.9%, B=11.4%, M=41.2% (for RGB 8-bit images only, the values will be different for RGB 16-bit images). You can record this as a macro. 8) Add a Soft Proof Adjustment Layer and set the Proof Profile to 'Greyscale D50'. This will mimic method 1 (Document > Colour Format > Greyscale) 9) To do it via 'Layer Effects' for a layer or group. Open the 'Layer Effects' settings. Go to 'Colour Overlay' and set Blend Mode to Colour, Opacity to 100% and Colour to white or black. It's worth noting that the different methods give different end results as a straight B&W conversion, as per the below examples (click on the first image, then use the left/right arrow keys to scroll through them). The Monochromacy/Achromatopsia 'Color Blindness Simulator' on this site, appears to be using something similar to methods 2 or 3 above.
-
Affinity Photo UK Price Increase
- S - replied to - S -'s topic in Pre-V2 Archive of Desktop Questions (macOS and Windows)
Amazon however don't charge their customers an exchange rate of $1 to £1 for digital downloads. Adobe Photoshop Elements 15 [Download]: £47.97 $59.99 Adobe Photoshop Lightroom 6 PC [Download]: £99.99 $142.99 Microsoft Office Home and Student 2016 [Download]: £99.99 $115.00 VEGAS Pro 14 [Download]: £336.66 $449.95 Neither does the Steam Store Rise of the Tomb Raider - 20 Year Celebration: £39.99 $59.99 Resident Evil 7: £39.99 $59.99 Arma 3 Apex Edition: £44.99 $69.99 Nor the Ubisoft Store For Honor: £39.99 $59.99 Tom Clancy’s Ghost Recon Wildlands: £39.99 $59.99 Far Cry 4 - Gold Edition: £44.99 $59.99 Nor the Origin store Watch_Dogs 2: £39.99 $59.99 The Sims 4 Bundle: £39.99 $49.99 Battlefield 1: £49.99 $59.99 GOG neither Torment - Tides of Numenera: £34.99 $44.99 Witcher 3 - Wild Hunt: £34.99 $49.99 Tyranny - Archon Edition: £44.99 $59.99 Nor the Microsoft Store Quantum Break: £29.99 $39.99 Forza Horizon 3 Standard Edition: £39.99 $49.99 Resident Evil 7 Biohazard Deluxe Edition: £38.49 $49.49 Gears of War 4 Ultimate Edition: £49.99 $59.99 Meanwhile, on iTunes... Affinity Photo: £48.99 $49.99 Adobe Photoshop Elements 15: £99.99 $99.99 Logic Pro X: £199 $199 Final Cut Pro: £299 $299 -
Video editor.for Windows?
- S - replied to Alan_video's topic in Pre-V2 Archive of Desktop Questions (macOS and Windows)
I've heard people recommending DaVinci Resolve before, but never paid much attention because I though there must be some sort of catch. However, seeing the posts here prompted me to check it out a bit more in depth this time and it looks really good. The tracking and stabilisation controls are in the middle pane of the 'Color' persona (as opposed to the 'Edit' persona). See the following videos: Tracking and stabilisation tutorials: Motion Tracking - Cloud Tracker Motion Tracking - Point Tracker Motion Tracking - FX Tracker Tracking Windows Through Obstructions Rotoscoping Image Stabilisation The full 'Goat's Eye View' playlist starting from episode 1 can be found here: DaVinci Resolve 12 Tutorial - Full Playlist -
To reset all the brushes back to just the default brushes, go to Edit > Preferences > Miscellaneous > Reset Brushes. If you have any brushes that you have created yourself, these will also be reset. To keep them, create a new category, move the brushes you want to keep into this category and then select 'Export Brushes' from the Brushes Panel. That way you can then re-import them again afterwards.
-
Resizing... is this a joke?
- S - replied to MX1's topic in Pre-V2 Archive of Desktop Questions (macOS and Windows)
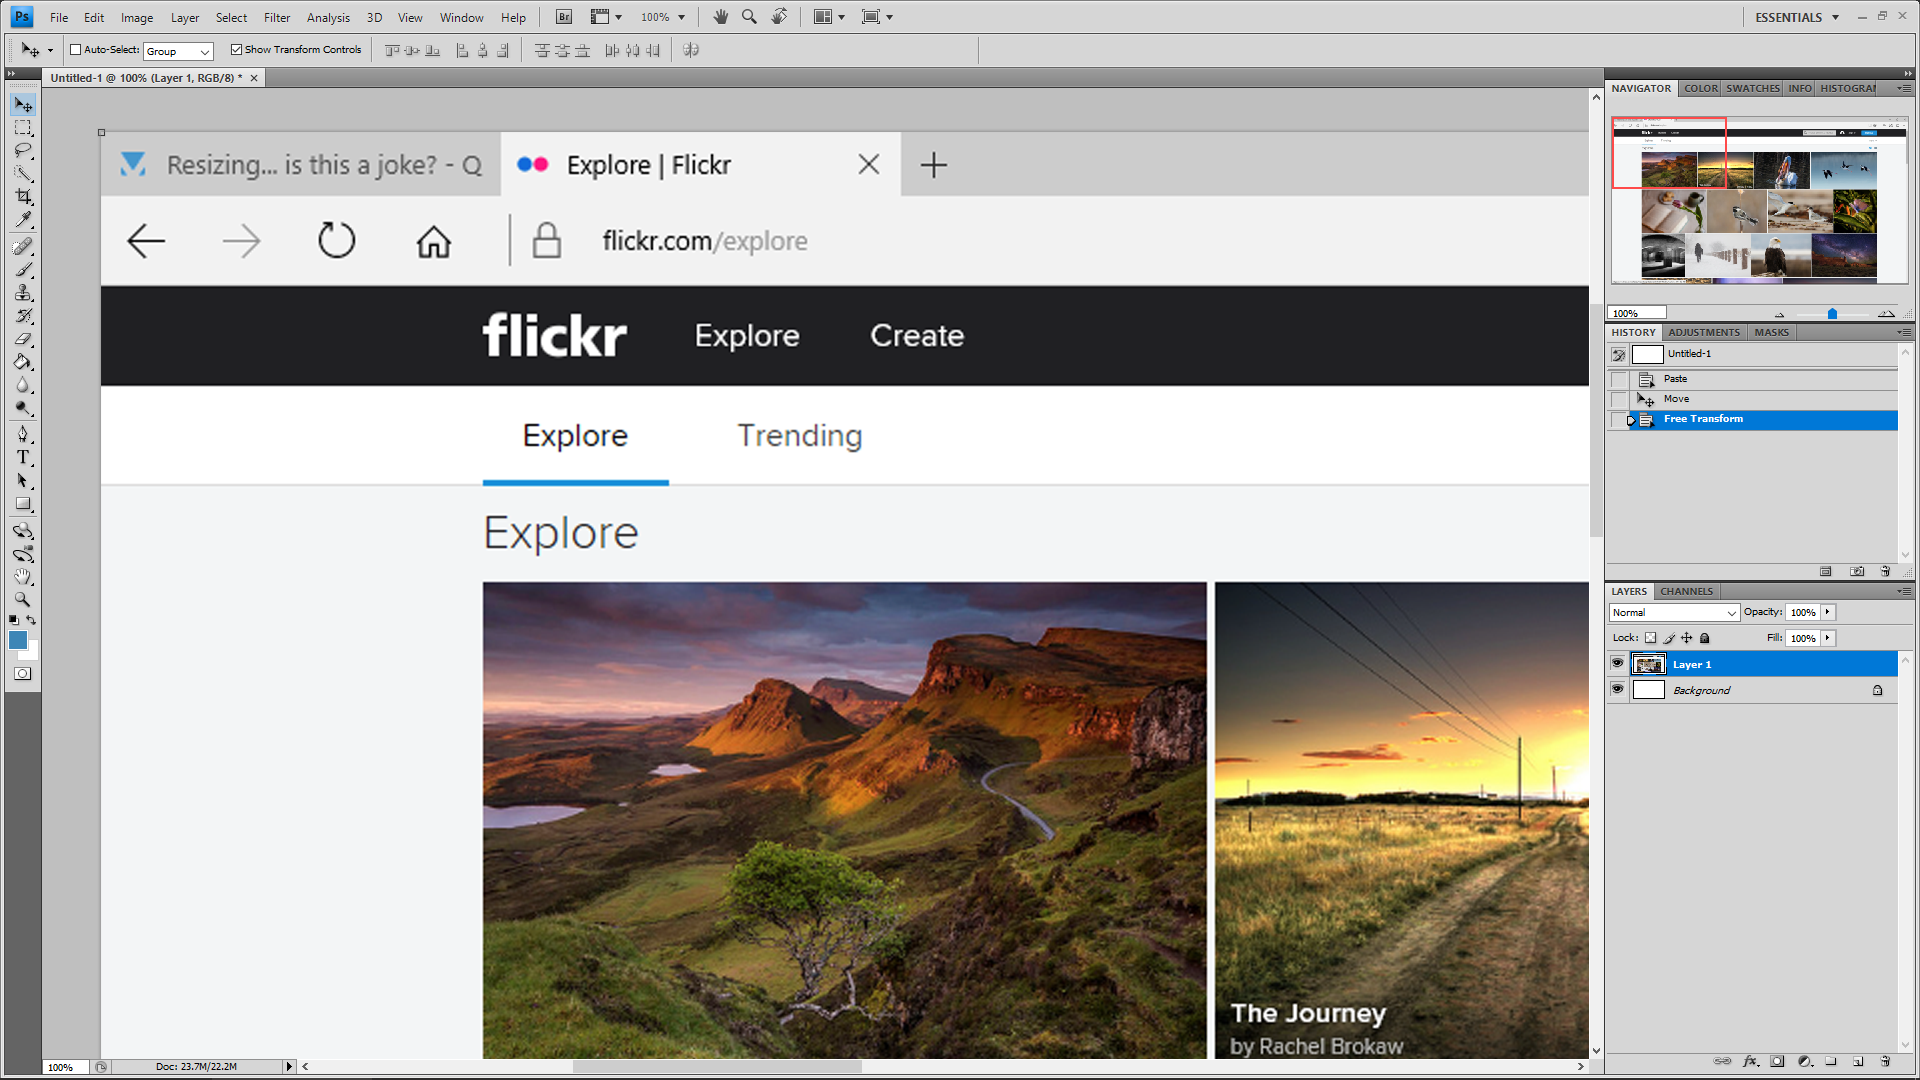
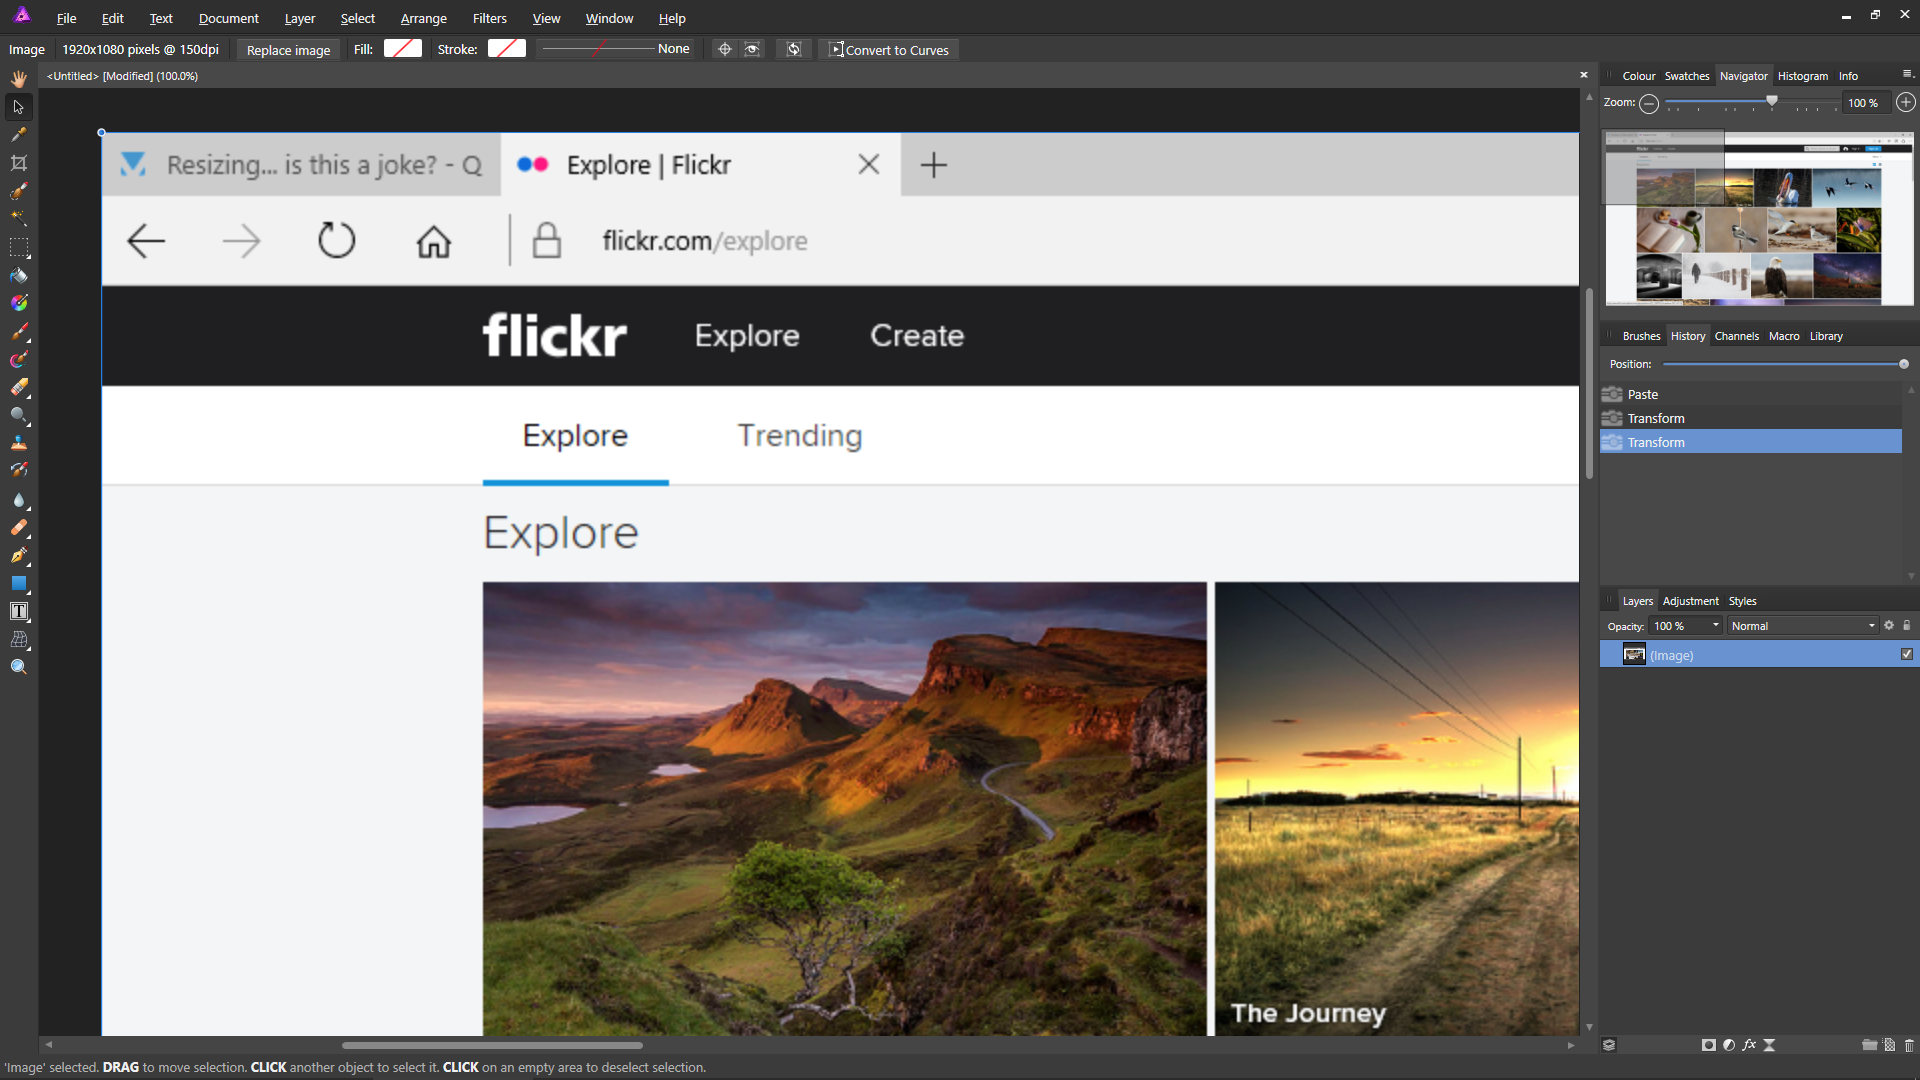
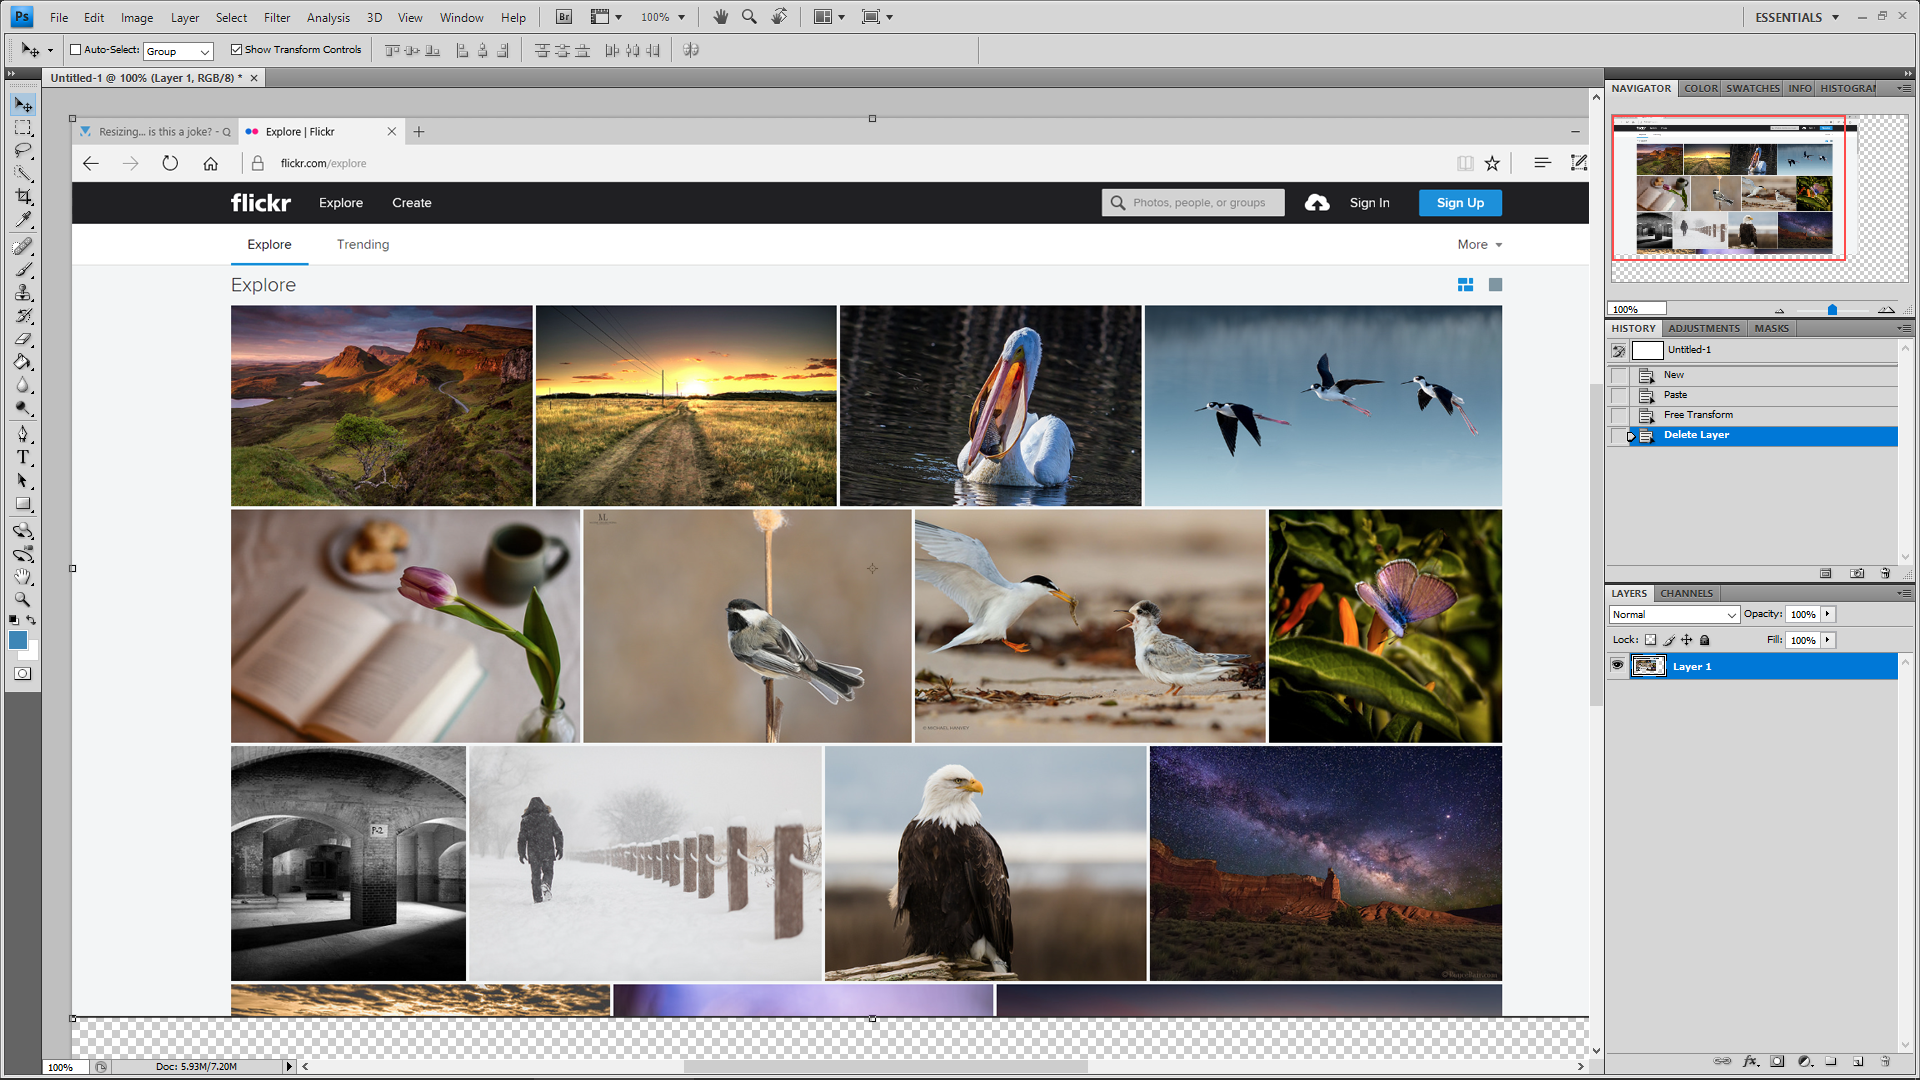
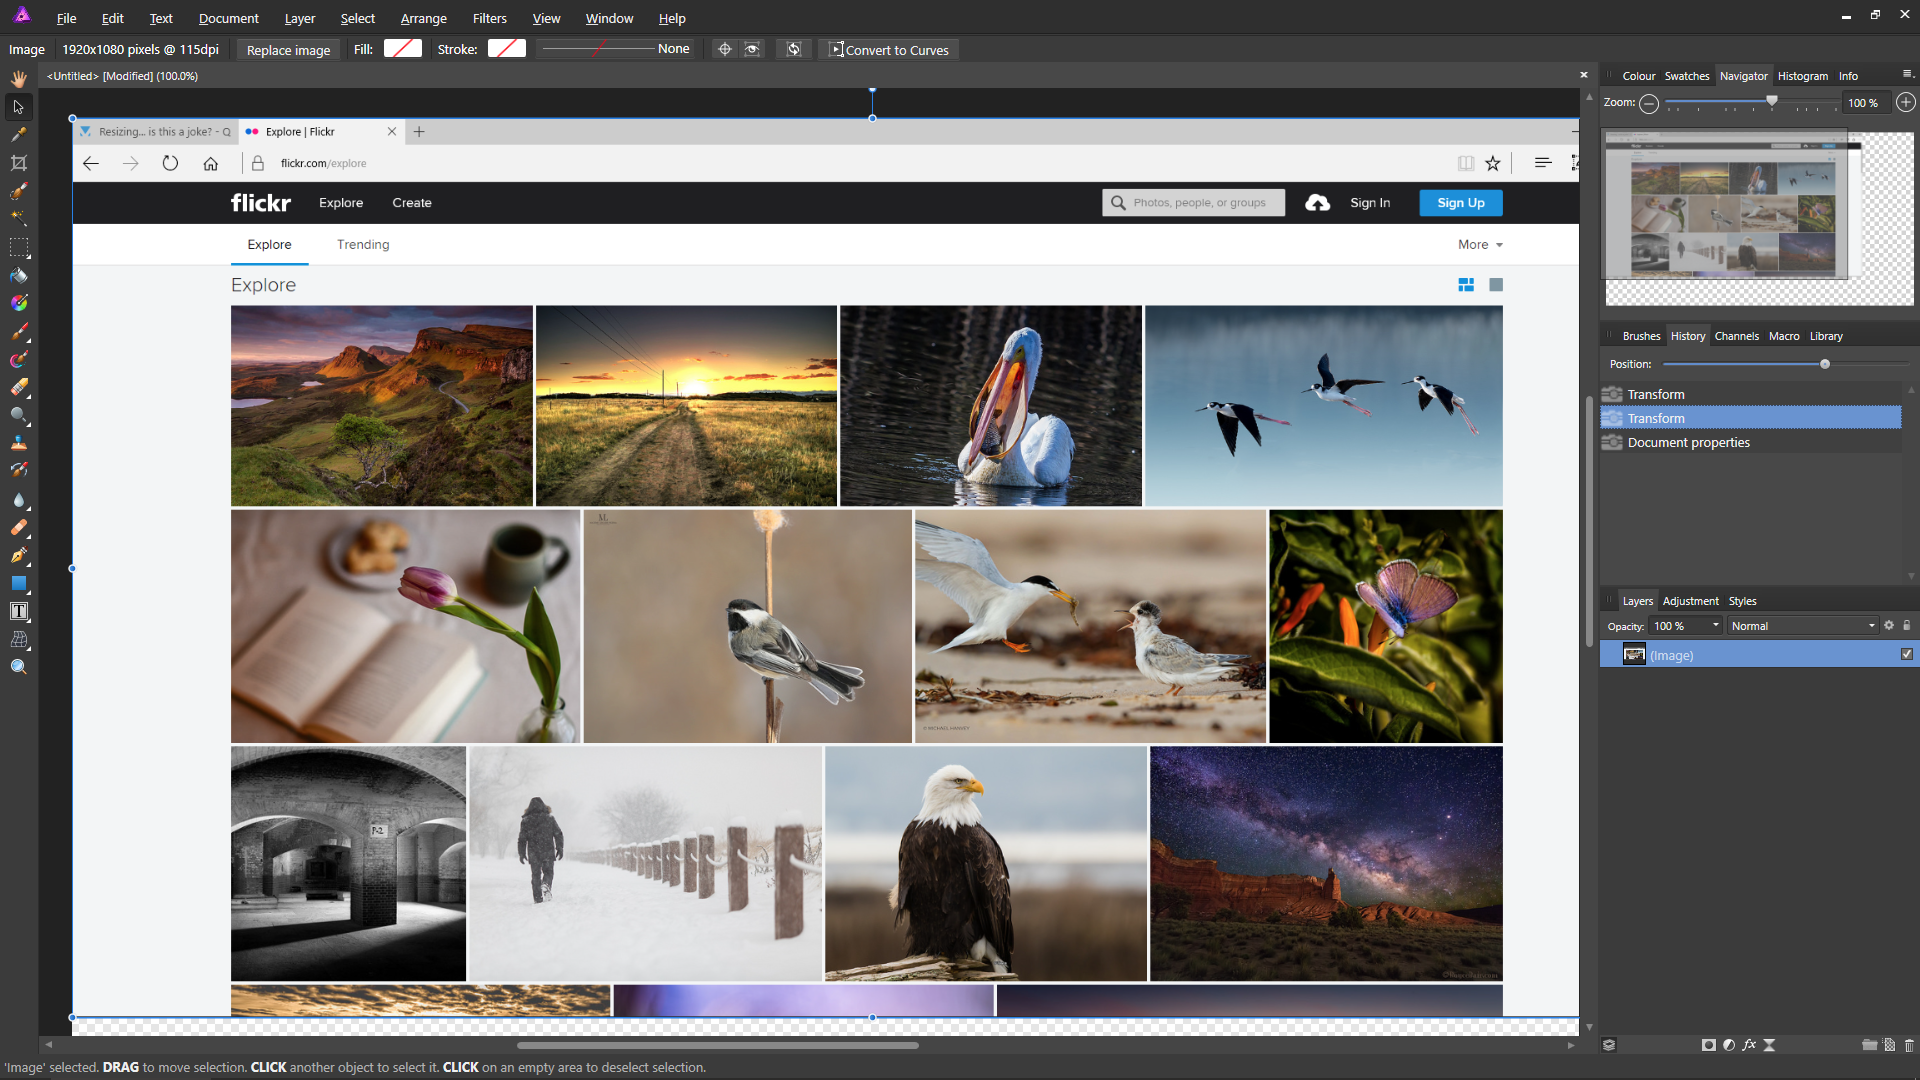
Have you gone to Edit > Preferences > Performance > View Quality and changed the setting from 'Nearest Neighbour' to 'Bilinear (Best Quality)' as per Post No.2, because I don't get what you mean? For demonstration purposes, I just took a screenshot of a webpage (1920 X 1080) and pasted it into a 3840 X 2160 document. Then using the Move tool handles, dragged them to double the size of the screenshot to 3840 X 2160. Affinity resamples the image instantly just the same as Photoshop. It's deliberately a more extreme example because ordinarily you would try to avoid upsampling smaller images unless it's an absolute last resort, but I don't see a distorted mess, the only difference I see is a difference in sharpness between the two (although when exported as TIF files, they are indistinguishable from one another). Photoshop: Direct Link Affinity Photo: Direct Link Here's the same image again, but this time with a 1920 X 1080 canvas and using the Move tool handles to reduce the size of the screenshot down to 1600 X 900. Same results as above. Photoshop: Direct Link Affinity Photo: Direct Link If you're experiencing something different, it maybe worth posting screenshots and the original images. What is it that you're trying to do?
-
Pencil brushes
- S - replied to mannyhenri's topic in Pre-V2 Archive of Desktop Questions (macOS and Windows)
Thank you for the reply. When I posted that I had just installed Affinity Photo and was about to move my Photoshop brushes over. In the end I decided to recreate all my brush nozzles from scratch and made them all 4096 x 4096. Although I won't ever use a drawing brush that size, at least I'll never need to recreate then again, and I can always downsize them if required. :) -
€ symbol
- S - replied to steve the hotspur's topic in Pre-V2 Archive of Desktop Questions (macOS and Windows)
Instead of using the CTRL + ALT + 4 keyboard shortcut, use ALT GR + 4 instead (or ALT GR + 5 on US-Int keyboard). 'ALT GR' is to the right of the spacebar. And if you use a full-size keyboard, use the numeric keys above the letters, rather than the number keypad to the right of the keyboard. -
Creating a road trip map?
- S - replied to beetley's topic in Pre-V2 Archive of Desktop Questions (macOS and Windows)
Initially I was thinking along the lines of taking screenshots all at the same map scale, cropping them so that the images only show map imagery (not the browser window or the Google on-screen icons), then using the Panorama feature in Affinity Photo to stitch them together. However, I'm not sure how well it will deal with matching the different days. In order to make the blue route colours from the different days all show up correctly, it may be possible to play about with the 'Add/erase from Source Image Mask Tools' in the Panorama Persona during stitching, but I don't know how time consuming this will be. So, I think it'll probably be easier to add a plain map and then use the pen tool or a brush to draw on it yourself, as the previous poster mentioned. Alternatively, depending on the number of destinations you have, Bing maps will allow you to add 21 destinations (as opposed to 10 in Google Maps) and also add more drawing pins. -
My god, do you ever stop whining? I can't speak for Serif, however this article may give you more of an insight.
-
You know what you need to do then. 1) Go to a bank and request a loan to cover two years salary for a developer 2) Hire a developer 3) We'll await your finished product in two years time. Go.
-
I think the Huion H610 pro was supposed to be superseded by the Huion 1060 Plus, but they're both still for sale simultaneously. I don't think there's much difference in them apart from a different button layout, slightly different surface and the 1060 Plus has a memory card slot. If it wasn't for the price I would probably have gone for a Wacom Intuos Pro Small, but because of the price I use a 1060 Plus instead. Size wise I think the 1060 Plus is roughly between a Wacom Intuos Pro Small and Intuos Pro Medium. The Intuos also has tilt, if that's something you're likely to use (obviously I don't). My use is different to the other poster, as I rarely use large broad strokes and therefore I only use a small part of the surface. Because of this, most of the surface on the 1060 is wasted on me. The below video is about Wacom, but it touches on this at the 4:55 mark. https://youtu.be/1wkwpntvyU4?t=295 Here's the area I use in conjunction with a single 24" monitor. So you need to think about how you're likely to use it, broad strokes or small strokes, as it's only something you can answer really.
-
Maybe a bit premature with that one, Quick Draw McGraw... Video: "When I click on the Background layer I get a prompt" Affinity Photo for Windows: Oi! Nooo! "Cannot record Set Current Selection" Video: "And this time I will single click it and name it BW" Affinity Photo for Windows: Oi! Nooo! "Cannot record Set Description"
-
Admittedly I'm not a hardware geek, however are you sure your PC won't run 64-bit Windows anyway? A quick search of your processor comes up with this link, which says "64-bit Computing - Yes", indicating that it's a 64-bit processor: https://www.cnet.com/uk/products/amd-phenom-x4-9500-2-2-ghz-processor-hd9500wcgdbox/specs/ It's possible that this CPU information is incorrect or that even though your processor is 64-bit, it's missing other required features to run 64-bit Windows. However, it may be worth reading through the below article, as you may be able to just clean install Windows 10 using Microsoft's Media Creation tool to download the 64-bit version of Windows 10. http://www.howtogeek.com/228042/how-to-switch-from-32-bit-windows-10-to-64-bit-windows-10/ There was no direct upgrade path from Windows Vista to Windows 10, so presumably your PC was upgraded to Windows 7 or 8 at some point before the Windows 10 upgrade, in which case it could be the case that it has just installed the 32-bit version because that's what version of Vista you originally had.
-
Not-smooth Brushstrokes
- S - replied to 4dm677's topic in Pre-V2 Archive of Desktop Questions (macOS and Windows)
The first issue has been previously reported in the bugs section by another user. You can view the post at the following link (See Post No. 10): https://forum.affinity.serif.com/index.php?/topic/32723-ap-brush-strokes-are-delayed-and-rough/ For the second question, to make the background transparent go to Document > 'Transparent Background' from the top menu bar.- 1 reply
-
- 1
-

-
- brush
- brushstroke
- (and 2 more)
-
The problem isn't an Affinity Photo problem, but an Adobe problem, due to Adobe not providing an official Windows File Explorer codec for Photoshop PSD files (hence the 3rd party links in Post 2). It's been like it for a long, long time, probably at least 10 years off the top of my head, maybe even since CS1 days. Therefore it's unlikely that Adobe will be providing an official 64-bit Windows codec for PSD files anytime soon. Adobe's stance was basically 'Tough luck', the lovely company that they are... If you only use Affinity Photo and therefore don't need to exchange layered files between other non-Affinity programs for editing, instead of saving as PSD files, you can save files as TIFF files (with 'Save Affinity Layers' ticked in the export dialogue). If you open those in another editing program though, the layers will be flattened (hence why unfortunately you still need to use PSD if you want to exchange layered files between other programs for editing).
-
AD & AP - Remember my settings of last use
- S - replied to vjsouza's topic in Older Feedback & Suggestion Posts
I think Bicubic would be a better default than Lanczos. Whilst Lanczos 3 Separable may provide slightly sharper images than Bicubic, if the image has plain areas such as a plain blue sky, it's more susceptible to introducing artifacts. For this reason I think Bicubic would be the safer 'all-rounder' default setting because there's not much difference between Lanczos 3 Separable and Bicubic, but it has the benefit of playing nicer with parts of images without much detail. -
Affinity Photo UK Price Increase
- S - replied to - S -'s topic in Pre-V2 Archive of Desktop Questions (macOS and Windows)
Why should Apple decide. If I'm based in the UK and am purchasing software directly from a UK software company, why should I be subjected to Apple's crooked exchange rates? 50 US Dollars does not equal 49 British Pounds. I presume Apple can't force companies to distribute the Mac versions of their software exclusively through the Mac App Store. Why can't Serif distribute Mac versions directly from their own site as well? That way purchasers worldwide (not just the UK, but Australia, Norway, etc.) aren't forced to use Apple's anti-consumer exchange rates. -
What's happened to the pricing of Affinity Photo? The normal price has been $49.99 or £39.99. Today it is $49.99 or £48.99. Last I checked, Serif is a UK company right?
-
Retreat to the forest Robin of Loxley, before The Serif of Nottingham catches you.
-
I think it's more than 150 to 1. Just a small difference... :) Adobe = 14154 employees (Source: Adobe Systems Investor Relations Data Sheet from 2016) Serif = 90 employees (Source: Nottingham Post article from 2016)
-
Brush dynamics
- S - replied to nano_'s topic in Pre-V2 Archive of Desktop Questions (macOS and Windows)
Yeah, Photoshop brushes have more settings, therefore there's not a lot you can do about that until Serif are in a position to add more. I think the main problem you'll have with the video is for the second brush he uses a 'Color Burn' mode and depth setting for the texture, which obviously Affinity Photo doesn't have. It's usually the missing texture and dual brush settings that have been problematic for me when I've been trying to replicate a brush. For something like clouds, it's maybe be better using clouds from another photo anyway, rather than using a brush. Either directly or make a stock image with transparency that you can re-use. However, if you want to use brushes I've attached a couple of brushes that are similar to the ones in the vid, which you can play around with and hopefully get what you're trying to achieve. Brushes (1.9MB Zip File): Cloud.zip (file no longer available) -
How to mimic PS procedures in AP
- S - replied to HaroldL's topic in Pre-V2 Archive of Desktop Questions (macOS and Windows)
The equivalent of Filter > Other > Offset in Photoshop, is Filters > Distort > Affine in Affinity Photo. Instead of 500px, use 50% instead. Here's the Affine Filter video: https://vimeo.com/134838293
-
reinstalling rainbow style
- S - replied to hack501b's topic in Pre-V2 Archive of Desktop Questions (macOS and Windows)
1) Go to Edit > Preferences > Miscellaneous > Click 'Reset Object Styles' 2) Close Affinity Photo and re-open it I'm not sure how to keep all your own Styles you've added to the default category before resetting it though. I have a separate category for my own Styles so I can export/import them separately, but if you've added them to the default category there doesn't appear to be a way to move Styles between categories without adding a new category and going through them manually one by one and adding them to the new category. -
The triangle colour selectors that move around drive me nuts too, lol. The circular colour selectors with the fixed square in the middle are OK, as the square stays fixed. Therefore when selecting a darker colour for example, regardless of hue it's always 'down and to the left' for a darker, less saturated colour. To keep your sanity, change the colour picker to 'Boxes' as per MEB's post. :) Here's the 'Boxes' selector next to the Clip Studio Paint wheel.