Search the Community
Showing results for tags 'opacity'.
-
 Hey y'all! Ever since the update to 1.8 the way the opacity slider acts on mask layers changed. I can try to explain it using words, but I made some screenshots to show you what changed. As you can see in the last two panes; the way the opacity slider behaved in the new and old version changed completely. Now, I now that applying different shades of gray on the mask can achieve the same thing (which I used to make this example) but I loved how the slider worked in the previous version. Especially when using various degrees of grey on the mask. With the slider you controlled the entire mask. Anyone know how to fix it or a workaround? Or should I hope it'll be patched in the next update? Thanks!
- 10 replies
-
- 1
-

-
- opacity
- opacity slider
- (and 3 more)
-
 I'm trying to superimpose one photo on top of another, with a gradient opacity. Both are roughly circular, and I want the opacity of the top image to be 0 in the centre and 100 at the outside. I've tried to use a radial gradient, and it gets the opacity down in the centre, but I can't work out how to set the outside stop so that it leaves the photo's colours unchanged. I seem obliged to set it all to a specific colour, which isn't what I want. How do I get round this?
 -
Hello: I have found an error that occurs on edges of a brush stroke in pixel persona. What it should be: The stroke has the same colour in the inner part and in the outline. What I get following the steps: The colour of the outline is different from the inner part. The steps are: 1. Change to pixel persona. 2. Use brush tool. 3. Select a pen brush and paint (the second one of the list below). 4. Change the brush to a hard basic one, change hardness to 0% and paint (I´ve used the 8th). Please, let me know if there already is a solution. For the moment to fix it, what I need to do is to change to draw persona and get back to pixel persona. Thank you very much.

-
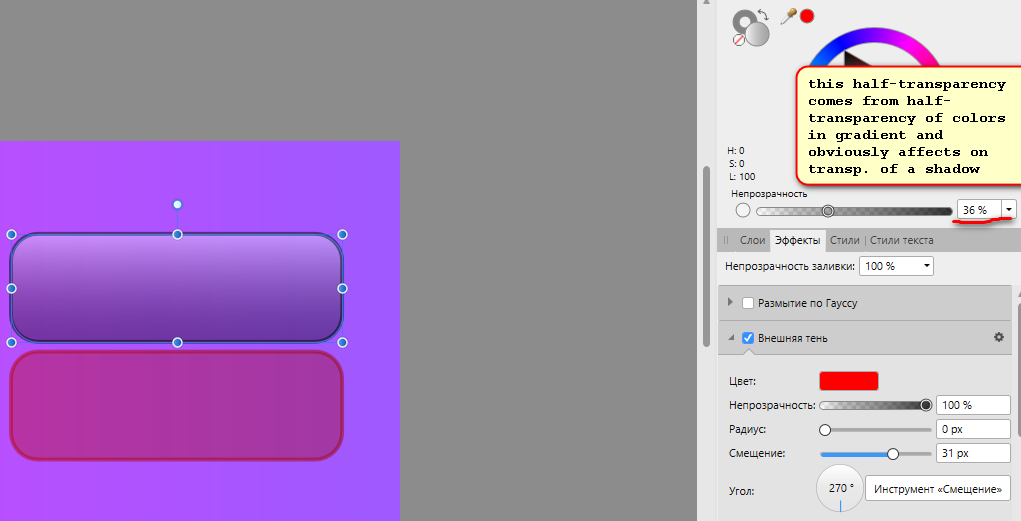
Hello! I haven't found a solution for my problem, though there are some similar topics here. I wanted to create an outer shadow for a button. The fill of the button was transparent (36%), and I wanted the shadow to have 100% opacity, but that is impossible: there is a dependence between opacity of a block and its shadow's opacity. Here is a picture. May be this is my mistake, anyway I hope to get a solution for that. Thank you!
-
Hey Why vector crop tool CHANGE opacity of the croping objects ? And how turn this off? It happend only when the object that i want crop is under 100% opacity VID_20200114_124459.mp4
-
 Hi there, I just finished my first illustration on Affinity Photo, and I can finally think I've found a good alternative to Adobe's softwares Especially one where I can recreate some of my long term habits from Adobe and remain efficient. The only problem I encounter is that I'm really, really used to control the size of my tools with the 2 and 3 key on the top left of the pad (so, rather the é and "). I find it to be the most comfortable for me as my left hand is always around there on the keypad while I'm drawing (oh look, there's also the ctrl and z keys nearby ). Well, so, it was quite disturbing that these num keys, by default, control the tool opacity and you can't change it at all. For now I've combined them with "alt" to control the brush/eraser size but (when I don't forget to press alt) it sometimes creates a conflict with the color picker shortcut (and I'm also used to constantly pick colors with alt). I don't know if I'm the only one wo needs to customize these keys but it would be really great if we could. Thank you and keep up the good work Serif !
 -
 Let's say I've created two global colors: G1 and G2. I insert some objects and assigned them G1 color with different transparency, tint and noise values. If I change the G1 color everything works fine. But if I assign G2 color to them, all attributes are resseted. BTW, you should put tint slider together with opacity and noise sliders.
 -
When using masks with opacity, in combination with an adjustment layer (which supports alpha, e.g. curves) to the mask, the opacity does not affect the mask, but the layers below the mask. Trying the same on the PC version (1.7.3.487) gives correct results: adjustments affects the mask.
-
 Hi all, The attached file shows a recurring problem, which is: I was tracing over an image and so set the opacity low so that I could see what I was tracing over. When I had finished, I removed the opacity on the slider so that it was 100%, but nothing happened, the opacity remained. Copying and pasting to the same and a new document did not work, neither did opening it on another machine - both Windows and Mac. There is no gradient or transparency set, all opacity sliders are set to 100% and no matter what colour I select, going from transparent to deepest black, the opacity remains. The only solution was to retrace at 100%, which I did. Any ideas? Opacity.afdesign
 -
Hi. When I add a mask to a pixel layer. The opacity slider of the mask affect the layers opacity instead of the masks opacity. I discovered this behavior in both windows version (1.8.0.486 beta and 1.7.3.481). In the ipad version the slider works fine. Best regards, Timo
-
 Hello everybody, I tried searching for such a topic and did not find one. My problem is that once I do a stroke with a Pixel Brush I can not modify its opacity after the fact. Is there a way I can do that? Or is this a bug of my version of Affinity Designer for iPad. I have the iPad Pro 10.5" I have attached a video of the problem. I have been learning and am very pleased with Affinity Designer and I wish to continue developing my skills Thank you! Boyan RPReplay_Final1571232327.m4v
 -
Have we lost image opacity slider in 1.7.3 on MAC? When I select any image on the document the slider seems to.. well not be available to the tune of no actual slider handle?? It doesn't seem to matter if I select the picyure frame or the lower image layer? Rob
-
 Hi, I'm not sure if I'm geting things wrong or there is a bug in Affinity software, but I see some weird behaviour with cliping objects in layers panel. See my video please: I have two squares, both the same colour and 50% opacity. Square 1 has 50% through Layers panel, Square 2 through Color panel. When I aply 100% white circle shapes inside them to clip them both, squares have different final colour. The Square 1 has in fact 25% opacity. Square 2 keeps correct colour. Is this behaviour normal? There is no blending option applied on any shapes at all. Things are weird even if I export my graphic to PDF. In PDF the final opacity of Square 1 is as I would excpect – 50%. Thank you for explaning. Mask-Opacity.mov
 -
When opening a PSD in AP 1.7, it is not grasping the opacity settings of some layers. This is especially weird since everything else works finely.
-
Well, it seems that I’ll be here very often anyways, I’d like to know how to change the opacity of a layer. Please, forgive me if it is a stupid question. thx so much
-
 Pen Pressure Opacity Settings for (1.7 Update): Affinity Photo/Designer - Pen Opacity Pressure Settings (As of the 1.7 Update): you do not need to adjust Flow or set Flow to "Pressure," to affect Pen Opacity Pressure. - All you need to do (via the Context Menu with the Brush selected) is: 1. select "MORE" 2. choose "Dynamics" 3. adjust the "ACCUMULATION" slider to 100% and select "Pressure" from the drop down. 4. Make sure the "Force Size button" is OFF, via the Context Menu; unless you want your brush pressure to affect both size and opacity at the same time, (which isn't uncommon when used with painting &/or blending). Note: you can also set the size to None via the drop-down menu for size in under More/Dynamics. Note: you may have to do this if you're using custom created brushes, such as some brushes made from Daub. Affinity Photo/Designer - Advanced Pen Opacity Brush Settings & downloaded/purchased Custom Brushes: 5. Advanced Pen Opacity Pressure: under (Brush/Context Menu/More Button/ Dynamics Tab/ACCUMULATION - Set to 100% & Drop Down to "Pressure)" you can also change the "Curve". The best curve to use is the same one for "size." The Curve button is to the "Right" of the Drop-Down menu in the Brush/More/Dynamics tab. Select a curve and try different curve alignments or create your own. The best one or rather for normal one you would expect (as in Adobe PS) is the curve alignment all the way to the Right (which again, is the same Curve used for Pen Size Pressure). 6. Download/Purchased Brushes and Opacity (very important especially for Designer): a lot of brushes already have multiple settings created from those downloaded, purchased or inherently part of Designer. However, older brushes not made specifically for the 1.7 Affinity update may need some adjusting. Flow and Accumulation are the two biggest sliders you must pay attention to if a brush does not behave correctly as it may have in previous additions of Affinity. Example: Daub | Essentials Brush Pack. Some brushes will need tweaking. I suggest coping the brush from the original and adjusting those there in (and Flow), as needed. That way you can save them and back them up as well! Hope this helps – Johnny K PS. Sorry for being so "obvious in my descriptions. I want to be clear with those whom never used Affinity before &/or those coming from Adobe. As I mentioned, Affinity really need to get with the program of adding a "FORCE OPACITY BUTTON" to the context menu as they did for Size and list "OPACITY" in the Brush/Context Menu/More Button/Dynamics with all controls, menus and curve alignments as they do for other brush properties. Kinda ridiculous this hasn't been addressed yet! * I will also try and get photos with # descriptions posted here in asap, if it is requested. -------------------------------------------------------------------------------------------------------------------------------------------------------------------------------------------------------------------------------------- While I'm writing a small book... Dear Affinity, Affinity needs to have a "OPACITY preset, under Brush Dynamics" with the brushes customary controls; Example: Typical settings under Dynamics such as: % Slider / Type (None, Random, "Pressure," ect), for both Photo & Designer. If Accumulation is Opacity (though it acts like opacity, it shouldn't be), then change the name, it's confusing. Pen Size and Pen Opacity are the most commonly used setting and not just for pen strokes! Also... a Pen: "Force to Opacity - Button," as there is now for Brush Pen Size is greatly need also. Perhaps you might want both settings on also; as this is "again," commonly used and it shouldn't be a headache to figure out. Again, Opacity & Size (pen, pen pressure, or mouse), are the two most commonly used brush features/settings needed for brush strokes and much, much more! Right now, is the best time to beat Adobe but, the jumping through hoops, having to write a book in the forums, for one of the most needed settings of a Pen Pressure "Opacity"effect is reDONKulous and kinda annoying! Severely Ridiculous; common guys & girls! BTW... Don't mistake me. I love what you are doing with Affinity, overall. That said, it would be lovely if the new Publisher "Studiolink feature," worked in 3 programs. Designer needs the Channels Palette ... just as Photo needs more brush painting abilities' that are in Designer! Couldn't a channels palette be brought in Designer via the Studiolink feature or simply put in Designer's Pixel Persona. This is another commonly used design feature, missing from your core designer program, (no pun intended)! How & why is there no channels palette in Designer? And if for some reason Designer can't support channels, then Photo needs a serious revamp, so it can Paint more effectively like Photoshop (which to be honest, wouldn't hurt doing so regardless). Photo feels like a after thought compared to Designer, with the exception of missing key elements, already mentioned. With all sincerity - J
 -
 In most places in Publisher the amount of opacity is shown as a percentage except for one. When changing the opacity of a fill in a text frame there's a slider but no place (as far as I can see) to view the actual percentage of the opacity. I find this very frustrating and makes for inconsistent values when adjusting the opacity of fills in text frames. If this is a missing feature, please add it in the next upgrade!!!
- 36 replies
-
- 1
-
-
- opacity
- text frames
- (and 1 more)
-
 Hello, I am unable to preserve an opacity gradient (transparency tool in designer) applied at the group level when exporting to svg format. With option "rasterize unsupported properties", I get a rasterize image With option "rasterize nothing", the gradient disappear Is it a some workaround ? Thanks for your help. gradient.afdesign
 -
 Is there a way to disable the opacity shortcut when using the number keys (1-9)? I use Affinity software for digital painting and illustration, and I keep accidentally hitting '3' instead of 'E' for the eraser and changing my brush opacity to 30% by mistake. I've also assigned Cmd+1 and Cmd+2 to rotate my canvas left and right, but the same problem here - I keep accidentally changing my brush opacity in the process if I don't perfectly press Cmd together with the number key. I don't use the number keys to set opacity of my brush anyway, so I would love to disable and/or customise those shortcuts to accommodate my workflow better, but I can't seem to find those keys anywhere in the Keyboard Shortcuts panel. I wouldn't recommend removing this shortcut for those who use it, but perhaps having the option to customise it would be helpful? Thanks in advance.
 -
 I have a text object with three separate lines of text, one word on each line. I'd like to alter the opacity of each word - 100% on top, 80% on the middle line, and 60% on the bottom. However, when I try to do this, opacity changes for the entire box, not just the word I have selected... Is it possible to do what I'm attempting? Or, do I have to create three separate text objects?
 -
 I hope the devs take a look at this issue. With the new gradient tool apparently the last point of the gradient prompts the tool to bring up the colour wheel but this tool has many other aspects such as opacity, accumulation, distance sliders, placement on continuum, all of these are important to gradients. In order to have all of this to work with one needs to take the extra step to click on the layer to bring up the window that contains all the above including the ability to choose whichever colour scheme one desires to work with. Personally this is an extremely annoying issue and a step backwards. This tool should not dictate the workflow.
 -

affinity publisher Affinity Publisher - Advert for Instagram
Taff048 posted a topic in Share your work
Hi all My first attempt at using Publisher Beta Version 1.7.0.206. I needed to create a square image for Instagram to advertise a concert. I had a square image of the church which I imported into publisher. It was rather large so I had to reduce the size by dragging a corner to fit on the page. Although the edges of the image were visible in what I would call the work area around the page the photo's detail was not, which I found strange. The image was too bright to show the white text I wanted to use so I drew a grey rectangle over it and reduced the opacity to 64%. I then used the artistic text to layout the text. I was surprised to find how easy it was to line up the various text sizes. Once I was happy with the text layout I grouped them then used select all and aligned all objects centrally on the page horizontally and vertically. I then exported as a png using selection with background. So my first impressions are that this is excellent software apart from the work area. I need to create a multiple page document to see if its possible to park objects in the work area to move from one page to another. As objects don't seem to be visible in the work area I'm not sure how this would be possible.
-
Hello! Affinity Photo is a really good software (except for the constant crashes). But it still lacks a simple basic and very important feature: BRUSH OPACITY CONTROLLED BY PRESSURE. If this option is somewhere hidden, please tell me. Oh and I don't accept that using pressure for the "Flow" option is an alternative. Common guys, many simple and free softwares have this: Krita, Gimp, Blender, or simple and cheap softwares like Artrage. I know this software is not made for digital painting, but I don't use it for that. I use it for render post processing, which is the same as phothography editing. And opacity pressure is very important to softly change masks, to add a bit of overlay or color dodge. So, (maybe someone already made this request) my suggestion is to simply add an opacity pressure button, just like the one Photo already has to control brush size, right beside it.
-
Does anyone here know how to setup the touch ring on a Wacom Graphics tablet to use for opacity, if it's possible? I use a Wacom Intuos Pro 5 Thanks Martigny
-

Add Background Color to Page
user099 posted a topic in Feedback for Affinity Publisher V1 on Desktop
I'd like to add background color to a page but can't figure out how to do it. I select the color with the color picker. There are two opacity slides, but neither does anything as far as I can tell. What am I doing wrong?