Search the Community
Showing results for tags 'nodes' or 'transform'.
-
 Hello there! I am currently trying to resize an existing artboard to an exact value using the transform panel, however I can't get the textframes to scale with the artboard, rather than just changing the frame size. When I use the "scale handle" and "manually" resize the artboard, it works just fine. How would I go about doing it with the transform panel? I have this question also over on stackexchange: https://graphicdesign.stackexchange.com/questions/120555/affinity-designer-how-do-i-make-textframes-scale-with-the-artboard-if-i-scale-b Also attached you should find a gif demonstrating the issue I am facing.
 -

Aligning node handles
DurkishDelights posted a topic in Pre-V2 Archive of Affinity on iPad Questions
I need perfectly symmetrical curves for a water symbol. How can I do this? I can snap the nodes to the grid and whatever else. But I can’t figure out a way to make the node handles snap. Help please. Thanks. C3559A0F-37E3-4429-B562-9CE51182E91C.MOV -
 Hello, If there are multiple shapes selected, and all are divided all at once, a number of overlapped content is removed and a lot of garbage nodes are left as separate paths. I've experienced on AI too, but there we can easily select them and remove them, but in AD it becomes a headache. Can you please make selection in such a way that.. if selection started form top left / bottom left then select all shapes touching selection box, if selection started form top right / bottom right then select only shapes, fully under selection box, Something same like in Auto-cad (somebody experienced?) Please take a look on this video and see what I mean. vertics, devide tool, shape tool, pen tool, garbage nodes, paths, Affinity Designer 2_5_2019 10_40_41 PM.mp4 Affinity Designer 2_5_2019 10_44_12 PM.mp4
 -
Hi all, Is there a way to reset the transform values of a layer? Cheers, Juan
-
 Hi, In Photoshop I can do Edit > Transform > Scale to enlarge an image on a layer. How do I achieve the same in Affinity Photo? I understand that I can use "Place", but is there a similar way as in PS? Regards & Thanks, David
 -
 When I have a lot of nodes in a small space, I am finding it very hard to move a specific node. A lot of times i go to drag a node and it catches the smooth tool right next to it instead. It would be nice if I could use the select tool to select the node or nodes I need to move and then (with move selected) drag from anywhere on the canvas to move the nodes in what ever direction I am swiping. I figured this would already be an option since very often there are multiple nodes in a small space and you cant zoom in too far to separate them because while zoomed, you cant move the node very far but I cant seem to find a way. When I try to drag from anywhere, it ends up selecting a different object instead (I have to drag from directly on the node which means I have to be zoomed in too far to move it where I need).
 -
 I'm currently test driving all of the Affinity products in hopes of leaving Adobe's Creative Cloud, but am coming up just a little short on some key tool necessities. The biggest hole I can see is the ability to distort or free transform vector nodes, whole objects or outlined text (curves). This is a tutorial on creating 'curved' text using 'free transform' tools in Illustrator from 2000: http://www.balloontales.com/curved-type/ Or selective scaling when nodes are selected. Here's an example of the function; keep in mind this isn't about WHAT is being created, it's the 'how'. http://www.balloontales.com/tv-shape-balloon/ Just added functionality to node/vector manipulation and I can then say goodbye to Adobe Illustrator. If these functions already exist, can someone point the way to any related tutorials? Thanks! Good stuff so far; just need a few more tools to be GREAT stuff. G.
- 2 replies
-
- 5
-

-
- vector
- free transform
- (and 4 more)
-
The ability to copy over an objects transform information like scale, position, rotation etc into another object.
-
 I think the only thing I'd prefer is a way to control the smoothness and vectors on a node and their length quantitatively. For example, right now, I can't create an exact circle with the pen tool on its own right now, since I can't be sure the vectors coming out of each node will be perfectly symmetrical. But if I could control how long both vectors coming out of the nodes are, I can easily round them. Right now, this tool would mainly be helpful for making face shapes for me. I can keep using circles to round a node, but looking being able to have quantitative controls over them would be much nicer. Imo, this can be done in two ways: In either case, I first click on the node, then for the left and right vectors coming out (assuming not a sharp node), I can either: Control the vectors using a value for an angle and length (ie. circular geometry). Control the vectors using a relative X and Y distance away (ie. rectangular/Cartesian geometry). Imo, such a feature could allow users to control the nodes and the vectors coming out of it nicely. My only issue with such an idea is that may add a bit of complexity to the elegant simplicity of Affinity Designer. It would be nice if this was possible.
 -
 Hi, when I press "Node Tool > Transform mode", all nodes on selected object are locked. Is this OK, or is something wrong?
-
 Does anyone know if the nodes in AD on Mac desktop is compatible to paste into FontLab Studio? Im designing a new typeface, and I’d like to design the letters in AD, then copy and paste the nodes into FontLab Studio.. i used to do this from Illustrator.. well, I had to do some adjustments after in FontLab but that’s ok.. Anyone? :-)
 -
 In Photoshop you can paste an image from your Mac 'clipboard' onto a PS layer, then press [cmd]T to resize the pasted image on that layer (without needing to resize the whole PS file's image). I can't replicate that behaviour in Affinity Photo and resize the image after pasting onto a layer (NB: I don't want to seize the WHOLE Affinity Photo file, as that needs to stay the same size - I just need to resize the image I've pasted in).
 -
 Hi, Is there a way to make bezier handles snap to 45 or 90 degrees? Most apps allow for this by holding down shift, but shift behaved differently in Affinity Designer, snapping to the existing curve. The only workaround i've found so far is to use the pen tool to redraw the bezier curve by clicking and dragging on the same point while holding shift. Is there another way to do this? Thanks.
 -
 I don't even know the right way to talk about this, so it's likely this is possible and I just can't find it. When I open a doc in AfPub, in the lower right corner there's a minitab labeled "Transform" -- this is distinct from the Layer -> Transform menu item; here I can just set the item's control point, X and Y Location (x and y), Width, Height, Rotation, and Skew for the selected item(s). Is there a keyboard shortcut (or way to make one) to alter these or put the focus in one of these boxes? Related, and again I don't know what to call it, but if the current selection is, say, a polygon, there's a bar of configuration options running just above the document. It has, e.g., the name of the shape, the fill, stroke, number of sides, etc. What is that called, and how do I get focus there without using the mouse? Thanks!
 -
 Hi @all I think i found a bug in publisher while transforming and duplicating a layer and it looks like the transformation was miscalculated. There are 2 Videos. The first shows how Designer works (that shows what it should be like) and for comparsion the second Video shows the same steps in Publisher with the wrong calculation. it seems that the rotating at the end of the video, where the layers with the transformation are duplicated, will be wrong calculated. The Steps in Designer: Designer.mp4 Same Steps in Publisher. Look at the difference in transforming please. Publisher.mp4 And in the Publisher Video you also can see two issues i reported to you. - Snapping of the rotaion centre to Guidelines doesn´t work (same snapping settings as in designer) - Roation Centre and ohter guides will be hidden if moving guidelines. This is very impractical. Many greetings Uwe
 -
 Two problems that, for use of Affinity Designer in technical illustration, I would like to see resolved: 1) What is the best way to scale (resize) an object, say up or down a certain percentage? Do you have to do the math and enter new values in the width/height edit boxes in the Transform studio panel? 2) What is the best way to move an object a certain distance in a certain direction? Again, do you need to do the addition/subtraction and enter the calculated values in the X/Y boxes of the Transform panel? Thanks for assistance!!
 -
 Hi, I often need to build a new picture from several others and I did that in photoshop by "transforming" the layers ("cmd t" keyboard shortcut). Isn't there anything like that possible in Affinity Photos for Desktop Mac? I couldn't find it at least.
 -
 Is there a way to copy paste nodes from a compound object? I have outlined text that copying the nodes of a letter and using it somewhere else is not working.
 -
 Is there a way to change the default position of the transform anchor point in Designer and Photo to not be at the top left but rather in the center?
 -
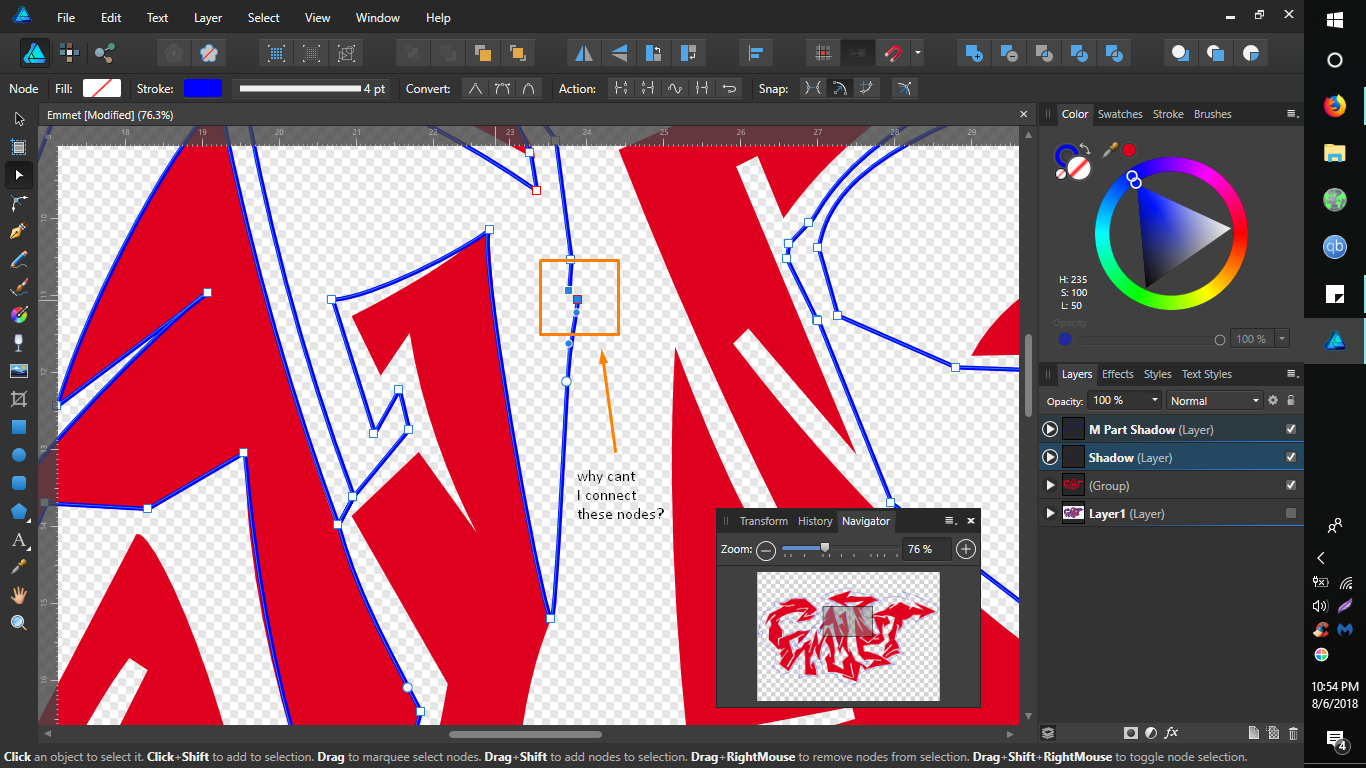
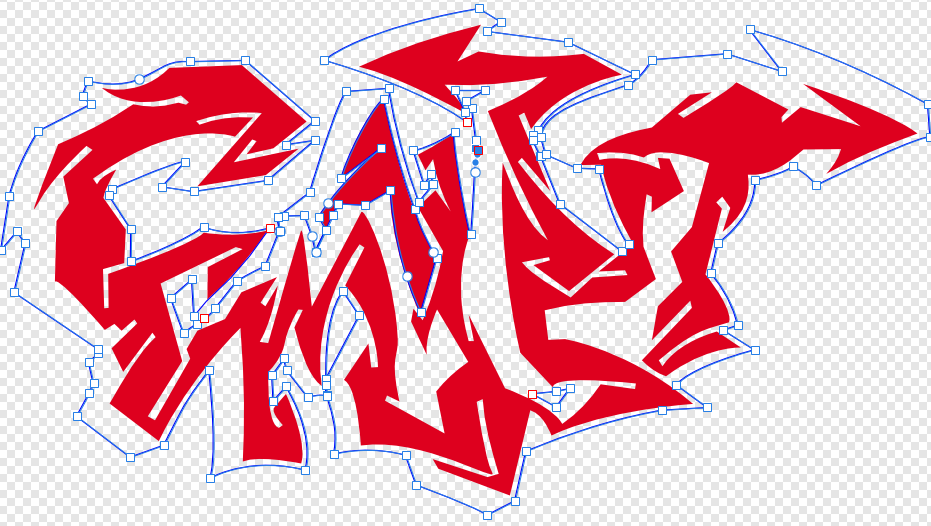
 Being a beginner, I jumped the gun on designing this. I had to split my poorly designed shadow. And now, I cant seem to combine it correctly without getting it all, well; wonky. Please help me finish this battle once and for all. How do I connect these nodes?
-
 Hello. How can I scale/transform an image layer in Affinity Photo (iPad)? I'm trying to get to grips with the Affinity suite on the iPad (Photo and Designer) and cannot seem to find anything related to a relatively basic feature such as transforming an image layer on iPad. Found something for the desktop version but it does not seem to apply to the iPad interface.
 -
A continuing annoyance is that when I go to selected an existing node in Curves, AP creates a new one, with the result that the slightest movement makes the curve go haywire. A simple fix is a 'snap to node' where a click close to a node results in the node being selected rather than a new one created. Perhaps this feature could be selectable in preferences. Intelligently, this would take account of screen size and resolution (and maybe even eye-screen distance, such as where desktops are likely to be further away than laptops, which are further away than tablets). Tx
-
 Hi there! I'm astonished with Affinity Designer for ipad! I'm almost completely transitioned from my PC to iPad, just need a few more options. Suggestion #1: Select BY SAME FILL COLOR This is very important for professional work :) For example, if a group of objects (or shapes) are overlapping, what we need to do is to select them all, and divide them. After they are divided, we need to click on "Add" to merge the shapes together, and that's fine. But if we have a LARGE number of SMALL shapes, merging one by one can take forever.So, option "Select by (the same) Color" is very important and time saving for us designers. How I think it should be done: Solution 1. Click and hold the color (from toolbox) with pencil, or with finger, and while holding it select (with your left hand) three dots icon "..." and then choose "Select all" Solution 2. Add a new icon named "Select Same Color", or similar. Suggestion #2: SHAPE EFFECTS For me, as a Vintage illustrations and Logo designs fan, I would like to have a ARC LOWER, ARC UPPER, AND (possible) ARC tools. For example: Netflix logo. How I think it should be done: 1. After typing "Netflix" for example, convert curves, and than click on new icon set named "shape effects", than click on "Lower arc", or "Upper Arc". OK, that's for now, If I missed these options, if they already exist in same/similar form, please let me know.
 -
 Hello all. I have been desperately trying to figure this out for a few days now, and am at the point with this program that I want to throw my whole computer out the window.. Anyways, I have a design that I've used several times before, yet now for some reason affinity is not recognizing it as a closed path, closed image, or a whole design at all. I can only select line work, the nodes (should be??) all connected.. Yet when I attempt to fill the image, the fill is all over the place as if the paths are not connected or that I'm trying to fill non-closed space. I don't understand. I normally can select one section, for example, the horns of the this skull design and fill it with a color. So on and so forth. I don't know whats going on and I'm really hoping I'm just overlooking a simple fix. I've tried connecting paths, snapping nodes, grouping, ungrouping, I'm not even sure what else to list but I have run out of options. I attached the exact file that I'm working with below... please help! -MC jellypins ram design.afdesign
 -
 Hello, I would like to ask - Is there any resizing of pixels during tranformation of object? I remember that Photoshop automatically depixelate your selection to size of canvas... Is this function in Affinity photo too? Thx! Lukas