Search the Community
Showing results for tags 'Selection'.
-
 I recently upgraded to MacOS Catalina. My refine edges seemed to start actingwonky after that. When I choose to refine, the red mask shows up as expected. When I draw along the edges, all seems okay until the app finishes. At that point, the mask disappears and the marching and are completely gone. If I click Apply anyway (without seeing the results), the marching ants reappear and show where refinement took place, but I have to hit refine again, in order to do more work. Also, the previews only work while the mask is visible. Is anyone else experiencing this? I've been using AffinityPhotofor years and I can work around this glitch but it really slows me down. Any help would be much appreciated.
 -
 Hi! I found that cutting backgrounds in product photos I've have to work on is somewhat tricky in Affinity Photo. I try to switch from PS to AP, but similar functions in both programs gives different effects. See attachments and you see squared edges in AP, and smooth (no feather etc.) edge in PS. Any suggestions?
-
 With CTRL+left click on a layer icon it is possible to create a selection from the contents of this layer. In PS (I know, AP is not PS...) you can use SHIFT or ALT as modifiers for adding to, subtracting from or intersecting with an existing selection. I would like to see this in AP, too. For adding two or more layers to a single selection there is at least a workaround: make a group from the layers you want the selection from and CTRL+left click the group layer icon to get a selection made of the "summed up" content of each of the grouped layers. However I haven't either figured out a way to realize the other operations or how to modify an existing selection with "selection from layer".
 -
Still not working in 1.7.3.481
-
 Hi guys. I am using affinity designer, I have a few objects grouped, three text objects and a background image, from top to bottom, in that order in the layers palette. I can select any object by clicking it individually, or by selecting it in the layers palette, however when I drag across multiple objects I keep selecting the background layer, either in conjunction with the desired elements or instead of them. Is there any way to stop either an individual layer from being selectable or perhaps prevent any locked layer from being selectable? I am aware that being able to select locked layers is by design but for me it seems to cause more issues than it fixes, is there a way to stop locked layers being selectable? At the moment the only solution is to turn that layer off visually but I still need to see what I am working with just don't want it to be selectable. Thanks, Aero
 -
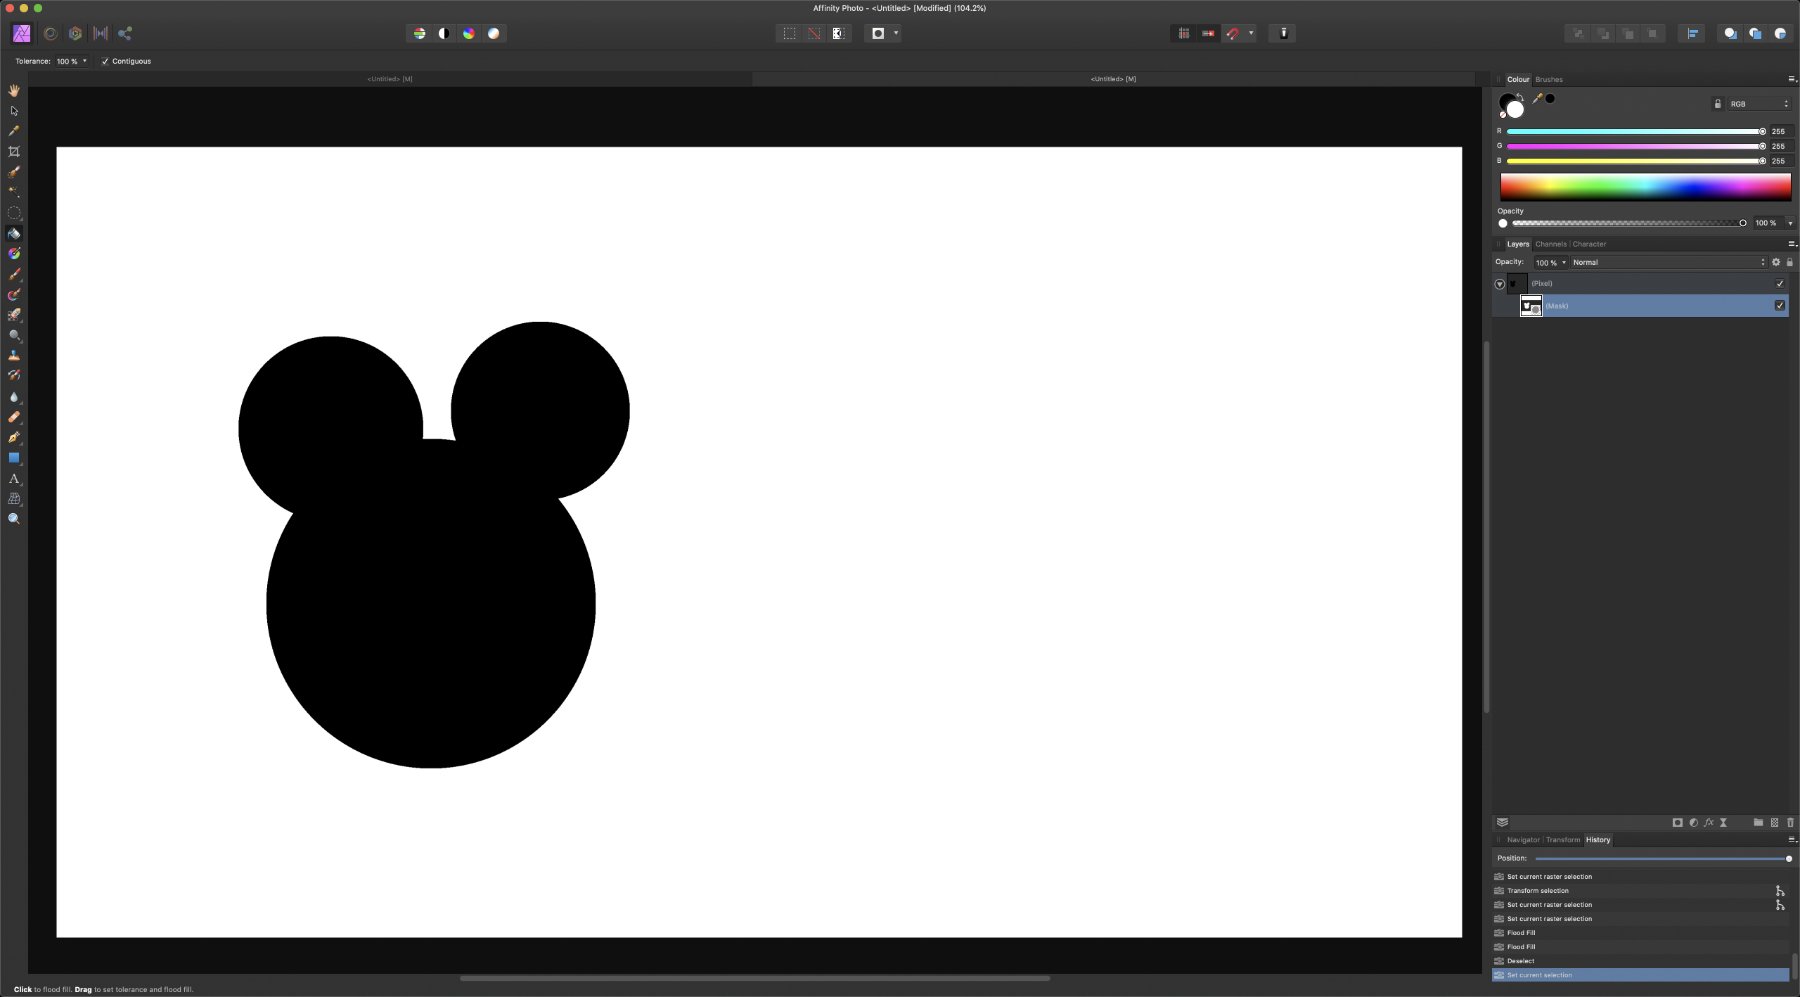
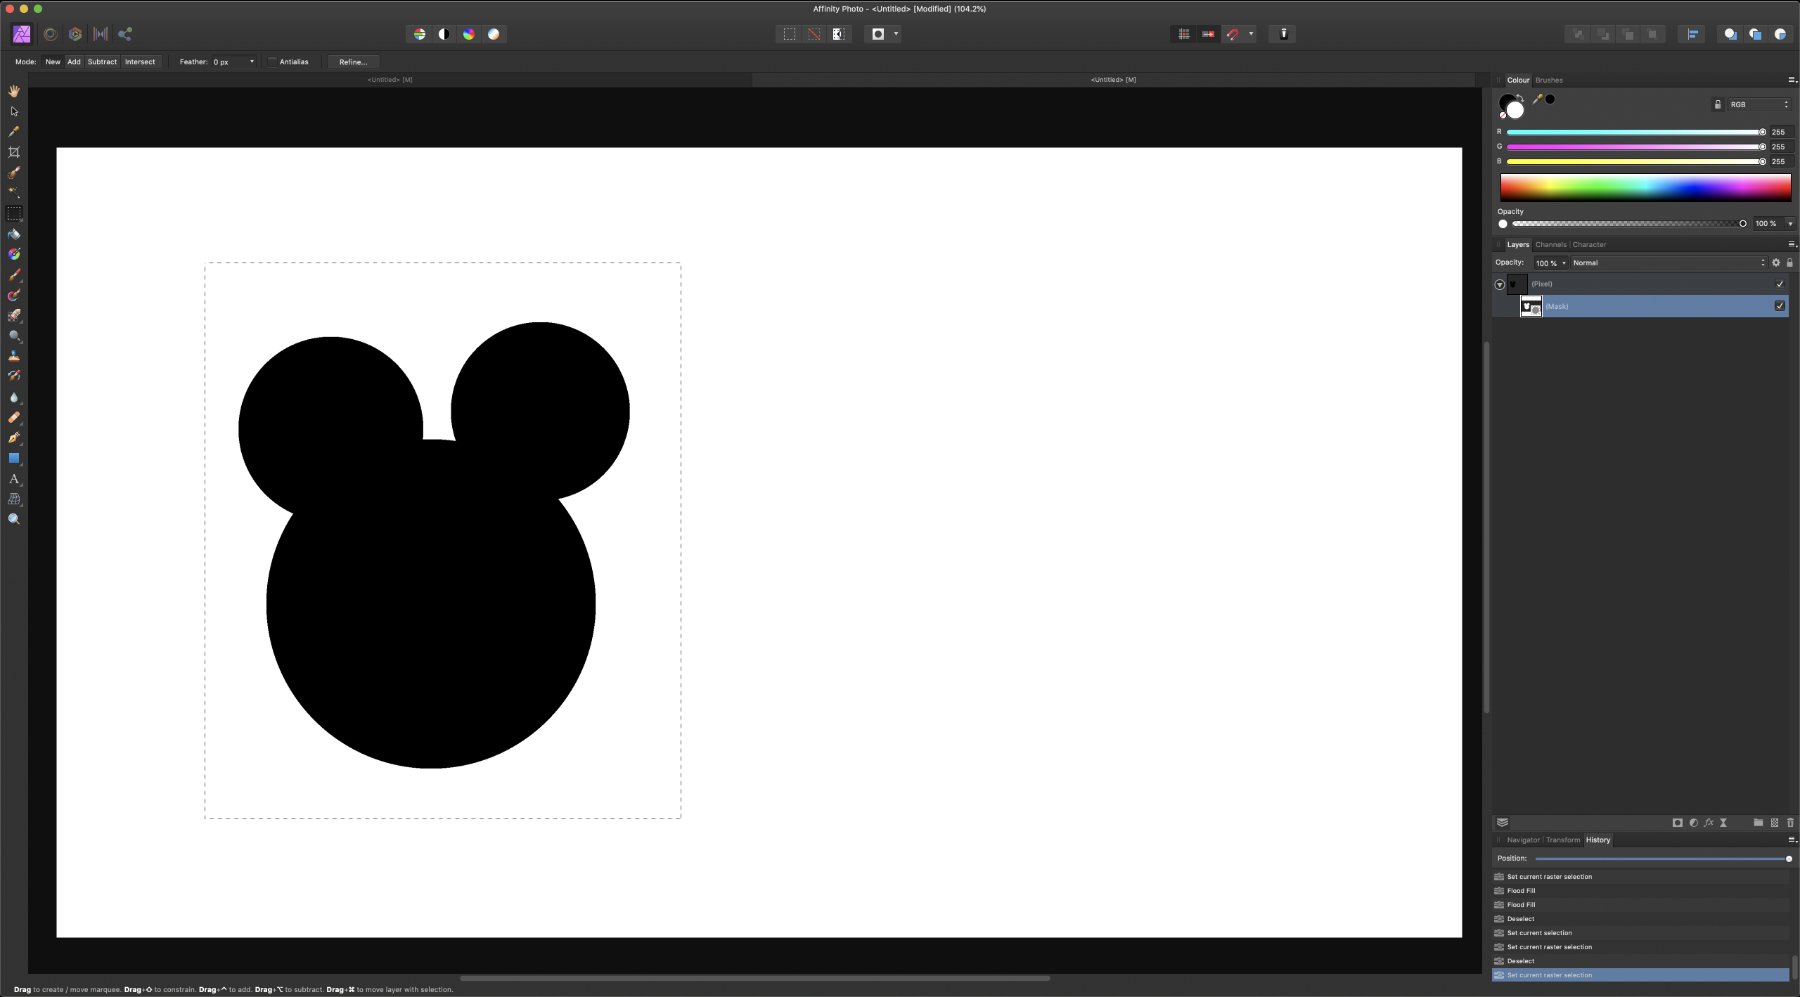
 Hello everyone, i have a question i didn't found the answer yet. After selecting and refining selection and then output it as a new layer with mask i got this. Why is my selection without mask pixelated and ruined and how can i avoid that? Thank you very much
-
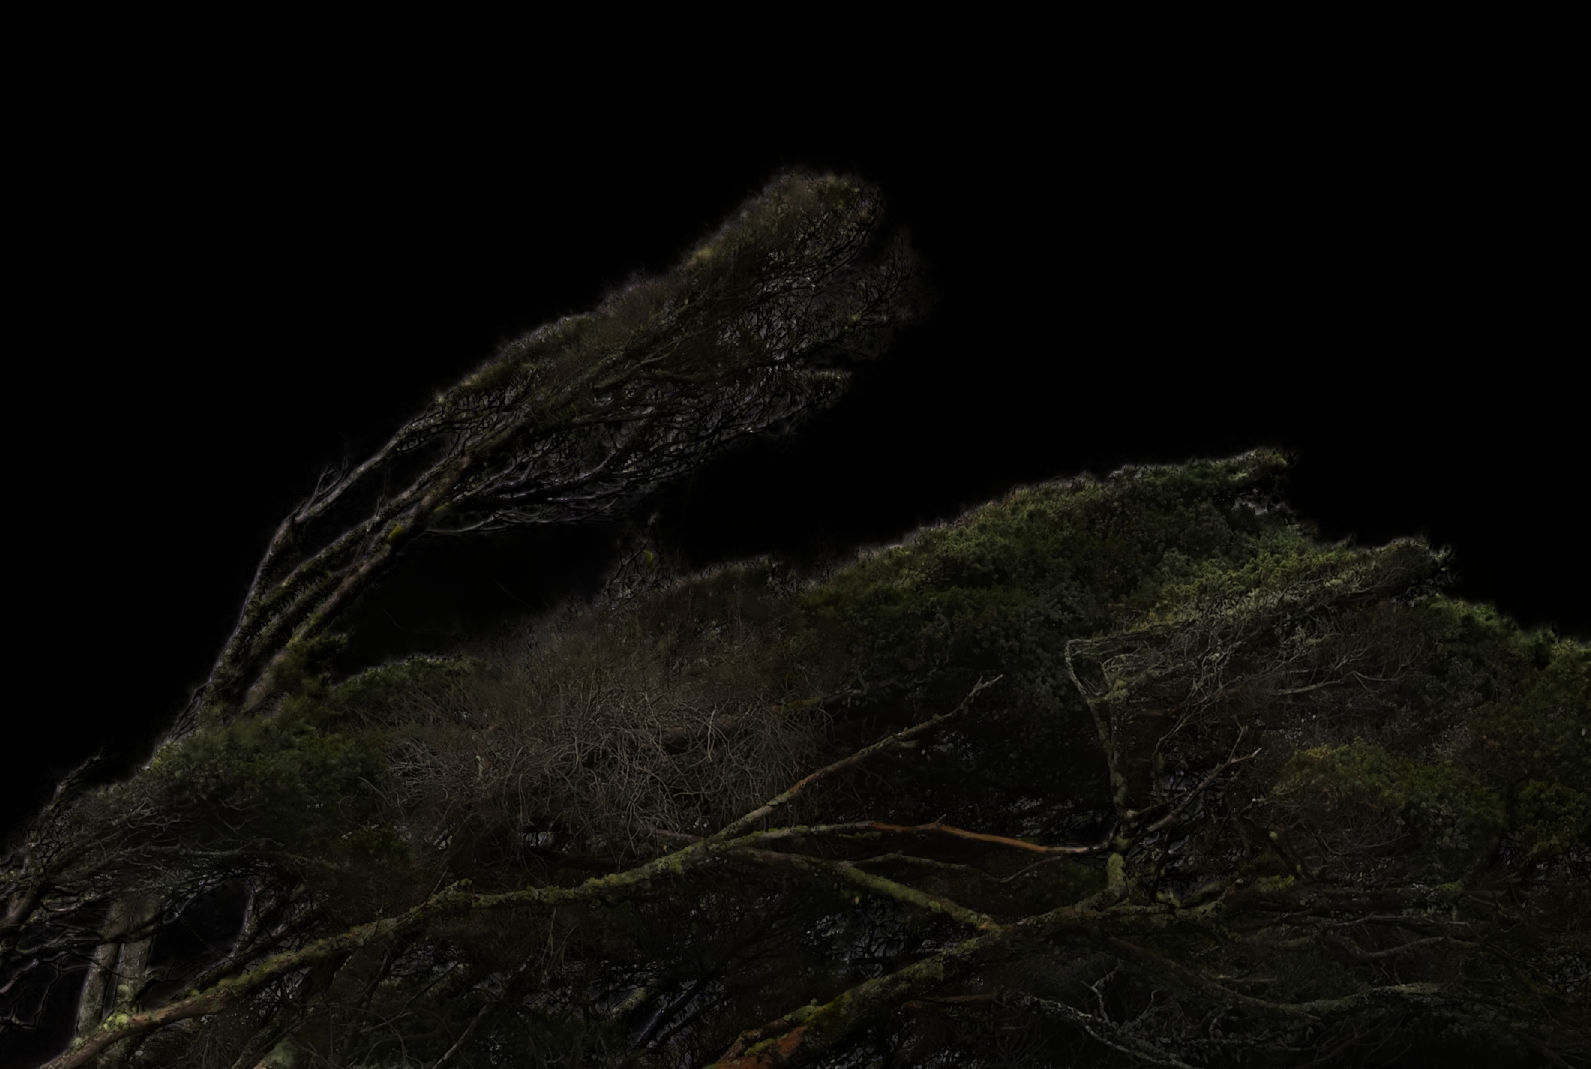
I have been looking at ways to effectively mask things like trees and then adjust the background so you can increase contrast, gamma etc in the sky without affecting the foreground. I have tried Remask from Topaz which is pretty good but thought I would try Affinity which is my core image editor. MY METHOD Using the selection brush I make a loose selection of the sky around the trees I then invert the selection I then hit Refine Using the Matt brushes and foreground and background modes I then tidy up the selection so only the tree is selected Using a black background in the Refine tool the trees look pretty good (see attached) In fact a better result than I can achieve using Topaz Remask and faster. MY PROBLEM So now I have the really good selection I need to transfer that into my final image so I... Hit apply Now I have a selection of just the trees To test how good this is and recreate the result of using the black background in the Refine tool I convert the selection to a mask. In my mind this shoud duplicate the effect of the selection including transparency Then I load a pure black pixel layer beneath the masked layer The result is attached As you can see the selection as a mask appears quite a bit different from the refine preview window with lots of bleed coming through. Am I doing something wrong? Am I wrong to expect the mask to replicate the preview window in Refine? It seems if the preview can do it why can't I replicate in the final image? I really enjoyed selecting a tricky subject like this in Affinity and would really like to get this right. What am I doing wrong? or Is there a deficiency in Affinity? Many thanks Andrew Busst
-
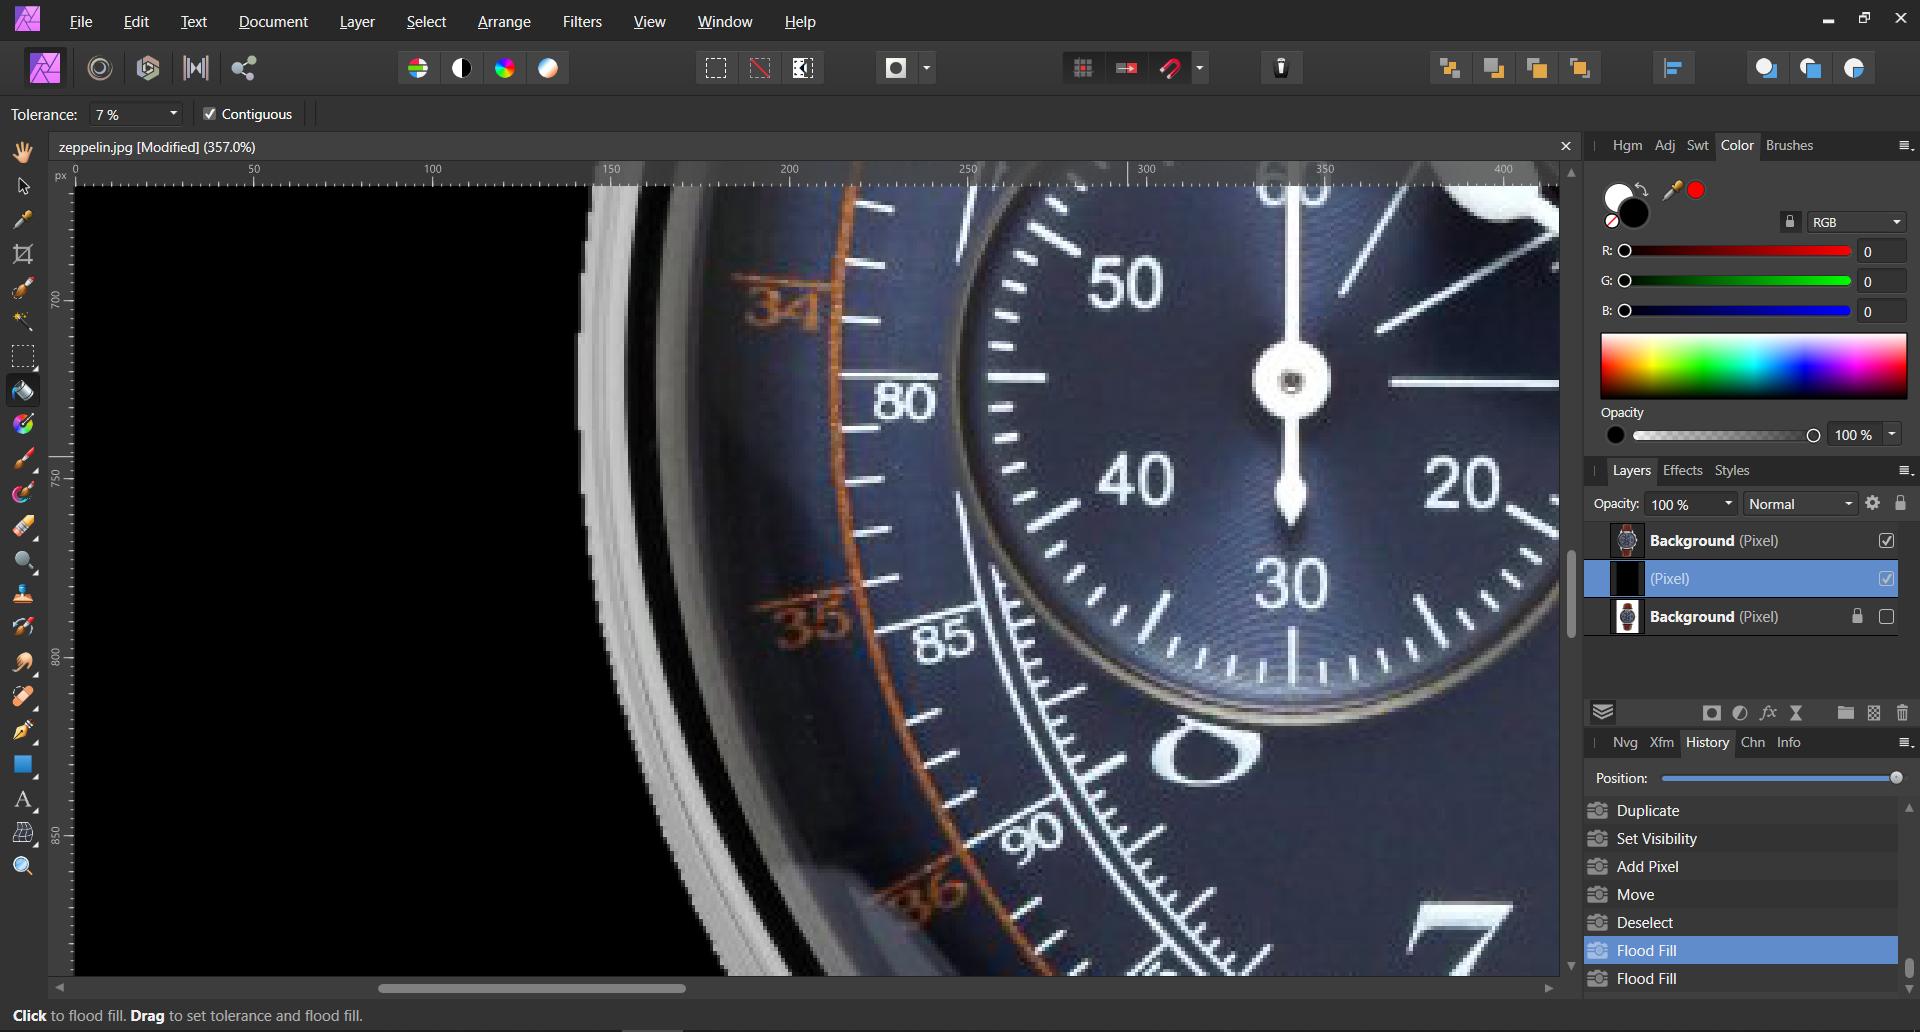
 Hello, I've been using Affinity Photo for about 2-3 weeks now to work on a local client's comic book and I am extremely impressed with the efficiency with the program thus far! However I ran into a problem when attempting to remove the blue guide lines (margins used in comic book coloring). These lines are traditionally color coded blue, so that they're "easier" to erase while in a photo editing software and with Photoshop I had no problems erasing them. However I have tried multiple selection options with Affinity but all the magic wand does is either select everything else including the black or selects individual blue pixels and not the blue lines entirely. The blue itself is slightly transparent so that might be an issue? Here is what I did to get to this stage if it helps: Filters > Color > Erase white paper CTRL + J > CTRL+ E (to make the marker lines darker and then I just merged them together) Magic Wand tolerance set at 0%. - I mean I could always erase with a layer mask, but I would prefer a cleaner way to select and erase the blue in one go. Any thoughts?
-
if something is selected when export the document, Area option should be Selection with background/Selection without background. I prefer Selection without background.
-
A "Select Same" option (as in Adobe Illustrator) would be incredibly useful in Designer to select objects that share the same appearance. That way a user could select, say, all vector objects that have the same stroke weight, or colour fill, or colour stroke, etc. This would make editing and recolouring complex vector files a lot less taxing and time consuming, and a lot more streamlined.
-

Freeze using selection tool
DigitalVisuals posted a topic in [ARCHIVE] Photo beta on Windows threads
After make a selection and inversed this and try to copy it the whole system freezed. I used a wacom intuos 4 driver with this, i had to use the mouse to get to unlock the system again. Don't know if this is a bug. There was no expended GPU or memory at the moment. Windows 10 home 28 gb ram i5 gpu an nvidia 1050ti -
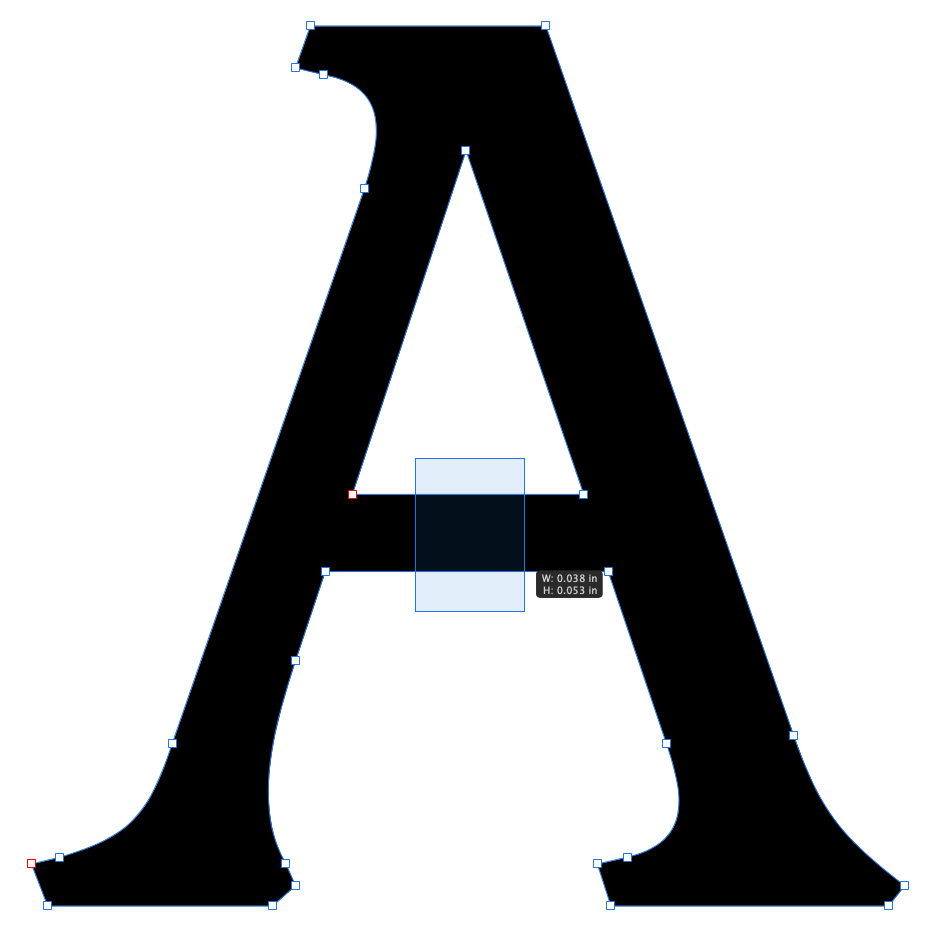
 So I'm trying really hard to figure out Designer. I apologize for these nuub questions, but I'm just not finding answers in the forum, the help files nor the video tutorials. So I have the letter "A" that I've created curves for, and I want to delete the cross bar. Again, cannot figure out how I would select those two segments of the shape. I don't want to delete any nodes; I'd rather leave those and join them back together. How does one go about selecting (and in my case deleting) segments of a shape? I've tried selecting the shape with the node tool, and then dragging over the segments, but when I go to delete it the entire shape is deleted, not just the segments. If I click on the segments with the node tool, it appears to add nodes to the segment, not select the segments.
-
Noob question: So I have a letter that I've converted to curves, and I want to tweak the letter form a bit. One thing I'd like to do is delete one of the serifs in the letter, and then lengthen the extender. For the life of me I cannot figure out how to select the nodes in the serif, other then shift clicking on every single node, which is would be very tedious because of all of the curves in the serif. I've tried using the node tool and clicking and dragging over the serif of the font, but nothing is selected. I've looked through the tutorials, but all I can find is how to select the entire object, or how to modify a single node. Any help with this would be appreciated.
-
 In Affinity Designer, is there a way to hide the blue outline surrounding the vectors on selected objects - similarly to how Adobe Illustrator hides the blue lines going forward by pressing "CTRL + H"? I often compare adjustments to a design by doing undos/redos and the blue vector outline changes what the design looks like. Thanks for any help!
-
Hello, Maybe there’s other ways to do this but i would like to request for the rotate slider to work with selected vectors. I can rotate selected vectors via the rotate button but not the rotate slider which i thought makes sense. See my point via video attached. 4B4B10D9-19F3-432F-B27B-40D3150B2C51.mov
-
 What title says. Steps to reproduce: place picture stretch it to cover bleeds, switch to Photo, marque selection can't be drawn on bleed. However when moving existing marque it can overlap bleed with no problem.
 -
 Affinity Photo for Desktop feature request: 1. Add a selection wand to select areas of related color when creating a mask, with +/- and antialias options. I use Corel Draw's "magic wand" to do this. I'd love to have this feature in APhoto.
 -
 When I zoom in a current selection often wanders out of sight, beyond the window’s edges. Wish: selection’s center is centred in the window as soon as it’s falls over the window’s edge.
 -
 An image is worth 1000 words, the first image is the cut out I made and second image is the cut out placed in another image... but with a border I do not want. If any more context is needed, please let me know! Any help? Thanks catonjam.afphoto
-
 I want to eliminate the a black background bg. of an open book lying on a black ground, so I just have the irregular shape of the open book. I've successfully done this on about 6 of them just like this one, using the wand. I can't (or don't know how to) use the wand on this one because of the B+W image (bottom center) abutting the blk. bg. The wand selection enters the image and I can't seem to get the "wand-subtract" setting to eliminate the inadvertent selection of portions of the image. With the magnetic lasso, I can switch to manual mode right before the problem area, trace the edge of the page across the problem area manually and them resume "magnetic" right after the problem area. When I close the selection, I get the marching ants around the book spread. I choose "invert selection" to select the blk. bg. I hit "delete" (as I do, successfully, with the wand) and nothing happens—the bg is not deleted. How do I get the bg. of this magnetic wand selection to delete? How come the selected bg of the image does not delete with the lasso but does delete with the wand selection? thanks, lettergothic
-
 I have to close the window and open again to move.
-
 Hello! I'm a proud owner of the full Affinity suite and I really enjoy using it. Selection dragging in AD and AP can be chosen to be either the Corel way (drag over the whole objects) or Adobe way (intersect with objects). It would be great if we could map a hotkey or modifier to switch between the two modes, as sometimes one is more suited than the other for what I'm trying to accomplish. Thanks a lot for all the hard work!
 -
 Hi guys, I would like to do some simple operations into my masking Affinity Photo, but I can't manage to do it. My project is a simple black filled pixel layer with a mask on it.I would like to duplicate an area selected of this mask with the marquee tool to another part of this same mask. But I can't find a way to do it, the "Drag + Command" operation doesn't seem to work (the selection is moving but isn't duplicated). It is just me or am I doing it wrong ? Thank you !
-
So, after this update to the latest version of AP, the ability to delete selections is no longer a thing apparently. It will only delete the entire image. No matter how I go about changing the selection or what selection method I use, it's only deleting the whole image. Why is that?
-
 I continue to have difficulty understanding the selection tool in AP. I expect the tool to behave like other software where I can make my selection and immediately copy/paste as a new object, or delete it. It seems that I have to go through the additional step(s) of refining the outputting. Is this the case or am I missing something? I keep going back to Pixelmator Pro for fast selection edits, and I'd rather not.