Search the Community
Showing results for tags 'Bleed'.
-
 Apologies for the very newbie question. I’m trying to get my image print ready and I’m not sure if I need a bleed if I already have a white margin. I would like the white border as a part of the design. If I do need a bleed, how do I get the white border to stretch past into the bleed?
-
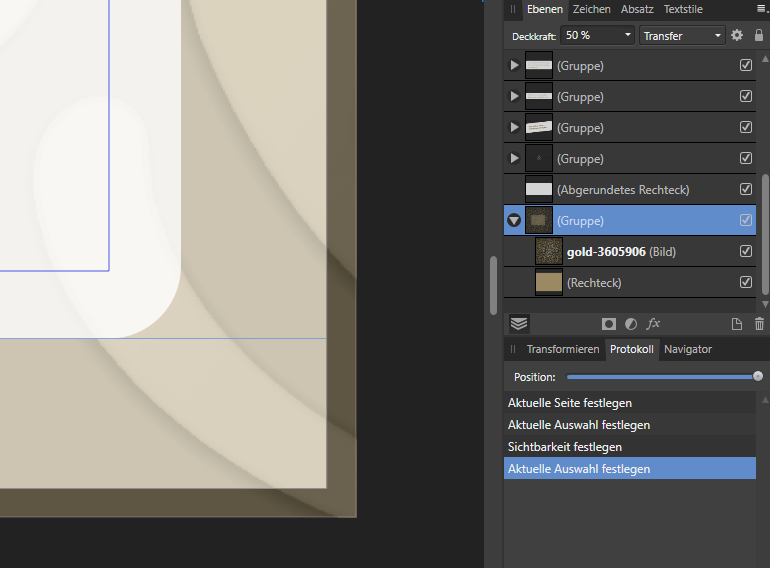
 See screen shot. I have a background image on the spread. The printer advised to expand the image into the full Bleed so as not to risk some "white" unprinted edges when the bleed is trimmed off. Printer indicated a risk factor of about 1/16th of an inch. In this case, the image Opacity is set to 30%, but it comes out 100% in the bleed. I think this needs to be repaired - if the printer is off in the trimming, you would see the 30% image in the center of a page, but at the edge the risk is that you would see the image at 100%. This becomes even more important for the cover since there may be a wraparound and you wouldn't want the image to suddenly change opacity as it wraps around the cover edge. If opacity is not used, then the entire full bleed image is fine at 100%. Fortunately, if you export to a PDF, this appears to be only a visual, cosmetic problem. That is, what you see in AFPUB is not what you get when you export. The exported spread does not show a 100% opacity in the bleed area - in my case it is the specified 30%. I do not know if the export to other formats would follow suit. So, maybe not so critical, but it could cause confusion for users to see the difference in opacity in the bleed. Second screen shot is a PDF export.
 -
 I am exporting a Publisher file to psd and can't work out how to include the bleed in the PSD document.
 -
 got all that, but what about exporting to .eps to include bleed?
 -
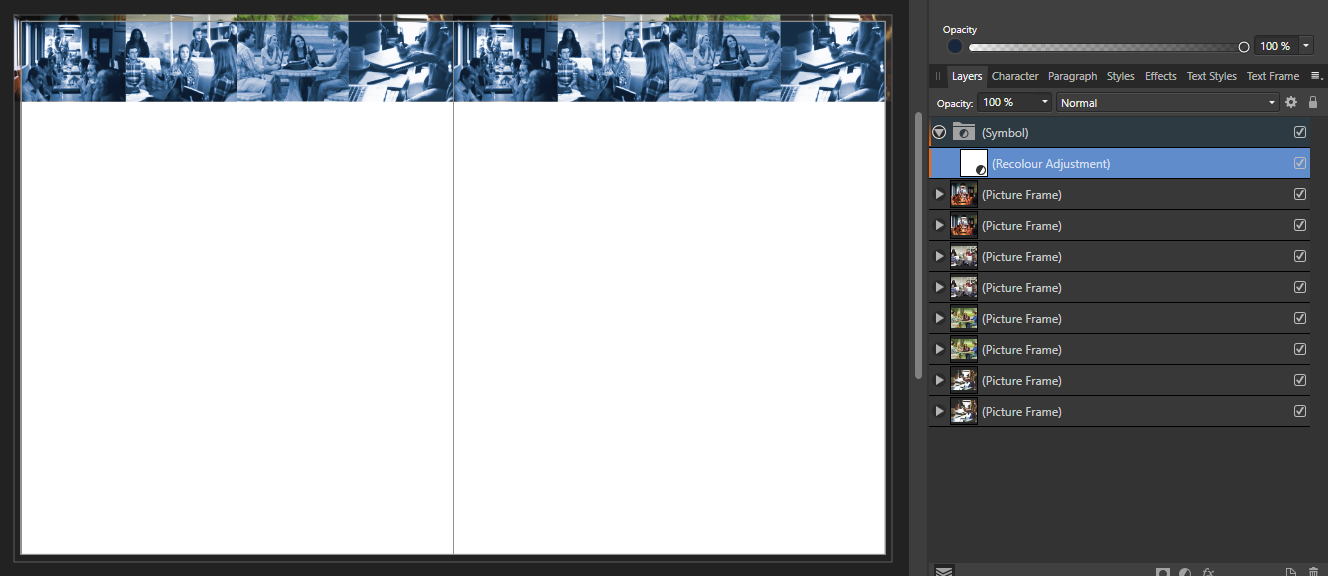
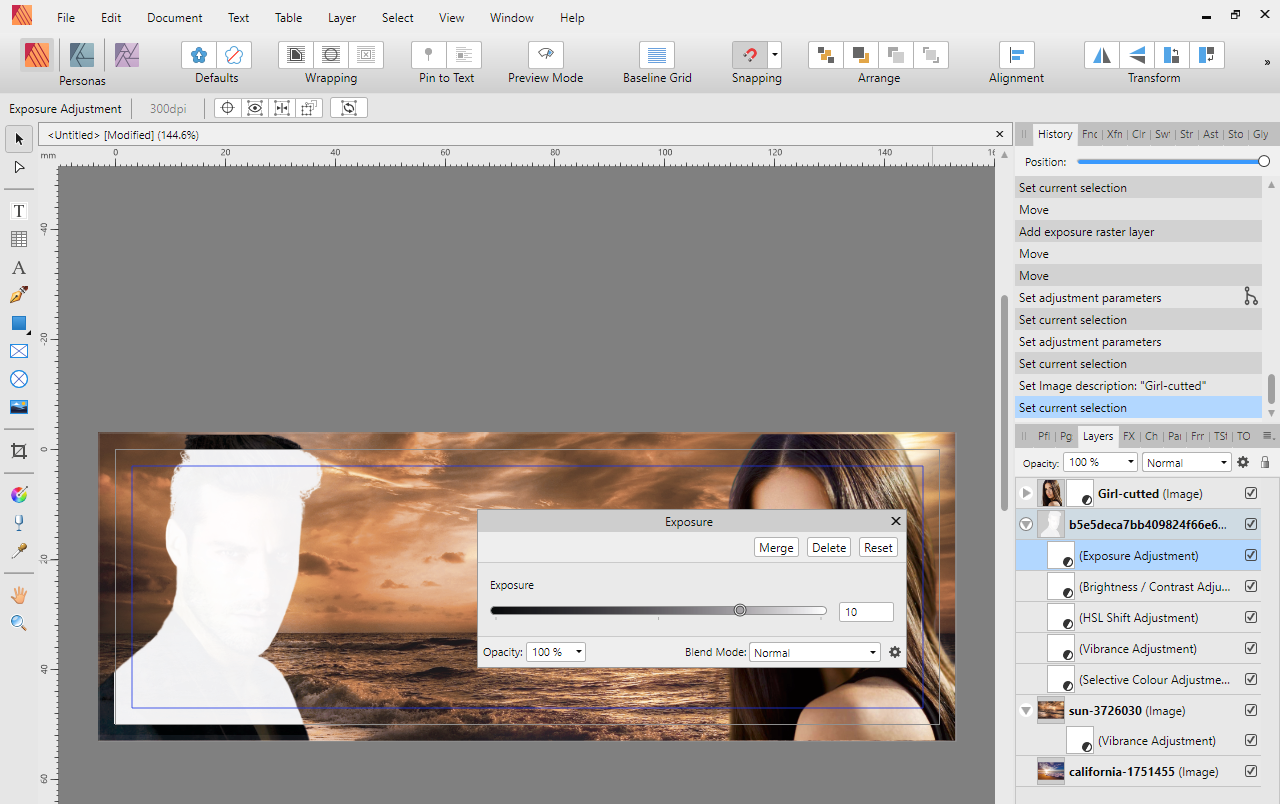
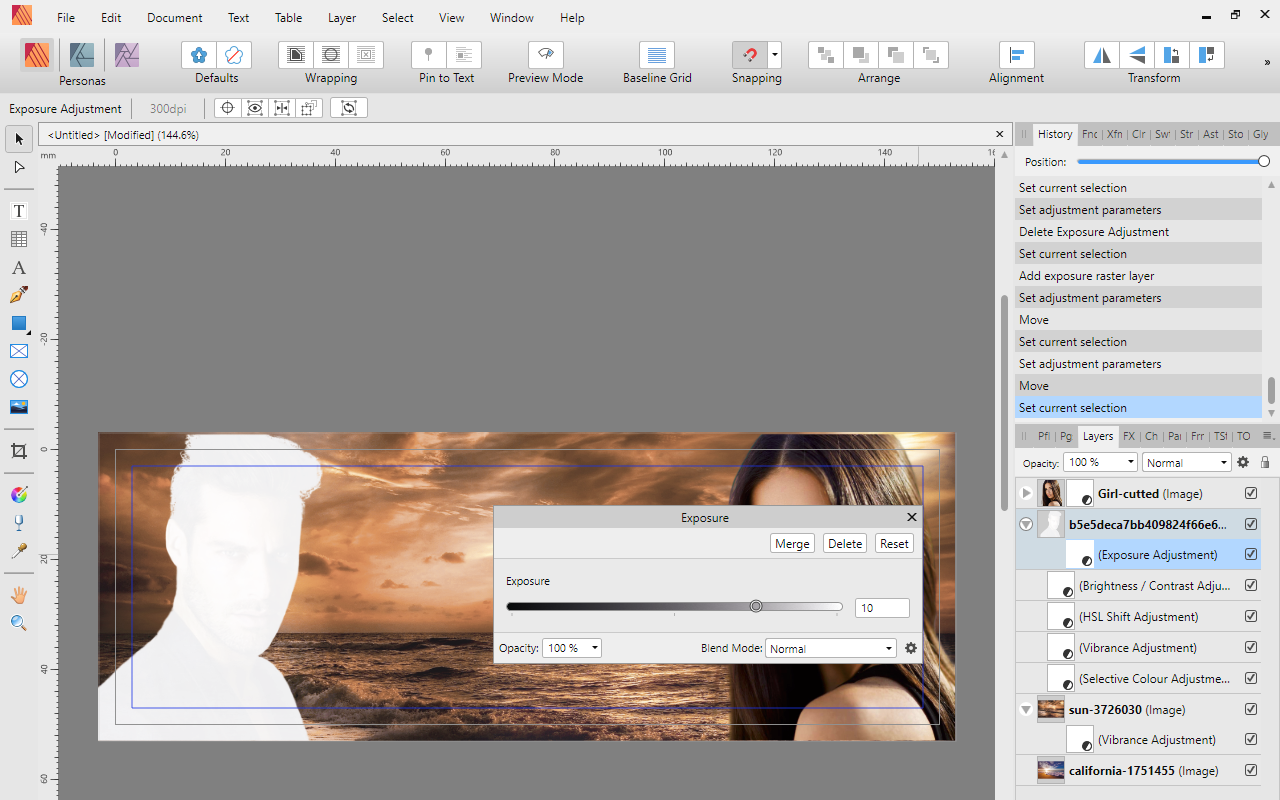
 Windows 10 Home 1909, Publisher 1.8.2.620. I’ve just noticed that, when I add an Adjustment, the bleed area isn’t updated when I change the Adjustment settings until I zoom the document. I’ve tried with Recolour (see attached video), Exposure and a few others and they all seem to do the same thing. Not a massive problem as the work-around is easy and most people might not notice anyway, but I thought I’d bring it up. This only came to light when, in another document, I used a Recolour Adjustment as a Symbol in Designer and then edited the document in Publisher. In this case the adjustment doesn’t seem to be applied in the bleed area no matter what I do (see attached image). I don’t know if this is expected or not as it’s the first time I’ve done it so more testing may be needed on my end. 2020-04-02_09-58-30.mp4
-
Hello, I make a bookmark, and I add exposure to image, but this doesn't work on bleed area when I use as sub-layer, and no like mask. See my example, and please fix this in next version if bug: This working as mask:
-
 Dear developers, When open a Publisher file in Photo persona or Affinity Photo bleed is missing! I didn't see it! This feature was worked in 1.7.3 version, and very important for me to publishing! Many times need patching bleed area for press publishing. And in Affinity Photo missing pages, I see current pages only! Please fix these! (Or get a trick, how can I use Inpaint tool on bleed without rasterization? I made a bookmark, and on bleed have a few item, but I cannot use Inpaint tool on bleed, because didn't see it... If use Inpaint tool, photo will rasterized AND CROPPED...) Update: here is temporary solution for bleed inpainting: Place image and set size Switch to Photo Persona Rasterize image (no trim!) Place image to spread visible area Inpainting Switch to Publisher Persona Place image back to bleed
-
Bleed is not showing on the Artboard. The bleed is there, you can snap object to it but it's not showing. It doesn't help to show/hide bleed or Clip to Canvas on/off. Is there any other option how to display it on the screen...
-
 Hi! I'm trying to do a layout for a "pdf to photo book" on Blurb and I'm at a loss for how to proceed with setting the bleed in Publisher. They give the following specs: Page Specifications Points Final, exported PDF should measure (w x h) 693 x 594 Page size / trim line (w x h) 684 x 576 Bleed (top, bottom, and outside edges) 9 Inset for Margins / Safe boundary (Top, Bottom, Outside Edge) 18 Inset for Margins / Safe boundary (Binding Edge) 36 Cover Specifications Points Final, exported PDF should measure (w x h) 1483 x 648 Total Page size / trim line (w x h) 1439 x 604 Bleed (all edges) 22 Flaps (w x h, measured from trim edge to fold) none Gutter / Spine (w x h) 33 x 648 Inset for Margins / Safe boundary (from edge of trim) 18 I'm doing both the cover and the pages in the same file...easy enough to do that but where I'm stuck is the bleeds are different for both the cover and the left side/right side pages. Is there a way to set bleed on each master page so that it is applied correctly for each page? The way I have it set up currently, the left edge has a bleed of 18 and the top, bottom, and right have a bleed of 9 on ALL pages. I know I could to facing pages...but Blurb can't seem to handle that. Any suggestions? Thanks! -Chris p.s. the file contains sensitive information that I don't want out in the wild so I'm not attaching it. If needed, I can scrub it and attach a generic example.
 -
 So I'm creating an RSVP card that has a bleed, and eventually will be printed 3-up on 8.5x11" paper. In the past, with the software I'm used to, I create a master document of the RSVP card, with the bleed margins set. I then create a separate document for the 3-up, and place the master into this document 3 times. In this way, if changes are made to the master, the 3-up reflects those changes. When placing the master into the 3-up, the software gave me import options when placing the master, one of them being that I could crop to the bleed bounding box. After placing the master, I would create crop marks on the 3-up (which the software had scripts for doing). So I could use some advice as to how to replicate this workflow in Publisher, at least to some degree. In order to get crop marks in Publisher, it appears I have to export the master as a PDF. Which I've done. But when I import the PDF into my 3-up, it doesn't include the crop marks for some reason, even though I can see the crop marks when I open the PDF in Preview. I'm starting to think that I will have to forgo the ability to link to the master, and simply copy and paste the master into the 3-up. Not ideal, but that is the only way I seem to be able to include the bleed. And then I will need to build the drop marks by hand on the 3-up.
 -
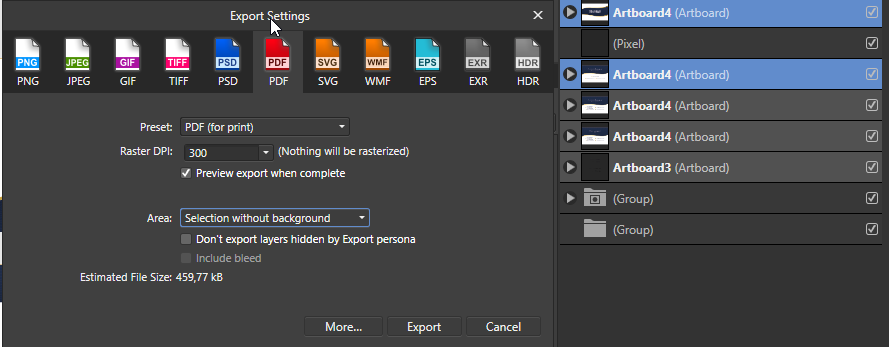
 I’m am new to bleeds, so maybe I’m doing something wrong, but… If I create a new document in Designer for iPad, and in the document setup dialog I don’t create an artboard, then once the document is created, I can select Bleed from the document menu and add & change bleeds on any side. If, however, I create a new document and select Artboard in the document setup dialog, then once the document is created, I select Bleed from the Document menu, I get the options to view & create bleeds, but they don’t show up. Also, the Include Bleed option is disabled on PDF Export. Likewise, if I create a document without artboards, and then add a bleed (say, on just 2 sides), it works fine, but once I selecte Document—>Artboards and add an artboard, I can no longer add or edit the existing bleeds. Are bleeds meant to work with artboards? Can different artboards within a single document have different bleeds? (I’m guessing not.) Thanks.
 -
 When exporting the bleed eliminates the background color and sets it to white or transparent, it should maintain the original background and just include the dieline. The last version would leave the background color. 4x5 Crimson Ride 750ml wDL.tiff 4x5 Crimson Ride 750ml.afdesign
 -
 Hello, Maybe a newbie question! I created a design in Affinity Publisher and exported all pages > PDF. When I view the PDF, the images that overlap to adjacent pages are not aligned properly, they are shifted/doubled. This makes me worry that when I send this document to the printer, it will have the desired result. Does this happen because of a bleed margin? Please advise. Affinity Publisher Problem #0001.pdf
 -
 Affinity Designer Version 1.7.1.1 iPad Pro 12,9 inch first generation, iOS 12.3.1 I added screen recordings for clarity. Problem 1: Margin and bleed not working for artboards Margins and bleed work perfect for documents that do not use artboards, but when I convert it to an artboard using "Insert Artboard" it stops working. Same goes for creating a document and enabling the option "Create Artboard". Bleed still shows, but changing the values for Left, Right, Top or Bottom doesn't change the bleed. When opening the menu again the values are back to what they were before using "Insert Artboard". Margins also don't work, it goes back to Left 0.0 Right 0.0 Top 0.0 and Bottom 0.0. Trying to change this makes it immediately jump back to 0.0. margin_bleed_artboard.MP4 Problem 2: "Check Spelling While Typing" option is always on when loading any document check_spelling_while_typing.MP4 Problem 3: Limited selection of presets for inserting artboards in an open document It looks like the artboard presets of the category "Device". However, the bottom four options are also missing: Kindle Fire HD 7, Kindle Fire HD 8.9, Galaxy S5 and Surface Pro 2. There is an option missing for selecting the category like when creating a new document. It seems that this simply has been overlooked. insert_artboard.MP4
 -
Bleed Inner 0 Outer 0.125 Top 0.125 Bottom 0.125 When exporting to PDF, the inner edges look all screwed up. It's taking graphics from right side inner and putting it in left side inner and graphics from left side into right side. Just place an image on right page to the inner edge and export to PDF, then look at the left page and right page.
-
 What title says. Steps to reproduce: place picture stretch it to cover bleeds, switch to Photo, marque selection can't be drawn on bleed. However when moving existing marque it can overlap bleed with no problem.
 -
 Hy :) I working with a document on affinity publisher with bleed 3 mm , and I have made the background as placed affinity designer document but the placed doc has not the bleeds and I don't know how to include those bleed when I import document as a linked :)? Thank's you :)
-
In version 1.6 it was possible to include bleed on selected Artboards, in AD 1.7.1 the checkbox is grey.
-
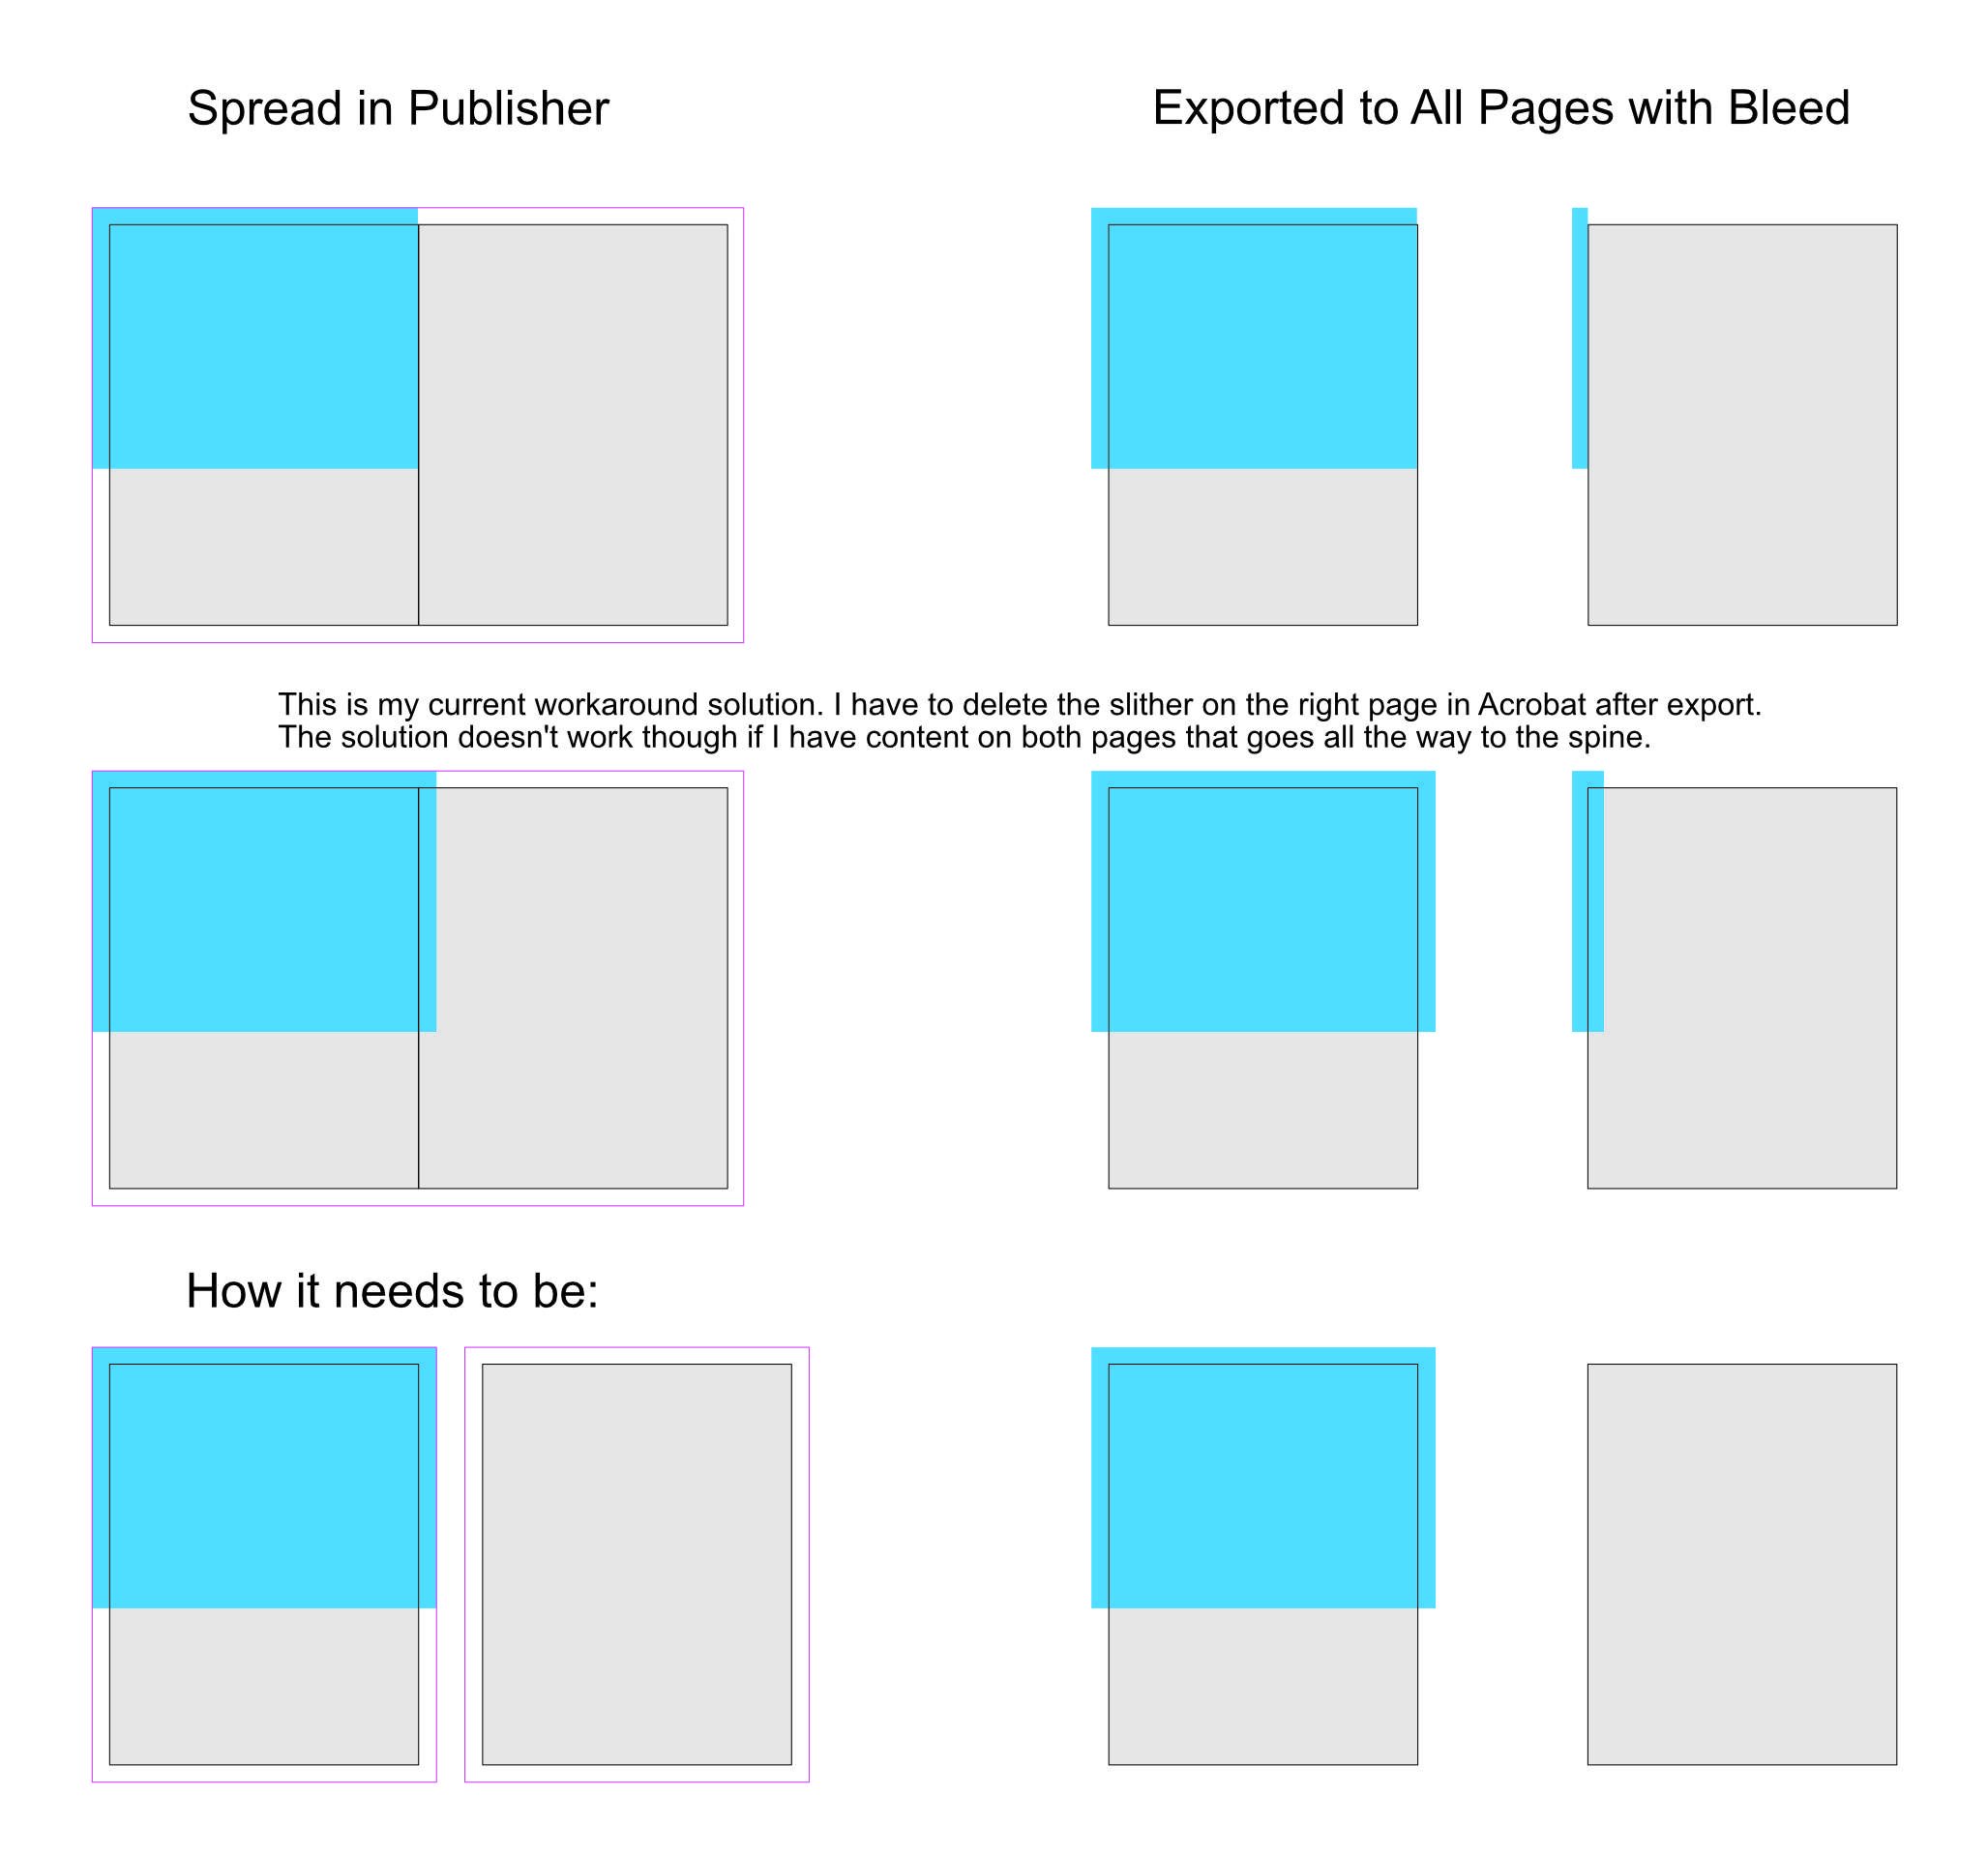
 I am designing a book that will be spiral-bound and therefore loose-leaf printed. Consequently the print PDF needs to be exported to 'All pages' (instead of spreads). When I set the inner bleed in the document settings and then export the PDF to all pages the inner bleed on the pages ends up being the page content of the facing page. If I have e.g. an image that goes all the way to the spine I have to stretch that image into the facing page in order to create an inner bleed for that page. I need to be able to seperate the spread in order to create proper bleed for the pages … in inDesign this known as 'Allow Document Pages to Shuffle'. Have I missed something in Publisher or is this indeed not possible in the current version? I have attached an image to illustrate the issue.
-
In Designer for iPad - when exporting PDF - the bleed is not showing - even if the Bleed is set to 3mm (or any other value). The crop marks and everything is there, but not the bleed. This is really essential for using the app for any serious print work.
-
 First of all, many thanks to Serif for Affinity Publisher. You did a great job and I love the software. However, I miss two features that are enormously important and prevent me from saying goodbye to InDesign: On the one hand, I do not have the "Data Merge" function that many users often want. I do not need to go into that. On the other hand (and this is really annoying), the function "Split Spread" is missing in the "Pages" panel. But this is very important if you want to place borderless or full-page photos. An example: Almost every professional printing company requires a 3mm bleed around each side. If I place a photo on the full page, the bleed of the photo on the opposite side appears during export. (see photo) In InDesign this is solved so that you can split individual double pages and then placed on the split page the photo with bleed. (see photo) That makes no problems in the export. A smaller feature that is missing is that you cannot export the bleed mark but only the cut mark when exporting. But I think I can live with that for now. (I hope my printers too)
-
 Hi! I can see the bleed margins, but i can't see the content when i'm trying to edit it. I only see the bleed content in the pdf. Is there any way i can see the bleed content? Thank you.
 -
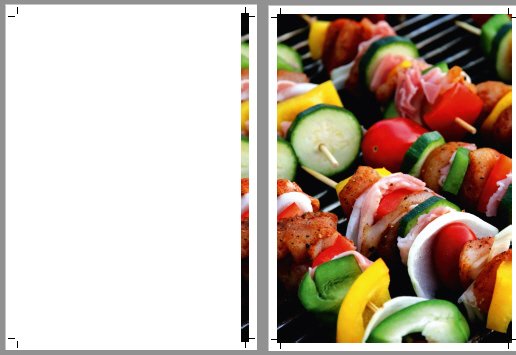
 In publisher I use 'spreads' view. The printing company wants me to set a 1 mm bleed and export as pages instead of spreads (option: 'all pages' on export page). The thing is that my exported PDF shows the inside bleed of the next page instead of its own. Same for the next page (shows bleed from previous page). [see picture] I'm no expert in publishing but this looks weird from my point of view. Is this the normal behaviour or is it a bug? I want to be sure before sending my file for printing. Thank you
-
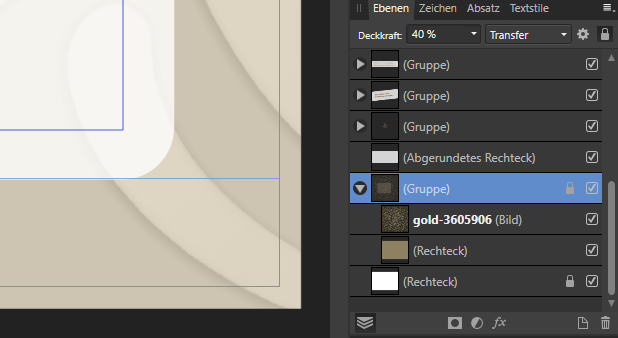
... looks like this: (layer "gold ..." -> 56 %, background rectangle -> 100 %; background-group: 50 %) For correcting I added a 100 % white background (outside of the group) and adjustet the transparence of the group:
-
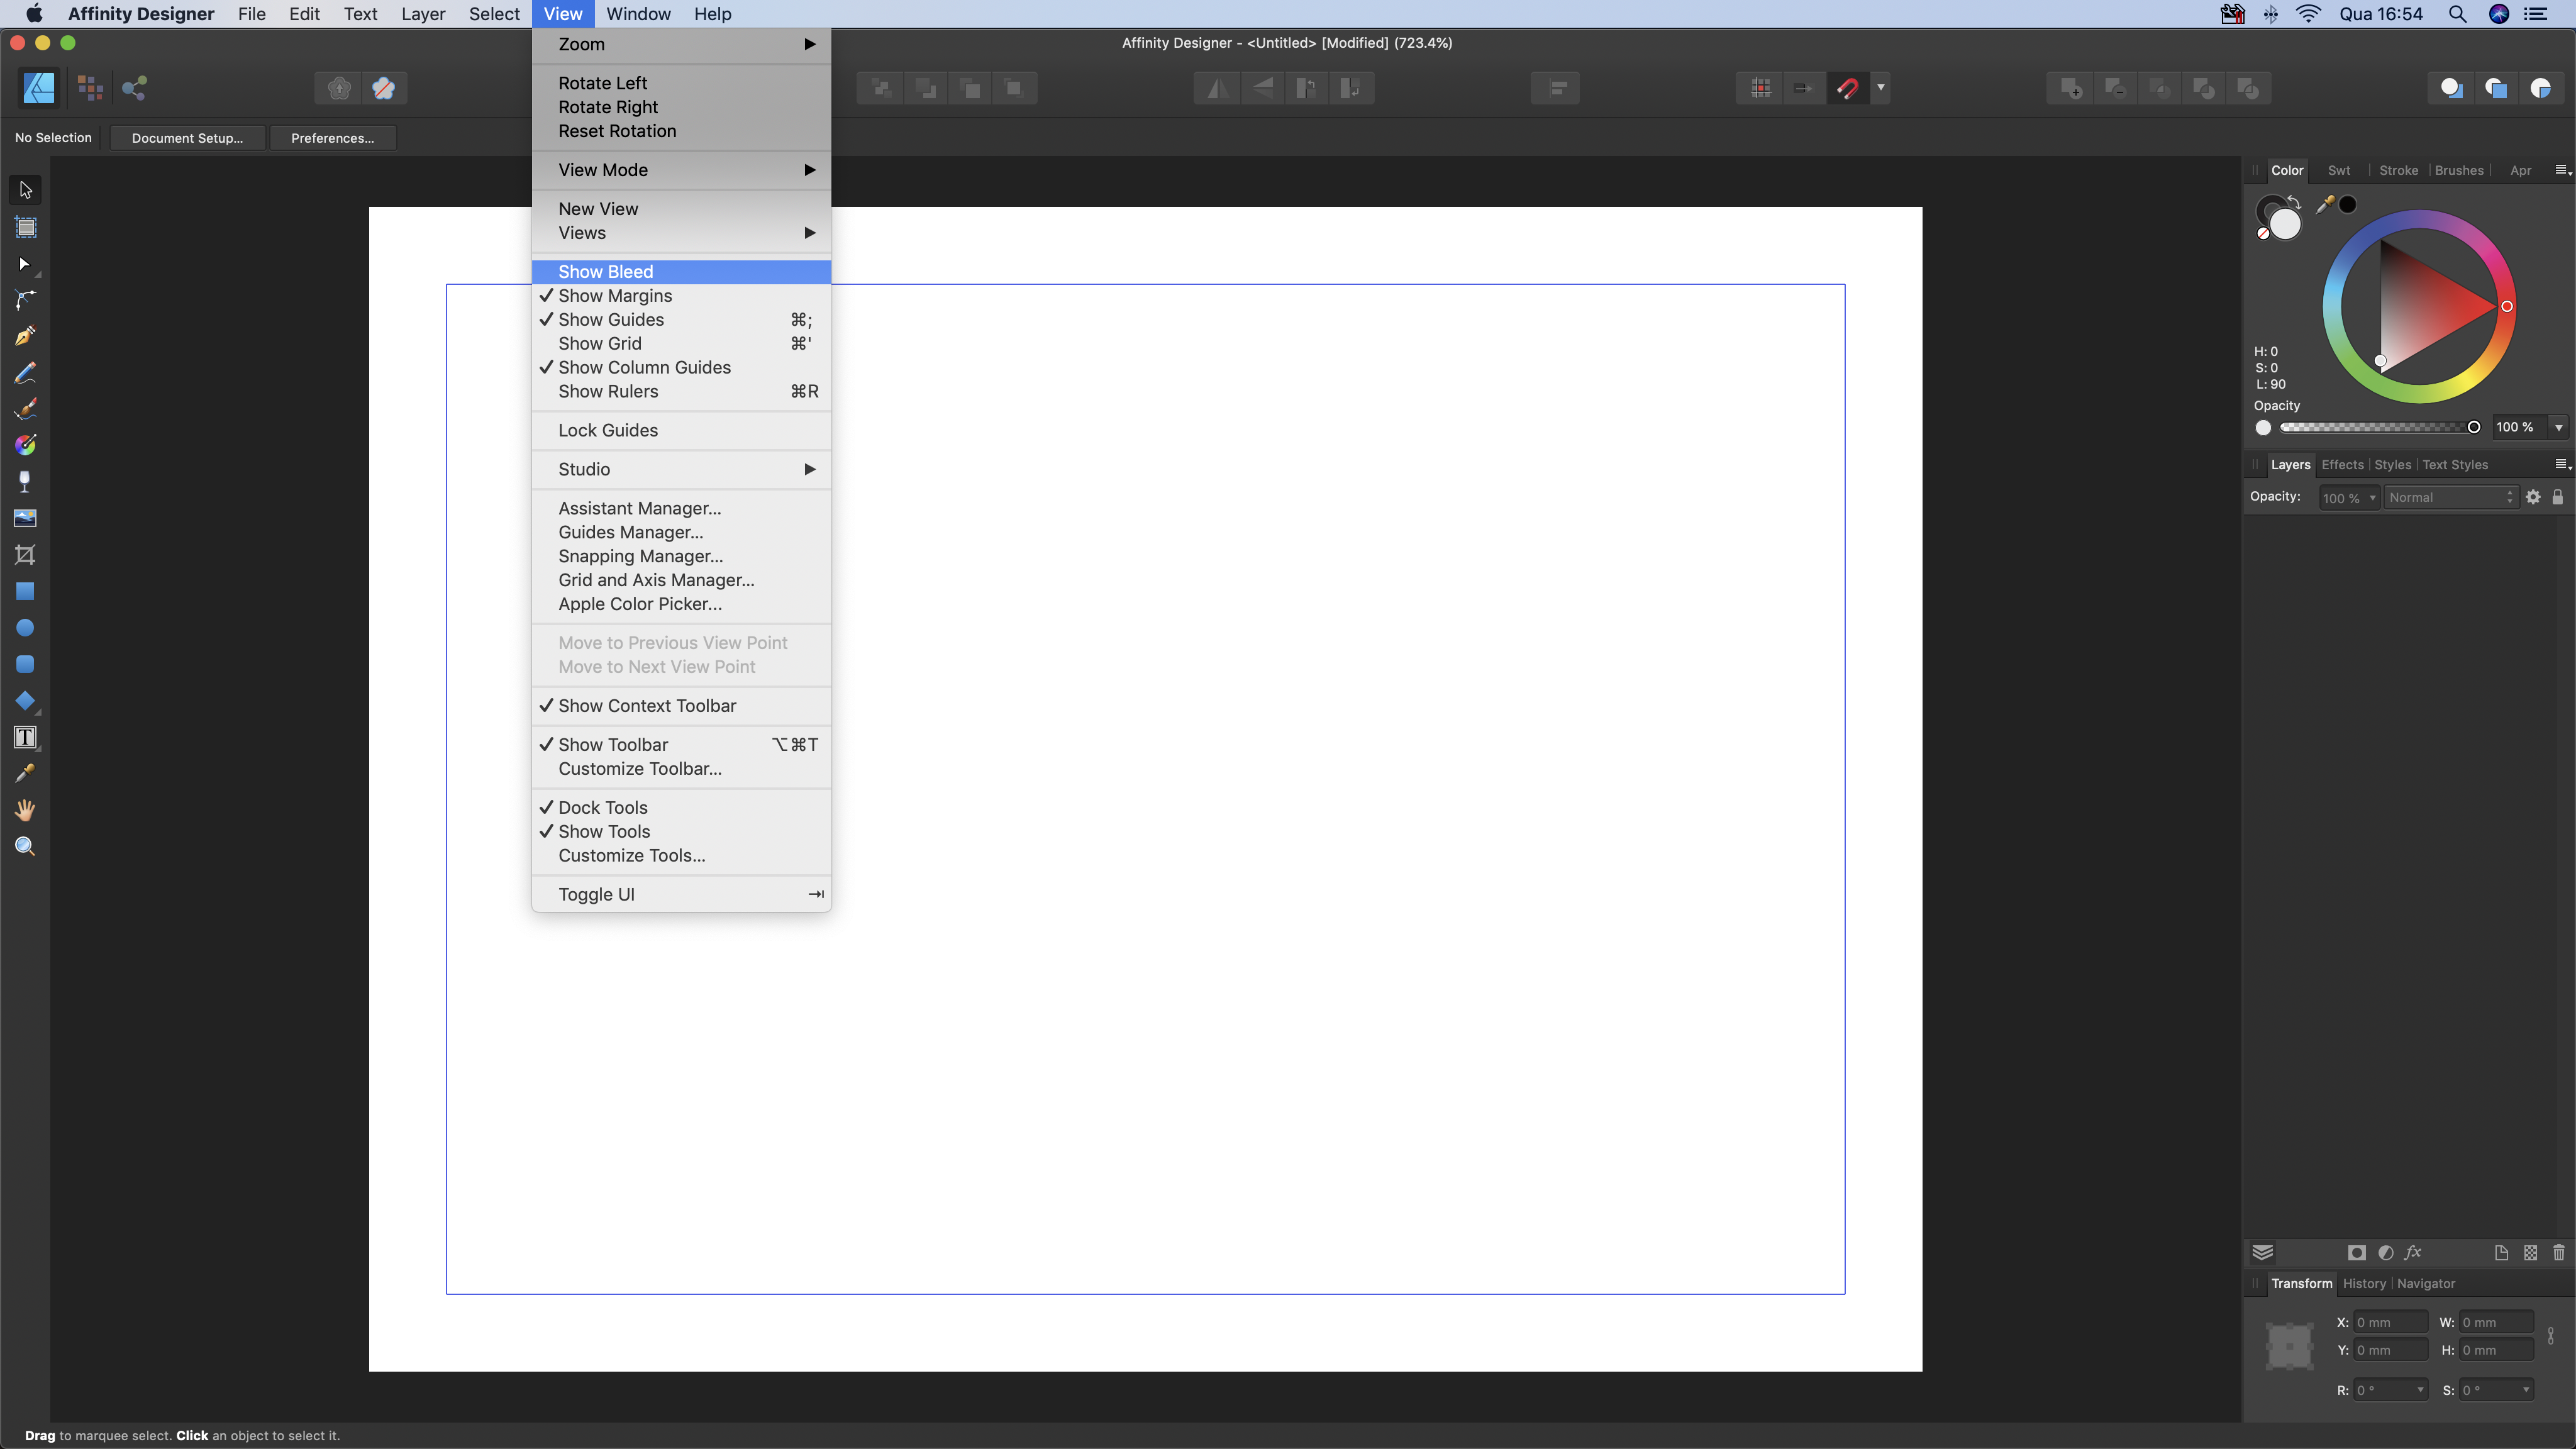
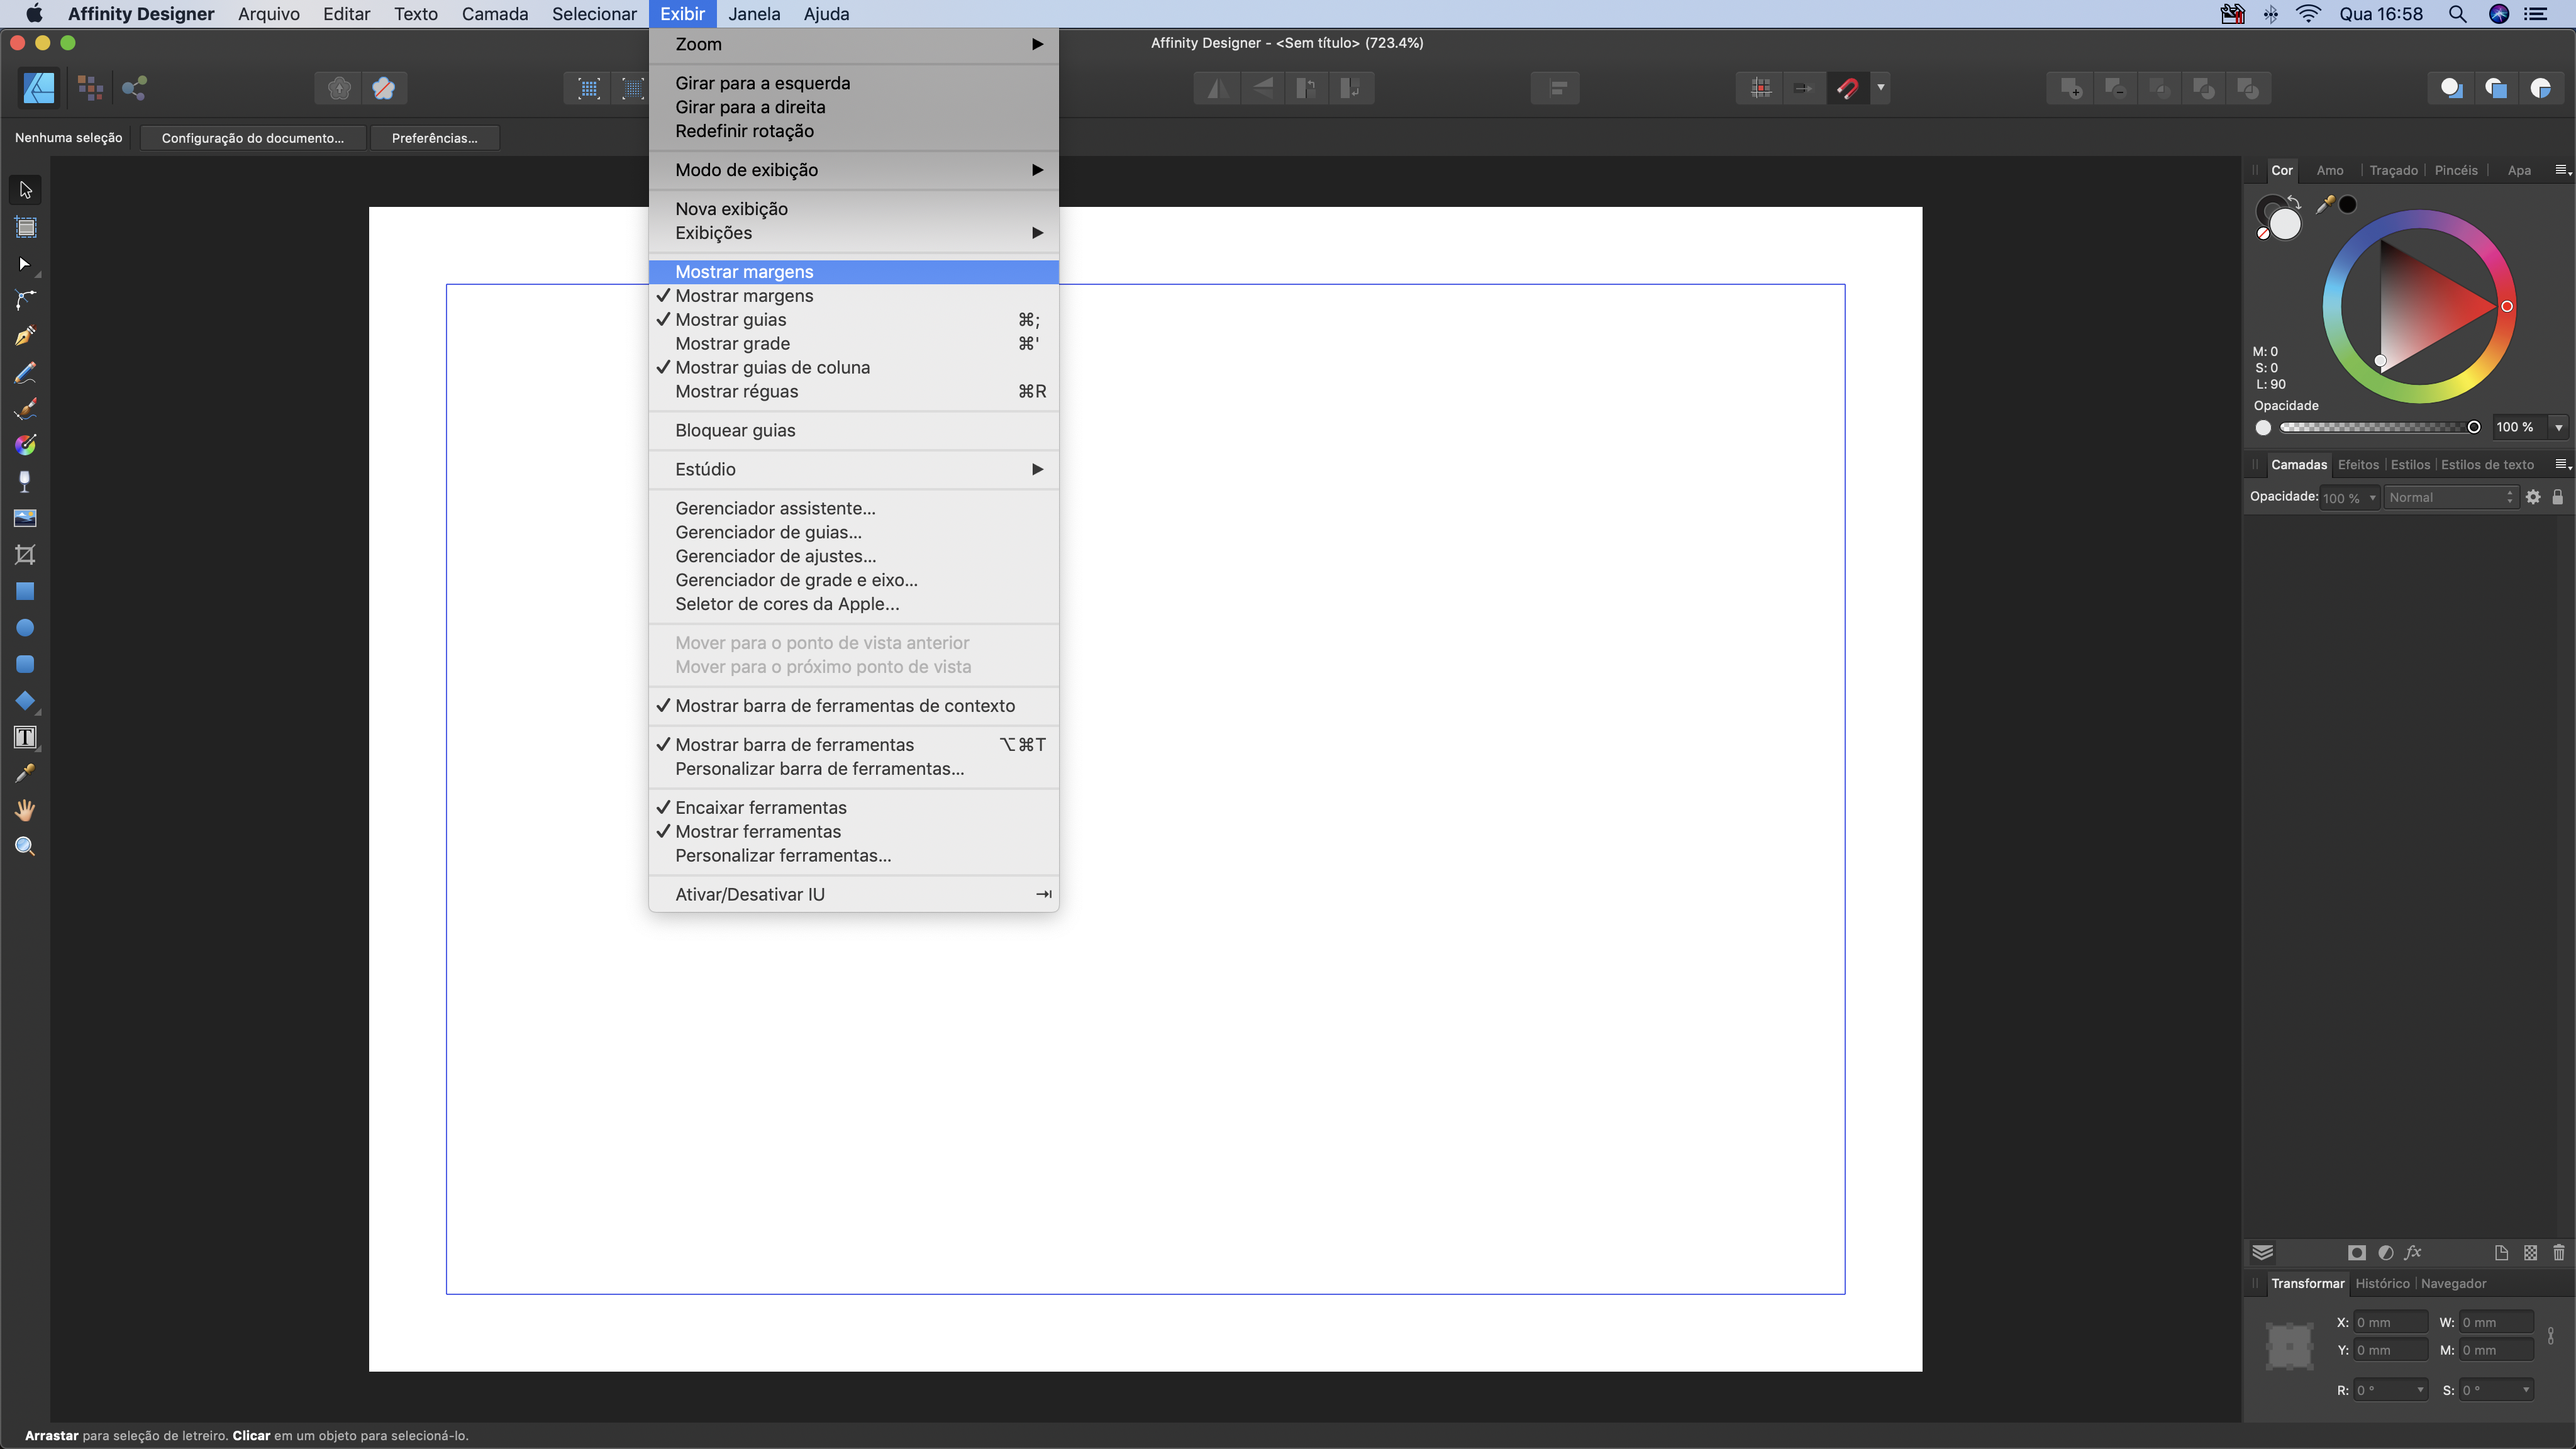
Hi, This isn't a bug, just a translation error that I, as a Brazilian user of Affinity Designer, noticed so, please, include the correct word in the next update. In the English translation, under the VIEW menu, you can read SHOW BLEED and SHOW MARGINS commands. But in the Portuguese translation - yes! In Brazil we speak Portuguese, not Spanish! -, under the EXIBIR menu, you can read MOSTRAR MARGENS twice. The correct would be MOSTRAR SANGRIA (for Bleed) and MOSTRAR MARGENS (for Margins). I would really appreciate if the translation team could pay attention to this detail that sometimes makes me choose the wrong option on the menu. Thanks in advance!