Search the Community
Showing results for 'select by colour' in content posted in Feedback for Affinity Designer V1 on Desktop.
-

Unlink Global color
thedivclass replied to shushustorm's topic in Feedback for Affinity Designer V1 on Desktop
An "unlink global colour" button in the colour panel would also make it much easier to change the colour of an object which currently has a global colour assigned to it. At present, for an object with has a global colour assigned, the default colour panel shows options for tint & opacity/noise, with a button to "edit global colour". If you wish to "detach" the global colour for this particular object, you have to select a different colour panel interface from the drop-down, either the wheel, sliders or box. (Note, you can also double-click the fill/stroke colour switcher to achieve the same result). Ideally, an "unlink global colour" button next to the "edit global colour" would then *automatically* switch the colour panel back to the wheel, sliders or box interface, which I believe would make for a faster and more intuitive UI. thanks- 1 reply
-
- 1
-

-
 @thomaso This can only be applied on layers. If you create a new layer without an object, you can then right click the layer, select properties and you will be presented with a colour picker. Lee
 -

Apply Global color to FX
shushustorm replied to shushustorm's topic in Feedback for Affinity Designer V1 on Desktop
@GarryP Thanks for the reply! It may be fixed in a more current version. Not sure. But that's what I do (maybe this is more precise): 1. Create a document palette. 2. Create a global color. 3. Select a rectangle. 4. Select "Colour Overlay" from the Effects menu. 5. Select "Colour". 6. Select the global color from Swatches 7. This doesn't result in the global color being used by the "Colour Overlay" Effect, but a window shows up that lets me edit the global colour instead. -
 I would like to be able to switch to the move tool from right within the colour picker. Currently, ctrl is in use to pick from the document palette, but I think it should be used to switch to the move tool, like in other parts of the software. The reason being is that I want to select elements and change their colour with the colour picker, yet I can't select other elements other than switching tools. This should also be possible by holding a modifier key. This is also what Illustrator does and it makes working a lot easier if you don't have to constantly switch tools (two presses as opposed to one for holding a modifier).
 -
 I have no problem adding colours from the swatches panel to the selected gradient when the Gradient tool is active and I have the object selected. I use a Document palette and either Global colours or just swatches from that palette. Or any other palette with swatches in it. If you are talking about the Gradient on the Context toolbar I just select the colour stop and then use the Swatches to pick a colour.
-
 I'm working on a map which has a hundred or so icons and hundreds of instances of each. These are all nicely arranged in layers which I can hide or lock as needed. BUT when I want to select all symbols of a certain stroke weight or stroke colour my organised layers are ignored and all instances are selected even if they are on hidden or on locked layers. This is very counter intuitive and I can't find any efficient work flow other than one by one picking hundreds of objects hoping I didn't miss any. It would make more sense, AND be more useful if locked and hidden layers could not be selected. After all, they are hidden or locked for the very purpose of not wanting to change them, yet the command to "select-same... " overrides that very intentional choice to lock and hide. I would like to know whether this was an oversight in the implementation or whether there is some useful reason for this behaviour. For me it is worse than useless, because I can often not see what "select same" has selected because most of the time, most of my very large map is off-screen.
 -

Macros for Designer
Paul Mudditt replied to Sylverzone's topic in Feedback for Affinity Designer V1 on Desktop
Whilst using Publisher, you can switch to photo, start recording a macro, switch to Designer, perform a limited sub set of operations then switch back to photo to finish the recording of Designer operations. I use this technique in my Mud's Macros library you can find on these forums to provide some of the Designer functionality that was missing on the iPad version of Photo. Unfortunately many of the operations simply end up with Publisher rejecting the step or crashing at the most innocuous step such as Select Same Stroke Colour. I really wish that macros could be recorded in Photo, Designer and Publisher and work more reliably across the built in Personas in Publisher. -
 @carl123 Thanks for that. The problem is I am working something quite complex (a generic seamless texture set for my concept brushes!). I used layer stacking in a symbol to create optional texture layers with an additional containment rectangles that can be transposed between symbols or adjusted using colour | layer options | transform etc... layer groups can contain multiple stacking! To get the pattern: Duplicate the centre symbol and detach Delete un-used layers (manually)..may need to get into habit of colour coding! and use layers > select same tag colour Then copy to grid output and export You can do colour but this slightly increases the file size! test in Base brush set (using sub-brush erase options for added texture)
-
Funny I was thinking this yesterday!... When toppling layers to create patterns you can be left with a substantial layer stack!.. un-used in the symbol It would be useful to be able to select all 'invisible' \ hidden \ deselected layers and remove.. or all 'visible' Only because when cleaning up some stacked symbols I had to manually remove the unselected layers...I was looking for an option at the time.. but also decided I had just really been inefficient by not assigning a colour in the first place😀
-
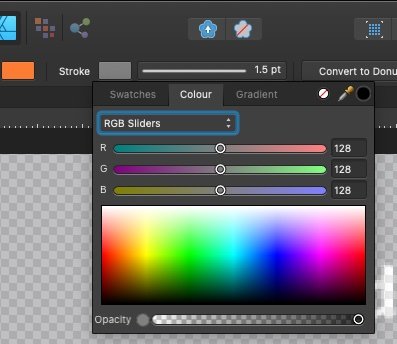
 Why, in the the name of all that is holy, can Affinity products not 'remember' how I'm choosing colours? For example, I want to change the stroke colour of some objects... I click the grey rectangle in the rectangle. The colour spectrum shown appears... I choose 'swatches' because that's what I want EVERY TIME. I choose a colour... great. I select another object, repeat, you'd think Affinity would automatically display swatches because that's the last option I used, but NO. You'd think there might be a user preference to specify the default view, but NO. Every single time I have to click about to get to the colours I'm using all the time. EVERY TIME... if there were a tax on clicks I'd be broke. Please fix this.
-
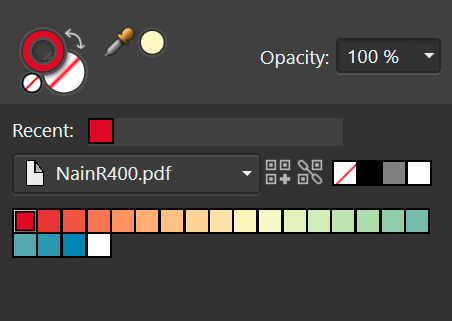
I want to use Select > Select Same to filter my objects from a PDF. In Illustrator, I can use Select Same to get all the objects that have a particular stroke & fill colour without selecting objects. I can use this to sort items along a gradient/ palette. The workflow is as follows: create a document palette > select the first colour > Select Same > Group > Deselect, pick the second colour rinse and repeat. This is also helpful to retrieve objects that are nested deep within the PDF, as long as you know the colours of the object.
-
 Scenario: Create a basic rectangle Fill it with red colour Draw an ellipse and make the fill colour yellow and keep it selected Select the Eyedropper tool and click on the rectangle to copy fill attributes Ellipse adopts the red colour Select the red rectangle and use the command "Select Same Fill Colour" Result: Designer refuses to accept the fact that the red colour in the ellipse is the same with the one in the rectangle… You also get the same results when using the Global Colour swatches. Using the Eyedropper tool, copy a global colour from another object and apply. Without anything selected, edit the Global Colour Swatch and you will notice that the copied colour will not update. Looks like a bug.
 -
 One of the things that I use quite a lot for creating controls for music software is the ability to easily recolour the whole control - Adobe Illustrator offers this capability in a really useful form in its Edit Colour/Recolour option where you can select multiple objects and recolour them all in one go in a very controlled and obvious way. With the trial of Affinity Designer, I could not find anything that can do this sort of recolouring - as a result, it does not do what I want for my use of it. This would be a great addition to Affinity Designer and could mean that I would actively consider using this as a cost effective option rather than the expensive AI subscription for the occasional use I need it for.
 -

Why can't the End Point of a gradient be Copied?
Guest replied to rjvela82's topic in Feedback for Affinity Designer V1 on Desktop
You could use the eyedropper tool to select the colour of which ever point of the gradient you want to use. Not copy/paste, but same results. -
 Basic Layer Management Improvements 1. Search by name/type/property, select and batch rename layers 2. Search, (re)group, export 3. Collapse All Layer, Expand All 4. Better visual highlighting upon selection (blinking, colour assignment) I think it's quite essential, I'm surprised it was not implemented yet
 -
to help differentiate between overlapping curves and nodes when multiple are selected, it would be useful if paths and their nodes could be (optionally) coloured differently for each layer/path selected. e.g. select 2 paths, one is blue with blue nodes (default) and the other is orange with orange nodes. When nodes overlap, it would then be easy to know which is on top without having to move anything first. it would also be nice if you could change the default colour from blue (or set a "default layer colour"). thanks
-
 Since there is already a background colour assignable to artboards (which is great) it would just make it usable if the background colour extends into the bleed, so that print documents are printed/cut properly artboards also could have strokes (borders) - imagine designing 20 artboard based online ads: select all artboards, assign an "inside" border of any colour and width, go have a chat with your mates. now it is draging a rectangle for each artboard and always make sure that it is positioned/sized properly,...
 -
 I think you're missing the point here, @Mithferion 😉 The way AI handles overprint is object (property) based while in Affinity it's colour-based. The object oriented system is imo way more logical, you could easily want to overprint the same colour at one place of the document, while having it knocked-out in other part. Overprint preview is a must also, without any doubts... Also, it's not that easy to handle colour swatches in Affinity compared to AI - you can't work with multiple colour swatches at once, and you also can't switch Spot color checkbox anymore, once you've created a Spot color swatch, you can't turn it back to CMYK (or other colour model). The only, and very counter-intuitive way is to create a new swatch, then Select > Same Colour, then change the swatch, later deleting the spot-colour swatch. What a UX I'd say...
 -
 I find opacity more of a problem. I really need a select same colour by opacity! I use that in Illustrator all the time. That and blending shapes are esential for me making the jump completely.
 -
When working with CAD files, there are usually quite a lot of lines that need to be altered, each with very minor variations. To this end, it is important to not only consider fill & stroke colour but also the stroke weight. Currently, it is possible to work around this by sifting through the lines based on stroke weight or Fill & stroke colour first to then sift through them once more with the other category. However, this quickly becomes quite a tedious job. Therefore, I would like to be able to select all objects based on fill & stroke colour & stroke weight.
-
I understand as much, that's why for some I already made separate requests, but considering these are to some extent interrelated, I consolidated them into a single thread concerning new keyboard shortcut functionality. Usually, it tends to work best this way, considering some are fairly minor requests that may otherwise end up being overlooked. Anyways, I'll split up the ones that do not link to an individual post yet. Nope, for pixel layers, it deletes the entire layer regardless of this setting. I know you can hit ctrl+a, delete, ctrl+d, but that's a multi-step procedure, which is usually simplified by a clear layer command. I see I accidentally duplicated this request in 1 and 4, so I'll remove one. Gotcha, Select next and previous. I'll remove this one. You see, as I mentioned Ctrl+Alt is a double button, which could be assigned to a single button, whereas the mouse wheel option is a no go when using a pen tablet. The GUI proposal circumvents the need to go to one of the studio panels to change settings, which allows working closer to the canvas and with a more minimal UI. Screen real-estate that would otherwise have to be reserved for the colour panel, whereas you can keep another panel opened in its place.
-
 Background: I work in CMYK for print. I never specify in hex, I rarely even notice hex. Issue: A set of objects with the same CMYK fill in my original Designer file import into Illustrator with the same CMYK fill, but some have a different hex code specification. Happened with two different colours. e.g. fill of objects in original .afd Designer file is CMYK 10,0,10,0. Export to .eps, open in Illustrator and discover that altho all objects still show 10,0,10,0 'Select same fill' does not find all objects. Check individual objects not found, discover fill is CMYK 10,0,10,0, but a different hex code. Most are EBF5EC; those not found are ECF5EC. I doubt the printed copies would show the difference, but seems a bit rude.
 -
 I select a fill/stroke colour and the default tab is always the Colour tab, but I always watch to pick from the Swatches tab as I have a limited palette as do a lot of designers. I have to select the Swatch panel everytime I select an object and fill. Over time this becomes 1000's of extra clicks. I just want the tab to stay the last one I picked. Is there any way to do that? If not it should be a sticky tab selection this is basic UI design - have a memory. This is one of the most annoying features in the app.
 -
I produce a lot of artwork to be printed greyscale. No colour, none, never. I go to 'File' ->'Document Setup' and select 'Grey/8' or 'Grey/16' and still Designer seems to default to rich black. I have to manually check and correct the black/grey as I work. Is there a better way to do this?
- 1 reply
-
- 2
-
-

-
Why does 'Select Same Stroke Colour' find lines on layers that are a) hidden and b) locked? Why does 'delete' actually *delete* these lines from layers that are both hidden and locked? Is there any way to genuinely lock a layer to prevent actions from occurring on that layer? What does the lock prevent if not that? Why can we not designate a layer as 'non-printing' even when it is visible? I am working from artwork (tracing, sketching, whatever) that I keep in a reference layer that must be visible but NEVER print.