Search the Community
Showing results for 'alpha black transparency'.
-
 original layer shows fine and i want found way recolour it beetween black and given colour. and bit hard show becouse is buyed element. but i tried found way thing what i not actually need when i can do it other ways. And i found gradient map allows this. and it keeps things transparency. only thing what i miss but procedural textures i know is solution. mapping image beetween colour and transparency mean for example image is opaque where i i want convert black color and white to transparency and greyscale vealues in are inbeetween values. in only need check rgb to greyscale converiso nratios (i have somewhere for ntsc/pal systems them). and also some other tricks where i can do suitalble alpha chanels. then case can counted solved even solution is elesewhere what i searched. procedural textures are indeed lot of things allowing thing even i miss better features what allows program own functions like programming language.(i mean more complex things what current possiblities allow).
 -
 While I appreciate the Affinity apps don't support CSS Level 4 specification 8-digit Hex codes, SVG files containing an 8-digit Hex code can still be opened but in doing so the Hex Codes are incorrectly read i.e., instead of reading the first six characters of the eight digit HEX code and ignoring the transparency values, i.e. the last two digits of the Hex Code, Affinity apps read the last six digits when the SVG is opened... This results in the following where the final two characters represent the alpha value: #FF000000 (red with 0% alpha) opens as #000000 (black) #FF000080 (red with 50% alpha) opens as #000080 (dark blue) #00FF0000 (green with 0% alpha) opens as #FF0000 (red) #00FF0080 (green with 50% alpha) opens as #FF0080 (magenta) #0000FF00 (blue with 0% alpha) opens as #00FF00 (green) #0000FF80 (blue with 50% alpha) opens as #00FF80 (light green)
 -
 As a game developer, I'm having an issue creating assets using Designer for use in a game. Consider this simple asset: If I export this as a small PNG in Designer, this is what the RGB layers look like before applying the alpha layer/transparency: However if I put this into an OpenGL game with texture filtering and the OpenGL render mode set to normal (i.e. not premultiplied src), all that black will be used in selecting resized pixels, resulting in black artifacts around the edges 😢 If instead I change the PNG's RGB to be ALL white, the RGB and A are correctly filtered and resized, and I get exactly what I'm looking for, a nice smooth result: From what I can tell, there are only three solutions: 1. Export images with extra bleed or a specific colour for transparent pixels. As far as I can tell Affinity Designer has no option for that, and I'll need to investigate additional software that can, further messing up my workflow. 2. Force your graphics software to export premultiplied alpha images, and use a premultiplied alpha render mode instead, and Affinity Designer doesn't support that. (Photo might have a filter or something that does?) 3. Stop using Affinity Designer and use different software that supports this use case. Ideally Affinity Designer would support option 1 or 2!
-
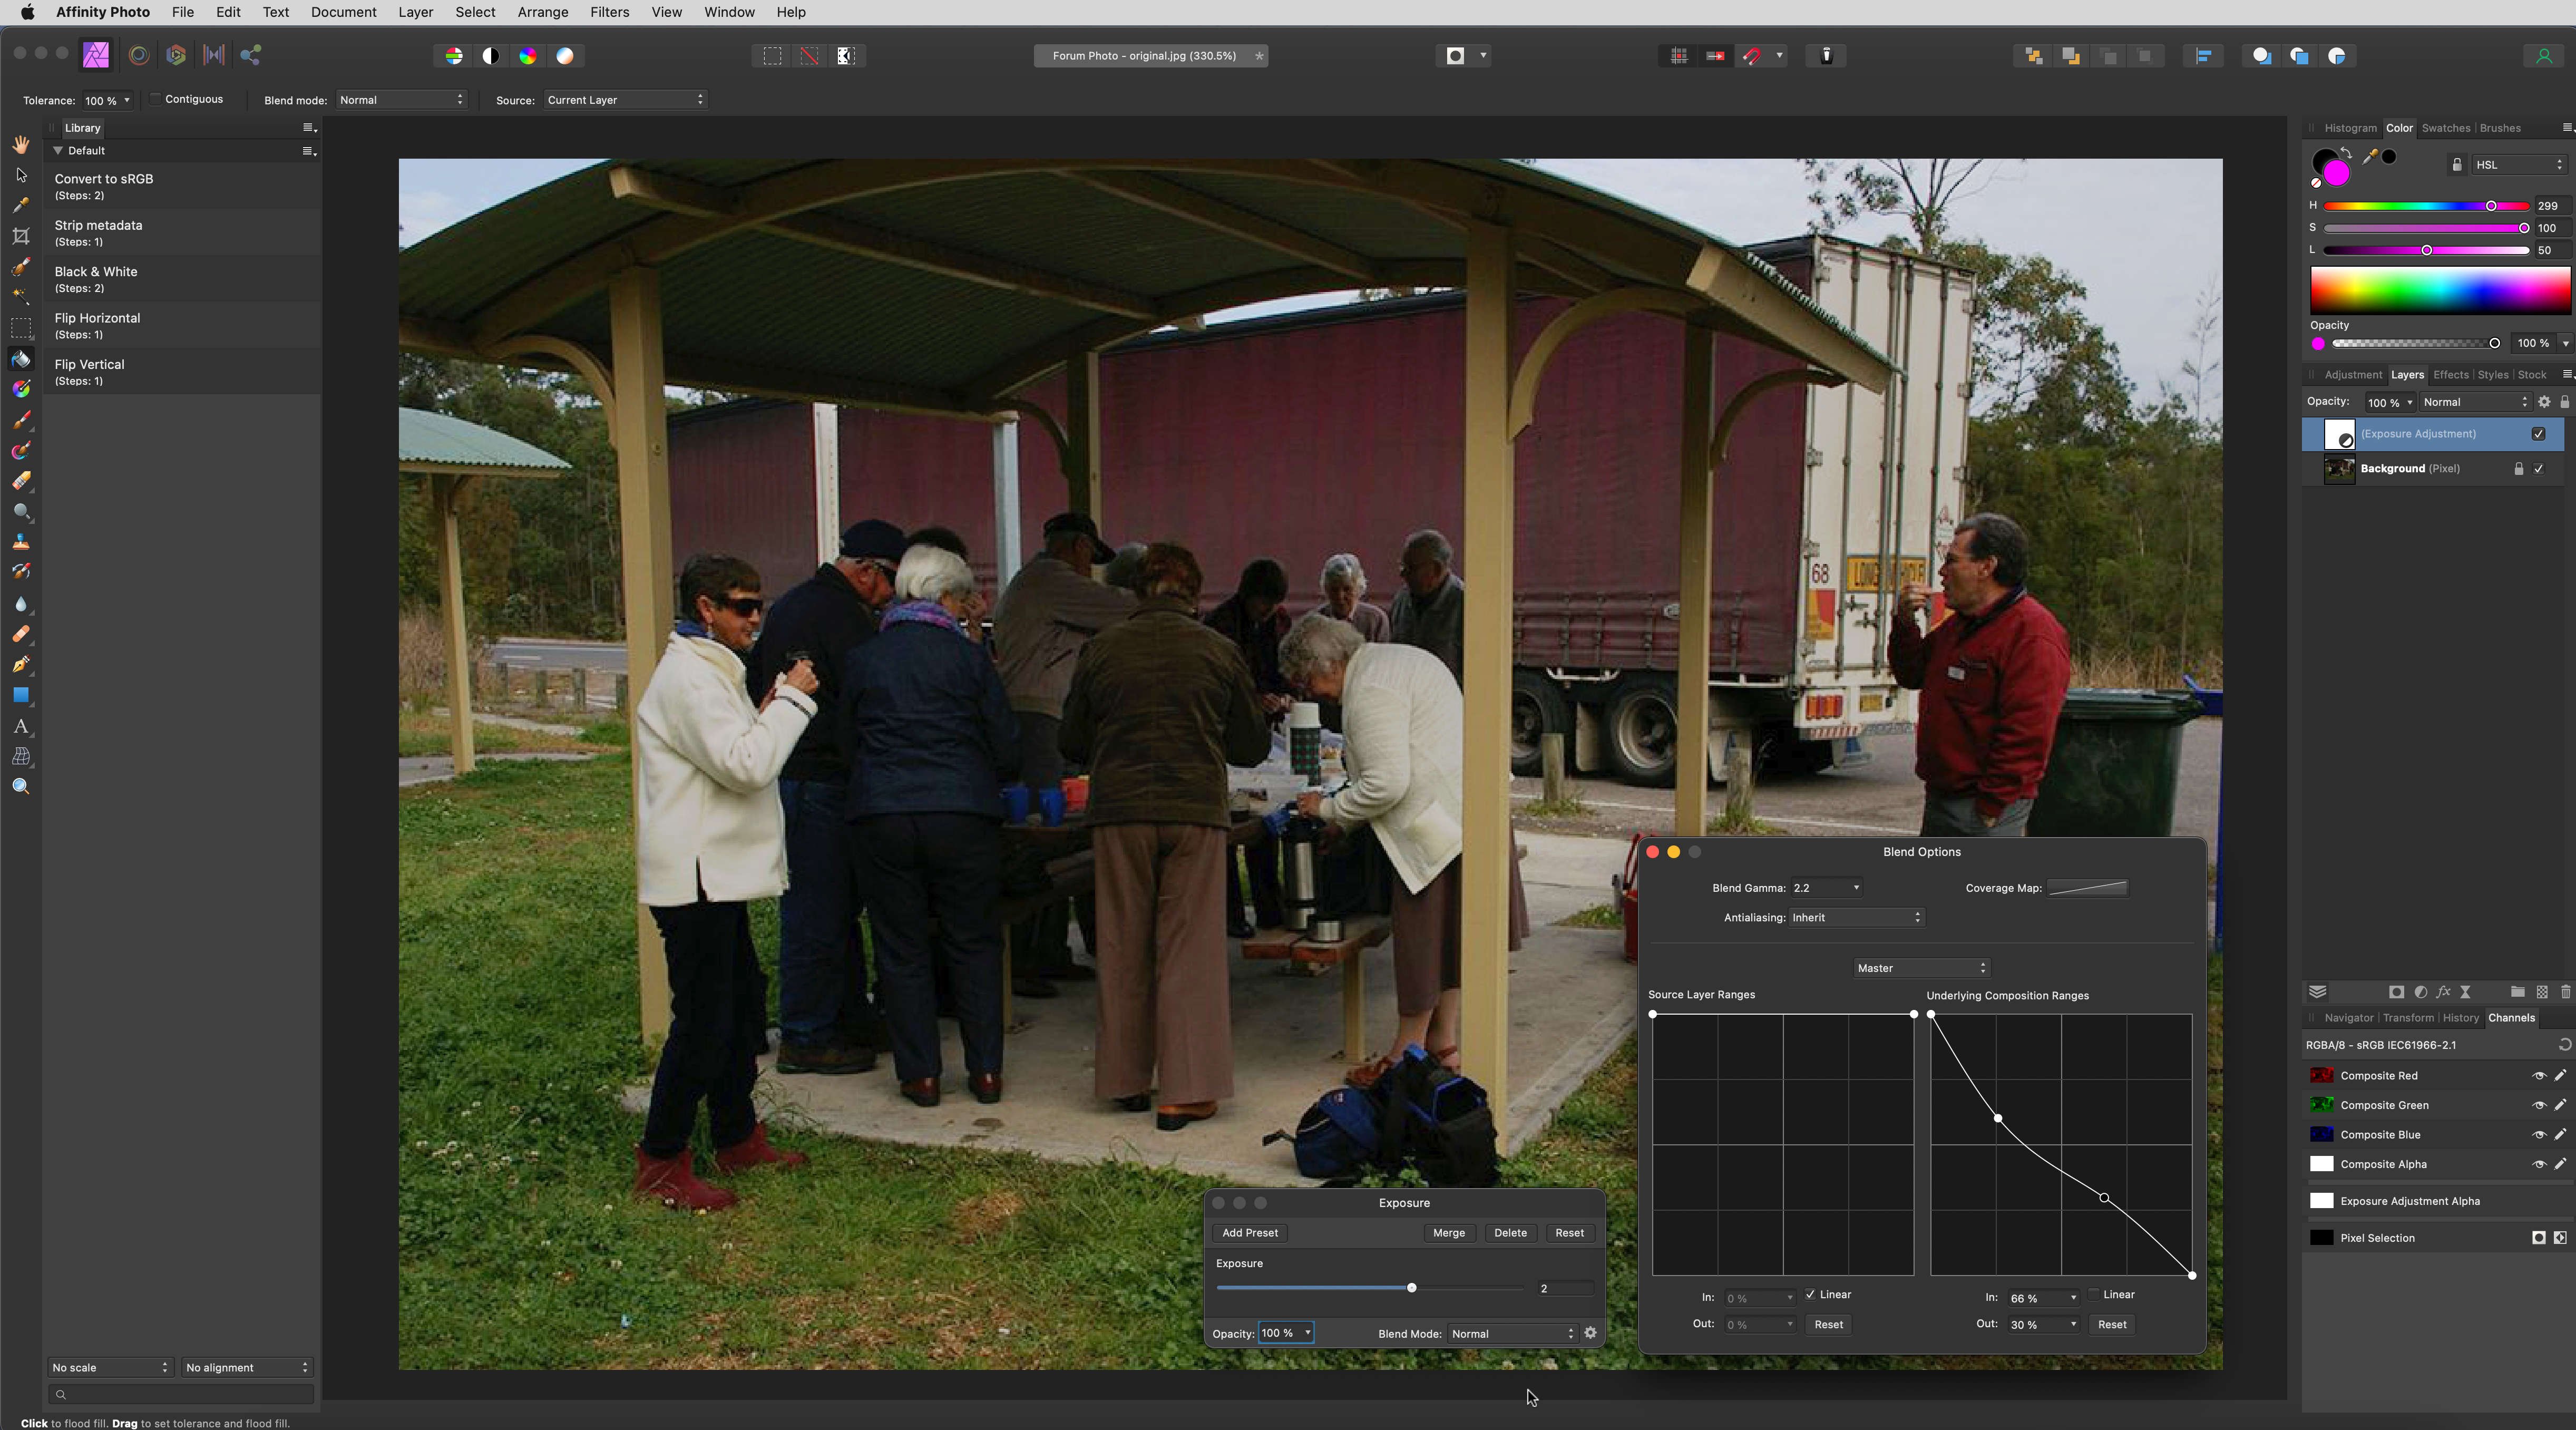
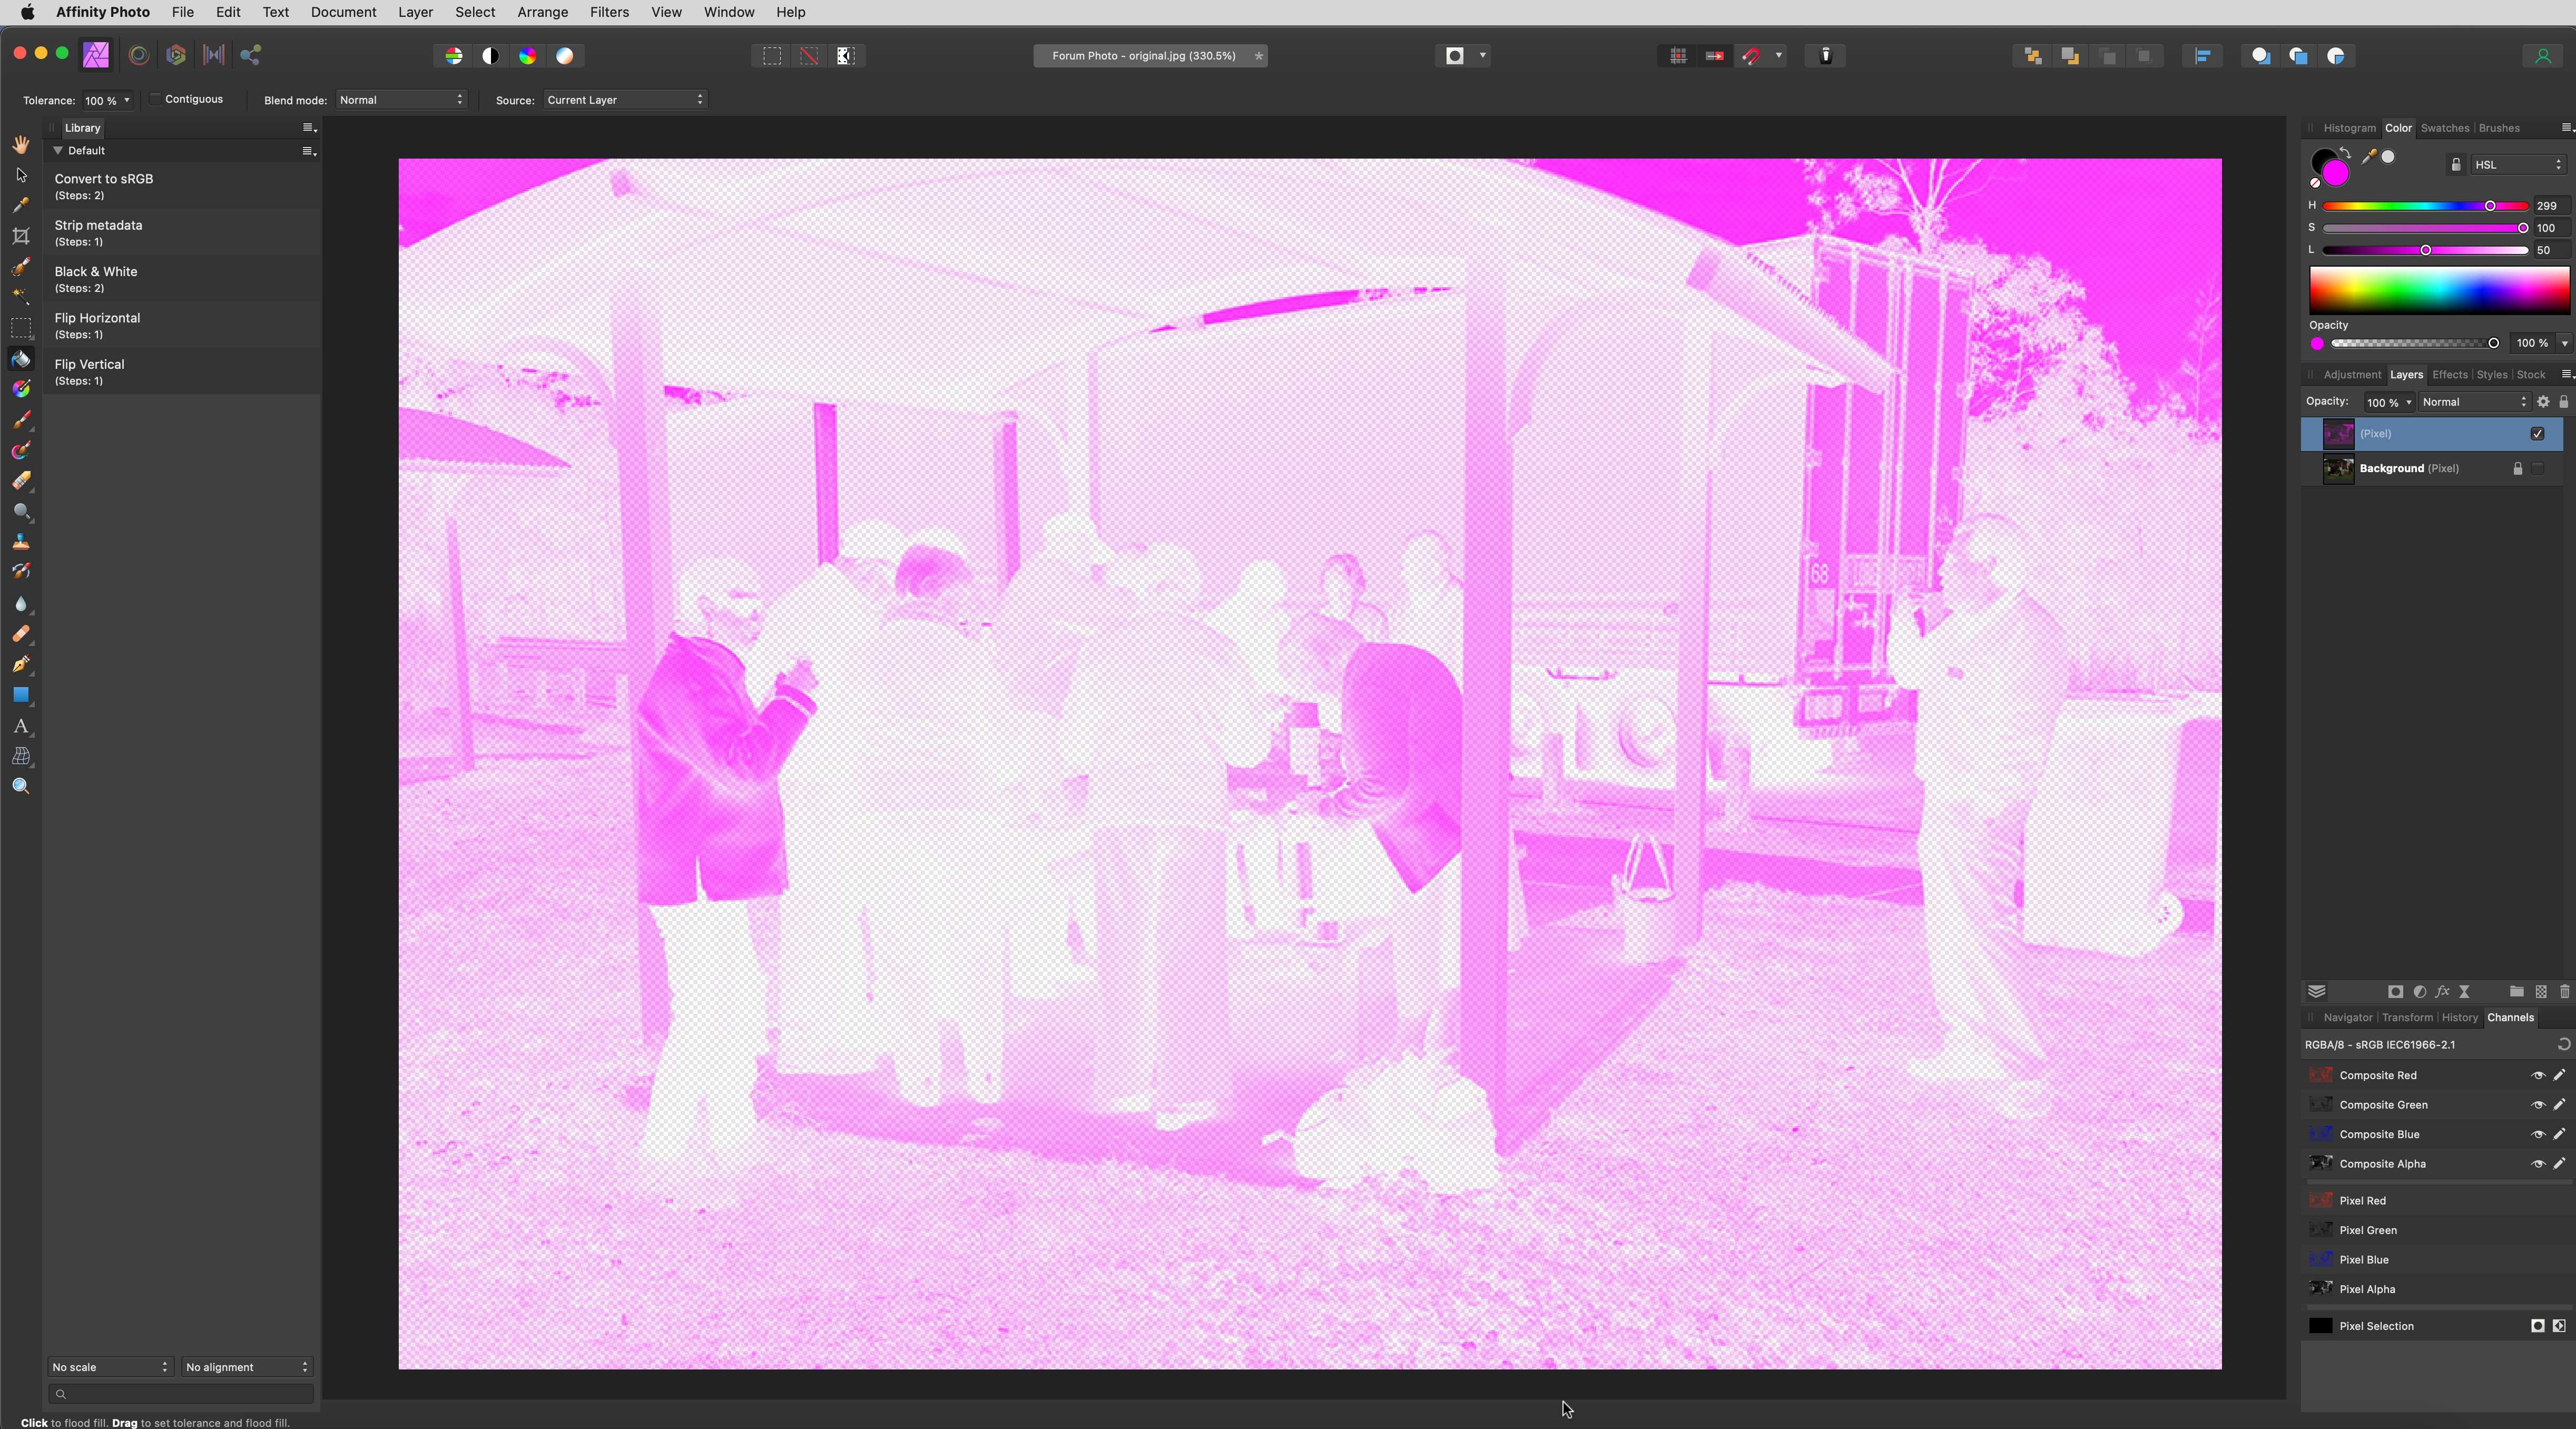
 Hi, @Furry and @thomaso. A couple of comments, especially regarding the questions posed by thomaso. First, my suggestion (as posed above) was meant to suggest a way to effectively duplicate the method that Furry was using in Photoshop. In copying the original image into the Levels adjustment, he is effectively masking the adjustment to work more in the highlights and less in the shadows. Inverting that will cause the adjustment to affect the shadows more than the highlights. Because Affinity Photo cannot "paste" into the Levels adjustment directly, I suggested a way to mask the Levels adjustment by first creating a luminosity-based selection of the original image. (As I will note below, I think there are far more elegant ways to do this.) Second, thomaso's question regarding the apparent transparency created with the Cmd-Opt-Click method of selection is best understood as follows. Cmd-Opt-Clicking the thumbnail of the Background layer selects the entire layer, but does so based on the luminosity of each of the layer's pixels. So, a pixel that is 100% luminous - white (255,255,255) will be selected at 100% strength; a pixel that is 0% lumninous - black (0,0,0) will be selected at 0% strength. A pixel that is 50% luminous - middle grey (128,128,128) will be selected at 50% strength. Because the photo provided by the OP is very dark, most of the pixels are selected at very low strength. Because of this, they will appear transparent. Actually, many of them are not completely transparent, but are so nearly transparent that they look that way. When a luminosity-based selection is in place, any operation that takes place next is applied to the selected area at a strength proportionate to the strength of the selection. So, applying a magenta color to pixels that are 100% selected will be applied at 100% strength (or, stated more appropriately, with an alpha level of 255 (100%). Applying a magenta color to pixels that are 0% selected will apply that color with an alpha level of 0, and the color will effectively be invisible. Applying magenta to a pixel that is 50% selected will apply that color with an alpha level of 128, and will appear 50% transparent. In the image below, I have added a blank pixel layer above the Background layer, Cmd-Opt-Clicked on the Background layer, and (with the blank pixel layer active) filled the selection with magenta. (See below for notes on the best method to fill a selection.) Hiding the Background layer reveals the magenta fill, which reflects the luminosity selection – opaque where the Background is white; transparent where the Background is black. Actually the entire pixel layer has RGB values of 300,100,50. But, the alpha channel values are different which causes the higher or lower measures of transparency. Lastly, the method that thomaso has used to fill the luminosity selection with magenta is flawed. Using the Flood Fill tool to fill any pixel layer (with or without an active selection) will always take into account the color directly under the point that is clicked on. Therefore, if I use the flood fill tool and click on the white coat of the woman on the left, only the areas of white are filled. It is only when I bump the tolerance to 100% that AP will allow any color to be affected by the Flood Fill. The better way to do a "fill" with a specific color is to use the Fill… command (in the Edit menu) and specify a "Custom Color". Performing the fill with this command avoids the need to worry about what color you're clicking on. As far as the Select Midtones, Select Shadows, and Select Highlights commands (in the Select menu) are concerned, I have always found them to be lacking in enough specificity for me. And, they tend to create hard-edged selections (or nearly so) that are difficult to control. I played with a couple of methods to accomplish the goal that Furry set out, and I think I got the best solution by increasing the Exposure, applying Blend Options to the adjustment (such that the adjustment is preferentially applied to the blacks and shadows).
-
 Yes, this is what I said. Yes, that's correct and it's easy to confirm that in the channels panel. However, when you export an image to an unassociated alpha format, composited layers get indeed premultiplied/postdivided. Try creating any image with masks applied to layers (not on top of the layer stack) and check the exported image and the semi-transparent pixels. That's why I suggested the workaround of using a small value for alpha instead of 0, to allow the premultiply/postdivide operation with a minimum value avoiding division by 0. As I mentioned earlier, that's the same idea behind the import method for associated EXRs, that otherwise would lose the luminescent transparent pixels in Affinity's unassociated pipe. "regain" RGB colors in places where alpha is 0 is impossible with unassociated alpha after an alpha over operation. Unassociated alpha is not really alpha transparency but a stage in the creation of a transparent image. Compositing it over a background always requires a multiplication by alpha. That's why In unassociated alpha it's impossible to express pixels that emit light and are transparent at the same time. Associated alpha allows that but Affinity Photo, like Photoshop, is designed to use unassociated. Pixels with alpha=0 in unassociated images are expected to be lost in compositing. You don't create an alpha channel to preserve those pixels, unless you're doing some channel packing stuff for games. Apart from that, there's only one use-case for a non-destructive mask, and that's the need of editing the transparency later. But you don't use final delivery formats for that, that's what formats like PSD or AFPHOTO are for, where masks stay as masks, and not as alpha channel. Not exactly. Pre-multiplied is a crappy term that should be replaced by "associated". There are many ways to produce an image where RGB represents emission and alpha represents occlusion (that's the model of alpha transparency) without involving any multiplication. CG renders, for instance, have associated alpha without multiplying rgb*a You can alpha-composite an image of a candlestick with its flame shot on black background using a roto of the stick, without any multiplications (a multiplication would destroy the flame). However, when the pipeline/workflow uses unassociated alpha, the multiplication is mandatory. Either pre-multiplying the alpha or using a multiplication in the alpha-over operation. If it's done pre-multiplying the source or on the fly by the alpha over op doesn't change the fact that the foreground loses the RGB where alpha is 0. The over operation is basically an addition. You're adding light from FG's RGB to BG's RGB. Alpha dictates what pixels are covered by the foreground (occludding bg's light) or not. That's why I said above that unassociated alpha is just a stage in the formation of an image with transparency. The emissions that don't belong to the foreground need to go away.
 -
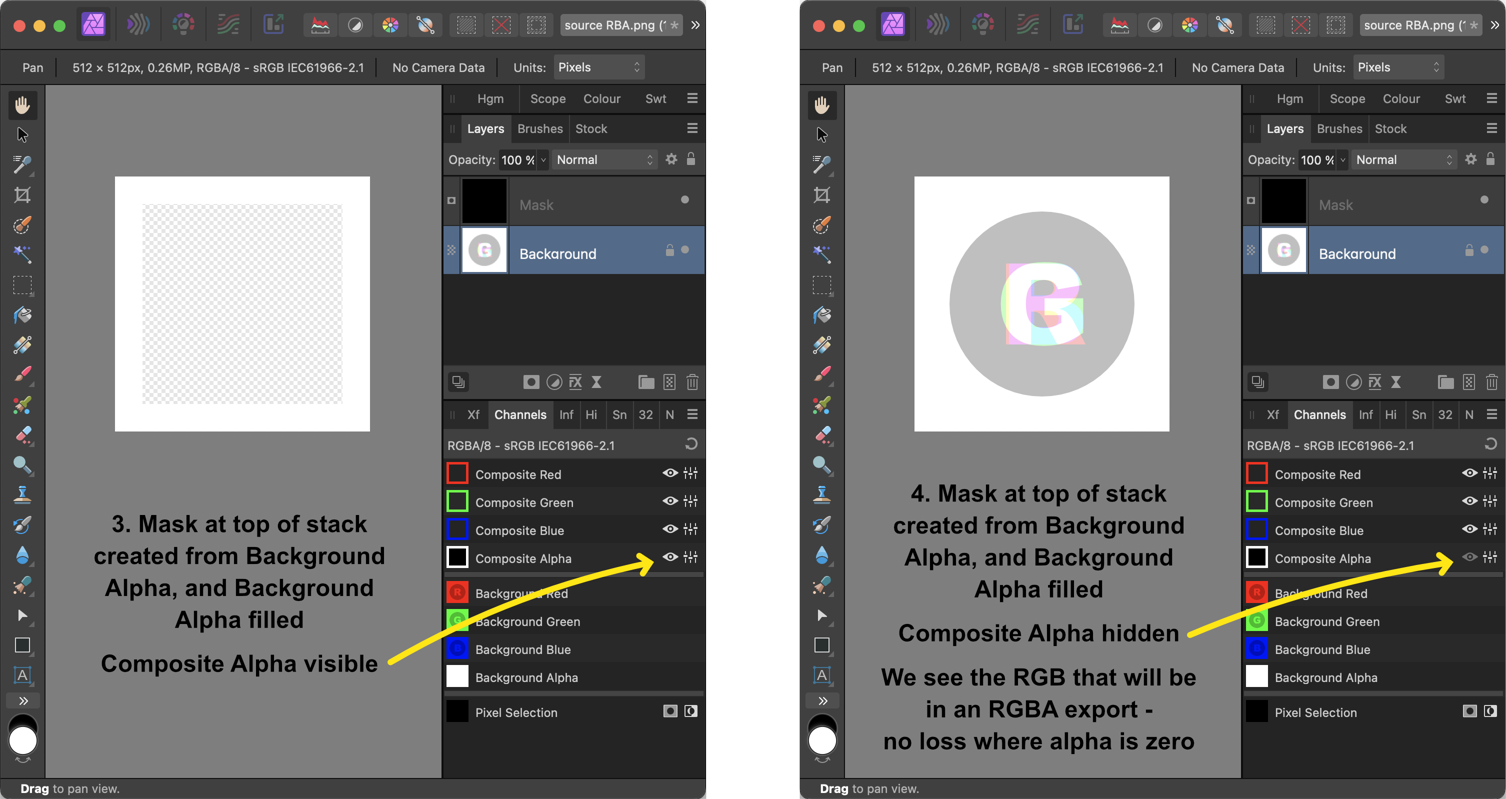
 @lloyds source RGBA.png.zip The provided file named "source RGBA.png" (which was originally exported from Affinity Photo) contains non-zero RGB in all pixels, although a large square central region is completely transparent because alpha is zero there. The following procedure will demonstrate: Affinity losslessly imports an RGBA PNG file (although the initial Composite RGB channels may suggest different) The Affinity document's Composite RGB is, or is not, set to zeros where alpha is zero, depending on the document structure Affinity faithfully exports the document's composite RGBA to an RGBA PNG file, and therefore it is possible to losslessly re-export an imported RGBA PNG. Start by opening the file in Affinity Photo (version 1.x or 2.x). Use Channels panel to temporarily hide the document's Composite Alpha to reveal the Composite RGB image is black where the Composite Alpha was zero, regardless of the actual RGB values in Background where alpha is zero. Export an RGBA PNG from the document; it will be identical to the Composite RGBA with zeros for RGB where alpha is zero. Obviously, that is a lossy trip from source file to exported file. Back in the document, use Channels panel to create a new mask from Background Alpha and then fill Background Alpha. That creates a mask at top of the stack and makes Background opaque. The document composite still has the same transparency as before, of course. Use Channels panel to temporarily hide the document's Composite Alpha to reveal the Composite RGB now has the actual RGB of Background with no zeroing where alpha is zero. Export an RGBA PNG from the document; it will be identical to the Composite RGBA with non-zero RGB everywhere, even where alpha is zero. That is a lossless trip from source file to exported file. Now in the document, move the mask from top of the stack and nest it in the opaque Background. The document composite still has the same transparency as before, of course. Use Channels panel to temporarily hide the document's Composite Alpha to reveal the Composite RGB has returned to zeros where alpha is zero. Export an RGBA PNG from the document; it will be identical to the Composite RGBA with zeros for RGB where alpha is zero. Obviously, that is a lossy trip from source file to exported file.
-

Pixel profile eraser tool - hardness setting does not work
NotMyFault replied to Salpal's topic in V2 Bugs found on Windows
There are many possible reasons. We would need several artifacts to be able to help in your specific case: a screen recording (at least screenshots) showing the full application window, including as many panels as relevant (color, brush, transform, navigator,info) include all brush settings, including „more“ (opacity, wet edges, protect alpha, ) we need to see all,color,and opacity values (layer, color, brush,channels) upload the actual affinity document. Always try to reproduce the issue in a new document, newly selecting the relevant brush from brush panel. of course, we welcome every report of users searching for help to get this solved. it is always possible to push partial transparency to zero or one, with 3 clicks: Add levels adjustment, on top of the layer with partial transparency choose alpha channel set white level to 0, or black level to 100 (boost to full / none) optional: merge down to bake in the result -
Unfortunately, a permabug. At least, it is on macOS. I don't know what happens on iPadOS or Windows. In the case of your ungrouped placed transparent PNG with reduced opacity, the RGBA TIFF inside the exported PDF has correct alpha values taken from the placed RGBA PNG, but its RGB values wrongly are as if the placed PNG was being blended with white. If you substitute a TIFF equivalent of the PNG, the RGBA TIFF inside the exported PDF will have correct alpha values taken from the placed RGBA TIFF, but its RGB values will wrongly be as if the placed TIFF was being blended with black. Warning: Affinity apps have numerous ancient bugs involving transparency, which I assume to be permanent.
-
When you use rasterize to mask, only the color of pixels will be used. transparent areas will be counted as black color, despite transparency is shown as white by default (transparent canvas setting off). You can see the actual color by using channels panel, and choose one color channel to be visible (but not alpha).
-
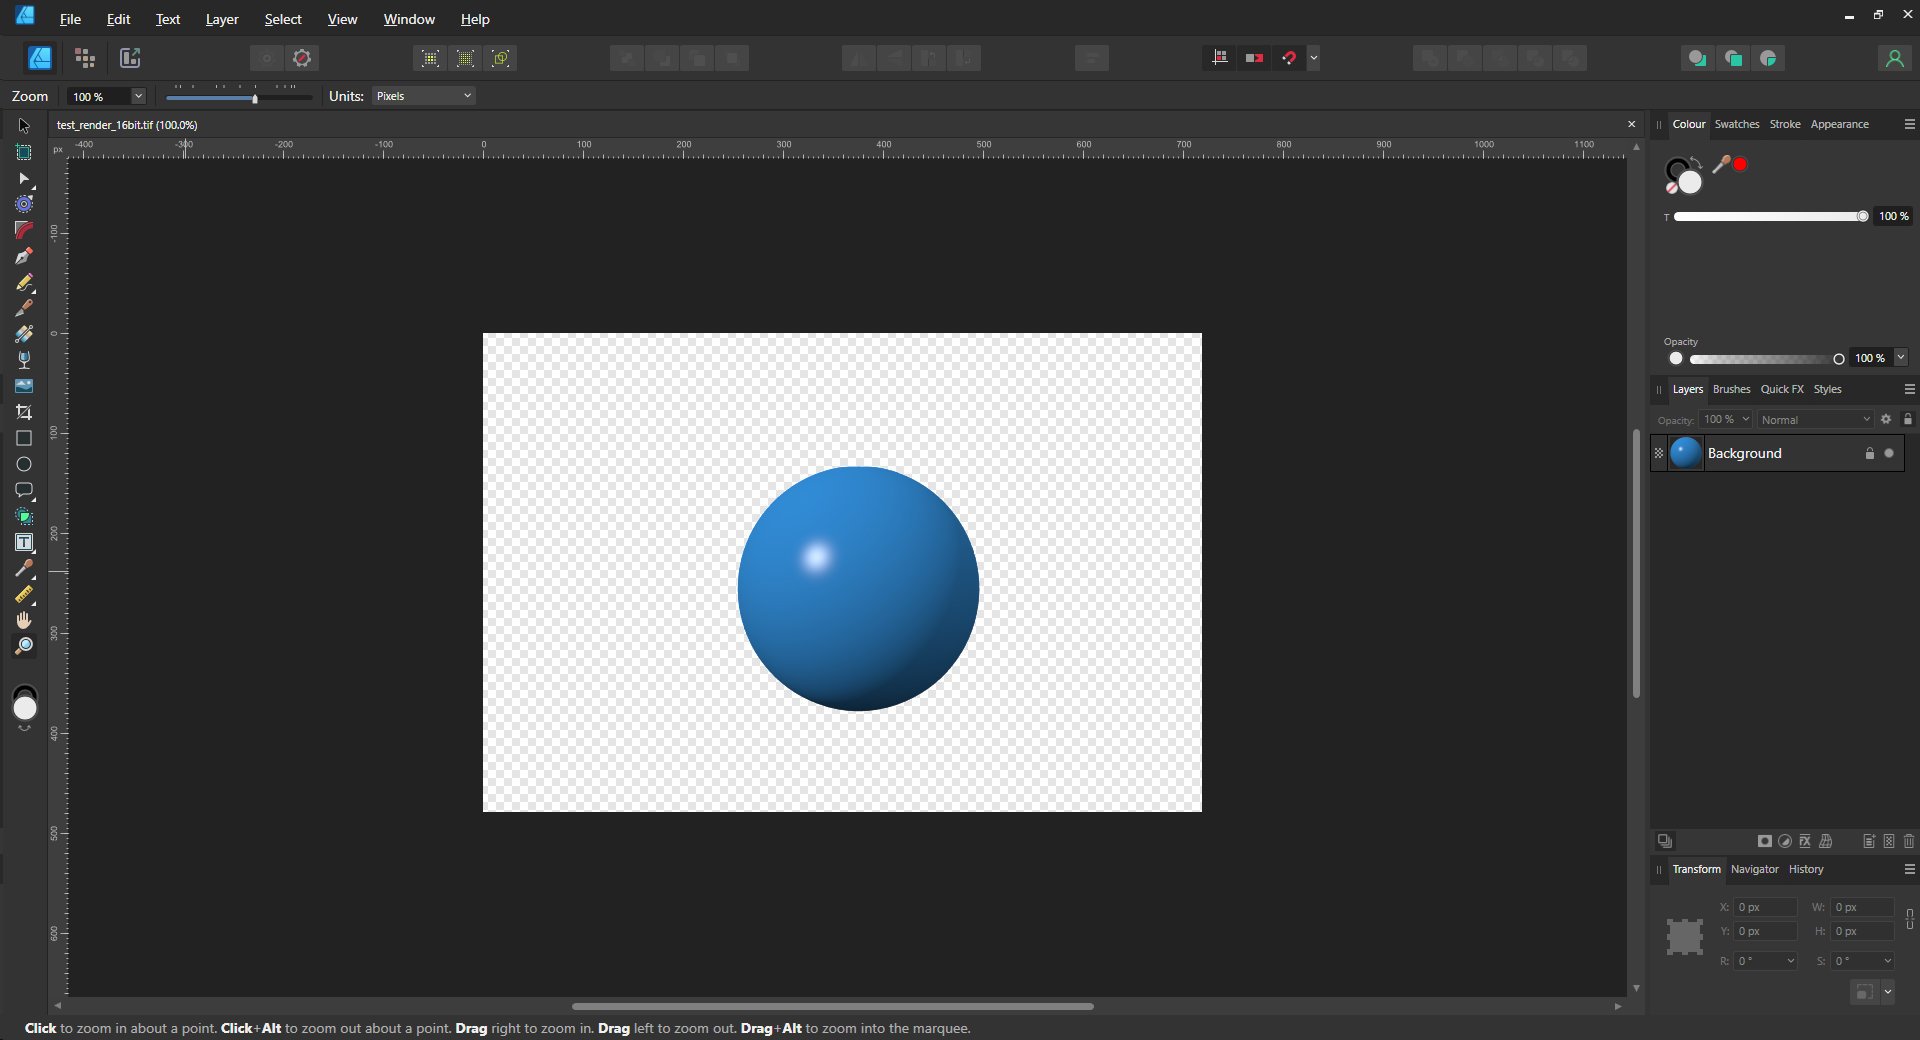
 Hello everybody! I'm having a problem with opening TIFF files with transparency (rendered in Modo application, both 8-bit or 16-bit versions with alpha channel). When I drag and drop these onto Affinity Designer app, a full background is seen - as below: Sometimes (very rarely) the TIFF file (a 16-bit version) can be opened with full transparency present but I can't see any logic when it occurs: A similar issue has been raised and posted on the Affinity Photo 2 forum and it may be the same problem I guess: https://forum.affinity.serif.com/index.php?/topic/177248-black-background-when-open-a-transparent-tif-file-which-was-rendered-from-blender/#comment-1020204 I'm attaching the two TIFF files for further tests. If anyone has the same observation please add your comments. I use PC with Windows 10 and had no problems with transparent TIFFs when worked in the preceding version of Affinity Designer. I'd appreciate if this could be added to the next list of patches Affinity Designer app is my main design tool and I've been using it for the last 6 years. Thanks, Alex test_render_8bit.tif test_render_16bit.tif
-
 For whatever reason. Saving a png with an alpha layer actively deletes the pixels that were made transparent by the alpha layer. I'm well aware the point of an alpha layer at least traditionally is transparency. But if I save a PNG in Photoshop with an alpha layer, I can open that image in any editor and enable or disable the alpha layer at will in order to show the parts of the image that were made transparent. In Affinity Photo, when I save with an alpha layer, any pixels that were made transparent are actively deleted from the main layers, meaning that there is just an empty black spot where the alpha layer is if you decide to disable the alpha layer. This makes absolutely no sense given Photo 2's emphasis on non-destructive editing. I understand that it might save on file size, however for that kind of decision it should be at the very least in the export dialog. I need to keep the data that was made transparent by the alpha layer, I don't want it deleted, I just want it hidden until I choose to unhide it again. Unfortunately yet another thing that puts Photoshop ahead for the moment, that I'm hoping is fixed.
 -
 Not only did I find this bug, I have a temporary workaround: if you swap to Swatches for the matte color picker, you can pick a transparent swatch and it will work. However, when you NEXT go to export, the matte will look like white again ... however it will still export as if you've set transparent - so I guess that is actually ANOTHER bug of a slightly different kind - it's showing a matte color instead of transparent, but still performing the transparent export. Also, there is a FURTHER bug for export of images with transparent content... and this bug exists in older versions such as 2.04 as well. If you export in PNG palette mode, some colors just vanish and are replaced with transparency, regardless of their alpha. I can see this problem on an image I have that has only 21 unique colors in it. I can understand that the alpha would be lost in palette images because the palette entries have no alpha but I cannot see any reason why opaque colors would simply vanish. I can understand colors that match the 'matte color' being turned into completely transparent. However, I had a white matte and black pixels were vanishing! e.g. Pure black pixels may just vanish altogether, even when the number of different colors in the image is very low. Palette export with a transparent color is, to put it bluntly, completely BROKEN for PNG 2.x on PC. Finally, even with no meta-data or ICC data, exported PNGs that are not in palette format are larger than they need to be, with sub-optimal compression of completely transparent areas.
 -
 When I load the attached TIFF file into AP 2.1.0, I only see black. However, this file has an alpha channel, and it should appear like a fuzzy black blob on a transparent background. I would expect that transparency to look like a checkerboard, like I see when loading the file in Photoshop.MetalPaint.tiff Please refer to the discussion here:
 -
 Hi lukchw I might have found a solution at least for now. I have found out that there is a line in channels that says "not assigned alpha-channel" (why should that be?). When I right-click on that channel and select "load alpha in background" I get the alpha working and I can toggle alpha on and off. It is important that the file is in RGBA with transparency. Placing a file with RGBA works on my side. I find it strange, that the alpha channel is empty and showing a black background when opening (while it worked in Photo1 without further ado!). Also the toggle Button does nothing unless I do what mentioned above. When I create a .tif file (in my case with Blender) with transparency I am doing that with the purpose of having a transparent background. Then I can fill or not my background as I like without having to mask out or whatnot. Also when opening the file in Designer the backgound is black with no chance to get the alpha working unless I switch over to Photo do the workaround and get back to Designer. Very annoying when working with like 70 files on a projekt as I do right now. I hope Affinity reads this and approves the behavior as bug and it will be solved with next update. @Affinity ...but else thank you for a great alternative to Adobe. I have also posted the same question in "Photo2 bugs found on windows". I hope this helps ;o) Cheers
 -

Pixels and Images and Alphas, Oh My!
Ldina replied to Ldina's topic in Affinity on Desktop Questions (macOS and Windows)
As promised, I wanted to report back now that I've had some time to study and experiment with the previous posts in this topic. Working through the points discussed has grounded me much better in how AP is structured, how these elements work, and more importantly, how I can utilize them in my work. Alpha channels are still a bit vague. I understand the concept that alpha is a property that describes transparency, black hides, white reveals, is essential for layer blending, blurs, unsharp masking, soft-edged brushes, etc. But, how to use, modify and manipulate alpha channels is not fully clear to me. Other threads on this forum, (notably a very long one about how to Edit Alpha Channels), suggest I'm not the only one. I used and edited spare alpha channels a lot in Photoshop, and it is VERY different in AP. Perhaps I don't need to understand more, since I've been able to do most of what I need so far, but I like understanding fundamentals, how things are structured and how to use them. I'm not a game developer, don't do 3D renders, etc, so my needs are far less demanding than they might be for others. I've learned a lot in this thread and have made significant progress due to all the helpful posts. Regards... -
Eliminating transparancies
NotMyFault replied to drdavendallas's topic in Feedback for Affinity Publisher V1 on Desktop
Hi, there are many options. Flattening (in Affinity) does not include matting (replace transparency by a selected color). Ad 1: identify transparent areas. If you have Photo, open the file in Photo nd use the channels panel to only inspect the alpha channel. If you have only Publisher: add a channel mixer adjustment, and use specific settings: R, G, B: set R,G, B to 0, and alpha to 100% Alpha: set all to 0, and offset to 100% This maps the alpha channel into a greyscale image. You can use curves or levels to further boos contrast, to see areas which are not 100% alpha. Ad 2: As explained, flattening does not include matting (removing transparency). The simplest method is to add a white or black rectangle as bottom layer to every master page. PS: you may export as PDF/x 1a PDF/X options are pro-print PDF presets that create PDF files that output to CMYK color space and can embed all fonts. PDF (PDF/X-1a:2003)—based on PDF 1.4, flattens transparency, no color management https://affinity.help/publisher/en-US.lproj/pages/Publishing/publishPDFFiles.html -
Pixels and Images and Alphas, Oh My!
NotMyFault replied to Ldina's topic in Affinity on Desktop Questions (macOS and Windows)
A pixel has only one single color value, consisting on all 3 RGB color channels combined. Color channels are not equal to pixels. They can be called sub-pixels, but this distinction is only used in specific contexts like sub-pixel anti-aliasing, or Display technology which are not relevant here, and could cause confusion. The alpha channel is an additional property of pixels: the degree of transparency, similar to glas or transparent film. Note that most displays do not render transparency. You will never see a pixel on your display which is fully or partially transparent. Instead, there is always a color like black or white or the grey / white checkered board used to backfill any transparency. So alpha is the transparency value of pixels in layers, used to calculate the final color as blend or mix of all layers (and the unavoidable backfill color), which you then can see on you display. -
Excellent description. would you mind copying this as tutorial in the tutorial section? Makes it easier to find. I think we can even extend this method to allow full edit of the mask as pixel layer: instead of a mask layer, simply create a pixel layer, add a channels mixer adjustment Map one or all color channels into the alpha channel i will check if this works later PS: it does not work. Mask layers have one special property not available by pixel Layers. masks can simply replace the alpha value of all layers below. No blend formula is applied, the RGB values stay as before transparency is treated specially for masks: the transparent background shines through Pixel layers, even with nested adjustments on alpha, enforce blend formula and will produce black color where alpha was 0.
-
 I did a test exporting graphics from Affinity Designer and importing them into Motion, where the alpha type makes a difference. PNGs were always straight alpha. For comparison, TIFFs with transparency are always pre-multiplied black, so they do have that black outline when I set them to straight alpha. But I'm wondering why your PNGs looked like they were pre-multiplied?
-
 When I export images with transparency from Designer or Photo, the alpha is always pre-multiplied which is not desired for a lot of assets in game development. The lack of this feature means I have to add an extra step to the creation of my 2D assets. Left is the exported file, right is the desired result. As you can see, all of the area with alpha is filled to pure black, which creates ugly edges on aliased images (as well as other issues with channel packing etc.)
-
cant make threshold adjustment on blurred text
NotMyFault replied to artist01's topic in V1 Bugs found on Windows
Unfortunately this will not work In this case. the pixel layer with text has probably been created by applying Gaussian blur (destructively). the blur leads to all pixels becoming blurred, but only on alpha channel. The color is pure black for all pixels in that layer. (Both black text, and all invisible pixels with full transparency) the threshold adjustment works on color only, not on alpha. So it has no effect on the text layer at all. when on top, the lower layer will produce 100% alpha for all pixel in the canvas, thus the TH will start to work. The main question to @artist01 is what you want to achieve by your workflow, why blur and then use threshold? If you can explain what you want, we can show other ways to achieve this. you could use a levels adjustment, select alpha channel, reduce white level. This will bring more pixels to full opacity, but keep the fully transparent. It depends on the radius of Gaussian blur if the result is what you want. -
Thanks for providing the video via private message. unfortunately i don’t get it fully why the filter solves the transparency issue. I could not really spot the visual difference it makes. Will try again on 4K display later. never the less, i see the color black is used as backfill. in affinity, we have a filter called diffuse which produces a similar effect like ps blend mode dissolve - but it works on one layer and swaps pixel randomly within given radius. to solve he transparency issue, add a levels adjustment choose alpha channel set white level to 0. this will leave fully transparent areas untouched, and make all partial transparent areas fully opaque. i hope this helps a bit
-

Alpha channel handling on import/export
kirk23 replied to ashf's topic in Feedback for Affinity Photo V1 on Desktop
While I agree there should be an easy quick choice there is a couple workarounds that work for tga export/import at least. I don't test it with other kinds but think it should works too. To export a tga where alpha 100% black make a "fill color" layer ( or by using solidify filter) with procedural filter where alpha is set to 0,001 . It would export 8 bit tga with perfectly 100% black alpha and no black color in RGB ( background colored by your "fill color" color) If you import such a tga back to Affinity photo it would still turn background color black nevertheless but both Photoshop or Substance Designer would read proper background color just fine. If you want that tga be opened without black background in Affinity just set alpha value in same procedural layer to 0,005 . it makes Alpha 99% black and thus when you import such file back to Affinity the background color would be perfectly preserved ( to check it uncheck composite alpha in channels panel) . While 99% alpha is not true 100% for sure, most of game engines for example would threshold it to full transparency nevertheless -
 I'm not sure I fully understand but, in cases with VFX textures R G B and A can be used as individual greyscale images that can be used in game engines and such, but also in the case with GUI work in games, applications and TV is that say you have an icon or logo, you'll want to edit the RGB as if there were no transparency, and the A channel would be used in whatever application/shader to create the transparency to avoid any bleeding because depending on how the image gets exported from photoshop/affintiy it could remove colour information from the RGB channels where the alpha channel is pure black, (which is ideally not what anyone wants in this case). Take this texture for example, the person who created this image filled the outer areas with an average green colour and wants that colour information to be retained so the alpha channel in an external application (like unity or unreal) can simply use the alpha channel as a way to mask the area out, but when viewing the texture from a distance the texture will mip out (get smaller in pixel size). if the outside area if this texture was pure black or pure white instead of green, then from a distance you'd get a white or black outline around all your tree leaves. Likewise, the alpha channel may not simply be a black and white mask, it might be a gradient from black to white so the person making the shader can use that to tighten or widen the alpha with the shader. artists and graphic designers need full control over each individual channel for this reason, and each channels information needs to be retained on export. That said I've just decided to do any texture packing in substance designer now because that *does* retain all the information in channels and I can just make seperate greyscale images in affinity photo if need be, save them out as bitmap/whatever and import to designer to pack... it's not super ideal though and not everyone uses substance designer/wants to use another expensive application to do basic stuff like this. thats probably a tangent to what you're talking about though, do you mean to effectively keep affinity photo much the same and just use a 5th channel as the 4th on export? If so this doesn't solve the issue of channels being difficult to work with. I'd say why even have channels exposed in the UI of affinity photo if they aren't meant to be edited?
 -
Now you are on the good road again 👍🏼 It is called transparency. Or alpha. It is explained in more detail in the GIMP documentation shared earlier. The link explains it for the specific case of anti-aliasing. Which is nice as it bridges to the part how partial pixel area gets transformed to an alpha value (percentage of areal coverage). Even if GIMP, PhotoShop and Affinity are different implementations, there are unanimously sharing the same underlying math and Logic. Otherwise it would be impossible to use and render images consistently. http://tinf2.vub.ac.be/~dvermeir/manuals/gimp/Grokking-the-GIMP-v1.0/node36.html#SECTION001112100000000000000 Alternatively, Figure 3.11(c) illustrates the concept of antialiasing. Here white represents a pixel which is fully selected, black one that is fully unselected, and gray represents partially selected pixels, where the level of gray indicates the percentage of the pixel that falls inside the selection. Thus, a lighter value of gray indicates a more fully selected pixel and a darker value a less selected one. Assigning gray values to partially selected pixels has the effect of visually smoothing the staircase effect illustrated in Figure 3.11(b), which is why this is called antialiasing. The way antialiasing is actually implemented is by using the layer's alpha channel. Alpha channels were introduced in Section 2.2 and a more comprehensive presentation of them is given in Chapters 4 and 5. However, for the purposes of discussing antialiasing it is sufficient to know that the white pixels in Figure 3.11(c) represent pixels that are fully opaque, the black pixels those that are fully transparent, and the gray pixels those that are partially opaque (or transparent). in my words: Take the RGBA values of every pixel in the selection, into a working buffer. Multiply the alpha value of every pixel with the alpha value of the selection for that pixel, and write the result it onto the working buffer. If an edit action is executed, apply the usual alpha composition blend formula to get the result, and write it to the selected layer. The working buffer is handled similar to an layer placed virtually on top of the layer stack.