lepr
-
Posts
6,129 -
Joined
Recent Profile Visitors
20,962 profile views


-
 lepr reacted to a post in a topic:
expand stroke on line after stroke width tool unexpected results
lepr reacted to a post in a topic:
expand stroke on line after stroke width tool unexpected results
-

in designer how to create an open path with pattern?
lepr replied to shemesh's topic in Desktop Questions (macOS and Windows)
The Appearance panel enables multiple strokes to be assigned to an object, each with its own colour and other properties. One stroke could be a standard solid line, the other could be a Vector Brush with dots and no line. -
shemesh reacted to a post in a topic:
in designer how to create an open path with pattern?
-
Alfred reacted to a post in a topic:
in designer how to create an open path with pattern?
-
lepr reacted to a post in a topic:
URGENT —— Right Click to LOCK & UNLOCK Objects & Groups
-
lacerto reacted to a post in a topic:
jpeg looks different to my artwork; unwanted changes added at export
-
in designer how to create an open path with pattern?
lepr replied to shemesh's topic in Desktop Questions (macOS and Windows)
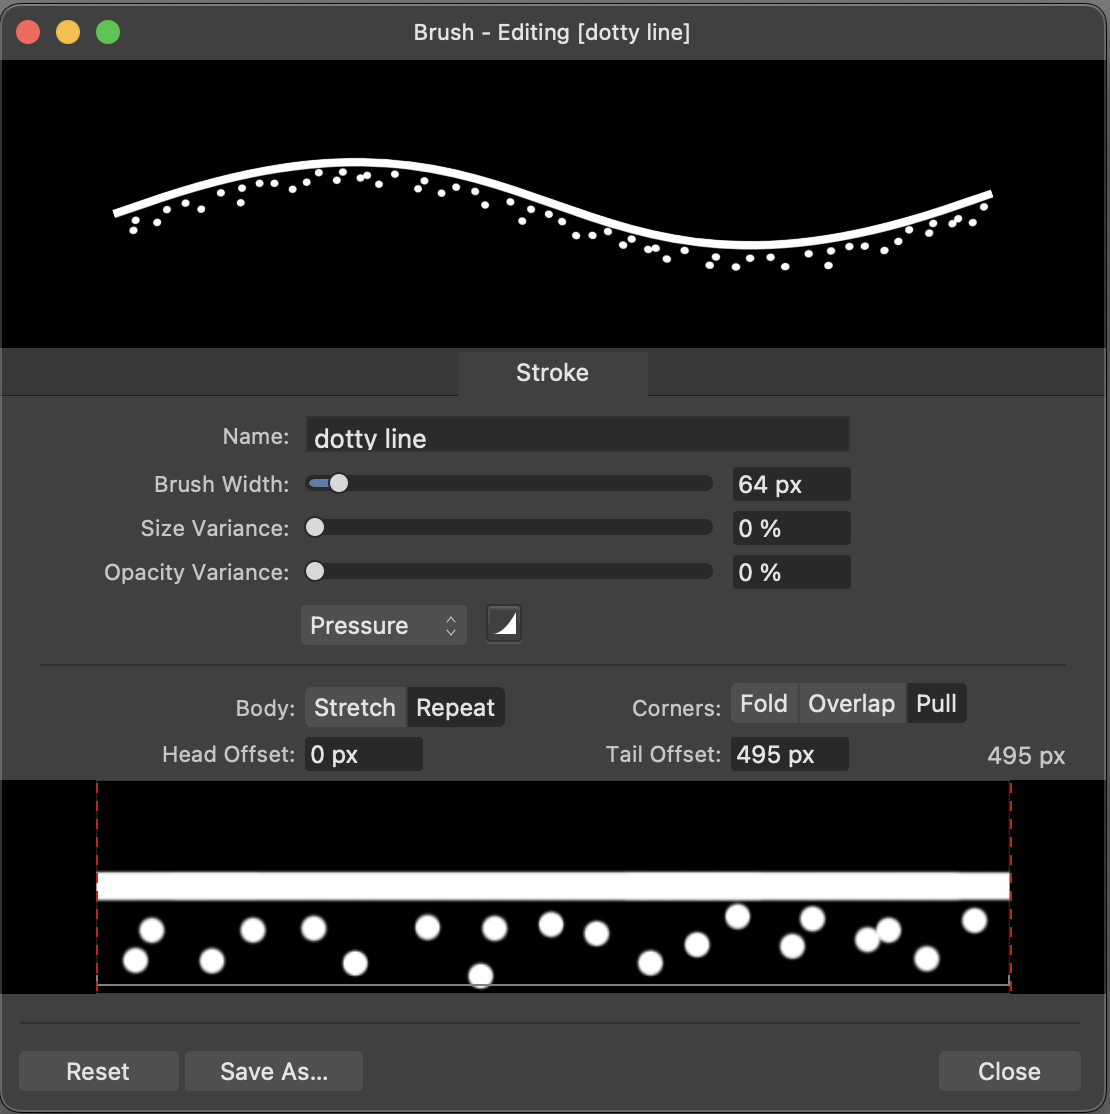
Welcome to the forums You could create a so-called Vector Brush (there are tutorials on how to do that) something like this - notice that the upper half of the texture is blank:
-
See my explanation and workaround:
-
Your situation (hiding at the edges) is one that works best with an Empty Mask instead of a Mask. An Empty Mask is not simply a Mask filled with ‘black’. It is considered to be surrounded by ‘black’ virtual pixels instead of ‘white’ virtual pixels, and that prevents the problem you are encountering. When refining the selection, set the output to ‘Selection’. Then when the refined selection has been output, add Empty Mask and fill with white to put ‘white’ into the selected region of the initially ‘black’ Empty Mask. The selection can now be cancelled.
-
lepr reacted to a post in a topic:
PDF export to single document, multiple layers
-
lepr reacted to a post in a topic:
PDF export to single document, multiple layers
-
George-Frazee reacted to a post in a topic:
Designer - Shape Builder problem
-
lepr reacted to a post in a topic:
Butterfly Illustrations
-
The workaround I've posted several times is to first enclose the text in a Compound (see next paragraph) and then use Appearance panel to give multiple strokes/fills to the Compound itself instead of the contained text. The text will remain editable in Affinity but the Compound will be exported as filled vector shapes in a PDF. (Of course, you'll be at the mercy of Affinity's stroke expansion which has been unreliable since v2.5.) Enclosing text in a Compound is a simple procedure of selecting the text and opt/alt-clicking the Geometry Add button in the main toolbar. Depending on the app, you might need to add Geometry buttons to the main toolbar. Commands are also available in the main menus.
-
I can offer a workaround only: use the Rasterise command to re-rasterise the Pixel object/layer and then the Flood Fill Tool will work on it as expected. (It is interesting that the Flood Select Tool seems to have no problem with the provided document.)
-
Destruktive filter wrong preview for layers with change dpi
lepr replied to NotMyFault's topic in V2 Bugs found on iPad
Ignoring the missing regions, there's definitely not a true preview on my Mac. That's at 100% zoom, 200% zoom and various other zooms, and with View Quality at Nearest Neighbour and Bilinear. Anyway, the false previews of filters is destined to be a permabug, in my opinion. -
Destruktive filter wrong preview for layers with change dpi
lepr replied to NotMyFault's topic in V2 Bugs found on iPad
I don't have an iPad, but the distortion destructive filters are falsely previewed on my Mac when the Pixel object/layer has a transform (for example scaling). I'm not going to test every available destructive filter, but I have seen no exception to the false previewing. -
Quadfour reacted to a post in a topic:
Applying Style Picker to an Image causes the Image to be Clipped
-
For me, zooming the view in and out can make the object reappear/vanish, therefore the problem appears to be a display error and there will be nothing to gain from uninstalling/reinstalling. The trouble is happening only when the linear gradient is perfectly vertical. Workaround: rotate the Image or the linear gradient by a tiny angle, 0.000001 degrees for example, so the gradient is not absolutely vertical, then the object will be displayed.
-
lepr reacted to a post in a topic:
Unexpected Feature: Vectorize a Bitmap Image Directly in Publisher
-
lepr reacted to a post in a topic:
Scale with Object Works on Parent but Not Children – Any Fix?
-
asdads reacted to a post in a topic:
Scale with Object Works on Parent but Not Children – Any Fix?
-
It’s often much quicker to just use Scale Override for strokes - bottom right of Transform panel - if you are maintaining aspect ratio.
-
 NathanC reacted to a post in a topic:
Possible snapping related bug, or at least annoying feature
NathanC reacted to a post in a topic:
Possible snapping related bug, or at least annoying feature
-
thomaso reacted to a post in a topic:
Problem Pixel Mask include all Artborads
-
Problem Pixel Mask include all Artborads
lepr replied to giovy's topic in Desktop Questions (macOS and Windows)
Yes, that will happen if you invert. What did you hope to achieve by inverting? -
Problem Pixel Mask include all Artborads
lepr replied to giovy's topic in Desktop Questions (macOS and Windows)
I guess you did not read my earlier post which gives a solution for a document with multiple Artboards. -
Problem Pixel Mask include all Artborads
lepr replied to giovy's topic in Desktop Questions (macOS and Windows)
Yes. When you want to reveal at the edges of an Artboard, add a Mask. When you want to hide at the edges of an Artboard (as in your example), add an Empty Mask instead of a Mask and fill the pixel selection with white. (An Empty Mask is a particular type of raster mask, and not simply a Mask filled with black.) Designer has no menu commands for adding a Mask or an Empty Mask, but, on a Mac, opt-clicking the 'Mask Layer' button at bottom of Layers panel will create an Empty Mask instead of a Mask. Maybe alt-click on Windows. -
lepr reacted to a post in a topic:
Designer v2: Portions of my graphics just disappear or seem cut off... what can I do to fix?
-
lacerto reacted to a post in a topic:
Designer v2: Portions of my graphics just disappear or seem cut off... what can I do to fix?
-
lepr reacted to a post in a topic:
Transform freeform raster selection
-
Fizmarble reacted to a post in a topic:
Transform freeform raster selection
-
lepr reacted to a post in a topic:
PLEASE RETAIN PREVIOUS VIEWED POSITION IN FONT LIST 🙏
-
Transform freeform raster selection
lepr replied to Fizmarble's topic in Desktop Questions (macOS and Windows)
Use a vector rectangle as a helper. create a vector rectangle and rotate it to match the arrow's direction perform one of the following options: nest the raster object inside the rotated rectangle, use Move Tool with 'Lock Children' disabled to stretch the rectangle, release the raster object from the rectangle don't nest and instead enable Move Tool's 'Transform Objects Separately', select the rotated rectangle first and then also the raster object, stretch -
My video demonstrates there is more wrong than just redraw - the result of Rasterise is also wrong. Is that logged, too?