

R C-R
-
Posts
26,691 -
Joined
Reputation Activity
-


-
 R C-R reacted to Madame in Teckradar rating photo editing progams
Teckradar rating photo editing progams
Yeey.. :D
Read the review.
-
 R C-R got a reaction from JFisher in Text tool not on side bar
Before trying the 'Select All - Clear' method (which will wipe out a lot of user preferences) I suggest opening the View > "Customize Tools..." menu item & seeing if you can just drag the Text tool onto the Tools palette. (There are three of them, one each for the Art & Frame tools individually & a combined 'fly-out' tool for both.)
-
 R C-R got a reaction from Leigh in What exactly do the Clear User Data options clear?
Leigh, I can't thank you enough for this! It is really helpful. :D
In particular, knowing the paths to the various propcol files & what they store will come in very handy for those times when I reset something I do not want to lose. I have experimented a bit restoring a few of them from Time Machine backups. So far, that works very well as an "undo" & lets me see fairly easily if an older version is what caused a problem.
-
 R C-R got a reaction from phil_s in Including AppleScript Functionality in Apps
+1 for Applescript (& Automator) support!
Python & other scripting language support would be nice, but Applescript has the advantage of allowing numerous applications to work together through the inter-application communication framework built into OS X.
-
 R C-R got a reaction from vonBusing in How do I easily delete a background color of a photo object to make it transparent?
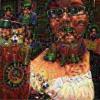
The Erase White Paper filter never seems to work very well for me on any layer that includes grayish tints. It seems to be adaptive in what it decides is white, so what typically happens is much of the grayish stuff is made partially transparent.
For example, in the attached, the top section is a stock photo of a key. The bottom section is a duplicate of that layer with the filter applied, & a green rectangle placed below it to more clearly show the transparency.
Any hints on how to avoid this?
-
R C-R reacted to Leigh in What exactly do the Clear User Data options clear?
I hope this helps
The majority of the settings found in the Clear User Data window can be found in:
For Mac:
/Users/{your username}/Library/Containers/com.seriflabs.affinityphoto/Data/Library/Application Support/user/
For Windows:
C:\Users\{username}\AppData\Roaming\Affinity\Photo\1.0\user\
Clear User Defaults This will clear any custom settings made within the Preferences panel. It will also reset any changes made to the Toolbar, Tools and Context Toolbar back to their default settings. This option is also available in Preferences > Misc > Reset User Defaults. Don’t Restore Windows and Documents This is normally used to stop the app from trying to restore a previous document that closed unexpectedly. Reset Studio This resets all panels in the Studio back to their default positions. This is the same as View > Studio > Reset Reset Object Styles This will delete any custom styles added to the Styles Panel. This option is also available in Preferences > Misc > Reset Object Styles These settings are stored in objectstyles.propcol and can also be exported from Styles Panel. Reset File Exports This will delete any custom File Export presets made in File > Export and the Export Persona. These settings are stored in: file_export_options.dat ( If you have no custom presets this file will not exist ) Reset Snapping Options Presets This will delete any custom presets made within Snapping. These settings are stored in: snapping_options.dat ( If you have no custom presets this file will not exist ) Reset Fills This will delete any Application Palettes you've added to the Swatches Panel. It will also delete any colours added to the default palettes such as Grey, Colours & Gradients. This option is also available in Preferences > Misc > Reset Fills. These settings are stored in fills.propcol and can be exported from the Swatches Panel Reset Brushes This will delete any brushes imported into the app and will reset all brushes within the app back to their default settings. This option is also available in Preferences > Misc > Reset Brushes. These settings are stored in raster_brushes.propcol and can be exported from the Brushes Panel Reset Font Replacements This will delete font replacements specified when opening files that contain fonts that are not installed. Replacement fonts are automatically selected the next time you open a file missing the same font. These settings are stored in: font_map.dat ( If you have no font replacements this file will not exist )
Please note: This is different from Preferences > Misc > Reset Fonts. This option forces Affinity to Reload/Repopulate fonts listed in the app. This can be useful when using 3rd Party apps to load fonts.
Reset Adjustments This will delete any custom presets found in the Adjustment Panel. These are created from Adjustments layers. These settings are stored in: adjustments.propcol Reset Macro Library This will delete custom Macros. These settings are stored in: macros.propcol Reset Develop Presets This will delete any custom presets saved in the Basic, Lens, Details, Tones and Overlays Panels in the Develop Persona. These settings are stored in: develop.propcol Reset Crop Tool Presets This will delete any custom presets saved within the Crop Tool. These settings are stored in: croppresets.propcol Reset Keyboard Shortcuts This will delete any custom keyboard shortcuts. You will need to export these by going to Preferences > Keyboard Shortcuts > Save before resetting. -
R C-R reacted to Dale in Image resizing Loss of Quality
Another way to look at these resizing issues... for starters I usually throw away DPI, ignore it, just think about the pixels. After all, a 600 x 300 pixel image has the exact same 180,000 pixels whether it's saved at 72 or 1200 DPI. So how many pixels do you start with and how many do you want to end up with?
An image "10x8 inches at 360 DPI" is 3600 pixels by 2880. In camera-friendly terms that's a 10.4 megapixel image. Resampling to make the image "6x4 inches at 72 DPI" would make it 432 pixels by 288. That's a 0.12 megapixel image, over 80 times smaller than the original. When you say it looks blurry, where is that? On a web page mockup on a laptop? On a 5K retina iMac webpage mockup? Or when scaled to fit the workspace area in Affinity Photo? Those 0.12 megapixels won't look good except when viewed taking up a small space.
A website won't usually be able to display the same 432 x 288 image at 6"x4" on all screens, and if it did the appearance would vary wildly. Visitors' screens (and browser settings) are all different, so it's usually necessary to make images at multiple sizes for retina, regular, tablet and mobile visitors. For instance, variants of a small image should vary from 480 pixels wide to 960 to 1440 to look good on different iPhones (with regular, x2 retina, and x3 retina screens).
There's always going to be reduced quality when resampling images though, the algorithms cannot usually create detail, but they can try not to throw too much away when redefining the image at a new size. And that first tip of ignoring DPI and focussing on pixels can help with some work, maybe not all, but it can help — DPI sometimes adds complexity just for the sake of having been around for a long time. It can be like a confusing "bank compound interest rate" middle-man in resampling, whereas original and desired pixel dimensions are like the much more obvious "loan amount" and "amount to pay back" monetary values. You know where you stand with pixels.
-
 R C-R got a reaction from arnofly in Image resizing Loss of Quality
In my opinion, "just think about the pixels" is good advice for anybody concerned with preserving image quality. Even if you are printing, you still have to include enough pixels in the image to preserve every detail you want the print to include. If you are not printing, DPI is irrelevant; if you are it sets the print's dimensions but not the amount of detail it contains.
-
 R C-R got a reaction from chishi in Flashing selection?
If you are referring to the selection border (sometimes called "marching ants" because it 'marches' around like a column of ants) then just hit cmd-D to deselect it.
-
 R C-R got a reaction from Markus Dierolf in Modify a Star Shape?
There are three different star tools in AD: star, double star, & square star. The first has 3 red control handles, the second just 2, & the third just one. The values they set (plus the number of points) also appear on the context toolbar & may be set from there as well as by dragging the control handles.
Converting to curves removes all the control handles & turns the shape into a curve with individual editable nodes.
-
 R C-R got a reaction from evtonic3 in AD does not recognize width and height after rotating shape
Yes, going back in history is the ultimate undo, but it is a "nuclear" solution that wipes out everything done after that point. That rarely if ever is what I want to do just to reset some object to its original rotation or skew angle, or to some other value(s) at some point in the design process.
As it is, the transform panel shows the relative rotation and/or skew applied to the original object, so for example it is easy to change either or both to some other value relative to the original ones. It updates in real time as you rotate or skew in the workspace, so you can see that, & if you prefer, you can change the rotation and/or skew values in the transform panel, so that (for instance) setting either or both to zero returns them to the original angles, all without affecting anything else in the document.
-
R C-R got a reaction from Leigh in New From Clipboard
cxi2001,
From what I can tell, at least on my Macs "New From Clipboard" assigns the new file a default DPI setting of 96 pixels per inch, regardless of the dpi setting of the source file. That doesn't change the resolution or number of pixels in the new image, but it does dramatically change the 100% view size, since that is based on the document's dpi setting.
You can change the new doc's dpi setting from the Document > Resize Document menu item to match that of the source file. To retain the original resolution & pixel count, in the resize dialog window, be sure to uncheck "Resample" first.
-
 R C-R got a reaction from MattP in AD 6 Point Star Question
There is probably a better way to do this, but I first made the star, then used the pen tool in polygon mode with "snap to key shape key points" & "snap to object geometry" on the toolbar enabled & "snap to selected curves" on the pen context toolbar turned on to draw the first parallelogram, using the star's nodes & center point as a guide.
Then I moved that parallelogram's rotation center to the center of the star, duplicated the first parallelogram with cmd-J, rotated the dup 60° clockwise, & power duplicated 4 more times to get the remaining ones. I finished off by deleting the star & coloring each of the parallelograms a different color.
Attached is an AD file of what I did with the history saved, so hopefully you can use the slider in the history panel to see better what I did.
6 pt star divided.afdesign
-
 R C-R got a reaction from MelG in Brush in / Brush out
GFS, it sounds to me like what you described as a "brush tool that toggles from brush-in to brush-out" is more of an erase/unerase tool, so to speak. That might be fine for a very simple editing app, but for a full featured one like AP I can't imagine how that would work.
To see why, consider that there are many tools available in AP (& PS and most other graphics apps) besides the basic paint brush & eraser like the burn, dodge, blur, sharpen, flood fill (paint bucket), gradient, smudge, & so on tools that can alter the image in dozens of different ways, & they can be applied in any order.
So in a typical workflow, an "unerase" or "brush-in" tool would somehow have to provide a method to choose from dozens if not hundreds or thousands of possible previous "brushed out" states.
AP does have such a tool: it is the Undo Brush tool that barninga mentioned. To understand how it works, I suggest opening AP's help viewer, typing "undo brush" in the search box, & reading the Undo Brush Tool help topic.
-
 R C-R got a reaction from ansdesigns in Can I resize a photo by dragging?
Yes. Use the Move tool for that.
-
R C-R got a reaction from ansdesigns in Can I delete parts of a photo with plain white background (not Transparent)
You could add a white fill layer below the photo layer, or select the transparent area & use the flood fill (bucket) tool to fill it with white.
-
 R C-R got a reaction from Brave Ace in Learn or Hire?
I think only you can answer this. Like anything else, learning something new can take considerable time, but the skills & understanding that comes from that may help you in ways you can't anticipate, often with things that seem unrelated until much later.
Regarding getting "good enough" for decent edits, it depends a lot on how good that needs to be for any particular purpose, but if you like to learn & can generate a reasonable amount of creative inspiration, you should be able to invest a lot less than 150 hours before you know if what you want to do justifies investing in more learning time or if it would be more time & cost effective to hire someone to create it for you.
If you are primarily focused on logos, I suggest starting with Affinity Designer & "graduate" to Photo if & when you need its more comprehensive bitmap editing features. If you have never worked with a vector graphics app before, there will probably be a steep initial learning curve "bump" but once you get past that, it will get easier & most things you learn will apply to AP as well, making that app easier to learn more quickly.
-
 R C-R got a reaction from coop3842 in Affinity Photo Extensions
Short version: no.
Longer version: Affinity Photo is an OS X application, as is the OS X version of Apple Photos. The iPad runs iOS, which is similar to but not the same as OS X. The iOS version of Apple Photos has a limited number of features compared to the OS X one, & does not support extensions written for OS X.
-
 R C-R got a reaction from Paul Bravery in 8 image examples to work with....where are they on computer?
They are in a folder in /private/var/folders/. The exact location can be found with the Affinity File > Reveal in Finder menu item when the file is opened in the workspace.
If you are worried about the file space they use, you can delete them from there, or just wait until you next restart the computer, which will clear the folder's contents automatically.
-
R C-R got a reaction from Leigh in inconsistent system colors between AD and other apps
Leigh, thank you for that little tidbit about the color profile Apple's Color Picker uses. It is one of the things I have wondered about from time to time, but did not know who to ask.
These forums are a great educational resource for me, not just for Affinity stuff but also for miscellaneous things like this. :)
-
R C-R reacted to Leigh in inconsistent system colors between AD and other apps
The colour picker used in Hype is Apple's Color Picker and it uses the Generic RGB colour profile. You could try changing your document's colour profile to Generic RGB to see if this improves things.
-
R C-R got a reaction from Leigh in Buying and Free Updates
"Maybe, just maybe, serif is NOT Apple. And Apple is just the pipeline from which is it distributed."
There is no maybe about it. Serif (Europe) Ltd is an independent developer of software applications headquartered in Nottingham, UK. Like many others, the company sells its Mac OS X products through the Apple Mac Store. That is the only sense in which it is an "Apple offering."
-
 R C-R got a reaction from DanielFS31 in Hackintosh VM Graphical Error
It is not a good idea to produce work product using OS X on non-Apple hardware for legal & practical reasons you probably already know about, but if feel you must, you will probably get the best results if you use a graphics processor as identical as possible to one of the ones Apple uses, including the same firmware.
So called "OTC" (over-the-counter) graphics processors, even ones with the same trade name, do not come with Apple's proprietary firmware installed. This can cause a variety of processing errors & performance issues.
-
R C-R reacted to A_B_C in Affinity Photo: Refelctions, seperate FX
Hi northstar,
let me just quickly address some of your questions. What regards the motorbike example, would have to create a vector rectangle or a rectangular pixel selection on a new layer, apply a black to white gradient fill, select this layer, choose Layer > Rasterise to Mask, and drag your new mask layer in the layers list directly onto the thumbnail of your flipped motorbike layer. Doing so will nest the mask to the respective layer (it should look like below).
You can set gradient nodes transparent by using the Opacity Slider on the gradient fly-out (see below). In order to apply a gradient to some part of an image you will have to create a pixel selection and apply the gradient to that selection. But you can also apply your gradient to a vector object that covers part of your image.
A neat trick for achieving polygonal selections is to create a (closed) vector path with the Pen Tool and click Selection on the context toolbar of this tool. This will convert your path to a pixel selection (see below). Please note that the path gets lost by doing so. You might want to duplicate it before clicking Selection.
Hope that helps … :)
Alex