Search the Community
Showing results for tags 'stroke'.
-
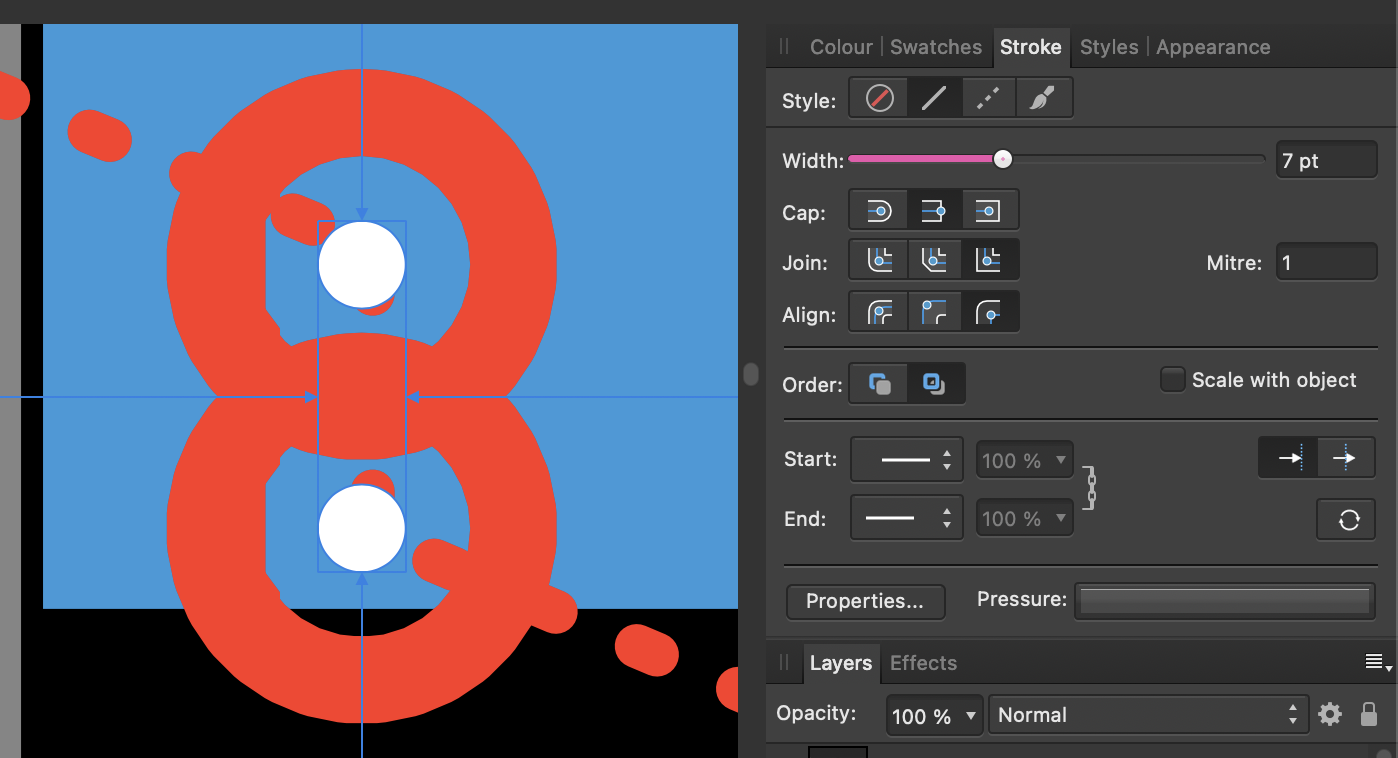
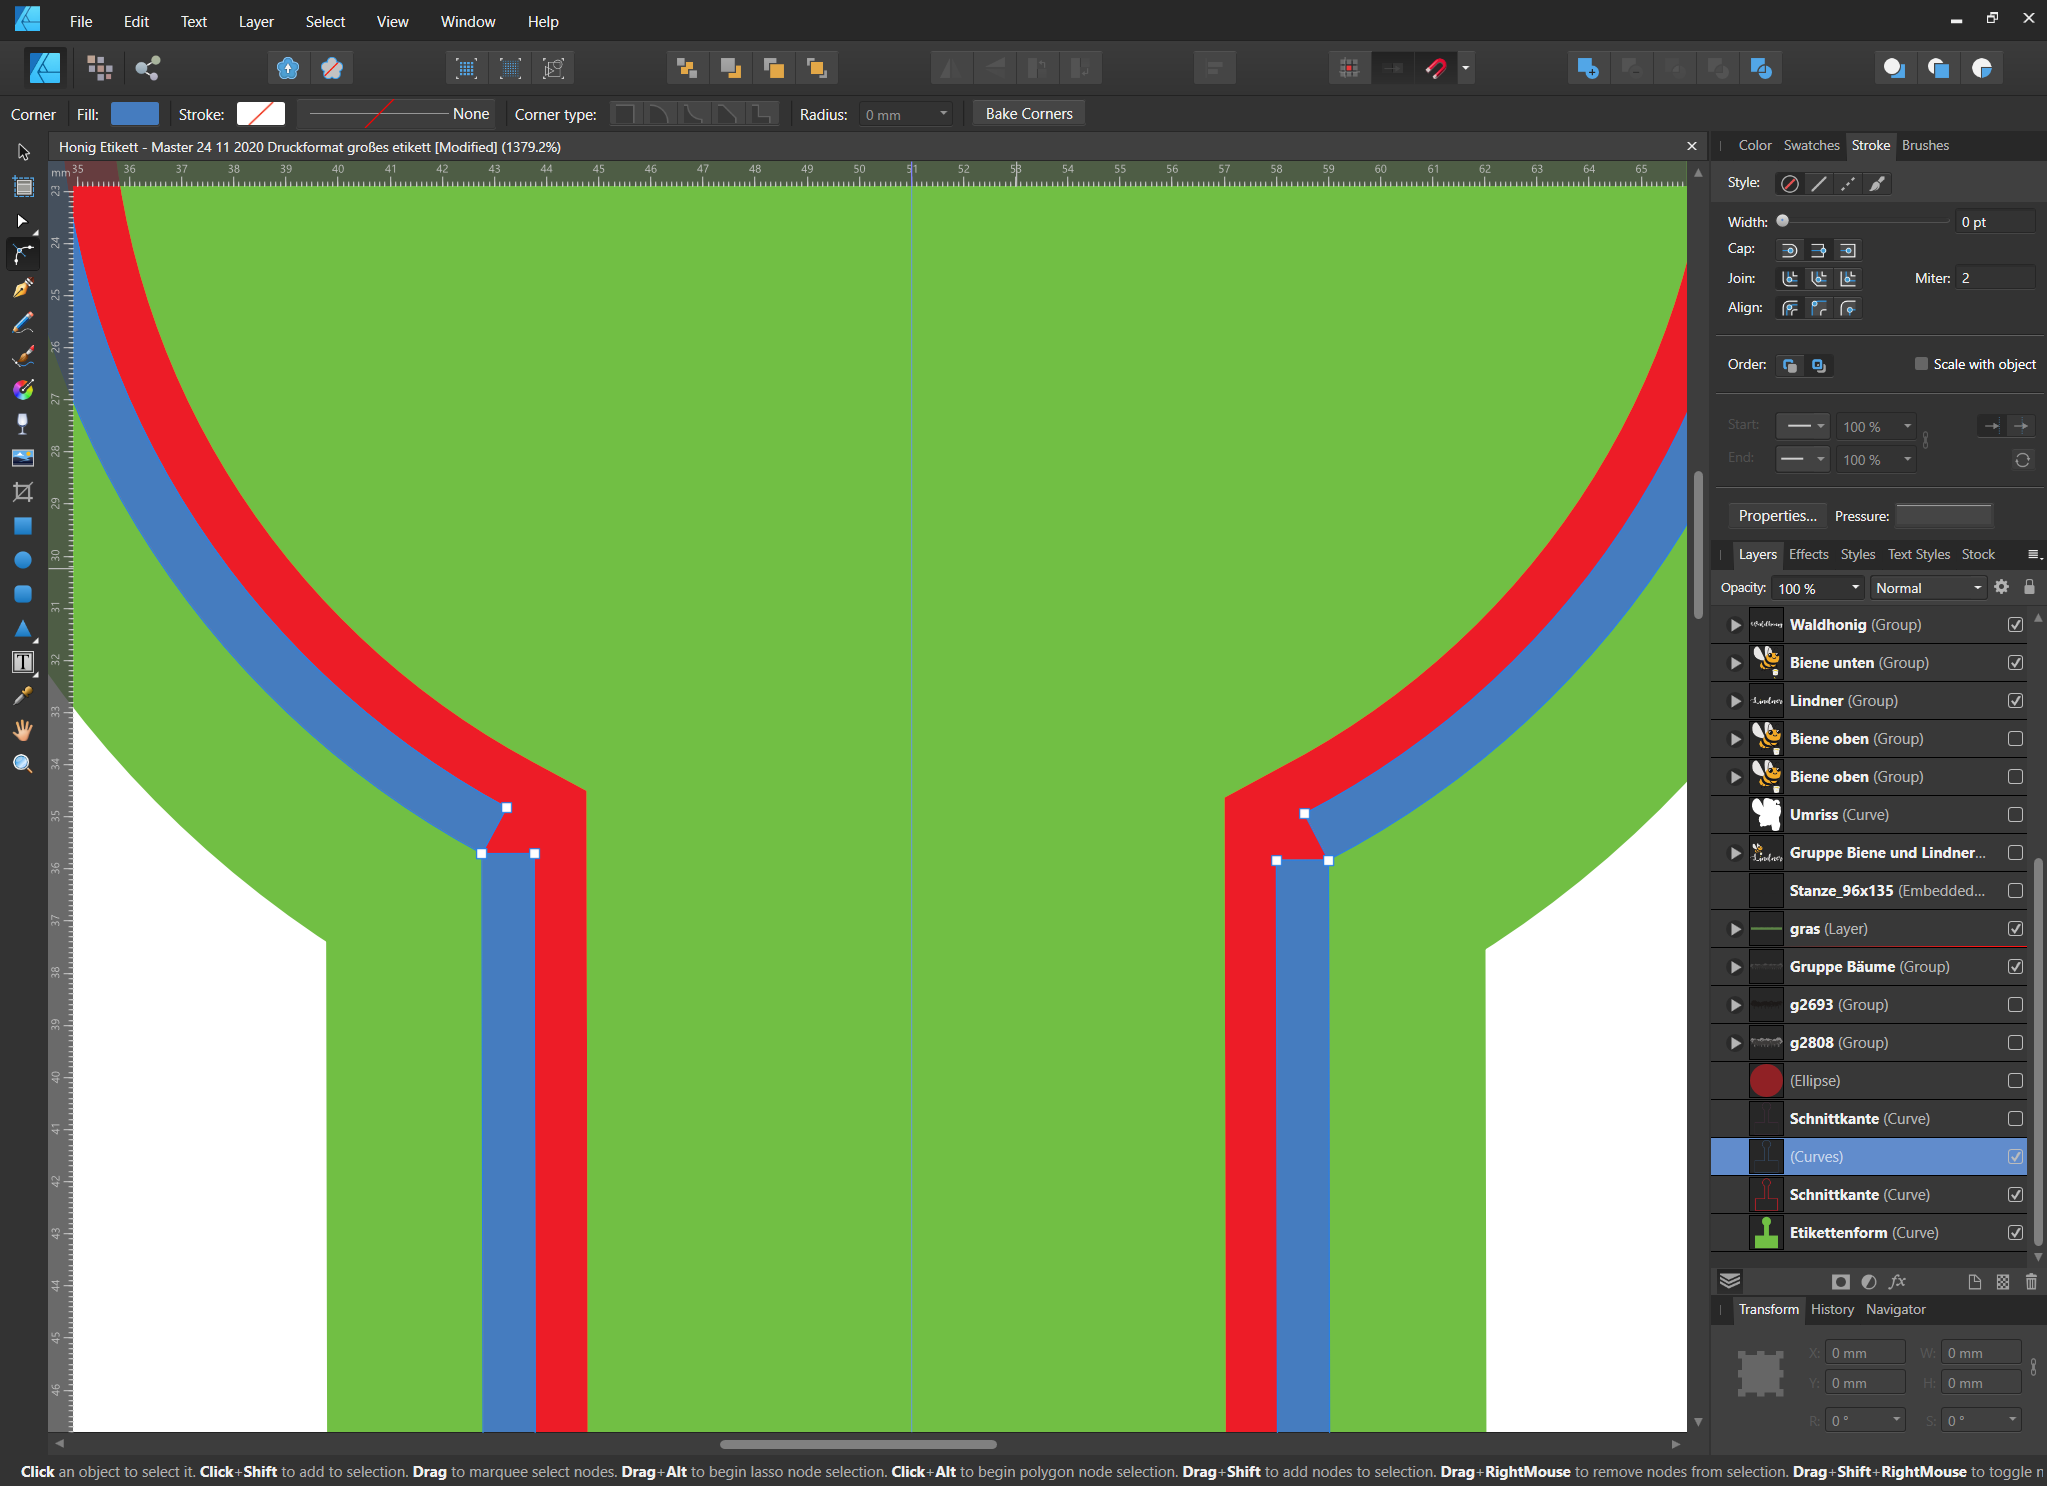
 V1.9.3, MAC OS 11.2.3, MacBook Pro 16" 2019 built-in screen, no exceptional hardware or software running. At default screen resolution. Expected: When I have a circle shape and set the stroke width to a high number, I expect the stroke to go al the way from the outside to the outline of the circles filling. What happens: A gap appears when the width exceeds the diameter of the circle. Also the shape of the stroke has different irregularities at different widths. Reproduction instructions: Create a new document. draw a circle shape set a stroke color and set the position of the stroke to outside. increase the width so it exceeds the diameter of the circle. a gap appears between the stroke and the shape.
-
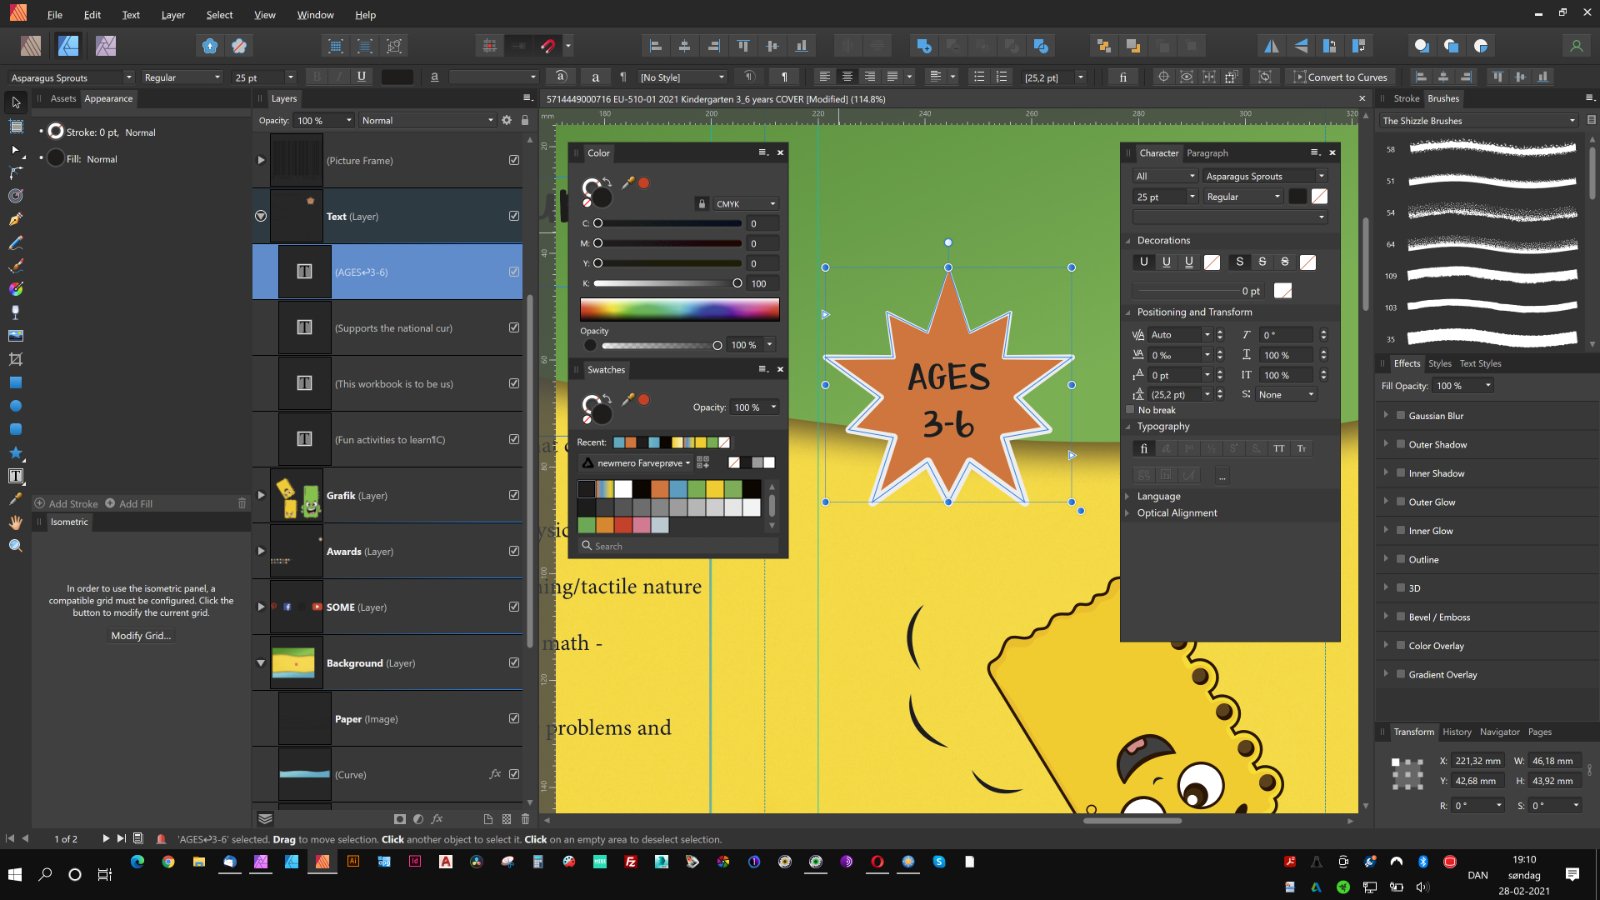
 Great googly-woogly! Yes, ’tis moi and, as Popeye would phrase it, ‘I yam back ay-gain!’ with another exciting round of ‘Wha … !?’ Today’s Episode deals with the vagaries of Multiple Strokes (thankfully this is the artistic, not the medical, kind of stroke we’re dealing with.) In past, it has been possible to use the Appearance panel and the ‘Add Stroke’ operation to create multiple instances of strokes. Since installing 1.9.3, that has not been possible. No, I'm not dissing the latest version, merely pointing out a tiny glitch that (hopefully) is able to be resolved. I have attempted creation of multi-strokes on plain text (text-as-text, not converted to curves), text which is converted to curves, on converted and non-converted with Expand Stroke applied, and a few other attempts to Make It Work! … Nuh-unh, Herbie. Stroke don't play dat … Application of a SINGLE stroke (regardless of inner, outer, or centered alignment) is uneventful. Clicking the ‘+’ sign for ‘Add Stroke’ provokes dry, mirthless laughter from the inner sanctum of the application. ‘Try that again, Fool … you’re not playing with an Amateur, you know!’ - can't you hear it? I'm attaching a screencap of the ‘Add Stroke’ settings window. Please advise if you spot something I'm doing (or, not) which prevents multi-stroke application from taking place. As usual, thanks to all for your input. Stay tuned for our Next Exciting Episode, featuring ‘The Jabberwock’ (as performed for us by the now-late Mr Frank [‘More Trouble Every Day’ & ‘Don't Eat The Yellow Snow’] Zappa …
-
 I have been trying the program for a few minutes it seems to be exactly what I need. Only a few things I need to figure out before deciding to buy or not. I draw mainly with the pen tool but I am unable to find the option to make the lines ends go thin in the edges. it gives the picture a pencil drawn like appearance. I notice something that looks like it in the stroke options but I am unable to apply it to a line. Notice that I am drawing with a mouse at the moment, maybe the option only works with drawing pad?
 -
 Hello, I'm trying to make the switch from Adobe to Affinity. I have this issue that it only seems to show on my Wacom Cintiq 16. Every time my brush hovers over my strokes they drop resolution/quality. I'd love to draw in Affinity photo, but I can't get around the low resolution lines. Any help? is this a known bug? what should I do? Note: Page size is Default A4 size, 300 DPI. Affinity Designer "pixel persona" doesn't drop brush stroke resolution. (Which uses pixels as well) Wacom cintiq 16 drivers are up to date. Specs: i7-10700k 3.80GHZ 16gb Ram 2070 super RTX Windows 10 I've attached an example video below Affinity Photo - Brush Strokes dropping quality. - YouTube
 -
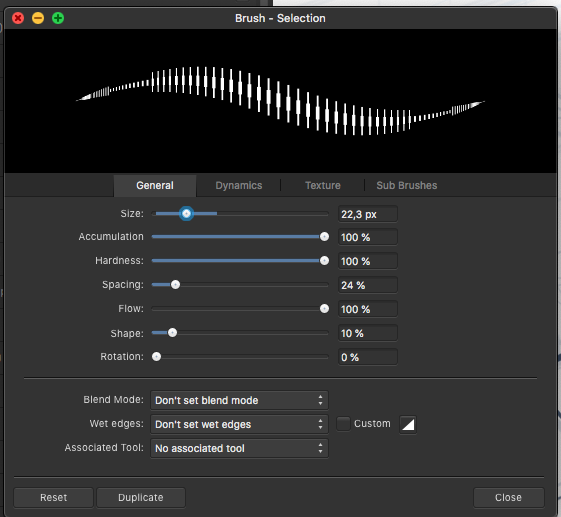
 I've had a hard time adjusting the brush to act in a natural way for drawing. I've compared with mainly photoshop and sketchbook pro and posted numerous reports about this. There are a few issues like jagged lines on low zoom levels and general inconsistent behaviour of hardness and size. Things you only notice when drawing or writing by hand on a tablet or Cintiq. Now I think I found what causes the latter! I was able to isolate what is going on by setting the shape to a narrow ellipse and the stroke to large spacing. Look what the preview shows. There are 2 things going on here: 1 Inconsistent size toward the beginning/ending of the stroke, causing a sort of 'arrow head' effect 2 The increase of the amount of dots towards the ending is too steep. Meaning the spacing between the dots in the end is near zero and in the middle pretty large. Some decay in spacing is useful since the relative spacing between dots should stay the same. But it seems that AP does not take the dot size into account and at certain settings the decay is much to steep, causing too many dots to overlap. I noticed that in photoshop and sketchbook pro this decay is far less and generally in better balance with the shape size. This presumably results in their smoother line behaviour. One result of this steep decay in AP is that soft lines are much harder in the endings than in the middle and pressure sensitivity feels a bit 'off'. All in all this explains the strange behaviour I was experiencing. This arrowhead effect is nearly invisible in the preview when the shapes are rounder, but in practice I always notice the inconsistent line behaviour because of this. Affinity photo: A drawn line to show it's not just the preview: photoshop: sketchbook lastly look at this soft line and how hard it gets near the endings. The steep decrease of dot spacing is what causes this. In all examples these are the dynamics settings: In my opinion two things need to change: 1 The arrow head behaviour is just off and needs to be fixed. 2 The spacing between the dots needs to be rebalanced in order to have a consistent line behaviour throughout different settings of spacing, dynamics, hardness etc. Generally speaking the dot SPACING needs to be in balance with the dot SIZE and SHAPE. E.g. the thinner part of a pressure sensitive line should be equally soft as the broader part of the line. Also when pressure sensitivity is set to linear, the line thickness change should also be linear. This is currently not the case and my guess is the inconsistent dot spacing causes this. I hope this helps refine the brush behaviour for AP!
- 18 replies
-
- 14
-

-

-
 How do I choose to position an object stroke on the inside or on the outside of a shape (i.e. a square or a circle or irregular shape)—rather the default stroke that straddles the shape border? Neither he Stroke panel nor the Appearance panel seems to offer this choice. Is it someplace else? I've been using "stroke alignment" options as long as I can remember in Quark. Thanks, lettergothic
 -
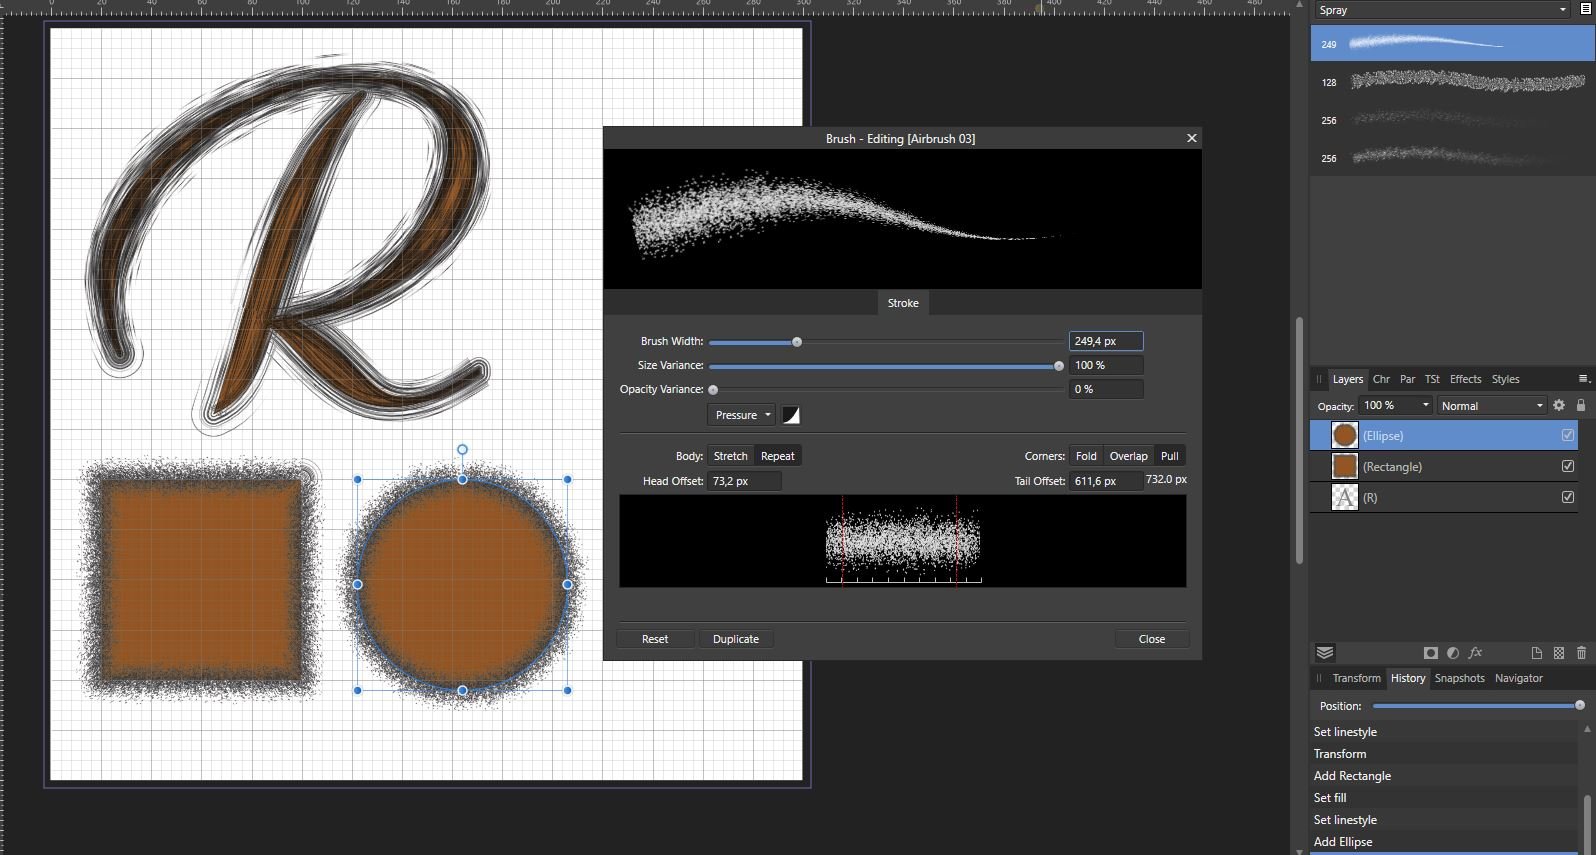
 Hi! I possibly found a bug. I tried to give a letter an outline with a selfdesigned brush to make its contour a little rough. So I created a new image, placed a letter with the Artistic Text Tool, scaled it by dragging its edge and then clicked on the brush in the Brushes panel. The brush was set to repeat, but the outline that appeared was stretched. So I controlled if this also happens to ellipses and rectangles. In that cases, it worked as it should. It has no effect to convert the letter into curves before. But sometimes, after having added some objects like ellipses, rectangles, curves..., suddenly it even works with letters as it should. But sometimes even that doesn't help. I attached a screenshot to show what I mean. All outlines of shown objects are made with the same brush and the same parameters. My OS is Windows 10, Version 20H2; Designer 1.9.1.979.
-
Whats going on here?!?!?! Just having a mess around with Beta 1.9.2.1014 to test if it's yet possible to use for vector sketching without freezing (No not yet) and come across this bizarre selection behaviour, where you click on a stroke and it selects completely different stroke, but outline mode works as expected - see grab Bug? Screen_Grab_2021-03-24_at_09_23_58.mov
-
 This did not happen before, but now every time I finish drawing a line (black) with the Vector Pen Tool and my Tablet, I go to fill the new shape (Red). When I click the Vector Pen Tool, the stroke is now RED instead of black, forcing me to constantly switch back to black. This is the first time I've seen the color change based off of whatever color I used to fill a shape. Does anyone know how to keep the black as default and stop changing?
 -
 I cannot seem to find a way to solve my problem. I made a shape in Apub and inserted some text in the shape. In Affinity Publisher you have the option through "Text frame" panel to change fill and stroke color of the shape. I now would like to add a brush to the stroke of the text frame but Brushes are not available in Publisher. No problem I think! I use the studiolink to ADesigner, but here there is no option of "Text frame panel". And I cannot figure out how to change either fill color or stroke color/type/brush of the shape that the text is embedded in, in Designer? The curios thing is I can make the shape in Designer. Select fill and stroke color/brush style. As soon as you use the text tool and write/insert text in the shape - I have no idea how to change the fill/color of the original shape. The only fill and stroke color I am able to change is that of the text. The appearance panel is no help in either program. So there are two things I would like to know: Either: add a brush to the stroke of the text frame in APub or, being able to add/change color and brush of fill/stroke of text frame in Designer. Anyone know how to do it? What panel or menu have I not been able to find?.... Thanks in advance The first image is from Designer /(studiolink) - the second from Publisher
-
 Hi. I would like to know if its possible to expand a stroke while deforming it progressively as it expands. I have a triangle with rounded corners and I would like to make a topography layout from it. Thank you
 -
 I have a question about curves / shapes inside another (parent - child). When selecting shape or closed path containing curves, stroke modification change only parent item. To change children strokes, they have to be selected separately. When items are grouped, there is no problem - changing group stroke make effect on all items in group. Is there a way to change child property when changing parent, or to select both, parent and child, to apply format for all items.
-
 I cannot get rid of the bluish stroke on my shapes. Happens with all shapes. As per screen cap no stroke is selected anywhere in the interface, the shape is not selected nor the group. Occurs in new documents as well. Mac os Catalina 10.15.7, external Samsung 32d850 (2560x1440), Intel iris graphics 6100. Thanks for looking.
-
 Hey Serif! First of all, loving the new 1.9 update! Tons of feature improvements and they're all awesome. There is a bug that I'm seeing in the select same tool. When I use "Select Object > Unstroked Objects" , it works the same as "Select Object > Stroked Objects". It selects only stroked objects and not the unstroked ones. Here is a reference video. A1LXRiNPvj.mp4
 -
 About a week ago a magenta stroke began appearing on everything once it had been selected, beit text or objects. It then remains whether selected or not. It appears on older and newly made projects. I've tried searching all pertinent topics and resources to learn how to remove this. Can anyone tell me why this is happening and how to remove it? Thank you.
 -
 Hi, I'm trying to create an old school ornamental stroke on a text frame for a book cover like, I think, used to be available back in the QuarkXPress world. I've attached an image of the type of thing I need (please excuse the lousy quality). I have all three Affinity apps on Mac. Ideally the frame would be in Publisher, but I'd be happy enough with a vector object brought over from Designer. I'm wondering what the best/easiset way of approaching such a need would be in the Affinity Apps. Any suggestions? Create a single vector and add multiple strokes in the Appearance panel? Another way? Thanks for any suggestions. Pat
-
 Hey guy, I have a shape with no fill and I want the stroke to be shape. So I use "Expand Stroke". The issue is that when I do this AD doesn't directly convert the stroke as it is but cuts off a corner. Look at the screenshots. Maybe you can give me hint why this is happening. EDIT: Maybe I should say, that the strokes are aligned to the inside of the shape
-
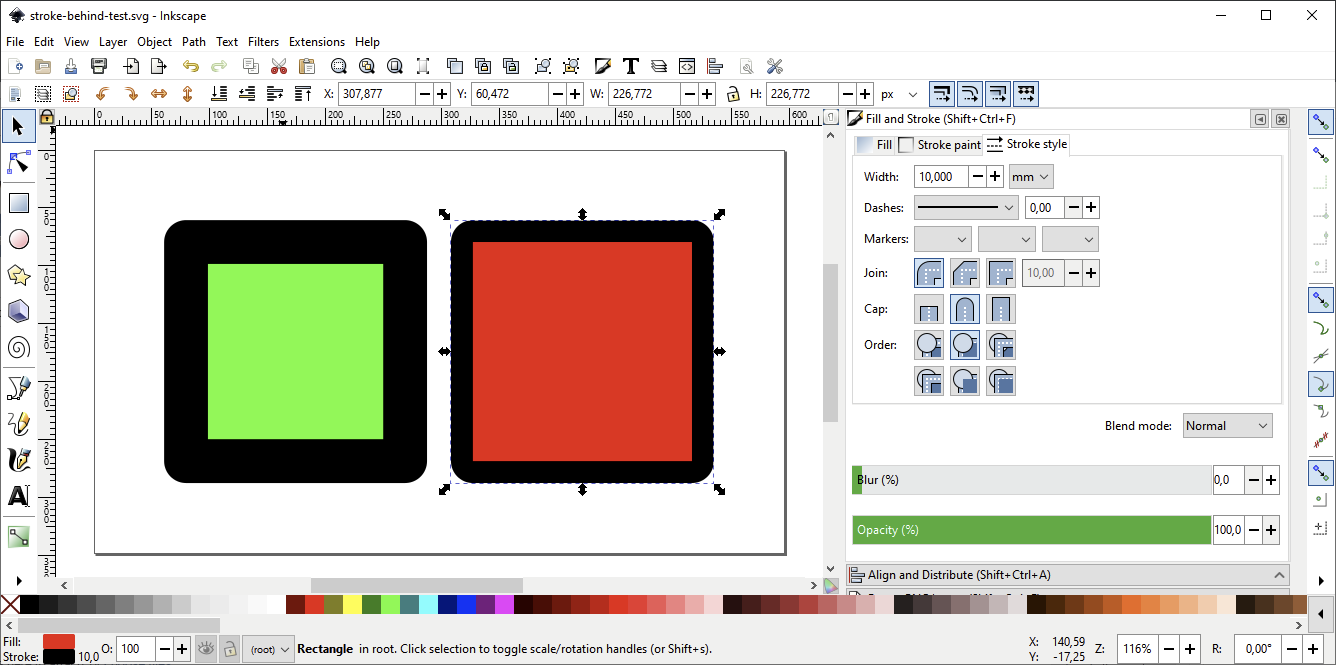
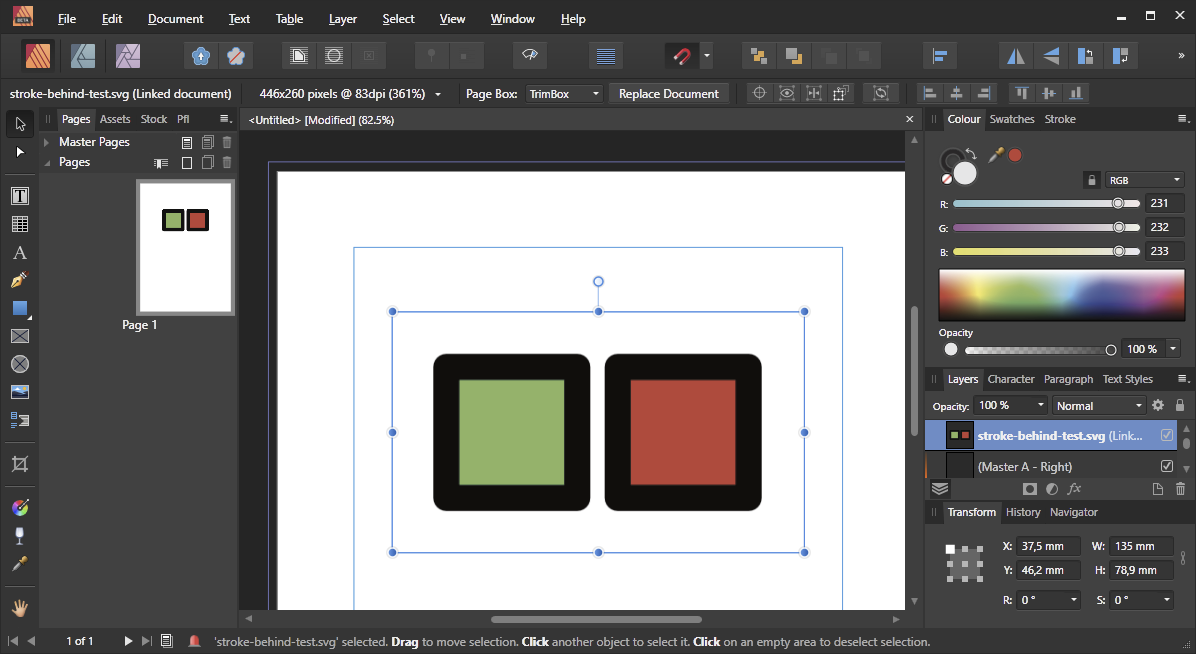
 Hi all, this bug is present on both, release and beta build (1.9.0.863) of publisher, so I'm not sure if this is the correct sub forum. This simple SVG example file (see attachment) contains two rectangles, each with a stroke width of 10mm. On the red rectangle the paint-order of the stroke has been changed, so the stroke lies behind the fill: Remark: this is a plain SVG files with no Inkscape specific extensions. It is also rendered correctly by e.g. Firefox. When I embed this SVG file into a publisher document, the paint order is ignored (and so are the colours, but this is not the point here) (wrong colours due to inadvertently CMYK setting) Testetd with: 1.9.0.863 This bug is not new to 1.9, it is also present in version 1.8 (version 1.8 showed at least correct colours, but maybe I have not set up my beta environment properly?) Greetings max1josef stroke-behind-test.svg
-
I would love to assign my curves a stroke and later be able to change this specific stroke. Identical to global colours, where I am able to change the color and all objects using it are updated. Styles can be used to transfer a stroke to other curves but a Style cannot be changed after creating it.
-
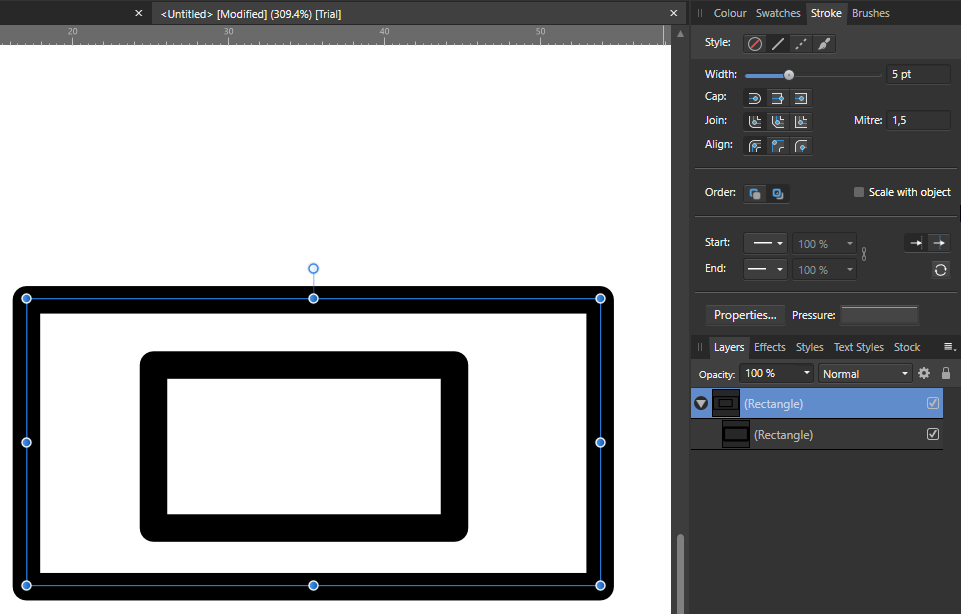
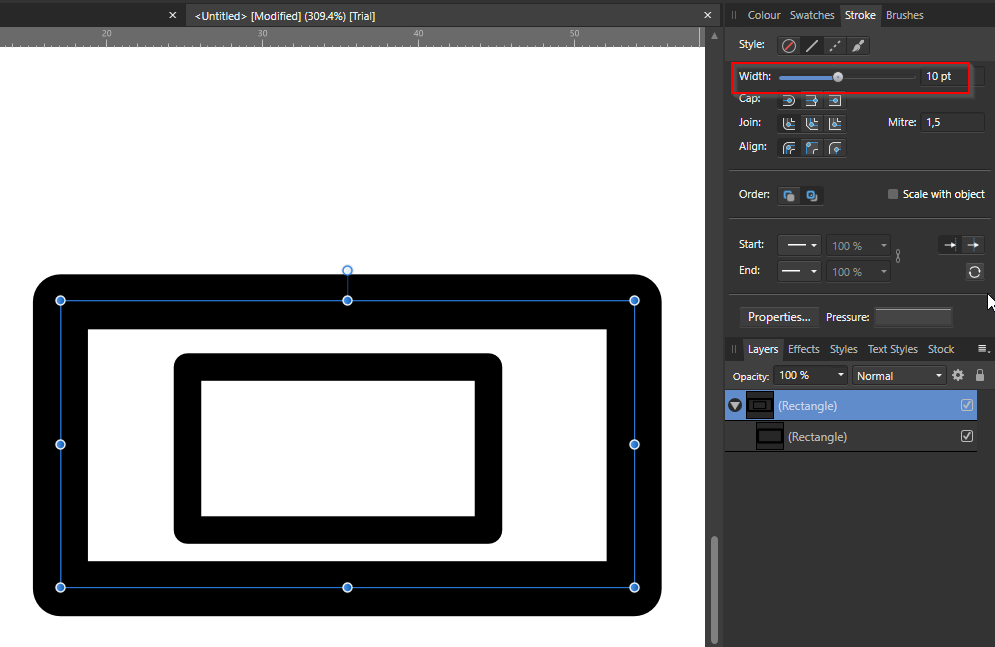
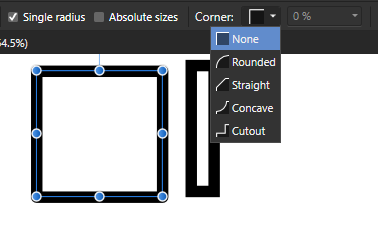
 Hello, While I'm still learning how to use Affinity Designer I noticed that the Stroke's Outline is always on the center. 1 - I would like to change the Outline to Inside or Outside - How can I do that ? What I mean is to make it NOT centered based on the blue stroke line, but either outside or inside of it's outline. 2 - I would like to make the rectangle have sharp corners (like the example on the left) - How can I do that? I've tried the Corner option, it seems like it's on zero, but still rounded. Thanks ahead!
-
 I feel it’s not possible in AD, but just to be sure, is there a way I can apply a gradient to the stroke width? I mean, I know I can apply a gradient to the length of a stroke, but can I do it also to the width, so that gradient would follow the path of the stroke? My first thought that it maybe could be done via layer effects, but I couldn’t figure it out.
 -

Apply Raster Brush to Path
ChristiduToit posted a topic in Feedback for Affinity Photo V1 on Desktop
Having the ability to apply a raster brush to a path would be such a welcome feature, even if the path is not editable after applying the brush effect. In many cases there are obscure shapes or angled lines that are difficult to draw freehand, and in those cases it would be great to be able to use the pen tool, but still retain the same texture and style of the raster brush you were using, as if you drew the stroke by hand. I know you can apply vector brushes in AD, but I mostly use the raster brushes in AP to sketch. Furthermore, the brushes in AD are stretched along the path, where in AP it would be great to rather have the ability to make it look like the stroke was drawn as if you were using the brush tool. I’ve recently been drawing out a lot architectural interiors for clients using a drawing tablet in Photo, and have really missed the ‘apply brush to path’ feature from Photoshop - would really speed things up and improve the end results! I’ve seen a few mentions of this online, but wasn’t sure if it was logged as a feature request yet, so here you go.- 11 replies
-
- 6
-
-
- affinity photo
- brush
- (and 3 more)
-
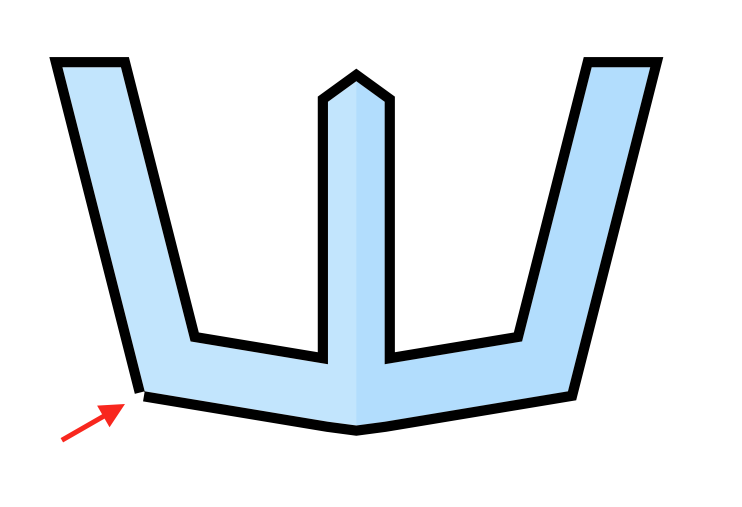
 When expanding the stroke of my drawing, one of the corners break. I've attached images. The first image is before the stroke is expanded, the second one is after. Why is this happening?
-
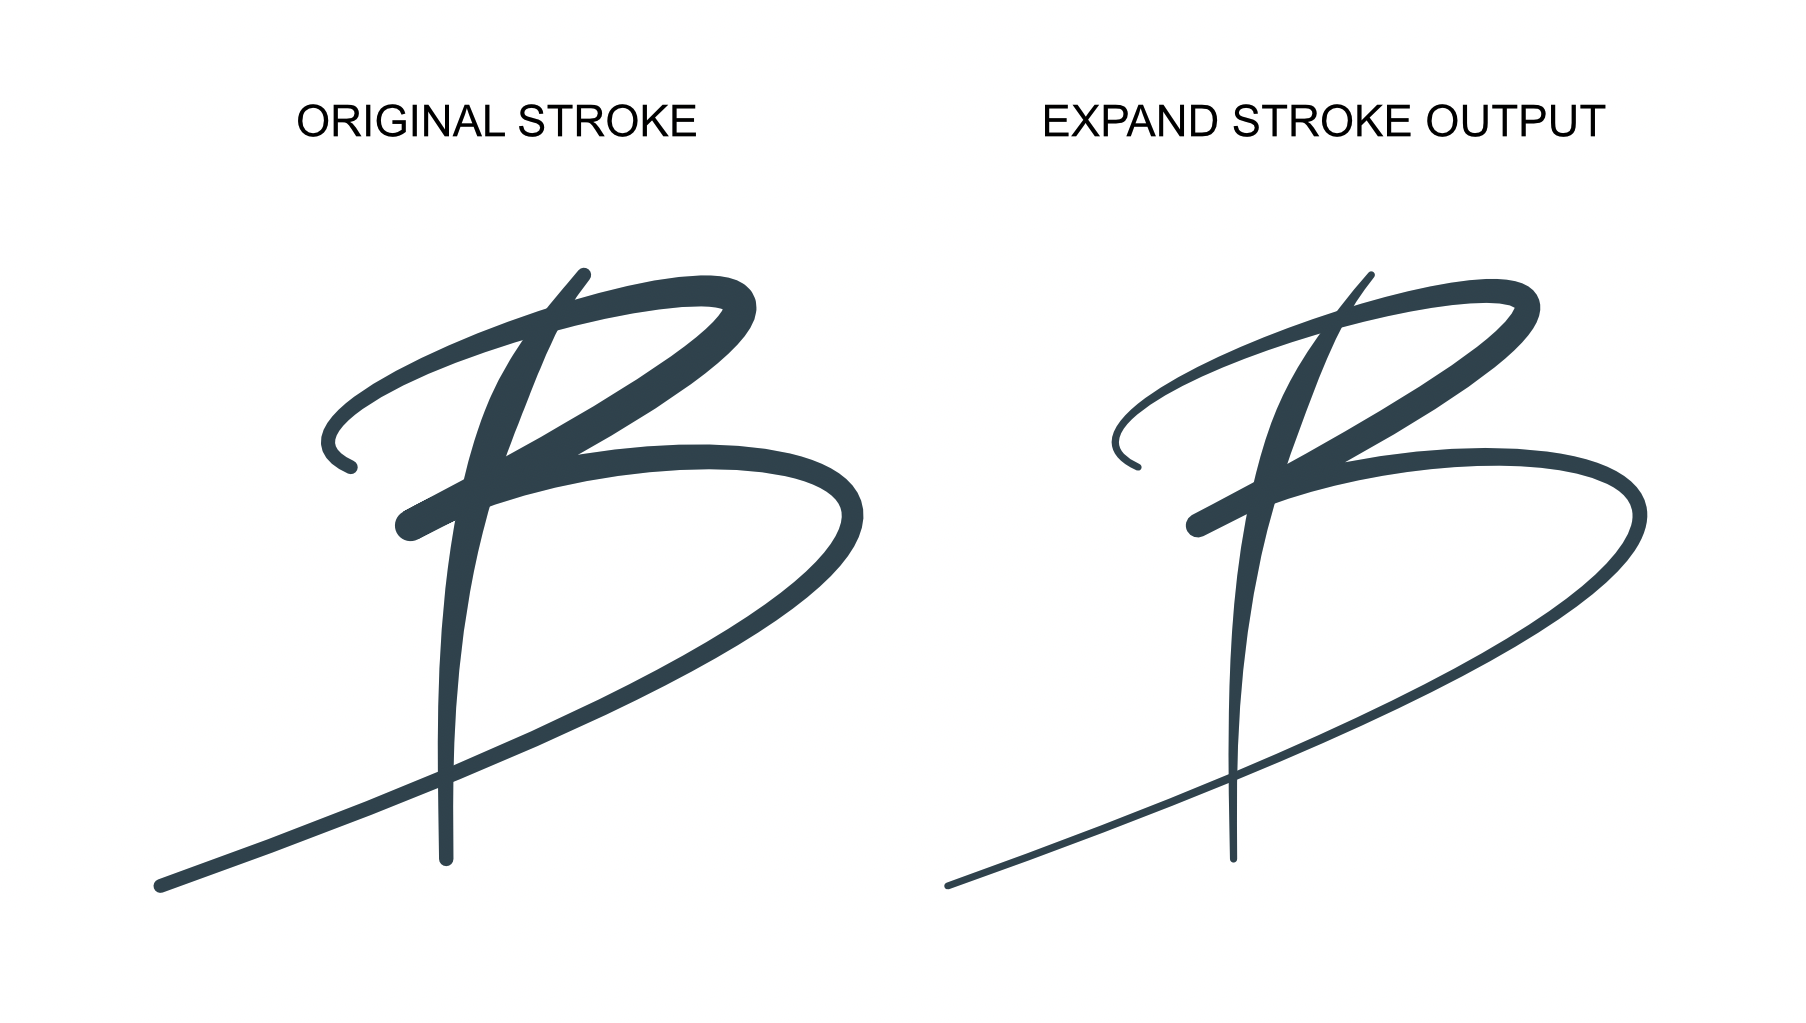
So I've added a document below. I did custom text with the path tool in AD. When I use the 'expand stroke' function the appearance changes. It becomes thinner, and it shouldn't. The appearance also changes when I do exports via the export persona. I am using Affinity Designer v1.8.4 expand stroke difference.afdesign
-
 I noticed that when the stroke of an object is set to inline that the fill color of that object is clearly bleeding through behind the stroke. I don't think that's supposed to be as it would mean the stroke is not aligned properly with the border of the object. As you can see this also transfers to exports and is not just a visual glitch. In my example image I have a simple circle, filled with black and on top of that a smaller circle with a white fill and a black stroke set to inline. You can clearly see the white bleed on the border of the inner circle. The bleed also changes with the color of the inner circle's fill. Is there any settings I might have wrong to fix this or is this a bug?