Search the Community
Showing results for tags 'layers'.
-
 Affinity Photo (Version 1.5.2) - April 27, 2017 Hello, We would like to build a Macro that includes different layers to build some sort of 3D image impressions including a separate background. Below you'll find the exact steps we've taken so far: A. MACRO PROCESSING 1) Drag and drop a .jpg image into Affinity Photo 2) Activate Macro 3) Document --> Resize Document to 560px x 395px, Units: Pixels, DPI: 450, Resample: Bilinear, Resample activated/ticked --> Resize 4) Document --> Resize Canvas --> 640px x 640px, Units: Pixels, Anchor: Center --> Resize 5) Click on image with cursor/arrow --> Document --> Flatten 6) Transform --> S: -3 Degrees 7) C&P image, switch to last layer and Transform --> S: +3 Degrees 8) Move edited image (of last/lowest layer) accordingly and enter H-Value with a Delta of -20px 9) Effects --> Gradient Overlay 10) Layer --> New Layer --> Arrange --> Move to Back 11) Choose Flood Fill Tool --> Click into empty area --> Effects --> Gradient Overlay --> Type: Radial 12) Document --> Flatten 13) Stop Recording Macro 14) Add To Library --> Enter Macro name and hit OK --> Don't save the document B. BATCH PROCESSING 1) File --> New Batch Job process and choose "Save as JPEG" While the above steps (1 – 14) work perfectly fine when doing everything manually in Affinity Photo, it doesn't so when executed via Macro. To see the difference between Manual vs. Macro refer to the ZIP-Attachment below. C. QUESTION How can we build a Macro so that the final image looks EXACTLY like the one shown under manual conditions? Thanks, Pat Macro.zip
 -
 This it is probably already among the requests or in the roadmap. At the moment, is not possible to select multiple adjustment layers if they are nested within a layer. Are you already considering adding it?
 -
Hi. I have to work in different languages, so what I normally do is making layers for the different languages text, one for each language, and when i need to export I just choose the right one and lock the others. This is really a hard thing to with the layers system we have now. In my opinion will be a good idea to be able to group elements of different layers just for faster access and choosing but not to move them from the actual position, just to turn them on or off. That could be a great feature for me. Been able, for instance, creating a group and calling it (Languages) and drop there all languages layers in proper order for activating or deactivating, while the actual text still in the proper position. An other good thing could be the possibility to choose in what order new working tables would be created in the right menu as it is now goes in the wrong direction for and I keep making some silly mistakes when exporting or printing.
-
 First off, I love your app, I made the change from Graphic which was recently purchases from Autodesk and I was having issues with the SVG exporting properly for my CNC machine. I do a lot of woodworking for customers and for my YouTube channel. I would love to use Affinity to make plans for folks to buy but what's holding me back is the way that measurements work. I love that you have snapping and measurements but I would love to have a way to move those to a layer so I can export the image for these plans. Thanks for all that you do, Zach Manring www.southernginger.com
 -
 My photo retouching workflow often results in many layers, such that I can't see them all in the layer list. When I attempt to use the mouse to drag a layer near the top of the stack to the bottom of the stack, I can only move within the range of visible layers. I can't reach a layer below those that are visible in the panel. I'd like to see a shortcut where you can select a layer, then use the up / down arrow keys to move it to a new location. It should scroll the layer stack if you're attempting to "arrow down" toward the bottom of the stack. It's possible there is some existing technique I'm not aware of Thank you for your consideration - Love Affinity Photo on my PC
 -
 Hello, What is the most efficient way to accomplish the following: (1) Create/refine a selection (2) Make an adjustment to it (3) Be able to go back and apply other adjustments to the same selection later on #3 is where I'm struggling. Thanks for your patience in helping a newbie.
 -
 Hi, Working with guides could be solved through special guide layer which will be always on top of all layers. It can be locked, made invisible, printed or not and every object that will be copyed/moved/created to that layer will automatically became a guide.
 -
Here’s some of my photo manipulation done in my love: affinity photo for iPad dont challenge me here, because I care less if your work is better than mine, rather I care if you yourself like your work as well as mine to share with me and all who feel the same describe your techniques, how long it took, anything original about your workflow... leave SE your raw assets if you want, let’s create a discussion about improving how we use affinity

-
- 2
-

-
- layers
- photo manipulation
- (and 6 more)
-
 I have an .eps file image of an open window with countryside view. I need to open the file and remove the view leaving only the window frame. I was told I coulde do this in Affinity Photo so purchased it yesterday. I can open the file ok but do not know how to remove the countryside view and then I need to save the windowframe only as a.png file. Can anyone help please. I need to solve this little problem as soon as poss. Thank you in advance. WINDOW.eps
 -
 Can someone point me to a video explaining how the layers panel works? Some trouble I'm having: 1. I'm not sure how to control where new things I draw are being put. I can highlight a layer I want to work on and then draw something. The new thing I draw is put into the bottom-most layer (even though it is locked). 2. Some layers are medium grey, some are dark grey. Why? 3. How do I unlock things without having to dig through the layers panel?
 -
Affinity beta on ios 11, text on imported files is getting rasterized and no longer editable. Opens as pixel layers.
-
 I would like the ability to turn off the automatic function that creates a new layer every time I touch my pen to my tablet. Instead, I'd like the program to assume everything is going to be on the same layer unless or until I press a hotkey that toggles off the function. Workflow wise, you'd start working on your first layer (I always do my construction work on one layer) and then hit the toggle to work on the rest of your stuff on seperate layers or you could set it to only create a new layer after pressing a hotkey. Just a thought!
 -
I have found AD to be WAY more intuitive and easy to use than Illustrator or other vector programs, including Sketch. It is such a joy to use that it has become my favorite go-to tool for design and layout. Take the pen tool in the draw persona, for example; it is so darn intuitive and responsive that it almost feels magical. However, there is one thing that I have yet to master, and it is driving me bonkers! I'm sure it is a simple thing, once I learn the trick. Let's say I am working on a project that has hundreds of layers, groups and objects, and trying to find a particular object in the layers panel is like trying to find a needle in a haystack. I can clearly see the object I am trying to get at on the canvas, but no manner of clicking, double-clicking, triple-clicking, right-clicking, Cmd-clicking, Option-clicking or any combination thereof gets me anywhere. And none of the layers are locked, so I ruled that out. Is it possible to drill down through the layers in the canvas or artboard without going to the layers panel? If so, what is the magic trick?
-
 Hi, I'm trying to figure out how to seperate two layers. One layer has part of another layer "seared" onto it (excuse my lack of terminology). As shown in the accompanying screenshot, the arrows point to the elements that are carrying over from the adjacent layer. In other words when I move the selected layer, it also moves the portion which the arrows are pointing to. I do not want the 10 and the In to be a part of that layer. Hope this makes sense. J
-
Is there a way to change the Artboard/Layers preview to a white background? I create most of my work with dark lines so I can't see them with the default black background.
-
 Hello, I'm new here and just doing some first steps with Affinity Designer. I've seen a design where two layers were linked to each other so that both show the same content. Let's say layer A is linked to layer B. Layer A shows all elements from layer B. Editing layer B affects layer A as well, as it always shows what layer B currently shows. The example that I've seen uses this "layer linking" to scale a design down to different sizes. The layers list shows an orange colored line on the left side of linked layers. I didn't find out how I can create such a linking between layers. Does anybody know how this works and could please explain? Thanks, skap
 -
 I've been looking all through Affinity Photo for Ipad and I can't find a way to isolate channels on one layer only. Here's an example of what I want to do, done in Photoshop (double exposure): https://www.graphicadi.com/create-double-color-exposure-effect In Photoshop there are advanced blending modes where you can select which channels are visible on each layer. So you can have the red and green channels visible on one layer but not the blue, and so on. Please note the blend mode selected in the example is "Normal". I'm looking for information on isolating channels, not blend modes. Is there the ability to isolate channels on each layer available in Affinity Photo? Thank you.
 -
 Hello For real estate work, I need to open several images as layers and blend them together for the final image. My workflow is mostly in Lightroom but I'd like to use Affinity Photo for the blending of different layers. The "classic" way is to select the images in Lightroom and use the function "Open as layers in Photoshop...". Is there a efficient workflow to do that with Affinity Photo as well? As a workaround, I currently select multiple images in Lightroom and open them as single images in Affinity Photo. Then I manually copy and paste all layers into one image. It works but is quite time consuming. Thank you very much for your support!
 -
 See attached. When in portrait mode and there are lots of layers, I can't scroll down to the bottom the list. If that glitch is active and I rotate to landscape it will persist. The only fix is to close the layer group, be in landscape, open the layer group. I can then scroll all the way down until I do some other manipulation, after which I may be restricted again. iPad Pro 9.7", iOS Public Beta 7, Photo beta v1.6.5.59 27D1BBC0-D580-416C-973F-4F76D6E19AE3.MP4
- 1 reply
-
- 1
-
-
- layers studio
- layers
- (and 2 more)
-
 Hi, I created a carefully tweaked adjustment layer with mask to compensate for a camera flaw on DJI Mavic (reddish cast in the center of the image, see Embedded lens corrections in raw files (micro Four Thirds)). Now I would like to save this adjustment together with it's mask somewhere so I can apply it to other images as well, and ideally also have it available on iPad (I did this on the Mac). Is it possible to save adjustments in some kind of library? Thanks Maik
 -
 I have a PSD file where there are multiple editable layers grouped together within a single layer. In Photoshop, you would open the layer, right click on the 'sub' layer you wish to edit, and click Edit Contents. Attached is a PDF where on Page 2, it will give the steps I'm referencing. When I attempt to do this in Affinity Photo, there is no such option. Am I missing something? Thanks in advance. Help.pdf
 -
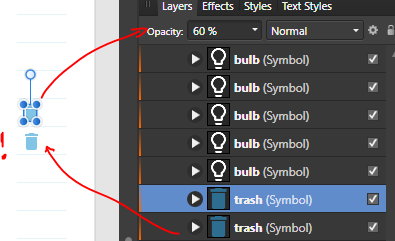
 I have two instances of a symbol in a layer. One of them, I want to make transparent. I assume I can treat one instance as a layer and set its opacity, how would I otherwise apply layer effects to one instance? However, when I adjust the LAYER opacity on a SYMBOL, all other instances of the symbol also go transparent. Looks like a bug to me, since I am not editing the curve inside the symbol.
-
 I think I need some help on the Affinity app. I use file (template) to add photos to and clip to layers. ( files will have 30-55 layers). I have tried two different templates in .psd format so there are a lot of layers. For some reason I can see the bottom most layers of the template when I scroll down and hold my finger in place. However I cannot get them to stay visible to move them up or add photos clipping to them. It is usually about 4 to 5 layers. What am I doing wrong or not checking in a box to see them?
 -
 Hello Affinity Users. I am using affinity, but is there any way to change the move tool, so instead of moving the object i clicked on, the move tool would move the layer instead. And would there by any chance be a way to add that to a keybind? (possibly see this: https://www.ctrlpaint.com/digital-painting-101/layers at about 3:10) Thanks for your time, have a nice day!
 -
 Hello, question from yet another Photoshop user doing a conversion to Affinity Photo. First, love the product as it will only get better with each new update. Photo does open PSD files, as well as .tiffs created in Photoshop; however, it seems to only open files as flattened objects, totally disregarding any type of layer which may have been set up in Photoshop. Is this statement correct or is there a way for Affinity Photo to recognize layers created in Photoshop? I have zillions of files created in Photoshop, having started graphic design in the mid-80s. I'm not enthused about exporting layers from Photoshop...I would rather do like Elvis did and shoot the software like he shot televisions. I'm proud to be using AP now and don't want to look back. Only hoping.