Search the Community
Showing results for tags 'bounding box'.
-
 I found this out by trying to duplicate/transform-position an image grouped with a clip-masked gradient-fill and grew frustrated when the new X and Y value didn't reflect what I set it with the transform option box, and the bounding boxes kept getting larger and larger. To test and break it down to simplest elements, I made a fill layer (conical so it would have an easy center to see, and because that's the fill in my initial file). The fill layer couldn't have it's location transformed - the X and Y options in the transform box were greyed out, not a big surprise. I then made a rectangle using the rectangle tool (solid fill). I transformed the rectangle's position with no mishap (just as somewhat of a control). I then clip-masked the rectangle onto the fill layer and selected the fill-layer-parent so I could transform it. ((If "clip-mask" isn't the proper term, what I did was grab the shape layer, drag it to the icon of the fill layer and released, leaving the fill layer with a mask in the form of the shape layer.)) Now, there was an option to set the X value and Y value, and when I added say 500 pixels to the initial X value of 0, the new X value showed up as -24706 pixels. Interestingly, the masked conical fill center did move the correct 500 pixels to the right. No bounding box showed up when the move tool was selected, but grouping this with another item showed a massive bounding box reflecting the new X and Y positions and dimensions following the transformation. I tested another mode of masking (empty mask and brushing a mask on), and that combination was untransformable like a straight fill layer, and grouping it with another item rendered the group properly transformable, with the bounding box pertaining only to the added item. Attached are screenshots showing the clip-masked transformation 500 pixels to the right (first and second pics as before and after), and since those don't show a bounding box, I am also including shots from my main file where I first found this issue. Layer/group duplications which repeated my X-position-transformation led to progressively larger bounding boxes, and I have included shots of selecting the different layers to show the boxes. In the last image I've selected a layer formed by grouping my initial 4 duplication/transformations and shifted the set up and right. I didn't bother rasterizing the fill/image group in my main file because the transformations shift the position as desired and I'll be rastorizing it all soon anyway, but I'm sure if I did so that it would transform normally.
-
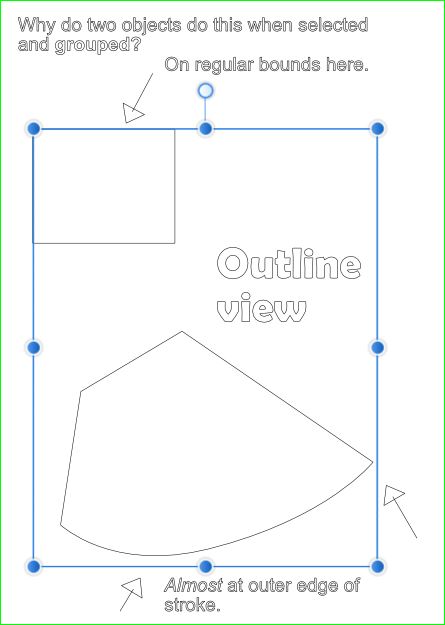
 I did not rotate anything, there are no hidden elements. Yet, the resulting group is somehow larger than the nesting elements? Why is that? test.afphoto
 -
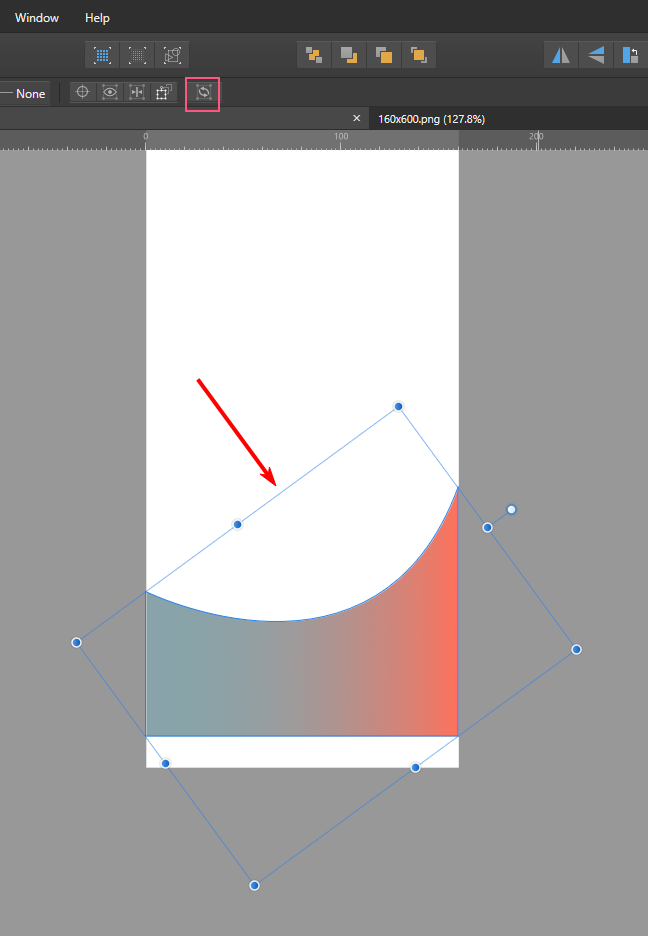
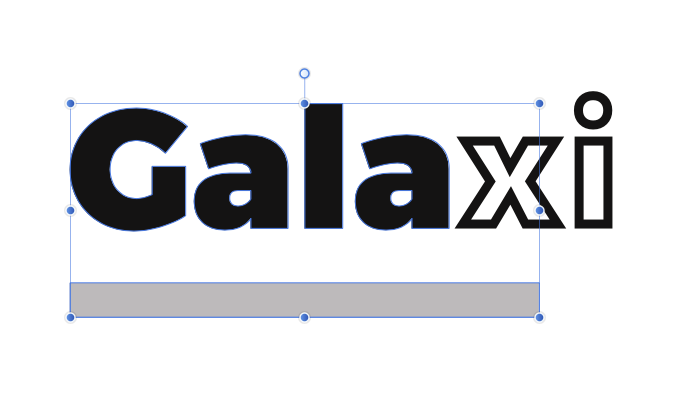
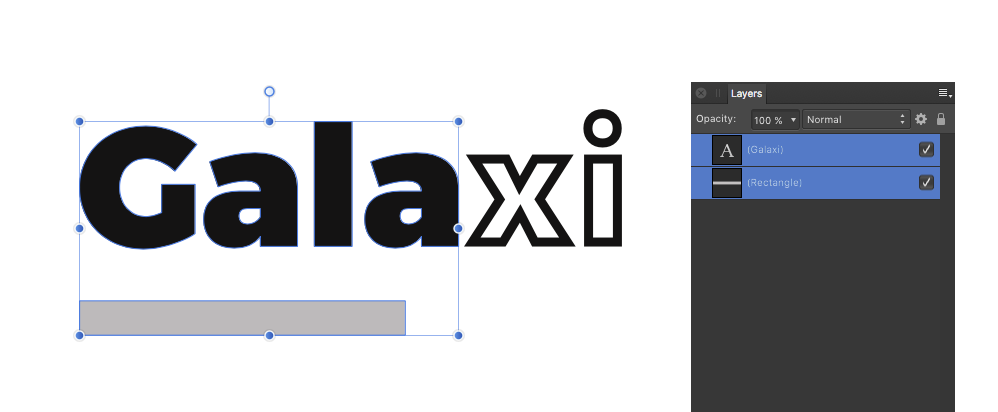
Hey everyone, I've run into an issue in Affinity Designer when using the Contour Tool with compound objects. What I would expect: When I select individual elements within a compound object, the bounding boxes fit snugly around each element – just as they do with shapes that aren't using the Contour Tool. What actually happens: All good when selecting elements one by one. But when I select the whole compound object, the bounding box is unexpectedly large, even though I reduced the shapes size inside with the Contour Tool. It doesn’t match the actual size of the object, making it really tough to position things accurately. I attached a sample file. I know I could »bake the appearance« to fix it, which makes the size permanent, but I want to keep the design flexible (need to create a graphic with different sized window frames). So, that’s not the solution for me. Has anyone else dealt with this? Greetings Dennis Contour_Tool_Compound_Object_Bounding_Box.afdesign
-
PLEASE enable a PERMANENT way to reset an object’s bounding box without workarounds! I posted about this in 2015 and it’s still an unresolved issue, with users asking about this in the OP. Is there anyway to make this permanent, ie, baked into the object? it’s really a hindrance to constantly work around BASIC functionality… PLEASE! https://forum.affinity.serif.com/index.php?/forum/138-21-new-features-and-improvements/ Thanks for your consideration !
- 9 replies
-
- 7
-

-

-
- bounding box
- reset bounding box
- (and 2 more)
-
 Hi, I seem to have run into an issue where Affinity Designer selects objects that are not within the selection window. This happens with both selection tools: 2023-03-10 09-25-50.mp4 You can see that objects were added even though I am not touching the object and I am even outside its bounding box. 2023-03-10 09-26-33.mp4 This is a file that I exported as PDF from Rhino. Buggy selection.afdesign Windows 10.0.19045, Affinity Designer 2.0.4.
 -
 I cannot locate the button to cycle through the bounding boxes; it used to be next to the "Convert to Curves" button. If I try to customise the toolbar, I do not see the button to cycle through the bounding box. Where can I find it?
 -
You can currently resize text frames horizontally by double clicking the centre handles on the left or right hand side of the text box. The same goes for vertical resizing. I would like to also have a resize to smallest bounding box of the text by double clicking the handles at the corners of the text box (e.g. bottom left/ right). That would be convenient for example for reworking large text boxes for titles, which overlap with other text frames.
-
 Hello, in Affinity Designer, is there any way to transform a bounding box around multiple objects without affecting the geometry of the individual objects, i.e. only affecting the position of their center points? For example, having circles distributed in a rectangle formation, could I change the "shape" of this bounding rectangle without affecting the shape or size of the circles within? I know I can group rows of circles and distribute those horizontally. That works well in this simple example. I would however like to perform more complex transformations that can't be as easily decomposed into subsequent distribution steps. Thank you!
-
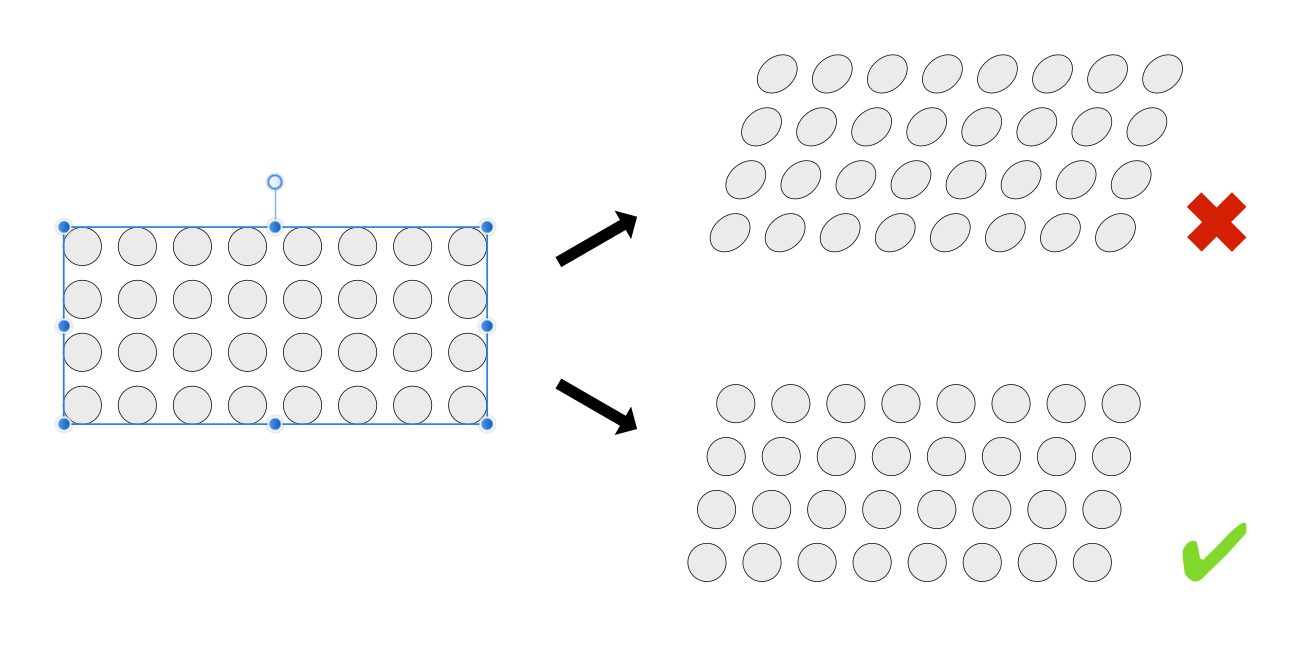
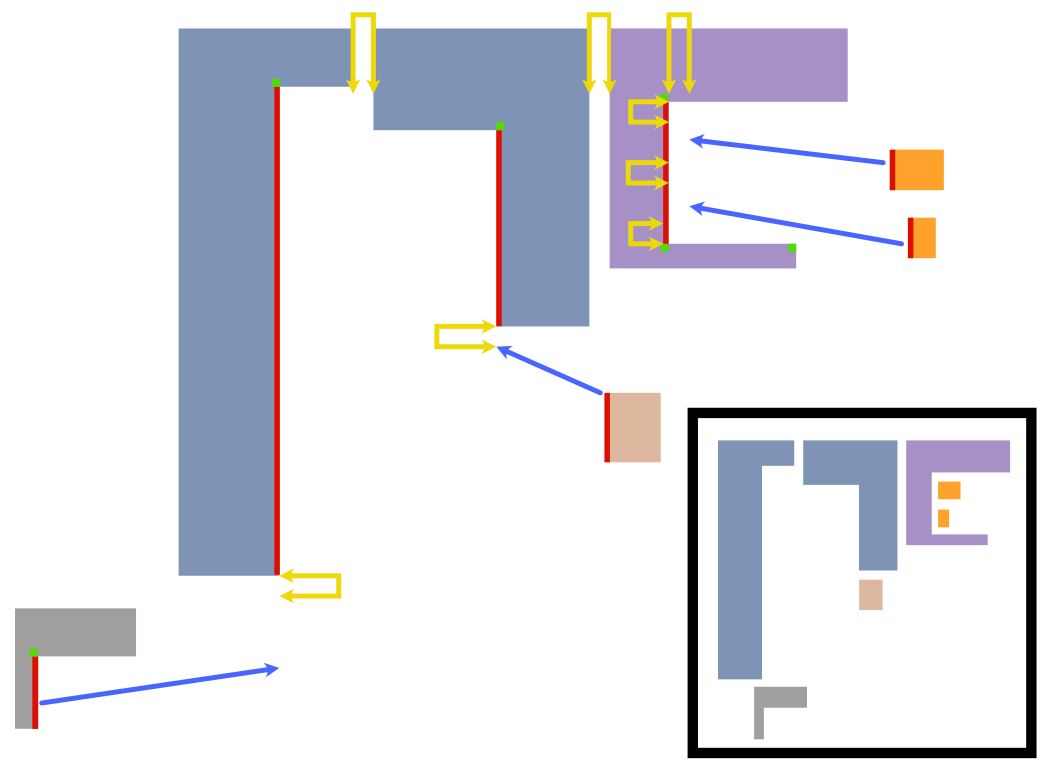
 Hi there. I've owned this software for quite some time, but this is my first post here. I'm importing multiple objects from different files and arranging them in a specific way. They are created to fit together so that there's equal spacing between and around each object (think Mondrian's work). I thought this would be incredibly quick and easy to do, but I'm completely stumped. Here is a simplified representation of what I'm trying to accomplish. For greater clarity I've included only a small number of objects. Normally, the entire page would be completely filled. I need to line up the sides marked with red, keeping the spacing between objects consistent throughout the document--approximation of the final result is shown in the black rectangle. The problem I've encountered is that snapping and measurements features seem to only work on nodes that are on the bounding boxes. There is no way to line up anything with the nodes marked with green. I can't get anything to snap to them. If I create a new object I can use those nodes as the starting point and the cursor will snap to them but, as mentioned, I'm not creating new objects. I will have pages filled with these objects, so using the transform panel would be too time consuming. I've tried every combination of options in the snapping panel but nothing seems to be working. In summary: how do I line up objects with the nodes that are not on the bounding boxes, and how do I measure the distance from an object to the lines converging in such a node?
-
 When I use the rectangular selection, copy merged, paste and then move the new layer, the bounding box of the new layer weirdly includes the original selection. Why is this and what am I doing wrong? Here is a video to demo the problem. I am using Affinity Photo 1.9.3 on MacOS 11.4 (M1).
 -
 I just noticed this while working with isometric objects. There is a noticeable gap between the objects and the top edge of the bounding box. What is causing the gap like that? I should note that I have these isometric objects grouped together. Thanks for your help
-
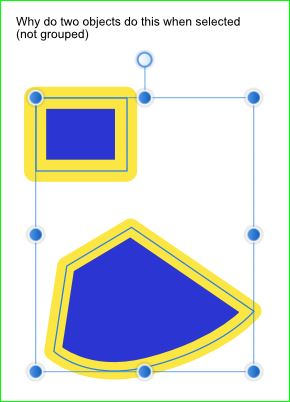
 Win 7, Designer 1.9.1.979 It seems the bounding box changes depending on whether two objects are grouped or not. I haven't tested with Publisher or Photo.
-
 Is there anyway to control the size of a bounding box without scaling the page size down to the size of the object for every icon I create? I export an .eps from AD for import into Keynote. The .eps icon is only half an inch yet when imported into Keynote the bounding box is the size of the original page in AD that the icon comes from. When more .eps icons are added to Keynote, selection starts to become a problem because of the number of icons and the excessive bounding box size. Why is the bounding box the size of the original page and not the vector object itself and how can I reduce the bounding box without having to create new page that is the size of the icon for every icon? . . .
-
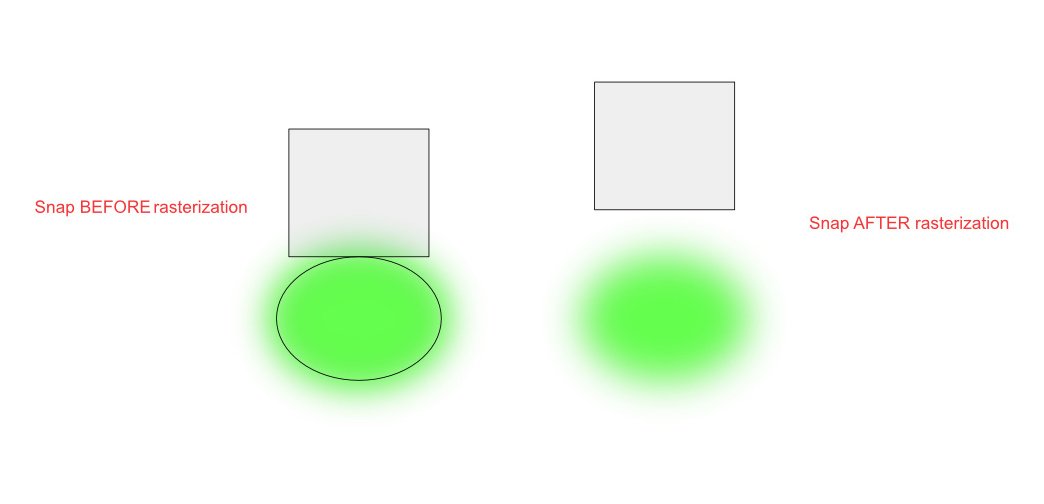
 Hi, I am a new Affinity Designer user and I am very satisfied so far by the application. I have an ellipse object and applied a Gaussian Blur effect on it. When I select the object, the Designer displays the bounding box selection without taking into account the bounds of the effect. Is there any option the snapping operation will include the effects of each layer
-
When placing smaller images into existing multi-layer Photo image, I sometimes see the frame edges visible as annoying thin white lines (sometimes dashed). I have tried copying and pasting, using File: Place, or dragging icon, but nothing seems to help. See attached JPEG, note line between red arrows. It doesn't seem to happen consistently, varying from one placed image to another; remains after import into Photoshop. I cure it using Inpainting brush tool but should I need to do this? Use is for large, fine art print. Late 2012 Mac Mini, 16 GB Ram, OS 10.14.6. Affinity Photo 1.8.3 intended to replace Photoshop CS6.
-
 Good day! I know there is a way to turn this base selection box into a regular selection box. But that's just temporary. Is it possible to keep the regular selection box forever? Base selection box is not always necessary, actually less necessary than the regular one. Any kind of help would be highly appreciated
-
Hi, there is some bounding box mischief when I sellect artistic text with some letters colored without the fill, just with stroke. Try to sellect the text with some other objects.
-
I, along with @v_kyr, have been trying to assist @GreenGirl in this thread on Drawing Automation based on formulae and range of input values? One problem we have run into is that the svg exported from the template designer file includes a transform that includes a rotation matrix, which affects all subsequent objects that we create in the svg file, when imported into Designer. Apparently, you can reset the bounding box of your basic tic by simply pressing the '.' (period or full stop) key! One of Designer's more useful, but well-hidden features. I created an oblique line, and exported to Oblique line.svg I then rotated it to the vertical. It maintained its bounding box and exported to Oblique line rotated.svg. This svg file included a transform and rotation matrix. Pressing the '.' key reset the bounding box and exported to Oblique line rotated.reset.svg. However the exported svg from this at stage 3 ignored the reset and was the same as that produced by stage 2. An older workaround (if your object is a closed path) is to create a box around it with the rectangle tool, and use the intersect tool on the pair. This doesn't work either. It still reverts back to stage 2 above. I would expect that the output from stage 3 would not have any transform and rotation matrix. John Oblique line.svg Oblique line rotated.svg Oblique line rotated reset.svg
-
 Congrats to the 1.7 release! Upon pdf import the bounding boxes of text objects are not as neatly adjusted to the text field as they used to be in AD 1.6. As I remarked in the beta forum, I would really love for AD 1.7 to revert back to the behavior of 1.6, since excessively sized bounding boxes make alignment of text objects in 1.7 much more cumbersome. Alternatively, it might be a solution to have a shortcut to make bounding boxes fit tight to text objects? Thanks for considering this!
 -
I am new to photo editing. Could you explain to me about a bounding box and how to use one.
-
 When I have two texts like this: "123456" and then "yay" and select this two text and want arrange it vertically to the some object with align bottom, they are aligned good but text with special characters, because text have some base line and there are characters which are out of this line (ypj... they are below). I mean when text like "123 abc..." it is ok, but when I write "yjp" and other signs which are extra sized (I am sorry, don't know describe it in english), because their base is lower then others, then text is aligned higher then other text without this extra characters, because bounding box take the extra sized characters. Question is, is there posibility change the bounding box to the base text line?
 -
 in both Photo and Designer, how do we toggle the blue bounding boxes on and off? Not so much an issue in Designer, but in Photo its essential... you can't see your composition clearly with that blue box distracting you, especially when creating digital art and photo retouching. Help to find this option in the menu would be appreciated!
 -
 Hey guys, I thought it would be really convenient to add Flip controls to objects' bounding boxes. Basically what I'm proposing is to change the cursor when it hovers over the top/bottom and left/right control handles while INSIDE the bounding box - in distinction from the shear cursor which appears when hovering OUTSIDE the top/bottom and left/right control handles of an object's bounding box. Additionally, adding a modifier for duplicating (alt or option keys come to mind) would make this a slick timesaver and UI improvement and shouldn't be too hard to code. Check out the attached image to see a mock-up. Cheers guys, the apps are rocking more with each release! Preview: AD master file: Flip cursor.zip
 -
 When the layer opacity slider is opened please hide the object's bounding box. Once the slider is opened the space bar does not work to hide the bounding box. Every time I have to close the slider, press and hold the space, then reopen the opacity slider. It would be so much easier if the bounding box disappeared automatically as it does with most functions. 2nd choice, make it so the space bar was functional when the slider was open. Thank you.
 -
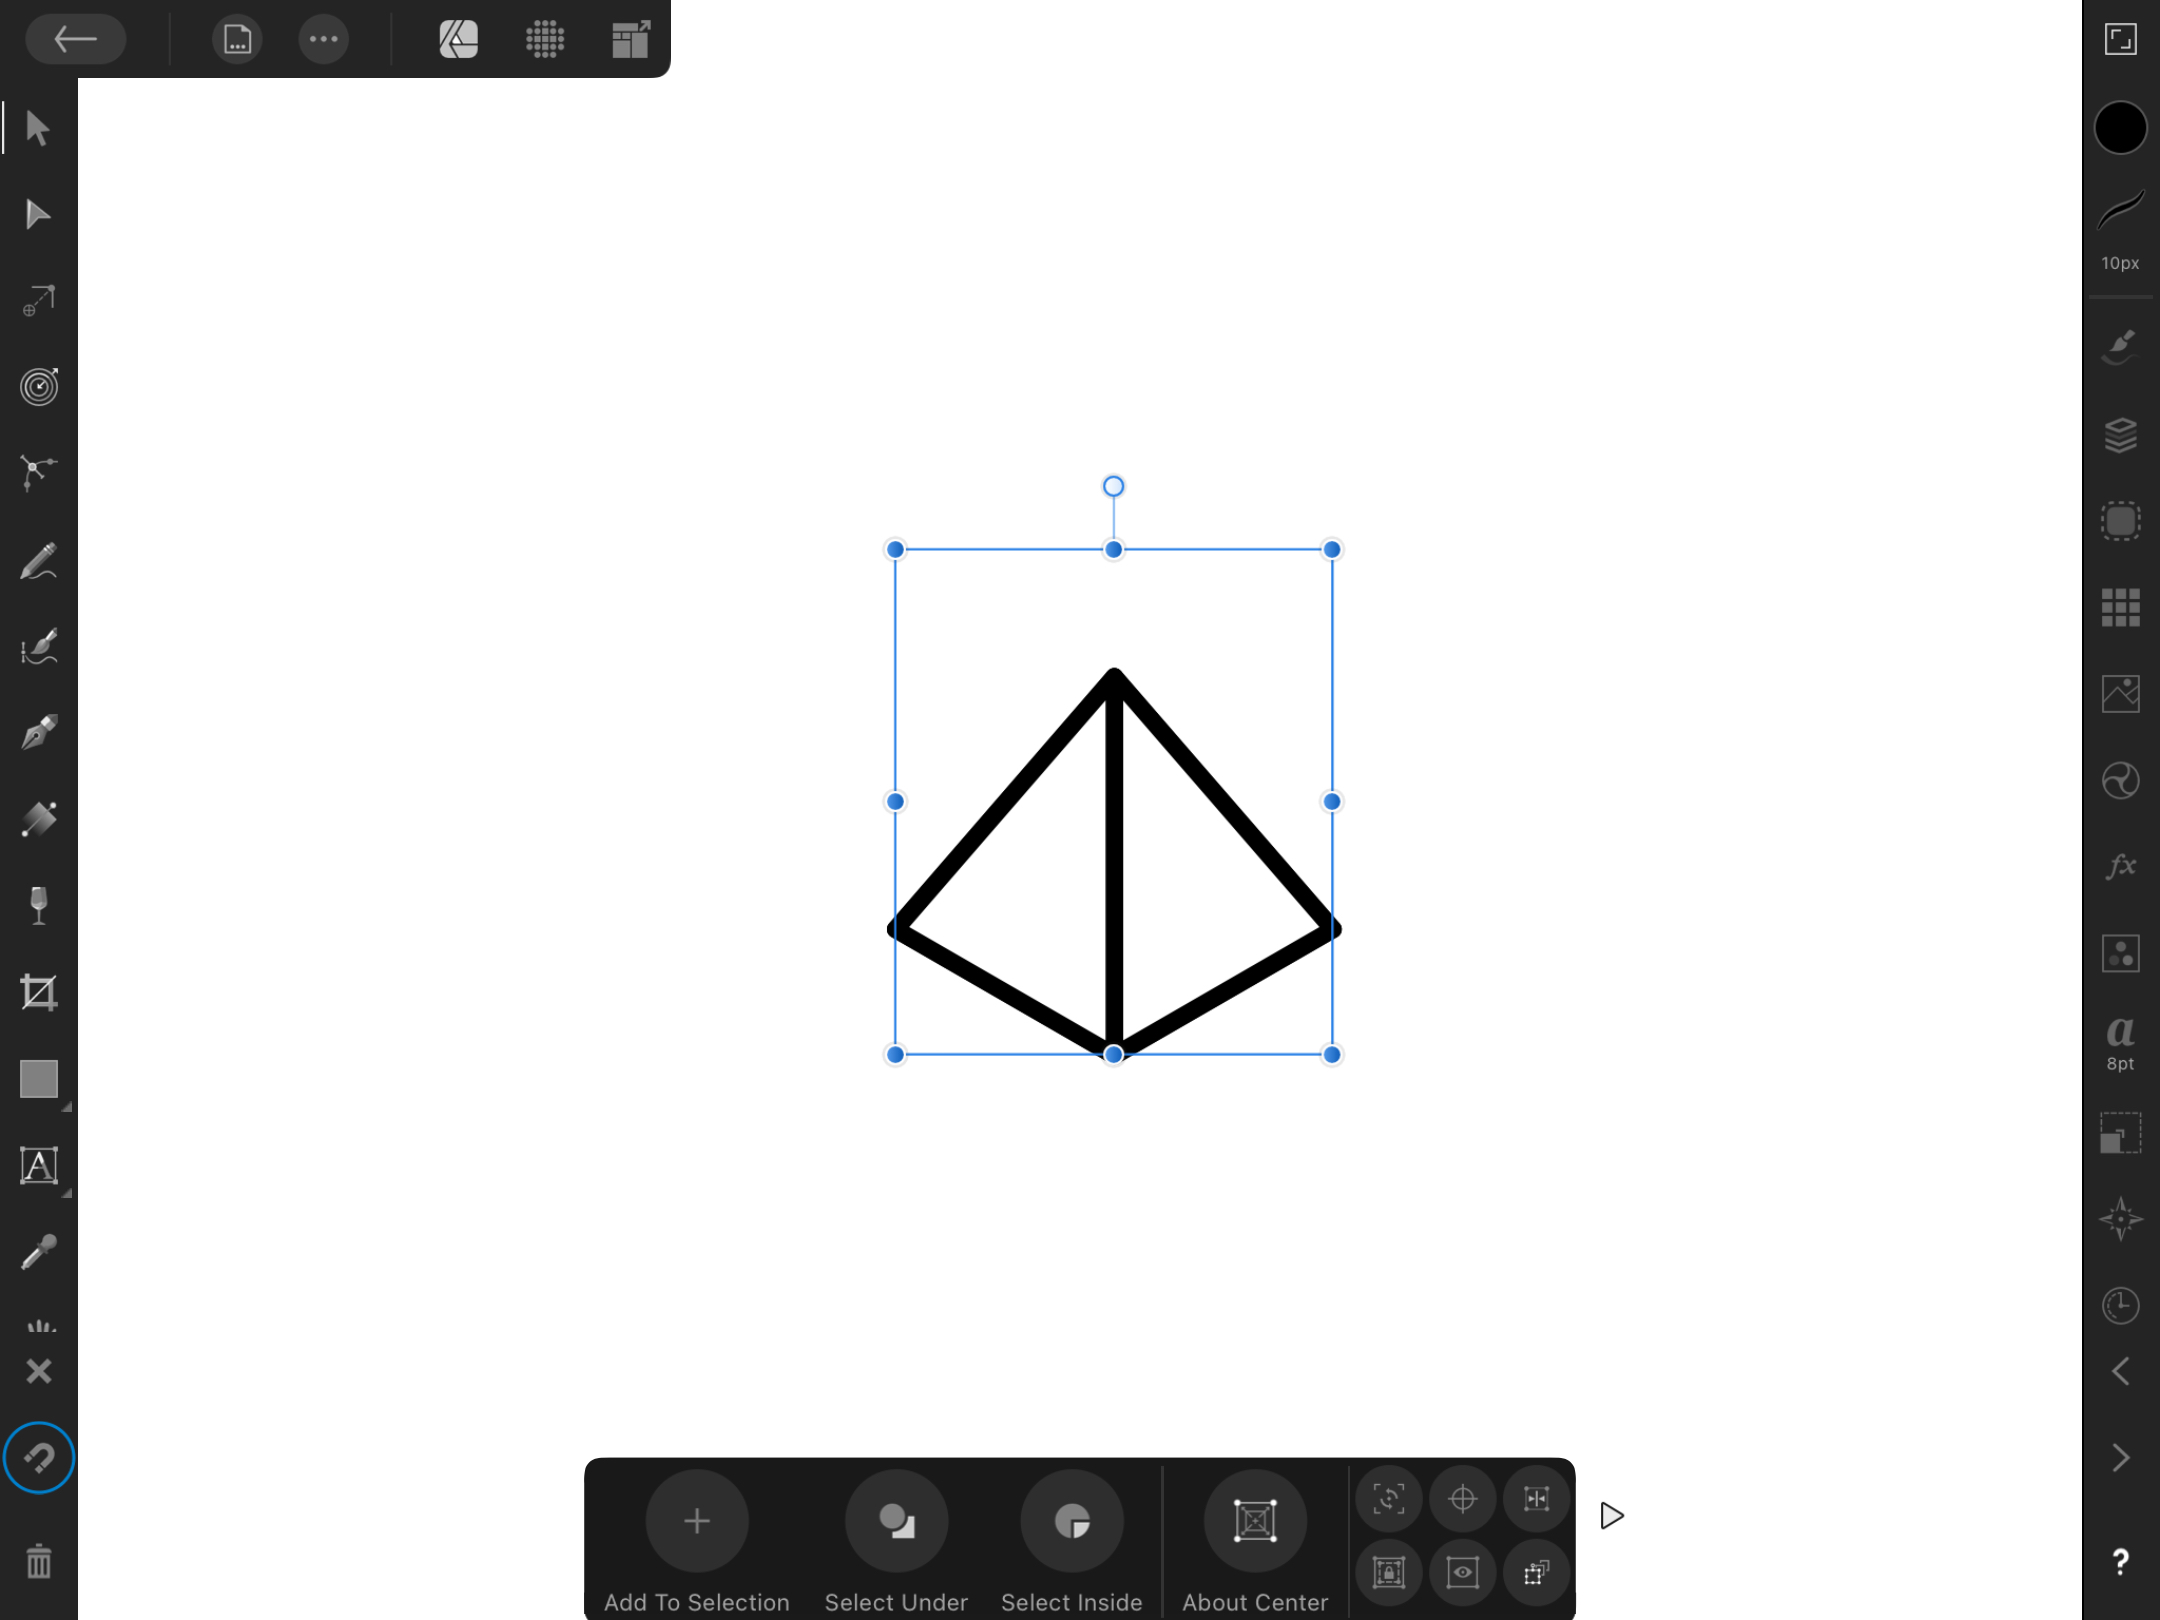
I made a drawing with 4 triangles each rotated 30 degrees from the neighbor. The bounding box for each triangle is just the size of the triangle. When I select all 4 triangles the bounding box is just big enough to hold the 4 triangles. But when I select a group of the 4 triangles (containing nothing else) the bounding box is considerably larger than the 4 triangles and offset to one side. This causes any rotation to be around a point not in the center of the triangles. Why is the bounding box larger and offset from than the objects in it when it's for a group? See attached. I don't know if this is a bug or if there is a reason it's supposed to do this. Beta 1.0.21861. Also when I do an addition or subtraction of these 4 triangles the result is not correct. Could this be related? I could have created a 12 pointed star but that wouldn't have worked for my needs.