Mr. Doodlezz
-
Posts
587 -
Joined
-
Last visited


.thumb.jpg.2ac1b0424a6896c349d3d16eea40c7f3.jpg)

-
 matisso reacted to a post in a topic:
Can't Set Distance with Key Object in Latest Version
matisso reacted to a post in a topic:
Can't Set Distance with Key Object in Latest Version
-
 Hey @NathanC, we’re now on version 2.6.3 – over a year since this change – and I was wondering if there’s any chance the original functionality of that alignment feature will be restored soon. I really miss being able to select an object in the middle and automatically align other elements around it at a specified distance. Now I have to manually reposition the entire group after aligning, which is pretty frustrating. 😢 Thanks Dennis
- 4 replies
-
- 1
-
-
- affinity suite
- alignment
- (and 7 more)
-
 Mr. Doodlezz reacted to a post in a topic:
Can not do skew transform in Affinity Designer v2.6.3
Mr. Doodlezz reacted to a post in a topic:
Can not do skew transform in Affinity Designer v2.6.3
-
Can not do skew transform in Affinity Designer v2.6.3
Mr. Doodlezz replied to WaveF's topic in V2 Bugs found on macOS
Hey @NathanC, I was about to start a thread about this so many times, but then it worked again randomly, so I couldn’t pin it down to the trackpad vs. mouse issue. Sooo … does this mean it won’t get fixed anytime soon, and “use a mouse” is the universal recommended solution? 😐 It’s a frustrating, workflow-hindering bug – especially when you don’t have a mouse at hand while on the go, with limited desk-space or if you simple forgot to bring one. (Yes, I know there’s an option for shearing in the Transform panel, but it’s not as intuitive or hands-on.) Would love a fix for this issue! Thanks Dennis -
Mr. Doodlezz reacted to a post in a topic:
Can not do skew transform in Affinity Designer v2.6.3
-
 Mr. Doodlezz reacted to a post in a topic:
Can not do skew transform in Affinity Designer v2.6.3
Mr. Doodlezz reacted to a post in a topic:
Can not do skew transform in Affinity Designer v2.6.3
-
Mr. Doodlezz reacted to a post in a topic:
Can not do skew transform in Affinity Designer v2.6.3
-
Mr. Doodlezz reacted to a post in a topic:
Can not do skew transform in Affinity Designer v2.6.3
-
Mr. Doodlezz reacted to a post in a topic:
Anti-AI tools for user created images
-
Well wow, if that isn't an AI-generated response with lots of textbook SEO keywords and tags, basically just parroting what real users have stated in this thread. What’s this have to do with Affinity and/or visual creativity? Nothing, I suppose. Sorry, what? Please elaborate on how it’s ethical to rip off and mimic pop culture icons voices to generate shitty, short-lived throwaway content. Random AI-promoting bots officially arrived in Affinity forums …
-
Mr. Doodlezz reacted to a post in a topic:
How to adjust rope / window stabiliser for brush in Photo, Designer, Publisher (iPad)
-
Hey everyone, I actually can’t find the third slider in iPadOS anymore when using the Vector Brush Tool. It only appears with the Pencil Tool, but the settings don’t carry over to the Vector Brush Tool. Has anyone else experienced this issue? Thanks!
-
Andy05 reacted to a post in a topic:
Anti-AI tools for user created images
-
PaoloT reacted to a post in a topic:
Anti-AI tools for user created images
-
Hm, well … I think this needs a bit more clarification: The two machine learning-based features are optional and have to be explicitly installed by each user, so they are NOT installed/activated automatically. The two machine learning-based features are based on pre-trained models (here, however, I would be interested to know what material the models were trained on). Affinity states on the »What’s New«-page that at no time is your user data (i.e. your own image material) transferred over the internet, so no training is done with it. The features work only locally on your machine. The two machine learning-based features have nothing to do with image generation. They are tools designed to make it easier to select objects – nothing more or less. HOWEVER, one can now wonder what kind of underlying meaning this decision carries. Before and during the takeover of CANVA, it was repeatedly stated that there were no plans to integrate AI into the Affinity Suit. To me, this step represents a kind of break – albeit in a grey area – because the features have to be actively installed by each user.
-
ASUNDER reacted to a post in a topic:
Anti-AI tools for user created images
-
PaulEC reacted to a post in a topic:
Anti-AI tools for user created images
-
Mr. Doodlezz reacted to a post in a topic:
Anti-AI tools for user created images
-
You’re absolutely right – it’s frustrating and exhausting to think about creating art when it feels like it’s just going to be scraped or stolen. But there are a few tools that can help push back against this: Glaze lets you »cloak« your artwork with subtle changes that confuse AI, making it harder for models to copy your style. Nightshade takes a more aggressive approach by poisoning datasets, so if your work gets scraped, it messes with the AI’s output. Yuify adds invisible ownership marks tied to blockchain (although it has a non-negligible energy-consuming impact on the environment) – not a fix for scraping, but it gives you proof of authorship if you need to fight back. There are more similar and they’re all not perfect and won’t solve everything, but these tools are a way to protect your work while we keep pushing for better legal protections. Don’t let them take your joy in creating!
-
ironchestgames reacted to a post in a topic:
Swatches Sorting Options
-
Yuriy_FontBase reacted to a post in a topic:
FontBase | Font Auto-Activation
-
Hey all, thanks for undeading the topic once more, @Yuriy_FontBase! 🧟♂️ And thanks @Leigh for replying! @walt.farrell, unfortunately, it still doesn't work for me the way I expected or experienced it before Affinity: Add Fonts to FontBase: Ensure the fonts you plan to use are added to your FontBase library. Activate Fonts as Needed: Manually activate the required fonts while working on your project. Deactivate After Use: After completing your work, manually deactivate the fonts. They remain in your FontBase library but are not active. Automatic Activation Upon Reopening: When you reopen the project, FontBase detects the missing fonts and automatically activates them, provided the auto-activation feature is enabled.
- 18 replies
-
- 1
-
-
- plugin
- affinity suite
- (and 6 more)
-
Mr. Doodlezz reacted to a post in a topic:
FontBase | Font Auto-Activation
-
Yuriy_FontBase reacted to a post in a topic:
FontBase | Font Auto-Activation
-
Yuriy_FontBase reacted to a post in a topic:
FontBase | Font Auto-Activation
-
Yuriy_FontBase reacted to a post in a topic:
FontBase | Font Auto-Activation
-
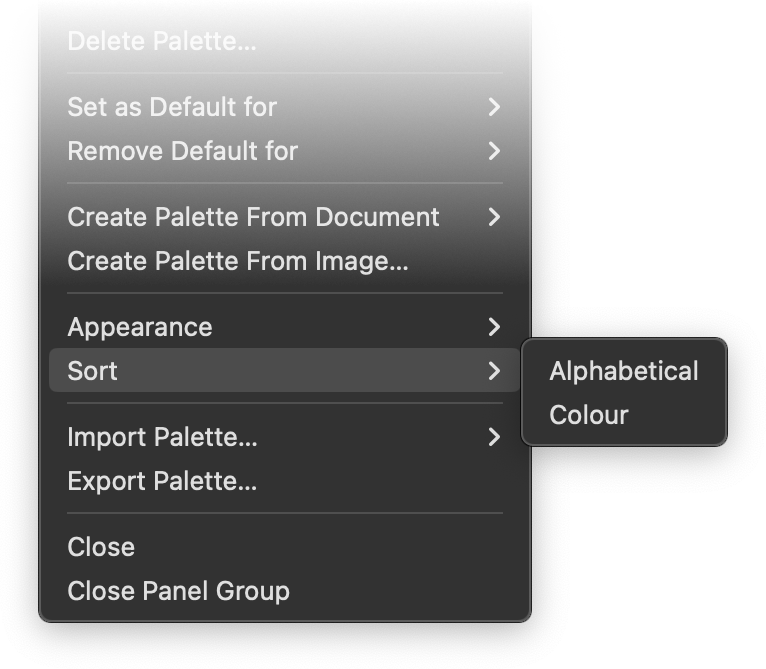
Hey everyone, I've been wondering for a few years now why there are so few sorting options for the Swatches palette: Alphabetical and Hue – that's very limited when compared to the options offered in other software, especially one of my favourites, Aseprite. The options in Affinity are somehow very sparse, even though colours play such an important role in our line of work. Aseprite: Affinity: More questions: Can anyone confirm that Document Palettes/Swatches cannot be sorted at all? I’ve tried in all three apps (Mac), the expanded menu as above does not appear in any of the apps. I also think the option to generate gradients between to swatches would be a great addition, just like seen in the Aseprite menu. I also know there are tons of websites that offer these options, but if I had one wish, I'd like to see some of these features in one place without distractions – preferably directly integrated into the apps. Cheers Dennis

-
- 1
-
-
- swatches panel
- sorting
- (and 4 more)
-
Mr. Doodlezz reacted to a post in a topic:
Reticulated Gradient Map - a FREE Macro Download
-
Hey everyone! I got the same issue on MacOS and can't re-open one of my current projects with the new version, but there’s no mention in the Beta notes about it. Right now I’ll revert to the previous version.
-
Oh perfect, thanks @NotMyFault! Strange, never crossed my mind that it’s related to the profile, but of course makes sense. Well, consider this issue solved.
- 2 replies
-
- 1
-
-
- affinity suite
- affinity designer
- (and 4 more)
-
Hey everyone, I've noticed time and again that there are recurring issues with different blend modes for effects, layers, shapes, etc. In the attached file, you can see this at the bottom edge of the compound shape with gradient and effect. There's a bar or area that seems to be unaffected by the effect. Over the years, I've pragmatically looked for and then used similar blend modes. But now I'm wondering: Are these display errors still due to technically limitations, and why aren't they being addressed/fixed after all this time? Cheers, Dennis Discolored_Bar_Bug.afdesign
-
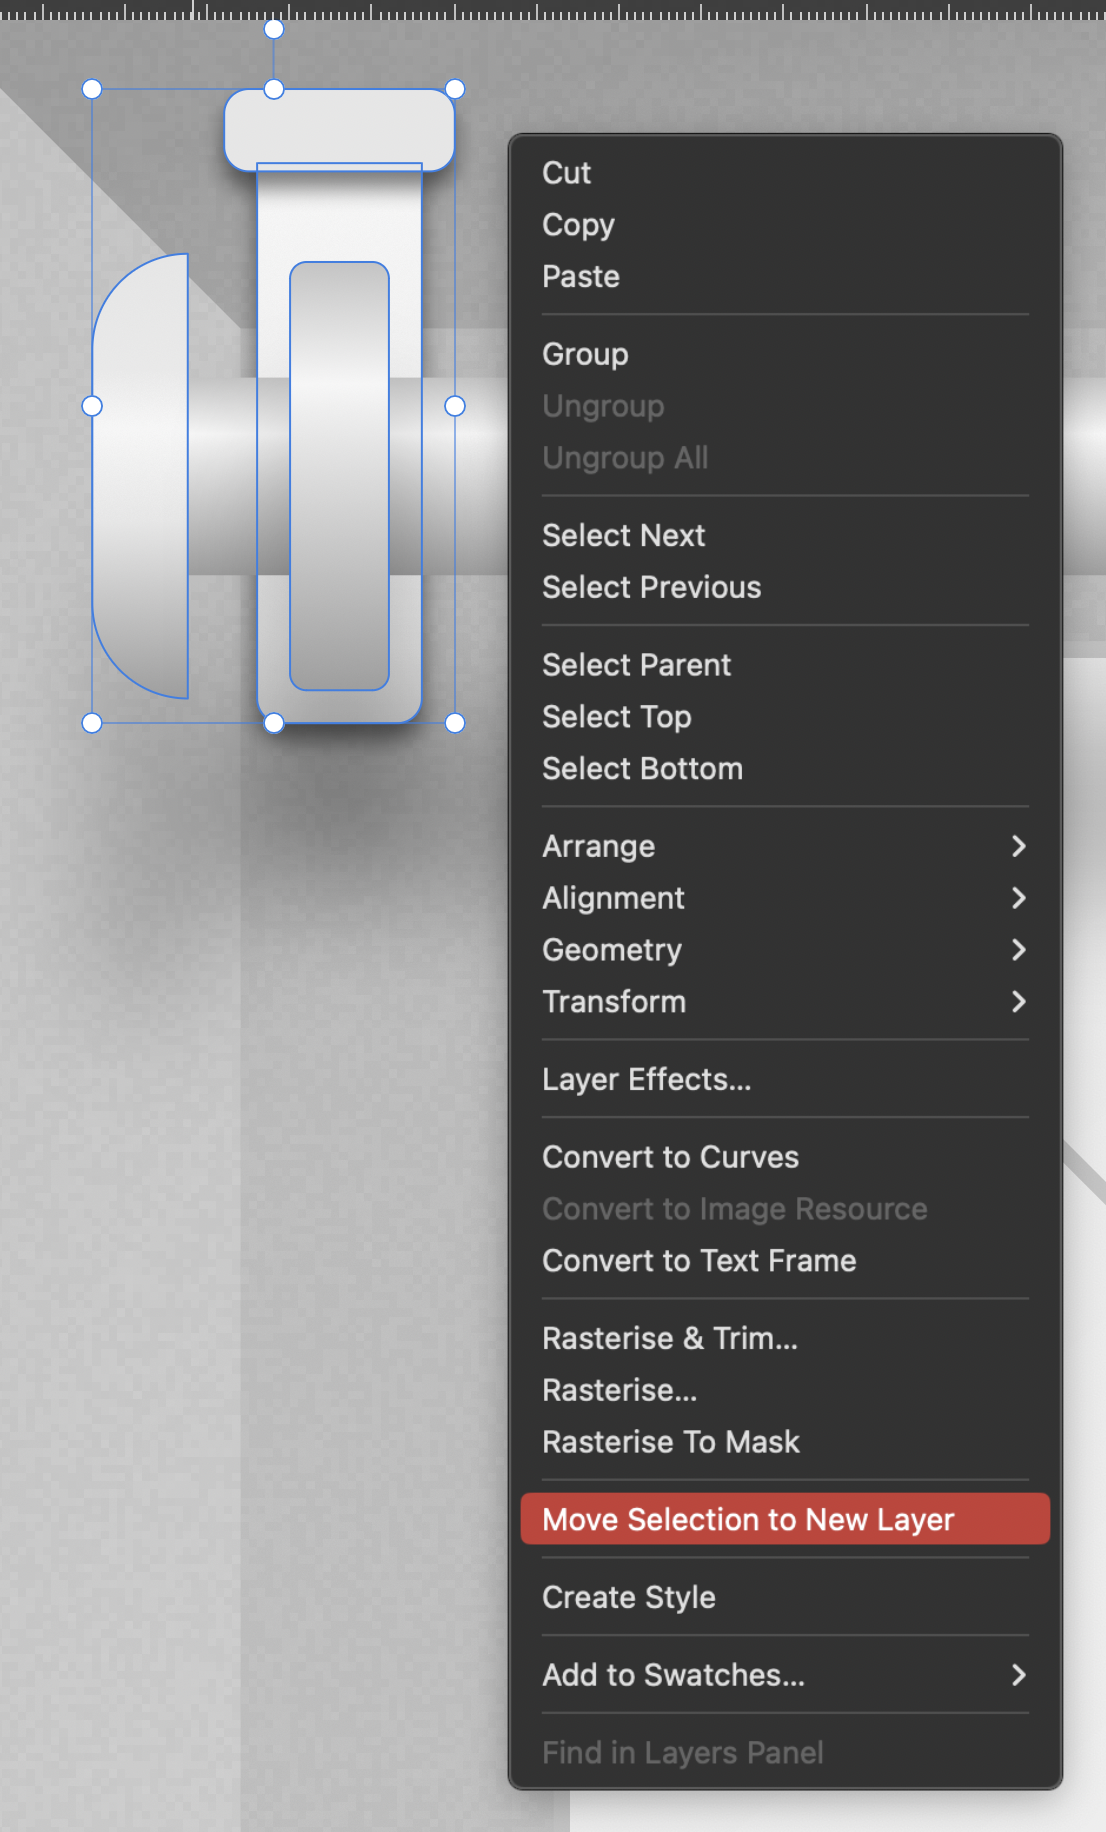
Thanks, in fact I didn't know! But there’s no option to directly assign a shortcut to it, is there? However I found a workaround just now: You can set up a shortcut for the option Promote Group to Layer. So you can setup a shortcut for that (⇧+⌥+⌘+L (for Layer for example). Now, whenever you want to create a layer containing selected items you combine ⌘+G and then ⇧+⌥+⌘+L. Includes an unnecessary intermediate step, but it works, I guess.
-
Hey everyone, I'm a big fan of shortcuts and well organized layers in my workflow and noticed something that could be improved – the accessibility of the Move Selection to New Layer option. Right now, it’s only available from the Move Tools context menu, which is fine, but I think it could be better, more visible and accessible. Wouldn't it be great if we could also find this option in the Layer options menu and therefore have the ability to set a custom shortcut for it? I feel like these changes would help make the (well, my) workflow smoother. What do you guys think? Is this something you’d find useful too? Cheers! Dennis
-
Thanks so much @NathanC – that’s the feedback I was hoping for! 🔥
-
Hey there, I'm a bit late to the game – only today updated Designer (and only Designer) to the latest app version on my Mac because I was wary of another bug on Win and iPad and wanted to sit it out. Now, I'm facing a new issue that's got me scratching my head. What I expected: I hoped the update would refine how alignment options work, especially in scenarios where a key object is involved. Ideally, I wanted the ability to set a specific distance between objects while using a key object as the anchor – distributing other objects evenly around it based on their relative positions. What actually happens: It seems like this feature has been scrapped or is malfunctioning. If I set a key object, the distribution for Space Horizontally/Vertically are fixed to Auto Distribute, which doesn't help at all when I want precise control the distance between each object on the fly and see live how it would look. It’s making it really frustrating to work with. I’ve compared the behaviour between the previous version, though in Photo. I’d rather get back that behaviour back and see what distance looks best on the fly instead of having to control the distance before even using the alignment function with the new way. Now it’s super intuitive in my opinion. 😮💨 Distribution_Missing_Feature.mp4 Am I the only one who’s missing the previous functionality dearly? Greetings, Dennis