Search the Community
Showing results for tags 'Tutorial'.
-
 Hi peeps, I leave here a tut on how to create an skeuomorphic volume knob. I'd say this kind of simple pieces is how I started learning how to "read objects" in order to reproduce them in a realistic way. It is pretty simple to follow through even for newbies and results are quite nice. Hope you enjoy it, and if so, comment, like and subscribe for more. Thank you all. Isabel.
- 4 replies
-
- 5
-

-
- affinity designer
- tutorial
- (and 6 more)
-
 Where can I download the Skate of the Art sample used in the tutorials?
 -
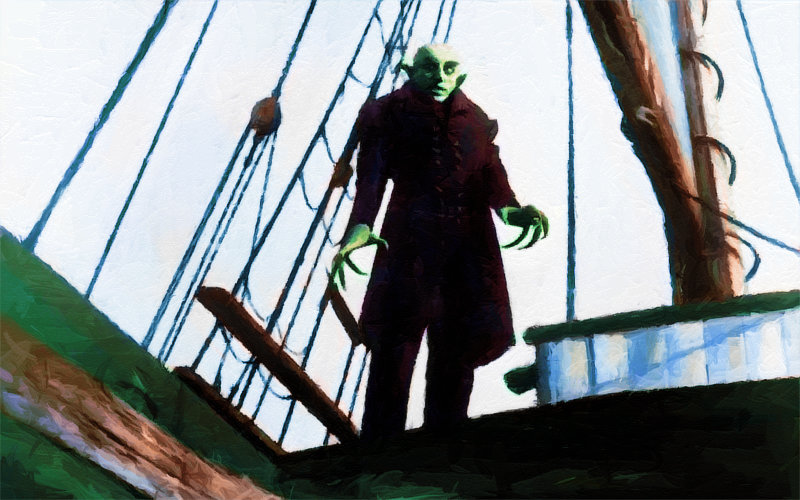
 Hello, here my Workflow for faking acrylic paintings in Affinity Photo using FotoSketcher(Freeware). I'm using FotoSketcher(.com) for the brushstroke effects. (PhotoArtist, AutoFX AutoMagic or Topaz Impression should work too, but not tested) Form the source image i generate 4 images with different minimal brush sizes, normaly 40, 20, 10 and 5. FotoSketcher settings: Painting 7(Gemälde 7). Have a look at the attached afphoto file. (It's simple, but complicated to explain) The images with thick brush strokes(40, 20) are used for the background and the remaining two images(10, 5) are for the subject und fine details. In Affinity Photo (or Designer) the image with bigest strokes gets loaded and used as main background and the others used as layers on top. My next step is adding layer masks and inverting (strg + i) them. A white brush on the mask is used to paint back the details. The Layer with fines strokes is only used for the face/eyes and other important details. Affinity Photo only: Now i combine the layers to a new layer for a paint effect. Dublicate the layer and apply "find edges" filter. Invert it (strg+i) and use curves to intens the borders. These two layers are needed for Lighting-Live-Effect and texture settings and notice the layer blending settings. Because i used a bw image as sample, i added some colour with extra layer ("Basecolour"). The last three layers adding some artistic feel to image. Colour variation layer: Colour variation are often used in paintings to fake details and add more life to a images. Warm layer: Add a warm orange colour tint to sun lit surfaces. Cold layer: To add a blueish ambient tint to some shadows. ps. You can use load you own brush as image in FotoSketcher. In Brush.zip are my test brushes. Brushes.zip Max_Schreck.afphoto
-
- 1
-
-
- affinity photo
- martinb78
- (and 2 more)
-
Hola, Quiero compartir este nuevo tutorial Salva tu Foto. En el veremos cómo salvar una foto sobreexpuesta mediante modos de fusión de capas y Asignación Tonal. El cielo quemado lo seleccionaremos con ayuda de una Capa de Umbral y aprenderemos cómo eliminar el molesto halo que se origina al reemplazarlo. Un saludo,
-
 I've been looking for a tutorial/guide to use as a reference whilst using Affinity Photo - without the need of watching a video whilst using Photo. Are there any available?
 -
 In this tutorial I will show you how to create a neon sign with Affinity Designer 1.5.5. You can download the brick wall seamless repeating pattern from the tutorial, which was made with Affinity Photo, here and use it for free in your own projects: https://goo.gl/nYw8Lz You will find the tutorial here. Keep on drawin' Norbert
 -
In this tutorial I'm gonna show you how to create an Ivy vector textured image brush in Affinity Designer with support of Affinity Photo in image processing. Link to the tutorial on YouTube You can download the Ivy vector brush from the tutorial here. Keep on drawin' Norbert
-
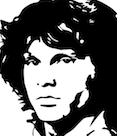
 Hello, is anybody here to explain, how to create a portrait style like this from any picture (portrait)? I would like to create vector graphics like this (see below) Also helpful could be a auto tracer software, but not with a monthly subscription Thanks for any hint, tipp ...
-
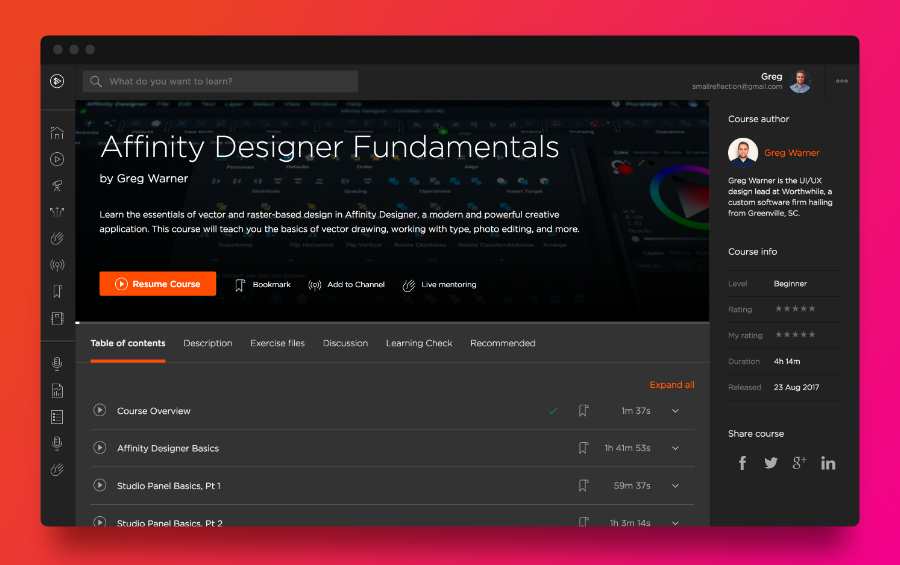
 Hey guys, at long last I'm happy to share that my beginner course Affinity Designer Fundamentals is live at Pluralsight! It covers the nuts and bolts of everything from customizing settings to typesetting and image adjustments. You can sign up for a free trial if you're not a Pluralsight subscriber. If you enjoy it, feel free to share!
-
affinity designer Flat design Volkswagen van + tutorial
IsabelAracama posted a topic in Share your work
Hi I did this flat style illustration of a Volkswagen van and a tutorial on how I created it. There's more in my youtube channel if interested. Check it out here: https://www.youtube.com/watch?v=V0c9f270zFU Thanks.
-
 Hello guys! Just wanted to let you know that today I've released a FREE eBook for Affinity Designer: Creating a Stylish Jungle Scene For $0.00 you'll get: 22 Pages PDF eBook FREE Assets Library Color Palette Original .afdesign file Click on the image to subscribe and get your download link. If you don't want to receive further emails from Frankentoon, just un-subscribe after downloading the eBook, no hard feelings :) Enjoy!
- 34 replies
-
- 21
-
-
- tutorial
- background design
- (and 7 more)
-
 I'm new to photo editing and when I look at all the different options available, I get overwhelmed and just don't know where to begin. I wish there was an explanation to what all the different options mean and an explanation of when and in which scenario they should be used. So, I'm wondering if such a website or video in AP exists? I watch all the tutorial videos but unless I understand when I should use the different options, e.g. masks, layers, brushes, etc., I won't be able to edit my photo properly. When I try to follow what's being done in the video on Vimeo, my photos look horrible then I get frustrated and just do basic editing on my computer.
 -
There are massive numbers of people using Photoshop and Illustrator who hate Adobe because of the switch to rental software. Many are working in very fast-paced, high-pressure situations, are highly task-oriented and facing a daily stampede of deadlines. If they are to jump onto the Affinity bandwagon, they need a quick and easy way to do this without risking any delays regarding their daily workload. Setting aside a large block of time to learn a new app poses a challenge for such professionals. I’ve been using Photoshop and Illustrator for a very long time and I can fly through tasks very quickly. While I have both Photo and Designer, as well as the Designer Workbook, in the intense rush of day-to-day business, I can’t put on the brakes and work my way through doing an entire project in a new app as it causes a huge hit in productivity. When the day is over, the thought of setting aside an additional block of time after hours is a bit much. It’s a cycle that keeps me from making the transition. When Adobe cut off permanent licenses after CS6 it was a major expression of disregard for long-time users such as myself, which is why I have purchased Photo and Designer. Taking the next step of actually using the apps is a huge hurdle. I know that I am hardly alone in this. Other pros I’ve spoken with have said the same thing. It all comes down to balancing workload, impetus to switch, and avoiding burnout while changing horses midstream. Having been on the creative side of marketing for a long time, I know what I would do in order to facilitate such a changeover. I would hire someone to take the ten most common tasks in Photoshop and Illustrator, create 60-second tutorials, then promote the heck out of them. After this, I would take the next ten most common tasks and repeat the above, then do the same until you have around fifty of each. Affinity already has tutorials but what someone in my situation needs is training that is quick, in-and-out, and which can be done on the fly whenever a small task comes up in the workflow; not project-stype tutorials or references to steps within projects. In an intense, high-pressure situation, the way to make inroads in prompting a transition is to provide a fast, brief and easy, guerilla-style tutorials so that the user can pull this off without blowing deadlines. Examples of quick, in-and-out tasks: – Adjust color balance and crop – Convert text to vector logo with gradient and outline – Open photo and save as optimized JPG / PNG – Import vector into Photo, then add fill and stroke – Select pixels, create a mask, and output with transparency – Create a nested object then duplicate this on a grid – Slice a photo for optimal web output – Isolate a foreground object, clone the background, and output layers for parallax responsive Affinity already has something similar in place. Refining this for pros in high-pressure working environments would speed adoption.
-
In this tutorial (German) I would like to explain how you can project symbols on a transformed parent object to create your own packaging designs. I've used English labels in the layer panel and hope you could follow my instructions. Keep on drawin' Norbert
-
 Hey all, It's been a while since I put something together, gotta give thanks to Teo on this forum as I completely forgot about this app. Would love to see this work more tightly with Affinity. In this new tutorial we look at creating a live preview layout for mobile devices using Affinity Designer and Skala Preview, will also work with Photo and having the design update live on your mobile device by using continuous export as you make changes. Enjoy.. Allan
 -
 Hey Everyone, I'm back with another video on how to add an Image inside of a Text: https://youtu.be/8Ykv45jox-w Let me know what you think and feel free to use this technique into your own design work. Thanks, Mike
-
Hey Everyone, I'm back with another video on how to add an Image inside of a Text: https://youtu.be/8Ykv45jox-w Let me know what you think and feel free to use this technique into your own design work. Thanks, Mike
-
 Ok, this... this shit is bad ass!!! Make us a pro Serif. Make us part of your Affinity ecology, by producing more talented individuals for your app, (with quality like the intro picture being taught) the more penetration you’ll attain into the mass social market. Can you imagine the league of Affinity Photo monsters you’ll create, if you teach us how to do stuff like this from the get go? Create a step by step guide, complete with assets for us to download. I’ll pay to learn how to create this photo. Jean Luc Picard style... Make it so!
-
Hi Everyone, I'm back with another YouTube video tutorial on how to add an image inside a shape: https://youtu.be/s4dGgAMqDp0 Thanks for watching and let me know what you guys think :). Have a good week! -Mike
- 1 reply
-
- 1
-
-
- vector drawing
- graphic design
- (and 4 more)
-
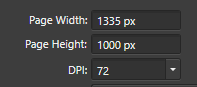
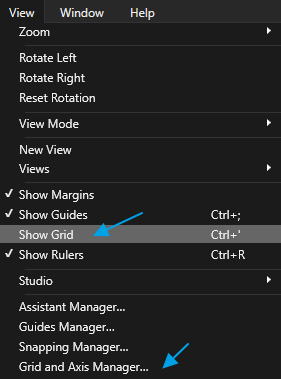
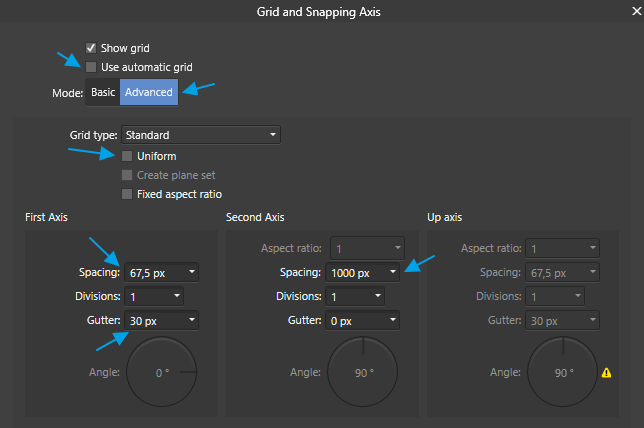
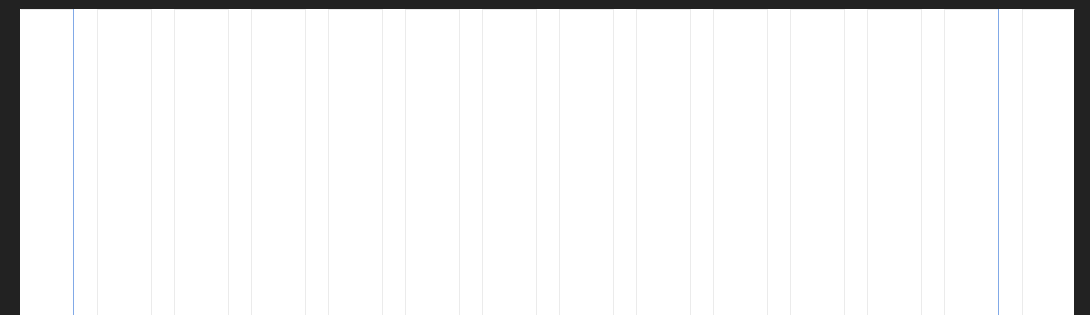
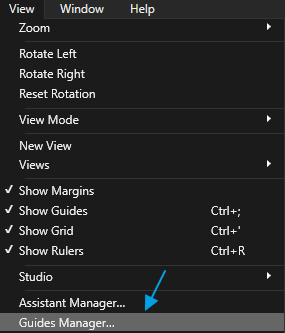
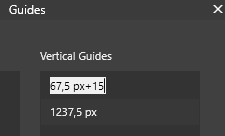
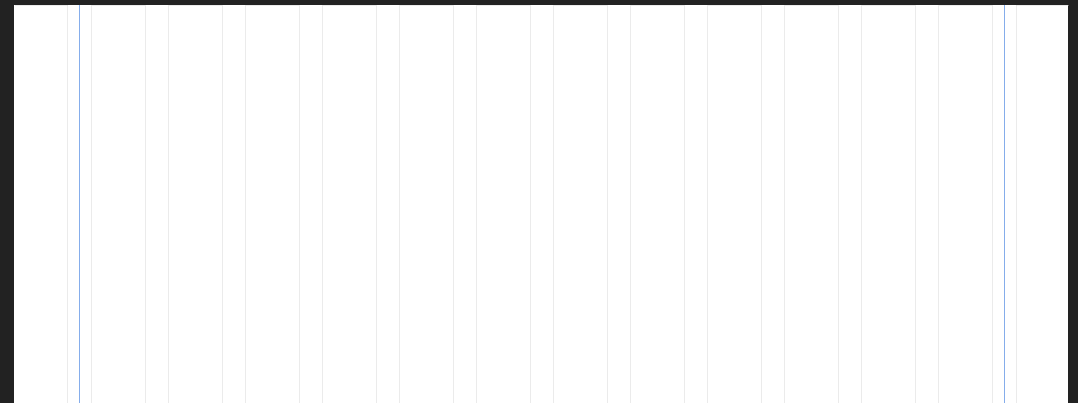
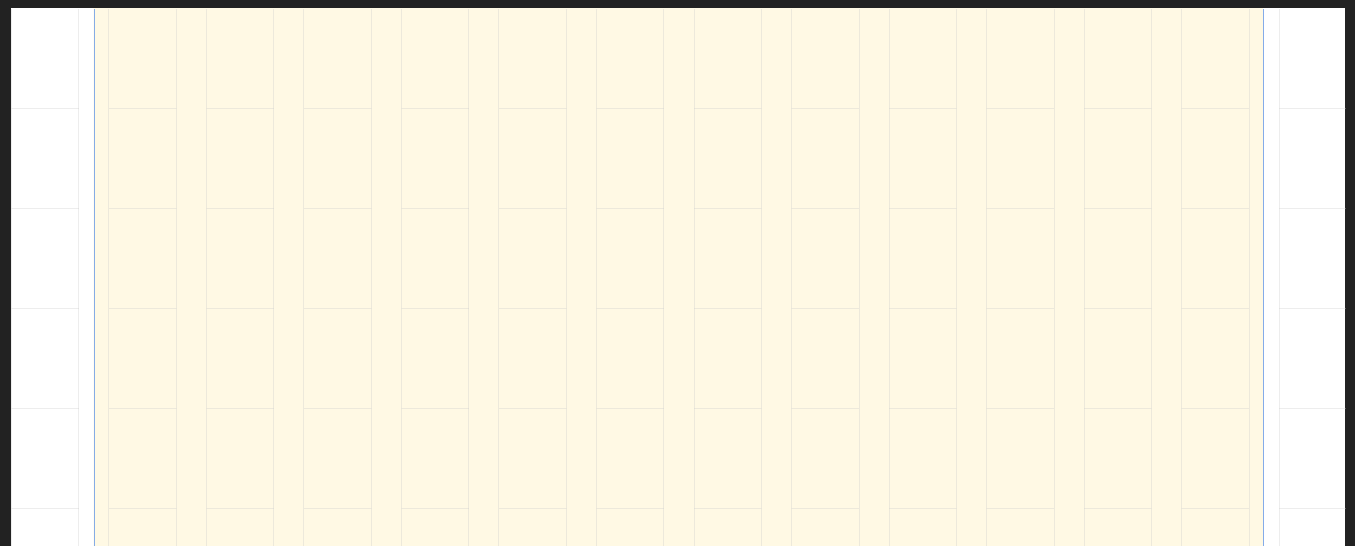
 Hi all, I figured out a way to configure a centered grid design in Affinity Designer, with a custom number of columns and gutter width. Below is a spreadsheet to calculate the required values. If you make a copy of the file to you Google Drive, you can edit the values. https://docs.google.com/spreadsheets/d/1imTD6Ao3OJyS0_E-fnHTr5l9GKG9zulM4uIutVZGAnE/edit?usp=sharing Example values for the calculation: Grid width: 1170 px Nr of columns: 12 px Column width: 97.5 px (= grid width / nr of cols) AD Gutter: 30 px AD Spacing: 67.5 px (= col width - gutter) AD Document width: 1335 px (= 2*spacing + gutter + grid width) Here's how you would use these values in AD to set up your grid. Create a new document, use the calculated document width, 1335 px in this example. Go to the View menu, enable 'Show Grid' and open the 'Grid and Axis Manager' Apply this grid manager configuration: - Untick 'Use automatic grid' - Select 'Advanced' mode - Untick 'Uniform' under 'Grid type' - First Axis spacing: 67,5 px - First Axis gutter: 30 px - Second Axis spacing: 1000px, for this example we use the document height but you can use any height you like Add guides to the left side of the first and last gutter. Go to 'View' - 'Guides Manager' Add half the gutter width to both guides by appending '+15' and pressing enter. This should be the final result. You will end up with two additional columns on the left and right side of the document. The reason for this is that there is no way to have a margin on the left side of your document using the grid setup. By following this tutorial you end up with a document that contains 2 more columns, but you simply do not use them. In the export persona, you can easily set the slice to export only the part of your design you need. In the screenshot below, I've marked the area you actually use. Of course there is an example .afdesign file to save you the trouble ;) centered 1170 px 12 col grid kareldries.afdesign
-
 Dear all, I am very exciting with Affinity photo on iPad. Therefore, I will make video clip of everything i learn from it, and they are for sharing always. Mask Layer on Affinity Photo on iPad https://youtu.be/c-pfrXDBwvU Perspective Projection in Affinity Photo on iPad https://youtu.be/PAtHcKEyh-w How to use crop tool in Affinity Photo on iPad https://youtu.be/UQaPDo9tfTs Equirectangular Projection in Affinity Photo on iPad https://youtu.be/bS34wOmoLzw Convert any photo to pencil sketch https://youtu.be/3OYKRBJpPqA
- 1 reply
-
- 3
-
-
- Affinity photo
- iPad
- (and 1 more)
-
 Hey, here's another one of my Affinity Designer tutorials. In this one you will learn how to create custom shapes using the Custom Shapes tools. Click here to see the tutorial. If you haven't seen my previous tutorials, you can watch them here If you like the tutorial, hit that like button and feel free to leave a comment! Thanks for the support!
 -
 Hi all, a recent tutorial I did for Envatotutsplus on Affinity Designer is out. It's a step by step from start to finish type of tutorial of my basic workflow developing a fun Canine Cowboy character to a cartoony semi-realistic finish. It's an intermediate level tutorial so some knowledge of Designer is required. :-) Check it out at: http://design.tutsplus.com/tutorials/how-to-create-a-detailed-beer-label-in-affinity-designer--cms-26010 Also checkout the attached image here for a preview of the final image. Have fun! Retrograde (aka Kevin Creative)
- 29 replies
-
- 14
-
-
 Hello everyone this is my playlist on youtube for some greate speedarts on affinity designer end photo (updated daily) https://www.youtube.com/playlist?list=PLRXqbiWpUbhSEGfnzh-dxQAqIiNz5jbpT i hope you like it :)
- 6 replies
-
- 1
-
-
- speedart
- affinity designer
- (and 3 more)
-
 Now that Affinity Photo for iPad is out, and since Apple's iCloud, Photos, photo libraries, camera roll, etc., etc., confuse me a bit, (what's going where, and when?!?!) any chance that you might do a video on the interactions of AP for Mac and iPad and all those Apple functions? How can they be brought together into a nice workflow? If you've already posted such a tutorial, sorry. Thanks.