
Affinity iPad Student
-
Posts
332 -
Joined
-
Last visited
1 Follower

Recent Profile Visitors
3,349 profile views


-
 Affinity iPad Student reacted to a post in a topic:
Affinity Photo 2.3 iPad (Duplicate Panel? - Where?) video inside
Affinity iPad Student reacted to a post in a topic:
Affinity Photo 2.3 iPad (Duplicate Panel? - Where?) video inside
-
 First 20 seconds of video shows this new 2.3 feature on PC. Where is this duplicate panel on the iPad and how do I enable it without keyboard? (In video, he shows how to activate it via keyboard) I don’t use keyboard, just Apple Pencil & gestures. I am aware I can also accomplish this via constantly tapping on duplicate (that’s insanely time consuming) the way shown in this video, is the most efficient way to go. Once again, how do I bring up this duplicate panel (without keyboard)? Thanks
 -
 Brian_J reacted to a post in a topic:
[SOLVED - Thanks @ Brian_J] Affinity Photo 2 - Can’t find the grids or guide? (images inside)
Brian_J reacted to a post in a topic:
[SOLVED - Thanks @ Brian_J] Affinity Photo 2 - Can’t find the grids or guide? (images inside)
-
walt.farrell reacted to a post in a topic:
[SOLVED - Thanks @ Brian_J] Affinity Photo 2 - Can’t find the grids or guide? (images inside)
-
@Brian_J Much appreciated Thank you fellas! This solved it.
-
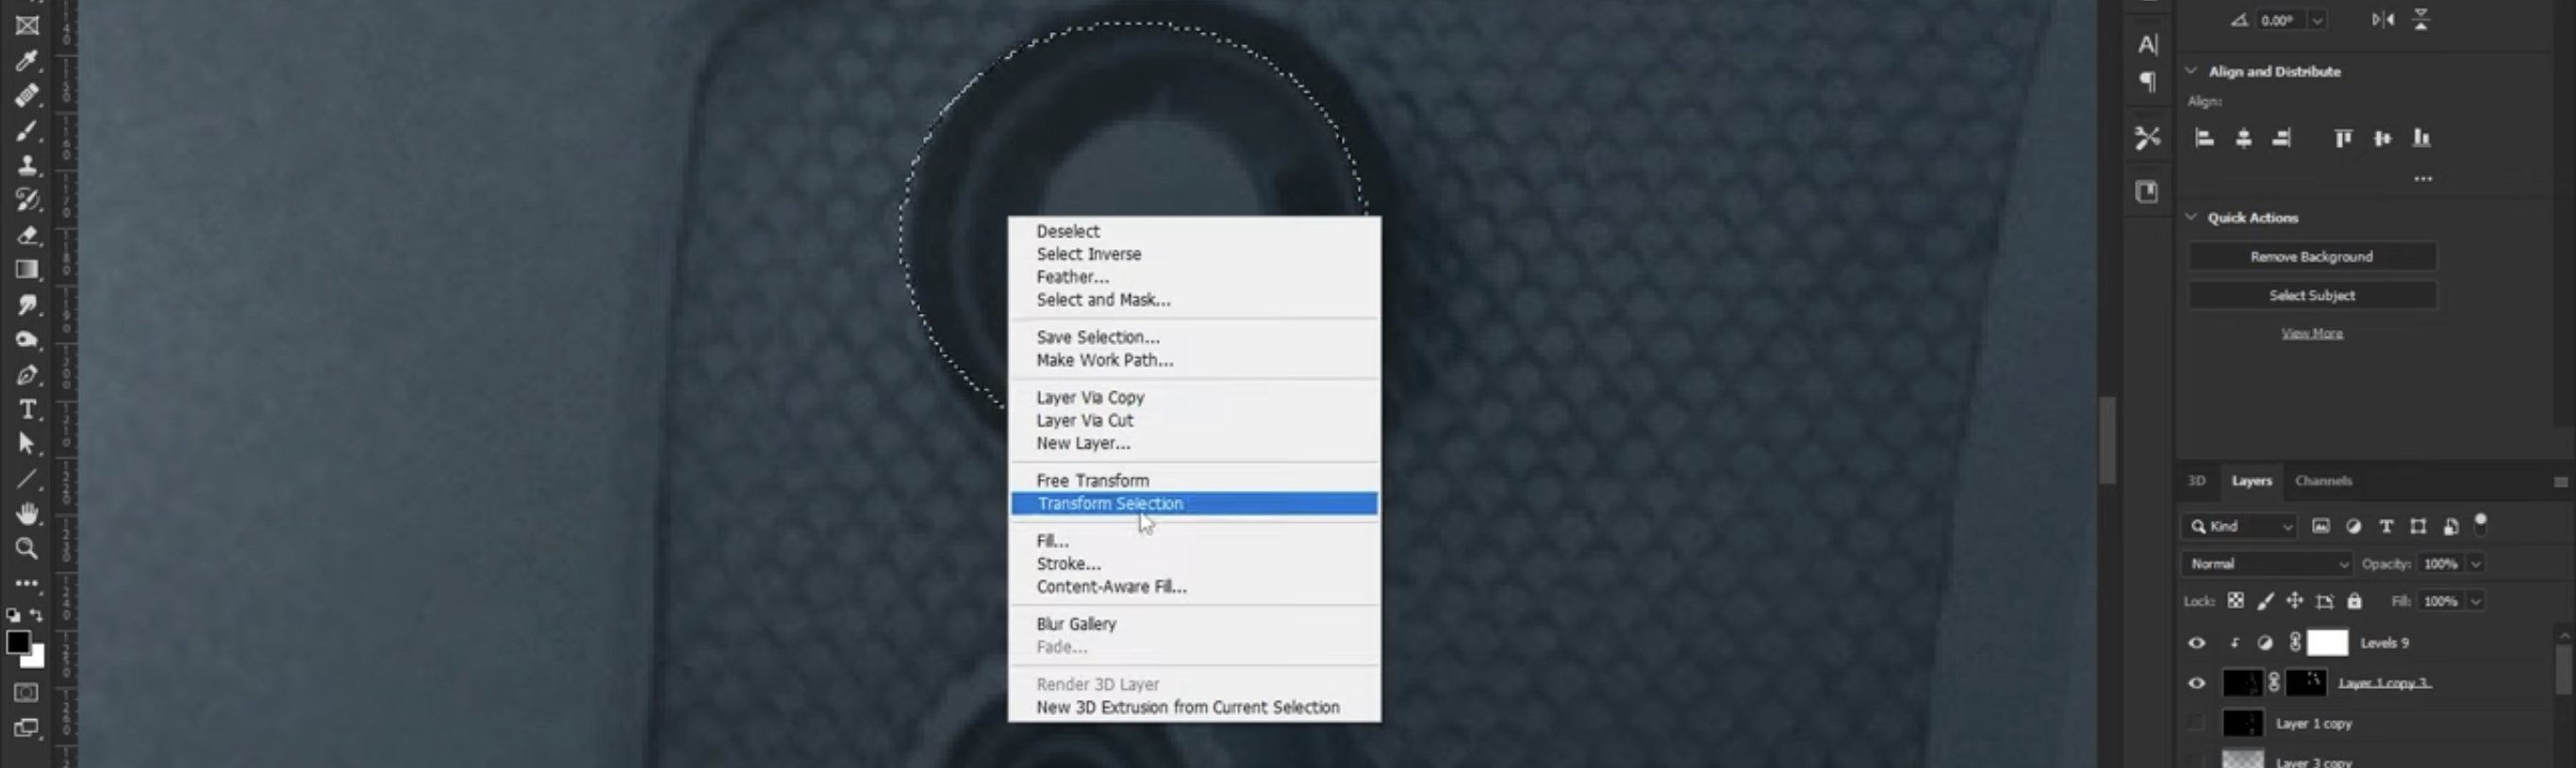
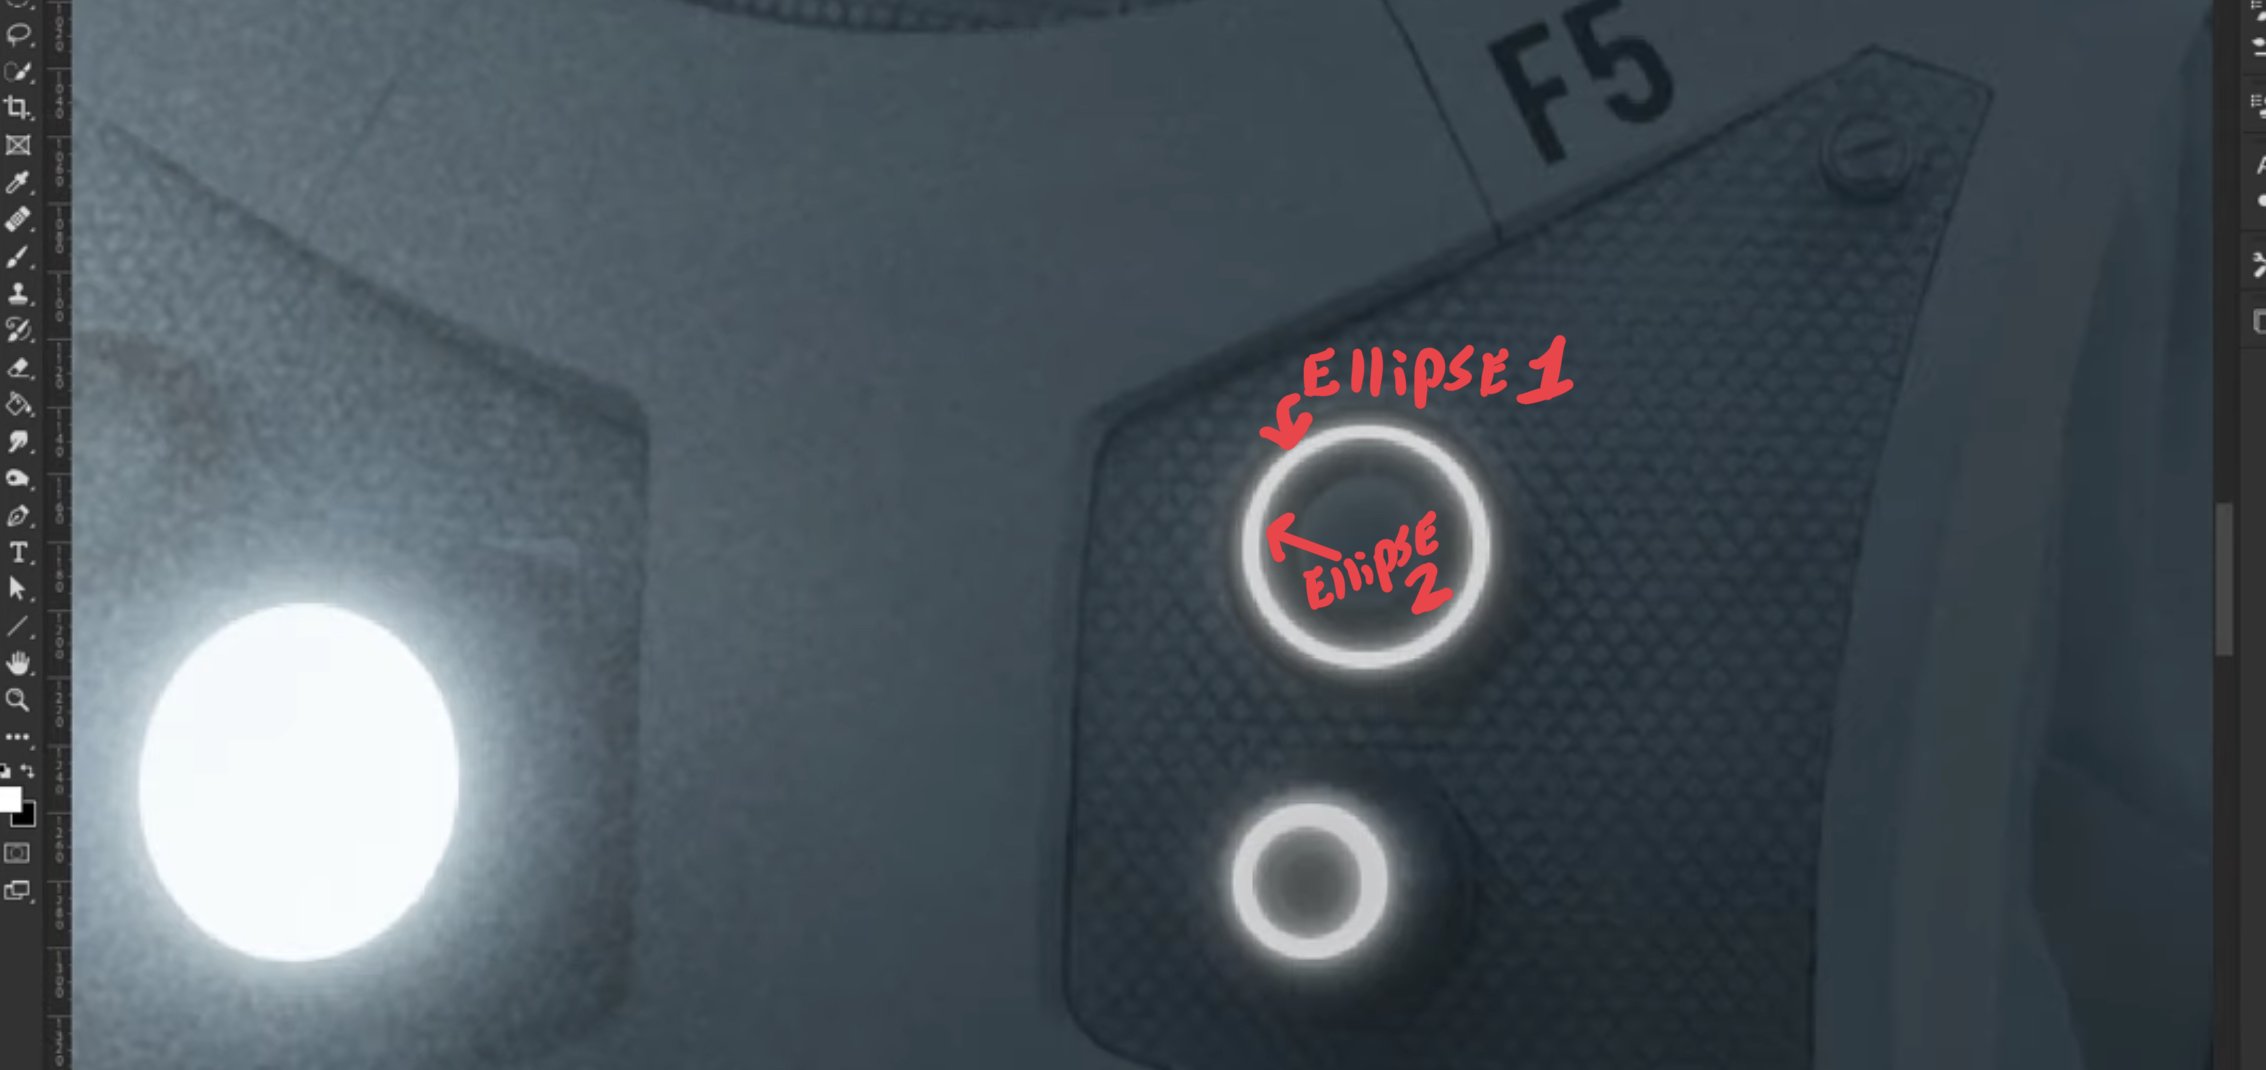
I am following a photoshop tutorial, he was able to go into selections, choose an ellipse selection, create a circle ⭕️ and then he brought up the ui, and chose *transform* selection, and then added another selection ellipse inside an existing selection ellipse. I want to do that as well. I can’t find a transform for affinity photo 2 selection. So i tried, creating an ellipse selection, inside an existing ellipse selection… not possible it will disappear.. (i used intersect, add, new) to no avail.. the goal is to have two selection ellipses like this: in the youtube tutorial I’m watching (for photoshop), he was able to achieve what I show above, by transforming one of the selection ellipses: The end result, I am trying to accomplish, is the same as he did in his video (with the glowing rings on a button).. except i’m trying to accomplish it on my sphere - this is what he accomplished by having two ellipse selections inside each other: I know there are other ways to go about this effect (creating border rings) but this technique of having two selection ellipses inside each other, has opened me up to other ideas that I could use it for… so I’m hoping there is way of achieving this. Does anybody know how? I vaguely recall, AP1 had an option to do this, after creating a selection, there was a drag slider option.. that allowed you to create a double of the selection (one inside the other) I can’t find it in AP2 (unless my mind is hallucinating) and no such thing existed in AP1.

-
Affinity iPad Student reacted to a post in a topic:
[SOLVED - Thanks @ Brian_J] Affinity Photo 2 - Can’t find the grids or guide? (images inside)
-
Affinity iPad Student reacted to a post in a topic:
[SOLVED - Thanks @ Brian_J] Affinity Photo 2 - Can’t find the grids or guide? (images inside)
-
Parrontof2 reacted to a post in a topic:
What happened to the undo button?
-
I can’t find the grids & guides on AP 2. I can’t believe i’m on here asking where this is located, I feel embarrassed. I searched google, and I knew my mind wasn’t playing tricks on me… they moved it from where it use to be, nestled in the hamburger menu: I checked (…) as well:
-
I truly hope not. It seems from this new and way better video (if you scrub to 4:39) he opens his cut out, in its own window, I guess you can save or screen cap from there. I still haven’t tested, I’m working on concepts in mid journey, which I plan to take to segment anything, then manipulate in Affinity Photo. Sorry I haven’t been of further help here Paul.
-
Paul Mudditt reacted to a post in a topic:
Instant Selections AI Tool (Tedious & Drudgery side of photo manipulation is now dead)
-
@Paul Mudditt Updated with a guide of sorts. Hopefully this helps!
-
Affinity iPad Student reacted to a post in a topic:
Instant Selections AI Tool (Tedious & Drudgery side of photo manipulation is now dead)
-
@Paul Mudditt I haven’t used it yet, Wish I had some input for you. when the YouTube tutorials start appearing, I’ll post here.
-
I’m just sharing the knowledge: Seems we can now be at superhuman speeds with what I consider the tedious, drudgery side of photo manipulation. (Selections, masking) Meta Releases open source Segment Anything Ai Tool, available to the public. Instantly make selections and Ai will even make several selections within that one subject: the human, their sunglasses, their shirt. All selections automatically made and layered. Better showcase in video, then website after video: Website: https://segment-anything.com/demo Gizmodo Article: https://gizmodo.com/meta-ai-sam-photo-segmentation-facebook-photoshop-1850304361
-
bob embleton reacted to a post in a topic:
Affinity Photo Workbook (iPad version in PDF?)
-
NotMyFault reacted to a post in a topic:
[SOLVED - thanks @ NotMyFault & DM1] Weird bugs with round brushes
-
wet edge solved it. I somehow clicked on it without knowing. I’ve never used wet edge, in AP1, and I’m definitely not used to its new position out in the open - up top, I must be careful. Thanks @NotMyFault @DM1
-
Affinity iPad Student reacted to a post in a topic:
[SOLVED - Thanks DM1] Photo V2 iPad (where’s brush opacity? what’s accumulation?) *images inside*
-
Weird bug One: Masking now requires double effort: On a mask, I choose regular round brush, full opacity, full hardness, full flow. Black color As I’m brushing away at the areas I want concealed, it leaves behind a faded portion of what I’m trying conceal. Meaning, I have to go over it twice. (Double the effort) Weird Bug 2: Light round brush leaving huge wet edges on stroke: even though flow is down to 15 percent, hardness is 0% these same settings on photo v1, the light round brush would have a very soft airbrush ink to it, now it’s giving very strong wet edges. These strong wet edges, defeats the purpose of the light round brush which should ink like a soft mist onto the canvas. This has to be a bug! Or is there some kind of requirement now, where I have to go into the brush options and revert its current brush setting, back to Affinity Photo v1 —> light round brush setting? I apologize for not providing images, I just wanted to throw up this post before I had forgotten due to me, about to go to sleep. Any illumination on this, will be greatly appreciated. Thanks.
-
@DM1 As always, the champion of getting us back on track, comes through. Thank you! No way I would had noticed the dots - I would had been here sitting on infinity and probably would not had found it. I’ll have to download your Photo V2 help document. (saw it in your signature)
-
 Affinity iPad Student reacted to a post in a topic:
[SOLVED - Thanks DM1] Photo V2 iPad (where’s brush opacity? what’s accumulation?) *images inside*
Affinity iPad Student reacted to a post in a topic:
[SOLVED - Thanks DM1] Photo V2 iPad (where’s brush opacity? what’s accumulation?) *images inside*
-
Following a photoshop tutorial, I have not had the chance to use photo v2 since update. I’m seeing things that alien to me, due to me being introduced to affinity photo with iPad (never used the pc version) though… I do recall reading, the new photo v2 is closer to the pc version in regards to ui. That said, I’m use to the older setup of brush UI: The new version, I can't find the opacity for the brush (did serif not make accessible) outside of my meus? must I dig through menus or something? (new brush UI): (now that I think about it, I don’t see hardness either what is accumulation? this was not part of the photo v1 brush UI. Thanks!
-
ericosmosNEW reacted to a post in a topic:
Photo V2 (Stoopid Question) Where is import from photos option? (images inside)
-
mark117h reacted to a post in a topic:
Photo V2 (Stoopid Question) Where is import from photos option? (images inside)
-
grammaknits02 reacted to a post in a topic:
Photo V2 (Stoopid Question) Where is import from photos option? (images inside)
-
Affinity iPad Student reacted to a post in a topic:
Affinity V2, updates, pricing and no subscription (moved)
-
Affinity iPad Student reacted to a post in a topic:
Photo V2 (Stoopid Question) Where is import from photos option? (images inside)
-
Long press… what the hell. 🤪 Wow, I don’t understand the UX reason on that one, first instinct is to tap screen not long press. I would had never guessed that one, thank you BIG TIME!
-
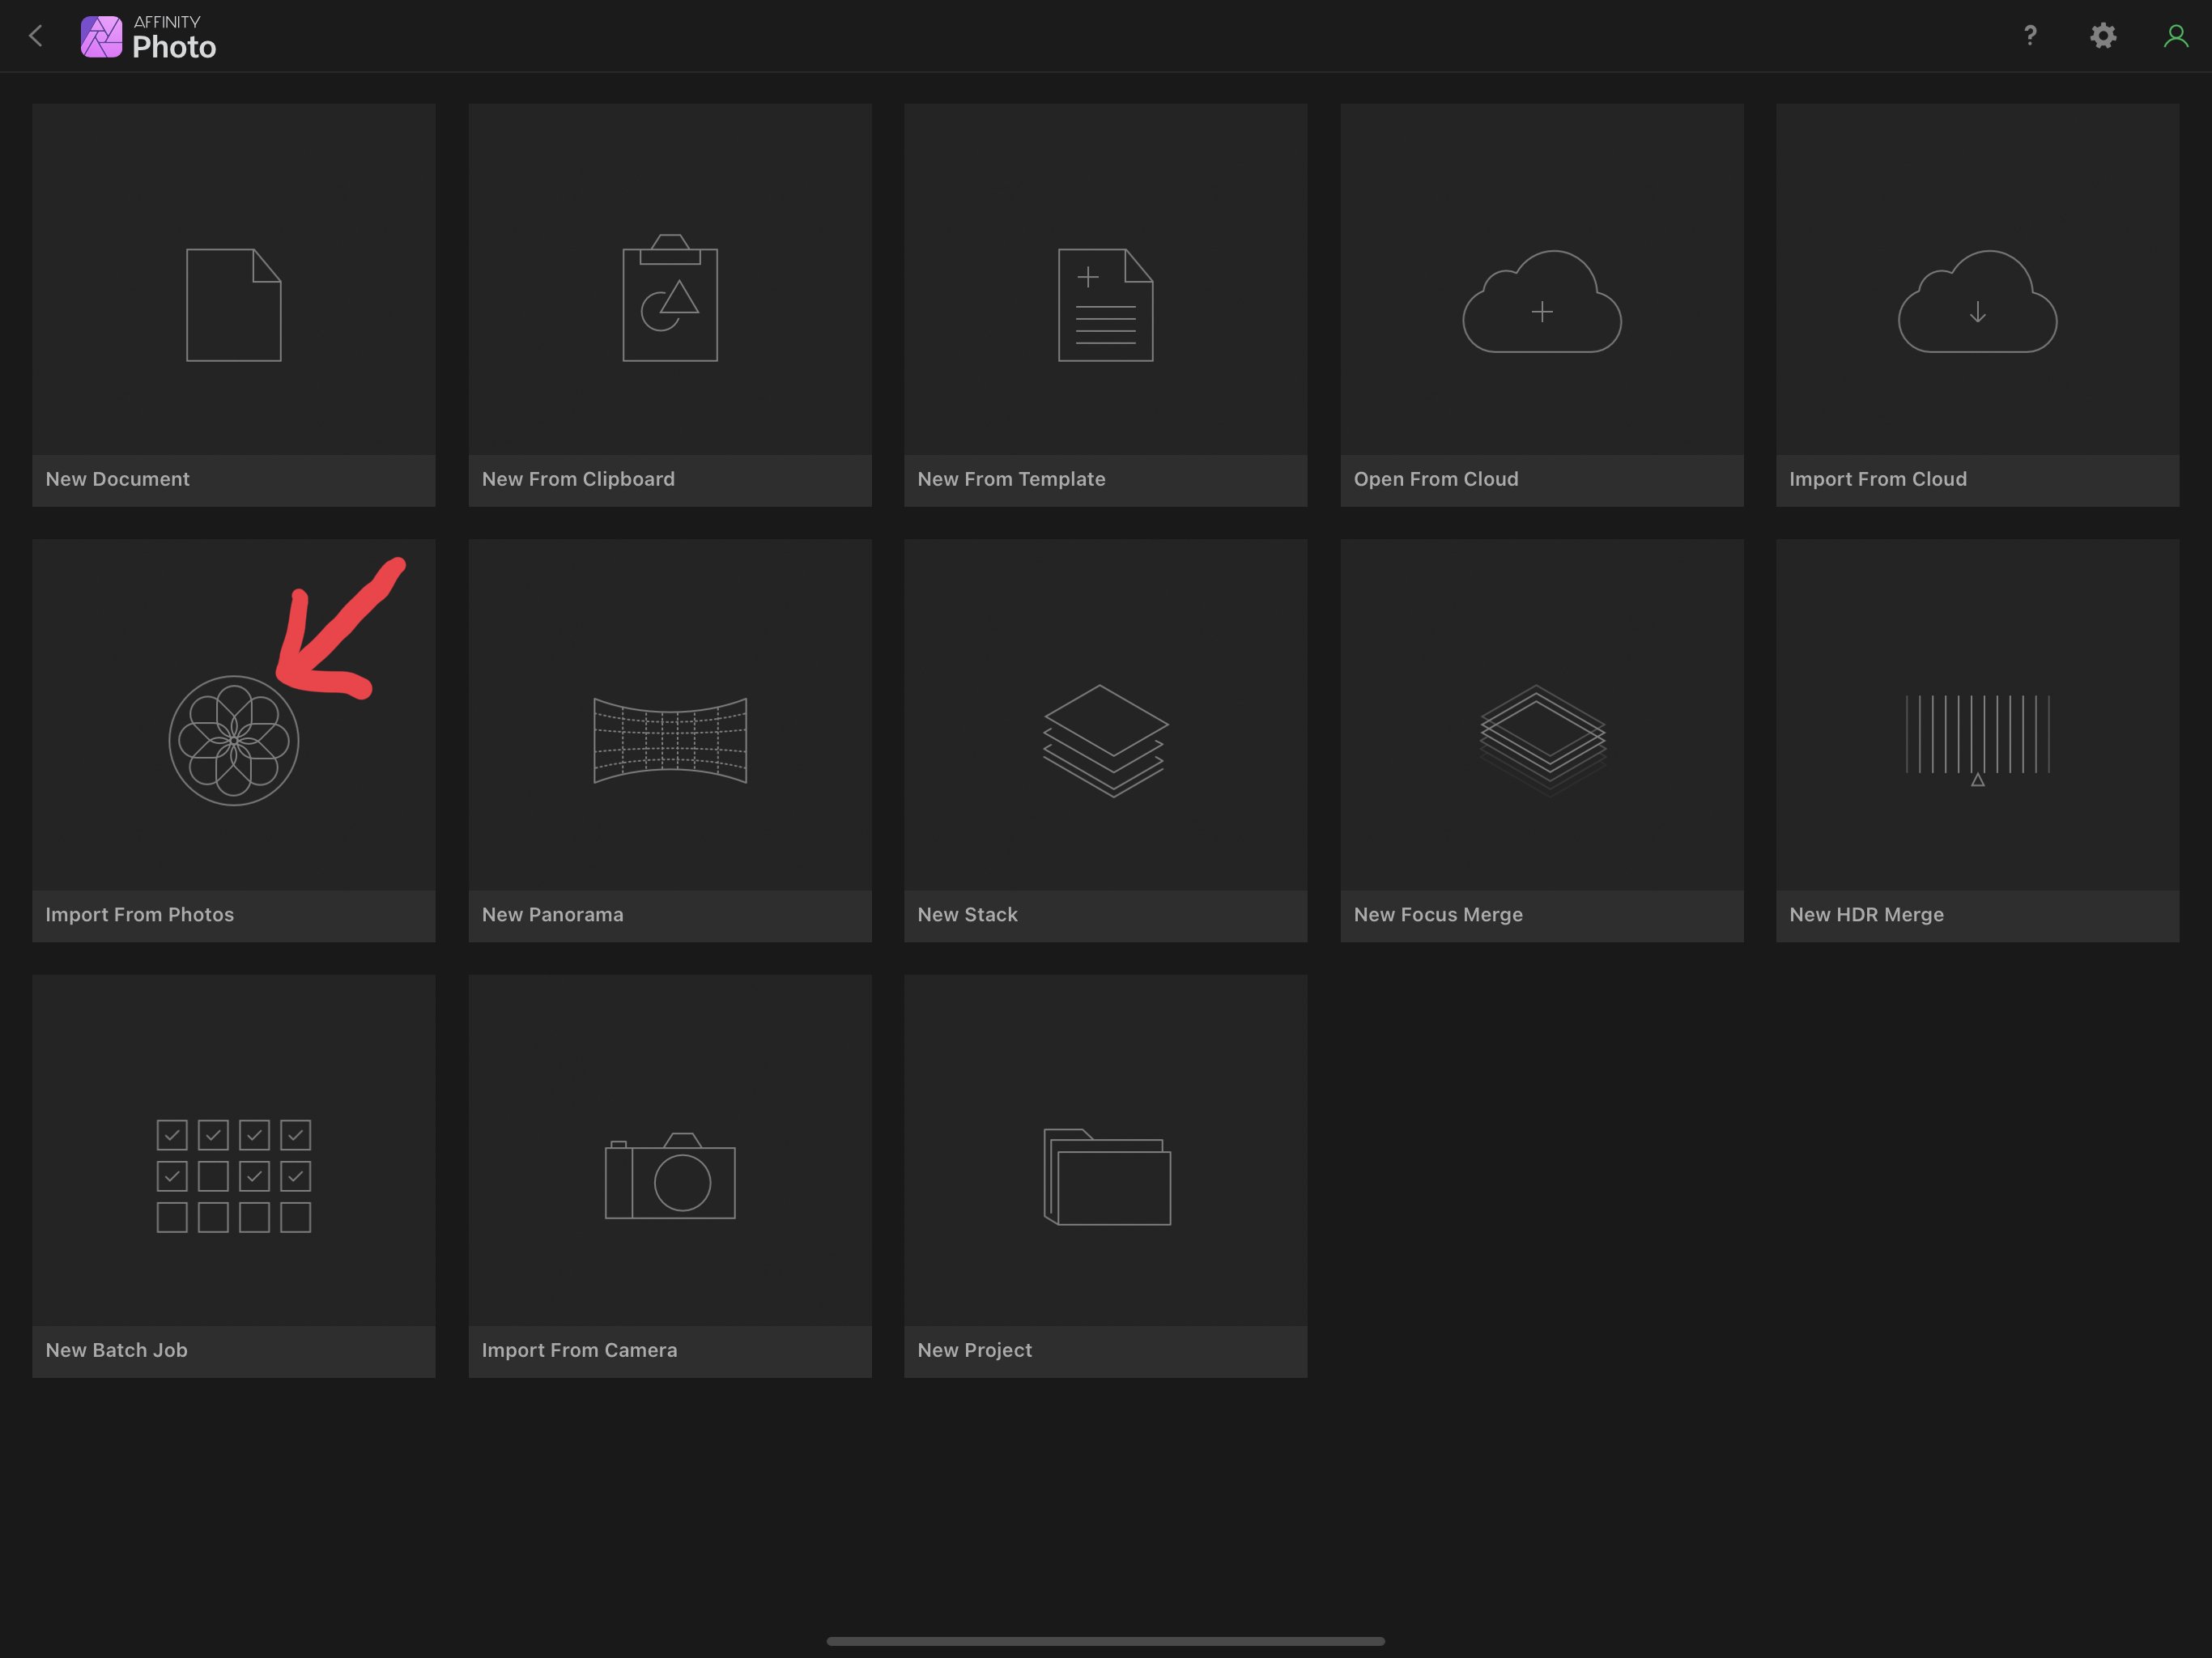
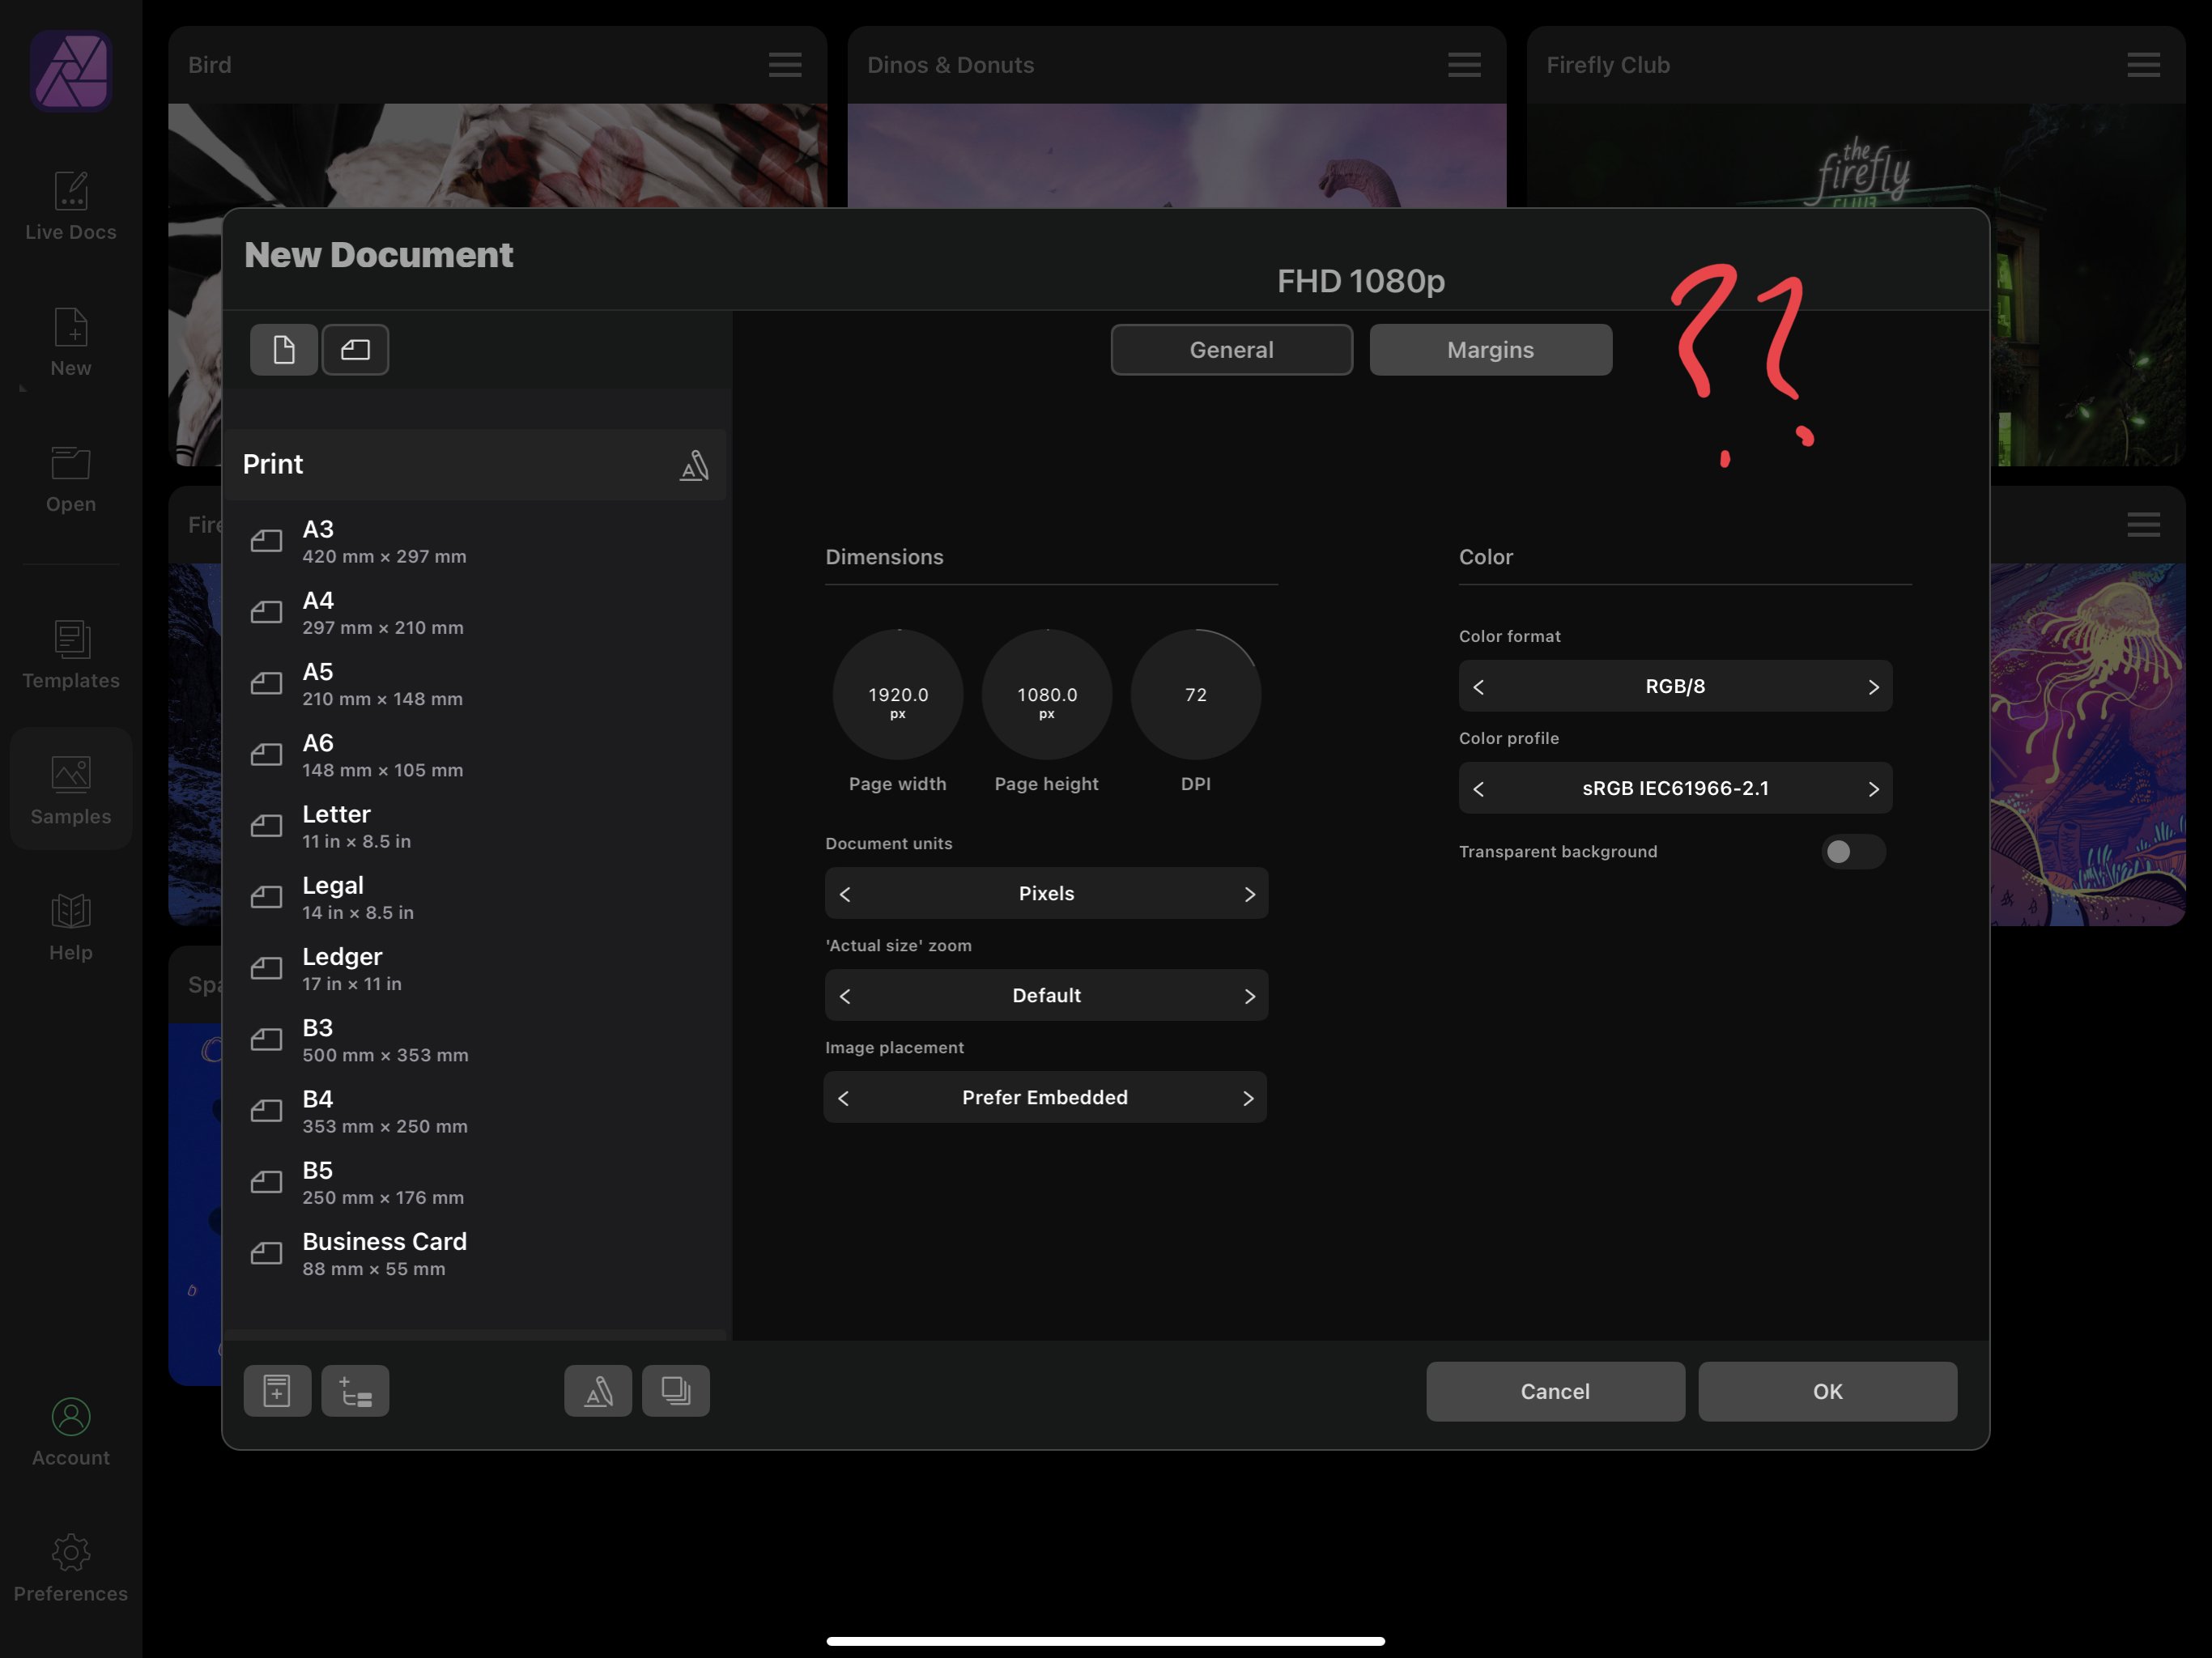
In the original affinity photo for iPad, no need for you to create a document, the app created one for you, dimensions based on the imported photo from your photo app gallery: In photo v2 for iPad, where is the import from photos option? I must be blind.. I can’t find it? It’s none of the menus you see: Any help appreciated, thanks.
-
@walt.farrell Thank you, any ideas for resolve? I updated my original post, by adding images, maybe this will help you see what’s going on.