Search the Community
Showing results for tags 'Snapping'.
-
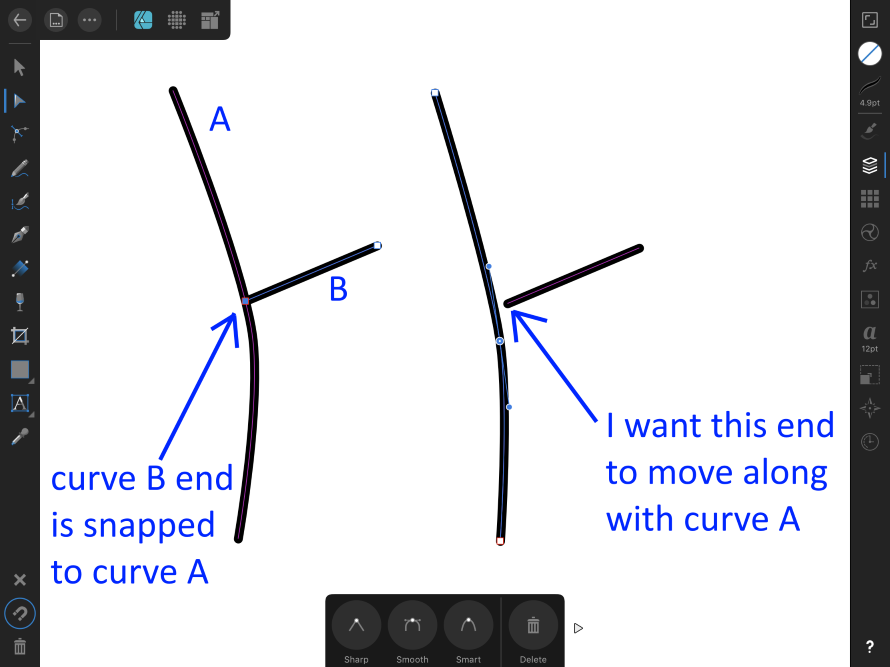
I have searched for a solution to this, but maybe I am not using the right keywords, or the right approach to the problem at all... I have two paths, A and B. The node at the end of B, when I create it, is "snapped" to the path of A somewhere near the middle. However if I alter path A, I would like for the end of path B to move along with it... a sort of "persistent snapping, if you will". Instead, path B stays put and a gap opens between the two paths. See the attached screenshot for an example. Is there some way to achieve this? Perhaps a different approach to that which I'm using? It would really help a lot when I go in to "clean up" my paths after a first cut. Thanks... Jon

-
 Can I enable (if such a feature exists) assisted drawing for Affinity Designer for iPad? I want to be able to use the pencil tool (with Apple Pen), with isometric grid enabled, to draw along the lines of the grid. This will greatly assist me in creating isometric objects. Tried most of the tutorials on https://affinity.serif.com/en-us/tutorials/designer/ipad/ but none seem to cover the topic I am looking for. Below is sample of a simple isometric box I am trying to draw. It looks hideous. Any assistance? Regards, asdutoit
-
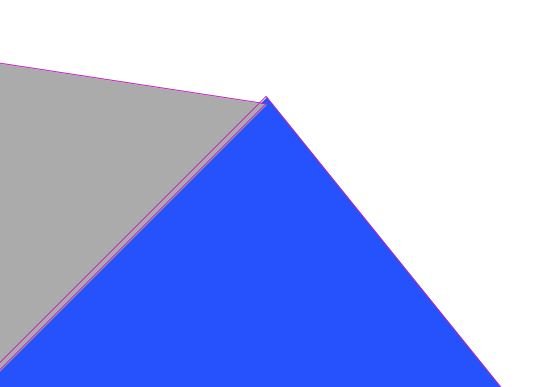
 Hey, I want to snap the corner of the following triangle to the corner of the other shape displayed. I tried fiddling around with the snapping tool but when I align the shapes and press shift it always overlaps and doesn't connect the corner. Any tips would be highly appreciated!
-
 In 1.7.0.3 when snapping is turned on the candidates are not shown until something is done to the drawing to force an update such as a click, pan, etc. Likewise when snapping is turned off the same type of update has to be made to force the hiding of the candidates. All other versions this did not require a second trigger to cause the update of the screen. Is this intentional? I sometimes just toggle snapping using the hotkey " ; " to display the hidden edges of an object. This can't be done any longer.
 -
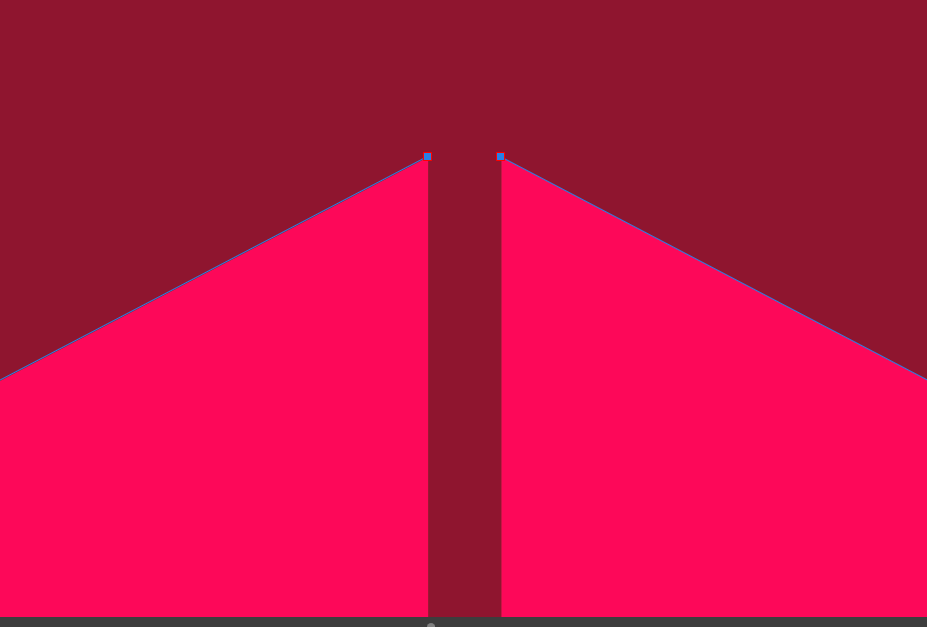
 Hi! I am quite new to the world of design and I'd like to pursue it as a hobby. I found out about affinity designer and i LOVE it so far. However I've noticed q lot of times while playing around with it, that sometimes the "snap" does not properly work, or at least I might not use it properly and therefore always do the same mistake: Whenever I create a symmetrical image, I first create half of the grafic and then copy paste and mirror it to get the image I want. In 90% of the cases though, I end up with the shapes not being perfectly together and it results in a gap between the images. I mostlay always discover it at the end, because I use a helper line which covers the gap. Is there an easy technique which allows me to fix this? I've tried to break both curves and then join the top and bottom nodes, but nothing happens. Also when trying to "snap" both nodes on top of each other, I can't get rid of the gap. I'd be grateful for any advice.
-
Allow the creation of what could be called, "Smart Guides". The difference with regular guides is iff something is 'snapped' to this new type of guide when the guide moves any snapped object(s) would move with the guide.
-
 I try to precisely fit the artboard to an element, but somehow snapping doesn't work on artboards (?). So I have the following questions: 1) Is there a way to fit an artboard to a graphical element (like in Illustrator, with I believe doubleclick on an object)? 2) How can we use snapping to snap the artboard-bounds (with the arboardtool) to a graphical element?
 -
 Okay, I thought this would be easy to figure out, even without the ability to use the AP Help (which doesn't work), but alas, I can't figure out how to draw a simple, solid, 100% opaque 1-pixel line in Affinity Photo. I tried the Pen tool, but it only allows me to set the width in points, which results in a semi-transparent line with anti-aliased edges. If I set the line to "1 pt" I get a relatively clean, 1-pixel line but it's semi-transparent. Not what I want! Can I set the line tool to pixels instead of points? I tried typing in "1 px" where it says "1 pt" but it just randomly changed it to "0.8 pt" when I hit Enter. Speaking of which, that interface is a bit messy. When I click inside a field there I see double of what was in that field, plus it's really hard to read due to the white text on light gray background. In Photoshop this is very easy, and I can set whether the line is drawn as a vector object, or as pixels, and I can set the line width in pixels or points. Am I not able to do something similar in Affinity Photo? How do I draw a simple, crisp, 100% opaque, 1-pixel straight line in Affinity Photo?
-
 Snapping at the spread mid point isn't working for me. (MacOS 10.13.6)
 -
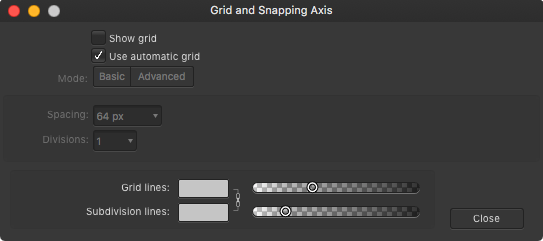
 Is there a way to change the default grid spacing or disable 'Use automatic grid'? This is the current default settings:
-
 I've noticed during my usage of Designer that, even when snapping is enabled, the pixel snapping doesn't work in the pen and node tools (it does a bit in the former, however it gets completely disregarded when aligning to a shape). Most of the stuff I create ends up being exported as a PNG file, and half-pixels (or the like) usually don't look good in the image at all. To combat this, I need to manually set the values of each node in the Transform panel after creating the shape - a slow and annoying process. I understand part of this is to make it so people can easily make complex shapes and align to edges and stuff, however a simple option to force pixel snapping for everything would be super useful. Thanks
 -
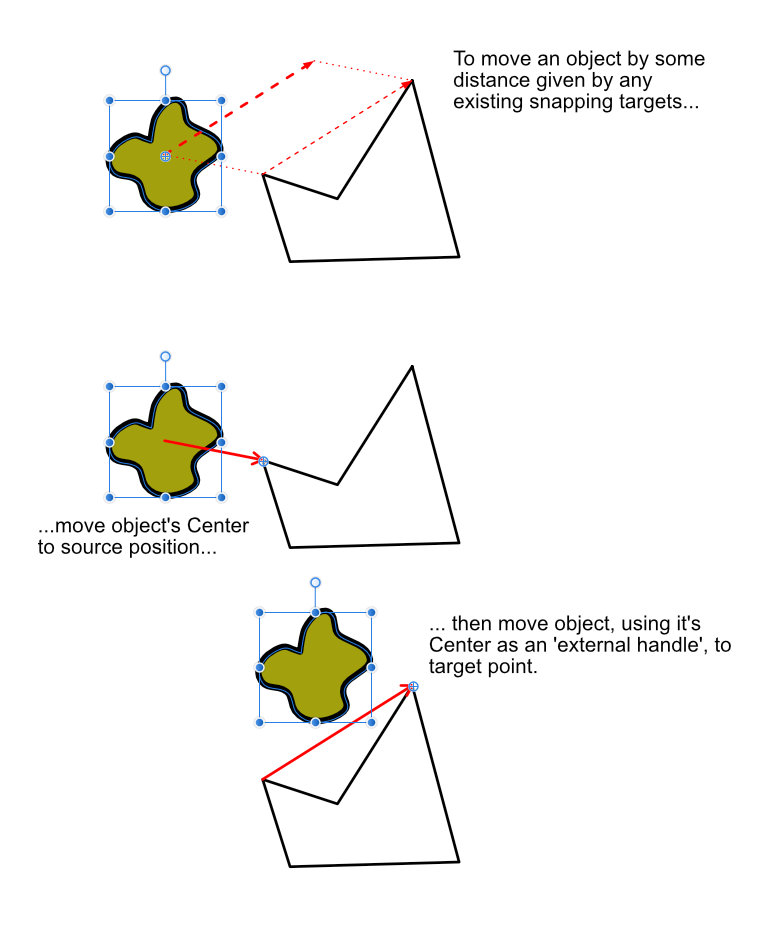
 Hello! Often there can be the situation that you want to move (more exact: translate) selected object(s) by some distance given by other existing objects/snappable targets on the artboard. I'd like to propose a very simple way to achieve this - by being able to use the Center as a handle. See attached image. Maybe holding CTRL while dragging the Center could invoke this 'locked' mode. Most 3d graphics apps have an Axis tripod (= the analogy to the Center here), and in some (Cinema 4D, Rhino, Softimage, ...) the axis can be used in the exact same way. It's called "temporary pivot", or "working pivot". Very useful! Example: imagine a ladder, with equidistant rungs. One rung is missing, and you want to copy the neighbour rung to fill the hole. How would you get the right snapping distance quickly? With this method, it'd be simple. The Center, by now, is used to 'assist' Rotate and Scale. It could easily be utilized to assist with Move, too. Hope it's clear. Thanks for considering!
-
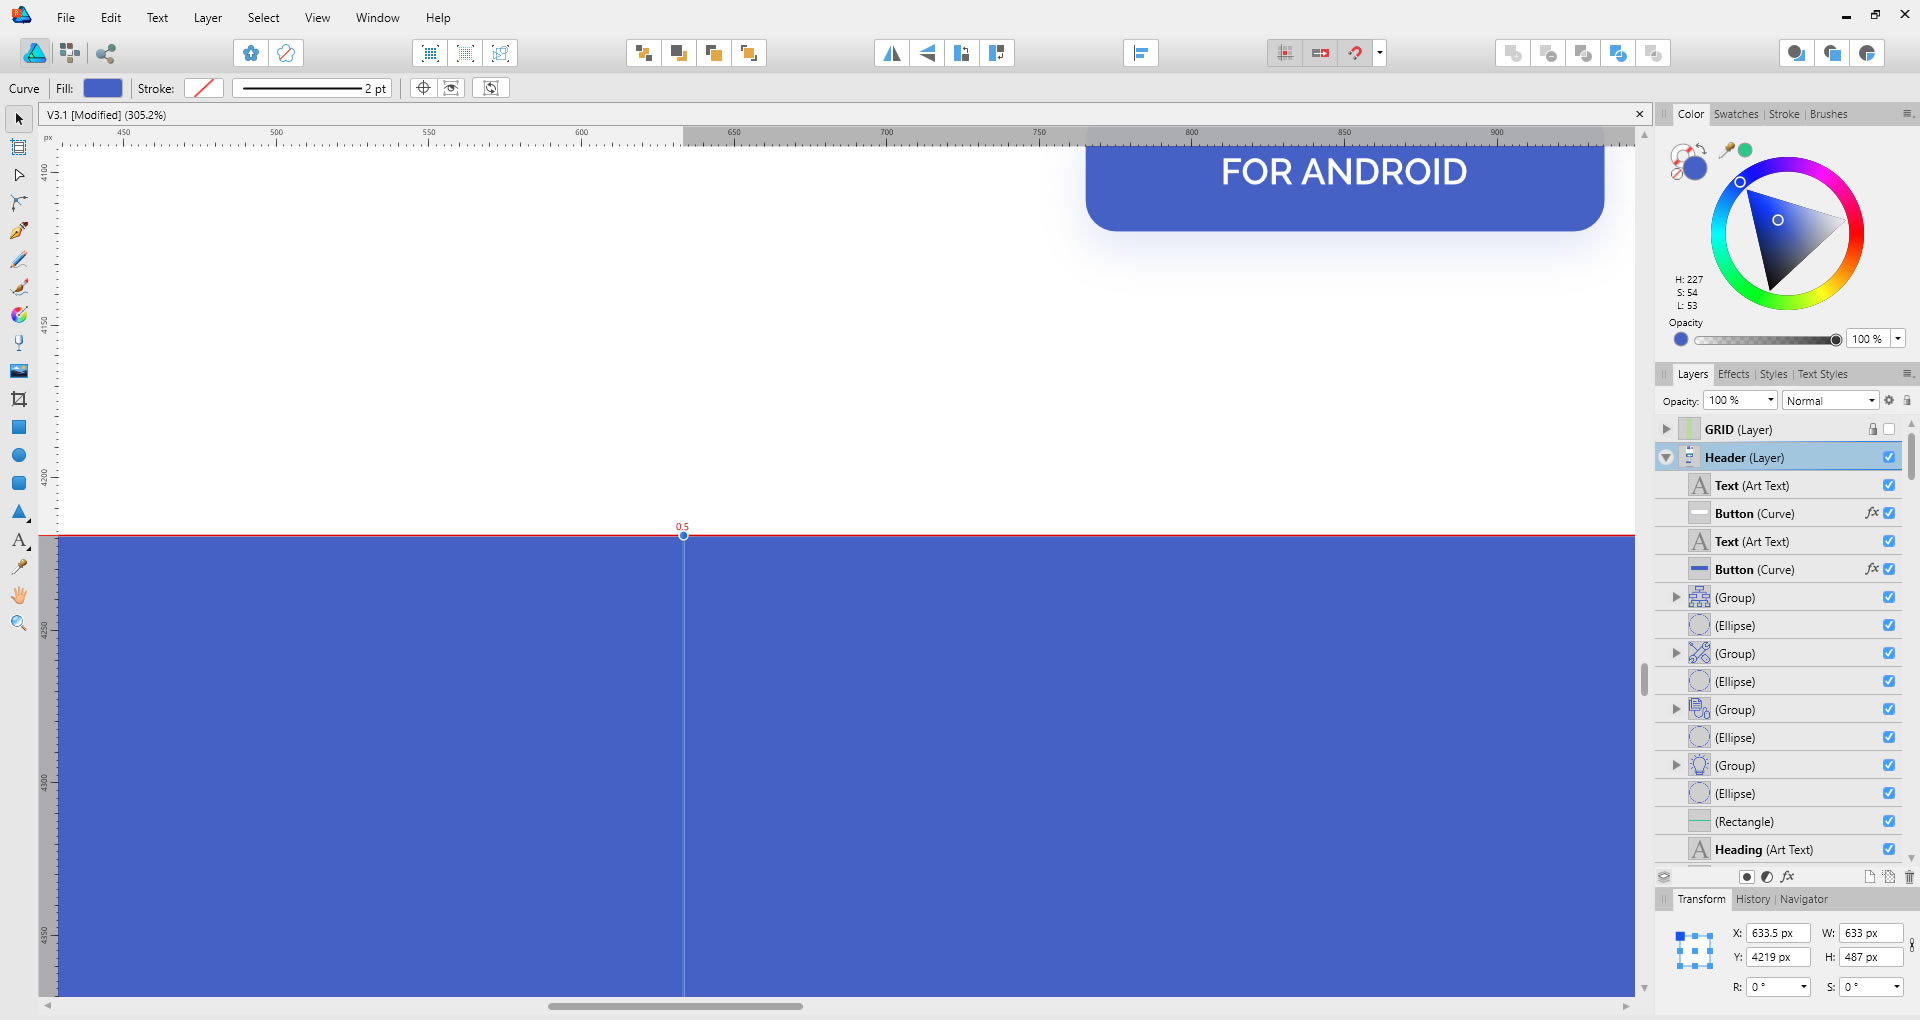
 Hey guys, I'm really having a tough time using snapping. It's like a cool feature that doesn't work for me. I can almost never get it to work properly, I have to adjust decilmals every time. For example in this scenario, there's a 0.5px gap between the two rectangles, when there shouldn't be any spacing between them. They have both rounded values for width/height, and even the "move by whole pixels" and "force pixel alignment" are turned on, but there's this 0.5 pixels gap, when in fact they should "stick" to one another. How do you use snapping? It's personally driving me insane, it could be such a time saver, but I can't get it to work properly. Thanks
-
 In this video, I show you how to create a simple dot pattern using ellipses. Using the alignment tools and snapping feature, it’s very easy to set up a pattern. Once your pattern is ready, it’s a simple matter of using the copy and paste functions to create multiples and keep them aligned perfectly. You’ll learn how to move, align, flip, and rotate objects using keyboard shortcuts and menu options. If all this is too much right now, jump over to my website: www.jencodesigns.com and you can purchase the original Affinity Designer file from my Comic Text video that includes the dot pattern asset I used, the color palette, and all of the illustration layers, objects etc. Don’t forget to SUBSCRIBE to my channel - It really does make a difference. Thanks for watching and Happy Creating. Jen
-
- 1
-

-
- affinity designer tutorial
- jenco designs
- (and 6 more)
-
Hey guys, Snapping is either very difficult to use and I gon't really get it, or it's not the best, either way, for me personally is a bit useless. I almost never get the snapping right. Maybe spend a bit more time on that for the upcoming version, that would be great. Cheers, Chris
-
 Hi, I am new to Designer so this might be an obvious question. However, I've done a lot of searching and haven't found the answer anywhere. I am drawing and animating a cartoon vine with lots of little branches off the main stem. I want to move nodes on the main stem around and have the branches follow while staying aligned to the nodes of the main stem. First, I know that there is no way to join curves that branch, so I can't create a single curve for my stem and branches. I can use snapping to align the nodes with each other, but then each time I move one, the other node does not come with it. This leads to my question. After aligning the nodes of two distinct curves, when I select the double node using shift + click, it only selects one of the two nodes. This is true even if both of the curves are selected. Is there a key to press or some other way to select all the aligned nodes at the same time? A workaround would be to first un-align the nodes, then select them both, then move them and finally re-align them. This is very inefficient.
 -
 Hey Im using Affinity Photo and I'm doing some pixel art. I'm using a brush that is 8x8 pixels. My grid spacing is 8x8 Pixels with no subdivisions. I was wondering if there is a way snap to grid but have the brush jump from grid square to grid square. So now I want the bursh just to snap to each indidvidual 8x8 grid space so every time i click its going to fill an 8X8 square within the bounderies of the grid. So my 8x8 brush always lines up with the grid. If i hold down shift and click on three points I want it to comes out like the image on the left. But right now I am getting the result on the right. I've played with the snapping setting but I can't quite figure it out. If anybody knows how to set this up please let me know. Thx
-
 Hello, I have received a temporary solution, but I think that without this temporary solution this function should be present! Will this lack be solved? And if so ... within what timeframe? Regards, Jan-Willem See the discussion that I open elsewhere on the forum:
 -
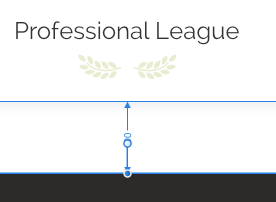
Hey guys, When snapping is on, when you move an object, the distances between that speicifc object and the object around it appear. The problem is that if two object are too close, the distance is hidden by one of its handlers. Maybe move it a bit to the left or right so they don't overlap? I attached a screenshot to show what I mean. Thank you
-
 Hello everyone....I have noticed that when selecting in Affinity Photo, unlike other programs that I have used, I cannot tell whether the selection has snapped to the very edge of the frame... most other programs the jagged moving line, indicating the edge of the selection, snaps to the edge of the frame and you see this moving line all around. For example if I select the sky, say the top half of a photo... in Affinity I simply see one moving line through the centre of the image, in other programs I would see an entire box... the line through the centre of the image and one along the top edge of the frame and also a line down each side... thereby in Affinity if I invert the selection I still see just one moving line through the centre of the photo... in effect thereby one cannot tell whether the top half or the bottom half of the photo has been selected. How do I arrange it so I see the entire selected box with the moving selection indicator line along all edges including right on each edge of the photo.
 -
Hello all, How can I snapping a guideline to an node in to a curve? I have searched everywhere in the program, but can not find it anywhere .... Is still an essential function. I work with Affinity Designer 1.6.1. Regards, Jan-Willem
-
 Basically what title says - if there's many objects and snapping is enabled for anchors/boundaries then moving any object is very laggy. I get that calculations for all those snap points must be done and that takes power, but some optimization in this area is necessary, as I never experineced such behavior in other vector drawing apps. Also I find snapping dialog and it's options too messy - why not stick just with objects and page/layout? Or at least give us option for easy switch between presets
 -
 Hi. I am struggling in something that whenever I try to make something, I don't get to use the smartness of Affinity Designer. It doesn't show me the automated height, length and angle thing. Like in the below screenshot, I am trying make something with the pen tool but then affinity designer is not showing the right height I should make so that it matches the previously drawn side on the other half (or I say follow the symmetry). How do I make a symmetrical vectors? Screenshot: P.S.: I am trying to learn things and if you think there is some video which could help me out too (any tutorial)? Please care to share with me. Any help is always appreciated. Thanks.
 -
 I tried many settings under snap settings and if snap to grid is enabled, it allways is same snapping - it snap to between grid points and on the points and it doesn't matter if all settings except snap to grid is turned off or on. How to make snap in to only points?
 -
Apple Pages give haptic feedback when an image or object is snapping, this would be a nice feature for Affinity Designer and Photo.