Friksel
-
Posts
502 -
Joined
-
Last visited
-
 keiichi77 reacted to a post in a topic:
Color preview is wrong when opacity is less than 100%
keiichi77 reacted to a post in a topic:
Color preview is wrong when opacity is less than 100%
-
keiichi77 reacted to a post in a topic:
Color preview is wrong when opacity is less than 100%
-
keiichi77 reacted to a post in a topic:
Color preview is wrong when opacity is less than 100%
-
Rikvee reacted to a post in a topic:
[Photo] How to draw directly in Alpha-channel?
-
Msmeraglia reacted to a post in a topic:
[AD] Force pixel alignment is still placing nodes in between pixels
-
Msmeraglia reacted to a post in a topic:
[AD] Force pixel alignment is still placing nodes in between pixels
-
 walt.farrell reacted to a post in a topic:
[found workaround] Designer 1 and 2 are not both allowed at the same time in Wacom Tablet Properties
walt.farrell reacted to a post in a topic:
[found workaround] Designer 1 and 2 are not both allowed at the same time in Wacom Tablet Properties
-
Friksel reacted to a post in a topic:
[found workaround] Designer 1 and 2 are not both allowed at the same time in Wacom Tablet Properties
-
 Not sure what you mean by 'pointing' tho. The way Wacom probably recognizes which application is currently active to switch settings to seems to be looking at the active window and find what executable filename started it. It doesn't seem to even know the path or at least doesn't seem to do anything with it. If it did than I wouldn't have this issue, because than it would see that designer.exe from program files (version 1) is a different designer.exe than the version 2 which is somewhere else. But it can't make a distinction between the two while the executable filenames are having the exact same names. That's why I just renamed the filename of the version 1 designer.exe to designer1.exe. Now it sees both executables (designer1.exe and designer.exe) as two different programs and I can set different Wacom setting for both versions. This will be a problem tho when there wille be a version 3 and Serif doesn't change away from the current v2 installer type and/or we're not able to change this filename and/or Serif is also calling the v3 executable designer.exe. Than we'll have to do something else to make this work. So if Serif is reading along; this would be easily fixed for all Wacom users by just adding only the mayor software version in the executable filename. So like designer-v1.exe, designer-v2.exe (not designer-v2.1.3, because than that would be Wacom configuration hell as that would be a wacom configuration per sub-version or it won't even have an application specific configuration!) Hope this makes sense!
 -
I don't. I'm renaming the executable of v1
-
Ah... I figured a workaround, which was actually pretty simple; Just rename the designer.exe (v1) into designer1.exe and the panel makes a distinction between the two 😀. It works now! 😀 Leaving this here just in case other people are looking for the same thing. And perhaps it's helpful to Serif.
-
Not sure what is causing this, but using the latest Wacom Tablet Properties configurator to configure the Wacom tablet for use with different software programs, I've bumped into something I never bumped into before; When adding the Affinity v2 applications to the wacom panel the version 1 applications get removed/replaced by the new application. So for some reason it's not recognizing Designer v2 (which I'm configuring right now) to be a different application. Probably that is because the name is exactly the same (Designer) somewhere and the software cannot make a distinction. I've tried adding the v2 designer application to the configurator by picking it from the path, but that doesn't make a difference. It's always only showing the last Designer-application I've added to the wacom panel (either v1 or v2). Not sure if this is something Serif can change, but it's not really a feature request either as I would expect this to work, so putting this in the bug-forum because obviously a lot of people work with Wacom so I'm sure I'm not the only one facing this issue so I consider this to be important to Serif. But if somebody has any tips on how to solve/workaround this, I'm all ears! <- one or the other->

-
ahnay reacted to a post in a topic:
Being able to drag crop edges instead of small crop-handles
-
Old Bruce reacted to a post in a topic:
How to view content of layer which is not on 'canvas'?
-
@Old Bruce BTW in these type of cases it's so briliant that we can just switch to Designer, edit the same file, and go back to Photo again 😀 Real timesaver!
-
@Old Bruce Nice! Thanks! Exactly what I was looking for! 😀
-
Friksel reacted to a post in a topic:
How to view content of layer which is not on 'canvas'?
-
Is there a way to view the content of a layer (while dragging) which falls out of frame/canvas?
-
I know. And it's probably a great workaround. Thank you for your help!
-
Friksel reacted to a post in a topic:
[Photo] How to draw directly in Alpha-channel?
-
Lisbon reacted to a post in a topic:
[Photo] How to draw directly in Alpha-channel?
-
Friksel reacted to a post in a topic:
[Photo] How to draw directly in Alpha-channel?
-
@LisbonIt can be done even easier: Just add a mask layer to the layer and paint inside that mask layer (select the layer and hit the 'mask layer' button)! No need to merge layers. And semi transparancy is working fine too! 😀 On second thought that's perhaps even nicer to use than drawing on the alpha channel! (although being able to draw directly on the alpha channel is still a great intuitive thing to have, especially when coming from photoshop and perhaps for reasons I'm missing now... [edit] ah, I found one: when you want to work directly into the channel and don't want the hastle to create a mask from an existing channel wich already has alpha. So the mask-workaround is not ideal either...)
-
Friksel reacted to a post in a topic:
How to Edit the Alpha Channel
-
Friksel reacted to a post in a topic:
[Photo] How to draw directly in Alpha-channel?
-
Friksel reacted to a post in a topic:
[Photo] How to draw directly in Alpha-channel?
-
Sorry, that's not what I want. I want complete paint-control over the grayscale Alpha channel. I see now that the alpha channel is working completely different than in Photoshop. Affinity Photo doesn't let us paint directly into a channel, but let us paint in a LAYER and let us turn off channels to paint on. So we always seem to be painting on the RGB channels and the alpha channel got created automatically, instead of letting us paint on the alpha channel. So we can indeed use the eraser to erase pixels from the RGB channels, which automatically erases the same pixels in the alpha channel, but I need semi transparent painting of pixels directly into the alpha channel and that's not possible this way. Beats me why Affinity created this totally different workflow compared to Photoshop. BTW it seems like the info in the help doc isn't completely right either; it tells us FOR EACH CHANNEL we can fill the CHANNEL information. But that doesn't seem to be true?! Guess painting into the alpha channel is just impossible in Affinity. Which makes me a little sad. Will try the workaround as mentioned by @Lisbon now. Thanks @Lisbon. Just found this thread on the forum with more people having complaints about it:
-
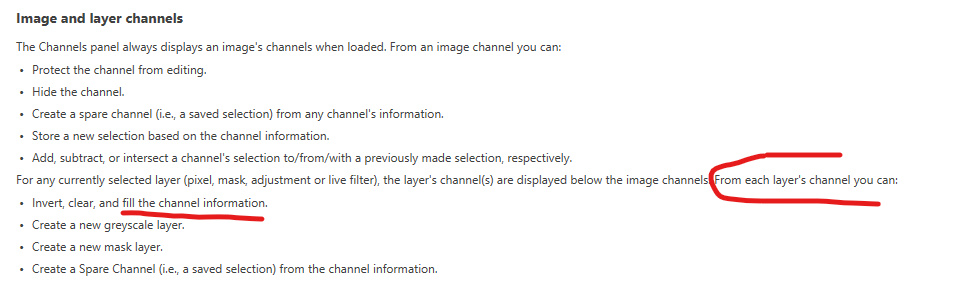
You mean you think it's not possible to draw directly on the Alpha channel? Than what is the channels tab for? I'm pretty sure those edit-icons (the pencil icon) aren't there by accident, right? This is what the Photo manual says about channels, so I would definitely expect the Alpha channel to be drawable:
-
Hi, I'd like to draw directly into the Alpha channel of a layer. I did this in the past in Photoshop and I'm positive this must be possible in Affinity too as there are switchable channels per layer with an edit button behind each channel. But for some reason it's not painting inside the channel with a paint brush tool (it seems to paint in the R/G/B channels still. How can we paint black/white/grayscale directly into the Alpha channel (not in the r/g/b channels) in Photo?
-
@David in Яuislip When doing this it indeed helps! The color dialog is back when changing to 200, 200 and restarting Designer. Something was off tho, as the previous location should also've worked fine as I'm on a HD monitor (1920x1080) and it should fit perfectly within (somewhere in the bottom right). And even if it wouldn't it would've moved to the second monitor, which it didn't. So it was some weird glitch I've never seen before in all these years. But it's working now again. And great to know these setting files now (never looked for them). And if it happens again I just reset these values again. Thanks for your helpful response!
-
@David in Яuislip Thanks. Great tip! However, it doesn't seem to be the issue that position is wrong. This is the ColourChooser location in Designer here according to that Window.xml: Even the Display is set to 0, which, I assume is just the main monitor <ColourChooser> <X>1671</X> <Y>1033</Y> <Width>586</Width> <Height>447</Height> <Display>0</Display> </ColourChooser>
-
Friksel reacted to a post in a topic:
Color dialog won't popup when doubleclicking the color. Anybody ever had the same?
-
Using all three Affinity products for years now I've never encountered this before; When double clicking on the color rings to make the color edit dialog appear in a modal dialog it won't show up. It's definitely not on another monitor either as I have every monitor turned on and it's on none of them. Not even hidden. It is NOT working in Designer, but it IS working in Photo still, so perhaps this is something Designer specific or perhaps some remembered setting making it different in Designer. I don't like re-installing this software or resetting all settings or similar without even knowing what caused this. So I wonder if anybody here on the forum ever seen this happening and what solved it? BTW of course I tried restarting Designer. It didn't help