Search the Community
Showing results for tags 'Photo'.
-
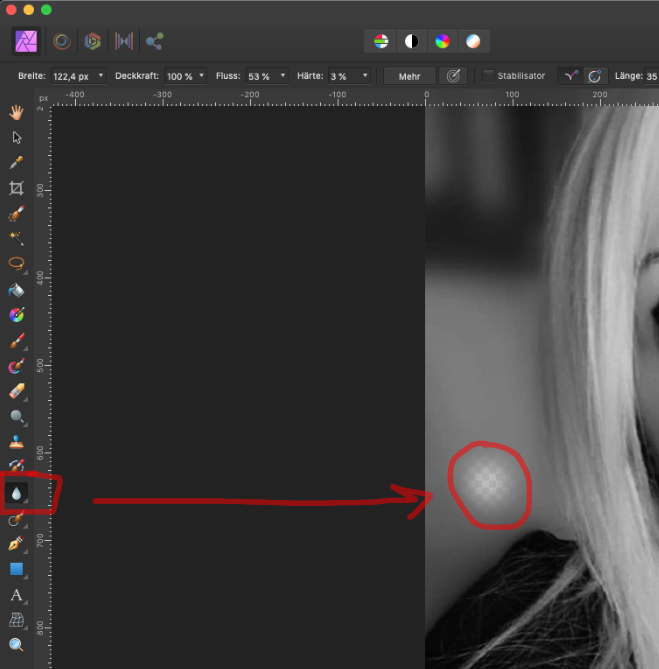
 Hi. Is it in Affinity photo possible to change the density the black parts of a layer mask? I know the opacity slider, but it affect only the white parts. Any hints are welcome.
 -
 New to Photo. Add photo. Select Liquify persona. Select Mesh Clone Tool. Help file says Alt + Click to select, Photo says Click + Alt to select. I Click + Alt but get a fault message saying I should Click + Alt (which I've just done). I take the Help file's advice and use Alt + Click. I'm then advised to Drag or Hold to clone the mesh, but nothing happens. What am I missing? P.S. The other Liquify tools seem to work OK.
 -
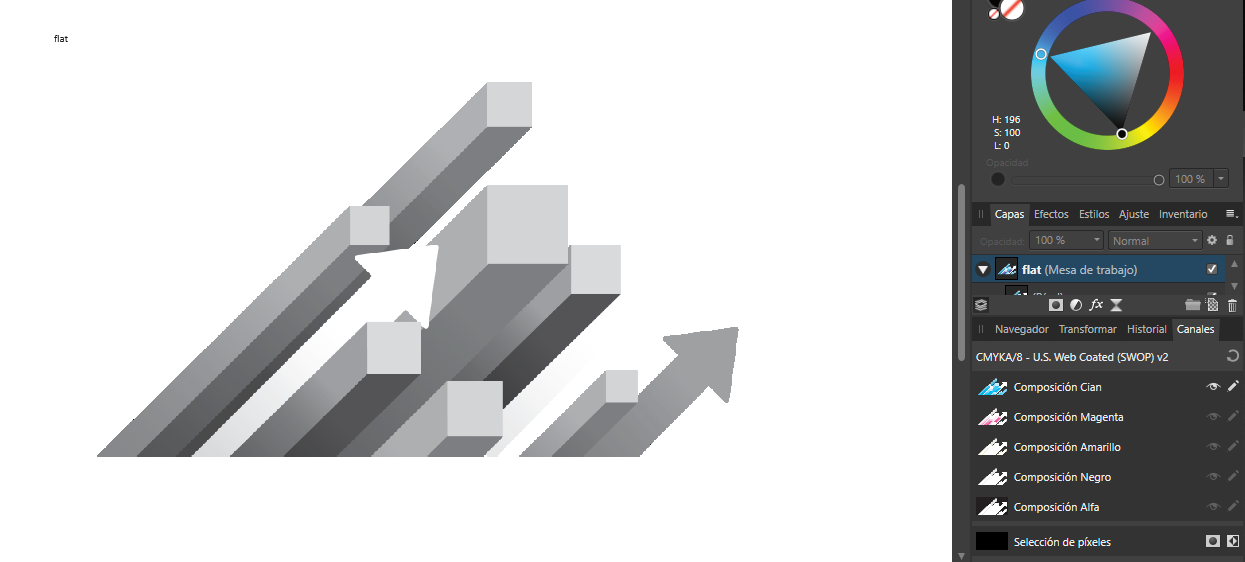
 Hello, I have the following issue for which I can't find a solution anywhere I've looked. So, I got this artwork and I need to prepare it for printing. I wish to export each CMYK channel separately so I can create the half tones. Howver, when I disable the channel on the Channels studio, and then export the image I don't get the grayscale of the enabled channel, instead I a full color export. Is there a way to export just a single channel or better to straight create a layer from the channel to do the half tones directly on the file? (this is what I want to achieve) Thanks for your time! I'm using Affinity Photo for this but I've got both in case I needed to use Designer. -Nehemek
-
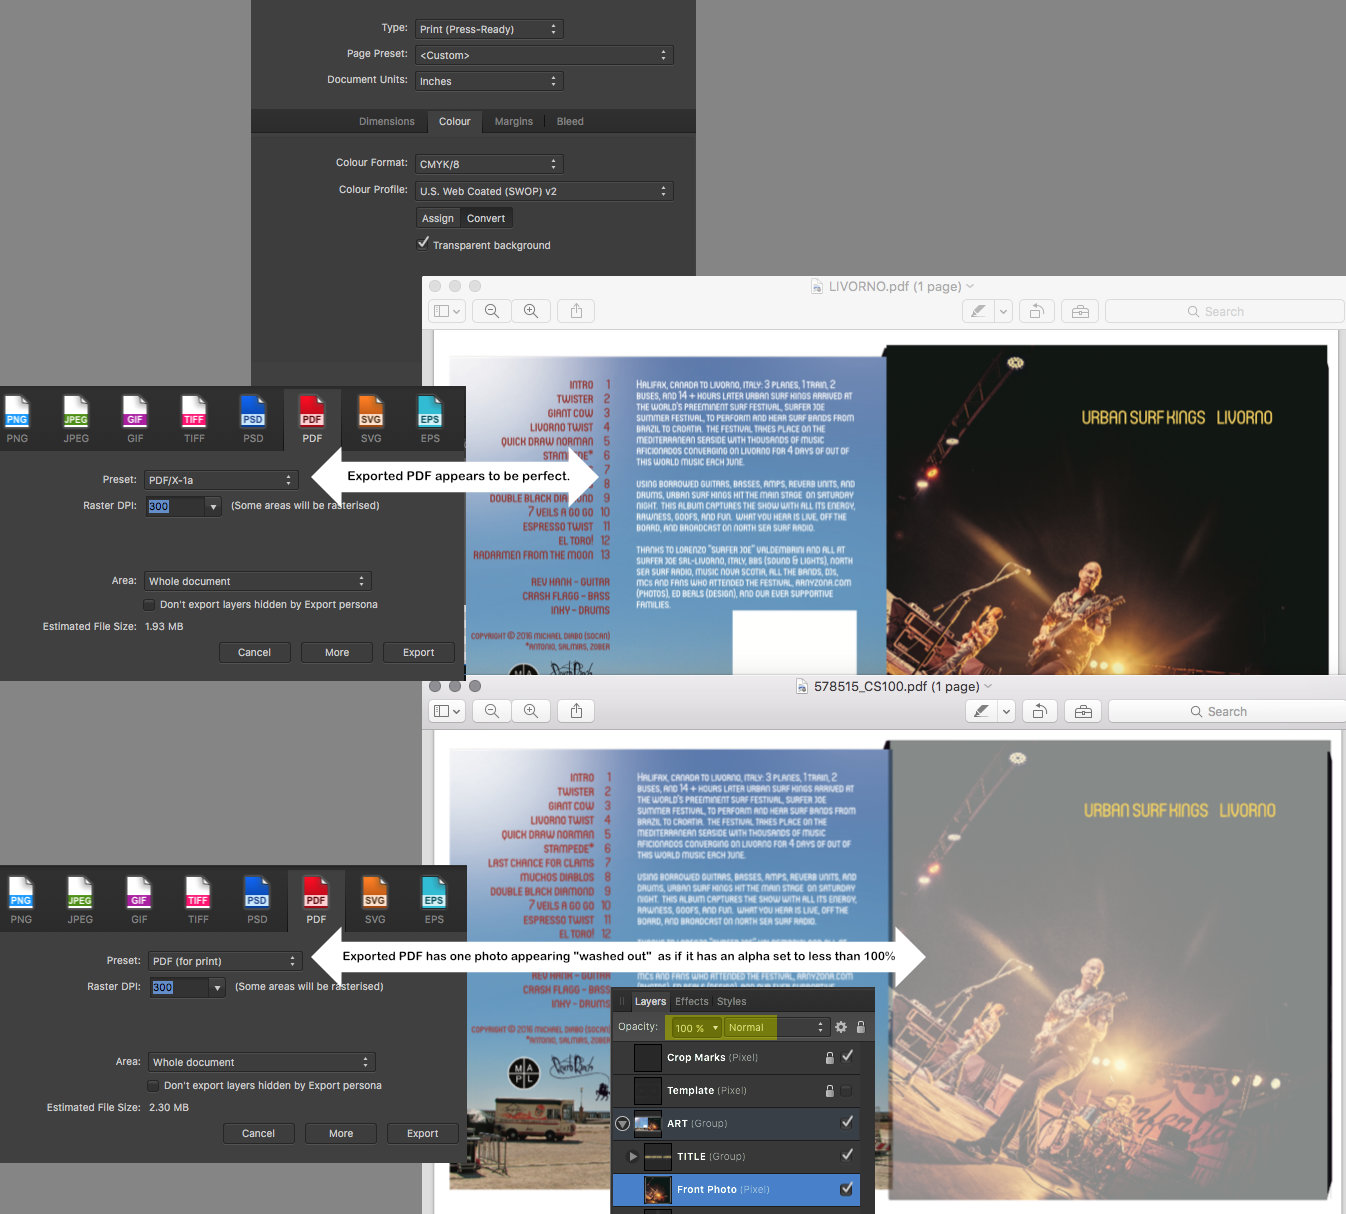
 The print service has requested CMYK exported as "High Quality PDF". The design has 2 photos, lots of text (converted to curves) and a few vector elements. When I use the "PDF (for print)" export option, the resulting PDF has the strange result you see attached. When I use the "PDF/X-1a" option, the resulting PDF appears to be as expected. I'm going to send this version to the print service. I am, however, curious about what is causing this issue with the "PDF (for print)" option. Id it possible that this is a problem only with the display, and that it would still print correctly? At any rate I did not want to test that theory on 1000 CD sleeves. This is not an emergency unless the manufacturers says they have an issue with the PDF version I am sending. Thanks in advance.
-
 Hello- I recently purchased the Affinity Photo app in iPadOS 13, and maybe there is something Im doing wrong while importing files, JPEG but specially with RAW files (Nikon D750), but I noticed the levels of noise are significantly increased. I have compared the imported RAW files in Affinity, against the iPad Photos app as well as Lightroom and noise is increased in Affinity photo. I tried multiple import methods, different configurations, but unfortunately I’m not seeing any improvement at all. Will appreciate any advice, I purchased this App as a replacement for Adobe Lightroom and Photoshop, but because of this issue I can’t fully replace them. Don’t get me wrong, I do like Affinity Photo is just that this issue introduces another step in my workflow by not being able to fully get rid of Lightroom at least. Thanks, kindly let me know if there is any other topic where this has been discussed in the past, any direction at this point of time will be appreciated. Oscar
 -
 Hi Chris, I'm seeing similar softness in RAW imports and general stability has gone backwards with the latest IOS update. I haven't processed a single image that hasn't crashed the app at some point. The RAW persona is reasonably stable with the exception of the elliptical overlay which doesn't work at all. The Photo and Selection personas are randomly killing the app. Adjusting filters, adjustment layers, selections. Not anyone in particular. Adjustments I regularly: (all have randomly crashed the app at some point) clarity high pass shadows/highlights vignette Filter I regularly use: (all have randomly crashed the app at some point) B&W B/C Colour Balance Curves Levels Recolour Selective Colour (crashed the app a lot) Shadows/Highlights Split Toning I use other filters but they have not crashed the app yet: Exposure White Balance Vibrance Been a very unproductive couple of days.
 -
 Would I be able to make use of the brushes in this offer? https://www.mightydeals.com/deal/2800-in-1-bundle.html?ref=ognews&refNL= Note that among file types are .psd, .svg, .eps Thanks
 -
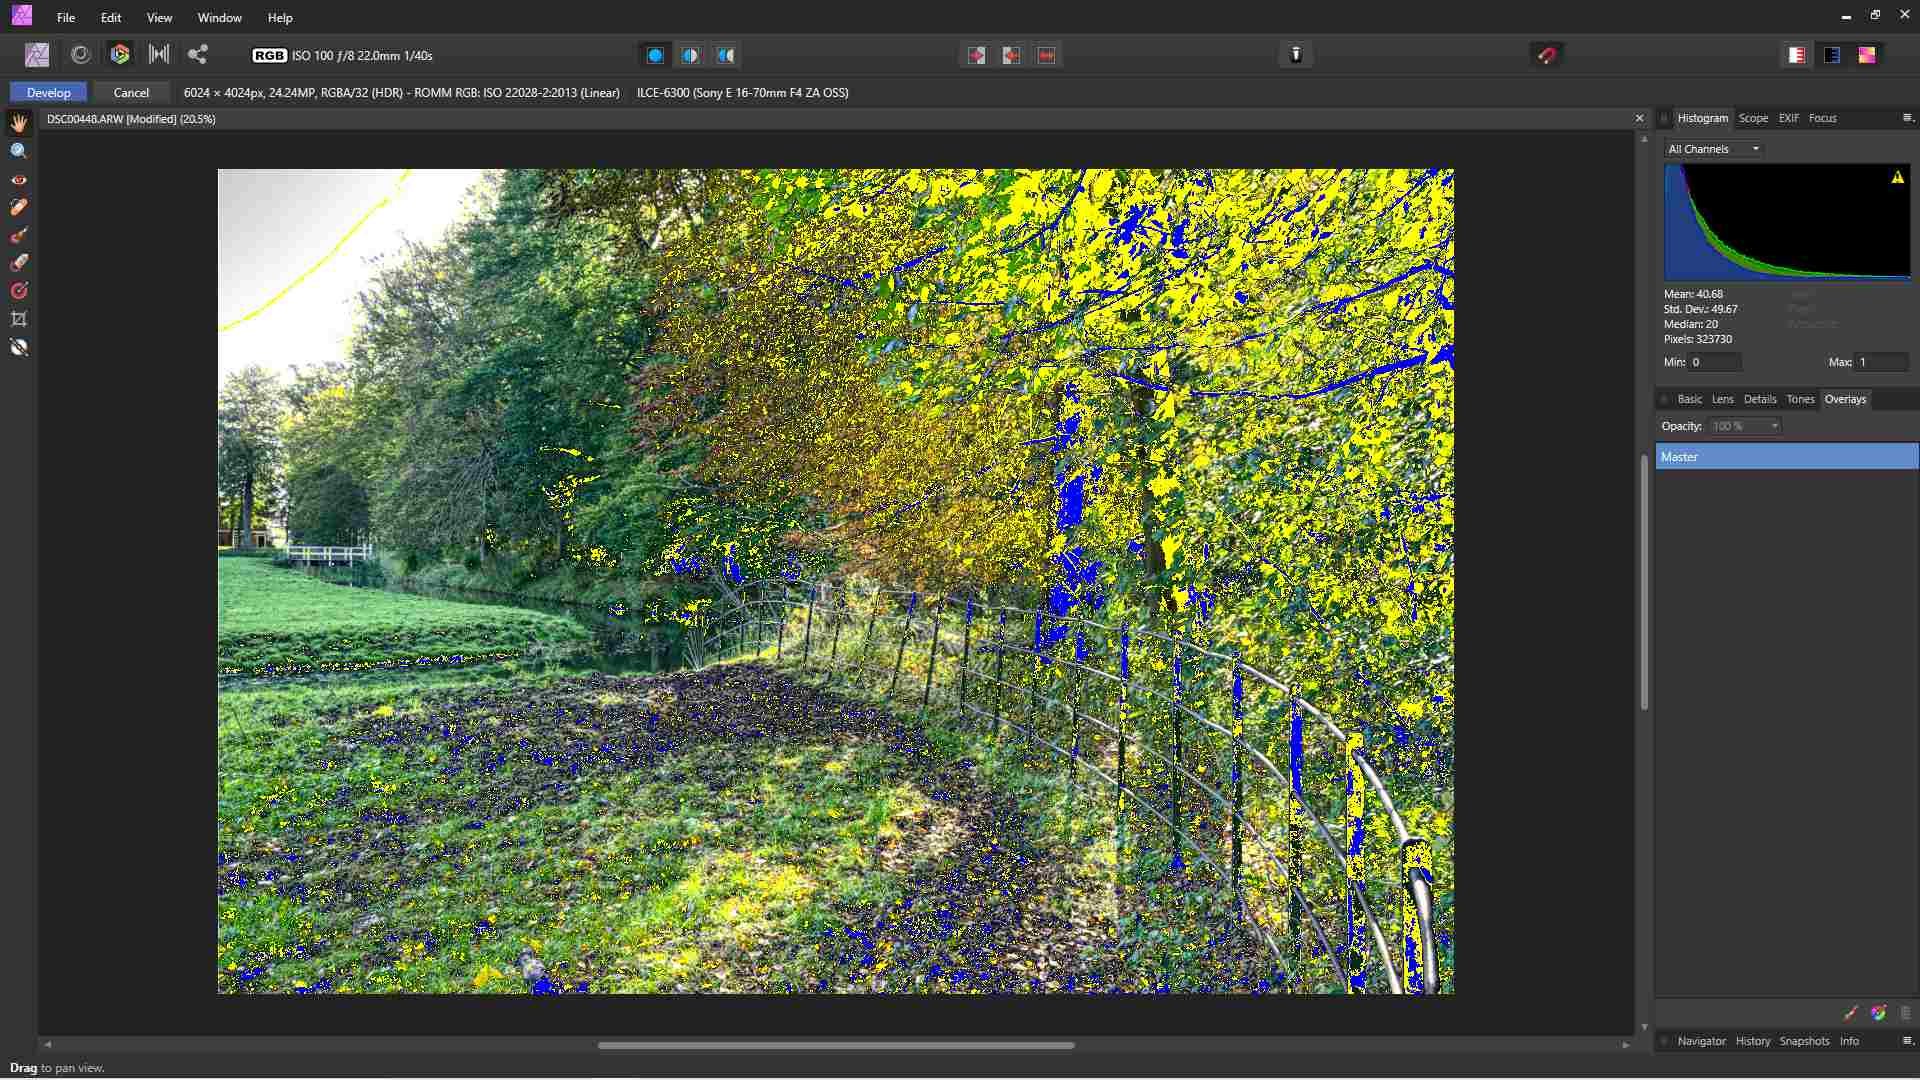
 Hello Please can you explain what is happening in the attached screenshot? This is with the latest update. What is the switch for this? It looks a bit like an analytical screen. Michael
-
 Is it possible to create a layer mask with the pen tool? I have a very difficult subject that needs to be removed from a photo and the pen tool will allow for precise cutting. Photoshop can do this with tremendous ease... I would need this to be possible in Photo. Any advice? Thanks!
 -
 It would be good to be able to compare at least two original, uncorrected, images in the photo library so that, if they are similar, it is easier to decide which to work on.
 -
 Studio Link sounds like a really good feature, but my only gripe with it is it only works within Affinity Publisher! It would be great if we could access high quality raster tools and easily switch between raster and vector using Photo and Designer, not just Publisher.
 -
 I'm trying to apply a lens distortion correction profile to my photos, but no matter what I try, I always see "Lens profile distortion (unsupported)". I have all the lens correction profiles from Lensfun in Affinity Photo's "Lens Profiles" folder (C:\ProgramData\Affinity\Photo\1.0\LensProfiles), and I've restarted the program, but nothing seems to enable this option for me. I've even tried using images shot using different cameras and different lenses, still nothing. Here's what I see at the top of the program window (oddly showing a different lens which I don't own): And here's the EXIF data (which is accurate): This camera and lens are supported, so does anyone know why the profile isn't automatically being applied?
-
 When I try to import a .CR3 file from my Canon 90D to Affinity Photo for iPad, I get the following error ... "Failed to open file .... The file type is not supported". Any ideas on the solution and/or work around until this is supported?? Cheers
 -
 Hi! There's a little glitch with the Blur Brush Tool in Photo beta 150 RC2: It does its job, but the live preview becomes transparent. But not always! I guess it depends on the type of file ... maybe Metal on.
-
Hello, Affinity community, has anyone noticed importing brush error? This is after the latest updates. Have never had this problem before. Since the problem exists in the affinity designer as well as affinity photo, i thought better ask the community. i cannot import any brushes in either of the programs. If anyone knows the fix, please lmk. Thank you Gyan
-
Why doesn't Affinity Photo Panorama Persona import .afphoto files?
-
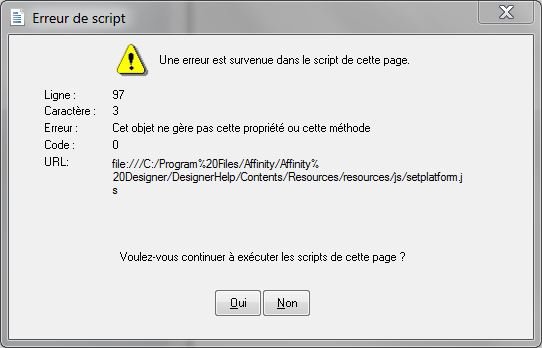
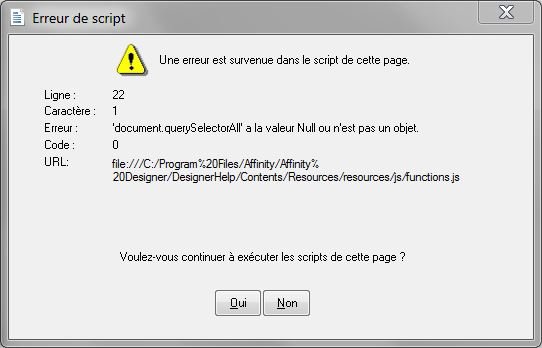
 Hi, I'm running Designer + Photo 1.7.xxx on a Windows 7 SP1 64bits computer, not so connected and updated by Microsoft Update. There are several scripts errors when I launch the Designer / Photo offline help. What are the requirements for having this help section working 100% if possible ? Sometimes I've noticed too examples images before/after not showing too. I'm ok to update only needed Microsoft packages, but don't want to update the whole system to stay on a fluid computer (my personal point of view !)... if possible. Thx !
-
 Hi, It's really usefull to use tints with global colours, but we miss the ability to add those tints to the swatches' palette. For now we need to use again the tint panel and choose a percentage, or copy-paste the style to have the same tint. If we add tints for a global colour from the menu, those tints aren't global, and aren't linked to the original colour: if we modify the global colour, the tints won't change accordingly.
 -
 Hey guys, I'm trying to make a black to transparent fading gradient, I drew a rectangle shape on 1/3 height of the page and use the transparent tool to click on bottom of the shape and drag to the top straight, midpoint set the standard 50% but on top of the shape, it appear to have noticeable edge and not completely fade to transparent and blend in to the background image, can you guys let me know how to settle this? I try to set the midpoint to 55% because I want the black are to be a bit higher and then make a second midpoint and set it to 45% and the edge don't noticeable much but because there's 2 midpoints, the gradient looks like a 3 bar with black, dark gray and light gray shading. And how do i make sure tire's no banding problem with amazon KDP print? Please help! Gradient Test.afdesign
 -
 Hi! I'm struggling to to do this – https://www.dropbox.com/s/npwdnrt7meqdax3/AFT_ScreenRecording - 20190702_1935.mov?dl=0 – in any of Affinity software. Am I missing something? Lack of a solid transform tool feels to me like a deal breaker. Best regards P.
 -
 I came across the Power Retouch Plugin Suite recently. It is available for both Windows and Mac. The price seems fairly high, around $60 or £64 (inc VAT) for a single module or $299 for the set of 27 modules (Windows only). The Demo full suite installs in Affinity Photo with no problems. Those modules I have tried work OK, although once or twice an error message popped up, then disappeared. The Suite includes Colour fringe removal, Chromatic Aberration removal, Brightness and Contrast adjustments, Sharpness Editor (including halo suppression), Film grain, Softness, Lens correction etc. Those I tried worked, though I do not think that they could do anything that the current Affinity Photo could not do as an Adjustment or a Filter. Neither did they do better than my Nik or Topaz plugins. The Demo version modules do leave a visible watermark. The plus is that they all seem to work with Photo. John
 -
When modifying hte opacity of a colour, the swatch/round/rectangle that shows the colour should display the colour at 100%, not lighter (colour panel) or darker (gradient panel).
-
 Hello, I'm having a problema with affinity photo on macOs (mojave)... I can't export EPS files, it appears empty, I think that is because of file authorization, something like that... because when I opened the file in Designer, it asked authorization, I granted and I was able to export, but won't work with photo and I don't know how to authorize, because it don't ask me anymore... thank you
 -
 Hi everyone. This might sound a bit silly but please bear with me. I needed to crop part of a picture using a heart shape, and the cropped piece needed to be a certain size. So, I used the elipse tool using a heart shape, dragged it across the part I needed to include, went to the "transform" tab and added the height and width I needed. I used "mm" and Photo took care of the rest. This didn't work as planned, I printed the selection on a transparent background and the image was probably 20% the size it needed to be. I am pretty sure that the problem I have is that I don't have a complete understanding of the whole resolution/size/format aspect of editing. I suppose the problem is that I must alter the size of the document depending on the size the picture is gonna be printed? I used the default setting for document size, the pic having been taken with a m4/3 camera. Then I printed the picture (have had it printed, actually) on 10x15. I have the feeling that in order to have a 55 x 55 mm picture (the size I need the selection to be) I should have printed it on a larger format or that I should've resized the document before getting to work on it. In short, how do I get the 55 x 55 mm selection I make on screen to correspond to a 55 x 55 mm printed image? Many thanks and sorry for asking something so basic.
 -
 I have noticed perhaps a significant issue in both Designer 1.7.2 and Publisher 1.72 after loading Affinity Photo 1.7.2 Images in either app. Designer and Publisher both crash when a <Print> command is entered. I have attached macOS 10.14.6 (18G95) error reports and uploaded them to Apple. I have been forced to export from Photo to a .png or .jpg format for the 2 apps to work properly. Please advise ASAP as it is much better to have a Designer + Publisher + Photo workflow rather than being forced through an extra stage of exporting .afphoto images. Many thanks amcd Publisher Crash on Print.rtf Designer Crash on Print.rtf