

- S -
-
Posts
817 -
Joined
Posts posted by - S -
-
-
12 hours ago, Florida said:
…Normally I expect adjustment layers to affect ALL layers below which is what I want.
The icon to the right denotes there's a layer mask applied to the White Balance Adjustment layer, which looks predominantly black. The White Balance Adjustment will not be visible on the underlying layers for the parts of the mask that are pure black – therefore the adjustments are only showing where the parts of the mask are lighter.
Hold the Alt/Option key on the keyboard and left-click the mask thumbnail in the Layers panel and it will display what's masked or not, represented in greyscale.
Unlike normal mask layers [Layer > New Mask Layer] where it's possible to easily toggle mask visibility on/off, or delete the mask, with these built-in Adjustment Layer types of masks you'll need to fill the mask with pure white [Edit > Fill] (Shift + F5) to disable it.
-
3 hours ago, DoctorBe said:
Sorry. It's the file with the bee
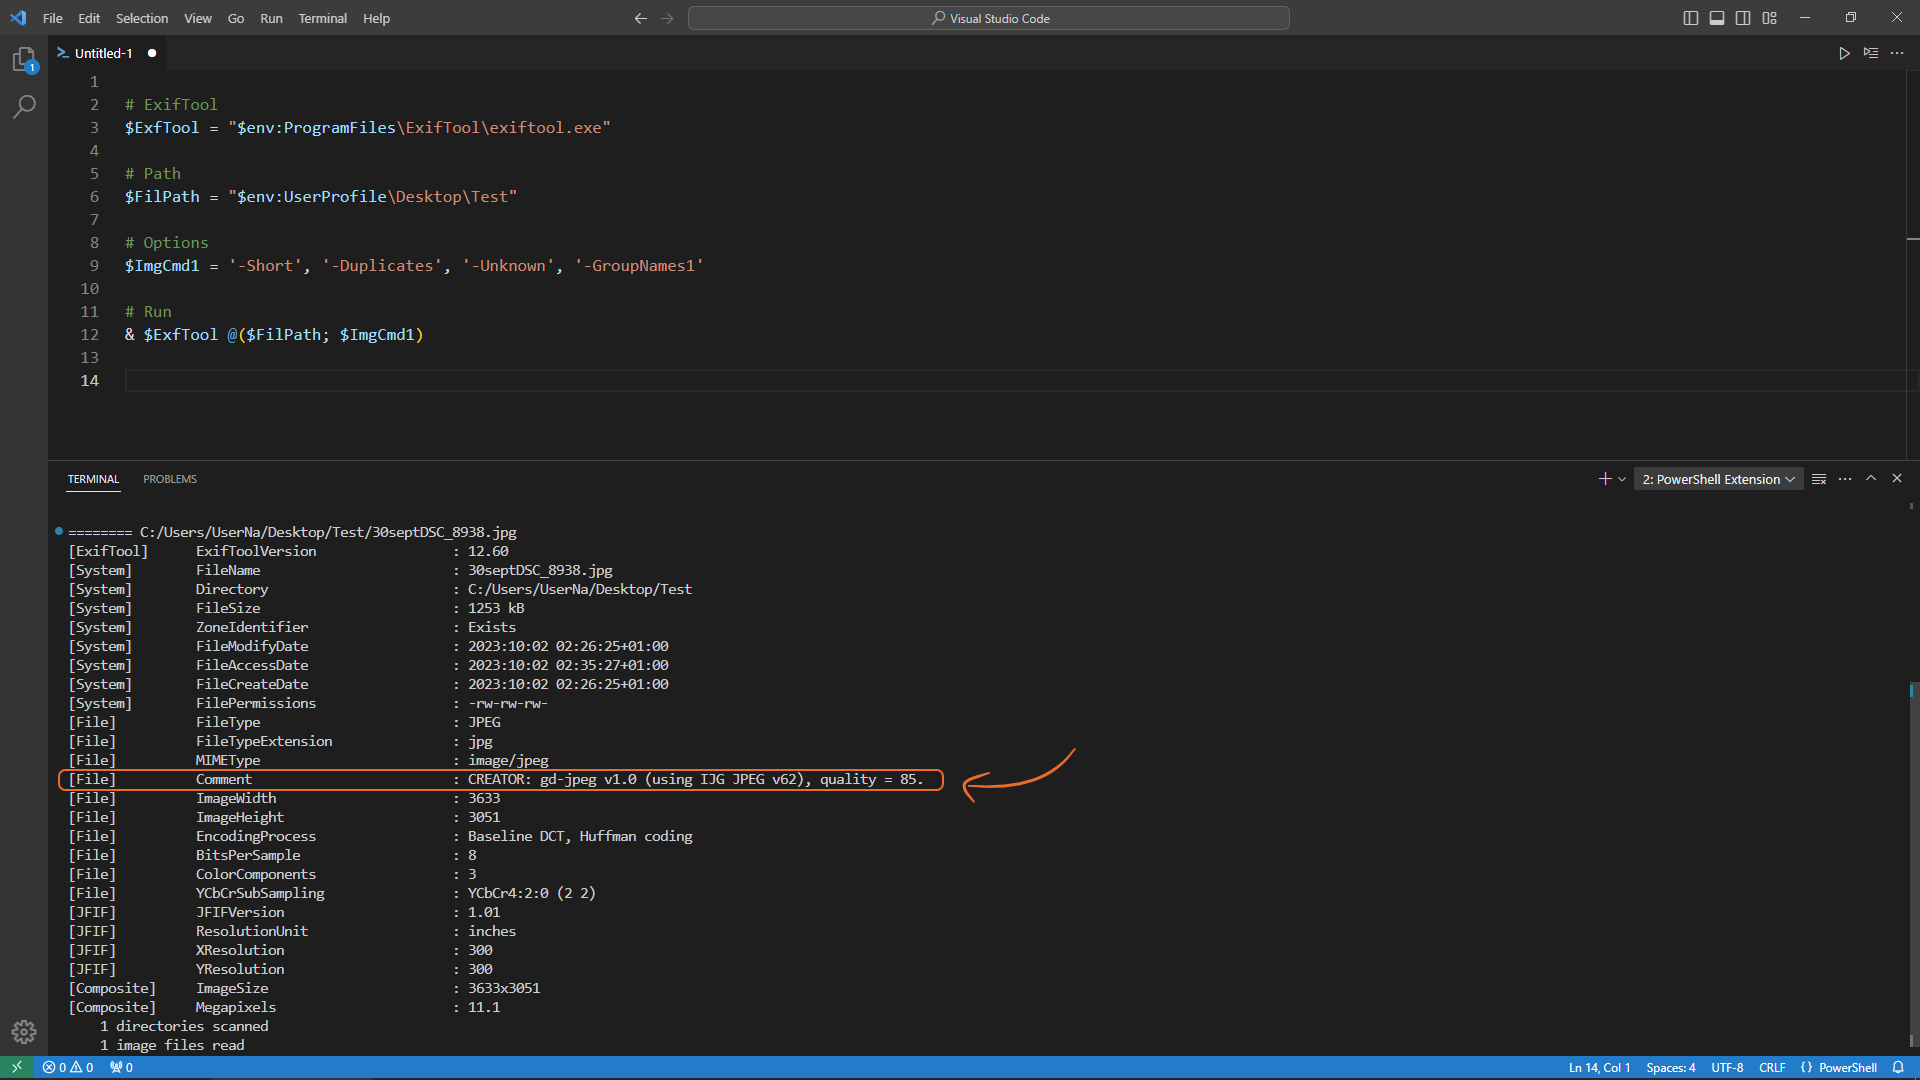
Although the below tag is in the file, I have never seen this tag added by Affinity Photo.[File] Comment : CREATOR: gd-jpeg v1.0 (using IJG JPEG v62), quality = 85.

I don't see that tag in D500 out-of-camera JPG images either, usually just the below tag.
[Nikon] JPGCompression : Optimal Quality
Therefore, I suspect this tag is being added by some other software prior to being processed with Affinity Photo. The image dimensions of your file are 3633×3051, rather than the standard 5568×3712, 4176x2784 or 2784x1856. Has the image been resized in other software and this software is possibly adding the tag?
I would double-check with a new out-of-camera JPG straight out of the camera – without any other software used – that this tag is definitely not there before using Affinity Photo, but is added by Affinity Photo.
-
I've seen this before where the individual was using an EF-S lens with a Canon mount adapter to mount it to their R body. It displays OK in Canon DPP, but not in Affinity Photo.
You should be able to get rid of the vignette mask in the Affinity Photo Develop persona by going to the Lens panel and unchecking "Remove Lens Vignette". However, I'm not sure whether they are any other issues as I use Canon DPP.
-
2 hours ago, dpick said:
…When I export the image as JPGs, sometimes it includes the metadata and copyright info and sometimes it doesn't.
Are you able to give steps of a particular workflow where it doesn't embed metadata when exporting as JPG (for example, is this when exporting from the Export Persona, rather than File > Export)? Ideally, also upload a sample JPG file that it happens with here in a ZIP file.
Quote…When I export as a PNG file, it never includes the information, no matter what I do.
The PNG file format historically didn't support standard metadata formats (I.E. IPTC, EXIF, XMP). While the authors of the PNG specification did finally add official support for metadata chunks fairly recently (2017), they took so long to add it quite a lot of applications such as Windows File Explorer never added support for it.
-
4 hours ago, marcus.fehse said:
exactly. thank you for investigating further, @- S -. (i’ve never read this tooltip info inside export persona. my bad.)
is there any idea or logical explanation why one would want this behaviour?
None that I can think of. I would expect the user to be able to choose whether or not metadata is embedded for all slices, not just the default slice. -
The Affinity Photo Export Persona will only export metadata for the default slice. When creating additional slices, the metadata is lost. Is this perhaps the issue you're experiencing?
-
I am able to reproduce this issue.
The original image dimensions in the above post were 4000 × 2250; the image has then been doubled in size to 8000 × 4500. In this scenario, the masks will display this phenomenon when converted to RGB/16, RGB/32, Grey/16, LAB/16.
Steps to reproduce:
- NotMyFault and NathanC
-
 2
2
-
I use Curves initially when processing scanned images/negatives like these.
However, Curves is missing some pretty crucial features in Affinity Photo, which means that although it can be done (in combination with the Info panel), it is really time consuming compared to Photoshop. This is predominantly due to Affinity Photo missing white/grey/black point pickers in Curves – along with the auto colour correction feature in Curves. The Photoshop Auto Colour Correction feature also has advanced settings that allows tweaking how the auto settings work, which makes it really useful and can save a lot of time (in Photoshop [Alt/Opt + Click] the "Auto" button to bring up "Auto Colour Correction Options").
Once getting the image to approximately what is should look like using Curves, it creates a good starting point where you can then tweak it further using normal tools – like you would any other image.
As per the below videos, it will be OK for just a few images, however if you have hundreds/thousands of images, this will not be practical.
01 - Colour Photo (_DSC1845.ARW)
File: _DSC1845.afphoto [Edit: Removed large afphoto file attachment to save storage space]
02 - B&W Photo (_DSC1810.ARW)
File: _DSC1810.afphoto [Edit: Removed large afphoto file attachment to save storage space]
-
Affinity Photo is sporadically cutting off one pixel from the layer width when rasterising.
This is probably going to be difficult to reproduce, as the issue is sporadic. In the below examples, with the exact same images and exact same steps, sometimes it cuts off one pixel from the width and sometimes it does not. When this occurs, the layer is aligned perfectly to the pixel grid, therefore this should not be occurring.
Example 1:
In this video, the image is rasterised using [Document > Flatten]. The first time it works incorrectly and cuts the pixels off (999 pixels wide); the second time it works correctly and doesn't cut the pixels off (1000 pixels wide).
Example 2:
In this video, the image is rasterised using [Right-click layer > Rasterise & Trim]. The first time it works incorrectly and cuts the pixels off (999 pixels wide); the second time it works correctly and doesn't cut the pixels off (1000 pixels wide).
Example 3:
This video is showing the image aligned perfectly to the pixel grid before rasterising.
Grey PNG test file used in the video (1000 × 610 px):
-----
Affinity Photo - 2.1.0.1799
Windows 10 - 22H2 (19045.2965) -
20 hours ago, grunnvms said:
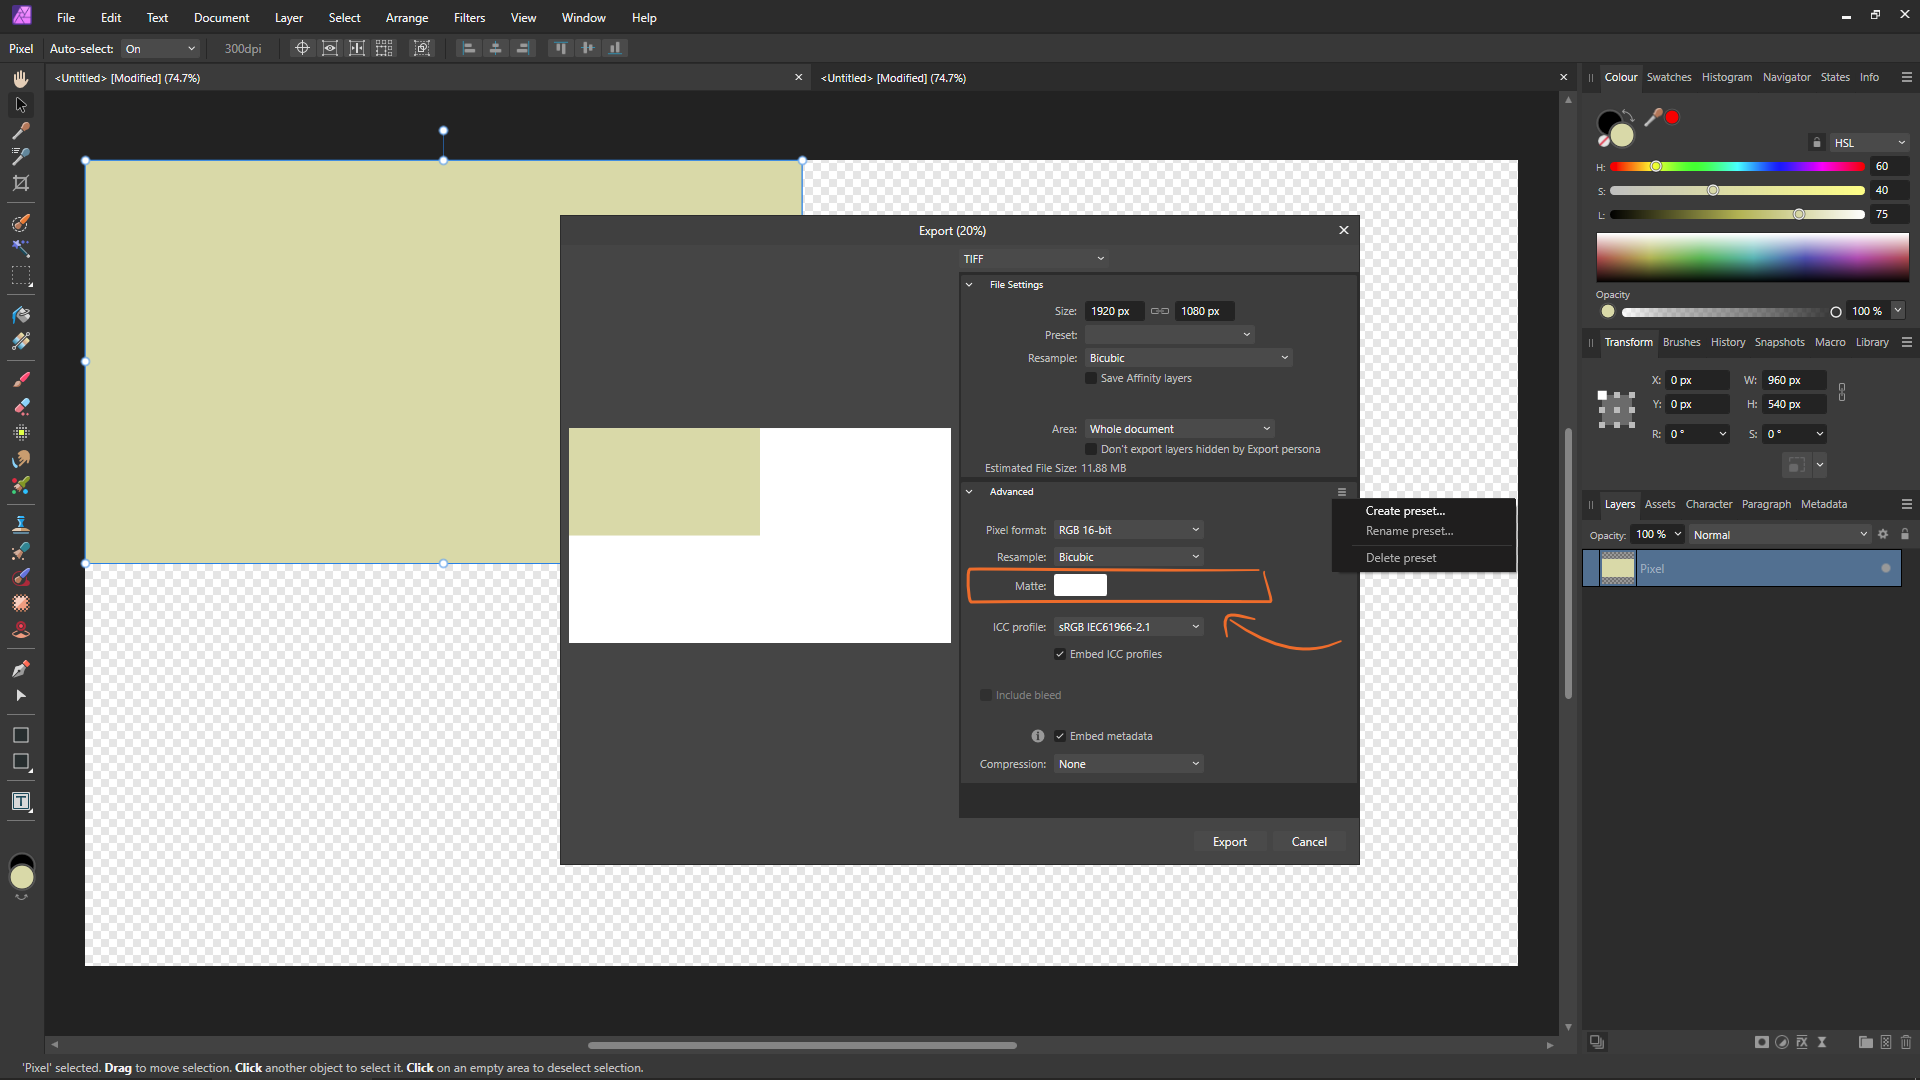
"…One would assume that the export file of Capture One and the export file of Affinity Photo have about the same size, after all I did not change the size of the image, and both export files are uncompressed 16 bit tiff files.
However, the export file from Capture One has a size of about 150 MB, and the export file from Affinity Photo has a size of less then 100 MB, so quite a difference."
The TIFF file exported from Affinity Photo is 91.4 Megabytes. This is around the file size I would expect for an uncompressed 16-bit RGB TIFF file of that resolution (give or take a bit for metadata and embedded thumbnail). I.E.4896 × 3264 = 15,980,544 pixels 15,980,544 × 48 (bits per pixel) = 767,066,112 bits 767,066,112 ÷ 8 (bits in a byte) = 95,883,264 bytes 95,883,264 ÷ 1024 = 93,636 Kilobytes 93,636 ÷ 1024 = 91.44 Megabytes
Therefore, I think Capture One is storing extra data in the TIFF file for some reason. Looking at the metadata of your TIFF file using ExifTool, it lists the below properties – which I think is likely where the issue lies.
[IFD0]          TileWidth                       : 2048
[IFD0]          TileLength                      : 2048
Looking at the Capture One help page (LINK HERE), it appears to have an export option for "Tile Dimensions". I think the reason for the extra file size is that you're exporting the image from Capture One with "Tile Dimensions" set to "2048".
I would suggest going into the Capture One export options and changing it to "Not Tiled". The exported file size from Capture One will then likely be around 91.4 Megabytes – the same as Affinity Photo.
-
When the left-hand toolbar is full, adding more tools to via [View > Customise Tools] adds them to an overflow menu. However, once added, it does not allow the user to remove them again by dragging then back out.
Video:
-----
Affinity Photo - 2.1.0.1799 -
-
17 hours ago, ElizabethZ said:
When I use Fireshot with Windows 10 to screen capture anything and paste as New from Clipboard, Affinity Photo 2.0.4 shows only the size of the screen capture as the new image but the area where the image should be is just a transparent grid. Copy and paste from any other photo editing program works just fine. It also works by copying an image to the clipboard from Affinity Photo 1.10.5.1342 or pasting into that version as well.
That's a different clipboard issue to the one in this post; this bug report is specifically about the image data shifting right by three pixels when pasted – causing it to wrap.Your issue is regarding Affinity Photo pasting a completely blank layer, which is more closely related to the bug report in the link below.
However, your issue is a bit different to that one as well, because in that one it's related to copy and pasting from a document in Affinity Photo, to another document in Affinity Photo, using [Edit > Paste Special] and pasting as "Device Independent Bitmap" or "Device Independent Bitmap V5".
As your case is to do with pasting from Fireshot, it may be worth creating a new topic. I don't have Fireshot installed, so I'm unable to check whether it's related to the linked topic or not – it's possible Affinity Photo is pasting from Fireshot as a DIB or DIBv5 and so could be related.
The clipboard from Affinity 2.0.3 onwards is pretty broken and it seems that their primary Windows developer has left the company.
-
5 hours ago, SpiritBlue said:
…Sorry - how do I get the versions without the black border?
See the below post on how to download the MSI/EXE installers, rather than the MSIX installers.
-
6 hours ago, Dan C said:
Am I missing a step in my testing? I appreciate you are seeing differences above but I am trying to ascertain why I'm not seeing the same differences when following this workflow.
Do you see different results when using Windows Snipping Tool and not Print Screen, as shown in my original post?
Hi Dan. Please see the video below, which includes both the Snipping Tools as well.The reason you're not seeing the issue with the other Windows Snipping tool [Winkey + Shift + S], is because Affinity Photo is then pasting as a PNG, not a "Device Independent Bitmap V5", and the issue occurs when Affinity Photo pastes the image as a "Device Independent Bitmap V5".
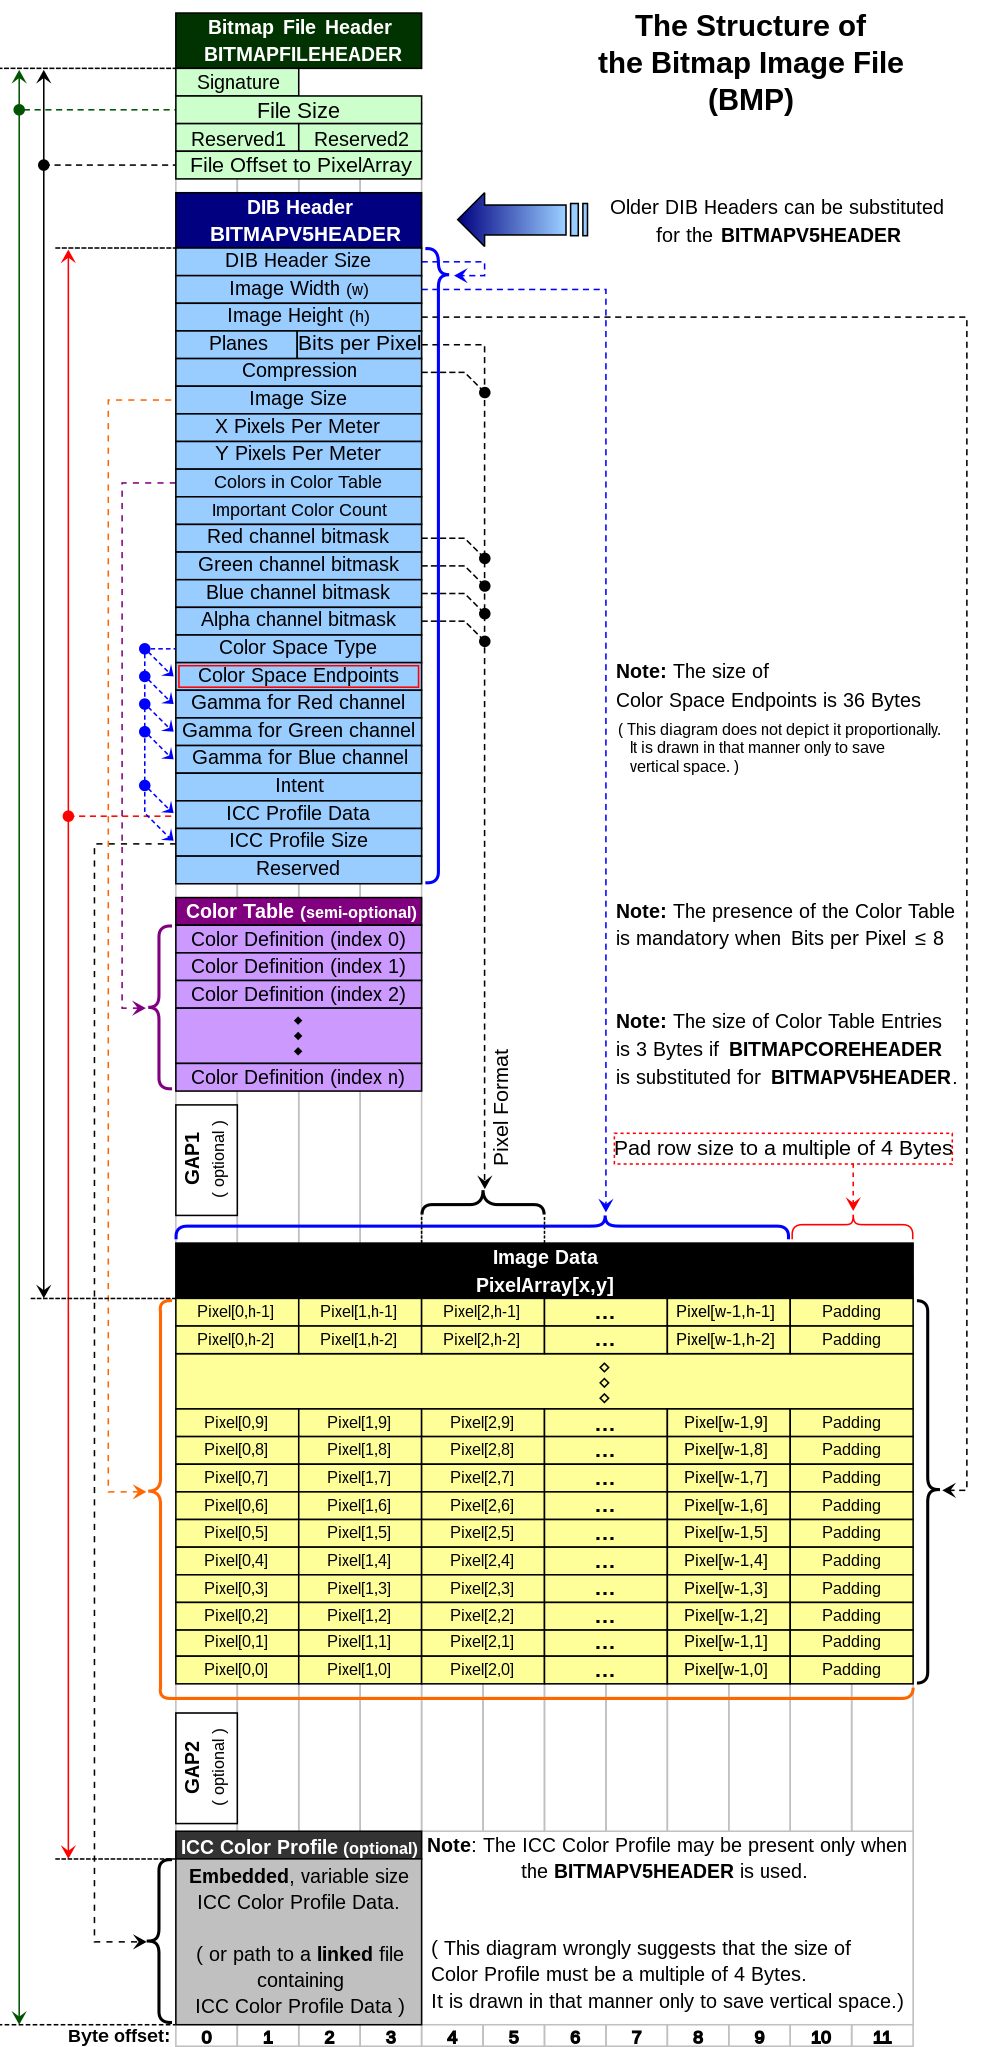
As the issue always adds three pixels in the bottom-left corner, it almost seems as though with "Device Independent Bitmap V5", Affinity Photo is adding some bytes of data into the actual bitmap data itself (perhaps something like an RGB color table from between the header and the image data), and this is causing the image data to shift right by three pixels (drawing from left-to-right, bottom-to-top, as with a bottom-up DIB). This is then causing the right-side of the pasted data to wrap to the left-side. These bytes of data shouldn't be in the actual bitmap image data, as they are not part of the image.
Versions:
Windows 10 - 22H2 (19045.2604)
Affinity Photo - 2.0.4.1701Video:
-
More specifically, the bug was introduced in Affinity 2.0.3. The issue did not occur in Affinity 2.0.0. See here:
It seems Affinity Photo is now pasting with "Device Independent Bitmap V5" and that is where Serif introduced the bug (it doesn't affect the older "Device Independent Bitmap"). See the video for "Issue 2" at the below link:3 hours ago, Dan C said:As can be seen, this issue is created by Windows and not the Affinity apps, as this edge is also included when pasting into Paint -
That's incorrect. Try reproducing it again without having Affinity Photo open, copying from scratch and just pasting directly into MS Paint.
-
I see the same thing. The clipboard in Affinity Photo V2 is pretty broken.
Issue 1 (This Issue):
When copy and pasting from a document in Affinity Photo, to another document in Affinity Photo and using [Edit > Paste Special], when pasting as "Device Independent Bitmap" or "Device Independent Bitmap V5", it pastes as an empty image.Video A
Issue 2 (Reported HERE):
When copy and pasting from the "Print Screen" button on the keyboard and using [Edit > Paste Special], Affinity Photo adds some bytes of data to the start of the bitmap data when pasting as "Device Independent Bitmap V5" (although not with the older "Device Independent Bitmap"). This causes the image data to shift right by three pixels (drawing from left-to-right, bottom-to-top) and making the right-side of the pasted data wrap to the left-side.Video B
Issue 3 (Reported HERE):
When copy and pasting from a document in Affinity Photo, to another document in Affinity Photo using [Edit > Paste Special] and pasting as "Serif Persona Nodes" (the proprietary Affinity format used by default when copying and pasting between Affinity apps), it doesn't automatically convert the pasted image from say RGBA/8 to RGBA/32.Video C
-
I see the same thing. The issue is occurring when copying and pasting from an RGBA/8 document into an RGBA/32 document.
In Affinity V1, when going to [Edit > Paste Special] there's no difference between pasting as PNG, Serif Persona Nodes or Device Independent Bitmap. Whereas in V2, pasting as PNG automatically converts it to RGBA/32, pasting as Serif Persona Nodes doesn't and pasting as Device Independent Bitmap is empty.
So it seems Serif Persona Nodes (the proprietary Affinity format used by default when copying and pasting between Affinity apps) is automatically converting it in V1, but not in V2 for some reason.
Video (Affinity Photo V2)
Video (Affinity Photo V1)
-
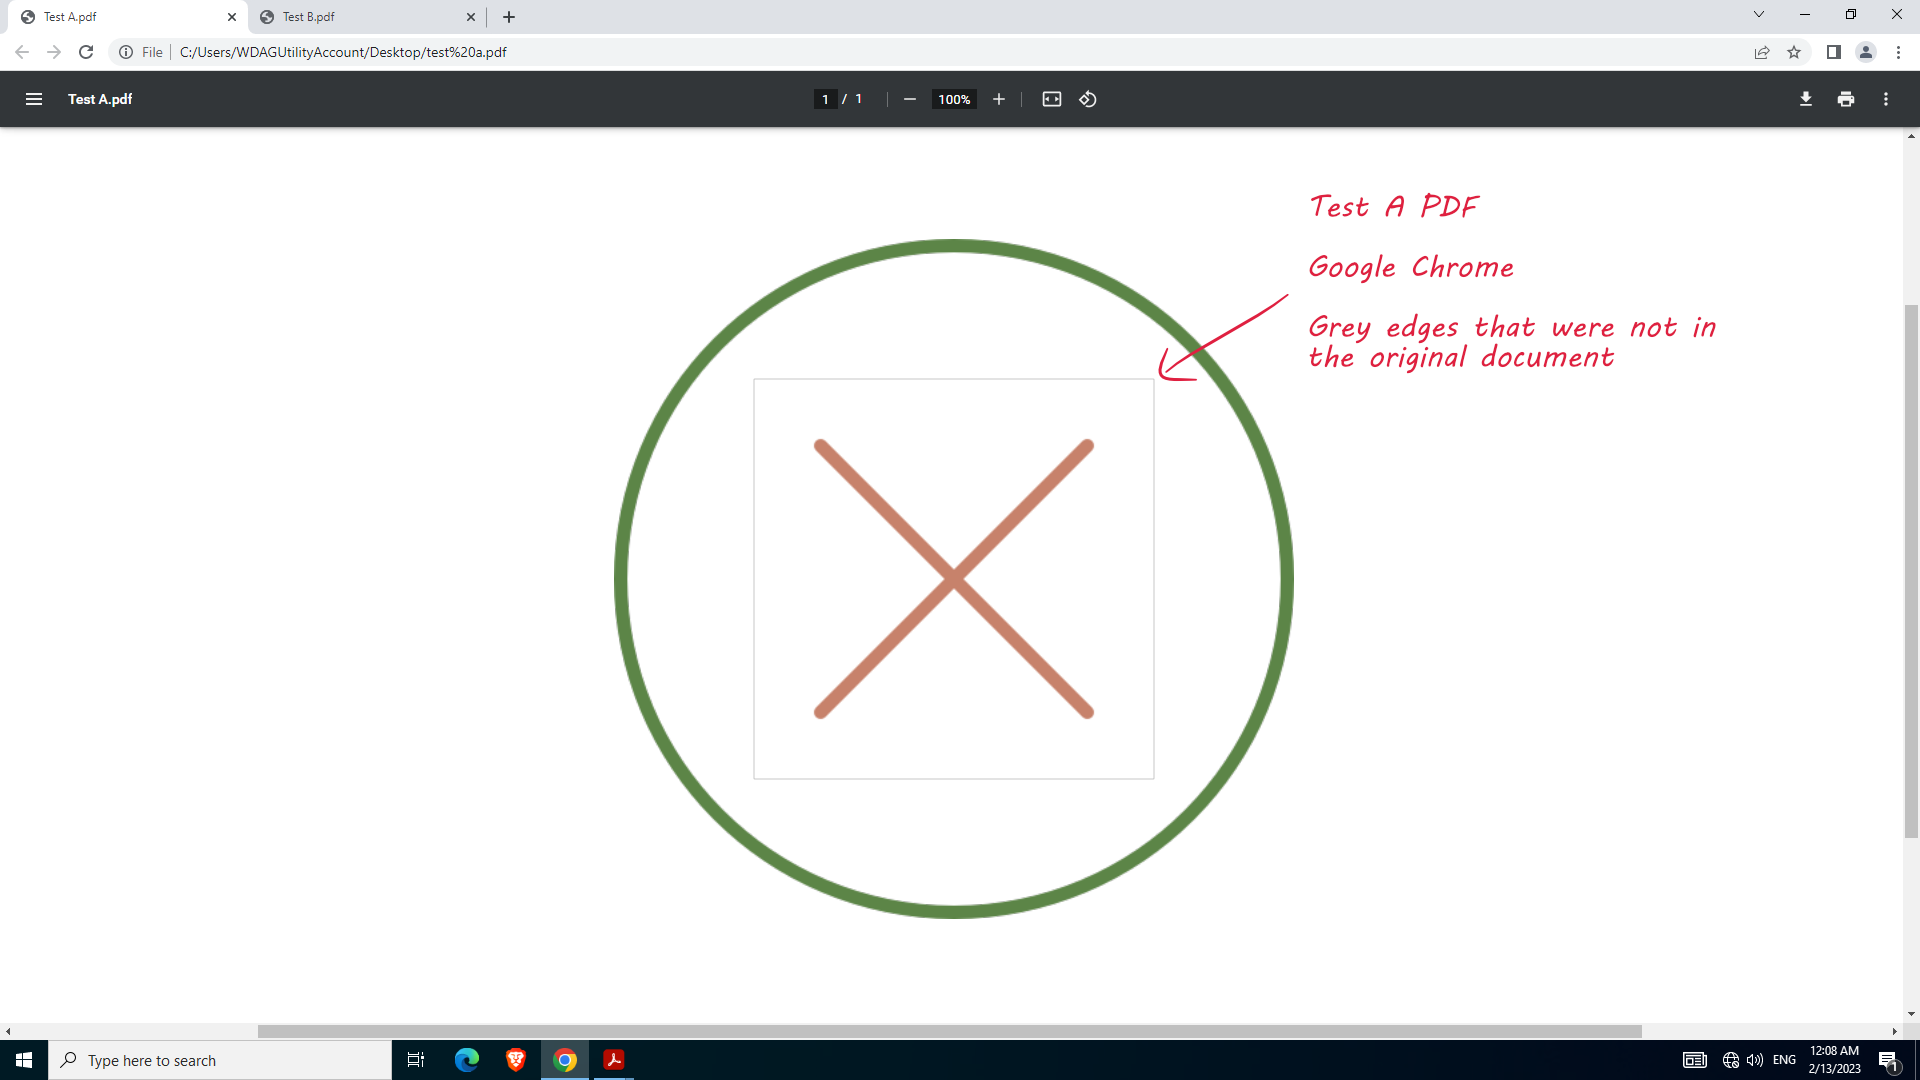
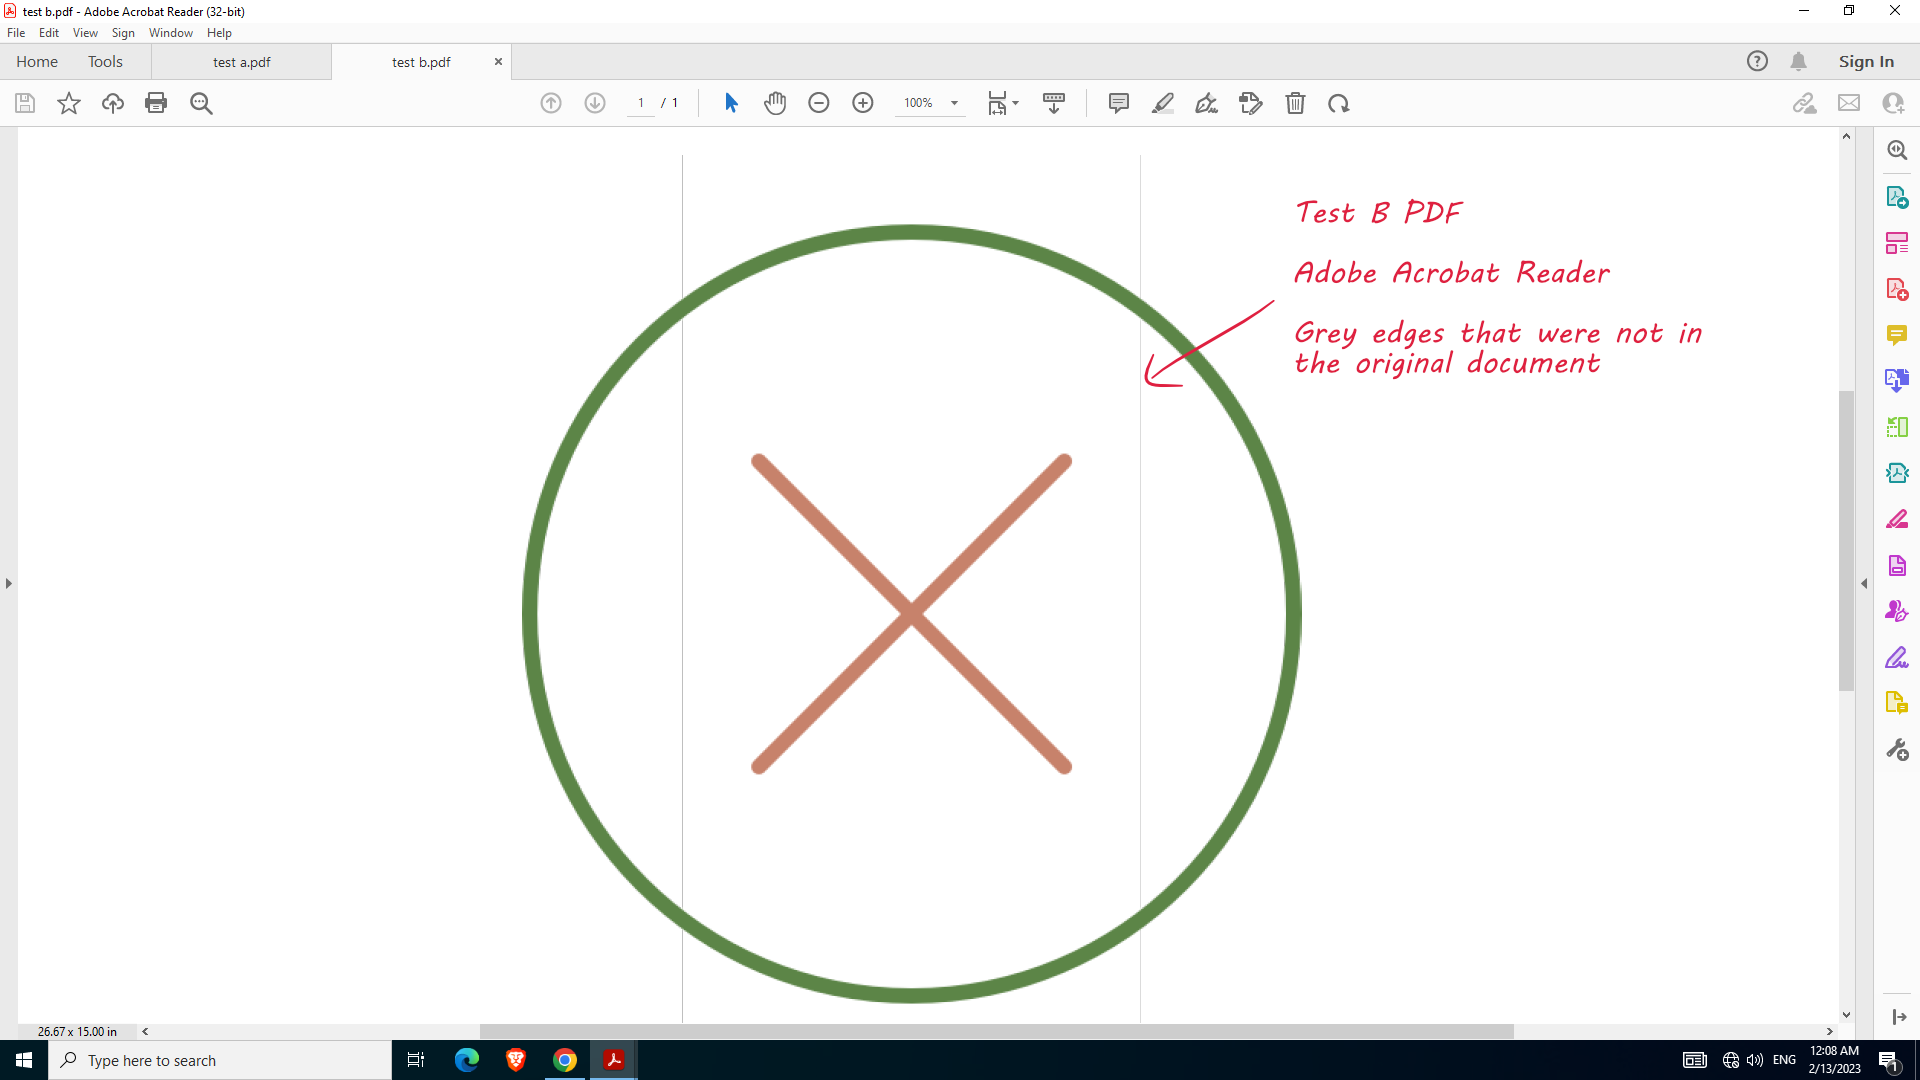
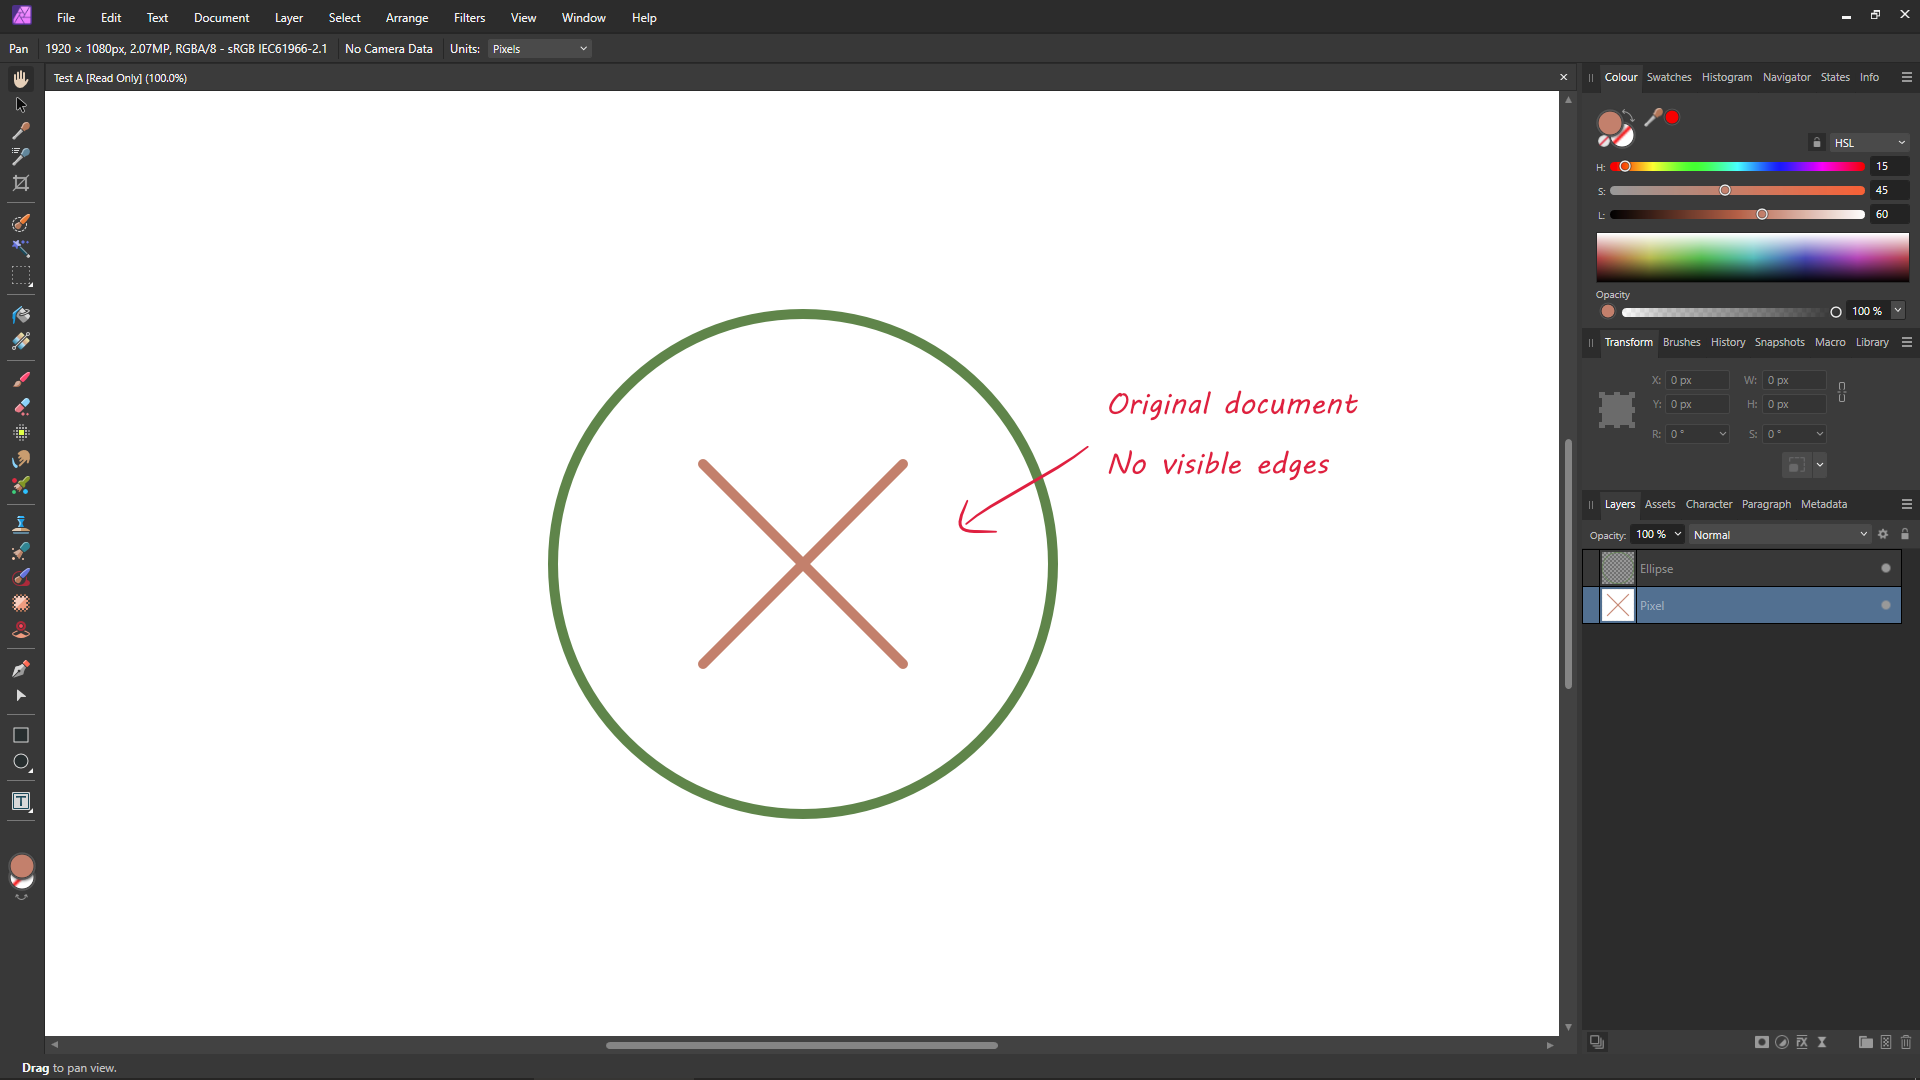
When exporting to PDF, Affinity Photo adds unwanted edges that were not in the original document.
Steps to reproduce:
1) Open the attached Affinity Photo files (at the bottom of this post).
2) Export to PDF using the 'PDF (flatten)' preset; although it occurs with other PDF presets as well.
3) Open the exported PDF at 100% view in a Chromium-based web browser (Google Chrome, Microsoft Edge, Brave Browser), or Adobe Acrobat Reader.
Actual Results:The PDF shows an edge from the pixel layer, even though the pixel layer has no border in the original document.
PDF A (Chrome/Edge/Brave – not correct):
PDF A (Adobe Acrobat Reader – not correct):
PDF B (Chrome/Edge/Brave – not correct):
PDF B (Adobe Acrobat Reader – not correct):
Expected results:The PDF should show only a green circle and an orange cross.
Original document (Affinity Photo – correct):
Test files (Zip file):-----
Windows 10 22H2 (19045.2486)
Affinity Photo (2.0.4.1701)
Google Chrome (110.0.5481.78)
Adobe Acrobat Reader DC (2022.003.20314) -
-
On 12/4/2022 at 12:53 PM, LondonSquirrel said:
TIFF is an acronym for "Tag Image File Format" and is the name of the file type, which is different to file extensions. In your RFC 3302 link, they say to use .tif as the file extension.
File extension(s): .TIF
It has also always been accepted best practice to put the most common and widely used extension first (which is .tif not .tiff), so that it is the default file extension. Microsoft documentation also says to put the most common extension first.
"For Save File, include all variations of the supported file extensions, even if uncommon, and put the most common extension first."
Adobe (the owners of the TIFF specification) also put the most common extension first (*.tif).
TIFF (*.tif;*.tiff)
Only Serif have it backwards. What Serif have done is completely nonsensical, but they won't listen to logic or reason. It's a headache when working with other applications, which all use the correct default file extension. It should look like this:
-
IMO, Serif should add an icon to the layer when Blend Options adjustments are not set to the default values – like they do with Layer Effects. Currently there's no indication to the user at all.
- oliver_fuchs, walt.farrell and lepr
-
2
-
 1
1
-
Did you try installing using the Affinity .EXE installer, rather than the .MSIX installer?
-


Blur also consider masked area?
in Affinity on Desktop Questions (macOS and Windows)
Posted
Did you tick "Preserve Alpha" in the Gaussian Blur live filter?