livetheshot
-
Posts
91 -
Joined
-
Last visited


-
 livetheshot reacted to a post in a topic:
Edit photos and apply results to video files.
livetheshot reacted to a post in a topic:
Edit photos and apply results to video files.
-
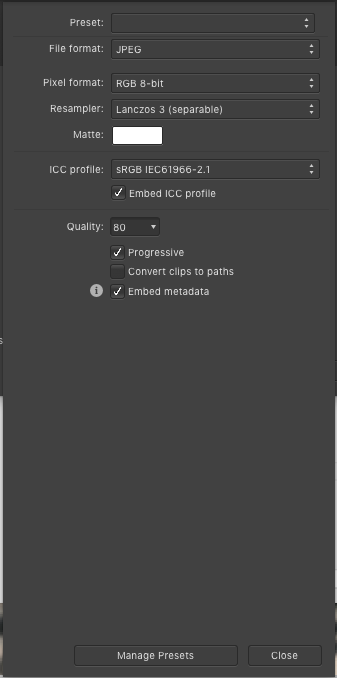
 Lanczos is a resampler algorithm, not an extra plug-in. You can change Bilinear to Lanczos by clicking on the Resampler menu One thing I've noticed in your screenshot is the brightness and saturation differences between what I'm presuming is a jpg saved in PS and the other in AP. Double check that your colour format and profile of your master file is in RGB8 and sRGB when exporting. If you click on More, you also get other options. I usually stick to these values for the web but vary the quality depending on where I'm uploading the final image to. You may also opt to drop the metadata as that usually contains exif and IPTC info.
-
livetheshot reacted to a post in a topic:
Take Off - Blade Runner-inspired illustration
-
If you outsource the colour editing to a colourist, they should be able to get the look you're after. Broadcast gamut is similar to srgb but the black and white levels are different. Also, creating LUT from Affinity Photo is not necessarily going to get you a simple "apply a lut and call it a day" editing for video. Also are you shooting the video in 8/10/12/14/16 bit? Ideally, do what you're doing now to get reference shots, export it as srgb TIFF (8 or 16 bit that is closest to the bits you're shooting the video in) and colour match it in post when you've shot the video in your NLE/Colour grading software. Luts are great for a reference point but it's still more ideal to build your own. If you've built the look in Affinity using adjustment layers, it should be relatively quick to translate the edits in the Colour Grading software.
-
Wacom clicks don't work on macro panel
livetheshot replied to livetheshot's topic in V1 Bugs found on macOS
Yes it does and it's a workaround. This is currently the quickest way around for me as I need to edit and retouch a lot of photos this week for work. -
livetheshot reacted to a post in a topic:
Wacom clicks don't work on macro panel
-
livetheshot reacted to a post in a topic:
Wacom clicks don't work on macro panel
-
Wacom clicks don't work on macro panel
livetheshot replied to livetheshot's topic in V1 Bugs found on macOS
Just discovered a workaround! It's not perfect and it'd be great for the single tap to work. I played around with the wacom tablet settings and under the advanced menu, when I switched to click and tap, the macro worked!
-
livetheshot reacted to a post in a topic:
Wacom clicks don't work on macro panel
-
Hi, Wacom taps or clicks don't work on the macros panel. They work for everything else. I've uploaded a video to show the issue. I can use my Intuos Pro with all the usual panels however when it comes to clicking on a macro, nothing happens and I need to resort to using my mouse. Thanks, Wayne no-wacom-with-captions.mp4.mov
-
The link you provided is for the beta version from last year. I just did a test in Publisher and there was some increase in the filesize as mentioned in the post. However, a few Kb is very different when working with filesizes in Photo that can push in excess of 1GB :) Even if file linking meant the afphoto filesize varied a few MB, I'd see that as a huge improvement :)
-
Hi, I'd like to make a request to link the file rather than embedding the file when we use the Place Image tool in Affinity Photo. The function exists in Publisher and it'd be great if this could be implemented in Affinity Photo too. When working with composites, there are times when some originals still need to be editable. When we embed the original, it makes the filesize very bloated. A smaller file size would make it more efficient to work with composites so it'd be much appreciated please Thanks
-
Chris B reacted to a post in a topic:
Toggling through tools not working as expected
-
Toggling through tools not working as expected
livetheshot replied to quinnballard's topic in V1 Bugs found on macOS
I couldn't get my express keys to toggle back to the inpainting brush tool on my Wacom tablet. Solved it by setting up a new keyboard shortcut for the inpainting brush tool -
livetheshot reacted to a post in a topic:
Toggling through tools not working as expected
-
Derayway reacted to a post in a topic:
Frequency Separation
-
Toggling through tools not working as expected
livetheshot replied to quinnballard's topic in V1 Bugs found on macOS
I'm also experiencing this issue with cycling with the shortcut key J. I've setup an express key on my Wacom Intuos Pro to cycle through Js to get to the inpainting tool but it no longer works. When I manually cycle through J, the clarity adjustment dialogue box pops up too. -
livetheshot reacted to a post in a topic:
Toggling through tools not working as expected
-
CathieLive reacted to a post in a topic:
My Adobe resignation. Anyone else packed it in with them?
-
Uncle Mez reacted to a post in a topic:
My Adobe resignation. Anyone else packed it in with them?
-
 BrianHermelijn reacted to a post in a topic:
My Adobe resignation. Anyone else packed it in with them?
BrianHermelijn reacted to a post in a topic:
My Adobe resignation. Anyone else packed it in with them?
-
SrPx reacted to a post in a topic:
My Adobe resignation. Anyone else packed it in with them?
-
livetheshot reacted to a post in a topic:
Smart Objects?
-
I've been Adobe free for two years and counting. Photo and Affinity have everything I need for my design and photo editing jobs.
- 161 replies
-
- 4
-
-
-
- subscription
- adobe
- (and 1 more)
-
@hannah I can't give you more than one thanks. This has been bugging me for a long time that it didn't occur to me to look under keyboard shortcuts
-
livetheshot reacted to a post in a topic:
Default Colors by Keyboard Shortcut
-
Gerlach reacted to a post in a topic:
Affinity Photo Workbook & Internet
-
livetheshot reacted to a post in a topic:
Affinity Photo Customer Beta (1.6.7 - Beta 2)
-
DPI doesn't matter for web use. Go to File -> Export. The next window lets you select the file format you wish to export to. Click on the More button for expanded options such as colour profile, etc.
-
(1.6.6 - GM) - Refine Edges issues
livetheshot replied to livetheshot's topic in [ARCHIVE] Photo beta on macOS threads
Those weird blobs appeared when I adjusted the border setting. I re-did the mask again today and it looks like there's a problem when selecting black, white and transparent matte options, as well as setting the output to new layer with mask. If you set the output to new layer with mask and view the new layer without the mask, you will see those white blobs along with the colour of the nearest neighbouring pixels. I found a workaround for it today by only using overlay and black&white for matte and selecting the output to mask only (and crossing my fingers when I pressed OK). -
(1.6.6 - GM) - Refine Edges issues
livetheshot replied to livetheshot's topic in [ARCHIVE] Photo beta on macOS threads
Is there an ETA for fixing the issue with refine edges or at least a workaround? The issue has been around for over a year. Masking is pretty important for composite image making and it's a major pain point for areas such as hair and really fine materials. It's pretty disappointing since the video tutorials that have been put out don't show this behaviour at all. Thanks @MEB. -
Hi, There's still an issue with the refined edges function. When saving the output of the refined mask to New Layer with Mask, it adds a blur to it. When I output to only a mask, the output is finally the same as the preview image. Please see the attached screenshot. Also, when using the matte brush, the selection is really soft even though I've set the Smooth and Feather options to 0. Please take a look at the attached video. refine-mask.mov