Search the Community
Showing results for tags 'Affinity Designer'.
-
 I started a thread in the Share your work forum. As I asked a question, @Alfred has suggested that I ask here, and @PaulEC has liked his post. As I would like the result to be in the Share your work forum, rather than ask to have the thread moved, may I instead post a link to the Share your work forum here and ask that suggestions as to technique are posted in this thread and any attempts at producing such aa result are in the Share your work thread please. Part of my reasoning is that I have thought of a possible way to proceed, so I might get a result for the Share your work forum. Here is the link. https://forum.affinity.serif.com/index.php?/topic/203266-quest-art William
 -
The Wall Affinity Designer | 1840 x 800mm 300dpi | Mixed raster and vector but mostly vector! Used Untamed: 'Planetary Toolkit' of for the Sky

-
Wanted to see if I could 'approach' photo-realistic results with Affinity Designer.
- 3 replies
-
- 13
-

-
- affinity designer
- pottery
- (and 1 more)
-
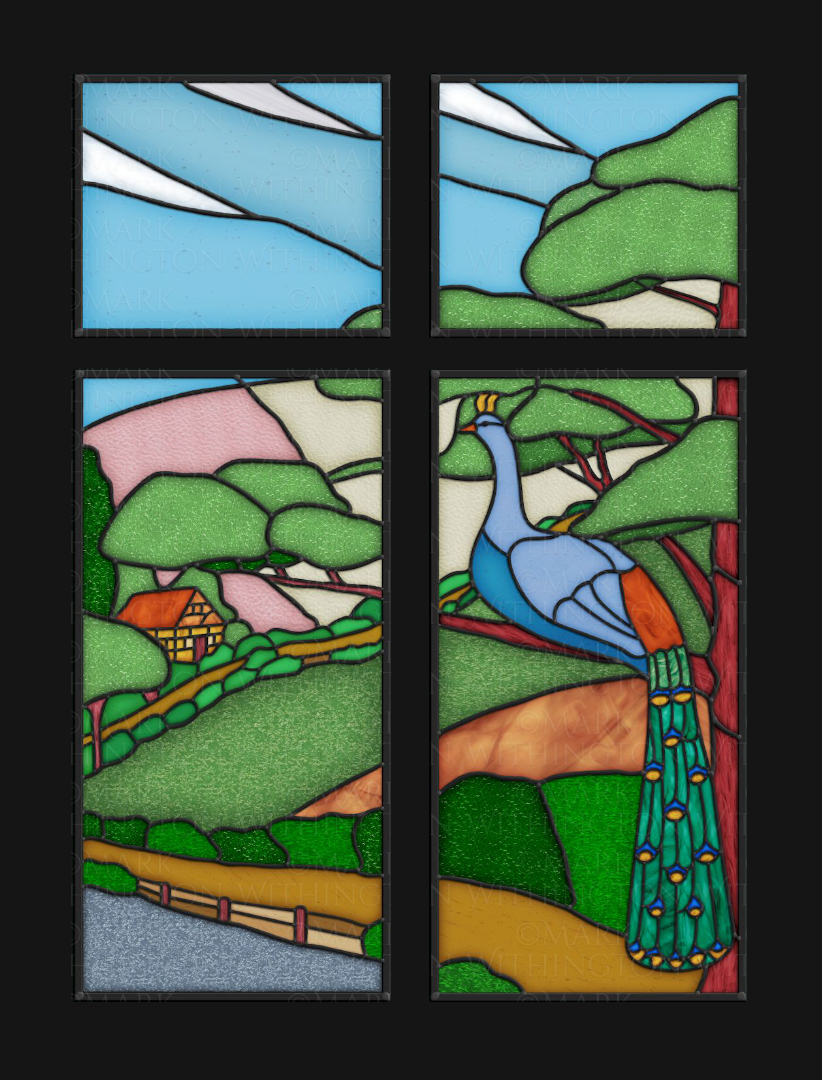
The “real world” original of this image was actually made a very long time ago by my mum’s dad, when he was a young glazier back in the 1930’s, and it was the landing window at the top of the stairs in my grandparent’s home. All I had to go off for this vector reconstruction was one rather faded, out of focus and distorted image in an old family album! Plus my memories of the window, how it felt running fingers over it’s textured glass… All done in Affinity Designer with the aid of the @The Artifex Forge ’Stained Glass’ kit. The house that was my grandparents “forever” home, was part of a new development being built in Barking in the 1930’s and they bought it "Off Plan" while it was still being built. At the time my grandfather was working for the company that was doing the windows for this new housing development and so he decided he would do something a little special for the landing window of what would be their new home! Though the house was sold out of the family, many years ago now after my grandparents passing, and has since been altered and extended, I would like to think and hope that it’s subsequent owners kept and reused this window.
-
So far, I have created 33 comics in Affinity Designer. Who knew making cartoons would be so much fun. Here is one that got a good laugh out of my wife. I hope that you like it too. Maybe you can relate to the skates. That is how I remember it. 🙂
-
 I love to work with artboards in Designer to create Flyers and other design elements all in one document. Designer also offers Bleed for artboards, which is great when creating PDFs for printing. One thing is a bit annoying though: Designer will not show the elements within the bleed area. It will indicate the bleed edges, but not show anything outside of the artboard but within the bleed area. This sometimes makes it hard to see how the final output will look like. Perhaps adding an option to the viewing settings to enable this? Thanks!
- 12 replies
-
- 1
-
-
- affinity designer
- bleed
- (and 2 more)
-
Hello, I just spend 2.5 hours working on a file during a collaborative zoom session. I was saving this Affinity Designer file periodically about every 5 minutes. Affinity crashed and now this file is not able to be opened. I am beyond angry. Is there something you guys can do to help me open the file or retrieve any of the text inside it? Full disclosure, it's mostly the text I need back. My small team spent 2.5 hours re-wording the text copy on a product packaging design. Even if I just got back only the text, that would be a victory. Thanks
-
 I have been using pixels in the document settings so far but have recently got a laser printer and want to take some svg files created with |Affinity to the laser burning software (LightBurn). In this case I would like to have my measurements in mm. The trouble is I was using a base shape with 100 by 100 pixels and deriving various tiling shapes based on that square. But when I convert the doc to use mm as unit, that 100 px translates to 8.5 m. Ideally I would like to have a round number like 10mm. Is there any way I can scale all of my tiles so that they will all scale to a 10x10 mm box? Thanks!
-
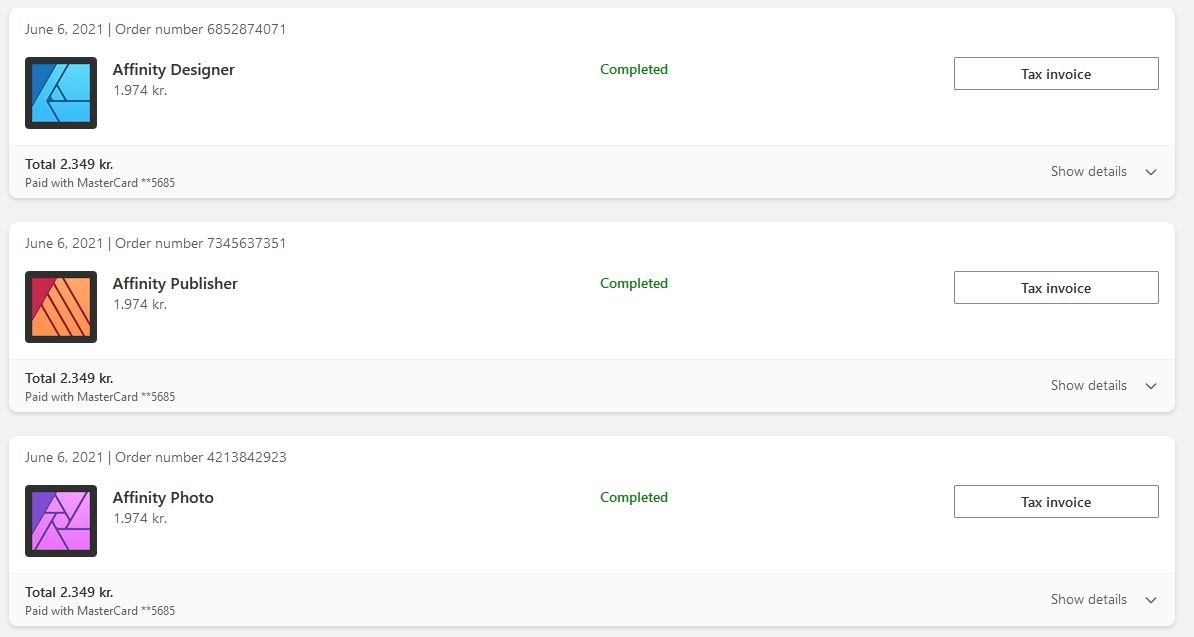
 I purchased all 3 softwares in the microsoft store but can not find the download links to the given apps. The links in my purchases brings me to a whitescreen page. This are the links in from my orders: https://www.microsoft.com/is-is/store/p/affinity-designer/9nblggh35lrm/0010 https://www.microsoft.com/is-is/store/p/affinity-publisher/9nblggh35lzr/0010 https://www.microsoft.com/is-is/store/p/affinity-photo/9nblggh35lxn/0010 When i download the Designer/Photo/Publisher Software from here (e.g. https://store.serif.com/en-us/update/windows/publisher/1/) it requires a product key wich i can not receive, because its not in the purchase mails or in the order list from microsoft purchases and the links don't work.
-
 Hello! Help me find Clone Brush Tool (analog Clone Stamp Tool in Photoshop) in Affinity Designer, please ? Or how can I implement this tool in Affinity Designer?
 -
A massive selection of vintage and retro color swatches for Affinity, inspired by the fashions and culture of the 20th century! Get 20% off until 11.59pm, 8th May (UK time). Simply use the discount code 'century' at checkout to redeem. >>GET IT NOW!<< Finding the right vintage or retro color palette for a project can be time-consuming so, we created these Affinity color swatches to help make choosing classic color schemes quick and easy. Drawing from the art, fashions and culture of the 20th century, we’ve created three color swatch sets representing each decade. There are also 15 bonus vintage and retro color swatch palettes included (not shown in the preview). Use them for your vintage and retro designs and illustrations! The retro color swatches are compatible with Affinity Designer, Affinity Photo and Affinity Publisher. To use the vintage swatches load them into the swatches panel and you’re good to go. Add it to your design arsenal today and get the classic look just right! The download features the following files: 30 vintage Swatches – for use with Affinity Designer, Affinity Photo & Affinity Publisher. 15 Bonus Vintage and Retro Swatch Sets. A Quick Reference Guide – Navigate the color swatches quickly and easily. Instructions for Affinity Desktop and iPad. >>GET IT NOW!<<
-
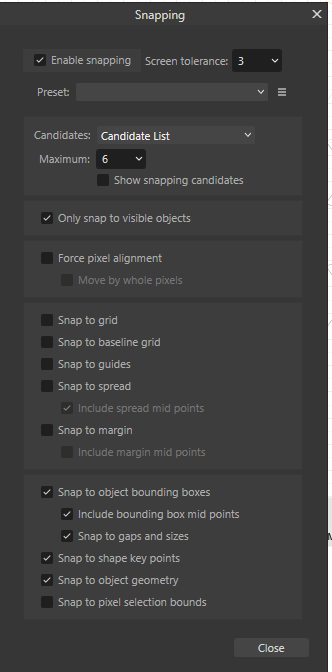
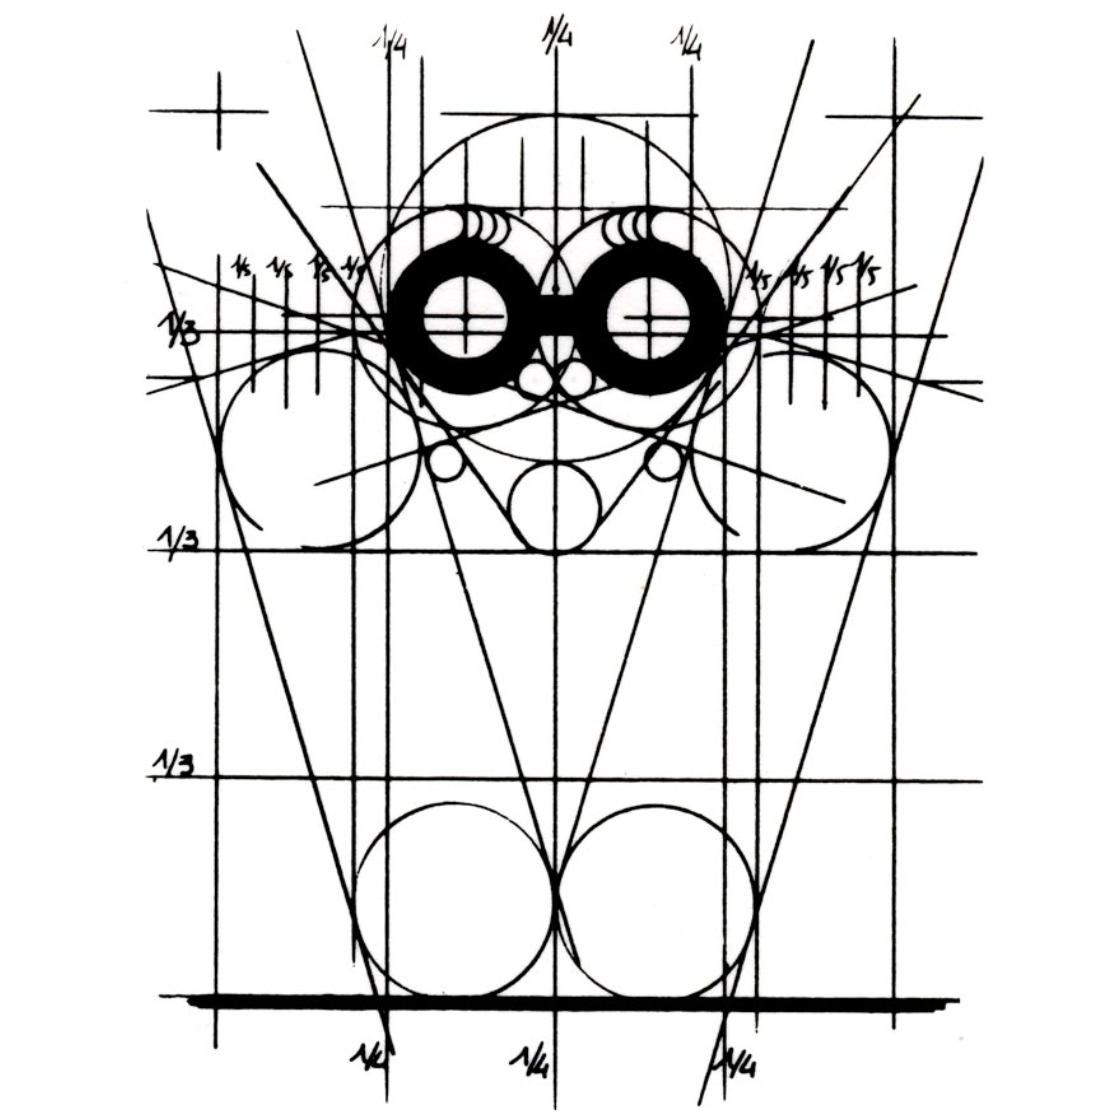
Hi have a couple of issues around my workflow for creating repeating patterns. For this I need to align objects to specific points or rotate translate objects around specific points. 1. For vector fill tool, is there any way to set the tolerance? I can't find any in the settings and even a tiny pixel level gap results in the tool refusing to fill the shapes. Yes I can workaround this by constructing lines that go beyond and overlap but that will also mess up the repeating pattern.. 2. For snapping, is there any setting where I can limit myself to snapping to only the nodes? i.e I want to snap one line to the end of another line, but with 'Snap to object' enabled, I could snap to the line itself (which is great in some cases) rather than the end point. Is there a toggle available where I can only snap to node/vertex? 3. My eyesight is not great as used to be, is there any settings where I can change the colours or the thickness of the helper lines that appear when I click and drag to align objects? This is the setting I am using for snapping
-
Custom vector drawing for guitar. For hydro dip or skin wrap.
-
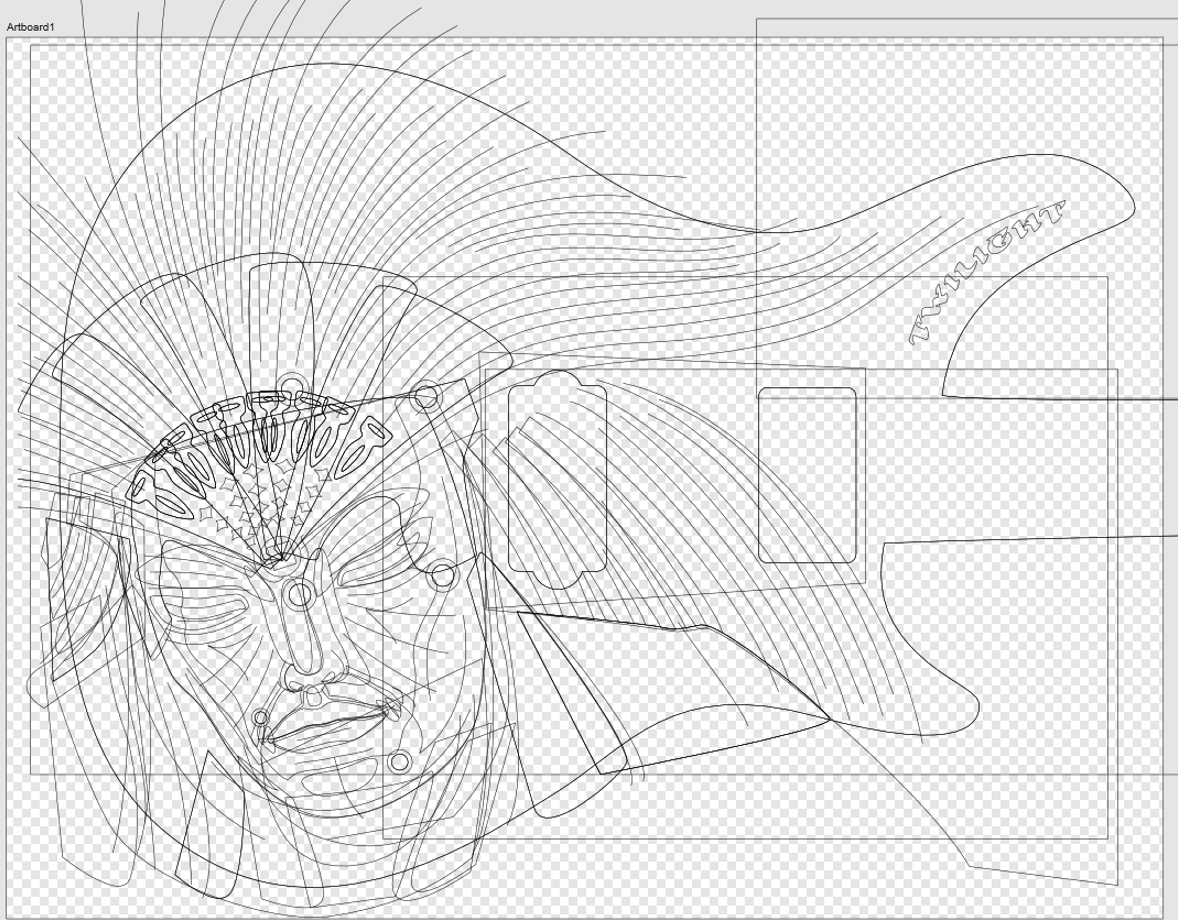
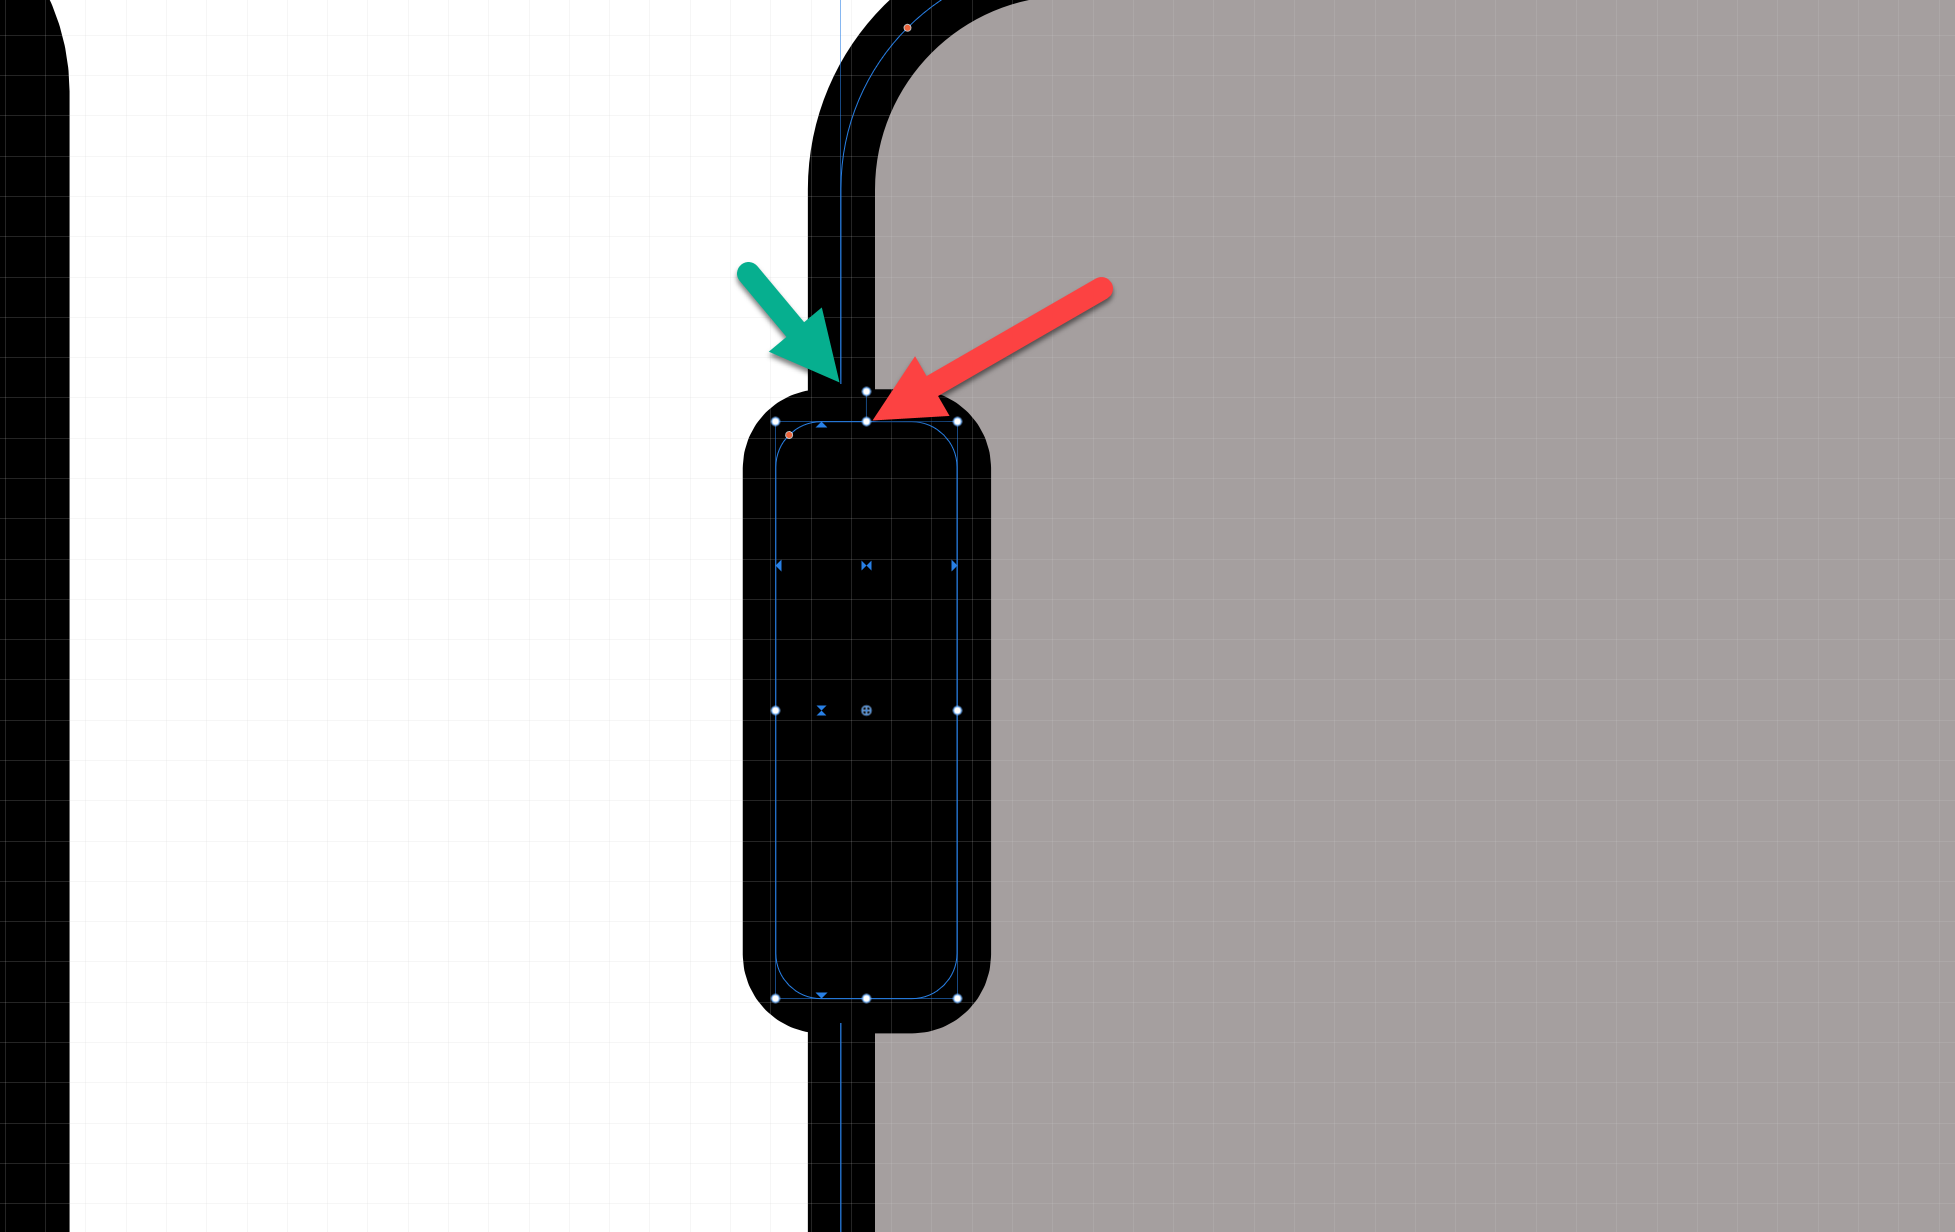
 Hello everybody, what do I have to do when I want to align an object's center upon a contour? In my example I want to put the center of the small black rectangle (red arrow) right on the contour of the bigger object behind (green arrow), but there is no snapping possible (even with all snapping options activated). Thank You very much in advance 🙂 -Rembrandt Note: The screenshot is superimposed as the contour and nodes of the active object and those of others are not visible at the same time.
-
Hello, when I want to set the pivot point of an object to the (usually) snapable center of a circle it won't do as it snaps only to contours. Do I really have to create a dummy object to locate the pivot point to the center of something? And another problem is that the marker for pivot point vanishes after changing to the move tool [V]; it is still active at its last position but its appearance does not respond to the click on the menu button that reveals it in the first place. The only way to get it back visible is changing to the tool for point transformation [F]. That's a bug, that can't be a feature, or is it? Greetings -Rembrandt
-
 Big problem, surely a bug?: Any gradient on any object will render all selection boxes invisible in the entire Affinity suite. It happens 100% of the time, on all files. I can select objects, but there are no visual cues in the Document View window. I've had the problem since I bought Affinity in December last year. It took me a long time to figure out what was happening. I haven't found any solution on Google or in existing forum posts, so I decided to write my first post here. I hope someone can help. Please read my explanation and watch my screen recording. * Recipe: Just add a color gradient to any object, e.g. text or a picture frame. After that, no selection boxes will appear when selecting one or more objects. I can still select objects with my mouse or using the Layers panel (Right Studio). I can see in the Layers panel that one or more objects are selected. And if I use, e.g., the move tool, I can easily move them. But there are no selection/bounding boxes around the selected object(s). This obviously makes it difficult, confusing and frustrating to edit files with many objects and layers. Please note that removing the gradient will make the selection boxes reappear! In short: Any gradient on any object will render all selection boxes invisible in Publisher, Photo and Designer (in both 2.4.2 – the newest version – and 2.3, which I installed back in December). * Screen recording (50 sec) using a new demo file: The demo file has two text frames and one picture frame, all having solid fill color. When I click on and select one or several of them, a selection box appears. So far, so good. As you can see, if I then change the color of one of the objects (the blue text) to a gradient, the selection boxes disappear. As you can see, I can select any of the three objects, but there is no box or outline around any of them. In the last step in the video, I remove the gradient on the blue text and select a solid color instead. Since there are no gradients in the document anymore, the selection boxes are again visible. 1. What Application are you using? Affinity Publisher, Photo and Designer 2. Are you using the latest release version? Yes, 2.4.2 (also happened in 2.3). 3. Can you reproduce it? Yes, 100% of the time on all files using any of the three Affinity programs. 4. Does it happen for a new document? Yes (see demo file and screen recording). Machine, operating system and extras: macOS Monterey (12.7.3) on a 5K iMac (Intel) with 16GB of RAM and plenty of internal storage. No additional hardware, just standard keyboard and mouse. No font managers or display managers. Hardware acceleration? I tried both ON and OFF. The problem persisted. Note: My iMac is working well and I don't have any issues with other programs. I did a fresh install of macOS Monterey in December, just before I bought Affinity. I have very few third-party programs installed: just Affinity plus Firefox, FileZilla and Stellarium (planetarium). Irrelevant background info: I've been following Affinity and cheering for them since 2018. I finally bought the V2 Universal License in December 2023, and I have spent the last few months testing the software and watching a lot of YouTube videos. I've previously used Adobe's software for editing photos, making illustrations, and designing books, but I decided to switch to Affinity. I like many things about Affinity! Sadly, I can't use Publisher for designing books (the text justification is absurdly poor, even with the Norwegian hyphenation dictionary correctly installed and activated). But I really want to make it work for my upcoming wall calendar as well as posters and other "simple" projects. If Affinity is able to show which objects and layers are selected also when using gradients, Photo and Designer will become very useful to me as well. I like both the features and the performance of Affinity. Screen_Recording.mov test.afpub
 -
Bildschirmaufnahme 2024-04-26 um 19.37.11.mov Tab Key is not working in FX Dialog.
-
I created this geometric line art pattern in Affinity Designer, and then, added effects in Affinity Photo.
-
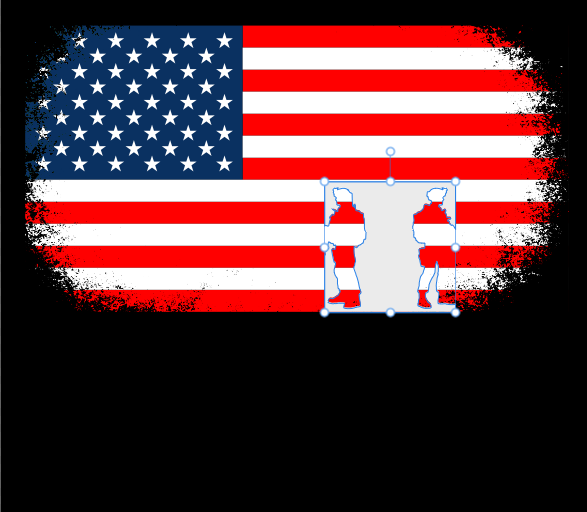
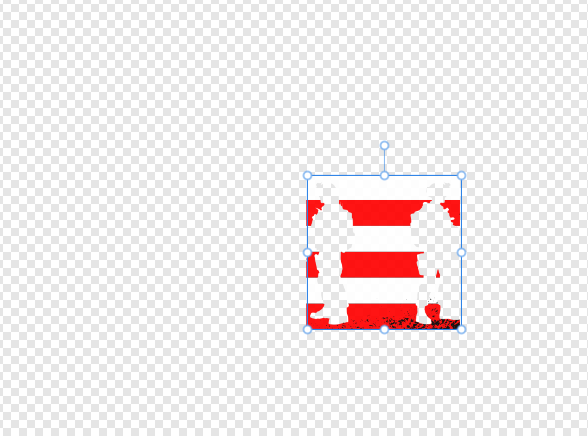
 i have an issue with applying textures in Affinity Designer. When i apply a texture, it's only affecting the area where the texture is placed, and everything outside that area gets deleted i'm a beginner and didn't find the solution of this problem in youtube , or maybe i didn't search enough , anyway this are picture that describes the problem in details This is the Steps that i did : - i used the svg soldiers element - Rasterize To mask into American flag and this what happend
-
The original artwork is A3 landscape, produced using Affinity Designer. William
-
The problem is quite simple. I am not able to use variable fonts installed on my system. I have attached screenshots showing that my computer properly recognizes the font however, none of the programs, Photo 2, Designer 2, Publisher 2, correctly recognise my font. And yes, this is the case with other variable fonts as well, not just one. Fonts were downloaded from Google Fonts. Running Windows 11 22H2. Downloaded all programs from Microsoft Store. If you need any other info, I'll be happy to provide. P.S: Sucks to not be able to create something on the first day itself. But I guess launching a software has its share of challenges.
-
 Will there be any value of including Variable Fonts accessibility in Affinity products? I see this as being a great time-saver when working on projects requiring a single font in various weights. ** Not heard of Variable Fonts? reads here: https://developers.google.com/web/fundamentals/design-and-ux/typography/variable-fonts/ https://v-fonts.com/ https://developer.mozilla.org/en-US/docs/Web/CSS/CSS_Fonts/Variable_Fonts_Guide https://medium.com/variable-fonts/https-medium-com-tiro-introducing-opentype-variable-fonts-12ba6cd2369
 -
Here's my latest upload and work in Affinity Designer! Please click the picture below and enjoy 2hrs of finest breaks alongside some vectorizing! Thanks for your precious time!
-
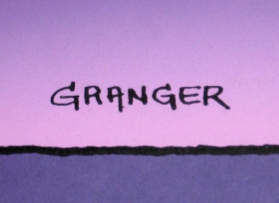
 🇬🇧 A little tribute to the graphic designer Michel GRANGER, French author of several album cover illustrations by Jean-Michel JARRE including the 4th, “Equinoxe”, released in 1978. The character on this cover is called “the Watcher”. He is adorned with the three Serif colors and looks into the future, saying to himself: what will I become?... And what will we become?... 🇫🇷 Petit hommage au graphiste Michel GRANGER, auteur français de plusieurs illustrations de couverture d'albums de Jean-Michel JARRE dont le 4ème, “Equinoxe”, sorti en 1978. Le personnage de cette couverture se nomme “l'Observateur”. Il est bardé des trois couleurs Serif et scrute l'avenir en se disant : que vais-je devenir ?... Et nous, qu'allons-nous devenir ?... 😉
- 1 reply
-
- 13
-
-
- serif labs
- cover lp
- (and 1 more)
-
 Hi, On Mac Monterey, Designer and Photo 2.4.1 don't show newly opened or created documents, after you have closed the background window. 1. Close all the document windows. 2. Close the blank, background window, to avoid it to block seeing everything that is on the back in the other apps. 3. Crete or open a new document. No window can be seen in Photo or Designer. The documents are there, since when closing the app you are asked if you want to save them, but you can't see them. To start seeing documents again, you have to relaunch the app. Paolo (who would like some more love for the Apple UI guidelines )