Search the Community
Showing results for tags 'Affinity photo'.
-
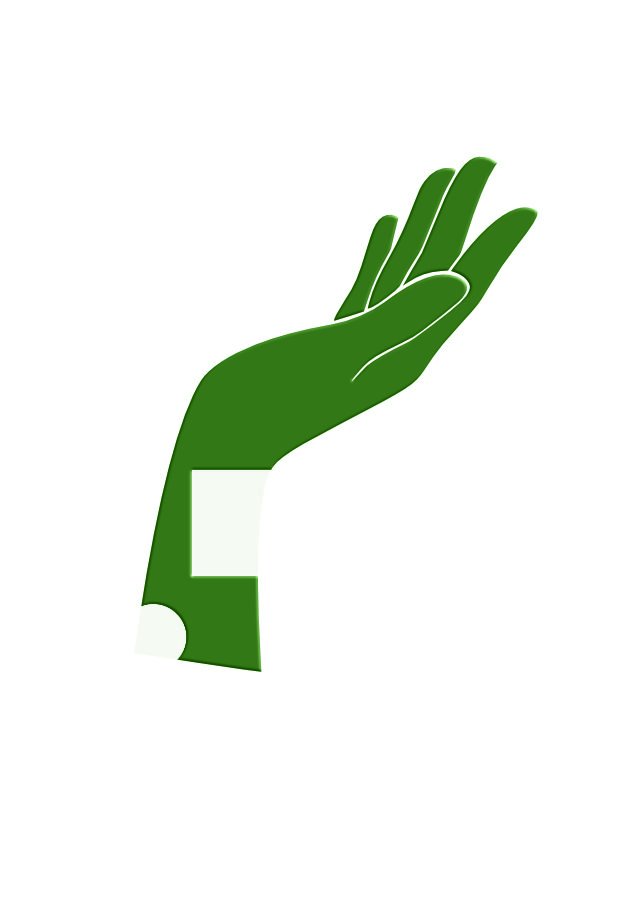
 Hello, I'm trying to mask curve shape to hide part of it but I don't know why it's not hiding the selected part entirely. Here is sample file where I added black brush and select with fill primary black color, as You can see there is still slightly visible part of shape. What I'm doing wrong? Greetings. sample.afphoto
-
Placed an image of a skull onto my face, then placed it into a CD case mock up for some flair...
-
 Hello, I used an ordinary photo of a car. In this speed art, I show how to improve and personalize the car. A method, which works also with your car: Erasing unwanted background, change the color, lower the car, widen the track, darken the windows, improve the chrome ... I hope, you enjoy the idea. Ciao Jack
-
- 2
-

-
- affinity photo
- tutorial
- (and 2 more)
-
 Hi All I understand that Affinity photo does not have smart object creation. The reason for my interest at the moment is to reduce file sizes From my understanding PS smart object allow for photographs of huge resolution to be scaled down to be a more manageable file size but retain the abilit to scale up for creating large 300dpi prints. So say, to be able to work on a 2000x1000px canvas for photo bashing and manipulation, but be able to scale up to a large print output of up to 10000x5000 if required. My (somewhat limited) understanding is this is an ideal use for smart objects in PS. But what do we do in Affinty? Greatful for suggestions. Thanks
 -
 Hi Guys, So we all know everyone has different method and approach to selecting a subject using the various selection methods that are available in Affinity Photo. Especially when there is no strong separation between the Foreground and Background it becomes very difficult to have a very clean cut out of your subject But the other day I came across a very interesting method to select a subject when tying to isolate it from the background. So this guy was doing a video on how to select a subject and the photo he had did not have a very clear, strong separation between the Foreground and the background So what he did was before selecting the subject he added a “Levels” Adjustment Layer and played with the toggles available there to try and define the foreground and background and then he used the Freehand Tool to draw lines around the subject and the idea was do not go too far from the edges of your subject and at the same time do not cross the border into your subject and then he used refine. And the result at the end were very good. I also tried this method and though it works well, But if you have a very bad photo and not a very high definition photo it still is a little tough to get a clean cut out if in the first place, your photo is bad. My question is what else can I do ? which other adjustment that I can apply on a bad or an average photo which does not have the Background and Foreground well defined, which other adjustment layer that I can apply that will help my photo differentiate between the background and the foreground ? Any ideas ? Suggestions ? Also I came across one another Video where the guy is using a High Pass Filter to clearly define the foreground and background in his photo even that worked well for him, when I tried that on my not so good photo the results were just about ok nothing great. Can you guys think of in similar ways what else can I do tricks to bring out a clear separation between the background and foreground if my poto does not have one ?
 -
Perhaps it is just me? 1. Type beach into the search box of the Stock panel for Pixabay 2. Drag the scroll bar 8 times completely down to the bottom Result: The panel shows Connection failed and all images shown before vanish.
-
 In Affinity Photo, Color Picker is extremely slow. It's terrible. When you use Brush tool and press alt/option to pick color, Color picker work so slow that it causes a lot of anger. please make your Color picker tool quick. Better fast and uptime than beauty.
- 4 replies
-
- 3
-
-
- affinity photo
- color picker
- (and 2 more)
-
 Hi volks, why do I'm missing a complete control of exposure in Affinity Photo Persona? I'm coming from darktable in there do I have every time these control?
 -
So my first attempt at an actual photo composite was last year. I just revised it with the little bit I am picking up (I'm not as consistent as I could be) here and there. This is the before and after...I hope it doesn't take me a year to reach level two. I feel like I've reached level one today.
-
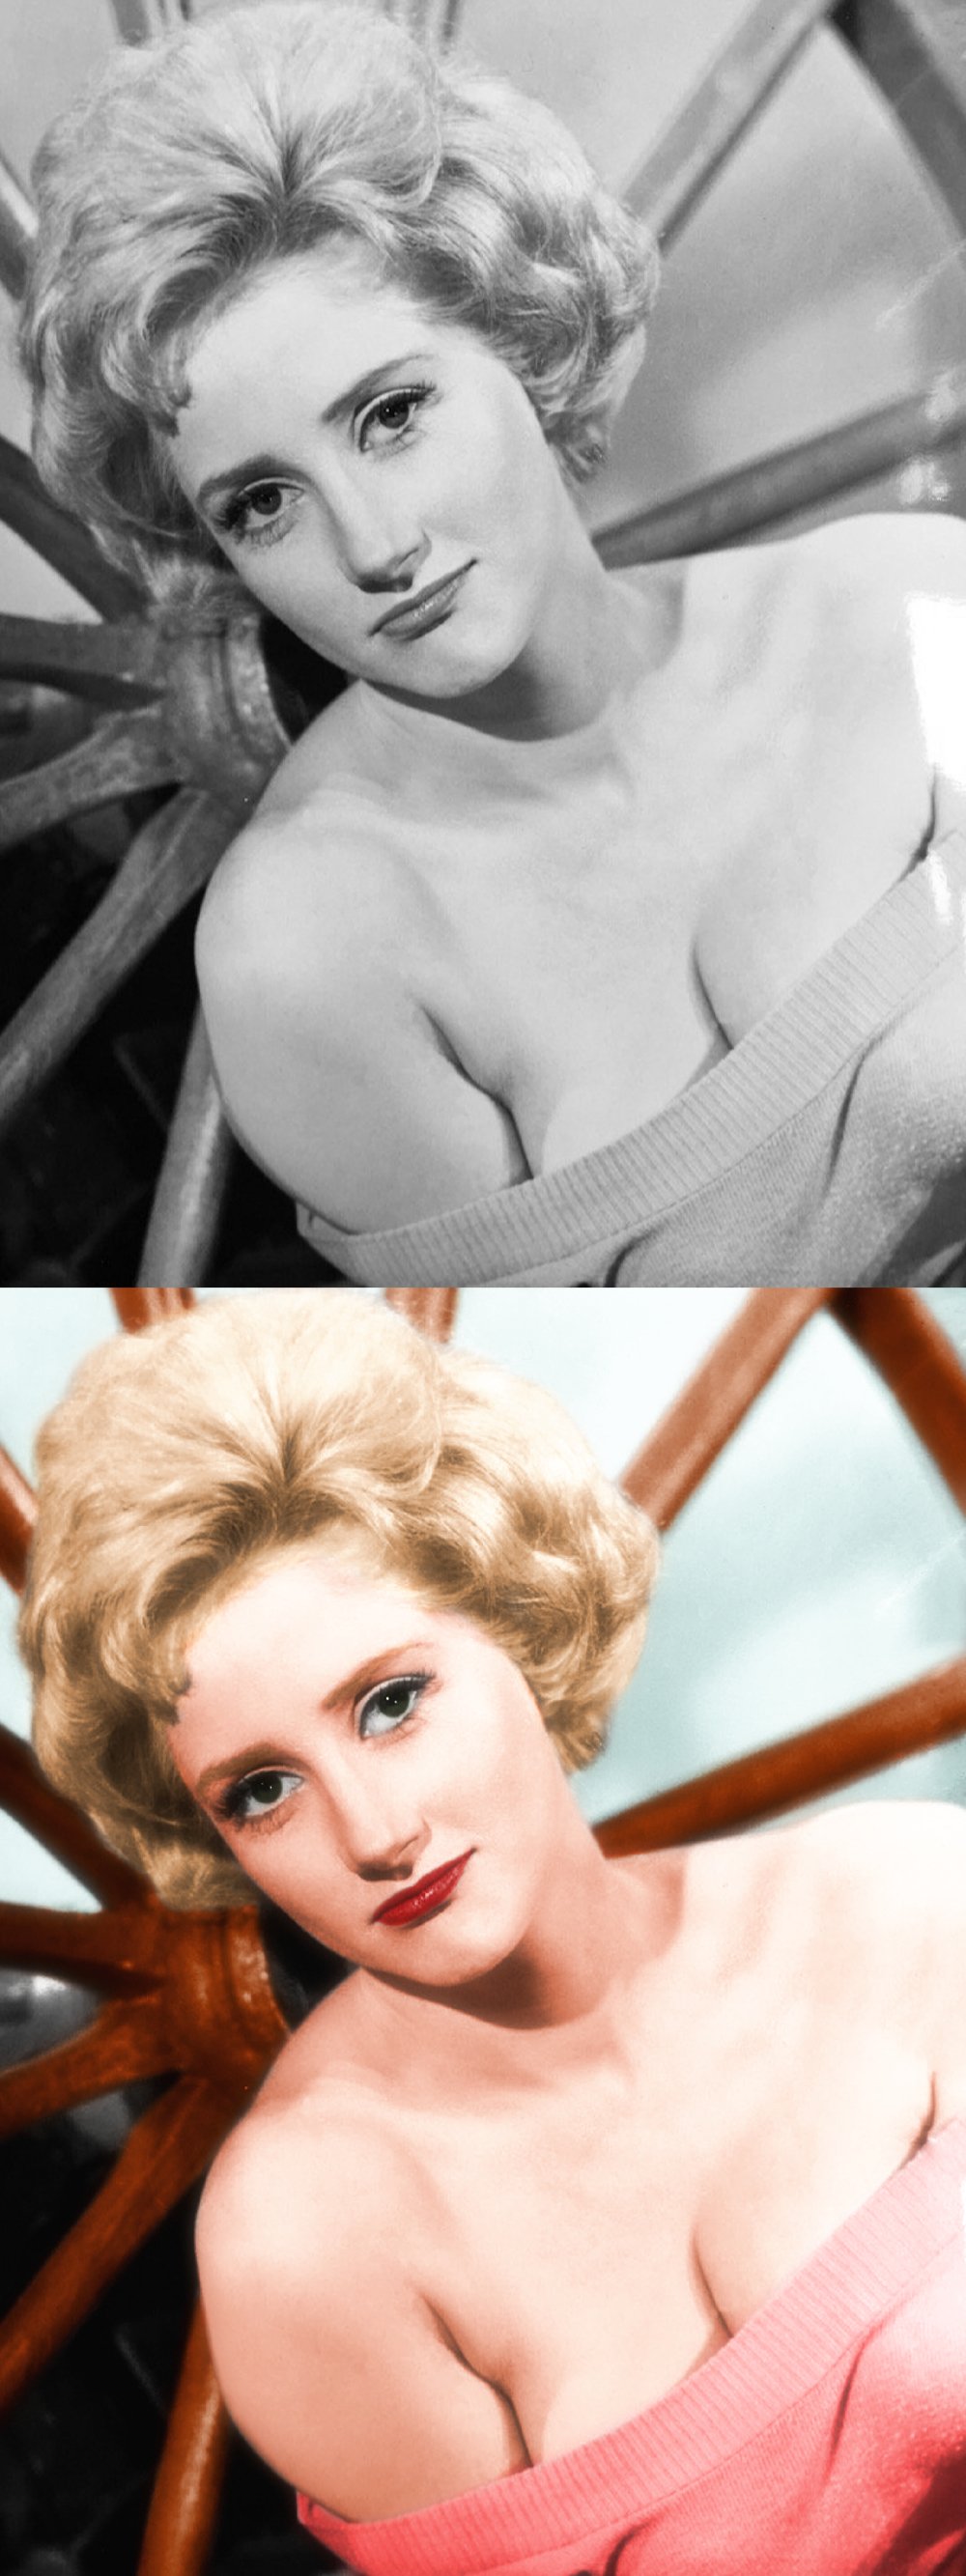
A (recolour) tribute to the amazing Liz Fraser. 1930-2018.
-
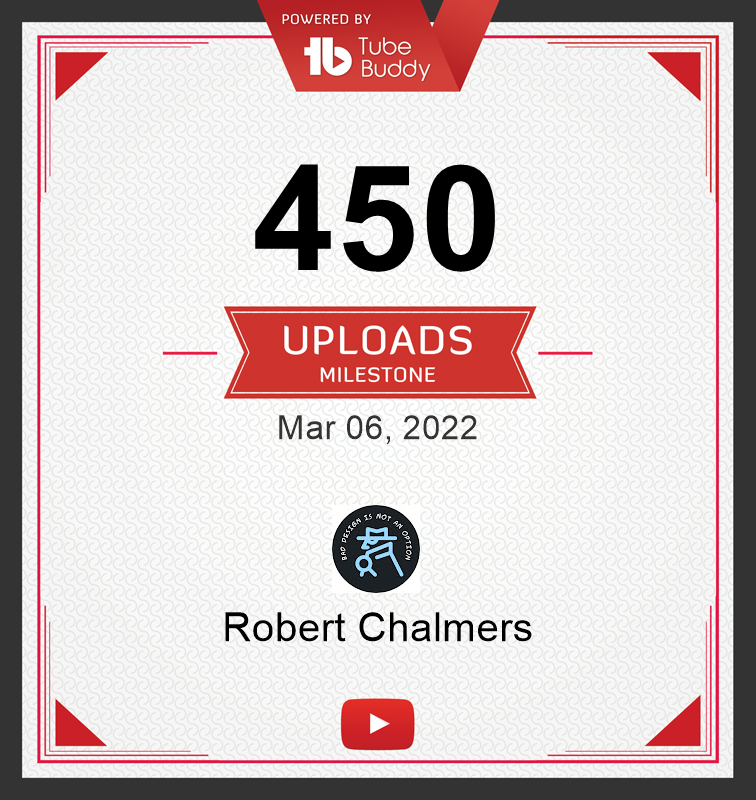
Pretty happy so far. Over 450 YouTube affinity videos on all apps, on all platforms. I love this software. Affinity Photo. iPad, Mac, PC Affinity Designer. iPad, Mac, PC Affinity Publisher. Mac, PC Still publishing. https://YouTube.com/c/RobertChalmers
- 4 replies
-
- 5
-
-

-
- affinity designer
- affinity photo
- (and 1 more)
-
 ill be gathering the issues i had in this thread and lack of QoL features ive found in this post. I like this app and the business model of affinity but these minor issues or after thoughts gets really frustrating when trying to get in the zone. Most of this applies for touch screen use. Lack of a ruler tool and poor implementation of constraint tool in touch screen only use. see this Lack of brush size presets, and poor implementation of brush size entry on touch screen. The smallest stroke of the pencil on the tool area causes brush size to be massive or tiny. its near impossible to do small adjustments, like taking it to 20px from 10px. Also it would be nice if we could enter brush size by writing the number with apple pencil on the toolbox. And presets, thats a must imo. Lack of split screen support or an in app browser for referencing. Cant relocate toolbox at the bottom. Longer list of recent colors and ability to add custom colors easily. A window to save brush + size + color combos on toolbox on the right would be pretty nice to have.
 -
This is my first attempt at a movie poster. I haven't used AP in a while and was bored and decided to follow the Affinity Revolutions movie poster tutorial and add some flair. I definitely enjoyed the process and am now interested in making some more of these.I know it needs some work but I still need to learn some tricks to make this more interesting. Any advice or feedback is definitely welcome. Thanks.
-
 Worked it tradigital, in Affinity Photo, on a splash page for my webcomic 'Never Lost for Words'. Here is the link to the WIP video, if you want to see what brushes I used, and how. Cheers!
 -
 Hi all, I was wondering, wether it´s possible to set a different default size for the Overlay Paint/ Erase Tools in the Development Persona of Affinity Photo. Or maybe just make the software remember my last setting when I open a new document. On a similar note: Is it possible to make "original ratio" the standard option for the crop tool, since I never use "unconstrained". Thanks in advance, juliann
 -
Ref: Thomas-Moran - Castle North Berwick Scotland
-
 There is a new realistic paint mixing technique made available to experiment with for free. It would be a good addition to Affinity Photo. https://scrtwpns.com/mixbox/
- 14 replies
-
- 4
-
-
-
- mixbox
- realtime paint mixing
- (and 1 more)
-
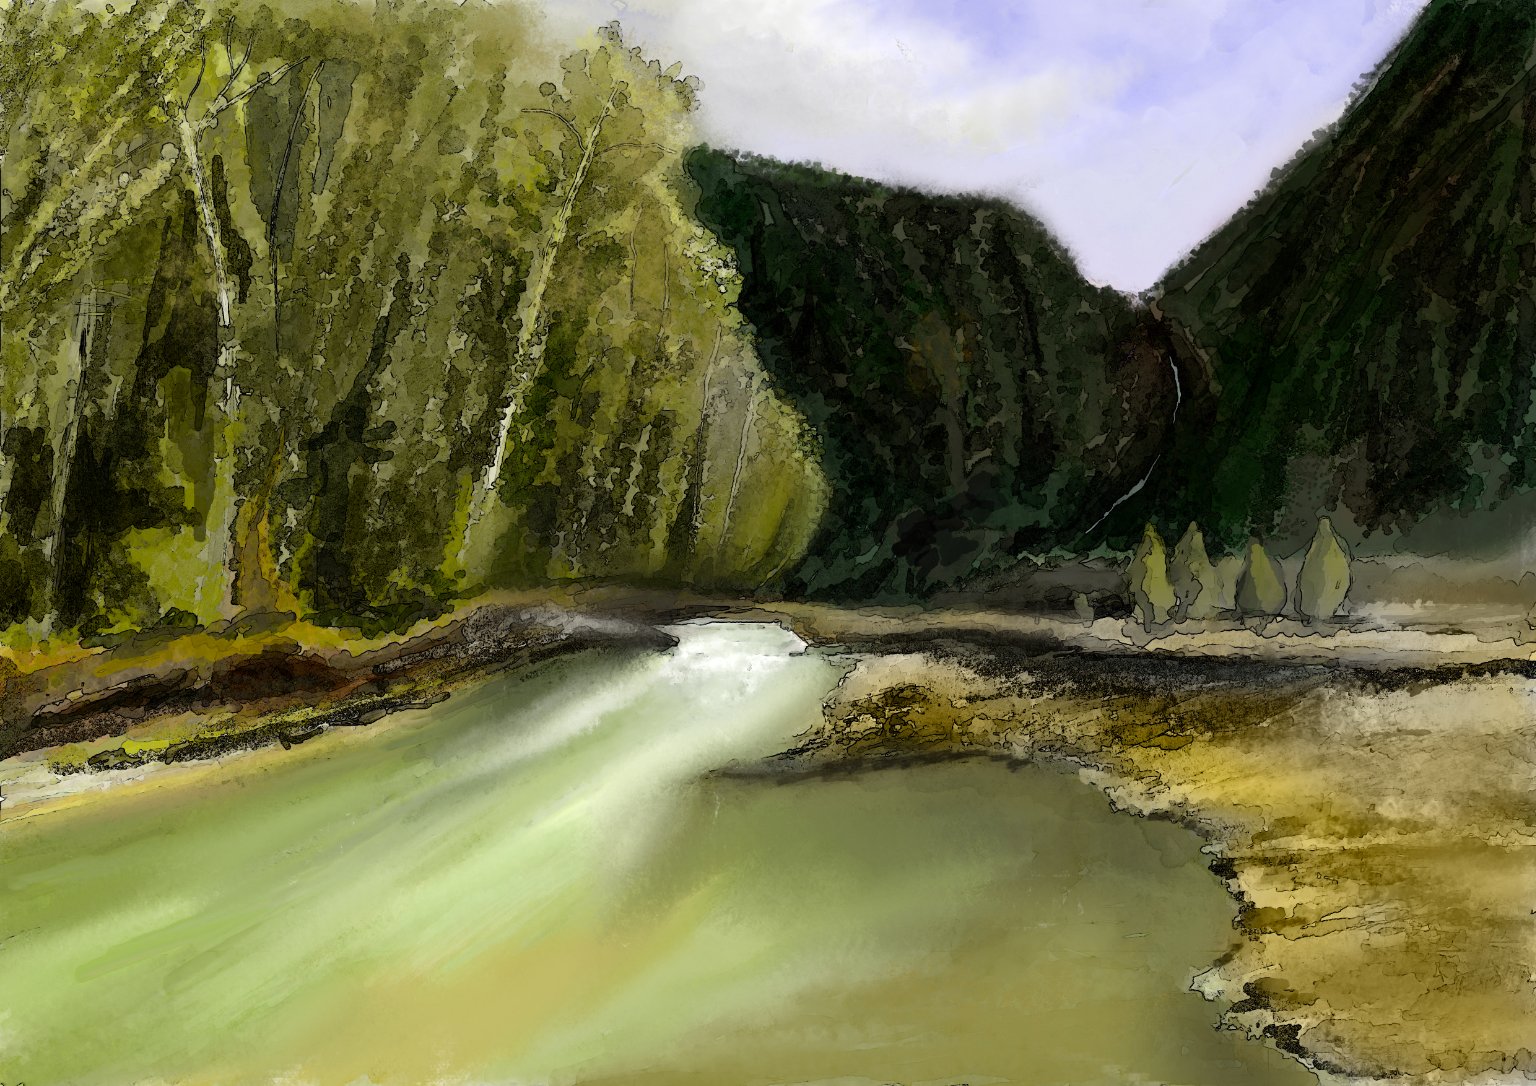
I am trying Affinity Photo as a painting program. If I succeed that means I can stick to one program on all of my devices throughout the complete development process (graphic novel in mind); a pretty exciting prospect. This is an attempt at a landscape with that novel "style" in mind.
-
-
- 2
-
-
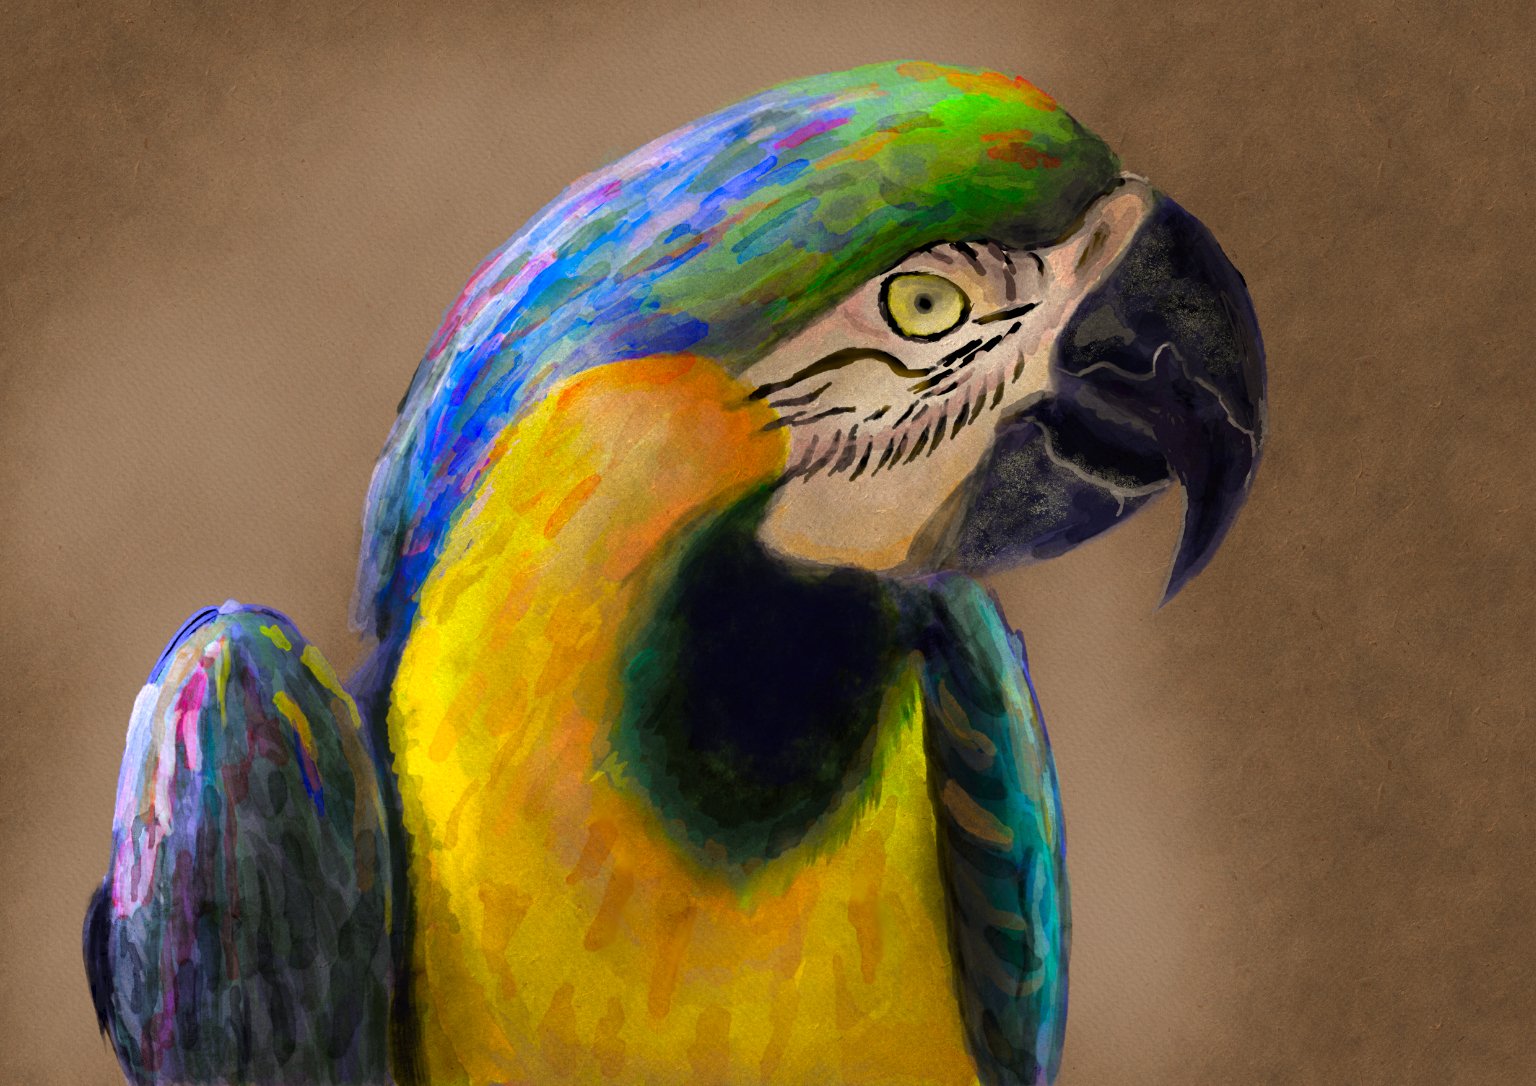
- watercolor
- birds
- (and 1 more)
-
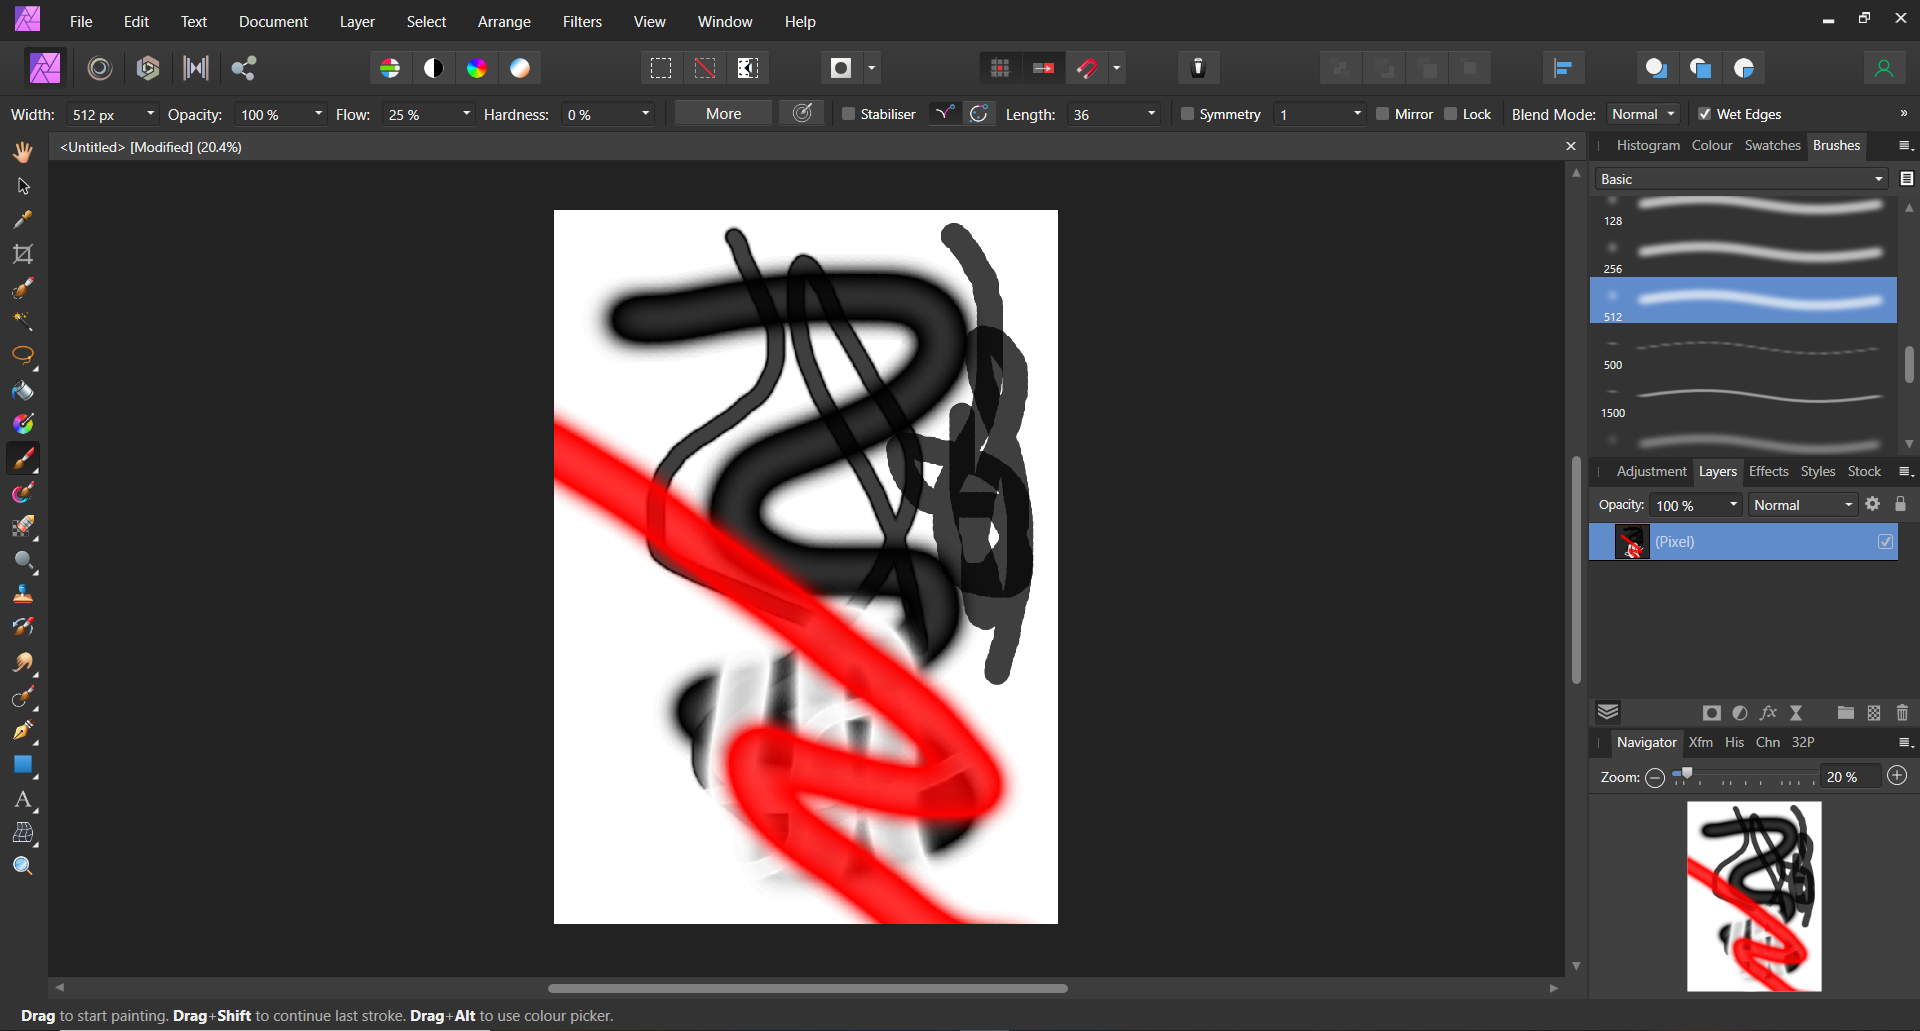
 SORRY FOR MY ENGLISH When I use brush tool it works like opacity is low i the middle and high on the edges - the lower hardness the higher opacity on the edges. It has already happened to me before, but it disappeared itself. I tried reinstalling but it didin't work. I use the latest version of Affinity Photo.
-
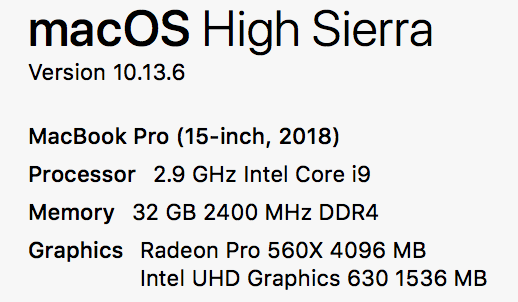
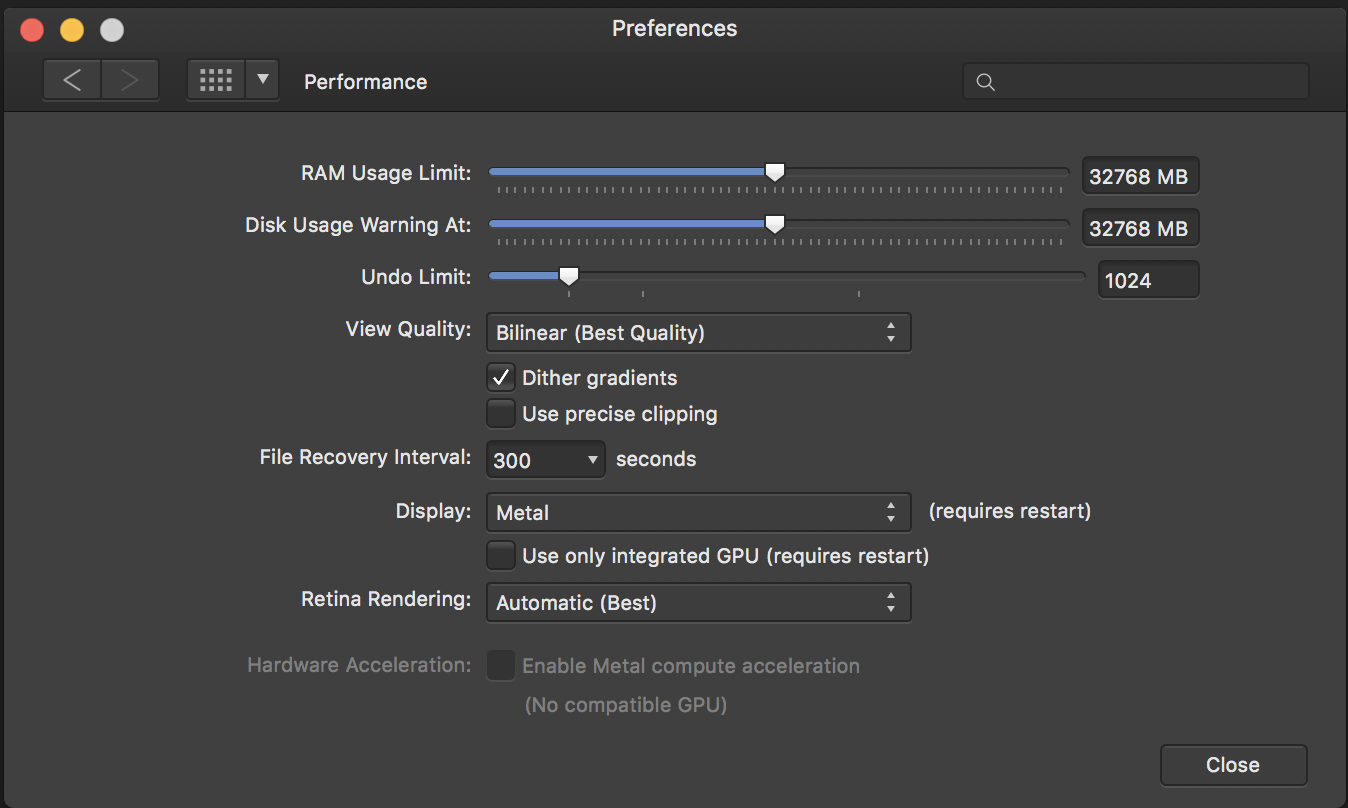
 Hi Everyone, I have a lot of "7 image exposure bracketing Raw" Canon 1dx mark 2 files. The problem is that it takes a lot of time to process each photo. I have a macbook pro 15" 2018 i9 32gb 560x gpu. The questions are: 1. Are there any settings i need to change in order to speed up the process, because it looks like metal gpu acceleration is off (my current settings screenshot attached)? 2. Is there an option to create a batch job for all of my 7 part HDR Merge photos, so ill be able to leave it processing and come back in an hour instead of clicking every few minutes each time? Thanx a lot in advance.
-
 Would be great to have most common admin commands (e.g., from the File menu) available as dedicated buttons, especially a "Save" / "Save As" / "Export". These are utterly commonplace in most programs now; navigating the menu is tedious and the key-codes are too complicated (at least in Windows) for common items.
 -
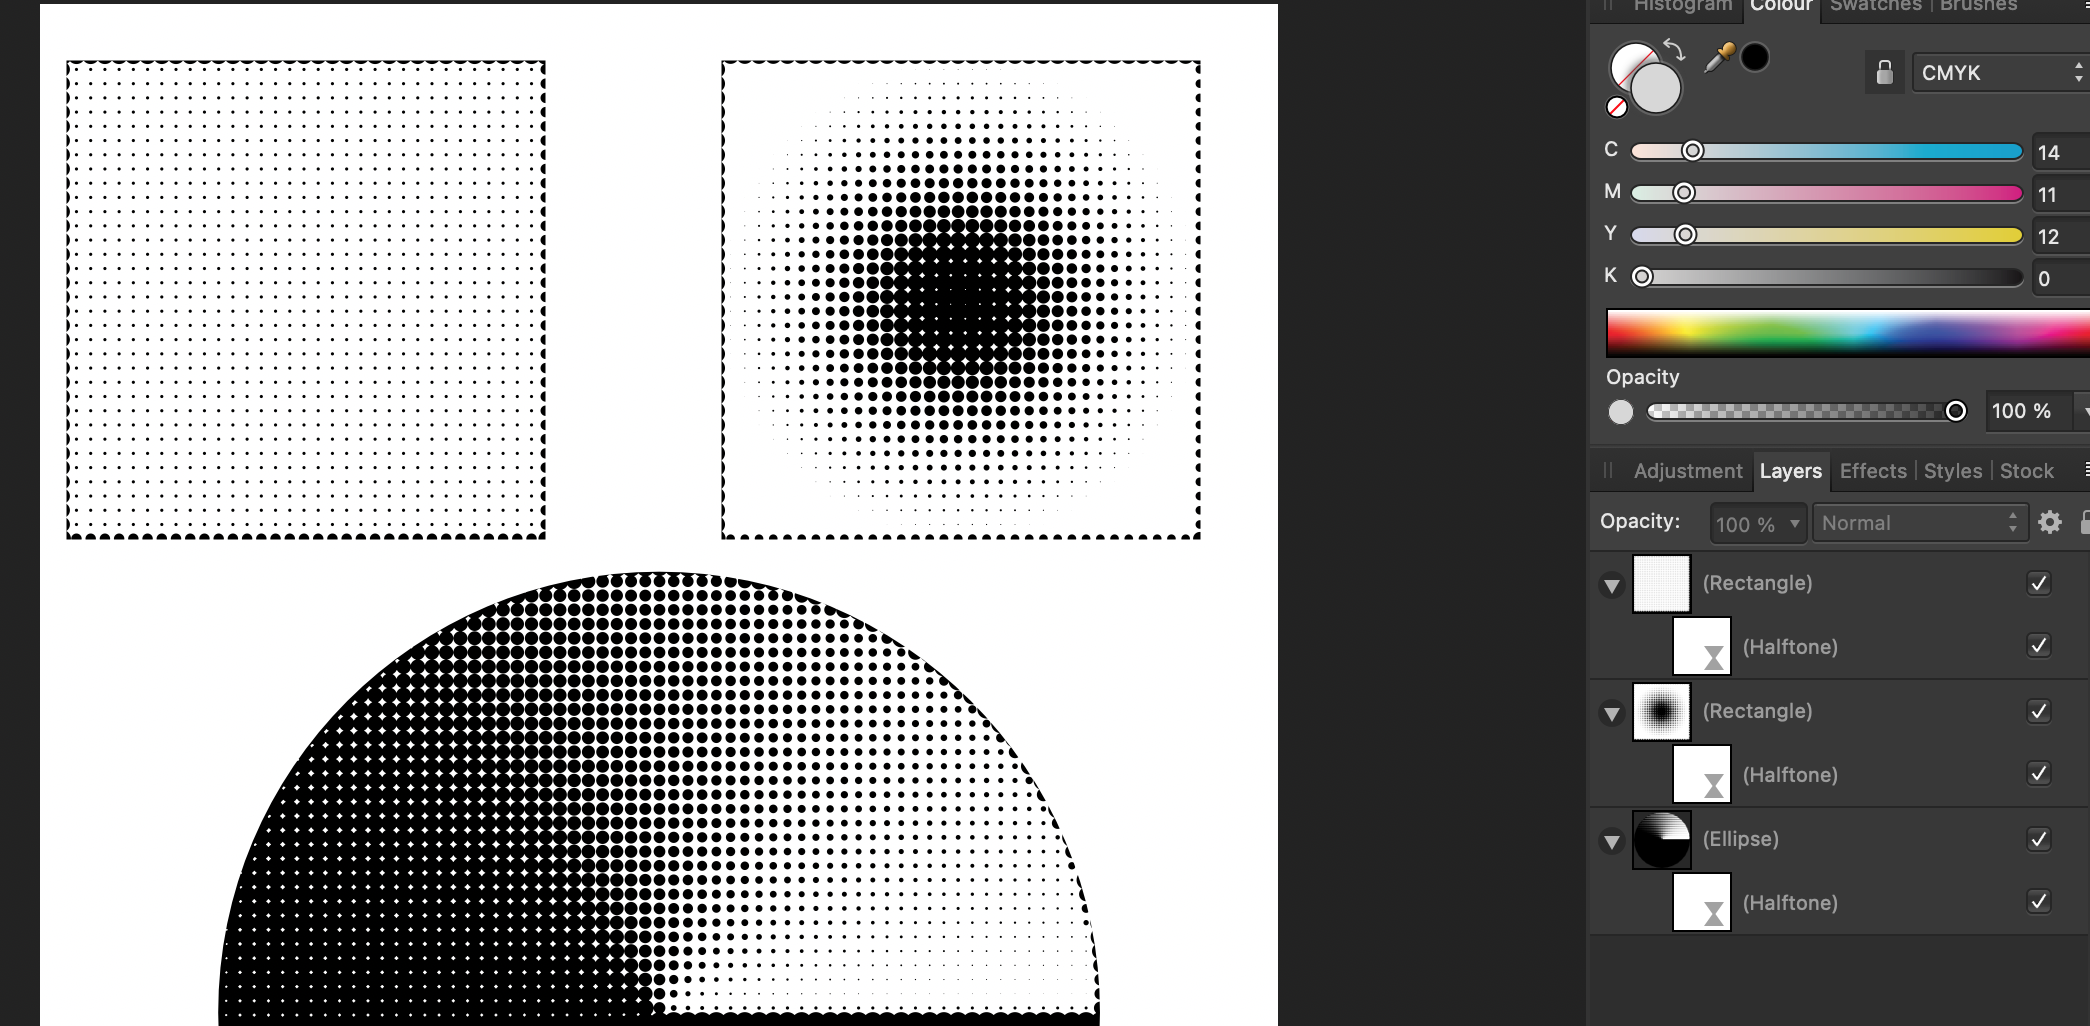
 I have an issue with halftone pattern inside shapes that I can't resolve. If I create a basic shape like a circle or square etc. fill it with a black to white gradient, or a solid color and apply a halftone filter to it. It does create a halftone pattern of the gradient that you would expect. Also adds halftones at the edge of the shape. So it doesn't fade out to white. How can I get rid of the border/edge?
-
.thumb.jpeg.6f143e8223547aba974205ef53397036.jpeg) Official Affinity Photo Desktop Tutorials We've got a brand new set of tutorials that follow a more structured approach and are sorted into logical categories. You can access them by following this link: https://affinity.serif.com/tutorials/photo/desktop Please note that the previous thread is now considered legacy and has been unpinned. The videos linked in the thread are also considered legacy—they will remain accessible (albeit unlisted) but ultimately my goal is to produce suitable replacements over time using the new studio setup with live mixing and picture-in-picture. There's been a clear increase in quality of teaching and production values since Affinity Photo was first released back in 2015, and we hope to continue this moving forward. The videos listed at the above link are hosted on Vimeo. Alternatively, please find a list below with YouTube links: Basics UI overview New document with templates Light UI Open and save Placing images Pixel vs Image layers Moving, scaling and rotating Layers Advanced layer options Selecting layers Mask layers Undo, redo and history Exporting Resizing & resampling Canvas resizing RAW development Tool cycling Studio presets Hardware acceleration External file linking and Resource Manager Advanced Adding lens profiles Manual lens corrections Keyboard and Mouse Brush Modifier Colour management Compression efficiency Channels Channels: Selections HDR merging HDR ghosts removal HDR from one exposure Liquify Stacking: Object removal Stacking: Noise reduction Stacking: Exposure blending Focus merging Panoramas RAW advanced development HDR/EDR workflow Macros 360 live editing OpenColorIO setup Blend modes Blend ranges LAB Infer LUT Importing and creating LUTs Luminosity masks from layers Masking vs clipping layers Paste/move inside Isolating layers Layer Z order and hierarchical view Linked layers Corrective & Retouching Cropping Straightening Images Inpainting Haze removal Dodge, burn and sponge brush tools Clone brush tool Sky replacement Chromatic aberration reduction and defringing Creative Tools Colour picker tool Gradient tool Paint mixer brush Selection refinement Fill layers Pen tool Bitmap pattern fills Selecting sampled colours Selection Brush Tool Freehand Selection Tool: Freehand, Polygonal and Magnetic modes Pattern layers Text on a path Custom brushes from layer selections Divide blend mode Filters & Adjustments Curves Levels Masking adjustment layers Filters Live filter layers Displace filter Shadows/highlights Gradient map Denoising/Noise reduction Radial blur Clarity Channel mixer White balance Black & white adjustment Zoom blur Selective colour Procedural Texture: Tone Mapping HDR to SDR Procedural Texture: Nonlinear Transform Correction Affine filter: seamless textures Frequency Separation: Gaussian, Bilateral and Median blur methods Export Persona Exporting slices Workflows & Techniques PSD write-back and PSB import PSD smart object import Editing infrared photography Relighting 3D renders Using Matte ID render passes for masking Lock children (Masking) Editing metadata Retouching scanned line drawings Applying Blender Filmic looks Compositing 3ds Max and V-Ray render passes Frequency Separation: Retouching lens flares with Median method Frequency Separation: Portraiture retouching Perspective compositing Astrophotography Astrophotography stacking: SHO composition Astrophotography stacking: One shot colour workflow Astrophotography stacking: Monochrome colour mapping Astrophotography stacking: LRGB composition Astrophotography stacking: HaRGB composition Astrophotography stacking: Bi-colour composition Astrophotography: Removing background gradients Astrophotography: Equalising colours Astrophotography: Sigma Clipping Astrophotography: File Groups and Filters Hope you find them useful! James
Official Affinity Photo Desktop Tutorials We've got a brand new set of tutorials that follow a more structured approach and are sorted into logical categories. You can access them by following this link: https://affinity.serif.com/tutorials/photo/desktop Please note that the previous thread is now considered legacy and has been unpinned. The videos linked in the thread are also considered legacy—they will remain accessible (albeit unlisted) but ultimately my goal is to produce suitable replacements over time using the new studio setup with live mixing and picture-in-picture. There's been a clear increase in quality of teaching and production values since Affinity Photo was first released back in 2015, and we hope to continue this moving forward. The videos listed at the above link are hosted on Vimeo. Alternatively, please find a list below with YouTube links: Basics UI overview New document with templates Light UI Open and save Placing images Pixel vs Image layers Moving, scaling and rotating Layers Advanced layer options Selecting layers Mask layers Undo, redo and history Exporting Resizing & resampling Canvas resizing RAW development Tool cycling Studio presets Hardware acceleration External file linking and Resource Manager Advanced Adding lens profiles Manual lens corrections Keyboard and Mouse Brush Modifier Colour management Compression efficiency Channels Channels: Selections HDR merging HDR ghosts removal HDR from one exposure Liquify Stacking: Object removal Stacking: Noise reduction Stacking: Exposure blending Focus merging Panoramas RAW advanced development HDR/EDR workflow Macros 360 live editing OpenColorIO setup Blend modes Blend ranges LAB Infer LUT Importing and creating LUTs Luminosity masks from layers Masking vs clipping layers Paste/move inside Isolating layers Layer Z order and hierarchical view Linked layers Corrective & Retouching Cropping Straightening Images Inpainting Haze removal Dodge, burn and sponge brush tools Clone brush tool Sky replacement Chromatic aberration reduction and defringing Creative Tools Colour picker tool Gradient tool Paint mixer brush Selection refinement Fill layers Pen tool Bitmap pattern fills Selecting sampled colours Selection Brush Tool Freehand Selection Tool: Freehand, Polygonal and Magnetic modes Pattern layers Text on a path Custom brushes from layer selections Divide blend mode Filters & Adjustments Curves Levels Masking adjustment layers Filters Live filter layers Displace filter Shadows/highlights Gradient map Denoising/Noise reduction Radial blur Clarity Channel mixer White balance Black & white adjustment Zoom blur Selective colour Procedural Texture: Tone Mapping HDR to SDR Procedural Texture: Nonlinear Transform Correction Affine filter: seamless textures Frequency Separation: Gaussian, Bilateral and Median blur methods Export Persona Exporting slices Workflows & Techniques PSD write-back and PSB import PSD smart object import Editing infrared photography Relighting 3D renders Using Matte ID render passes for masking Lock children (Masking) Editing metadata Retouching scanned line drawings Applying Blender Filmic looks Compositing 3ds Max and V-Ray render passes Frequency Separation: Retouching lens flares with Median method Frequency Separation: Portraiture retouching Perspective compositing Astrophotography Astrophotography stacking: SHO composition Astrophotography stacking: One shot colour workflow Astrophotography stacking: Monochrome colour mapping Astrophotography stacking: LRGB composition Astrophotography stacking: HaRGB composition Astrophotography stacking: Bi-colour composition Astrophotography: Removing background gradients Astrophotography: Equalising colours Astrophotography: Sigma Clipping Astrophotography: File Groups and Filters Hope you find them useful! James