
HenrikM
-
Posts
66 -
Joined
-
Last visited
Reputation Activity
-

 HenrikM got a reaction from Jose3DSigner in Portrait with Frequency Separation
For a recent portrait, I decided to try out the Frequency Separation functionality in Affinity Photo to remove skin discoloration. Worked very well.
-

 HenrikM got a reaction from Alfred in Portrait with Frequency Separation
@Alfred and @Smee Again,
Here is a version without frequency separation.
-
HenrikM reacted to Smee Again in Portrait with Frequency Separation
Nice work, but I agree with Alfred about it being more interesting if we saw the ---ahem--- "before, after" (a poke at Unmesh Dinda from PixImperfect).
-
HenrikM reacted to Alfred in Portrait with Frequency Separation
It would be interesting to see the original picture so that we can appreciate how dramatic the effect has been.
-
 HenrikM got a reaction from Wosven in Portrait with Frequency Separation
For a recent portrait, I decided to try out the Frequency Separation functionality in Affinity Photo to remove skin discoloration. Worked very well.
-
 HenrikM got a reaction from Gabe in Portrait with Frequency Separation
For a recent portrait, I decided to try out the Frequency Separation functionality in Affinity Photo to remove skin discoloration. Worked very well.
-
HenrikM reacted to Gerry Fraiberg in Affinity Photo - DxO Photo Lab 2
As I learn Photo, I decided to edit the same image in Photo then in DxO Photo Lab 2. My photo editing workflow starts in Lightroom 6 (no subscription for me) for asset management, quick edits, applying a watermark and to create online galleries for client review. I've been using DxO for a few years. One downside is the .afphoto file in this exercise is 545 MB. The Nikon NEF or RAW file from a D7500 is 24.9 MB. After editing in DxO Photo Lab 2, the image goes back to LR6 as a TIFF - 28.5 MB, so DxO wins over Affinity as far as hard drive economy goes. Interestingly, the JPEG from Photo is smaller, but that might be due to the intermediate TIFF. I intend to use Affinity Photo for composites (layers) and graphic screens with text for video.
The image with the watermark was edited in DxO, then sent back to LR for watermark and resized for export. The image without the watermark was edited and resized in Photo. There are subtle differences as a result of the way the two softwares process images. At the moment, DxO does the best job for noise reduction in RAW or NEF images. By the way, the photo is of fringes on a scarf hanging on stair railing in morning sun. It caught my eye as I was going by.
-
HenrikM reacted to MattP in PLEASE READ THIS: Sharing Guidelines
We've had a query about what is viewed as 'acceptable' content, and what our stance on it is.
This topic is one which is typically fairly volatile because everyone is so different and what is acceptable for one person, can be shocking or inflammatory to another. We don't want everyone to feel cautious about what they click, just in case they are faced with something they'd rather not see, but we also don't want to discourage people from sharing the amazing work they've been creating, so... We think the simplest, clearest thing to do is:
If you think your image could in any way be described as controversial...
- Start a new topic with an appropriate title
- Upload your image to a sharing site (Flickr, Behance, Instagram, etc) - you can even use the 'Share' link in the app's File menu
- Write a proper description of your work in the body of your post and add a text link to the image you have shared
Now, if people think they'd be offended, they just don't have to click the link and they won't see it at all.
Thanks,
Matt
-
 HenrikM got a reaction from Edazza in Night of the Werewolves
Alice of Sandby vs. werewolves. Alice is a graphic novel character created by Petra Brewitz. Petra and I are working on a graphic novel manuscript, Alice: Demons Gate. No werewolves in that story...but there is definitely story potential in an encounter between Alice and a pack of werewolves.
The scene was rendered in Daz Studio. I used Affinity photo to turn the original daylight scene into a nighttime scene:
I increased the contrast reduced saturation toned bright parts slightly yellow, and darker parts slightly blue, to create a feeling of night. That is basically it.
A
-
 HenrikM got a reaction from Lovemonkey in Night of the Werewolves
Alice of Sandby vs. werewolves. Alice is a graphic novel character created by Petra Brewitz. Petra and I are working on a graphic novel manuscript, Alice: Demons Gate. No werewolves in that story...but there is definitely story potential in an encounter between Alice and a pack of werewolves.
The scene was rendered in Daz Studio. I used Affinity photo to turn the original daylight scene into a nighttime scene:
I increased the contrast reduced saturation toned bright parts slightly yellow, and darker parts slightly blue, to create a feeling of night. That is basically it.
A
-
 HenrikM got a reaction from ianrb in Night of the Werewolves
Alice of Sandby vs. werewolves. Alice is a graphic novel character created by Petra Brewitz. Petra and I are working on a graphic novel manuscript, Alice: Demons Gate. No werewolves in that story...but there is definitely story potential in an encounter between Alice and a pack of werewolves.
The scene was rendered in Daz Studio. I used Affinity photo to turn the original daylight scene into a nighttime scene:
I increased the contrast reduced saturation toned bright parts slightly yellow, and darker parts slightly blue, to create a feeling of night. That is basically it.
A
-
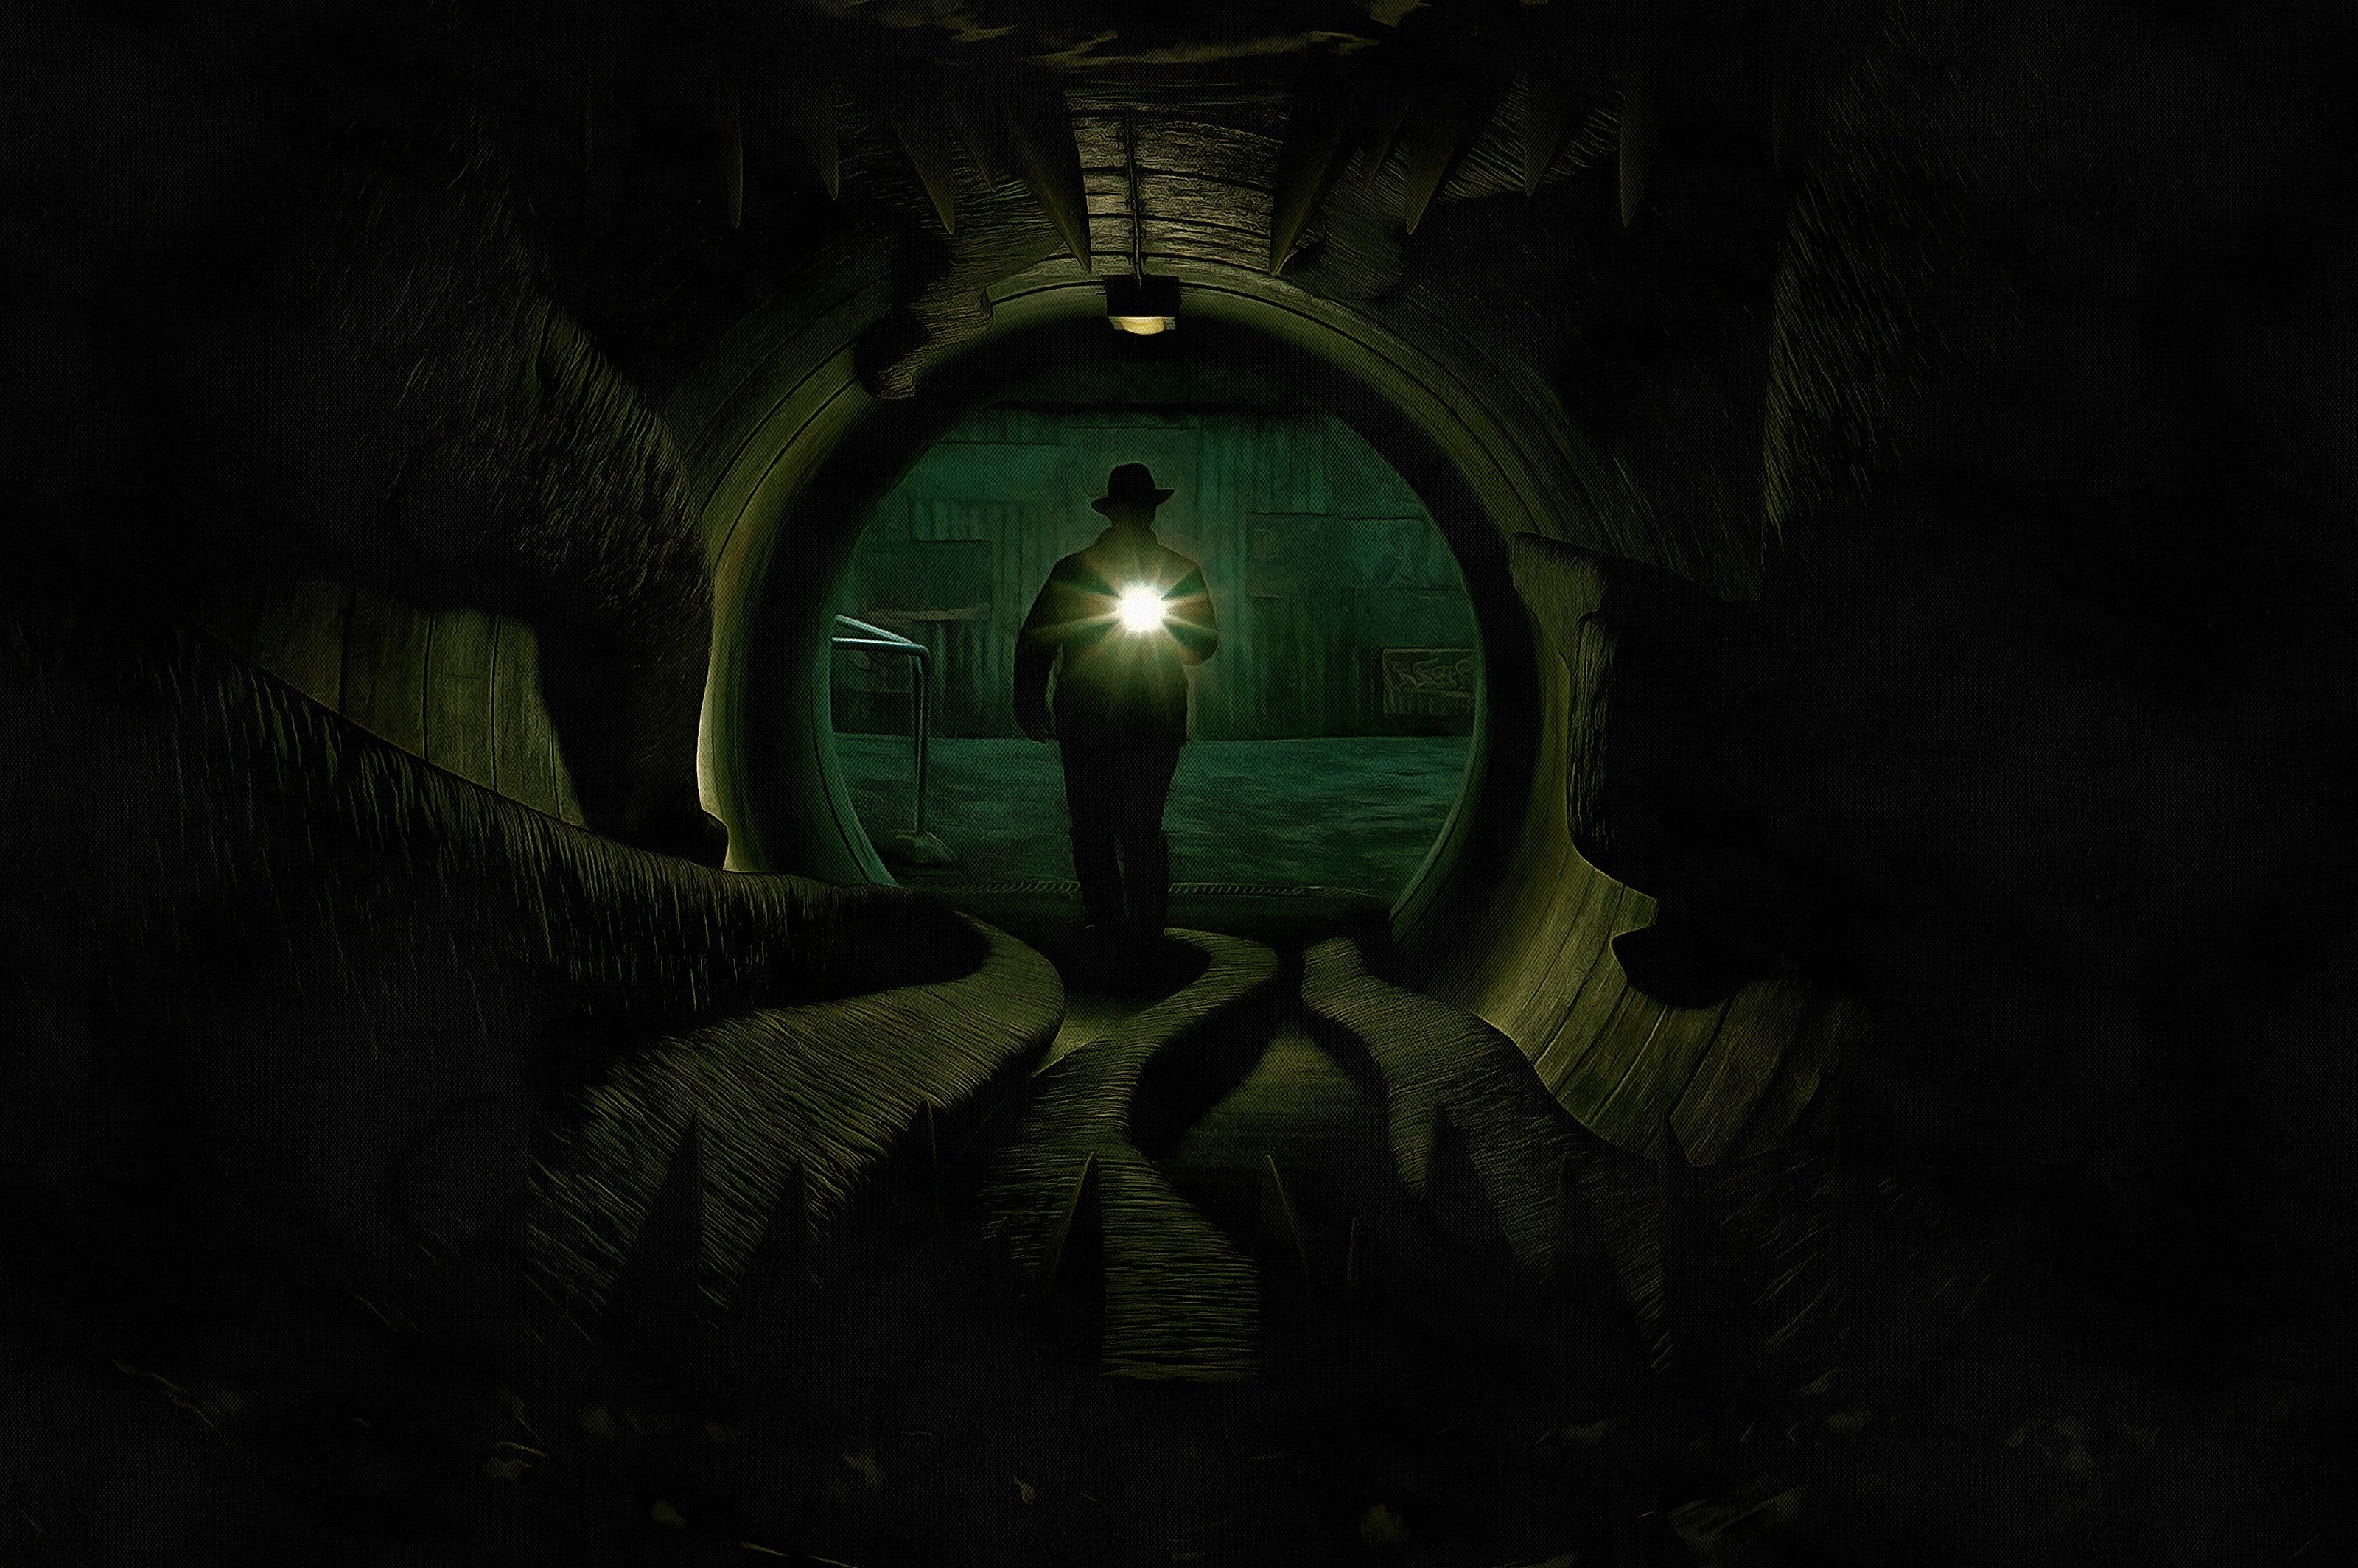
 HenrikM got a reaction from Bratan in The Tunnel (Lovecraftian Horror)
This is a selfie. I shot the photo of myself in the tunnel over a year ago. My initial attempts at adding tentacles did not work out too well.
A couple of months ago, I made a new attempt. I rendered the tentacles in Daz Studio, composited in Affinity Photo, and painted in Dynamic Auto-Painter.
I created several different versions. This is the one my son likes the best.
-
HenrikM got a reaction from Wosven in Poster made in Affinity Publisher
Here is the final version of the poster.
There are still things that can be improved, but I had to get it printed while there was still time.
-
HenrikM reacted to iMatt in Experiences so far.
My experience with Affinity Publisher has been positive so far. In essence, it appears to be Affinity Designer with a far more robust text capability and multiple pages. A little simplistic, I know. But as Adobe incorporated Illustrator's graphics engine into InDesign, so Serif have done the same with Designer and Publisher. And I think they've probably done a better job given my experiences with Adobe CS in the past.
-
HenrikM reacted to GarryP in Designing Pulp Book Covers
Very nice work.
The use of 3D models for this kind of thing is an excellent idea; I think I might try it for myself some day.
-
 HenrikM got a reaction from stokerg in Five Finger Voting
Five Finger Voting - A quick-and-dirty illustration for a presentation slide.
-
 HenrikM got a reaction from VectorWhiz in Designing Pulp Book Covers
Looks very good. The artwork matches the pulp paperback style very well.
I use a similar technique, but I often go for more of an 80's book cover look. I usually shoot backgrounds first. Then I render 3D elements with Daz Studio, and combine with the background photos in Affinity Photo. Finally, I use Dynamic Auto-Painter to convert to a painted image.
I have done the paint conversion in Affinity Photo a couple of times, with the paint mixer tool. Takes a lot of time, but works very well.
-
HenrikM reacted to John Rostron in Cat and Mouse
Can I put on my hat of a retired Lecturer in Animal Biology? Many illustrators of Sabre-toothed Cats fail to realize that these sabre-like canine teeth are strongly embedded in the upper jaw. The roots are at least as long as the exposed crowns and the whole tooth follows a continuous smooth curve. If you google images of a sabre-tooth skull you will see what I mean.
Your image is more-or-less face on so this may not be so crucial.
If you need a live model, the cat across the road from us has got the biggest fangs I have ever seen in a domestic cat. It is also one of the daftest and noisiest!
John
-
HenrikM reacted to EZeemering in Cat and Mouse
So you gonna make a photo and insert a 3D model in post-op?
I like the idea of story-boarding this way. It would really help out the model in the photo shoot. Please post the final image, I'm curious.
-
HenrikM reacted to Alfred in Trying to create a portrait that looks painted
Here’s a post linking to a video which demonstrates a nice way to achieve an oil painting effect:
-
HenrikM got a reaction from Lovemonkey in Five Finger Voting
Five Finger Voting - A quick-and-dirty illustration for a presentation slide.
-
 HenrikM got a reaction from John Rostron in Cat and Mouse
Ordinary house cat, and a really, really good makeup-artist.
Actually, I cheat a bit. I bought the cat model in the Daz store.
For the final photo version, I will probably buy fur with longer hair. The model looks pretty realistic as it is right now though.
-
HenrikM got a reaction from stokerg in Cat and Mouse
I have begun storyboarding photo sessions using Affinity Photo, Daz Studio, and Dynamic Auto-Painter.
Cat and Mouse is a good example. I set the scene up in Daz Studio and rendered it. Then I post-processed it in Affinity Photo. Finally, to reduce the realism and get a more painterly feeling, I ran the picture through Auto-Painter.
Works pretty well, I think.
Now, of course, I have to do everything all over again, shooting with a live model. However, having a storyboard picture like this makes it a lot easier to figure out how to light the scene, to discuss the scene with the model, to figure out what props to use...
-
 HenrikM got a reaction from Wosven in Cat and Mouse
Ordinary house cat, and a really, really good makeup-artist.
Actually, I cheat a bit. I bought the cat model in the Daz store.
For the final photo version, I will probably buy fur with longer hair. The model looks pretty realistic as it is right now though.
-
HenrikM got a reaction from Wosven in Cat and Mouse
I have begun storyboarding photo sessions using Affinity Photo, Daz Studio, and Dynamic Auto-Painter.
Cat and Mouse is a good example. I set the scene up in Daz Studio and rendered it. Then I post-processed it in Affinity Photo. Finally, to reduce the realism and get a more painterly feeling, I ran the picture through Auto-Painter.
Works pretty well, I think.
Now, of course, I have to do everything all over again, shooting with a live model. However, having a storyboard picture like this makes it a lot easier to figure out how to light the scene, to discuss the scene with the model, to figure out what props to use...