

Dave Vector
-
Posts
130 -
Joined
-
Last visited
Posts posted by Dave Vector
-
-
Ok, an update.
I noticed that one of my linked pictures was in a picture frame and I could see it in the frame, but the picture frame had a thin black "X" through it, corner to corner. I tried to find out what that means, presumably a missing image? Even with the picture frame containing the "X" the file exported as a PDF fine ("X"ed picture visible in the result).
I then removed the picture frame and just had the image on the root of the page layer and I was able to get the "Relink" to work!
Now when I use "Relink" to find and update the 150 linked images, I successfully see the updating bar go across the screen, but after a few seconds the progress bar disappears and APub is frozen. It takes about 105 seconds for it to finish and APub goes from using 2.1 GB of memory to about 9.5 GB of memory, dropping back down to 2.4 after the operation successfully completes.
I don't know if that helps anyone, but there are my findings. Hopefully it may help someone else troubleshoot a similar issue.
Again, thanks for the help!
-
I tested this on a new APub file, adding seven .png images from the file that was giving me an error. It works fine.
Seems like either my file has some sort of corruption, or some failing function.
The file is too complex and there are too many hours into it, to easily pare it down, to troubleshoot and fix it. I will live with my hack fix... 😑
Thanks everyone for your help!
-
I corrected my pervious post. I meant "Relink". the button confusingly changes states depending upon the situation, I would prefer it if there were buttons for both "Relink" and "Update" with one or the other greyed out, but I get that UI simplification is a trend...
Regarding the Relinking attempt :
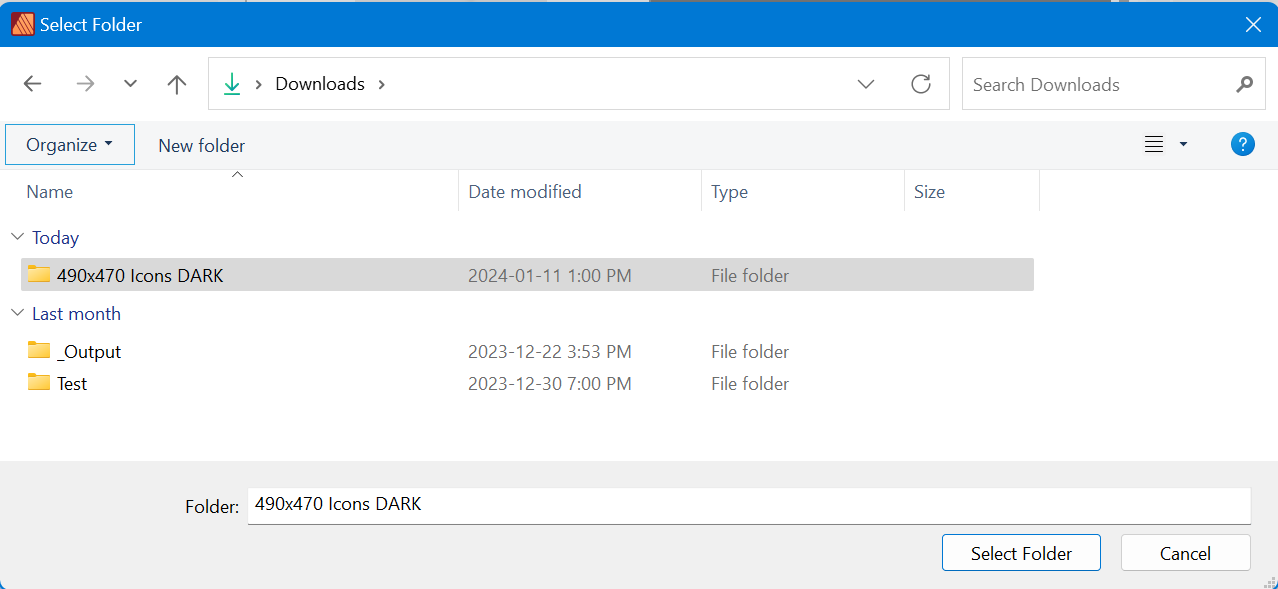
When I said "this does not work" I meant that when I set it up for "Downloads\490x470 Icons DARK" as per my screenshot in the previous post, and click "Select Folder" It dismisses the dialog but the linked files are still shown as Missing, yes Walt.
-
51 minutes ago, walt.farrell said:
You should have a blank folder name field. With that value in it, you are trying to select Downloads\490x470 Icons DARK\490x470 Icons DARK which does not exist.
Okay, I tried to make sure that there is only one level of folder, so : "Downloads\490x470 Icons DARK" like this:

This does not work...
HOWEVER... I did discover another way to get APub to see the folder:
- Upon opening the file, at the message display: "Missing Resource(s) Some of your linked resource files are missing. Would you like to locate them?"
- Instead of clicking "Resource Manager", click on "Yes"
- A Windows Explorer pops up showing the contents of the new folder (or you can navigate to the desired folder).
- Observe the file name it is trying to match and click on that matching filename in the window, then click "Open" [first time].
- Another Windows Explorer pops up, this time with a new file name. Click on that matching filename in the window, then click "Open" [second time].
- Another Windows Explorer pops up, this time with a new file name. Click on that matching filename in the window, then click "Open" [third time].
- After 3 times, APub finally sees this as the new folder and "Updates" all the links in the document. Sometimes is works on the second time.
So I think this is a bug, unless I am doing something wrong, but to me the Resource Manager "Relink" button should work for files with missing links.
-
Yes I select the folder and double-click to open it. I do not get the greyed-out files, but this could be a Windows thing.
But hitting the "Select Folder button, nothing happens.
-
4 minutes ago, Old Bruce said:
The folder needs to be opened so the actual picture files are visible and then you choose the Select Folder. Completely unintuitive.
Okay, Oddly enough my folder path is correct and the .png images are indeed in the folder, but when I select the folder by double-clicking Widows shows nothing in the folder except a message "No items match your search". This is in the Windows Explorer pop-up with "Select Folder" at the bottom.
-
Hi,
I have an Affinity Publisher 2.3.1 document with 150 linked files. I switched the folder name and when I load the document, it gives me the warning about the missing files and I choose Resource Manager.
In Resource Manager, I select all the linked images designated "Missing" and click the "Relink" button at the bottom.
I select the renamed folder and click the "Select Folder" button at the bottom.
Nothing happens.
Clicking the "Close" button at the bottom of the Resource Manager does not execute the action either.
Am I missing something? I am not sure why it does not work.
-
Ok, I just wanted to be clear about this, because this post is mostly about the ability to make a vector-based pattern and fill a shape with the vector-based pattern.
I did not want someone new to the thread to think that this request is included in Affinity Designer V2.
But yes, a tool called Vector Flood Fill does exist and will let you fill with solids, gradients, and bitmap fills.
-
10 hours ago, Komatös said:
Vector fill is included in Affinity Designer V2.
@Komatös Can you please tell us where you find the vector fill in Affinity Designer V2?
-
Thank you for the handy Alt + U trick. I checked all the colons and they were all U+003A, but I managed to dig a little deeper and believe I have this bug 100% reproduceable.
I put the explanation on the "Publisher 2 Bug found on Windows" Subforum.
Thanks again for your help!
-
Hello!
I think I figured out how to reproduce this 100%, however I included a sample file as well, just in case someone spots something I did wrong.
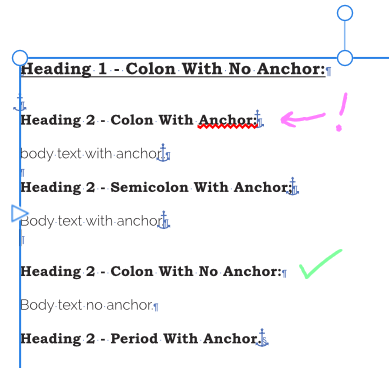
**** The issue seems to be a combination of a header style, a colon immediately following a word, and an anchor! ****
I am not sure how the anchors got into my text, perhaps from copying the HTML text from the website?
- Make sure your spell check is turned on, of course. Within the Base style, the Language for the spell check dictionary is English United States
- Turn on Text > Show Special Characters (Alt+P)
- Turn on Text > Interactive > Show Anchors (**This setting should also be under the View > menu, in my opinion, as it is very obscure**)
Interestingly, it does not seem to give a spelling error with other types of punctuation as shown in the screen capture below. Note: I did not check every punctuation symbol...
Seems like something that should be fixed. In life, nobody wants colon trouble

-
Hi, This issue was originally posted here in version 1.x of Affinity Publisher, but the issue persists with Affinity Publisher 2.0.4 on Windows 11 22H2, OS Build:22621.1555
ISSUE: Words ending in a colon in a header style, flag as misspelled, when they are, in fact, correctly spelled.
TO REPRODUCE:
- Copy some HTML text from the web, preferably a title with a colon and a line break right after. I suspect it might have something to do with this source text.
- Pasted it into a text frame in Affinity Publisher.
- Mark the pasted text with a heading style.
- Ensure Text > Spelling > Check Spelling While Typing is on.
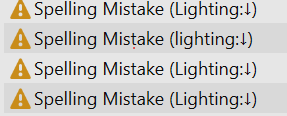
OBSERVATIONS: in the Preflight panel, that there is a down arrow glyph (see image below)next to the colon. Turning on Text > Show Special Characters (Alt+P) does not seem to reveal a difference between this arrow (new line glyph) and the normal "new paragraph" (backwards P) glyph. Replacing it by deleting the paragraph symbol and typing a new one, does not fix it either.
WORK-AROUND: adding another colon, then add a space, and then delete the second colon.
e.g.: right after the "g" in "lighting", add a second colon, (Lighting::) and then space (Lighting: :), then delete the right-most colon.
The end result is your headings will have an extra space after the colon and before the paragraph symbol, but since they are invisible, this should not be a critical document housekeeping issue.
EXPECTED BEHAVIOR: Spell checker will not flag words in a heading style, that precede colons or hidden html symbols, as misspelled.
Dave
-
Hmm, I have this same problem: words ending in a colon in a header style, flag as misspelled, when they are, in fact, correctly spelled.
I grabbed this text from the web, so I suspect it might have something to do with it, when I pasted it into Affinity Publisher.
I noticed, in the Preflight panel, that there is a down arrow glyph next to the colon. Turning on Text > Show Special Characters (Alt+P) does not seem to reveal a difference between this arrow (new line glyph) and the normal "new paragraph" glyph. Replacing it by deleting the paragraph symbol and typing a new one, does not fix it either.
What did work for me was adding another colon, then add a space, and then delete the second colon.
e.g.: right after the "g" in "lighting", add a second colon, (Lighting::) and then space (Lighting: :), then delete the right-most colon.
The end result is your headings will have an extra space after the colon and before the paragraph symbol, but since they are invisible, this should not be a critical document housekeeping issue.
I hope that helps,
Dave
-
2 hours ago, Calvert said:
You guys seem knowledgeable about the clipping... I can't find..
How do I move an existing photo that all ready has been clipped. Say reposition/resize without moving the mask itself?
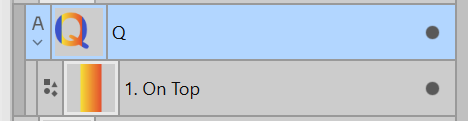
If you are referring to task #3 "Rectangle Clipped":
Ensure you have the top layer of the group selected. It should be highlighted in blue like this in the layers panel:
If you move the "Q" in the view window with the Move Tool, the nested bottom clipped layer (rectangle) should move with it as well.
-
@Washishu Interesting. I cannot test this currently as I don't have version 1.x on my computer any more.
My best guess is that perhaps Serif played with the zones on a later version of 1.x??
-
Updated the cheat sheet to better articulate how to achieve Masks (4) in Affinity 2.x
This link will take you to the original post (above) containing the PDF and PNG files:
-
Hi @Washishu,
First off, are you using the new Affinity version 2 apps? If you are, the "drop" zones have changed for the layer nesting.
I cover it here, and I updated the cheat sheet, in a new thread:
-
UPDATE: I was able to edit the original post to update the link to the new PDF version 4.1
All future updates will be posted there.
Thanks!
-
This would be a perfect 2.x update since they redesigned the Asset Studio for 2.0.
We are almost at the 4 year anniversary for this ask!
-
For some reason I am unable do edit my old post from November 14, 2022, so I cannot replace the 4.0 PDF with the 4.1 PDF.
If a moderator knows why I cannot edit old posts, please let me know , or please point me to instructions on how to do so.
I can edit newer posts no problem, using the upper right-hand three dots (More options...) There I can see Edit and Hide as well as Report and Share.
I only see the Report and Share option in the older November 14, 2022 post.
-
@thomaso Thank you for spotting this glitch.
I also noticed that the PDF is only supposed to be the one page, and it exported some of the early legacy pages from Affinity Designer version 1.x, so I fixed that as well, making for a much smaller file.
See original post above for the updated version!
-
If you were following this thread for the cheat sheet updates,
I created a new thread and cheat sheet for version 2 of the Affinity apps.
Check it out below!
- NotMyFault, j3rry and StudioJason
-
 2
2
-
 1
1
-
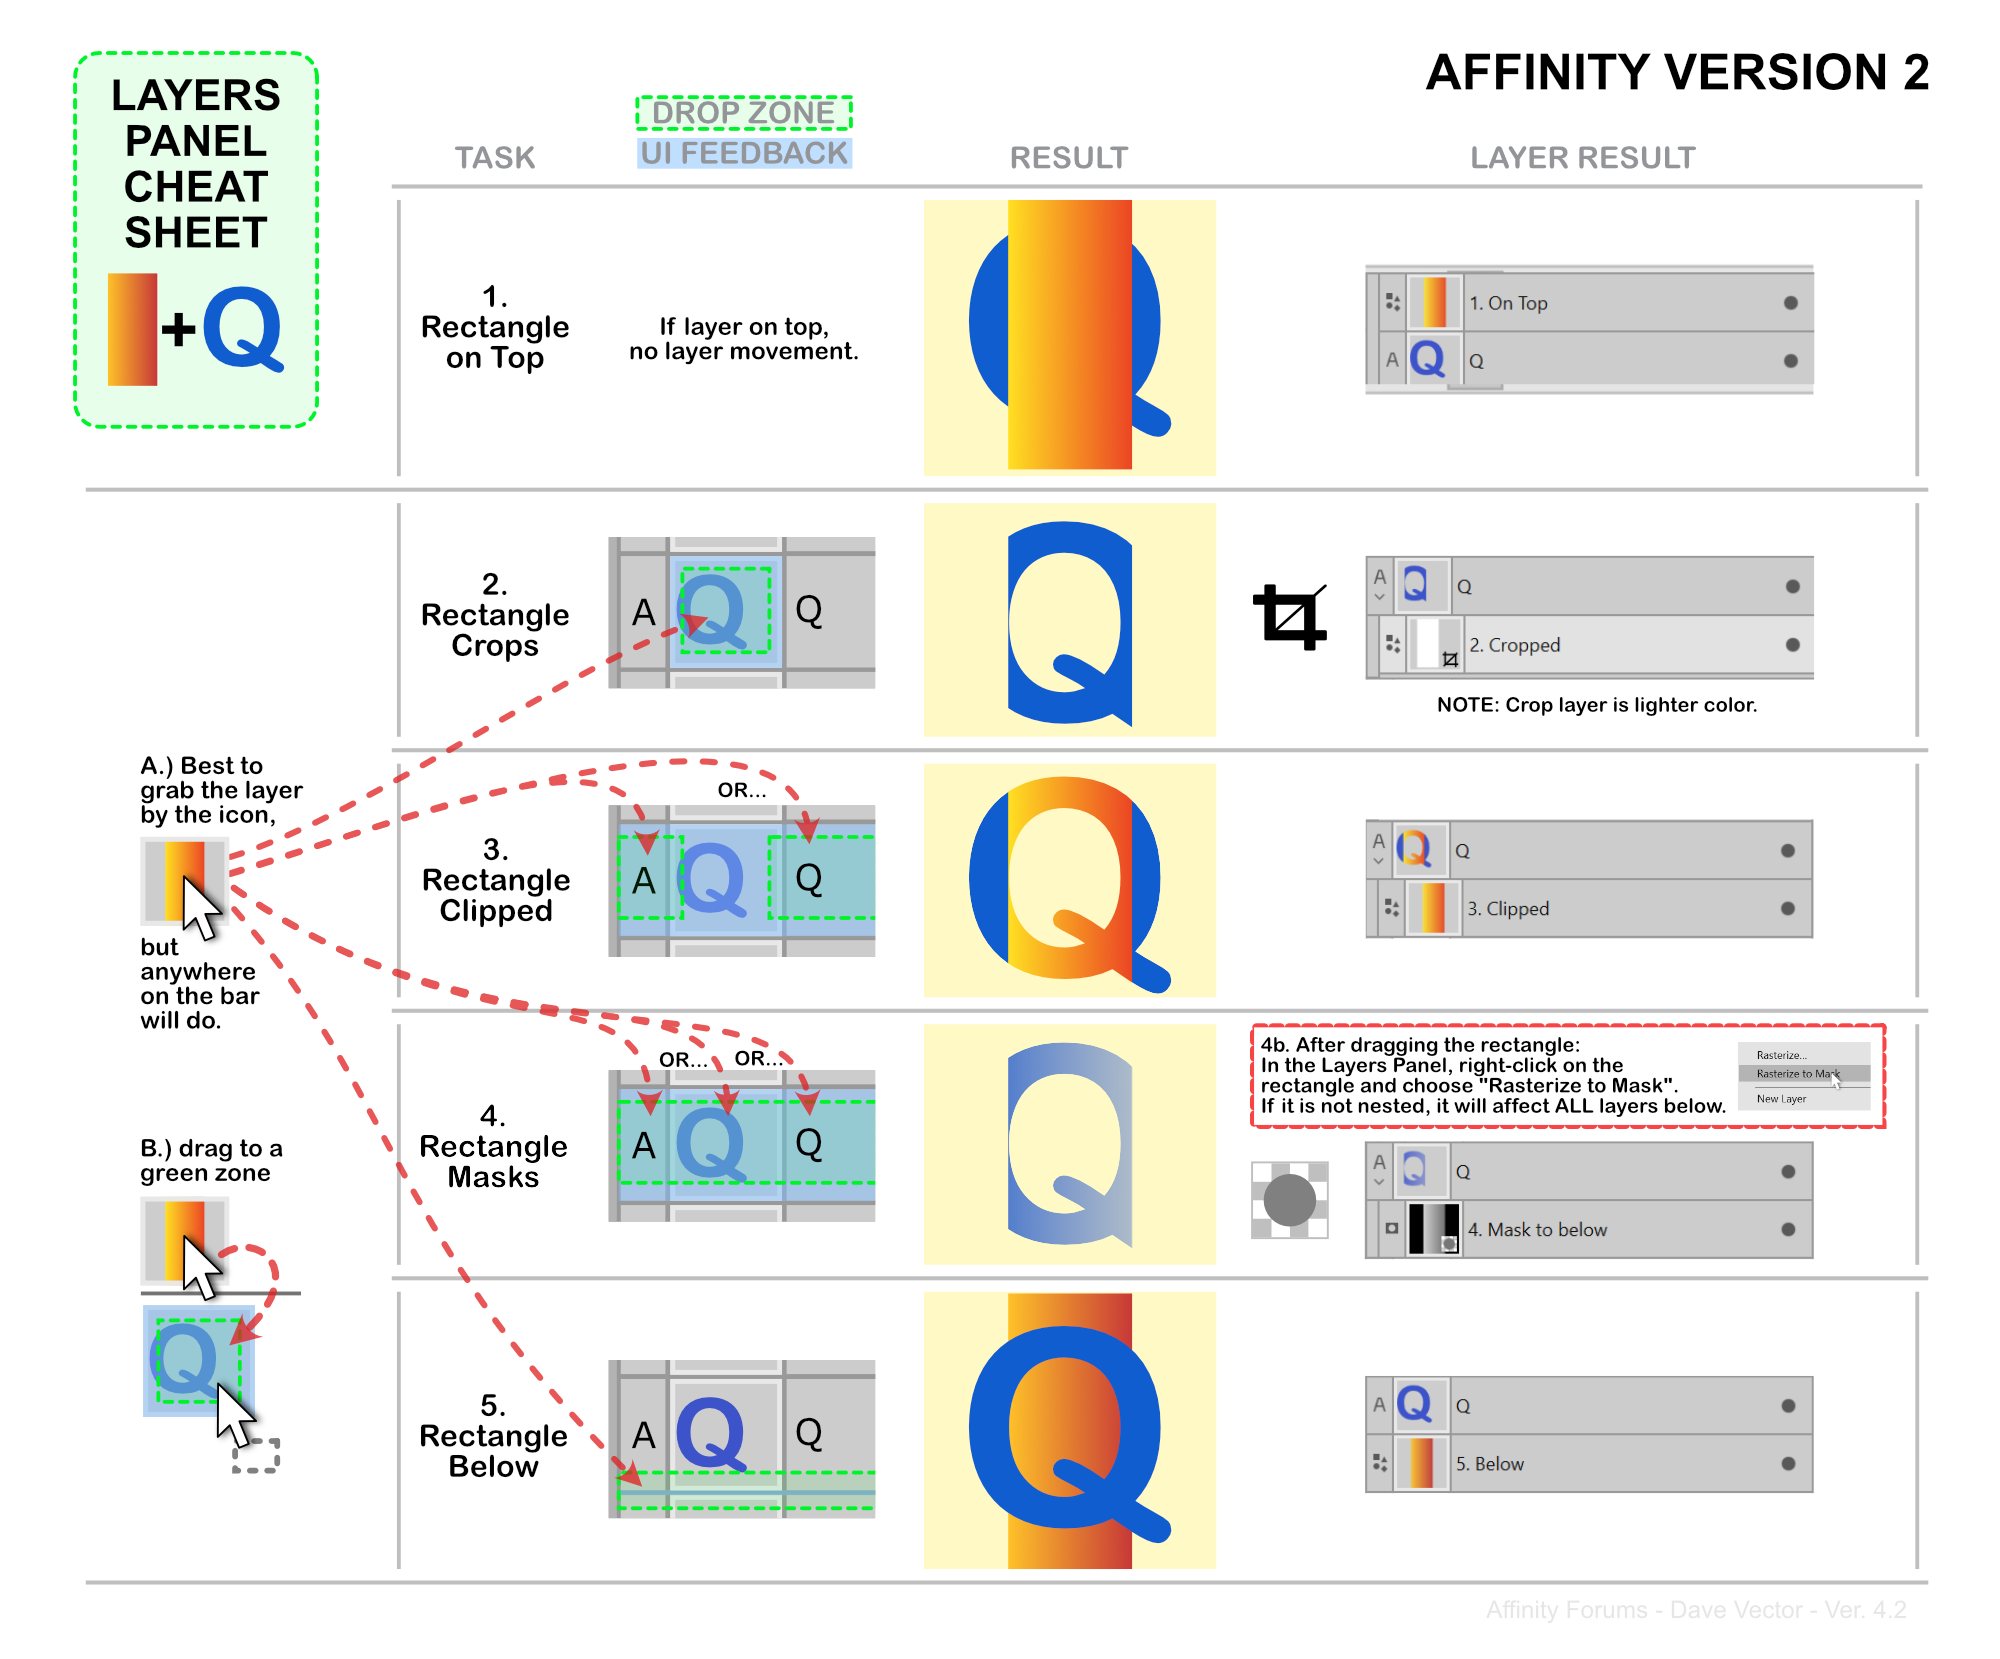
Hello,
With version 2 of the Affinity apps comes with not only new layers interface, but also new layer drop zones and new UI feedback (blue highlights).
I updated the cheat sheet to reflect these changes to help anyone who is looking for better understanding on how layers behave when dragged within the layers panel. Original post for version 1 of the cheat sheet here.
This is a basic guide. It does not address all the possibilities of non-destructive masks, multi-nested layers, etc. There are many complex possibilities. I hope it serves to get you on the right track to understanding the foundations of layers in the Affinity Apps.
Here is a PDF version:
Layers Panel Cheat Sheet v4.2.pdf
Note that my example uses the light UI. I did not create one for the dark UI, but the principles and feedback are the same.
-
5 hours ago, NotMyFault said:
I think your case 4 (rectangle as mask) describes a useful case, but misses the core functionality.
When using vector shapes in masking position, the opacity value of colors is used, instead of the lightness. This is important if you want to use gradients for masking. Instead of using colors and „rasterize to mask“, simply apply the opacity to the nodes. So you can use the rectangle directly - non-destructively.@NotMyFault Thanks for adding value to this point. I was using the terms "light and dark values" very loosely. Your term is more accurate and further strengthens the explanation and use case for (4) Masks.
Cheers!

Affinity Publisher Windows - Relink does not work
in Affinity on Desktop Questions (macOS and Windows)
Posted
@walt.farrell Here is a sample what an "X"ed file that was still visible looked like (icon on the right):
As to your question on the type of files I was linking, they were .PNG files, averaging about 10 kilobytes each, nothing weird or huge.
I should mention that using my 7-step hack I mentioned above ("Replace" files 3 times before APub understood the new directory and replaced them all), that only took a few seconds to complete, not like using the "Relink" so I does seem like there is some sort of glitch/bug/corruption somewhere.