

- S -
-
Posts
817 -
Joined
Posts posted by - S -
-
-
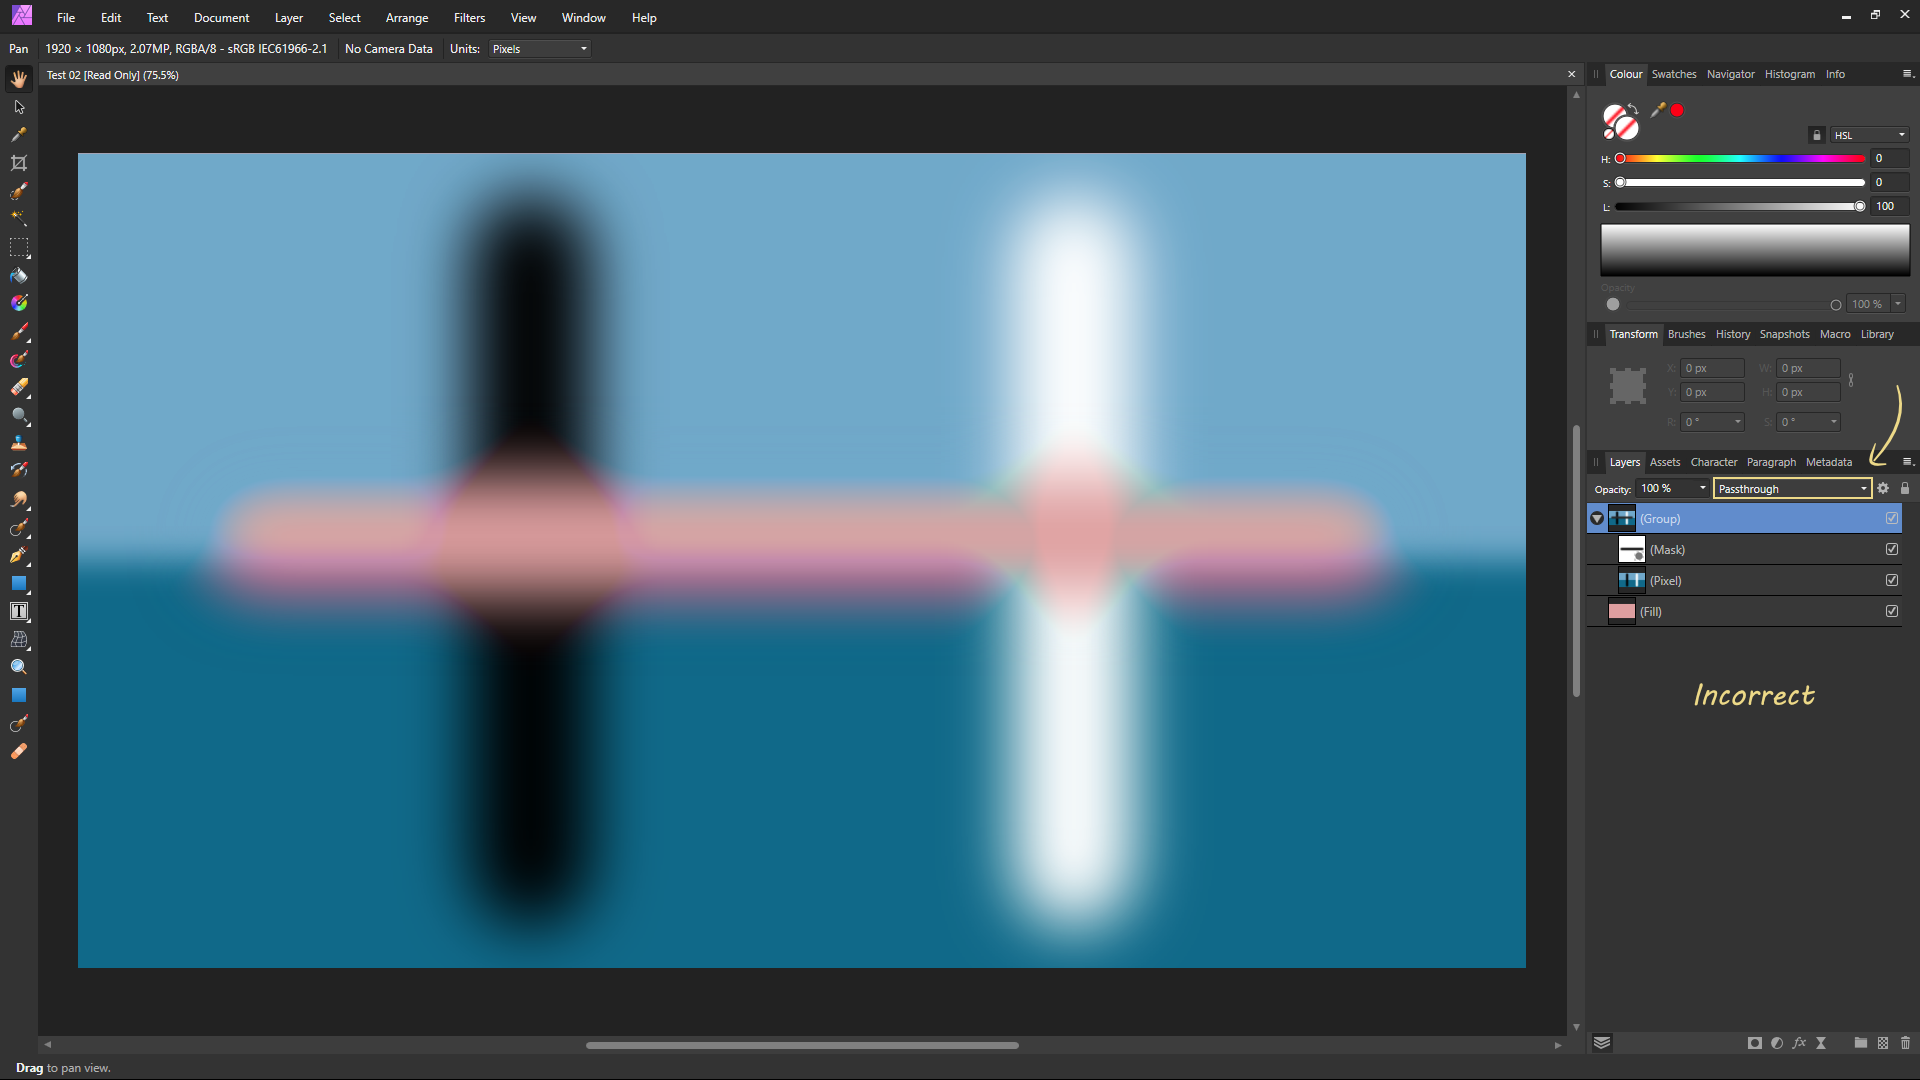
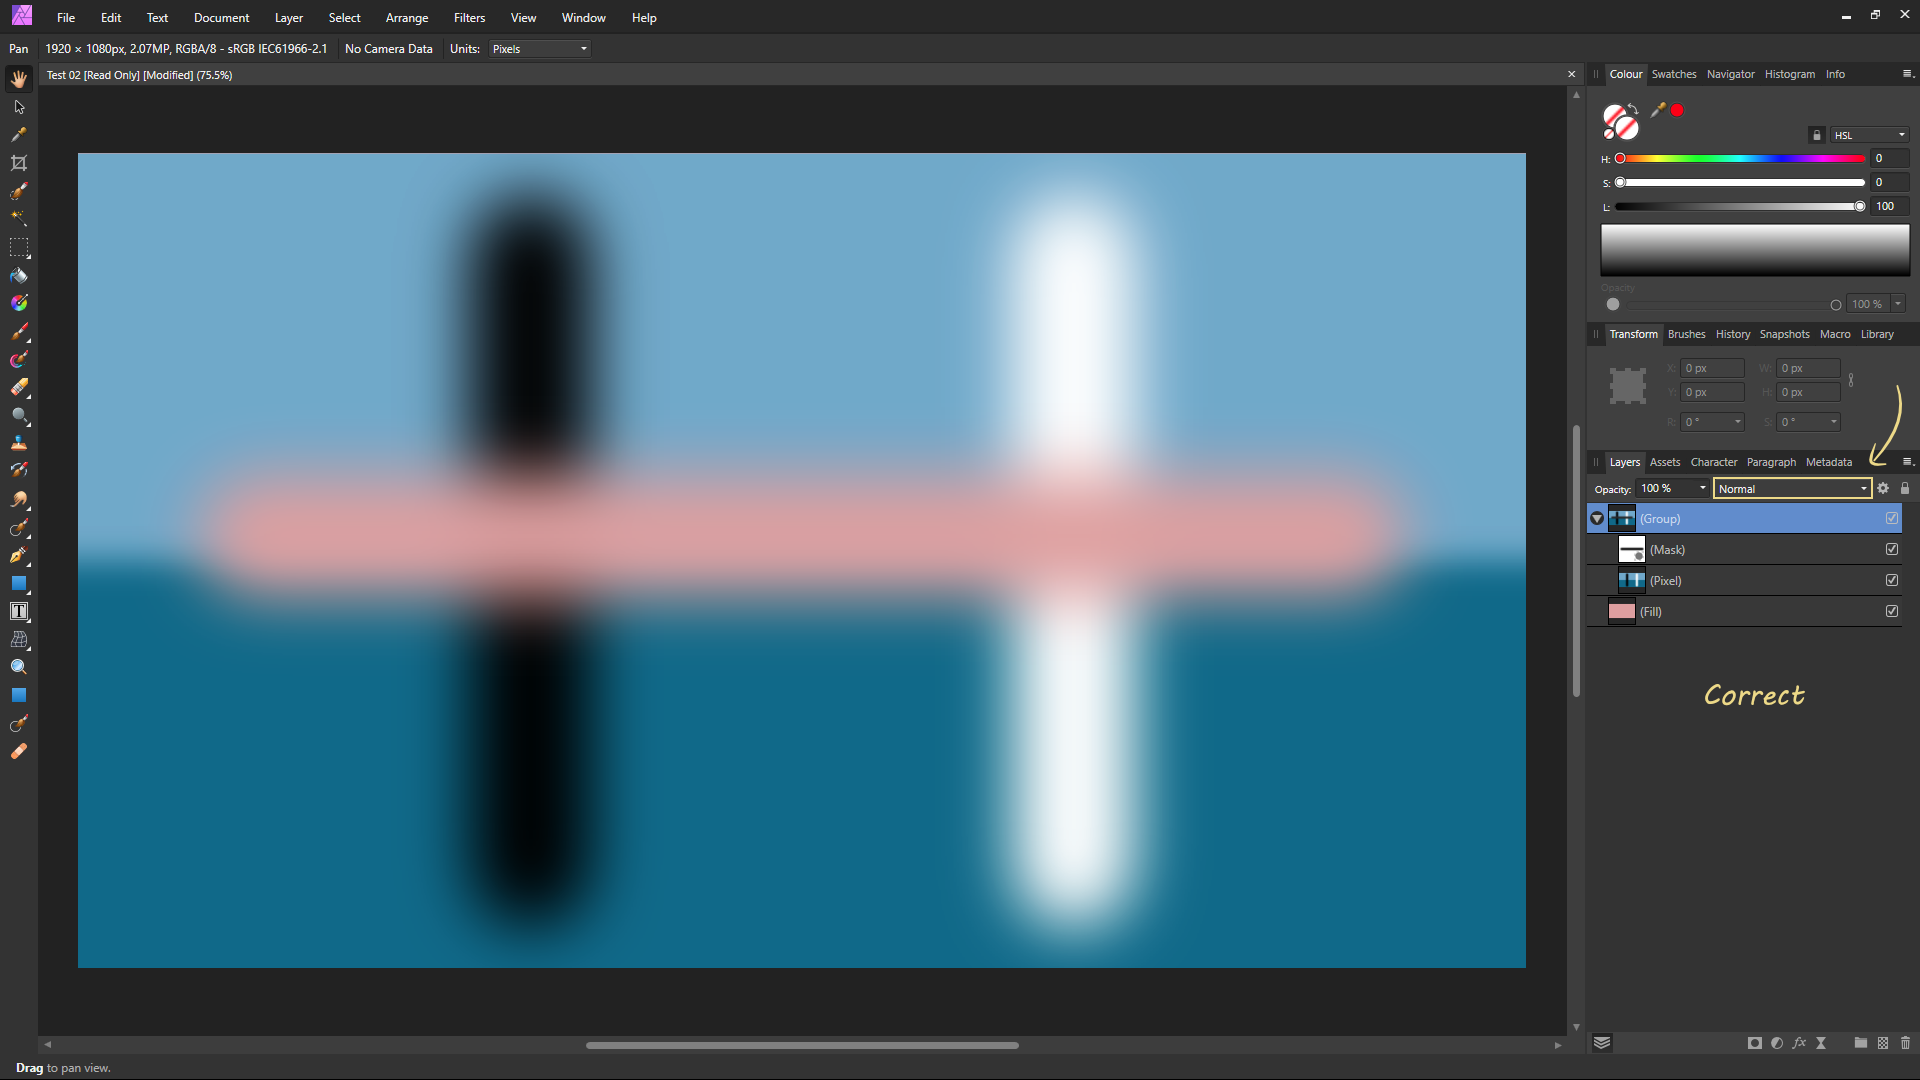
This issue is still present in Affinity Photo V2. See here: -
It's due to the group being in "Passthrough" blending mode (the default). Although the behaviour is not correct, you can try changing the blending mode of the group to "Normal".
See my post here:
- Print Monkey and Callum
-
 2
2
-
The four uppermost input fields (X/Y/W/H) in the Transform panel are different sizes (taller) when using a Pen tool line compared with using other types of layers, such as a Shape layer or Image layer.
Although it's only a minor UI difference, it's distracting when switching between layers with the Move tool selected, as it alters the panel size and therefore moves the other panels. The input field sizes should probably be uniform.
Video:
-
As Walt mentioned, Windows File Explorer camera raw codecs are no longer distributed through Windows updates. You need to install the "Raw Image Extension" from the Microsoft Store.
https://www.microsoft.com/store/productId/9NCTDW2W1BH8
-
8 hours ago, Lee D said:
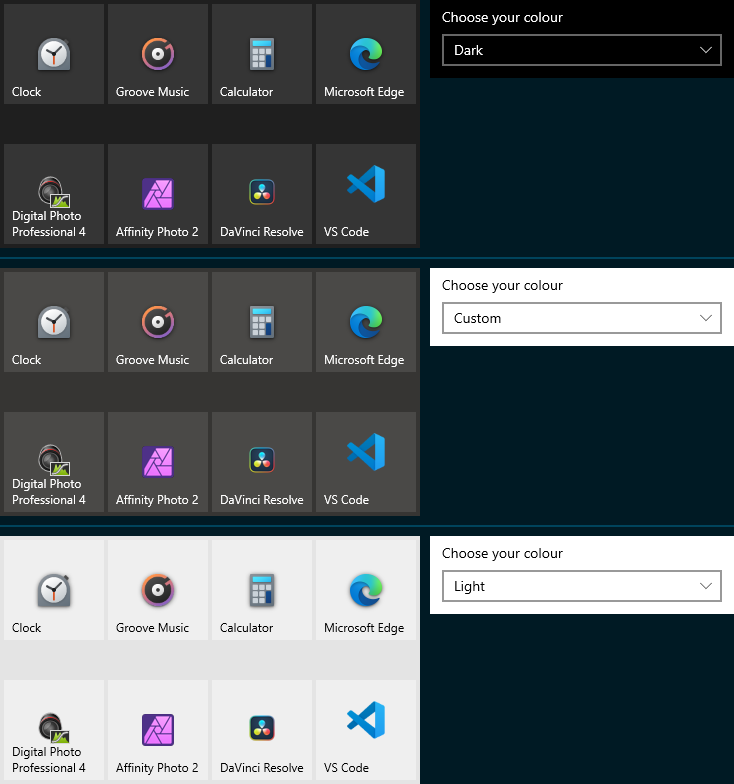
Can you try changing your Windows colours to something different to see if the icon sizes changes. As we are aware of an issue with dark and light colour modes and available icons.
I have included screenshots below showing the Start menu tiles with both light and dark themes. While the Affinity Start menu tile looks even worse on a light theme, the issue in the original post remains regardless of colour theme.Screenshot A (what it looks like):

Screenshot B (what it should look like):It seems as though the icon needs more padding and also the icon background changed to transparent so that the tile background colour shows the Windows theme set by the user and matches the rest of their Start menu tiles.
Screenshot C:
-
4 hours ago, Sandi said:
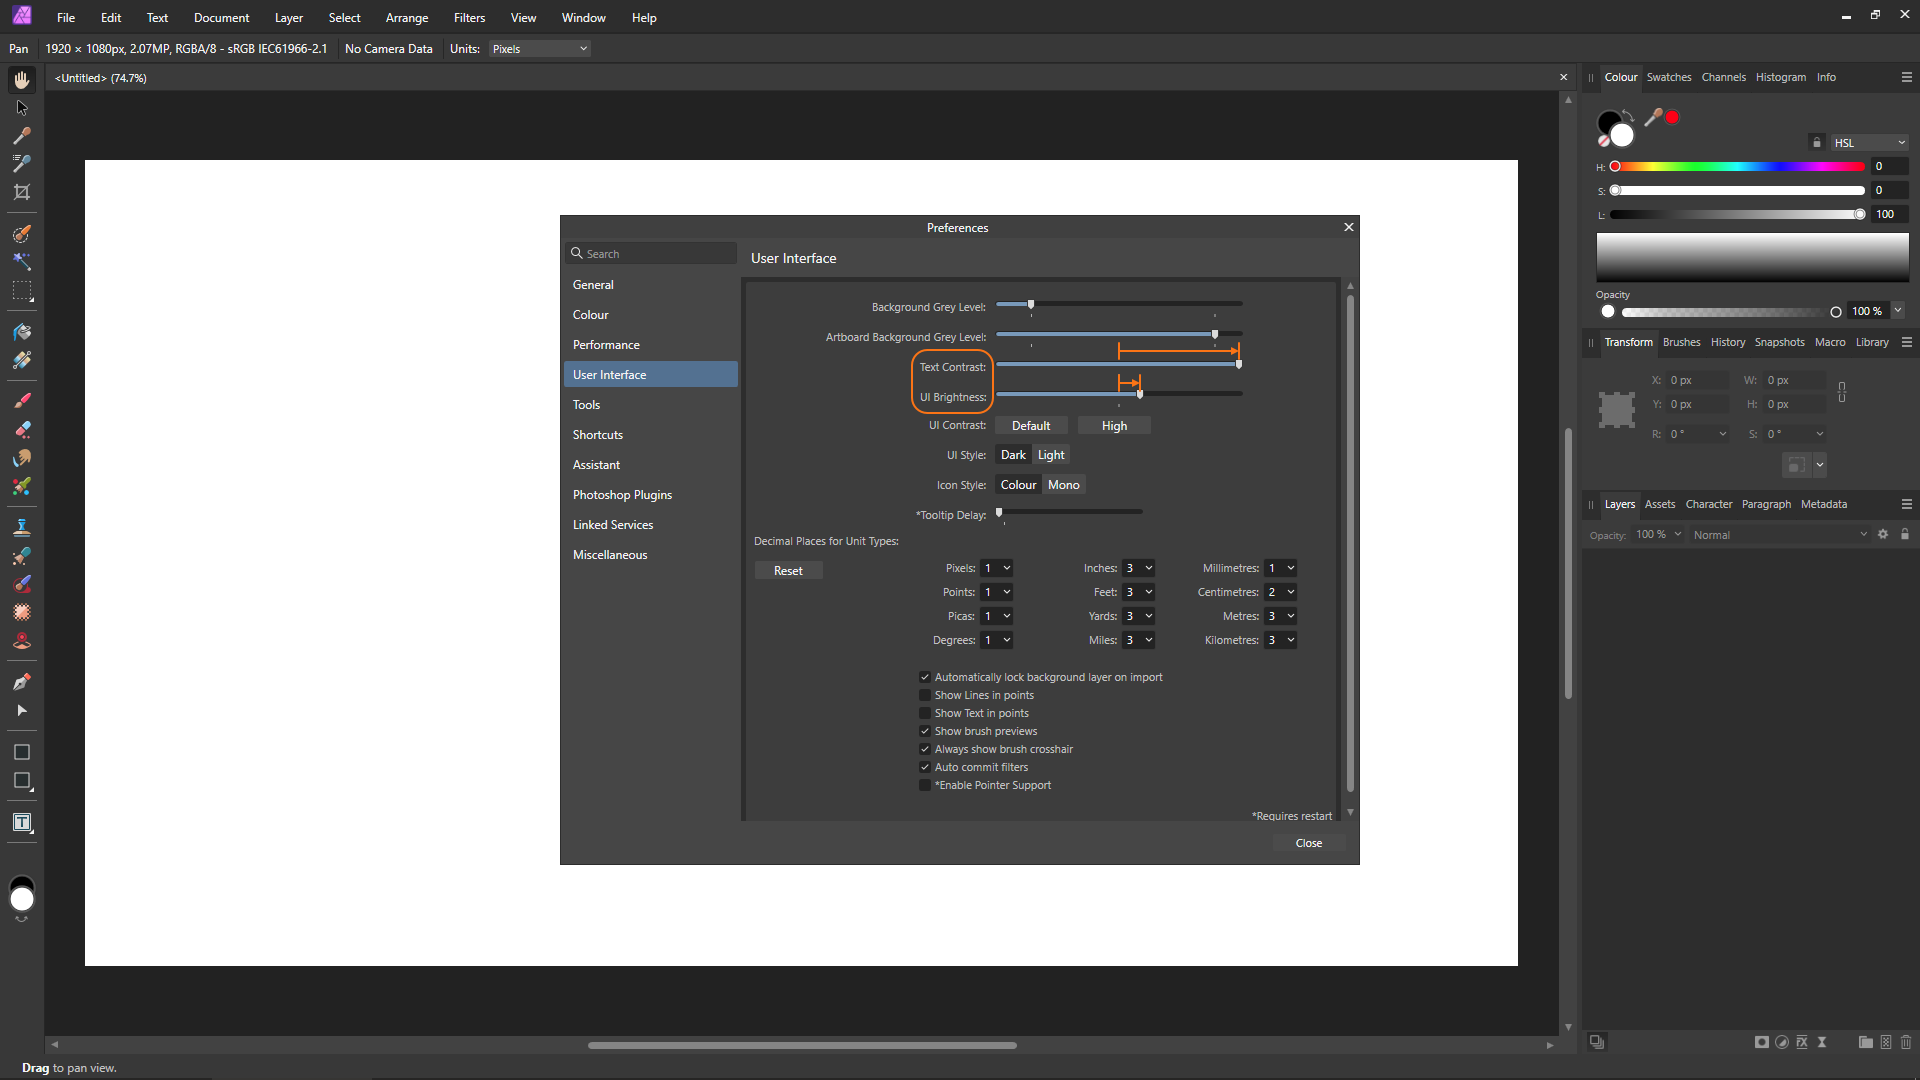
"…I find the readability of the text too small and to me it is much smaller than V1"
Although this won't resolve your issue if the text is too small, one of the differences between V1 and V2 is that the text is darker (greyer), which doesn't help with readability.
Increasing the 'Text Contrast' and the 'UI Brightness' in settings may help a bit. However, even with the text contrast slider all the way to the right, it will still not be as clear as Affinity V1.
-
Thanks for the tip!
Named them "- My Assets" and the Assets panel now opens to them by default.
👍
-
It is not possible to import assets (*.afassets) directly into the "Default" category in the Assets panel. Therefore, when importing assets they are placed in their own category beneath it.
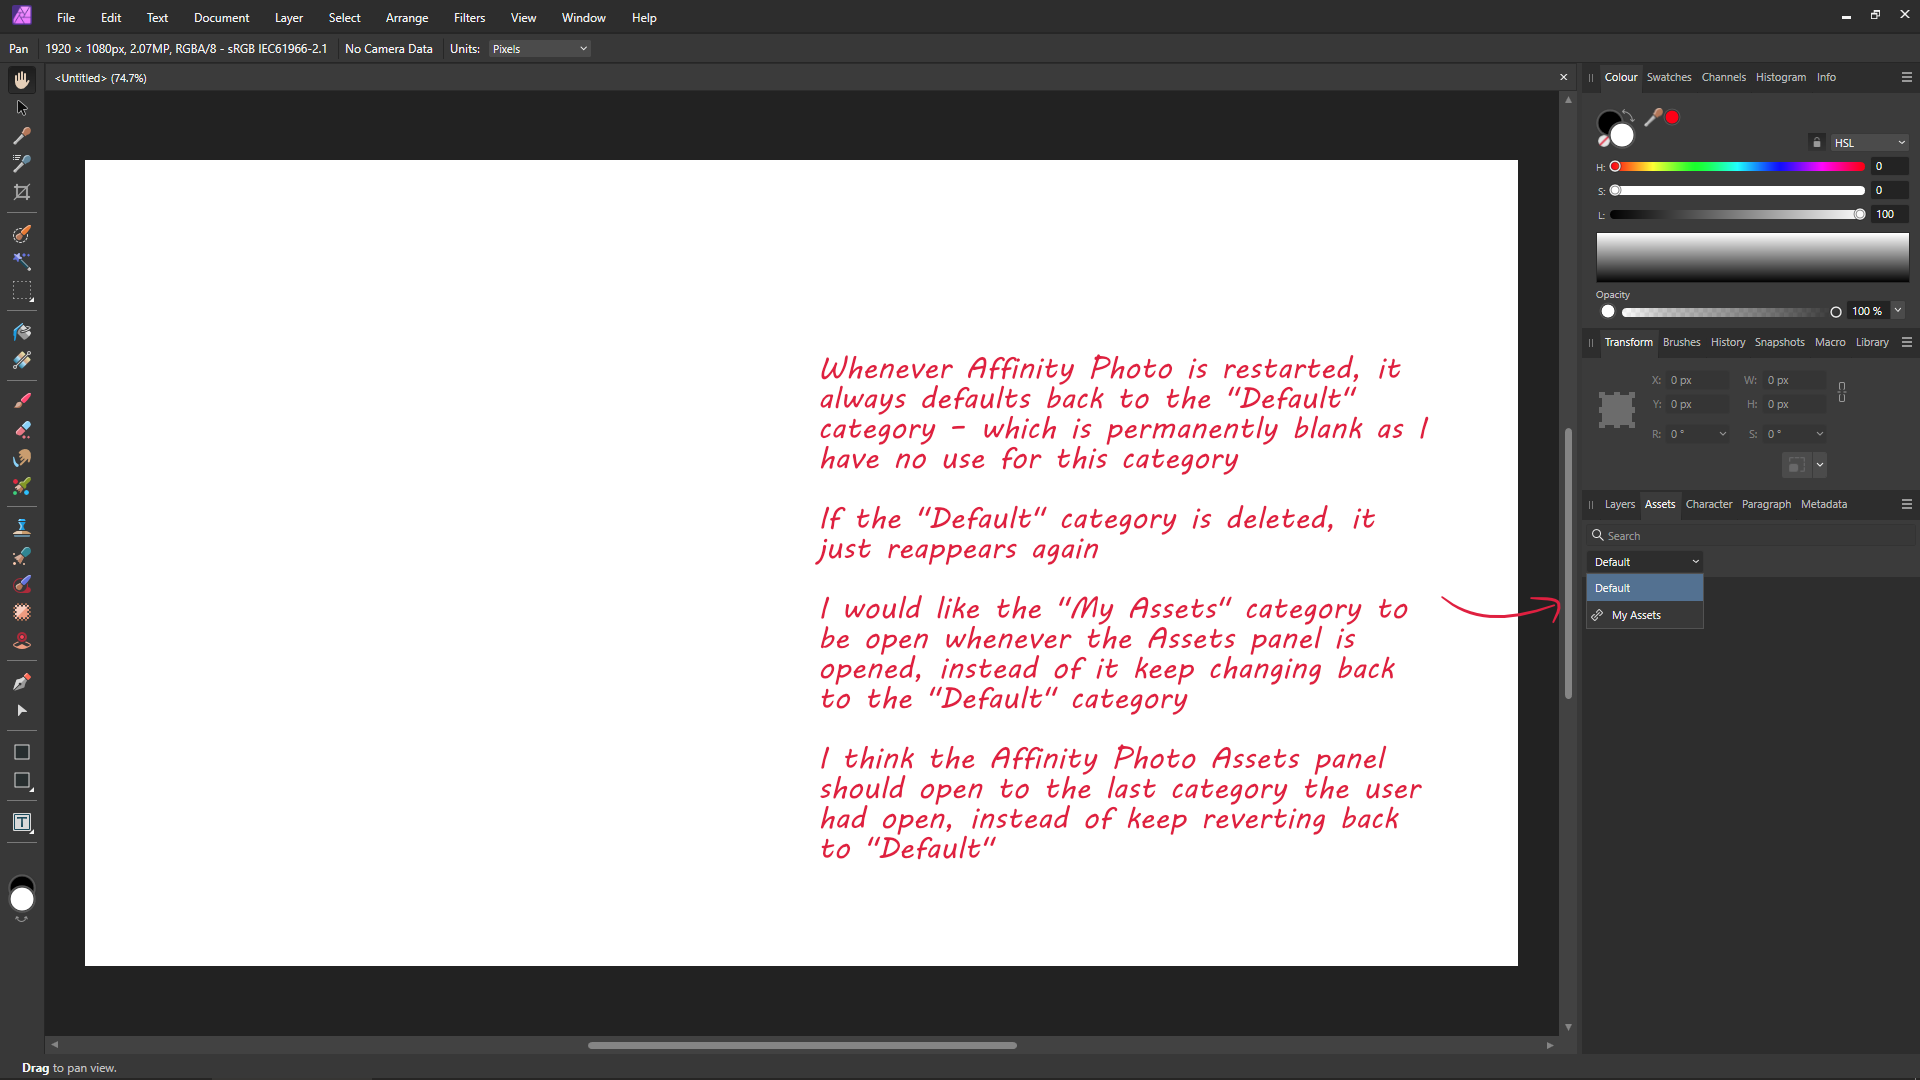
The problem is whenever Affinity Photo is restarted, it always defaults back to the "Default" category – which is permanently blank as I have no use for this category. The only category I use is the assets imported from file (My Assets.afassets) and add new assets to that category.
If the "Default" category is deleted so that only "My Assets" are listed, then instead of "My Assets" becoming the new default, Affinity Photo just adds another "Default" category when restarted and defaults straight back to it again.
I would like the "My Assets" category to be open whenever the Assets panel is opened, instead of it keep changing back to the "Default" category.
Therefore, I think the Affinity Photo Assets panel should open to the last category the user had open, instead of keep reverting back to "Default".
-
1 hour ago, walt.farrell said:
Do either of you know whether these approaches will work when users have not modified the permissions of the WindowsApp folder?
I never modify the permissions for the WindowsApps folder, as doing so will likely allow privilege escalation. So the answer is yes, they will work when users have not modified the permissions of the WindowsApps folderIf a user tries to navigate to C:\Program Files\WindowsApps through Windows File Explorer, then they will see a warning saying "You don't currently have permission to access this folder".
What the OP is doing though is pasting the path to the Affinity folder in the Windows File Explorer address bar, which is launched by the Windows Security app when clicking the "Add an allowed app" button. I.E. When pasting one of the below in the address bar, it will navigate directly to that folder location without displaying the permissions warning and will allow selecting the required exe to add to the allow list (assuming the app is installed).
C:\Program Files\WindowsApps\SerifEuropeLtd.AffinityPhoto2_2.0.0.1640_x64__3cqzy0nppv2rt\App
C:\Program Files\WindowsApps\SerifEuropeLtd.AffinityDesigner2_2.0.0.1640_x64__3cqzy0nppv2rt\App
C:\Program Files\WindowsApps\SerifEuropeLtd.AffinityPublisher2_2.0.0.1640_x64__3cqzy0nppv2rt\App
Adding allowed applications using PowerShell or Group Policy will also work fine with default folder permissions.
- walt.farrell and 4dimage
-
 2
2
-
As you mentioned, if you've enabled "Controlled Folder Access" in the Windows Security settings, then any applications you want to allow to write or modify locations protected by Controlled Folder Access will need to be manually added to the list of allowed applications.If an application has not been added to the Controlled Folder Access allow list, then users will see an error when trying to save to a protected folder location saying the following:
File not found.
Check the filename and try again.
This is out of Serif's control. The reason for the issue is that the paths to Affinity applications have been changed in Version 2.
What you posted is fine, however whenever you update any of the Affinity applications, you're going to have exactly the same issue again and again, as the software version number (2.0.0.1640 at the moment) is now included in the file paths.
Fortunately, Controlled Folder Access allows the use of wildcards for application paths. However, unfortunately I don't think the Windows Security user interface will allow using them, as the UI expects the user to navigate to the actual application they want to add to the allow list.
Therefore, in order to use wildcards you would need to use Group Policy or PowerShell to add the allowed application paths.
I've added a PowerShell script below, where the paths use wildcards (*) in place of the version numbers. This way it shouldn't be necessary to keep adding new Controlled Folder Access rules every single time the applications are updated. These will then appear in the Windows Security app in the allowed apps section.
To add the rules, run the below in PowerShell (running as Administrator).
$Applications = @(
    "%ProgramFiles%\WindowsApps\SerifEuropeLtd.AffinityPhoto2_*_x64__3cqzy0nppv2rt\App\Photo.exe"
    "%ProgramFiles%\WindowsApps\SerifEuropeLtd.AffinityDesigner2_*_x64__3cqzy0nppv2rt\App\Designer.exe"
    "%ProgramFiles%\WindowsApps\SerifEuropeLtd.AffinityPublisher2_*_x64__3cqzy0nppv2rt\App\Publisher.exe"
)

Add-MpPreference -ControlledFolderAccessAllowedApplications $Applications
To remove the rules again, run the below in PowerShell (running as Administrator).
$Applications = @( "%ProgramFiles%\WindowsApps\SerifEuropeLtd.AffinityPhoto2_*_x64__3cqzy0nppv2rt\App\Photo.exe" "%ProgramFiles%\WindowsApps\SerifEuropeLtd.AffinityDesigner2_*_x64__3cqzy0nppv2rt\App\Designer.exe" "%ProgramFiles%\WindowsApps\SerifEuropeLtd.AffinityPublisher2_*_x64__3cqzy0nppv2rt\App\Publisher.exe" ) Remove-MpPreference -ControlledFolderAccessAllowedApplications $Applications -
It's no longer possible to install Affinity Photo without outbound internet access, as the installer now requires a Serif store username and password – instead of just an email address and serial number. Internet access is also required for other optional features in the app.For machines that automatically block outbound connections by default (I.E. use Windows Firewall whitelisting), this means they will be automatically blocked from making outbound connections as they do not have a valid firewall rule (outbound connections that do not match a rule are blocked).
The main problem is Serif have moved from using an EXE installer, to using an MSIX installer and these MSIX packages include the version number in the file path. I.E.
%programfiles%\windowsapps\serifeuropeltd.affinityphoto2_2.0.0.1640_x64__3cqzy0nppv2rt\app\Photo.exe
This creates problems with creating Group Policy firewall rules as the Windows Firewall rule will only be valid for that exact version – as firewall paths can't include wildcards. This means every time the software is updated, the firewall allow rule will no longer work and internet access will be automatically blocked again, as the version number in the path will change and the path will no longer be valid.
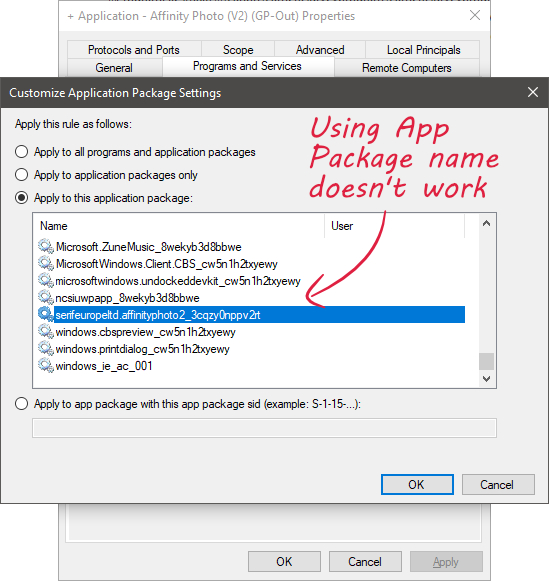
Windows Firewall does however allow creating firewall rules using an App Package name, instead of a direct file path, specifically for this purpose. This gets around this issue and means the rule will continue working even when the program is updated. I.E.
serifeuropeltd.affinityphoto2_3cqzy0nppv2rt
The problem is using the App Package name doesn't work with Affinity Photo. When using the App Package name, outbound connections still remain blocked.
TimeCreated : 09/11/2022 16:41:01
Message     : The Windows Filtering Platform has blocked a connection.

              Application Information:
                Process ID:             660
                Application Name:       \device\harddiskvolume3\program files\windowsapps\serifeuropeltd.affinityphoto2_2.0.0.1640_x64__3cqzy0nppv2rt\app\photo.exe

              Network Information:
                Direction:              Outbound
                Source Address:         192.168.1.2
                Source Port:            61160
                Destination Address:    18.165.242.52
                Destination Port:               443
                Protocol:               6

              Filter Information:
                Filter Run-Time ID:     76235
                Layer Name:             Connect
                Layer Run-Time ID:      48
Id          : 5157
I'm not sure whether Windows Firewall rules are something that developers need to include in the app manifest or something?
-----
Windows 10 - 22H2 (19045.2251)
Affinity Photo - 2.0.0.1640
-
When using the MSIX installer from the Serif store, the Start menu icon is an eyesore and doesn't match the rest of the tiles.
1) The icon in the Windows Start menu is massive, with little in the way of padding.
2) It doesn't use the Start menu tile background colour the user has set as the colour set in Windows settings.
3) It contains no text below the icon.Screenshot:
-----
Windows 10 - 22H2 (19045.2251)
Affinity Photo - 2.0.0.1640
-
Although there are alternative methods that can be reasonably quick depending on what you're doing, in order to replicate what Photoshop does with white point, grey point and black point pickers in Curves and Levels, it is a slow manual process in Affinity Photo.
Those pickers are something that anyone who uses Photoshop will absolutely miss in Affinity Photo as they save a lot of time. Even more so with old faded scanned images – the Photoshop pickers are pretty great, along with the "Auto" button in Curves, that users can [ALT/OPT + Click] to bring up the settings.
To try to mimick the Photoshop white point picker directly, you need to determine what point of the image should be pure white (R=255, G=255, B=255) and manually adjust the white point of each RGB channel with a Curves adjustment layer – using the Info pane as a guide. But it will quickly become a PITA, unless you only have a couple of images to work on. Maybe Serif will add them in the future…
Video:
Affinity File:
222670981_WhiteBackground-1 (NEW).afphoto [Removed to save space]
- EricGraphix and loukash
-
2
-
5 hours ago, jmwellborn said:
Maybe this?
That's a great photo. Did you use a remote shutter, or go full "Andy Rouse" and lay on the ground with a 16-35 like a psychopath…
-
3 hours ago, voo2 said:
thanks! That helped. Is there any shortcut to do that I used unintentionally? Because I wasn't in this Brush editing dialog.
It's likely that you pressed your keyboard's left or right arrow keys (which manually rotate the brush nozzle).
As far as I'm aware there isn't a keyboard shortcut key to reset the rotation back to zero, however you could create a new pixel brush preset – based on a new square brush – and then click the preset to reset the brush back to default settings.
-
I don't do much work with vector graphics, however it's possible depending on what you want to do. I'm not sure whether or not the separated effects layer will need to be rasterized for what you're intending to do with it, so I added this step at the end as well.
There's a way to save it as a macro in Affinity Photo so that it can be a one-click process, but that obviously won't be much use to you if you are using Affinity Designer.
-
13 hours ago, zamadatix said:
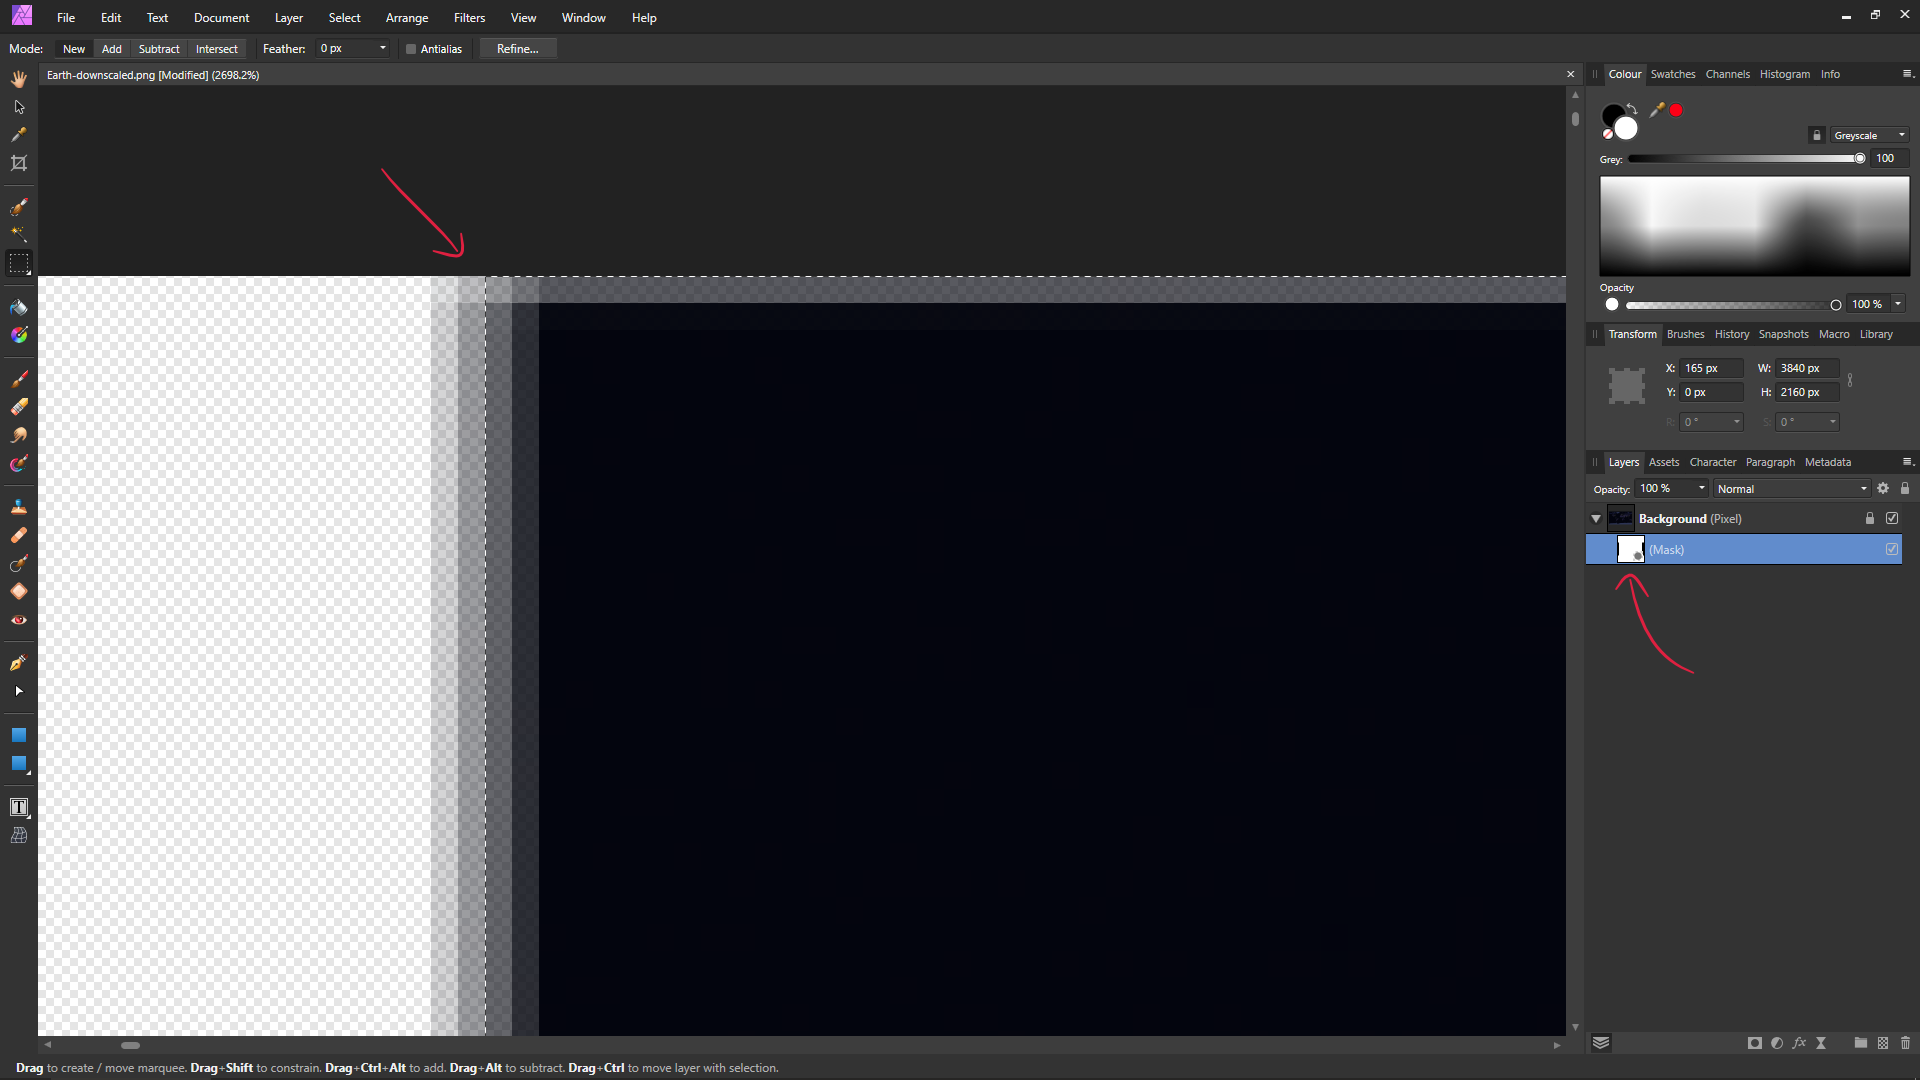
3. Selecting a 3840x2160 portion of the image (Antialias is unchecked on the selection and feather is set to 0 px) and copying it
Note: this is done by creating a selection then manually editing the "Transform" dialog to X: 165, Y: 0, W: 3840, H: 2160
This step is where the problem lies. When transforming or resizing a selection in Affinity Photo, it will soften the edges (even though you have antialias and feather turned off). It's not just when creating a new document from clipboard, creating a mask from the selection will have the same problem (see below). It's a PITA.Screenshot A:
Screenshot B:
Although obviously not ideal, you would need use the Rectangle tool instead of the Marquee tool to create selections in this way and retain the sharp edge. [CMD/CTRL + left click] on the rectangle layer icon in the layers panel will create a selection from the rectangle shape (the fill opacity of the rectangle will need to be put back from 0% to 100% opacity before creating the selection).
In your case though, depending on what you're doing, it will likely be better to create a document at the correct final dimensions (3840×2160) and place the original image straight into that document, where you can then move it around and resize it.
-
14 hours ago, Stokestack said:
Which there's no way for the user to know. So why doesn't the software do that as a part of the "merge down?"
And Affinity Photo already has a feature precisely for this type of thing [View > Assistant Manager], where it could be added.
But Serif will continue to ignore it – like they always do. The nerds will continue to gaslight and make excuses – like they always do. And people will have to keep paying through the nose for Photoshop on their main machine because nothing come close to it and it just works.
Serif really need to get out of this nerd-bubble and do some real-world usability testing. How they think the majority of users use their software is not how they actually use it. Nobody wants blurry layers, or hairline seams at the edges of their vectors, or blend modes that don't work properly, or to wrestle with countless other idiosyncrasies with the software that keep trying to trip them up, they just want to get on with what they are doing. A constant stream of "work-a-rounds" impresses nobody.
-
I agree about fractions of pixels being a PITA. I would gladly welcome a setting where absolutely everything is automatically rounded to whole pixels – I despise fractions of pixels.
Anyway, regarding the degradation of the image quality when merging down (I.E. making the image blurry). I haven't been following the issue, however has anyone given an explanation why the bottom layer moves slightly when merging the top layer down?
In the below test file, when the top layer is merged down, the bottom layer expands slightly – which will obviously cause blurring. I have no idea why it would be considered normal to do this when both layers are already perfectly aligned to the pixel grid.
Upper Layer Before Merge Down:
Lower Layer Before Merge Down:
Merged Down:
Before Merge Down (Close-up):
After Merge Down (Close-up):
Test File:
-
3 hours ago, NotMyFault said:
…But currently there is no other to achieve the current behaviour (as shown in DanC's video) where selection and pixel content are synchronised, even if you repeatedly adjust the selected area and move again.
2 hours ago, NotMyFault said:…But again, I rate this as a feature and want to keep it for my special workflows.
You have your wires crossed – nobody is looking to get rid of that feature. It's a feature I use myself with digital drawing for example (I.E. select an area – such as a nose – using the Freehand Selection tool and move/scale/rotate the selection slightly with the Move tool so it's better proportioned.The problem is with the way the Marquee tools work. I.E. the user is expected to be able to select a pixel perfect area in one go, first time, and without even being able to use any modifier keys such as the spacebar to position it. The OP is talking about a rectangular selection, however this gets even more tricky when using the Elliptical Marquee tool to select parts of eyes, such as pupils and irises, or wheels for example. If the user has come from Photoshop, it will be a jarring experience.
A work-a-round is then posted that allows changing it afterwards, however it doesn't work as expected (I.E. it makes the edges soft when resizing the marquee) as either the workaround wasn't originally designed to be used for that particular purpose, or it's possible there's a discrepancy between how it works on different platforms.
The hope is not for the tool makers (Serif) to remove functionality from the workaround (which is a bit like Free Transform), but to look at the problem the tool user is experiencing (with the Marquee tools in this case, not the Move tool) and figure out a better way to do it – maybe even with a [Select > Transform selection] menu item.
-
1 hour ago, NotMyFault said:
Sorry to hear this is rated as “bug”. For me it is a feature, and removing it would not cause any real benefit.
We are talking about the blurring of the edges being a bug. If you want soft edges instead of hard edges, you can still do that using various other methods. I.E.1) Enter a "Feather" value in the selection tool context menu at the top, or the [Select > Feather] menu.
2) Select the "Anti-alias" tick box from the selection tool context menu at the top.
3) Select "Refine…" from the selection tool context menu at the top, or the [Select > Refine Edges] menu, where it's possible to also enter a feather value.
4) Add a Gaussian Blur directly to the layer mask. Or, to do it non-destructively, clip the layer mask to the image layer (longer horizontal bar, instead of short vertical bar) and then clip a Gaussian Blur Adjustment Layer to the layer mask to blur the mask.
-
Quote
…Another workaround, you can use a new, empty pixel layer as a 'donor' layer whilst you resize the Marquee Selection -
Both the "quick mask" technique and the "empty pixel layer" technique make the edges soft when resizing the marquee.
The marquee tools need to be changed to operate in the same way the rectangle and ellipse tools do. These tools also allow the user to position the first corner while holding down the spacebar and then releasing the spacebar and dragging to select the rest. The marquee tools in their current form are pretty useless.
-
1 hour ago, Dan C said:
Hi @- S -,
Thanks for your report!
I can confirm this issue is already logged with our developers, though the previous example files provided do not show the issue as clearly as your document - so I will be providing this to our developers now, alongside 'bumping' the report with them.
I hope this helps
")
Thanks.
-
Below are similar images to the original post, just with the mask shifted up slightly.
Screenshot C :
Screenshot D :
Original File:


Search Box in Macros Library Panel is Case-Sensitive
in V2 Bugs found on Windows
Posted
When using the search box in the macros "Library" panel, it often does not return any results despite containing a macro of that name.
The issue is due to the search box being case-sensitive. However, I can't think of a scenario where this would be beneficial to the user, therefore it's likely that this is something that has just been overlooked. IMO the search box should not be case-sensitive by default, as it will trip users up.
Looking at other search boxes in Affinity Photo, the search box in the "Assets" panel for example is not case-sensitive and therefore works in a more user-friendly way. In addition, the search box in the "Swatches" panel is also not case-sensitive. Therefore, I would imagine it's not actually intended behaviour in the "Library" panel search box either.
As a side note, I also don't see it as beneficial to have it as the default behaviour in the layer "States" panel either (Layer name is…) – although that search box is a bit different to the others as it also gives the option to use RegEx as well.