Boldlinedesign
-
Posts
454 -
Joined
-
Last visited
Everything posted by Boldlinedesign
-
LOVE AD and anxious for the ipad version release! Just need to express how badly we need an vector erase tool like Illustrator has, to quickly cut through strokes, but more importantly, to be able to quickly edit fills. Also hoping for a direct node deletion method. In Illustrator, you press the minus key and it activates the node erase tool. I get that we can hit delete after selecting the node in AD, but there are a couple issues with that... first, its a multi-step process each time (click on node or drag selection box over node(s) and then hit delete to erase them.) second, there is always a risk of hitting delete too many times and accidently deleting the fill you are trying to edit. Hoping there is also a plan to add a freeform selection tool for AD on the vector persona. If we need to select multiple nodes to erase using the selectnad then hit delete method, it would be a little easier if we could have more control over how to grab those nodes. The vector erase tooll would be the compliment of the "blob tool" in Illustrator... where I can add vetor fill to a new or existing fill as if i were painting and turn around and delte parts away from it easily. If anyone has any great solutions I am missing - please let me know. I am a grateful Affinity user - just sharing where the limitations are that i can find that hold back what would make Affinity be my sole set of apps for design work.
-
I was thinking about the process to remove existing points from a design. Right now you have to click on it and hit the delete key - a two step process for each one you delete, unless you grab a bunch at once and do so. Is there a way to make this a one step process? In Illustrator, you click the minus key and it gives you an extension of the pen tool so you can click on one point after another to delete.
-
This is amazing work John - Did you or would you record a tutorial on how you went about it in Affinity Designer? We need more of that available online. Thanks!
-
AD for iPad?
Boldlinedesign replied to VectorCat's topic in Pre-V2 Archive of Affinity on iPad Questions
I'm with you VectorCat - I'm excited about all Affinity has accomplished - but the hardest thing is waiting for Designer for iPad -
Thank you for your quick and detailed reply - that helps a lot! Makes sense when you explain the value of the setup.
-
When I open a jpeg photo in AP and want to edit that image directly, like removing a background, I have found I am unable to do anything more than make a smart slection on the image. I can't add brush strokes or clone anything or touch up the image until I go to the layer of the image and right-click and then hit "rasterize", then it act like a normal jpeg I can edit. Is this standard practice for every photo I bring in? Or am i missing something? Thanks in advance! Mat
-
This is really amazing - thank you!
-
I don't think Affinity is holding out those bigger features like offset path for version 2.0 - even if they did, the app is 50 dollars - a minor amount in comparison to what Adobe expects us to pay each year. Affinity provides such hope for those of us sick of Adobe's predatory pricing policies. I think we're all anxious for Affinity to be able to fully handle our wishlist of tasks. On that note, another +1 for offset path functionality - I use that daily in my workflow with Illy.
-
That was really helpful thanks as well. Same principle works to make a new pixel layer and move it to be a sub-layer of the curve layer Is there a section on working with curve shapes? Does it follow the PS concept?
-
Ok I understand now - once I click on the vector i can go back dragging a marquee around the loose leftover nodes and delete them - thank you! Awesome When this happens in Illustrator, I either use the minus pen tool (minus sign) or I use the blob tool to cover over that area and it automatically merges it all cleanly. My two biggest feature requests are a blob tool and a smooth tool like they have in Illy. Really loving Affinity Designer more and more as I figure out solutions that held me back from accomplishing what I assumed I still needed Illustrator for. I assume the layer>gometry>divide is the same exact function as the "divide" tool in the upper right side, correct? Thanks for your help with this so far!
-
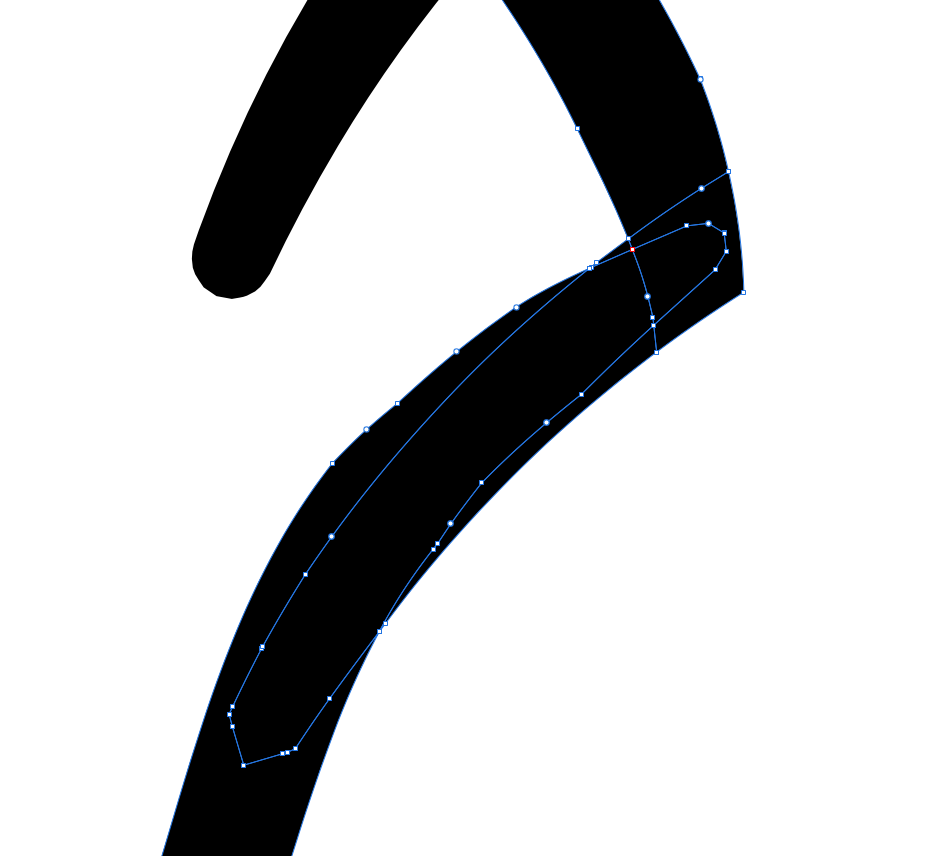
Thanks for the help everyone - what I am doing is inking characters and creating corners and edges with overlaps and then erasing the excess. I included a picture of a hand in this post showing how I overlap everything. This way I can control the line width and get the exact edges I want. The example I showed earlier in this thread was the corner of the sleeve cuff above the thumb. I cannot get a marquee to show when I use the node tool and drag - but I can get one with the move tool. Is there a setting I need to adjust? thanks!

-
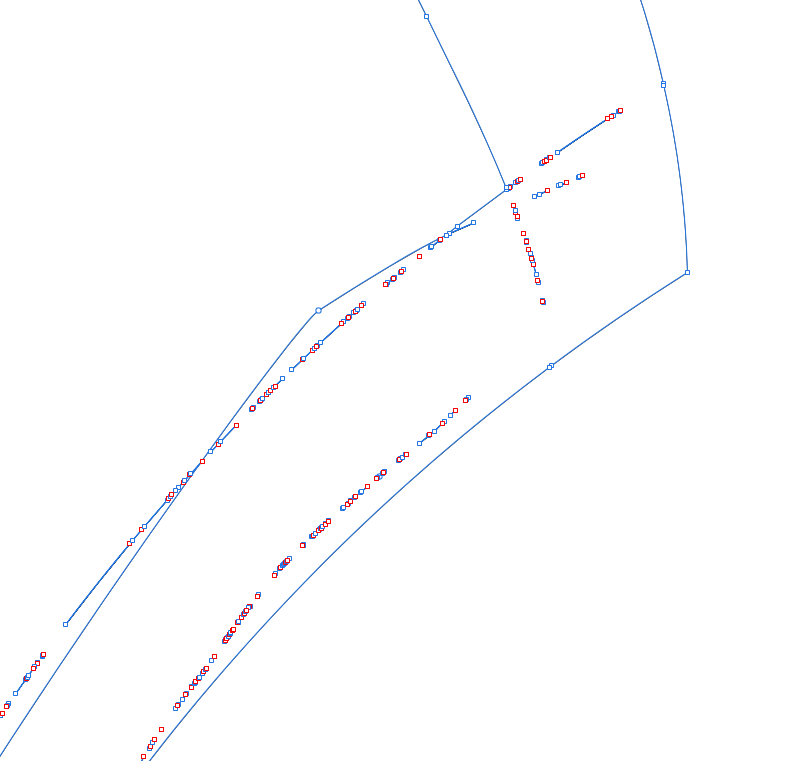
I made overlapping strokes and then did layer>expand stroke, to convert it to fills. I then hit the "divide" option to split up the fills where they overlapped so I could erase the extra. i then wanted to merge the remaining pieces together to make a solid fill shape, so I hit the "add" option (in the upper right corner near the "divide" option). This worked great, as it became one general shape, but it left a lot of debris - leftover nodes and partial lines of nodes...I included a picture of the same section in outline view mode and in regular mode. Anyone know a solution for this? Or a better way to accomplish what I was doing in order to avoid the debris leftover? Thanks!
-
Thank you Leigh - Your tip did work perfectly. I'm wondering if selecting all the overlapping pieces and hitting "divide" from the top right section of the screen creates the same effect. Any idea if one option is better than the other? Is it the same function for both, but one is an easy button to hit versus going to the menu? I'll look into that as well. So after dividing and then deleting the overlapping excess, I grabbed the remaining pieces intended to be one piece, and hit "add" from the same grouping of buttons as before... but this left debris inside the newly united shape. Any thoughts on solving that? I attached some pics Thanks for your help so far - overall this is very promising and looks more and more like I can accomplish all I need to in AD instead of Illustrator.
-
I've had the same question - really I'd love the flexibility of an app like Clip Studio paint where you can ink with a tapered brush and also edit the width of the stroke as you draw by applying pressure with the stylus..... right now I'd settle for being able to achieve a tapered brush look
-
Are we still waiting on this to be resolved? I know they have a lot they are trying to accomplish there with three apps in progress and ipad versions of them as well - but this is a serious need if we are going to be able to really ink designs in Designer...
-
I would like to be able to use a tapered brush set to adjust its width and tapering effect based on the pressure I put on my stylus as I make the strokes. This works with some brushes - the ones that seem to have more of texture to them - but I can't get it to work for a standard solid brush. On the flip side - thos tapered fancy brushes when selected, will not expand to a fill (is this because they have a raster element to them?) meanwhile solid fill simple brushes will expand when selected and "expand" is chosen - but they are useless without the taper... am I missing something? I don't necessarily want to go through after inking the whole design and adjust the taper and wideth of a stroke afterwards
-
I think what people are looking for is the option to have it taper and apply to pressure settings of the stylus in the moment, as it's being laid down on the design, not as an after-thought per line
-
This topic is a huge feature that needs to be a part of Affinity Designer if it's a program I can utilize full time. Right now it's an option available in apps like illustrator and in clip studio paint.
-
Hey everyone, I've been trying to do more of my regular workflow in Designer and get away from Illustrator as much as possible - can someone point me to a tutorial or explain to me how this task is accomplished in Designer? In Illustrator, I trace over my original sketch layer with strokes that purposefully overlap each other. When completed, I select them all together and expand them to fills and then use the "live paint"option to convert them to separate pieces that begin and end where they overlap - so then I can deselect and use the white arrow tool to click on each overlapping piece I don't want and delete. I included a picture from Illustrator showing the overlapping technique and the individualized pieces. Im not sure what to call this technique, so its been hard to look up - any help is appreciated! thank you! Mat
-
This may have already been covered and if so I apologize. I wanted to see if there was a way to get the crisp points like in Illustrator. When I wanted a path or fill to come to a point in Illustrator, I could grab the handles of the node and bring them in and they'd "lock in" - when I attempt this with Affinity Designer, they remain "unlocked" Does this make sense? Thanks!