Brian_J
-
Posts
615 -
Joined
-
Last visited
Everything posted by Brian_J
-
 Bummer. Maybe another user or Serif will be able to help.
 -
File previews went back to normal for me after uninstalling MSIX and installing the MSI apps — preview size is as expected and resizes based on width of the preview pane. I don’t think I’ve come across reports about what you’re experiencing. Shot in the dark, but have you restarted your computer?
-
Is there another object on the page that the Shape Text layer may be snapping to instead of the top of the page? If you zoom in further, move the Shape Text layer above the top of the page and drag it down slowly, are you able to get it to snap where you want it? Is the right side of the Shape Text layer snapped to the top of the page? If the top of the Shape Text object is not perfectly horizontal, that would create a gap. If you're still having problems, if you can upload the Affinity Publisher file, that would help someone identify the issue.
-
Or, everyone else could deduce this conversation (and others similar to it) is futile and move on.
-
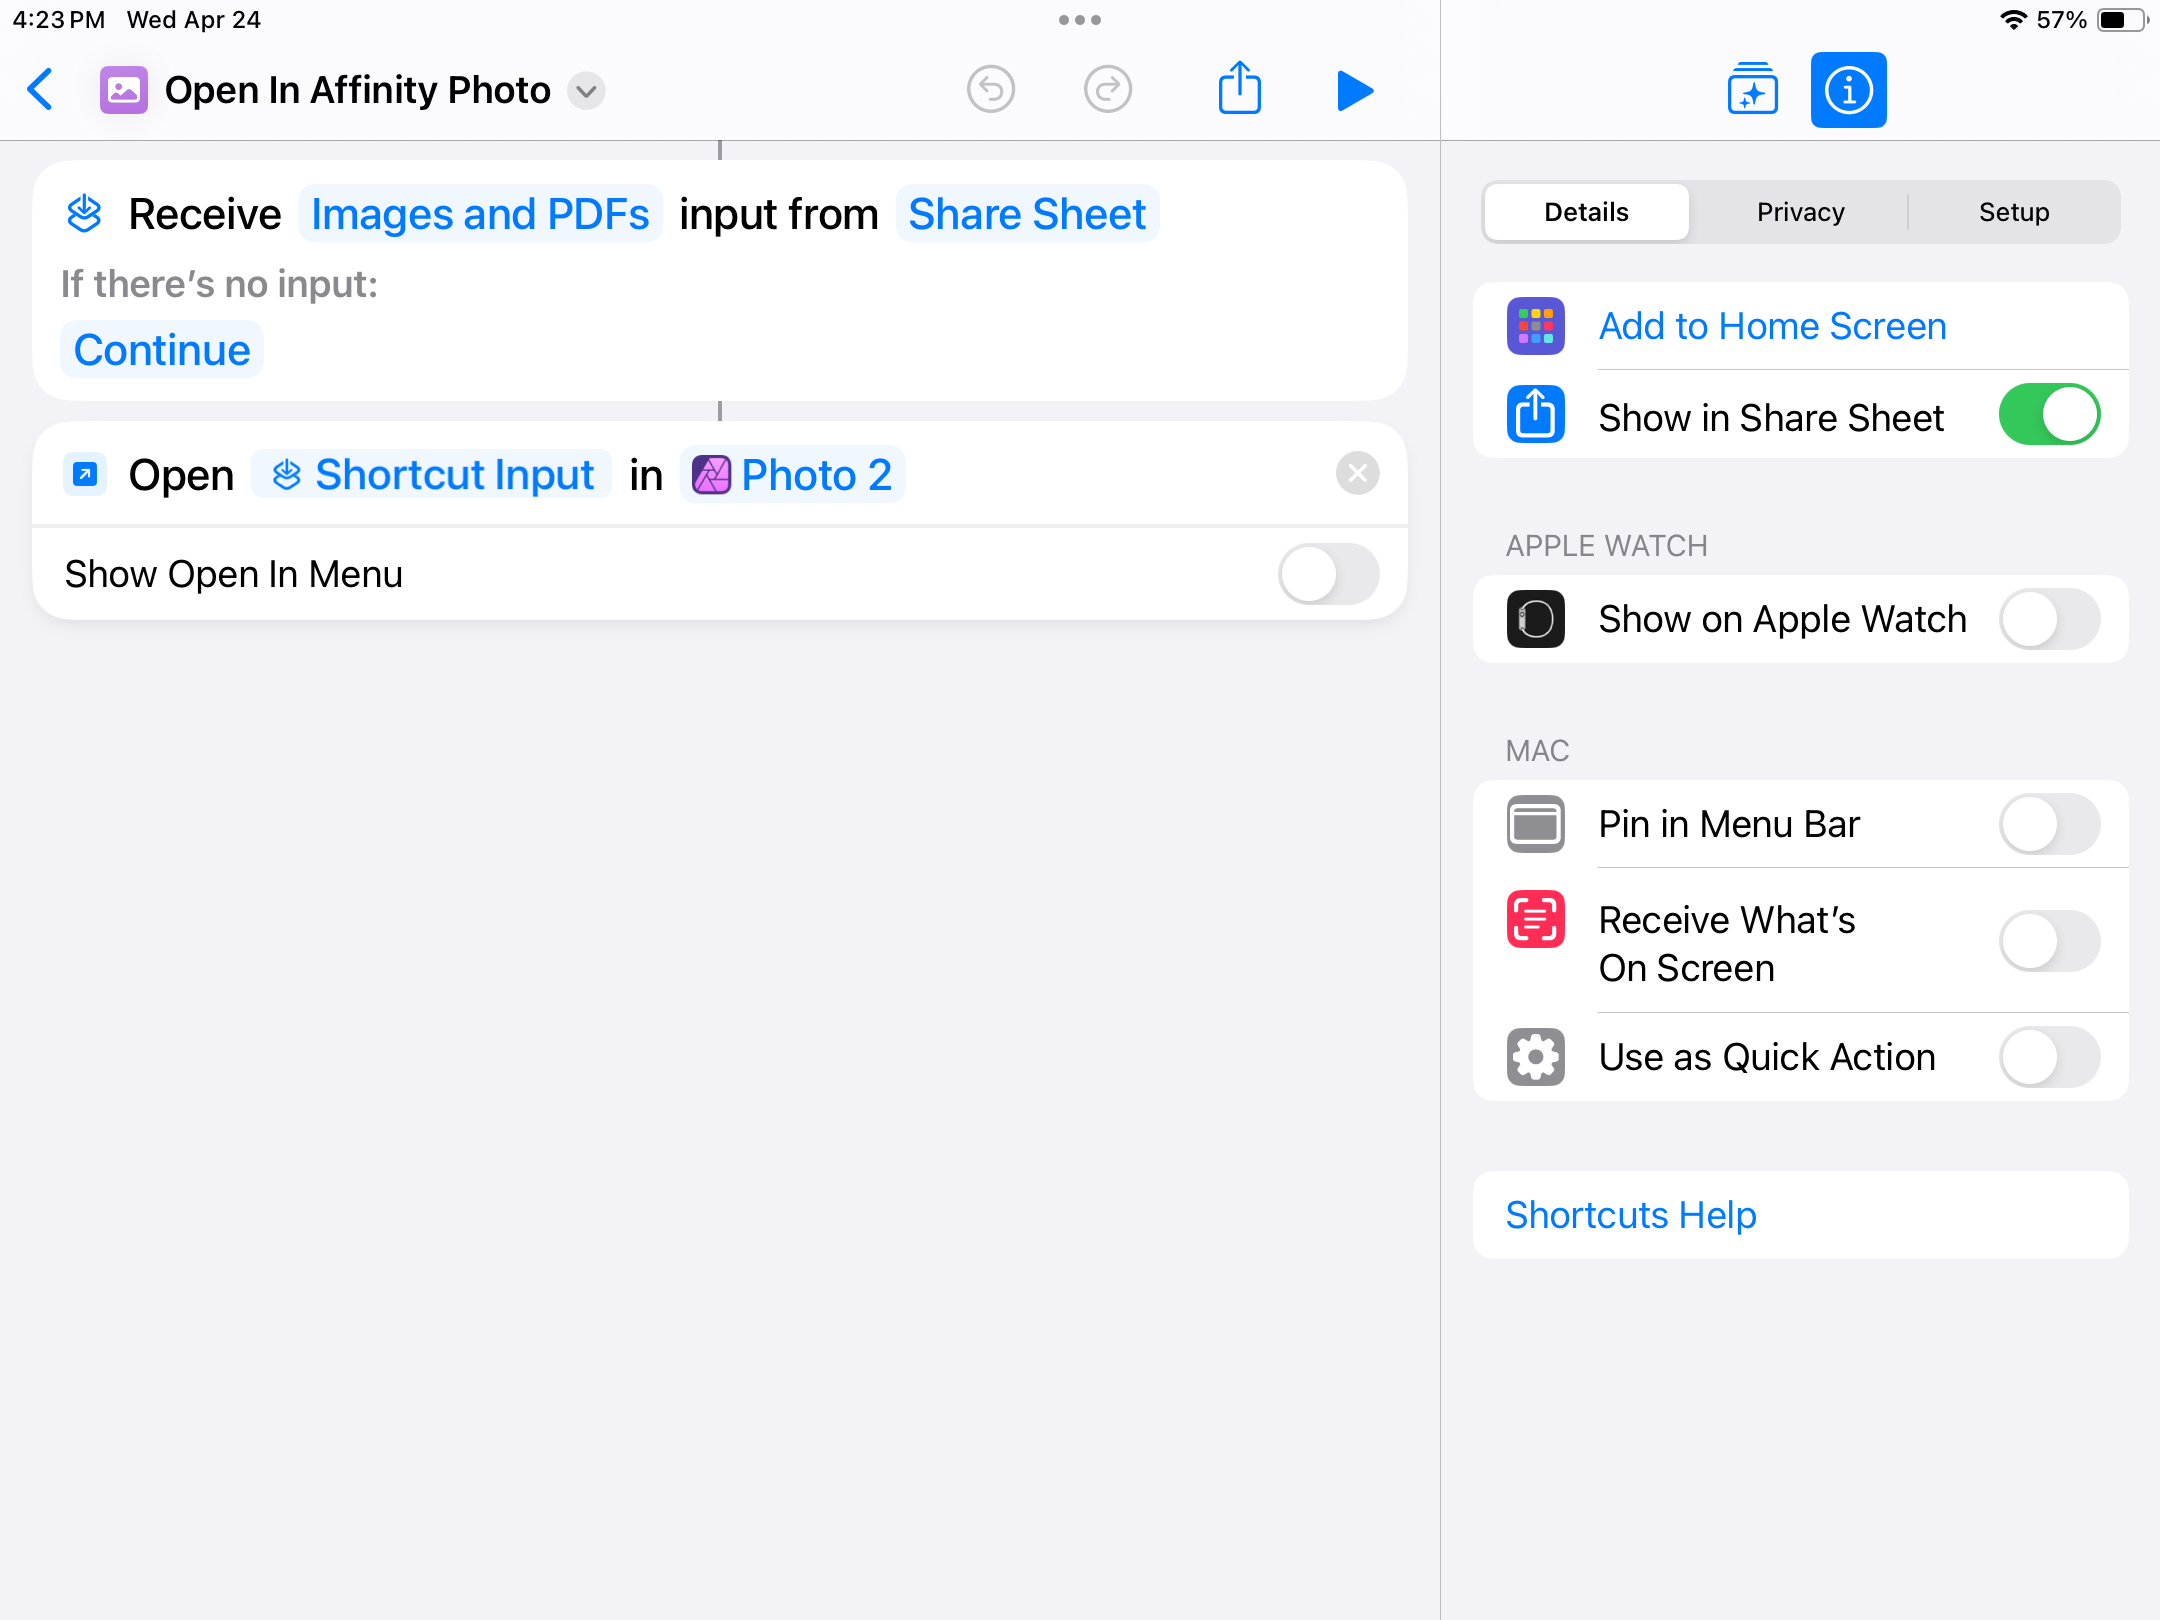
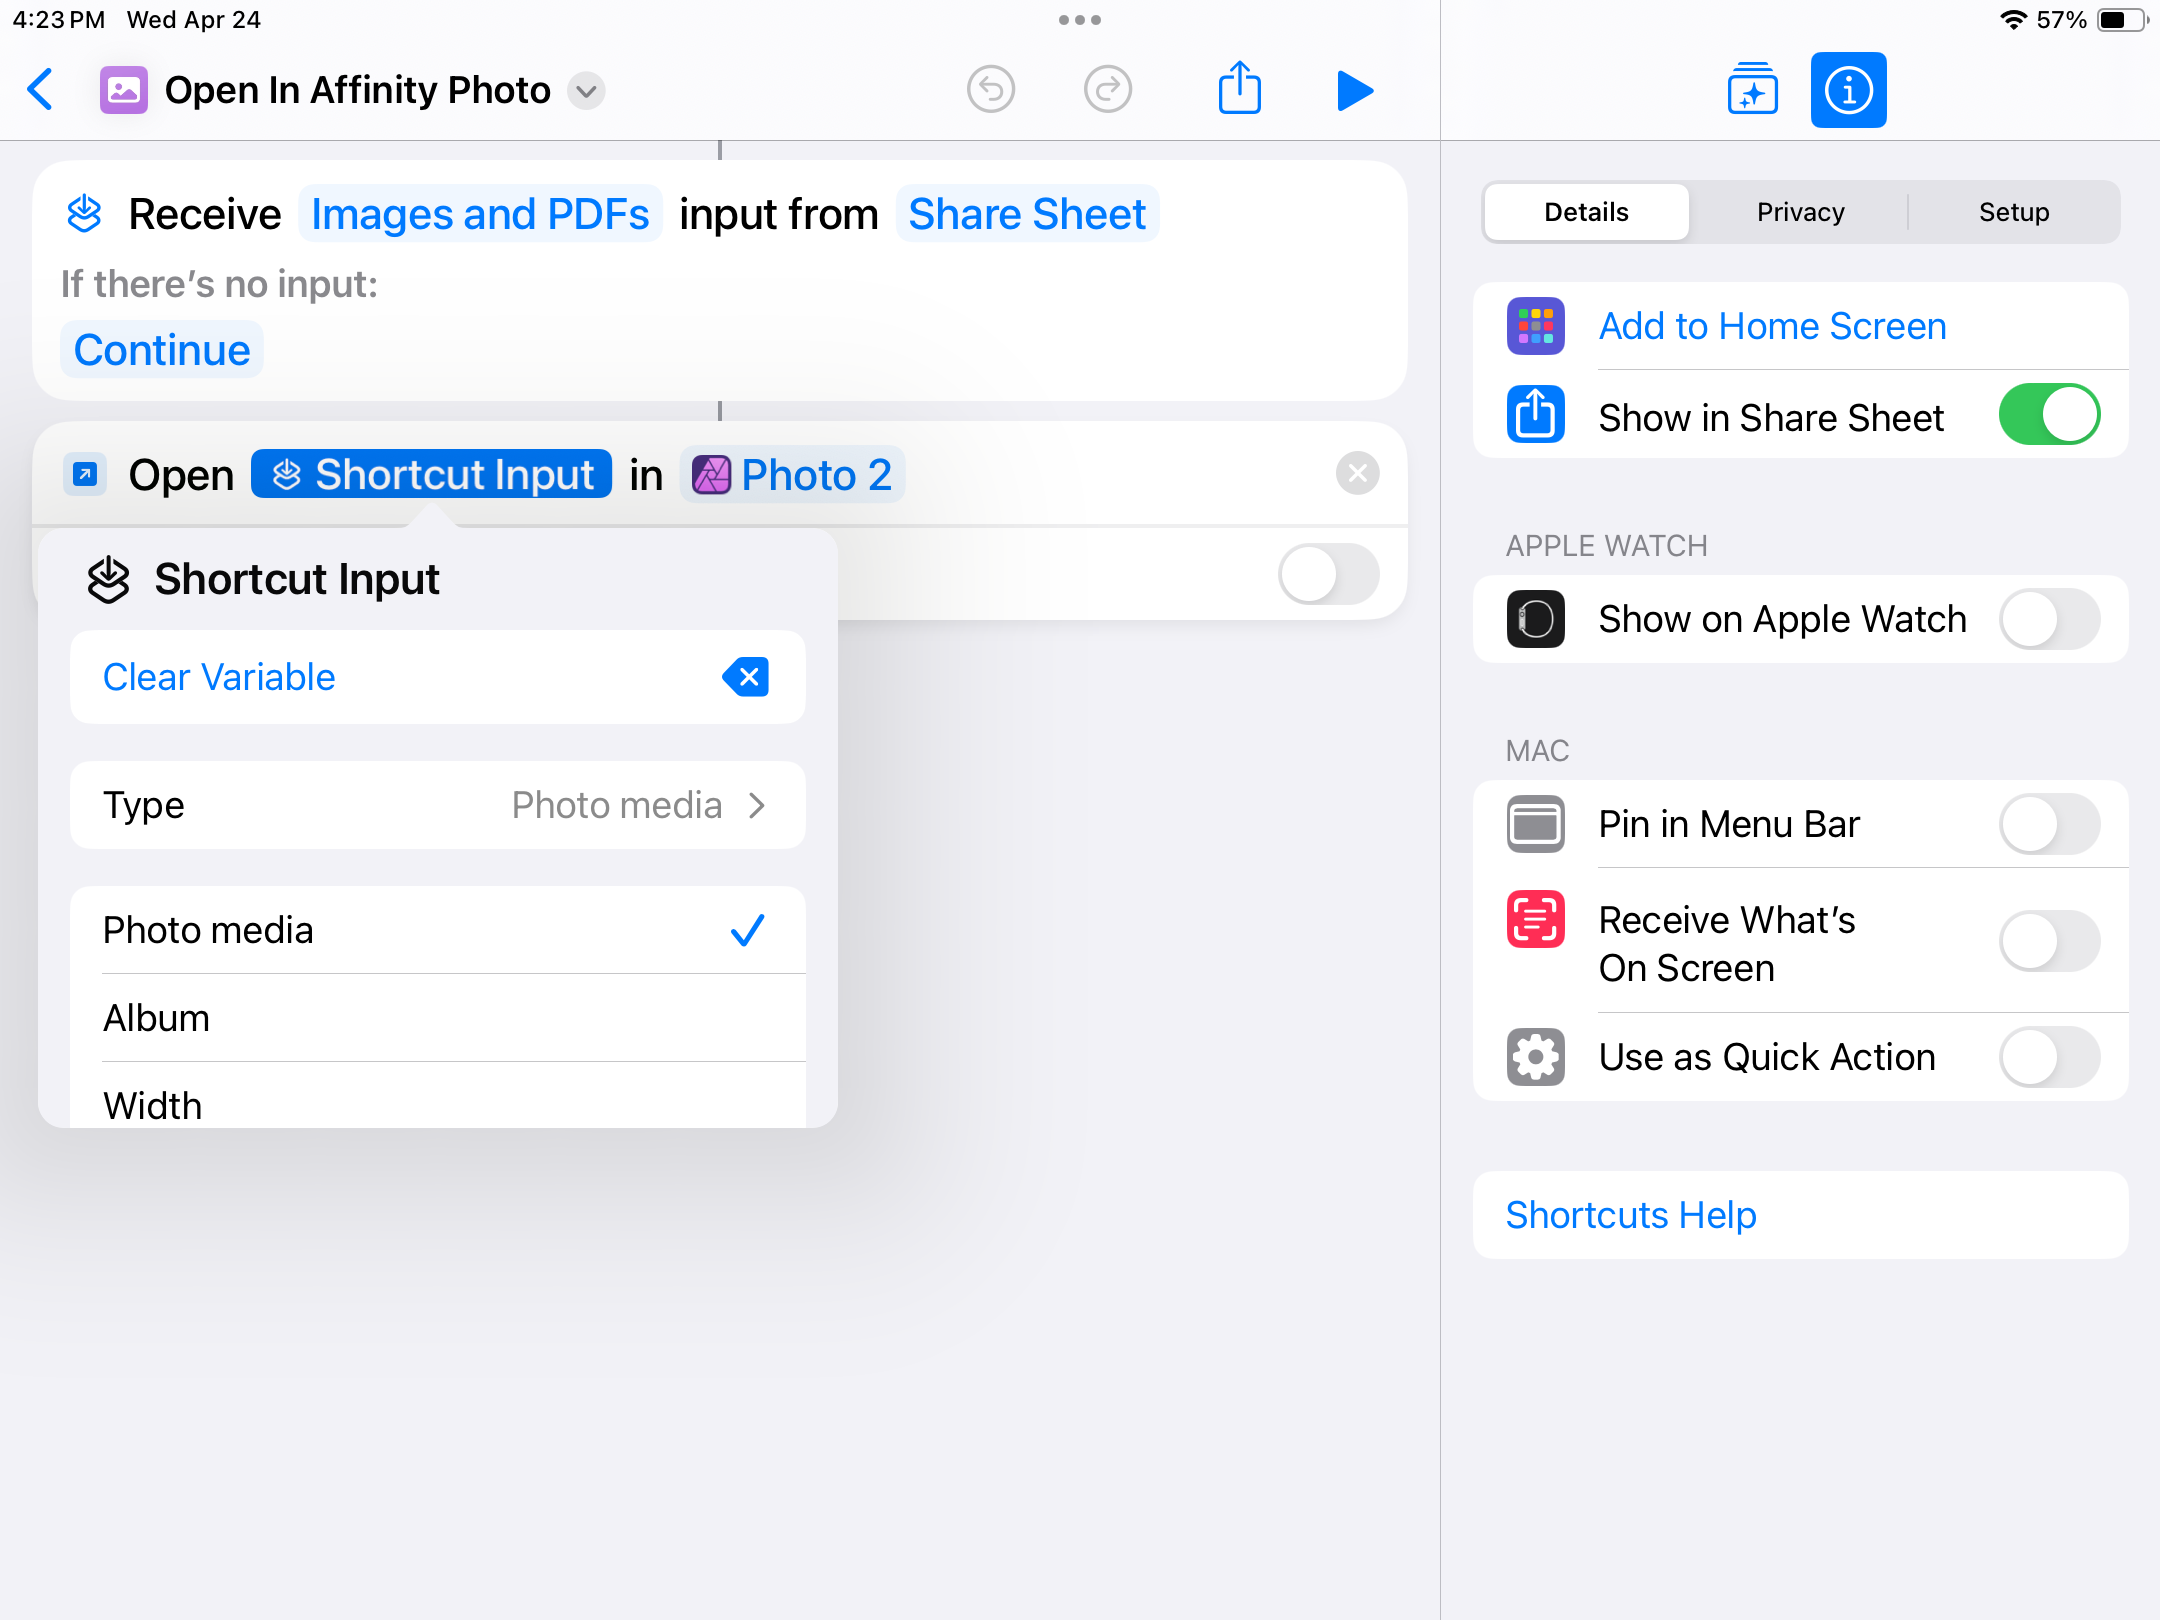
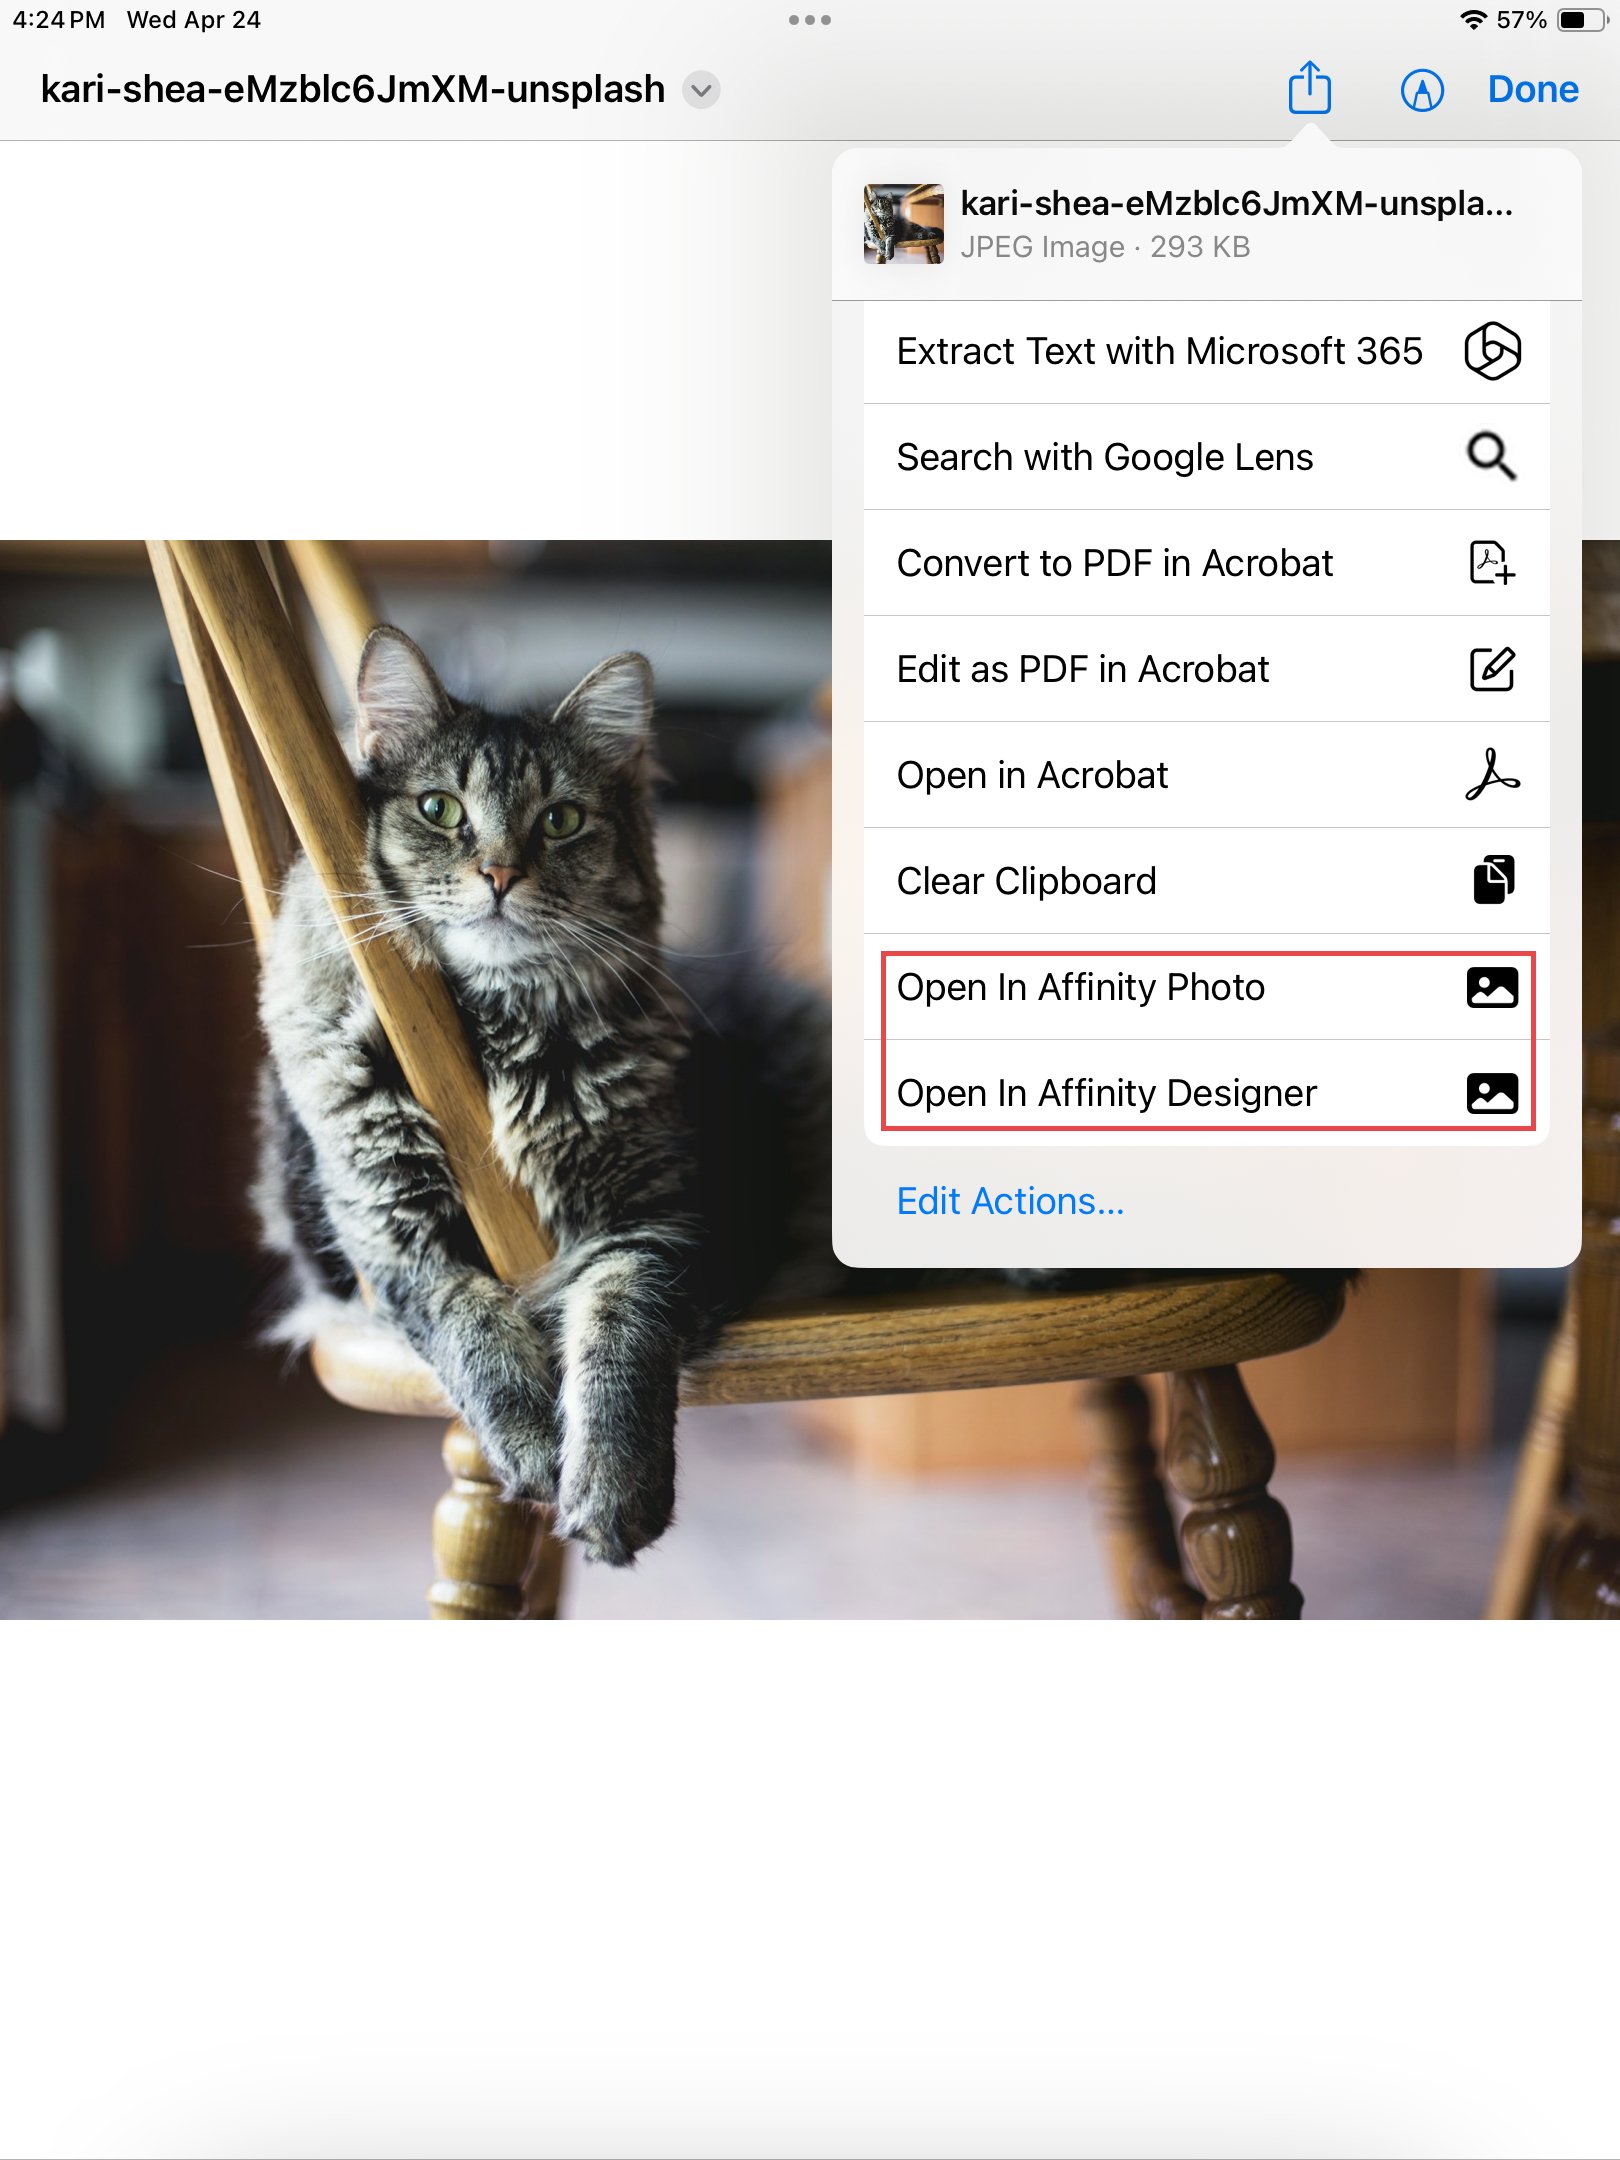
I find the iPadOS ‘Open In’ shortcut really convenient, and it works for me on iPadOS 17.4.1. Here are screenshots from iPadOS 17.4.1 in case they’re helpful. If you want to create shortcuts and have trouble doing so, let us know.

-
Enable Studiolink
Brian_J replied to Juan T's topic in Pre-V2 Archive of Affinity on Desktop Questions (macOS and Windows)
It can be confusing when viewing the version number of Affinity v2 apps. What you were actually seeing is ‘Publisher 2 2.4.2 is now available’ — the first “2” is part of the app name, not the version number. -
Hide v1 help from search engines?
Brian_J replied to MikeTO's topic in Feedback for the Affinity V2 Suite of Products
I think an ideal solution would be to place alert messages at the top of v1 help pages stating the content is for v1 and providing a hyperlink to the corresponding v2 help page. Depending on how the site is built, perhaps a time-consuming and unrealistic solution… I don’t know. I always look at the URL in the web browser and add a ‘2’ if I landed on a v1 help page, which seems to be most of the time. I’d rather not have to do that. I think the Affinity Help site is in need of improvement — e.g., I’d appreciate more in-depth information; search function is rudimentary and often does not provide adequate results; and sharing a help page URL can be confusing for new users. Helping users get to the appropriate Affinity Help page via an internet search is another example of something I hope Serif addresses to make the Affinity Help site a better resource for new and experienced users. -
Gradients can't be saved as a swatch from a pixel layer. If you apply the gradient to a vector shape (e.g., Rectangle Tool) or a Fill Layer, you can then select the layer and save the gradient swatch to a palette.
-
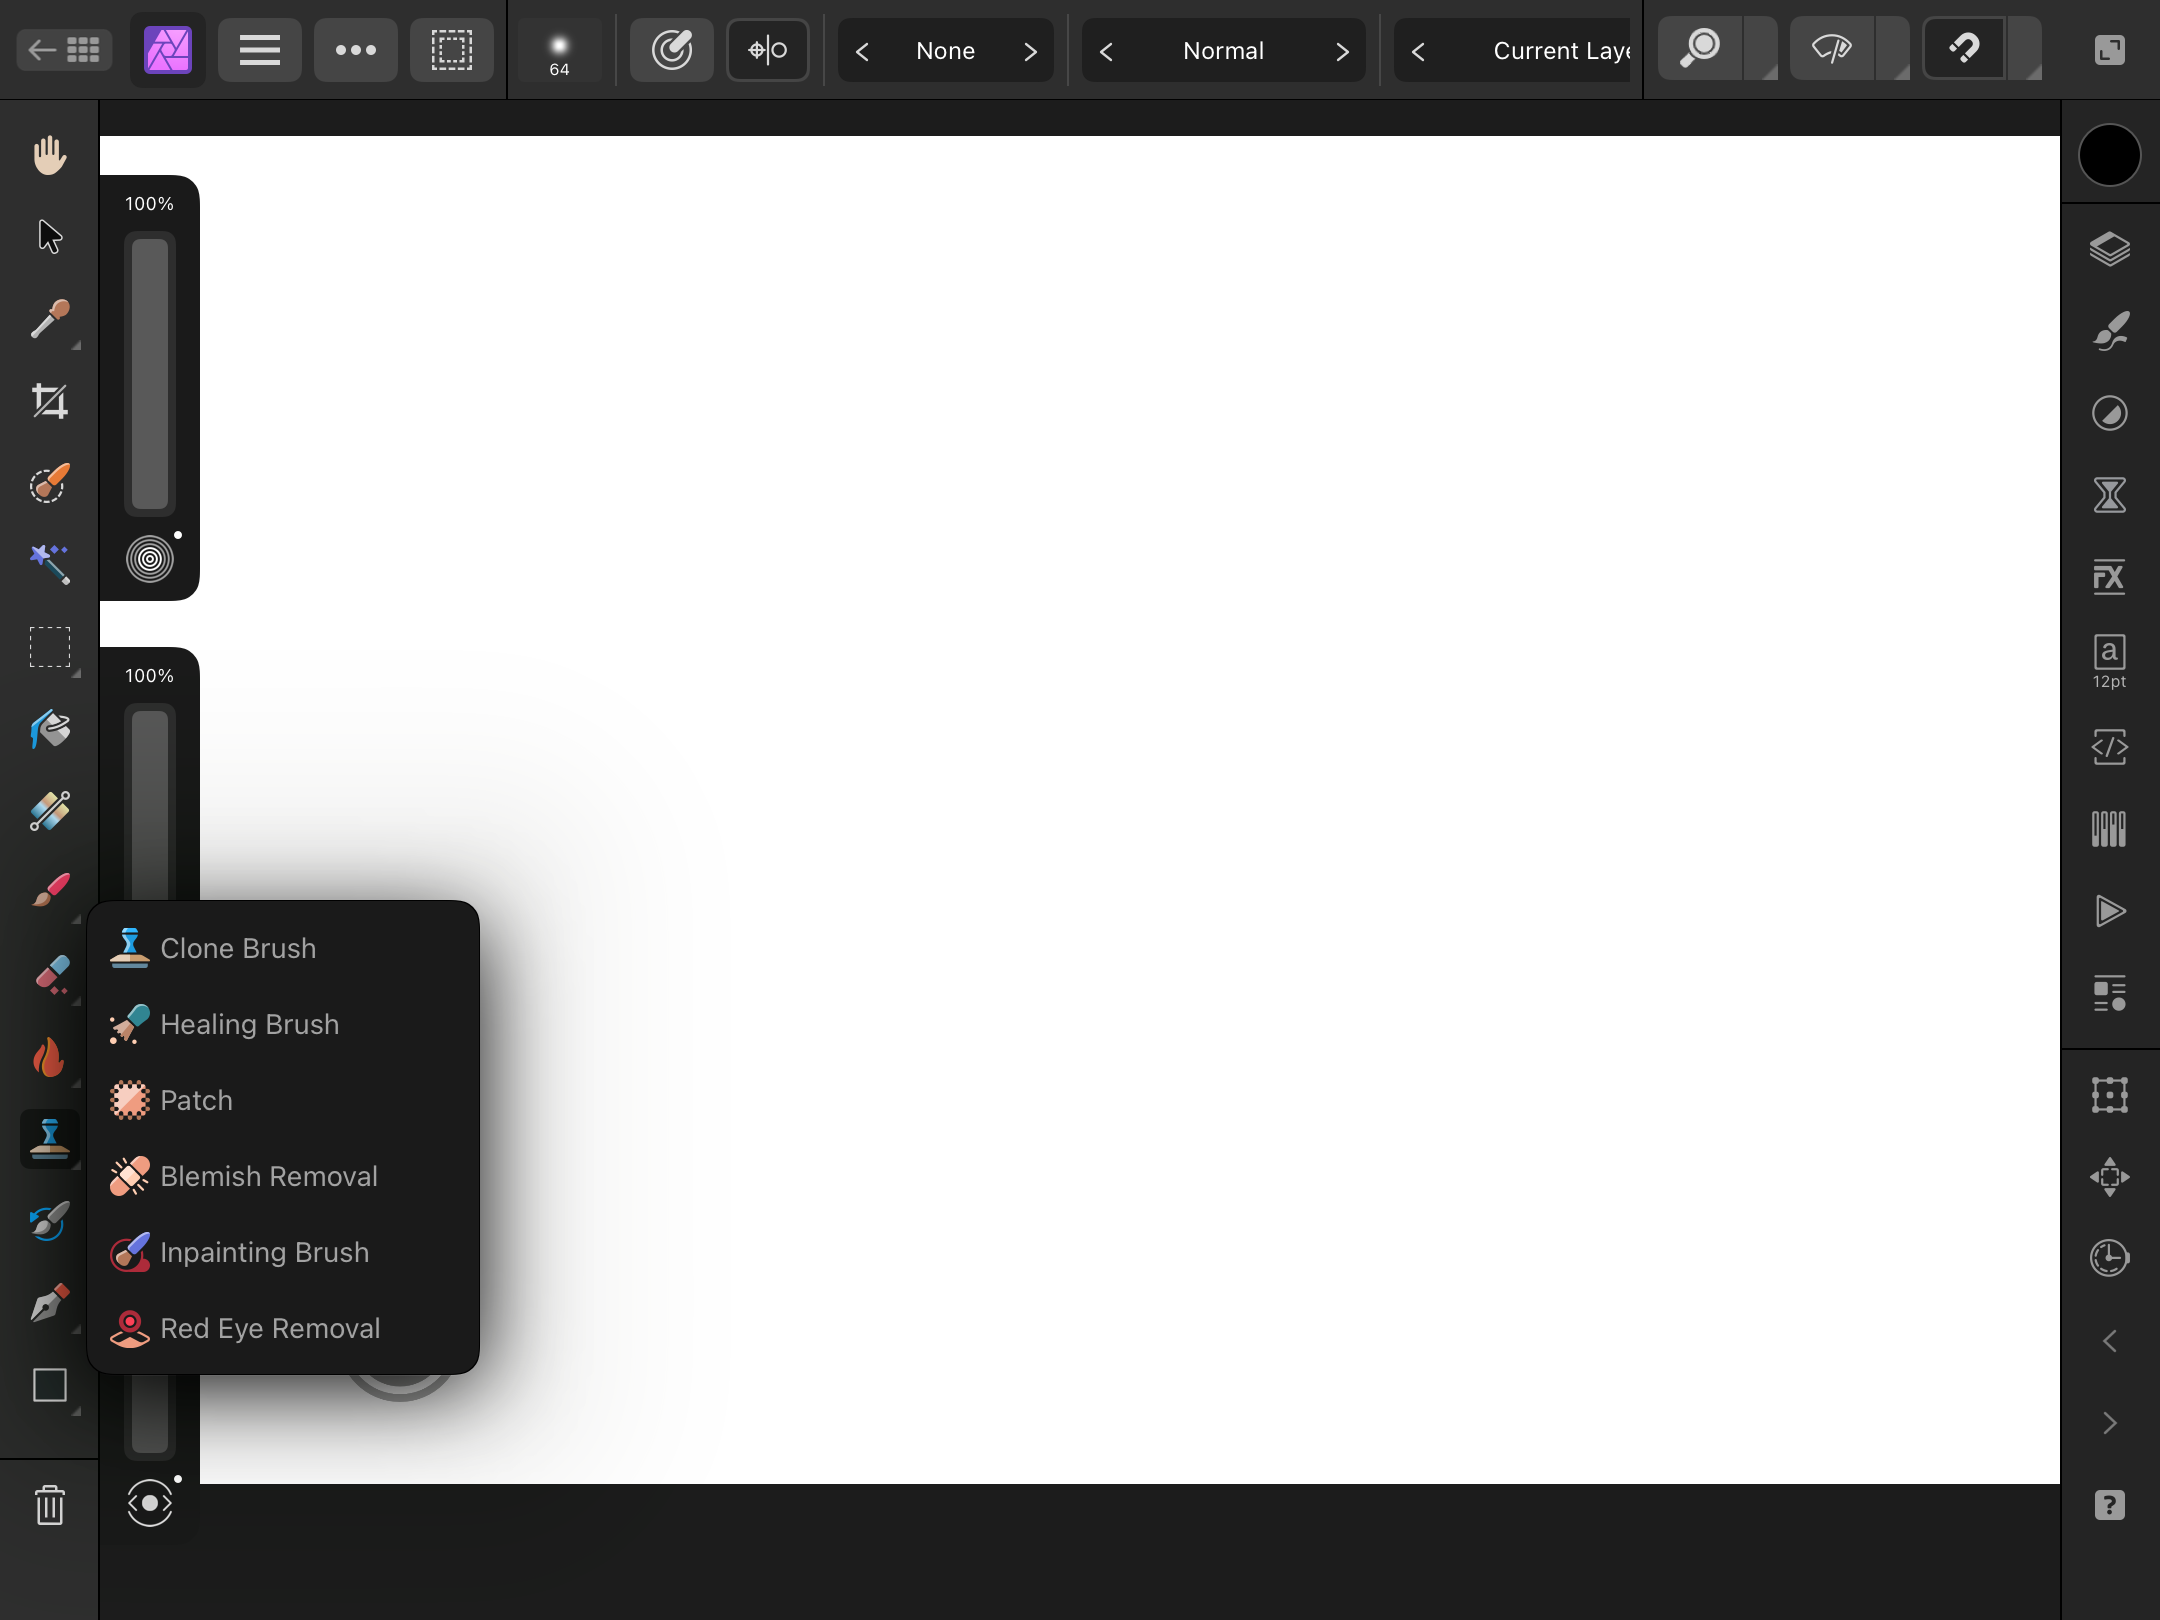
Where is the healing brush?
Brian_J replied to Bettona06084's topic in Affinity on Desktop Questions (macOS and Windows)
Select the Clone Brush then tap it again to display additional tools.
-
Text Defaults to Bold -- Unsure Why
Brian_J replied to piotr4338's topic in Affinity on Desktop Questions (macOS and Windows)
One other thought… again, if you’re using Word. If you create a character text style in Word for italics and use the character text style instead of the italics button in the Ribbon, the character text style will be brought into Affinity Publisher. Having a character text style applied to italic text would enable you to apply a different paragraph text style without overriding the italics. -
Text Defaults to Bold -- Unsure Why
Brian_J replied to piotr4338's topic in Affinity on Desktop Questions (macOS and Windows)
The bold is a mystery. Since I don't have the Bell MT font, I can't experiment with it. What app are you copying the text from? If it's Word, doing the following will create a new text style in Affinity Publisher when copy/paste from Word: In Word, create a new (text) Style (don't use the default 'Normal' style). In the new Style, change the Style based on to (no style). Apply the Style to your text. Copy the text in Word and paste it in Affinity Publisher. The text style used in Word will be applied to the text in Affinity Publisher, and the new style will show in the Text Styles panel. You could use this new text style as your Body text style. If you want to rename the text style, it would have to be done after all the text is copied over from Word. I don't know if bringing the text style over from Word will have an affect on the issue. And if you're not using Word, this is all moot. I always paste plane text into Affinity apps and apply text styles in Affinity. It would be a hassle, though, to have to reformat large amounts of text. Maybe someone else will have a suggestion. -
Text Defaults to Bold -- Unsure Why
Brian_J replied to piotr4338's topic in Affinity on Desktop Questions (macOS and Windows)
Sorry man… you mentioned that in your OP but I overlooked it. -
Text Defaults to Bold -- Unsure Why
Brian_J replied to piotr4338's topic in Affinity on Desktop Questions (macOS and Windows)
I’m not on a computer with the Bell MT font installed, so I can’t test it, but it doesn’t look like the Font Trait is set in the Body text style. If you set the Font Trait for the Body text style to Normal — or whatever it’s named for the font — does that resolve the issue? Edit: I didn’t see Walt’s comment; maybe what I mentioned isn’t the issue. -
refine edge
Brian_J replied to Ned Sloane's topic in Affinity on Desktop Questions (macOS and Windows)
In the Refine Selection dialog, with the Output set to Selection, clicking the Apply button should result in a pixel selection that you can invert: Select > Invert Pixel Selection. I'm not sure what the '2 mode buttons' are that you're referring to. If what I mentioned above doesn't address your issue, a screenshot showing the entire screen (all Affinity UI), including the Refine Selection dialog, and/or your artwork with the selection you'd like to invert would be helpful. -
Export Publiser document to .afpub
Brian_J replied to Intuos5's topic in Feedback for the Affinity V2 Suite of Products
Something I found useful in Adobe apps was the Duplicate file option. Duplicating a file presents a dialog with the original file name appended with “copy” — so there’s no chance of accidentally overwriting the original — and the option to change the file name. Duplicating a file keeps the original open and the duplicate can be saved or experimented with and closed without saving. -
How arch text?
Brian_J replied to hsmokey's topic in Affinity on Desktop Questions (macOS and Windows)
Agreed. I wish Designer had predefined warp options like Illustrator. That’s one of the first things I missed when I started using Affinity. I hope Serif considers adding predefined warp options at some point. -
The issue appears to be caused by the Group — I have no idea why. If the Layers are removed from the Group and put into a new Group, text in the Footnotes text Layer aligns to the Text Frame Baseline Grid. It looks like there are some Paragraph panel settings overriding the Footnote - Note Text Style... so text is aligning to every other baseline grid line. If the base style is reapplied (Text > Reapply Base Styles) the text aligns correctly to the Text Frame Baseline Grid.
-
From Affinity help https://affinity.help/designer2/en-US.lproj/pages/GetStarted/save.html: To save history with a document: From the File menu, select Save History with Document. In the Saving With History dialog, click Yes to accept the conditions discussed in the dialog. Save your document.
-
It looks like the rectangle is in a Master page. If you go to the Master page in the Pages panel, you should be able to delete it.
-
Ditto. I’m not fond of how scrolling in panels works.
-
The blend mode is behaving the way I’d expect it to. My assumptions… White is a color, so the blend mode is interacting with white. A layer with no color beneath it (transparency) doesn’t have a color to interact with, so blend modes won’t effect the object’s color.
-
Snap One Handle on a Node
Brian_J replied to Boldlinedesign's topic in Feedback for Affinity Designer V1 on Desktop
Awesome! I was hoping it was just a matter of our wires getting crossed. -
Snap One Handle on a Node
Brian_J replied to Boldlinedesign's topic in Feedback for Affinity Designer V1 on Desktop
As you mentioned, in Illustrator, dragging a control handle onto the node snaps the handle to the node. If I'm not mistaken, snapping a control handle to the node basically removes the control handle. As far as I can tell, alt/opt-clicking a control handle in Affinity has the same effect that's achieved in Illustrator by snapping the control handle to the node. In the video below, the results appear to be the same: On the first shape, I dragged the control handle onto the node to simulate snapping it to the node. On the second shape, I alt-clicked the control handle to delete it. Let me know if I'm not understanding something. Delete-Control-Handle.mp4 -
User data is stored in a different location than the core program files, so things like brushes, plugins, assets, UI preferences, etc. are not overwritten when installing a new version. It's common for any customization in the Program Files folder to get overwritten when updating an app. I'm not familiar with how custom PANTONE files work — if they can be added to the Affinity user folder instead of the Program Files folder, they won't be deleted when the apps are updated. On Windows, Affinity user data is stored in the following locations (C drive is Windows default, but it could be different on your computer): MSIX Installer C:\Users\username\.affinity MSI/EXE Installer C:\Users\username\AppData\Roaming\Affinity
- 14 replies
-
- 1
-

-
- affinity publisher
- affinity photo
- (and 2 more)
-
Similarities of Photo2 and Photoshop
Brian_J replied to CTDude's topic in Affinity on Desktop Questions (macOS and Windows)
To make a pixel selection based on a curve or shape (a.k.a. path): Create the curve or shape. Select the Move Tool. In the Layers Panel Ctrl-click (Windows) or Command-click (Mac) the layer thumbnail of the object you want to make a selection of. Note: the path must have a fill or stoke in order to create a pixel selection. You can then use the pixel selection to copy, delete, make a mask, etc. Alternatively, you can create a path and turn it into a pixel selection, which deletes the path. This Affinity help page explains how to do that: https://affinity.help/photo2/en-US.lproj/pages/Selections/selections_fromshapes.html. Regarding getting up to speed with the apps, here are some resources you may find helpful... Affinity Learning Portal — a good place to start; video tutorials created by Serif (click the desktop and iPad buttons): https://affinity.serif.com/en-us/learn/ Affinity Online Help — a good place to get familiar with the apps, terminology, etc. The Affinity documentation needs to be improved, in my opinion, but it's helpful, nonetheless: https://affinity.help/ Serif YouTube Channels https://youtube.com/@AffinityDesignerOfficial https://youtube.com/@AffinityPhotoOfficial https://youtube.com/@AffinityPublisher Searching YouTube for specific topics related to the Affinity apps may also yield helpful videos. And, of course, this forum is a good place to ask questions when you're stumped. It's a good idea to search the forum to see if you're question may have been answered already. The search functionality in the forum isn't that good, so I often search the forum via Google, like this: site:forum.affinity.serif.com QUESTION HERE.