euronesia
-
Posts
56 -
Joined
-
Last visited
-
Yes, you are right, It is dangerous to have scroll available in the middle where the value fields are scrollable, for sure it would accidentally change value on some. Yet I can't scroll even if the mouse is at the edges of the tab. The only way is to slide the classic slider on the right side. I think it would be a nice feature to have scroll available at the edges of the tab or an extra key such as "cmd+scroll". But come to think of it, I just realized that in the other software I use, the character tab is more compact, no separated categories/drop downs, which made it visible in one small tab, even on a small screen so it has no needs for scrolling. May be that would be better then having title for each category/functions with the need to scroll up & down when everything is open.
-
Hi, I noticed that I can't scroll on Character tab. I think it would be really helpful and can speed up the workflow if this could be mouse scrolled. Any chance to add that? I haven't fond any settings to allow that. Cheers. Screen Recording 2024-04-08 at 21.31.10.mov
-
 JohnM reacted to a post in a topic:
Publisher V2 - Fillable forms & page copying.
JohnM reacted to a post in a topic:
Publisher V2 - Fillable forms & page copying.
-
RocketGS reacted to a post in a topic:
Publisher V2 - Fillable forms & page copying.
-
barbBear reacted to a post in a topic:
Publisher V2 - Fillable forms & page copying.
-
Show Anchor not working.
euronesia replied to euronesia's topic in Affinity on Desktop Questions (macOS and Windows)
Thank you, That's great to hear. Hope it's fixed in the next update. Cheers -
Thank you for the great observation @Hangman and for pointing out the RGB, HSL, CMYK mixup... I didn't know that each element could stay with different colour space. I thought they all follow projects main colour space. Good to know for future projects. Now I also understand more what Allow Advanced Features does 👍🏼 As for the bug, hopefully Affinity team do something about it for the next update.
-
Hi, Ok this never happen before, the export using PDF (digital...) has problems with object with blur layer fx. As seen on the attachment screenshots, exported pdf it has dark area at the size of the blurred object. It shows correctly in the project file while working. This happens when exporting to PDF (digital small), PDF (digital high), PDF for Export. I've included exported .pdf file as well the project file. Please Advice. Update: This happens when the blur object has opacity less than 100% and it is inside another object (sub layer) while on normal Page. If it's on Master Page, it doesn't have to be inside an object it exports with error. This started happening from Affinity Publisher Version 2, I couldn't replicate the issue in Version 1. I also noticed that some object do export correctly (not all) when have "Allow advanced features" ticket on. Current Workaround: To avoid this problem currently the blurred object should stay 100% opacity and use the Fill opacity option in layer effect menu under gaussian blur. Still it is really inconvenient, having to go into layer effect option to control the opacity. AffinityPublisher-Export-BUG.afpub AffinityPublisher-Export-BUG.pdf

-
Show Anchor not working.
euronesia replied to euronesia's topic in Affinity on Desktop Questions (macOS and Windows)
That's strange, because the last two text objects in the file where the anchor is visible I inserted the anchor exactly the same way as the two above, just in different order. I think this could be unfixed bug in Publisher, because it's the same in both v1 and v2 publishers. 🤔 Well, at least now I know that the anchor only shows on text. Wish it did show on all objects with anchors so it could be easier to identify objects with anchors on the page. -
Show Anchor not working.
euronesia replied to euronesia's topic in Affinity on Desktop Questions (macOS and Windows)
Hi @MikeTO Sure, here I recreated the problem, as you can see in the attached file. I also marked the order of creation. Really strange. If I don't set the text box as an Anchor just after I create it, it won't show the anchor, but if I make it as an anchor straight away after I created it it shows the anchor, and the rest of the artistic text follows with showing their anchor. None show anchor icon if I create it before the text box. (by text box I mean frame text tool). Btw, is the anchor only meant for text? since it never shows an icon on shape objects which are set as an anchor. AnchorTest.afpub -
Show Anchor not working.
euronesia replied to euronesia's topic in Affinity on Desktop Questions (macOS and Windows)
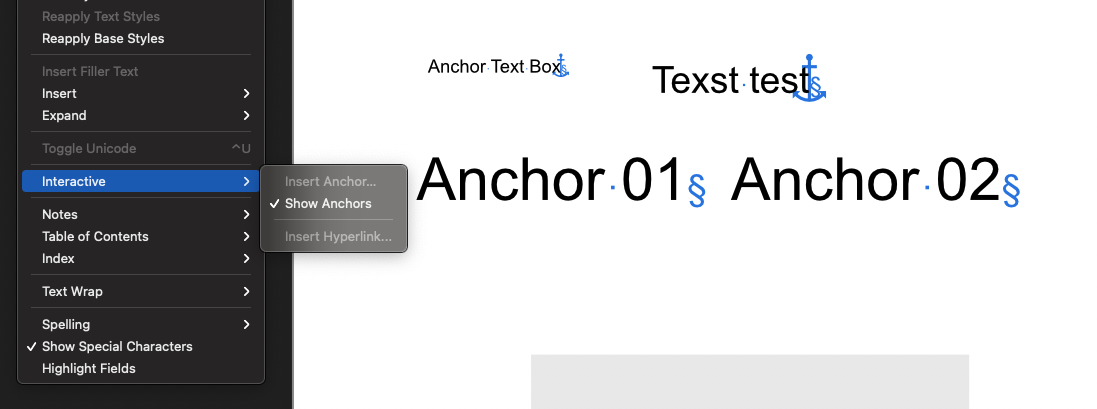
With Show Special Characters shows the special characters but still no Anchors...
-
Hi All, Recently I had to use anchors, and at start when I clicked "Show Anchors" it did show the little anchor icon on one of the objects, but then it disappeared and since then "show anchor" doesn't show anything. I've tried it on Affinity Publisher V1 as well as V2 with the same result. am I missing something or there is a bug in showing anchors. Please advice. Cheers Update: Apparently when I use text box and set an anchor to it, the little anchor icon shows normally, then when I create another art text the icon shows. But on art text that was created before the text box it doesn't show.
-
DanielSan reacted to a post in a topic:
Publisher V2 - Fillable forms & page copying.
-
TineB reacted to a post in a topic:
Publisher V2 - Fillable forms & page copying.
-
mcollins reacted to a post in a topic:
Publisher V2 - Fillable forms & page copying.
-
Just came a cross this problem, it is frustrating. One solution I found out is to use shape tool or picture frame, put the image/layer in it and make it really small and adjust the layer accordingly, then rescale it back up as big as wanted.. it worked with unlocked children. But wen it's already big, don't try to move the children otherwise it will jump again to other page.
-
Horys reacted to a post in a topic:
Publisher V2 - Fillable forms & page copying.
-
euronesia reacted to a post in a topic:
Export Persona slices not aligned properly.
-
Thank you @,,, for the reply, Yes that's even much faster to do it. 👍🏼 Thank you again.
-
Hi, I can't find this was discussed earlier but I just noticed that my exports of few projects using export persona didn't export correctly. It created thin outline/line around the image which created problems when I wanted to tile the designs. After looking deeper into it, apparently the problem was with Designer's Export Persona. The slice box did not align perfectly to artboard dimensions. As you can see in the attached video. So far the solution I found is to create artboards perfectly aligned one to another with 1 point increment to separated them. So I aligned the artboards to snap and then manually using keyboard to separated them away. Otherwise if I just move the artboard manually where ever I want using the mous, it creates the gap in slices as seen in the video and exports images with unwanted lines. I hope this can be fixed so we can use & arrange artboards freely and know that the exports will be correct. export-persona-problem.mov export-persona-problem.mp4
-
firstdefence reacted to a post in a topic:
Affinity Photo Masking a selection on Bigger size layer then project dimensions.
-
Thank you @firstdefence Actually that's a good idea, That also did the trick I needed, Used the layer image inside the rectangle selected the area needed and created the mask using mask icon, and I can still preserve the original layer size. Still too many steps to achieve it but If there's no other way I guess that's the workaround to do it in Affinity Photo.
-
Thank you for the suggestion, But using that technique it clips the original oversized layer, meanwhile I need to maintain the layer original size. So far to the only way I found out to achieve what I was looking for is to create a new blank image or rasterised layer from fill layer, based on the mask selection I want to create and then drag that layer as a mask on the oversized layer I intend to use it on. But that's so many steps to achieve such as simple mask layer effect. I was wondering if there is an easier way to do it.
-
Hi All, I'm a photoshop user trying to learn Affinity Photo and there are so many little things I can't figure out on how to do in. Can someone please explain to me how to make correct selection masking in Affinity Photo. What happens is when ever I try to make the mask based on the selection on a layer which is bigger then the project dimensions, the mask is only based on actual project dimension of the project. not to whole layer size. Example as seen on the attachment. My question is how do I make that selection mask only at the selected area, as it works in photoshop. Is that possible in Affinity Photo? Please advice. Cheers Screen Recording 2023-01-01 at 10.27.55.mp4