Realto
-
Posts
33 -
Joined
-
Last visited
.thumb.jpg.2ac1b0424a6896c349d3d16eea40c7f3.jpg)


-
 Opening the image instead of pasting seems to work still, which is great news, so thanks for the tip! However, it used to work either way. so there's that. Also, I'm not impressed with the new tool they came out with at the same time this started happening. It makes my computer cripplingly unresponsive and has forced me to shut down at least twice because I couldn't even bring up Task Manager to kill the app. The last time it happened I waited it out and didn't have to shut it down, but the program was totally unresponsive. And my computer is hardly a Stegosaurus so I'm probably not the only one having problems... Thanks for your help!
 -
Not sure about the OP, but I'm having the same issue. I hadn't noticed that it automatically applied a mask for some reason, but even if you remove the mask it still doesn't work: the only difference is that with the mask it appeared to erase the entire image and without it there's no effect at all. I've tried this with several images and I'm convinced it's a bug, so please investigate this issue. Thanks! Paul
-
 NCOLEAMY reacted to a post in a topic:
Free Gradient Palettes
NCOLEAMY reacted to a post in a topic:
Free Gradient Palettes
-
 Realto reacted to a post in a topic:
Named colours color palette to share.
Realto reacted to a post in a topic:
Named colours color palette to share.
-
Alan Ralph reacted to a post in a topic:
Free Gradient Palettes
-
Ashcat reacted to a post in a topic:
Free Gradient Palettes
-
Andy05 reacted to a post in a topic:
Free Gradient Palettes
-
MEB reacted to a post in a topic:
Free Gradient Palettes
-
Not exactly. It IS a combination of the three styles I used, but other than random chance there shouldn't be much duplication. I have a collection of about 3500 different colors and they were used to create the "random" colors. That 3500 is divided into 16 groups and then for each of the gradients I had one randomly selected from each group. I'm probably going to thin that list down by removing some of the duller colors that didn't create very interesting gradients, but I have no idea when that will be. The ones that I created so far have some nice gradients, but not much yet that really blew my skirt up. This was my first real attempt, so I need to refine the process to get it dialed in. Creating gradients manually is a real chore, no offense to Affinity. I may wind up creating a more robust web app that takes the existing code I have and makes it easier to create the SVGs for direct import since process works very well in Designer.
-
 HCl reacted to a post in a topic:
Free Gradient Palettes
HCl reacted to a post in a topic:
Free Gradient Palettes
-
pruus reacted to a post in a topic:
Free Gradient Palettes
-
Andy05 reacted to a post in a topic:
Free Gradient Palettes
-
Ik heb een korte YouTube-video gemaakt die laat zien hoe je de bestanden kunt importeren. I created a short YouTube-video to show how you can import the files
-
YouTube video I created a very short video that shows how to import the attached files and use in Designer. Hope this helps anyone that might have any questions. It only takes a few steps and less than 30 seconds. The only thing you have to know is where you save the files, because you have to open them from your saved location to import them. (I tried to figure out how to embed the video directly into my reply, but the best I could do was add the link to the video. Sorry!) Good luck! "Have fun storming the castle!"

-
jmwellborn reacted to a post in a topic:
Free Gradient Palettes
-
walt.farrell reacted to a post in a topic:
Free Gradient Palettes
-
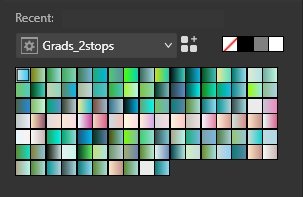
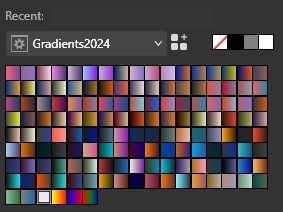
I have a bunch of gradients that I created that I wanted to share with the rest of the community. For each palette I created a screenshot from Designer so you would have a better idea if you want to actually download them or not. They were all created semi-randomly so there's a lot of mixed results. Some I think turned out great; Others not so much! I didn't really filter them, I just flew threw them and added them all to a palette as I went. I also have several thousand SVGs that I created using the same process that I haven't converted into palettes yet. If there's any interest, I can upload those at a later date. Why did you do this? I haven't seen many free downloads available since version 2 was released, so I wound up making my own. It was a little time-consuming getting the PHP created on the backend to create all of the SVGs that I used to create the palettes, but now I have a process in place to mass-produce them in the future should I find the current ones are lacking in some aspect(s). What would you have done differently? If I didn't just want to get a finished product done so that I could use it in my own work, I would have taken a bit more time and made the SVGs a bit more random as far as what percentage the stops were created with. I basically split all the colors up evenly, but I'm curious if they would have been much different if I had randomized the stops, too. That will probably be done in the next version that I work on. Will you create any more? If anyone is interested in additional palettes, please post a message in here and I will do what I can. I'm also interested in any suggestions/critiques/criticisms that anyone may have. Feedback is always a positive: good, bad or indifferent. I really hope that someone will be able to take advantage of my work and incorporate it into their own projects. You know what they say about working in a vacuum: it really sucks! DISCLAIMER: The provider has shared this work at no cost to the end user and assumes no responsibility for any damage done during it's use. Since there are no applications or executables included in any of the files provided the potential risk for anyone that uses it is negligible. I regularly scan my system for malware and viruses and at the time of uploading was not infected with any to the best of my knowledge. In the extremely rare event that someone does encounter an issue with any of the attached files, please post a message and I will re-examine the files and take any appropriate action deemed necessary at that time. Gradients2024.afpalette Grads2stops.afpalette Grads3stops.afpalette Grads4stops.afpalette
-
Create Gradients Programmatically
Realto replied to Realto's topic in Desktop Questions (macOS and Windows)
Ok, here's my first automated palette. It took several hours to set it all up and get it working right. I wound up using PHP to generate the gradients and save them as files. Once the files were all created, I think it took all of 10 minutes to get them added to a new palette in Designer. Doing it manually would have taken several entire work-weeks and an advanced case of carpal tunnel. These are all two stop gradients. I'm also going to add a few stops and test them out to see how those look. Now, the only real challenge is combining the colors effectively, which is exactly how it should be! Thanks again! If anyone is interested in additional gradient palettes that I create, reply in here or send me a DM (if that's possible in here) and I'll post anything new. Gradients2024.afpalette
-
Create Gradients Programmatically
Realto replied to Realto's topic in Desktop Questions (macOS and Windows)
I wasn't aware that they could be copied so easily and imported into a palette that way, so this should be a perfect solution. I already have a JS app I created that generates CSS gradient code that will just need a few slight modifications. I'll post the palette that I create in here in a few days if you're interested. Thanks! -
Create Gradients Programmatically
Realto replied to Realto's topic in Desktop Questions (macOS and Windows)
Perfect! Exactly what I was looking for. I can mass-generate all that I need with a simple JS function and now I won't have to deal with the manual way of creating them which is worse than watching paint dry as well as painful after only a few with the constant trackball input required to make one. If you're interested, I'll post the results after I make some progress so I can share the wealth. Quality gradients seem to be a bit scarce in Designer. -
I have a slew of gradients that I want to create, but creating them all manually could take me well into retirement age.🤪 Is there a way to do it programmatically? Are gradients stored as a text string somewhere? Or if I created them as images could they be captured via the same approach that is used to create single color palettes? Are macros something that would work for a task like this? Anything that I haven't mentioned would be awesome as well. Ideally, being able to convert CSS into gradients would be preferable, but I can work with anything that's faster than doing them all manually. Thanks in advance, Paul
-
I've tried that a few times and I have problems getting it to sync back up again sometimes. I'll try it again and see if that's still an issue. Thanks!
-
Let's say I want to make a symbol where most of it repeats, but there are some details like text that are going to be different for each one. I want it to be a symbol because if the size of one changes I want them all to change, but details like text will vary on each one. I want the text to be part of the symbol so I don't have to recreate it every time, but I want that part to be updateable separately. Hopefully this makes sense. Is there a practical way to do that? Right now, when I try to change details like the text it changes them in every instance which is not what I want. I tried searching for this scenario and I watched several videos on the subject, but none of them addressed my question. Thanks in advance! Paul
-
I can confirm this issue. Haven't tried to do it for a while, tho, so I'm not sure if it's an issue only with the current version.
-
Realto changed their profile photo
-
Realto reacted to a post in a topic:
What is the Blue Line for in Designer Files?
-
What is the Blue Line for in Designer Files?
Realto replied to Realto's topic in Desktop Questions (macOS and Windows)
@AndyWhAhhhhh.... Thank you! So much better now...😁 In fact, it's so much nicer that with my creativity no longer stifled, I created a new avatar! -
This is probably a stupid question, but what is the blue line for in a Designer file? And how do I hide/remove it? I see no purpose for it and all it does it get in the way, stifling my "artistic genius" (kidding). Thanks in advance, Paul