Realto
-
Posts
21 -
Joined
-
Last visited
Everything posted by Realto
-
 I can confirm this issue. Haven't tried to do it for a while, tho, so I'm not sure if it's an issue only with the current version.
 -
@AndyWhAhhhhh.... Thank you! So much better now...😁 In fact, it's so much nicer that with my creativity no longer stifled, I created a new avatar!
-
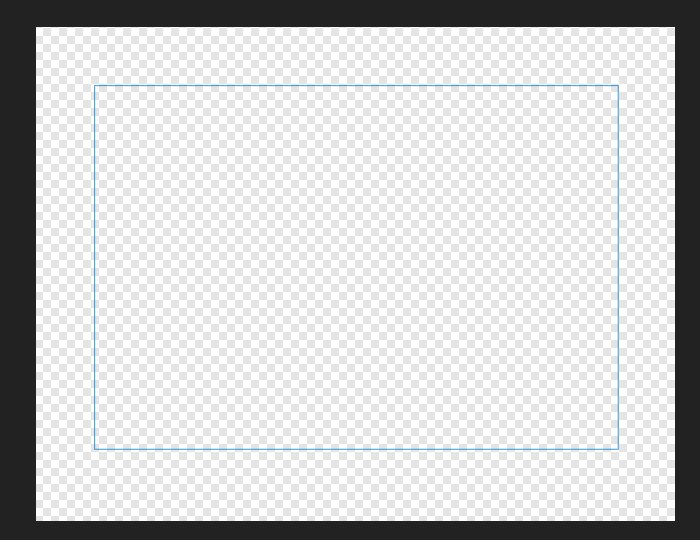
This is probably a stupid question, but what is the blue line for in a Designer file? And how do I hide/remove it? I see no purpose for it and all it does it get in the way, stifling my "artistic genius" (kidding). Thanks in advance, Paul

-
@walt.farrell Thanks for your help!
-
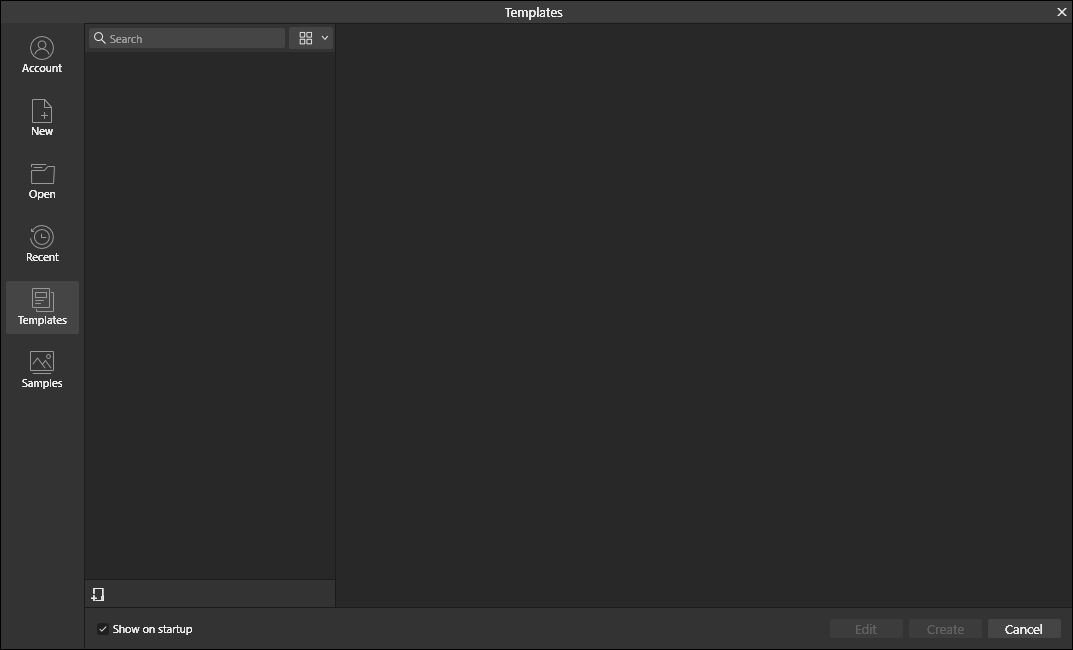
Greetings! I'm wondering about the lack of any default styles and/or palettes for either Designer or Photo v2? Should I export them from v1 or are there downloadable versions available? It would seem like an opportunity to leverage v2 features is being missed here. Just to be clear, this isn't intended as a complaint: I'm happy with what I've seen so far, just want to take my work to the next level. Also, there are no Templates in the Account section. Samples, yes, but no Templates. Thanks in advance, Paul
-
Yes, that's it! Yoda: "The force, with you, truly is..." (okay, he didn't actually say it, but it would have sounded something like that if he had)
-
I'm trying to remember 🤔 the term for an action that allows you to create a shape layer that allows layers below it to be transparent based on that particular shape layer. It's virtually the same effect as actual subtracting a part of a layer, but it's non-destructive. It's similar to a layer mask, but that's not what I'm referring to. Very handy feature, but I can't seem to find it in the help. Hopefully, I described it well enough for someone to know the correct term for it so I can figure out how to use it again. If not, I would be happy to provide more detail. Thanks in advance, Paul 😁
-
@Alfred I finally got a chance to try it on my Windows laptop, but I came to the same conclusion that you did: it can't be done with a touchpad. You can't simulate a left click hold followed by a right quick hold and release. In fact, the status message in the lower left isn't the same as it is on my desktop computer. I bet it would work if you plugged in a regular mouse, but I'm assuming that isn't convenient for you or you would have already tried it. Sorry about that, mate! If it's any consolation, even tho the alternating click and release does work, it's not extremely reliable so it's hard to work it into the workflow. Most of the time I just set the nodes and then come back afterwards and add the curves. Fortunately, it's only a minor inconvenience, all things considered.
-
@Alfred Ah, yes. Good point. I'll try to see if I can figure it out on my Windows laptop when I get a chance. If I have any luck, I'll post a follow up.
-
Okay, so after much trial and tribulation, there IS a way to do this in Windows: When you want to create a straight line (at the spot you want to create it): 1) Press and hold the Left mouse button 2) Press the hold the Right mouse button 3) Release the Left mouse button 4) Release the Right mouse button After you get used to this series of actions, you can roll the two buttons quickly together and achieve the same effect. Then, queue your favorite version of Hallelujah, observe a fitting moment of silence and get on with your life! Again, my apologies to the posters who tried to help me arrive at this solution much earlier, but I was too obtuse... (Attn moderator: if you want to move this up to the top of the thread so more people see it, I wholeheartedly support that decision.)
-
@anon2 The statusbar shows Drag+RightMouse to create a straight line. However, I can't find "RightMouse" referenced anywhere in the Help I'm guessing it means to right-click, but all that does is bring up the right-click menu. I did find the post below in the forum, but that person didn't find it helpful either Apparently, you're supposed to be able to click both the right- and left-click buttons simultaneously? Yeah... no, that doesn't work at all.
-
@walt.farrell I took a screenshot because I wasn't sure what the symbol towards the middle represents
-
I posted a question last week about issues that I was having with the Pen tool on Windows not matching up with a Mac behavior: Despite the kind and perseverant assistance of a few individuals, I was not able to get it resolved. So, I decided to download a trial copy of Designer on my MacBook to see if it worked on there the way that I was hoping it would, and, sure enough, it works perfectly. I also figured out the problem: in Windows, instead of the Control key functionality on the Mac being applied to the Ctrl key the Command key functionality on the Mac is being assigned to it So, I need to figure out a way to switch the mapping of that key Unfortunately, I'm not quite sure how to do that yet. In summary: applying the equivalent of the Mac Control key functionality to the Windows Ctrl key in Pen tool mode could solve this issue. I'm thinking that it may need to be applied inside of the software, but I'm hoping there's a workaround because that probably won't be something that can be done quickly. Any suggestions? Thanks in advance... (oh, in case a suggestion is to use my Mac instead of Windows, there are two problems: I only have a 30 day trial version installed My two nicest monitors are hooked up to Windows and it's not practical to switch things around at this time)
-
@v_kyr No, that's not what I'm trying to do. I'm trying to replace having to click on the node that I want to convert manually and do it with a Keyboard Shortcut. See video. PenTool2.mp4
-
I do have Affinity Photo. 😊
-
The Convert To Curves command isn't designed to straighten curved segments of paths, anyway, so what were you hoping to achieve by using that command? I don't want to straighten out a curved segment of paths, I just want to make the next node Sharp after a single Curve. I can accomplish that now by clicking on the end node of the first Curve, but I would prefer to be able to do the same thing with a Keyboard Shortcut, since that would be easier than actually having to click on the node. The method that works for me is the one stated earlier by @firstdefence and @prophet: use the ctrl key. The CTRL key doesn't help in this case for my needs. CTRL causes the current curve to end and the next click starts a new curve. I think I'm going to purchase Publisher and see if I can use the Macro functionality to accomplish my goal. Thanks everyone for all your help! I think I know what my options are; I just need to figure out the best solution.
-
@anon2 Hopefully, my explanation makes sense and my terminology is correct: Currently, using the Pen tool, when you click and drag to make a curve, that has to be followed by a second curve. Then the third click will Convert to Sharp if you don't specifically make it a curve.. However, if you click on the last node of the first curve, that Converts to Sharp, so you can create a single curve without a second curve. That second, mandatory curve is what I'm trying to avoid in this example, because it happens quite frequently. I want to be able to accomplish this without having to click on the last node because that's such a precision click that my hand starts to cramp after extended Pen tool usage. Make sense?
-
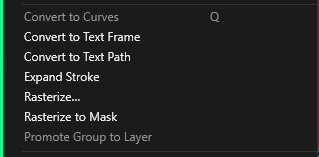
@Chris26 Touché! It's yellow before all the opacity is applied, but you are indeed correct! I really thought you had solved it this time, but there are a still a few roadblocks: The Layer > Convert to Curves command is actually "grayed out" and unavailable from the menu when I'm using the Pen tool. Is there a way to make it so it's available? If not, you can assign a mouse command to a Macro, right? Would that work if I had Publisher, as well? Also, I see your point about holding down SHIFT to make the next line reasonably straight. However, that only works if the next point is 0°, 45° or 90°, and that doesn't happen very often.
-
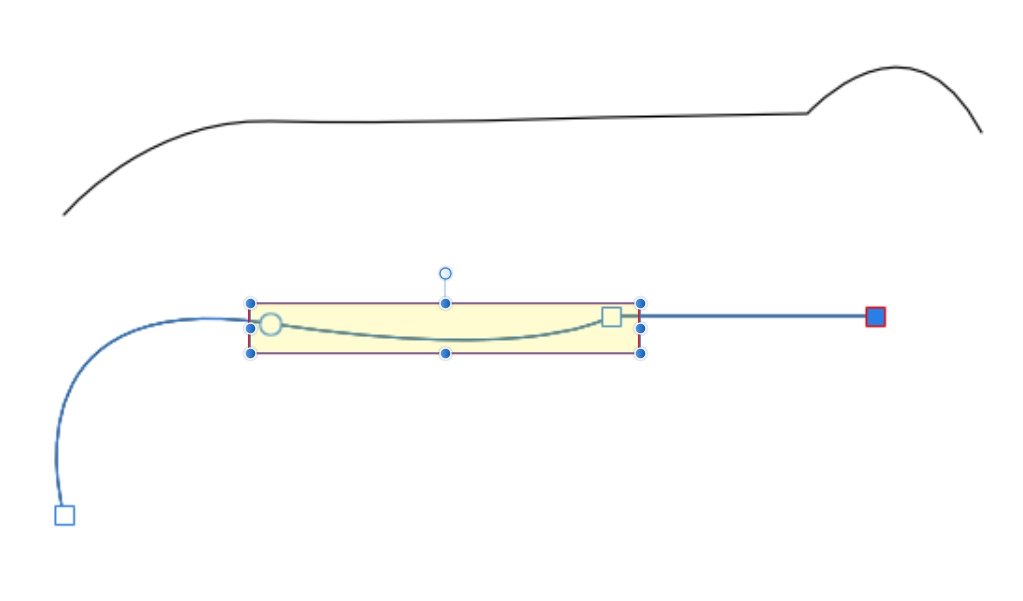
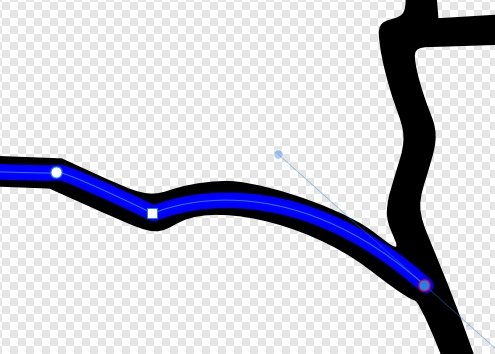
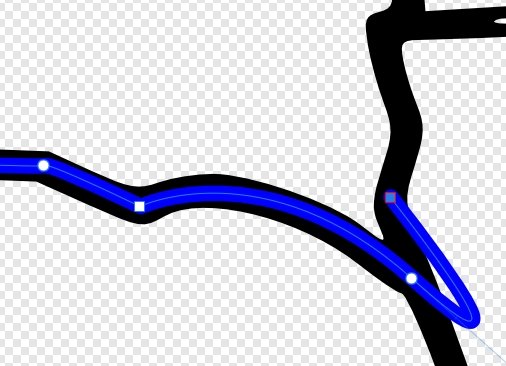
@Chris26 That's close, but not exactly what I'm looking for. What I really want is for the second segment (see first included screenshot in the yellow highlighted section) to be a straight line. It works ok in your example, because the curve is gradual., so the second segment is pretty close to flat But in my second screenshot, when the curve not as gradual, then the second segment is not flat at all. –––––––––––––––––––––––––––––––––––––––––––––––––––––––––––––––––––– I found out that if you click on the second node (after the first curve), you can accomplish exactly what I want to do. However, clicking on that node requires a lot of precision and my hand starts to cramp when I'm working on a detailed pen segment. What would be ideal is if there was a keyboard shortcut for the Convert to Curve(s) command, but I haven't been able to figure out how to assign a keyboard shortcut to it because I can't find the command where it can be assigned. I'm thinking that I may be able to record it as a Macro, which would be perfectly acceptable. I realize that I would have to purchase Affinity Publisher since Macros are not available in Designer. But if that would work, it would be worth the investment. Would that work? Thanks again for your assistance in this matter. Very much appreciated!
-
@Chris26 In the second image from my original post, that's what happens when I simply CLICK after the first curve. The next click after that results in a straight line, however, but that's not what I want to do. Also, if I press CTRL and then left click, it behaves the same way that ESC does, which is to terminate the curve and start a new one. I've tried everything that I can think of, but nothing seems to work the way I would like it to. CTRL doesn't actually seem to offer many options as a modifier for me. I've even tried Reset Studio to see if I had something misconfigured. Thanks for the reply, tho! I appreciate the effort.😀
-
My apologies in advance since there's likely an easy answer to my question, but I can't find it if there is! Using the Pen tool, how do I insert a sharp corner after only one curve? If you check out the first image file I uploaded, I'm trying to figure out how to insert a straight line immediately after inserting a curve. Often, I only need to insert a single curved point followed immediately by a sharp corner, but I only seem to be able to 2 curves consecutively Then I'm able to insert a straight line, but that's not what the design calls for. Sometimes I can insert a new node immediately after the first curve, but doesn't always produce the result I'm looking for. Hopefully I've explained my question well enough, but please let me know if I can clarify anything. Thanks in advance!